GoShockFree GSF997 User manual
English
USER GUIDE GSF997
http://stores.ebay.com.au/Goshockfree

Welcome:
Thanks for purchasing this product. Please read the instructions carefully
before using this product.
•FCC Compliance Statement:
This device complies with Part 15 of the FCC Rules.
Operation is subjected to the following two conditions: (1)
this device may not cause harmful interference, and (2)
this device must accept any interference received,
including interference that may cause undesired
operation.
This equipment has been tested and found to comply with limits for a Class B
digital device, pursuant to Part 15 of the FCC rules. These limits are designed
to provide reasonable protection against harmful interference in residential
installations. This equipment generates, uses, and can radiate radio frequency
energy, and if not installed and used in accordance with the instructions, may
cause harmful interference to radio communications.
However, there is no guarantee that interference will not occur in a particular
installation. If this equipment does cause interference to radio or television
equipment reception, which can be determined by turning the equipment off
and on, the user is encouraged to try to correct the interference by one or more
of the following measures:
-Reorient or relocate the receiving antenna.
-Move the equipment away from the receiver.
-Plug the equipment into an outlet on a circuit different from that to which the
receiver is connected.
-Consult the dealer or an experienced radio/television technician for
additional suggestions.
You are cautioned that any change or modifications to the equipment not
expressly approved by the party responsible for compliance could void your
authority to oper- ate such equipment.
The symbol of the crossed out wheeled bin indicates this product
should not be placed in municipal waste. Instead, you need to dispose
of the waste equipment by handing it over to a designated collection
point for the recycling of waste electrical and electronic equipment.

1
Caution
1. Do not drop, puncture or disassemble the device; otherwise the
warranty will be voided.
2. Avoid all contact with water, and dry hands before using.
3. Use the device with care.
Avoid pressing hard on the device
body.
4. Use only the accessories supplied by the manufacturer.
5. Keep the device out of the reach of children.
6. For your own safety, don’t operate the device while driving.
If your cigarette lighter draws power while the car is off, please
disconnect this device to avoid draining the car battery.
This device will turn off if the max/min temp is reached.
2
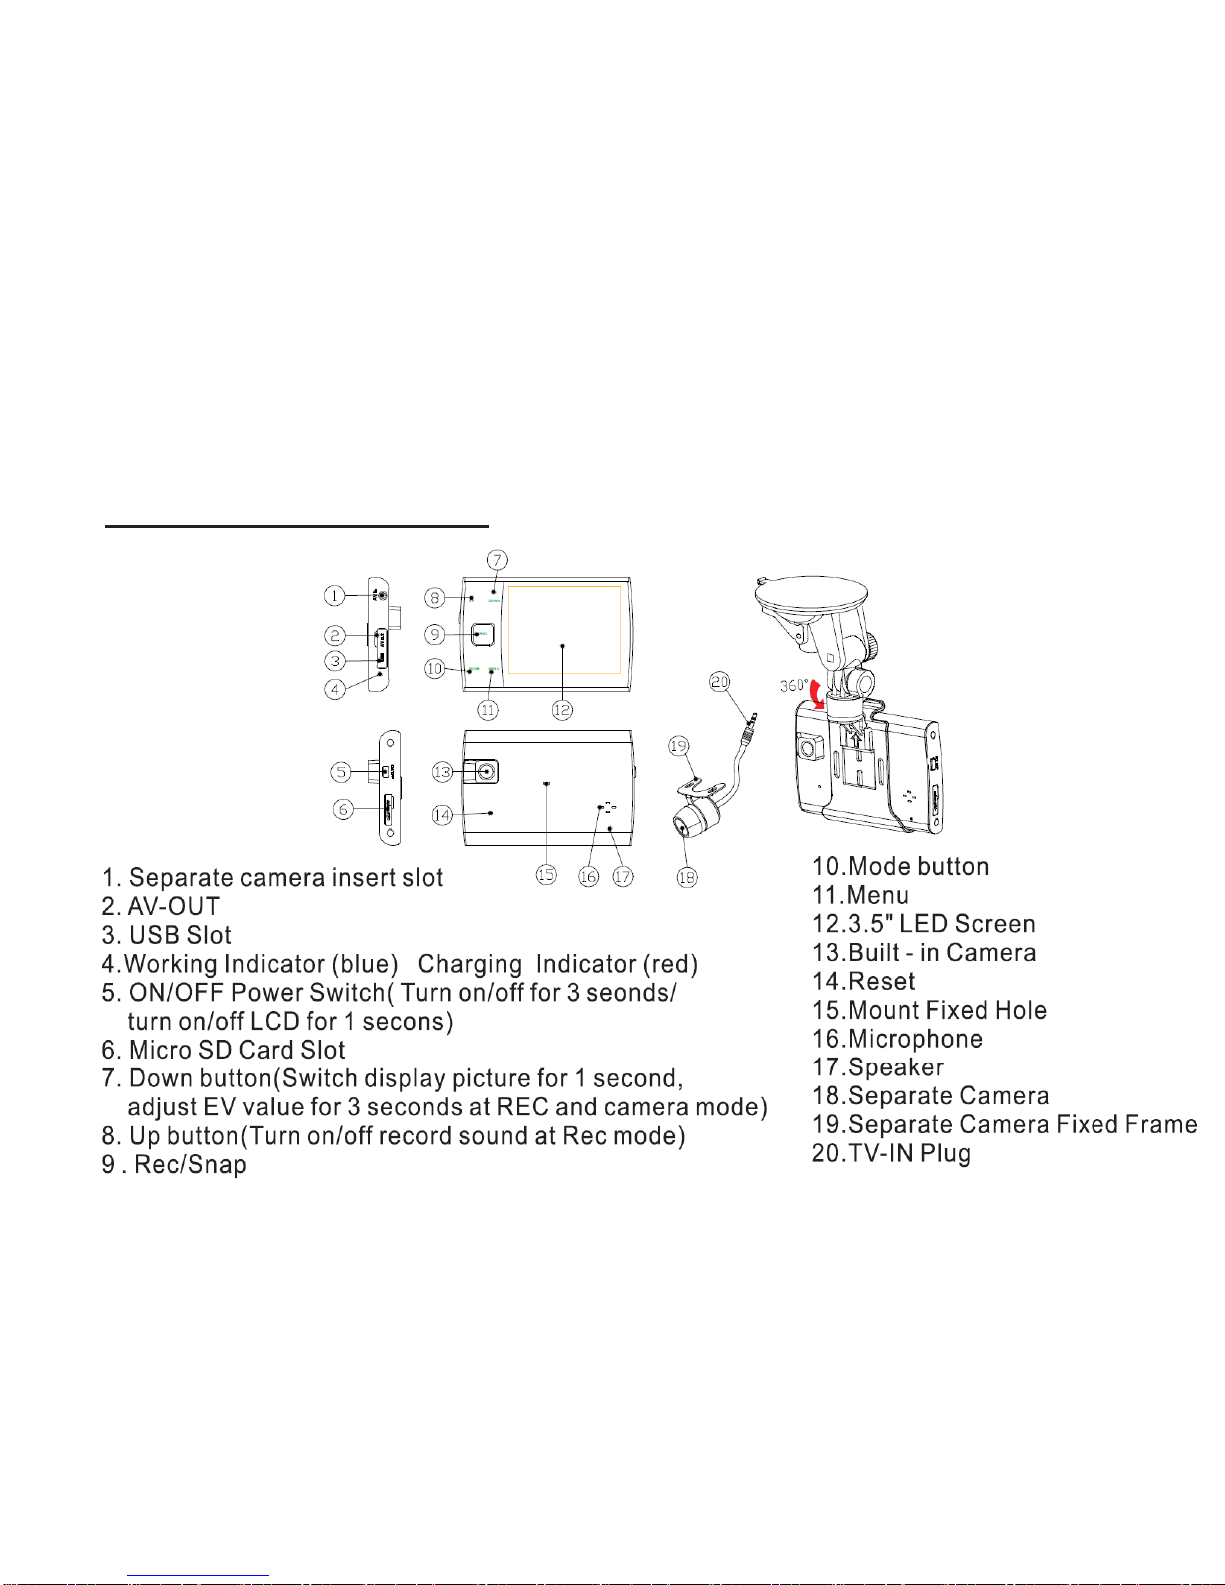
Product Overview

3
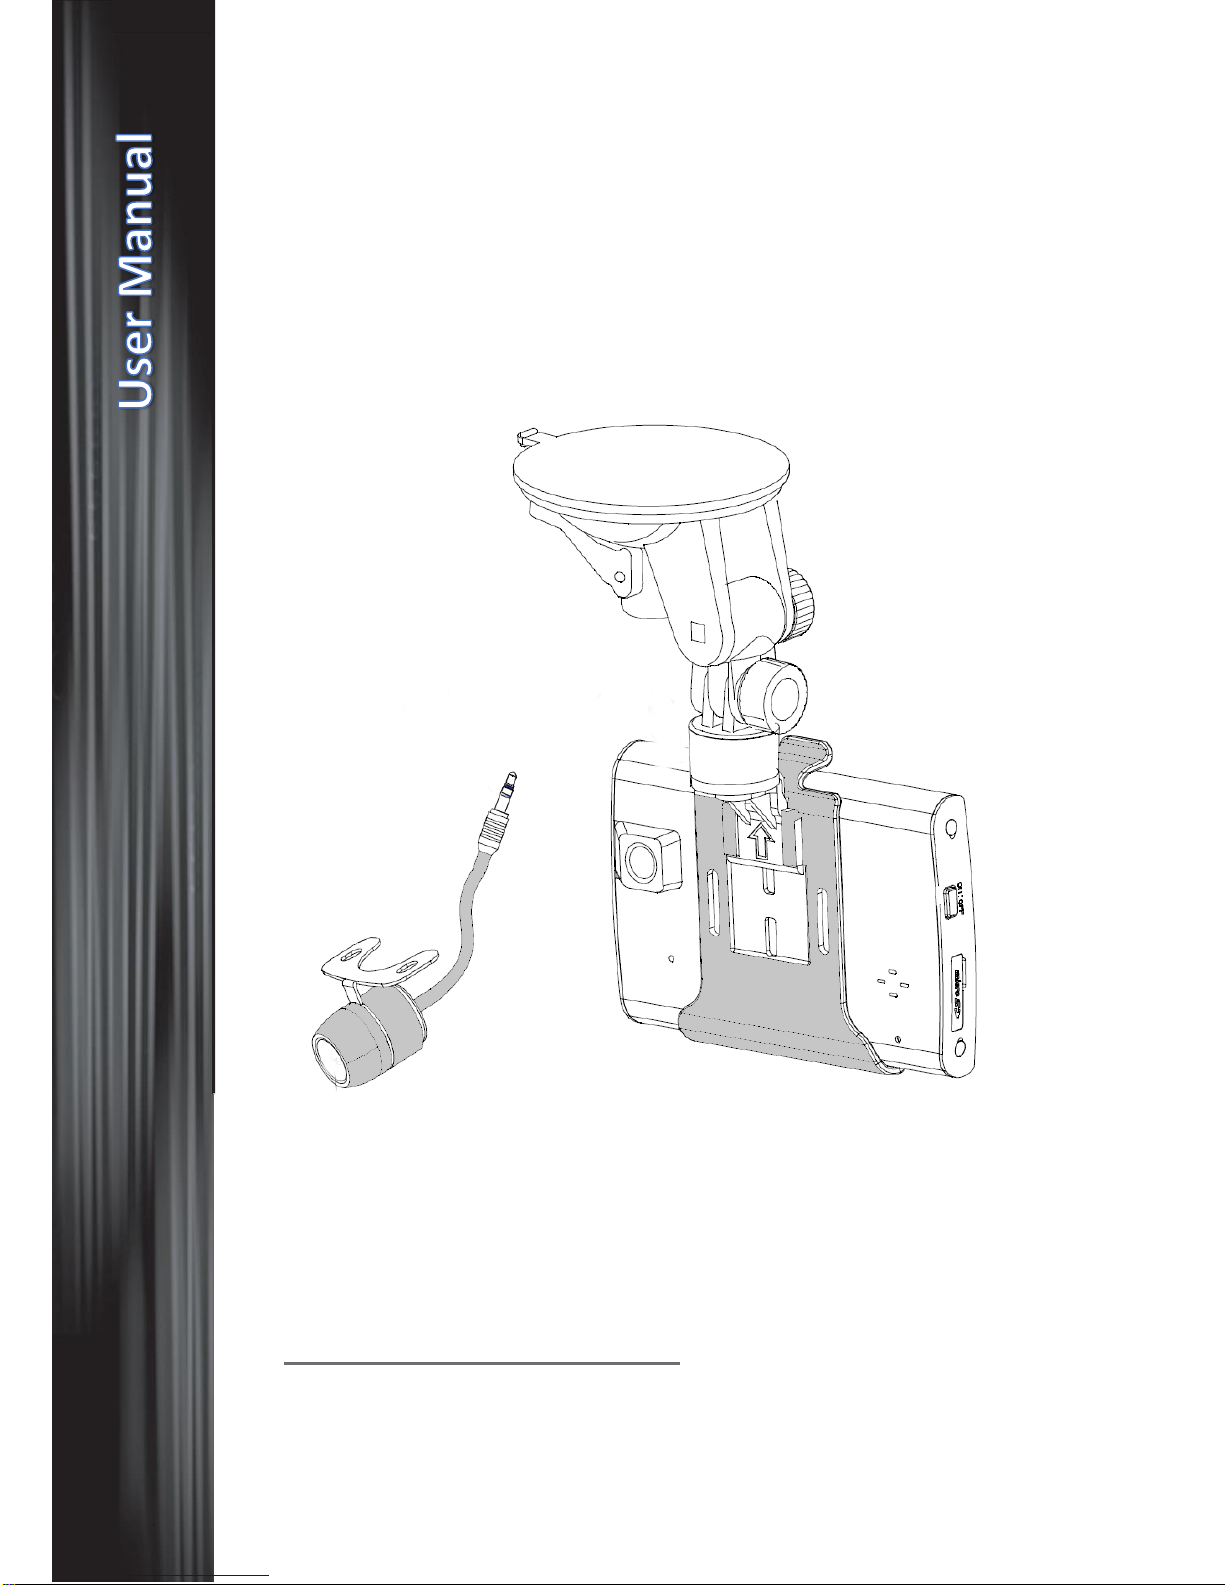
Included Accessories
-Car Window Mount
-USB Cable
-AV Cable
-Reversing Camera and Cable
-Car Charging Adapter
Operations
This Device can be used via power 2 options.
1. USB Car Adapter
2. Li-Ion internal battery.
The Li-Ion Battery included in this device is of small capacity to reduce
the overall size of the unit. The intention for the battery is that if a crash
occurs and the power is shut from the car, the camera is still able to
record for full evidence and the files will be in tact as opposed to
corrupted. If required to be used without the Car adapter plugged in,
Please ensure you fully charge the unit before use. This can be done by
charging via USB. A Red LED will indicate that the unit is charging and
once fully charged this red light will disappear.
When using the device while being powered by the car, ensure your
cigarette lighter plugin is not faulty, a loose connection could send
mixed signals to the device (intermittent on and off), and as a result the
device may shut off thinking the motor has stopped.

4
Installation of Second Camera
A Second camera is included with this model, this camera does not need
to be installed if it isn’t required as the unit will work with only the front
camera active.
If you wish to use this camera, simply plug the 2.5mm jack into Port (1)
from the product overview image. Ensure the surface you wish to mount
this camera to has been cleaned free of dust and oils.
Video Recording Mode
If the unit is plugged into the cigarette adapter, once the car motor starts
the unit will turn on and start recording. The ‘working indicator’ (4) will
flash blue if the unit is recording.
If the device is not plugged in or automatic start up is disabled, turn the
camera on by pressing the ON/OFF switch (5).
Once the unit has powered on, press the REC button (9) to start
recording.

5
Camera Mode
While the unit is on, Press the Mode Button (10) to enter the Camera
mode. Press the Rec button (9) to take pictures.
Image/Video Preview
If in recording mode, Press the Mode button (10) twice, or once in
camera mode. This will enter image / video preview mode.
Navigate using the up and down buttons (7) and (8), (9) to play, (10) to
stop and (11) to delete.

6
Settings
Press the Menu Button (11) to enter the settings interface.
FORMAT
(YES/NO) –Choosing Yes will format the SD card within the Unit. It is
recommended you do this with every new SD card you use. Formatting
the card will delete all existing data on it.
DATE SET
Set time and Date of the unit. The video files will display the correct
watermarked time and date (if enabled) and also file information will be
set to what date is set.
VOLUME
Adjust the volume of the unit. Note this is not the recording volume.
TV-OUT
(PAL/NTSC) –NTSC is normally used in Northern America, PAL for the
rest of the world.
WATERMARK
(On/Off) –This will turn on time stamps on the videos/ images
BACKLIGHT
(15/30/60/On) –This will be the delay between last using the device and
when the LCD screen turns off. We recommend not using ON as it can
prove to be a distraction whilst driving.
FREQUENCY
(50/60Hz) –Change if static caused by similar electrical frequency is
affecting your videos.

7
DEFAULT SET
(YES/NO) –Choosing Yes will turn the unit back to factory settings. This
is not a hard reset but a soft factory reset.
VERSION
Displays the current version of firmware.
MP
(HD/VGA) –Choose between HD recording or VGA.
RT
(1min/2min/5min/OFF) –When Off the unit will not cyclic record. The
intervals are the lengths of each cyclic recording block.
FRAME RATE
(15/30FPS)
(Mic) RECORD
(YES/NO) –If YES is selected, this unit will record audio during video
record.
AUTO DETECT
(ON/OFF) –If ON, the unit will only record if there is movement every 5
seconds.
PIP
(ON/OFF) –If switched on, Picture in Picture will be enabled.
Simultaneously view the rear camera and front.
RECORD MODE
(Double Record/Front Record/Back Record) –Set which cameras are to
record.
BOOT RECORD

8
(YES/NO) –When ON, the device will record when the car switched on.
This only works if plugged into the cigarette lighter.
LANGUAGE
(English/ Chinese/ Korean/ Japanese/ Russian)
Technical Specifications
Video Resolution:
Front Camera: 1280x720P / 640x480P
Rear Camera: 720x480P1
Image Resolution:
1280x960 / 1600x1200 / 2048x1536
Video Format:
H.264(MOV)
Power Supply
Rechargeable Li-Ion battery or 12/24v car Charger.
TF Card
lass 6 and above, 4-32GB
Audio Recording
Mono Record
Output
USB 2.0 and AV-Out
Display
Table of contents
Other GoShockFree Dashcam manuals


