GOSUN chillest User manual

Manual de usuario en Espanol
Manuel d'utilisation en Françias
Gebruikershandleiding auf eutsch
日本語のユーザーマニュアル
中文用户手册
User Manual
®chillest™
gosun.co/manuals
Portable solar cooler that
doesn’t need ice

Table of Contents
1
Features
2-3Safety Guidelines
4-6Function & Operation Settings
6-7
Troubleshooting
7Error Codes
8Function & Operation Settings - Advanced
8-9Defrosting
9Technical Specication
10Environmental Guidelines
10Packing List
11-12Warranty
Download the GoSun Chillest App:
Get the most out of your Chillest with the
App! Remotely set temperatures, check
battery levels, change settings and more. iOS ANDROID

1
Features
High efciency brushless DC compressor.
Closed cell foam insulation to minimize heat loss and increase
durability.
12V DC, 24V DC or 120~240V AC operation.
Runs off of a Power bank, car or any AC outlet.
Compressor delay detection. Prevents the compressor from
starting too soon after an interruption of power.
Two independantly controlled zones. (can cool and/or freeze in
either zone)
68° to -4° F (20° to -20° C) temperature setting range.
3 user selectable battery protection modes - for lithium battery,
portable lead acid battery, or car mounted battery.
Wheels designed for rough terrain
Pouch for transporting Power bank and accessories
Bungee cord tie-downs
Telescoping handle
Bluetooth App to allow remote access to the Chillest.

2
Safety Guidelines
Do no use if he elec ronics or provided ba ery are submerged
in wa er. Dry ou comple ely and es for func ionali y in a
con rolled environmen if any par of he Chilles ’s elec ronics or
ba ery are submerged in wa er.
Verify power source voltage and amperage before using. Change
battery protection level as needed depending on power source.
Do not place electronics in the Chillest when in operation.
Do not tilt past 45 degrees during transportation or 15 degrees
during operation. If the Chillest falls over or ips during
transportation or operation, turn off immediately and allow to
rest for at least 12hrs before turning back on. Liquid refrigerant
may have gotten to the compressor, and you must allow it to
evaporate before turning back on. The compressor is designed
for evaporated refrigerant only, liquid refrigerant can cause
immediate and permanent compressor damage.
Do not operate the Chillest next to a heat source (re, stove or
heater), avoid operating the Chillest in direct sunlight if possible.
The cooler areas of he Chilles can hold wa er. To drain any
wa er from he Chilles , use he drainage plug in he bo om of
he larger side of he uni . DO NOT POUR WATER OUT OF THE
CHILLEST FROM THE LID, his will po en ially allow liquid
refrigeran o reach he compressor and you will need o wai 12
hrs before using he chill again while you wai for he refrigeran
o fully evapora e. Use a cup or owel o remove buil up wa er
from he smaller cooler sec ion if needed.

3
We recommend you clean the Chillest’s interior before rst use.
Use a damp cloth with mild soapy water.
Never use harsh cleaners with the GoSun Chillest. Only use a
damp cloth with mild soapy water. Do not use a hose to clean
the outside of the Chillest as water may get into the compressor
and electronics section of the unit.
Clean and dry the inside of the Chillest after each use. If storing
for more than 24hrs, we recommend you partially open the lid
during storage.
The GoSun Chillest is not designed as a seat, do not stand or sit
on the Chillest.
Ensure the Chillest has proper ventilation to the compressor
chamber. Leave space to the front, back, and side of the Chillest
as shown in the diagram below ▪ Front: 4” (10cm) ▪ Back: 8”
(20cm) ▪ Side: 4” (10cm)
8
(20cm)
4
(10cm)
4
(10cm)
keep this are
clear while in use

4
Function and Operation Settings
ECO MAX H M L
1 2 6 7
8 9 10
54
1USB Port
2Up / Down / Lock
3Temp. - Large Compartment
4Battery Level
5Temp. - Small Compartment
6Set
7On / Off
8Eco / Max
9Battery Protection Setting
10 Voltage
.0 Lock Setting:
After 10 seconds of inactivity, the control panel will lock
automatically. To unlock, press and hold the + and - buttons at
the same time for approx. 5 seconds until screen unlocks.
.1 Power Supply - Multiple Power Sources
Power bank - use DC adapter cord
Car battery - use DC adapter cord
Wall Outlet - use AC adapter cord
.2 Power Cable Connection:
Connect the end of the adapter cord shown into the Chill’s cable
port, located on the side of the Chill.

5
3.3 Operation Settings
ON / OFF: Plug in Press and hold the Power Button (3 sec) to
start the unit, and press and hold again (3 sec) to turn it off
Press the + UP or - DOWN buttons to adjust the target
temperature By default the left (large) side will ash rst To
switch between setting the left (large) side and right (small) side,
press the setting button once The + UP button increases temp,
the - DOWN button decreases temp
Press the Settings (gear) button to change the compressor speed
1 ECO (Energy savings mode
2 MAX (Fast cooling mode) - factory default is MAX mode
3.4 Source Battery Protection Settings
By default the GoSun Chillest is set to protect the Included lithium
battery-based Power bank This setting will not protect a 12V lead
acid battery in your car Because of the differences in battery
voltages, the GoSun Chillest has three different battery protection
settings to help ensure that you can always protect your power
source from over-discharge To change this setting, when the
Chillest is powered on and running, hold the settings button until
you see the display ash (L, M, or H) Then press the setting
button again to change the setting for the battery being used
L: Protection for a standard 12V Lithium-ion battery.
Low voltage cutoff: 9.0V DC (12V) or 18V DC (24V
R
eco
nn
ect Voltage: 10.9V DC (12V) or 21.8V DC (24V)

6
M: Protection for a 2V lead acid battery when being used
solely for portable power. (Also a good setting for 12V
Lithium Iron Phosphate batteries)
Low voltage cutoff: 10.1V DC (12V) or 20.2V DC (24V)
Reconnect Voltage: 11.4V DC (12V) or 22.8V DC (24V)
H: Protection for a 2V car batter
Low voltage cutoff: 11.1V DC (12V) or 22.2V DC (24V)
Reconnect Voltage: 12.4V DC (12V) or 24.8V DC (24V)
3.5 Bungee Tie-Downs
There are four tie-down bars at the four corners of the chillest.
These are good locations to use with the provided bungee cords
to hold items on top of the Chillest
Troubleshooting
The Chillest is not cooling down
Check the power cord connection
Check that your power source is fully charged.
Make sure the power button was pressed and the indicator states
the Chillest is running.
Check the
F
use in the
D
C power cord
(
if applicable).
Check the fuse inside the compressor
/
electronics section.
The compressor may be in delay start mode to protect the
compressor
,
allow
5
min before continuing to troubleshoot
F
ood inside is fro
z
en
S
et the temperature above
34°

7
The Chillest makes a sound like water owing or bubbling.
This is normal it is the refrigerant circulating within the unit.
The Chillest makes a metallic sound when going over a
bump or transporting the unit
This is normal the compressor is suspended by springs within the
sealed chamber and larger bumps can allow the compressor to
touch the outer shell of the chamber.
Error Codes
F1 Code
Low battery voltage. Your battery has been drained and needs to
be recharged. Charge your power source and reconnect to the
Chillest. Ensure that the correct battery protection setting is used
(see section 3.4).
F2 Code
Fan overload. Turn off the Chillest and let rest for 15-30 min.
Restart the Chillest. If the error persists contact GoSun Support.
F3 Code
Compressor protection activated. Turn off the Chillest and let rest
for 30 min. Restart the Chillest. If the error persists contact GoSun
Support.
F5 Code
Compressor controller module protection activated. Turn off the
Chillest and let rest for 30 min. Restart the Chillest. If the error
persists contact GoSun Support.
F7/8 Code
Temp sensor error. Turn off the Chillest and let rest for 30 min.
Restart the Chillest. If the error persists contact GoSun Support.

8
Function & Operation Settings -
Advanced
Defrosting
After prolonged use, your GoSun Chillest may start to accumulate
frost on the inside. If the frost gets more than 1/4” (6mm) thick it is
recommended to defrost the Chillest to maximi e energy
efciency.
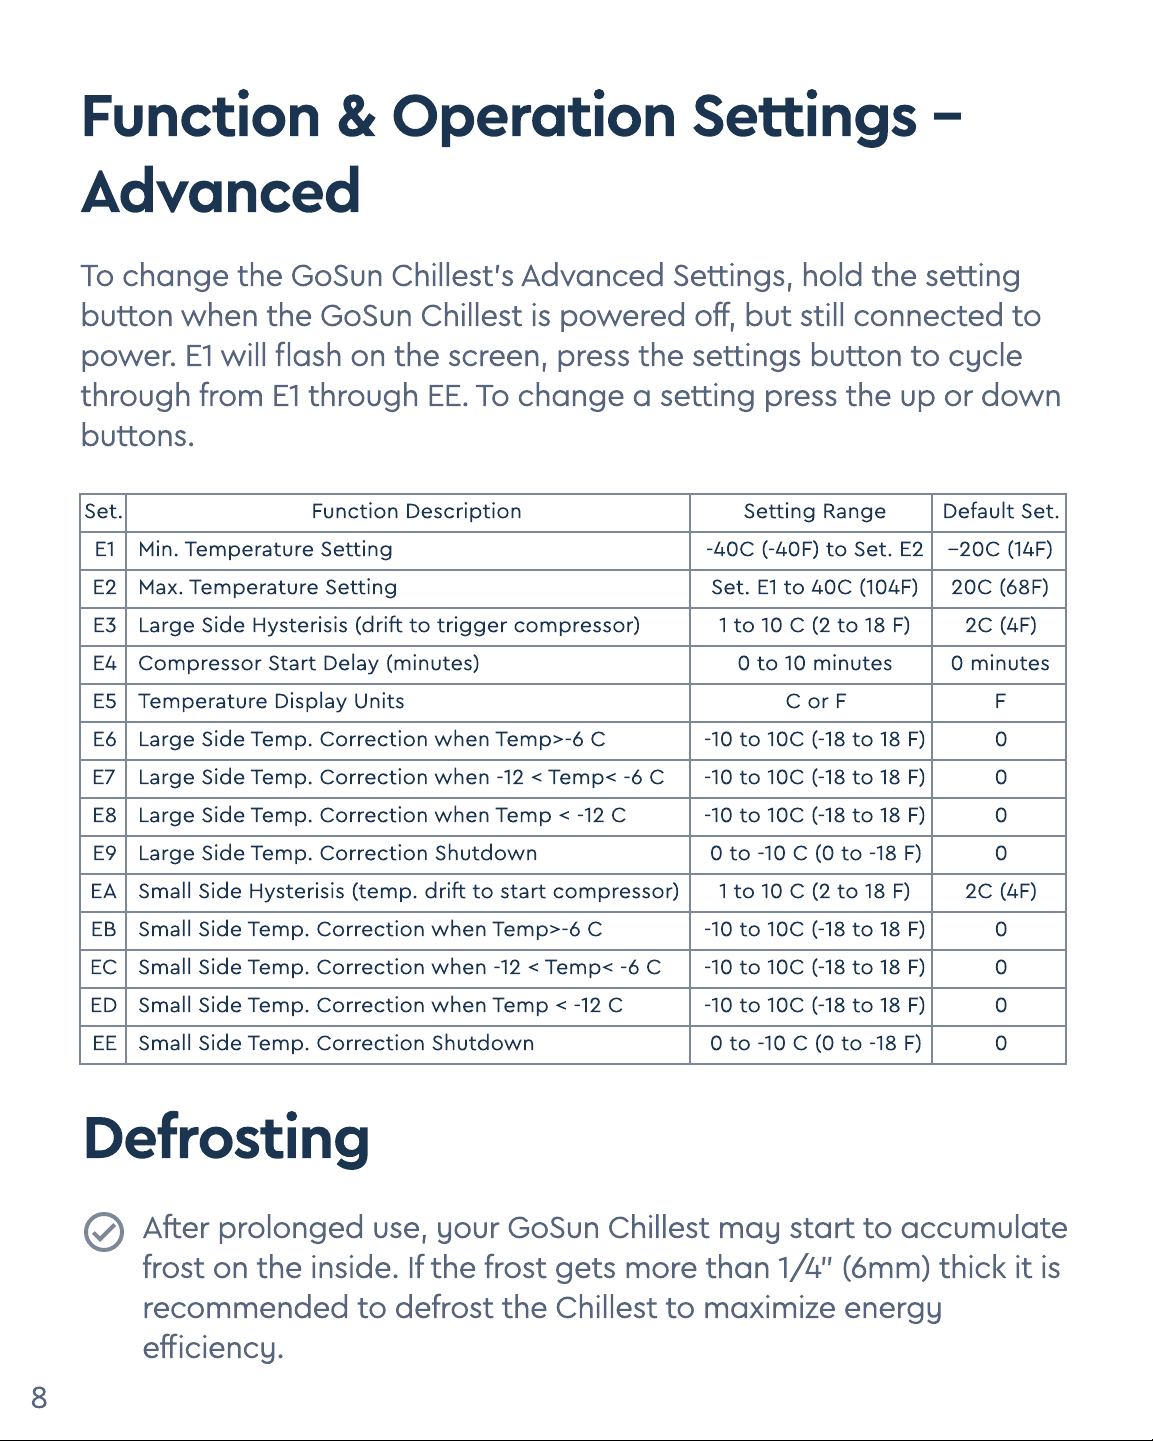
To change the GoSun Chillest’s Advanced Settings, hold the setting
button when the GoSun Chillest is powered off, but still connected to
power. E1 will ash on the screen, press the settings button to cycle
through from E1 through EE. To change a setting press the up or down
buttons.
Set. Function Description Setting Range Default Set.
E1 Min. Temperature Setting -40C (-40F) to Set. E2 --20C (14F)
E2 Max. Temperature Setting Set. E1 to 40C (104F) 20C (68F)
E3 Large Side Hysterisis (drift to trigger compressor) 1 to 10 C (2 to 18 F) 2C (4F)
E4 Compressor Start Delay (minutes) 0 to 10 minutes 0 minutes
E5 Temperature Display Units C or F F
E6 Large Side Temp. Correction
wh
en Temp
>
-6 C -10 to 10C (-18 to 18 F) 0
E
7
Large Side Temp. Correction
wh
en -12
<
Temp
<
-6 C -10 to 10C (-18 to 18 F) 0
E8 Large Side Temp. Correction
wh
en Temp
<
-12 C -10 to 10C (-18 to 18 F) 0
E
9
Large Side Temp. Correction S
h
utdo
w
n0 to -10 C (0 to -18 F) 0
E
A
Small Side Hysterisis (temp. drift to start compressor) 1 to 10 C (2 to 18 F) 2C (4F)
E
B
Small Side Temp. Correction
wh
en Temp
>
-6 C -10 to 10C (-18 to 18 F) 0
EC Small Side Temp. Correction
wh
en -12
<
Temp
<
-6 C -10 to 10C (-18 to 18 F) 0
ED Small Side Temp. Correction
wh
en Temp
<
-12 C -10 to 10C (-18 to 18 F) 0
EE Small Side Temp. Correction S
h
utdo
w
n0 to -10 C (0 to -18 F) 0

9
Fast method: Turn off the Chillest. Use a plastic tool such as a car
ice scraper, and physically remove the frost from inside the
Chillest. Then wipe up and residual water/ice with a towel. Turn
the Chillest back on and place any items you removed earlier
back into the Chillest
DO NOT USE METAL TOOLS on the inside of the Chillest as they
can cause permanent damage to the inside walls and refrigerant
lines.
Slow method: Turn off the Chillest and leave the lid open. Just
wait for the ice to melt and remove the remaining water with a
towel, or use the built in drain in the bottom of the Chillest. Turn
the Chillest back on and place any items you removed earlier
back into the Chillest.
DO NOT TRY TO POUR OUT THE MELTED ICE, the cooler should
not be tilted past 30 degrees from at, as this will allow liquid
refrigerant to gain access to the compressor which can damage
the Chillest
Technical Specication
MODEL Chillest
Climate Category T/ST/N/SN
Protective Classication of
Electric Shock Resistance III
Rated Voltage DC (V) 12/24V
DC Fuse (A) 45W (eco) / 65W (max)
Rated Current for DC (A) 3.75- 5.4A/1.87-2.75A
Refrigerant (g) R 1234yfa
@
54g
N.W (kg) 19 kg
Si
z
e (in) 28
”
x 17
”
x 2
0
.5
”
Si
z
e (cm) 71cm x 43cm x 52cm

10
Guidelines for Protection of the
Environment
Disposal
Do not dispose this product as unsorted municipal waste.
Collection of such waste separately for special treatment is
necessary. Meaning of crossed-out wheeled dustbin: Do
not dispose of electrical appliances as unsorted municipal
waste. se separate collection facilities. Contact your local
government for information regarding the collection
systems available. If electrical appliances are disposed into
landlls or dumps, hazardous substances can leak into the
groundwater and get into the food chain, damaging your
health and well-being.
Packing List
Model Portable
Fridge
1 1 1 1 4 2
DC Power
Cord AC Power
Adapter ser’s
Manual
Trashbag
Clips Bunge
Cords
Chillest

11
Warranty
Warranty Policy
GoSun, Inc. extends this One-Year Limited Warranty to the
original end-use purchaser of GoSun products* or the
person receiving a roduct as a gift, provided that the
GoSun Stove roduct was purchased from an Authorized
Dealer as defined below. The Limited Warranty does not
extend to any other person or transferee. Statutory or
common law may provide additional rights or remedies
that vary from state to state, and country to country,
which are not affected by this Limited Warranty.
Denitions
“Authorized Dealer” means any distributor, reseller or
retailer that was duly authorized by GoSun at the time of
the sale to sell authentic GoSun products in the jurisdiction
where it sold the roduct, and that sold the roduct in new,
unused condition in its original packaging.
“Fraud or Misrepresentation” means misrepresenting any
fact related to a warranty claim to GoSun, including the
nature of the defect, whether the roduct was purchased
from an Authorized Dealer, and the authenticity of the
roduct.

12
Intended Use” means use of the Product (a) for food
preparation, (b) for private (as opposed to commercial)
purposes, (c) in conformity with all applicable local, state
or federal law, code or regulations, (d) in accordance with
GoSun recommendations and/or instructions in the
materials and documentation that accompany the
Product.
Scope of One-Year Limited Warranty
GoSun provides a One-Year Limited Warranty against
Manufacturing Defects. If a Product contained a
Manufacturing Defect when it was purchased from an
Authorized Dealer, GoSun, at its sole discretion, will (i)
repair, (ii) replace, or (iii) provide a Warranty Credit for the
Product on the GoSun online store. The amount of the
Warranty Credit shall be equal to the purchase price of the
Product paid to the Authorized Dealer. GoSun reserves the
right to inspect any Product subject to a warranty claim to
determine, at its sole discretion, whether the claimed
defect is a Manufacturing Defect or otherwise.
GOSUN DOES NOT ASSUME ANY LIABILITY FOR ANY
INCIDENTAL, CONSEQUENTIAL OR INDIRECT DAMAGES
UNDER THIS LIMITED WARRANTY.

+1 888.868.6154
support@gosun.co
gosun.co/help-center
Need help?

Patent pending in USA & other countries.
Copyright © 2022 GoSun Inc. All rights reserved
+1 888.868.615
support@gosun.co
@gosun
Table of contents
Other GOSUN Accessories manuals
Popular Accessories manuals by other brands

SIIG
SIIG VV-S20012-S2 Quick installation guide

Action Sports Equipment Pty Ltd.
Action Sports Equipment Pty Ltd. Netball Stand Set Assemble, instruction manual

Leuze electronic
Leuze electronic MLD-M00a Mounting instructions

Philips
Philips DLA71026 brochure

SuperFish
SuperFish Automatic Twilight Sensor manual

echoflex
echoflex RVS-A-XW installation guide

Nienkamper
Nienkamper Vox Forum L Series installation guide

Baumer
Baumer UNAM 70U6131/S14 quick start guide

Kiwi Camping
Kiwi Camping TUATARA 270 KC077-004 instructions

Bray
Bray 54 Series Installation, operation and maintenance manual

NOVAK
NOVAK BRAKE LIGHT KIT manual

Alpha Arsenal
Alpha Arsenal EXPRESSGSM1 user manual