manuals.online logo
Brands
  1. Home
  2. •
  3. Brands
  4. •
  5. Gotharman
  6. •
  7. Desktop
  8. •
  9. Gotharman Gotharman's Little deFormer 3 Technical manual

Gotharman Gotharman's Little deFormer 3 Technical manual

1
Gotharman’s Little deFormer
3
Granular Workstation
Update Manual 12.96
2
-Parametric EQ insert effects added Page 3
-All sequencer steps on a subtrack can now be offset adjusted with one knob movement Page 6
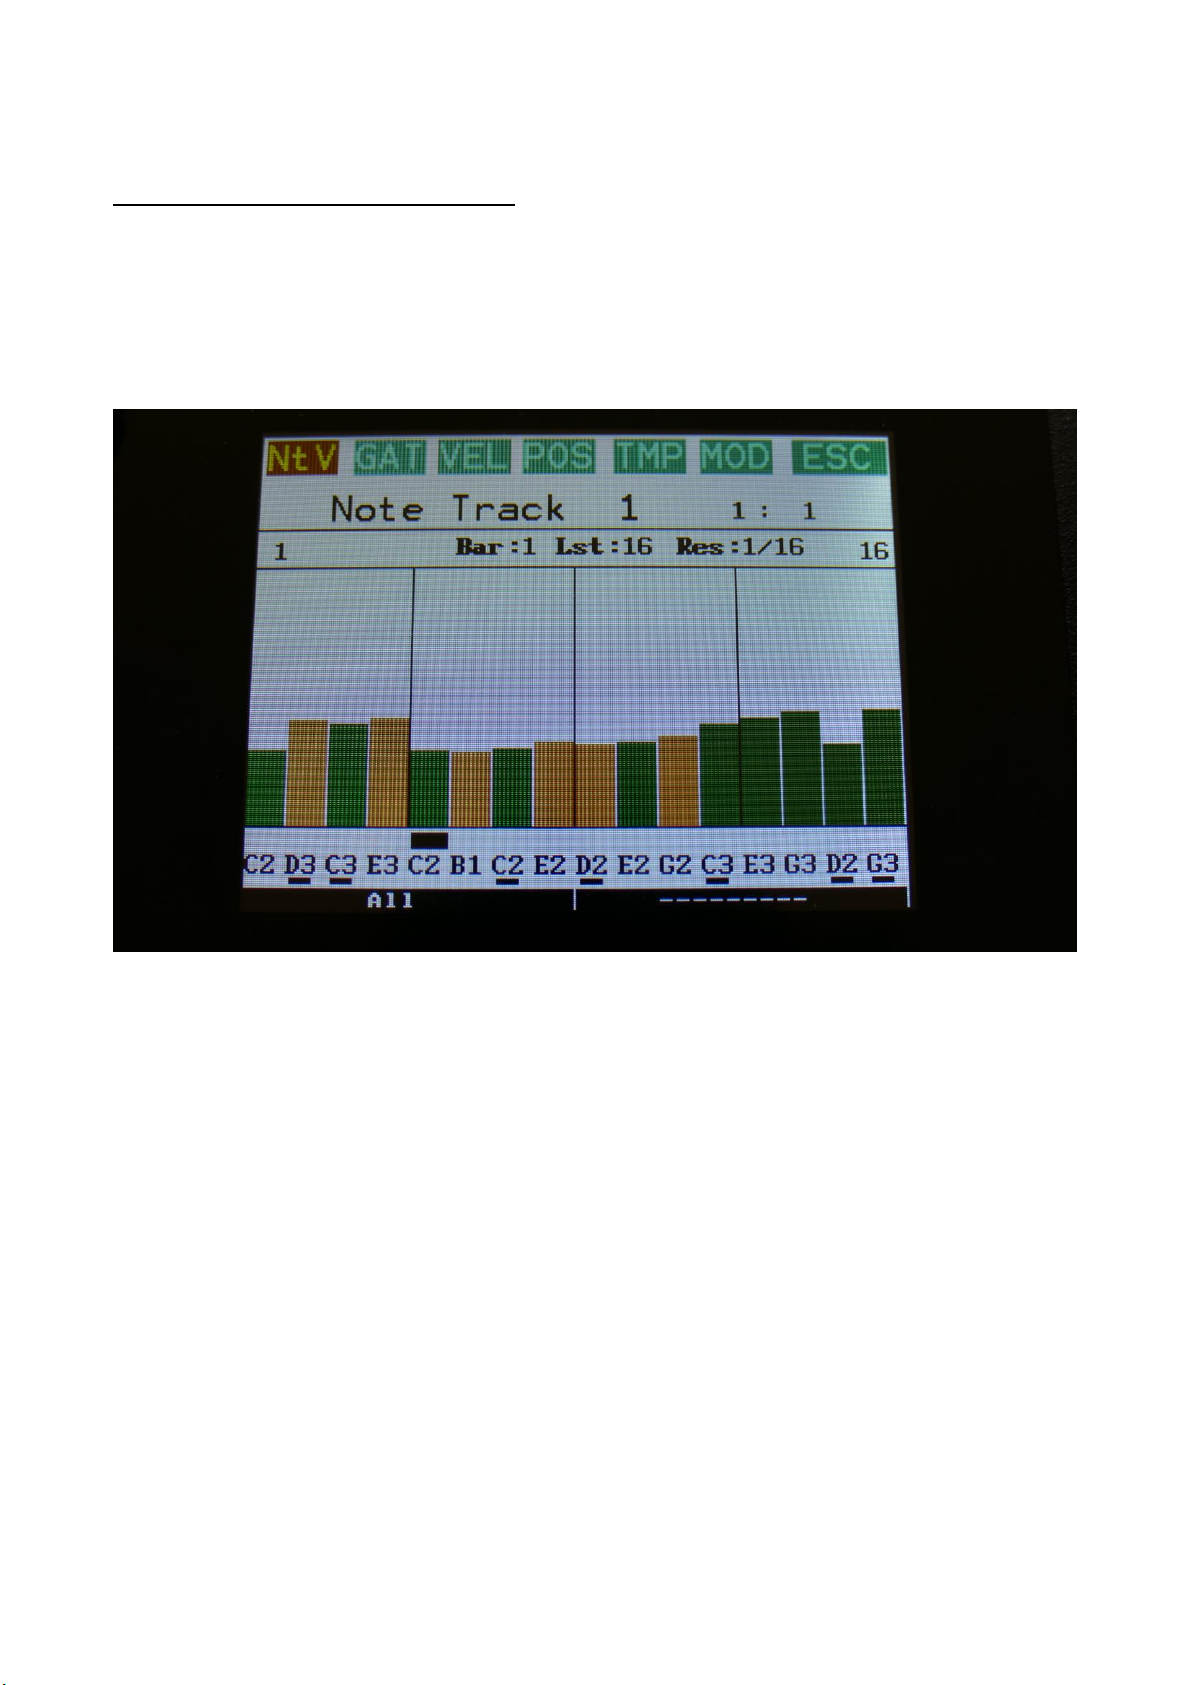
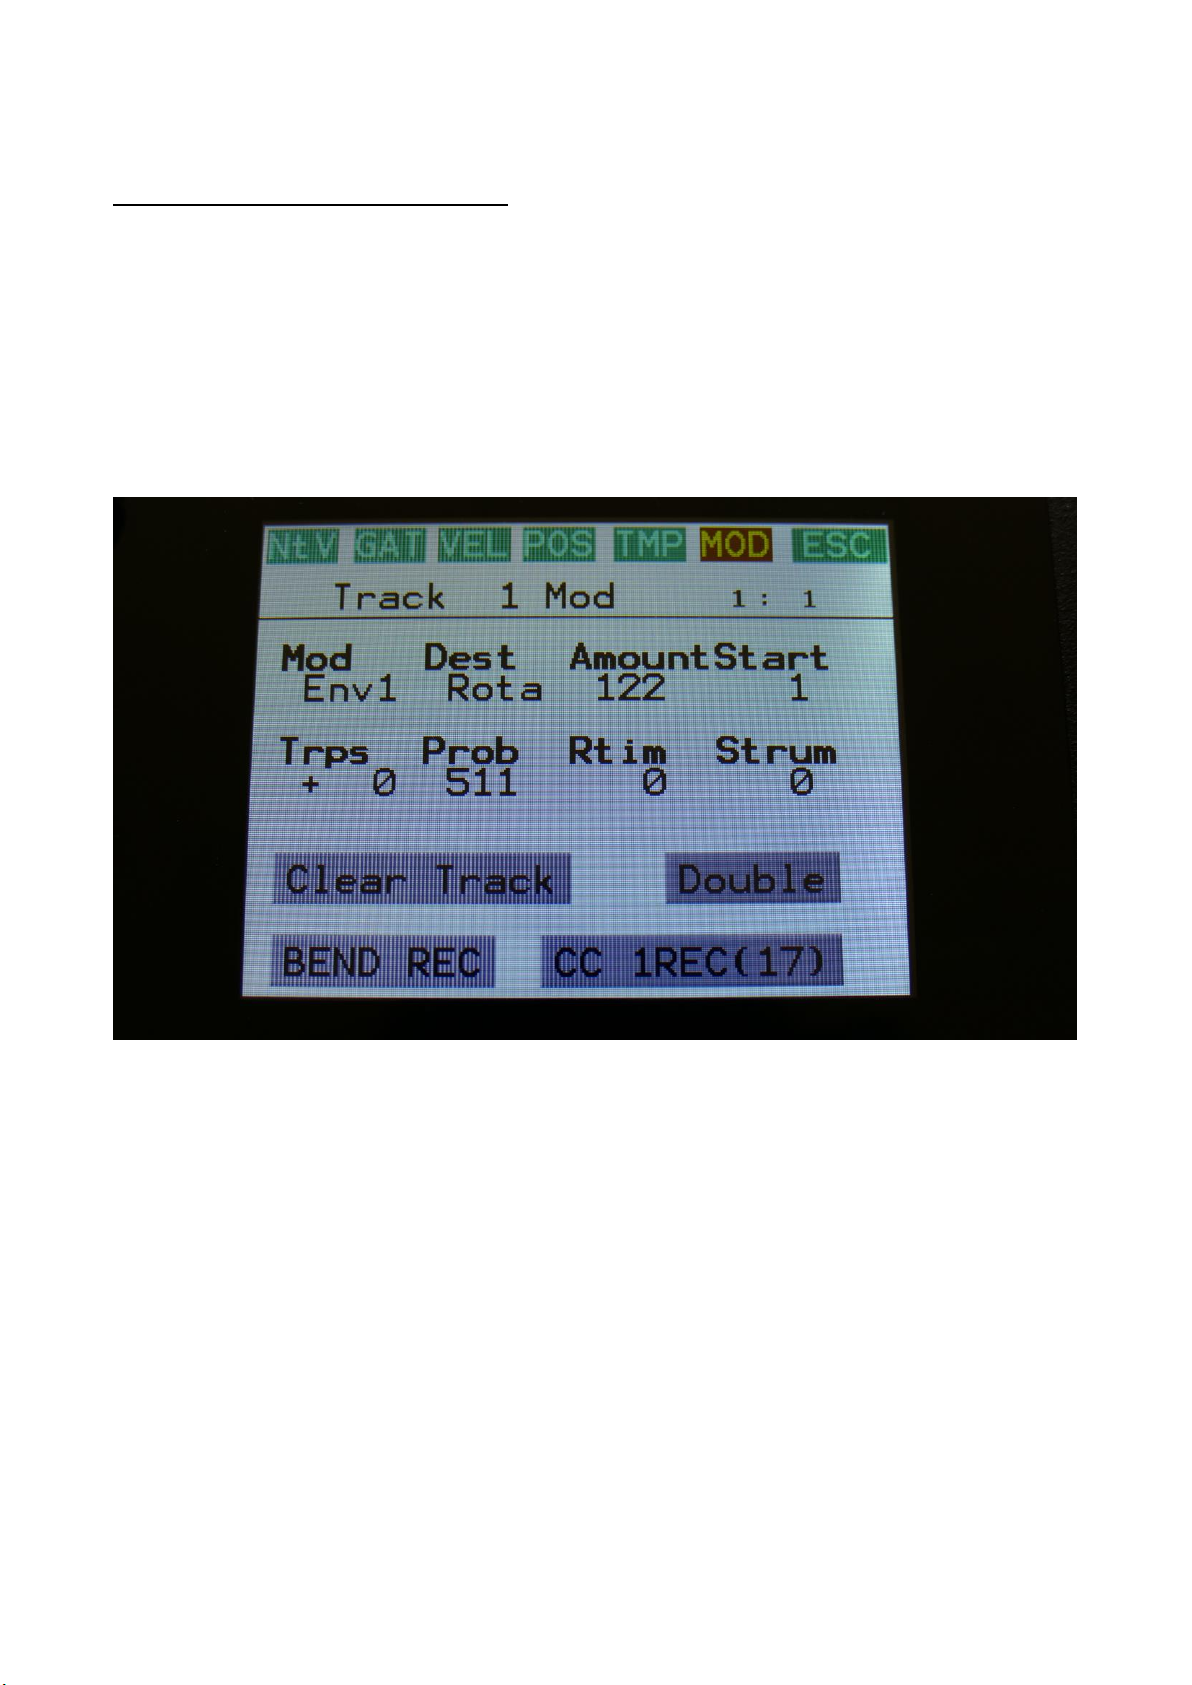
-Position Rotation Modulation added to the Sequencer note tracks Page 7
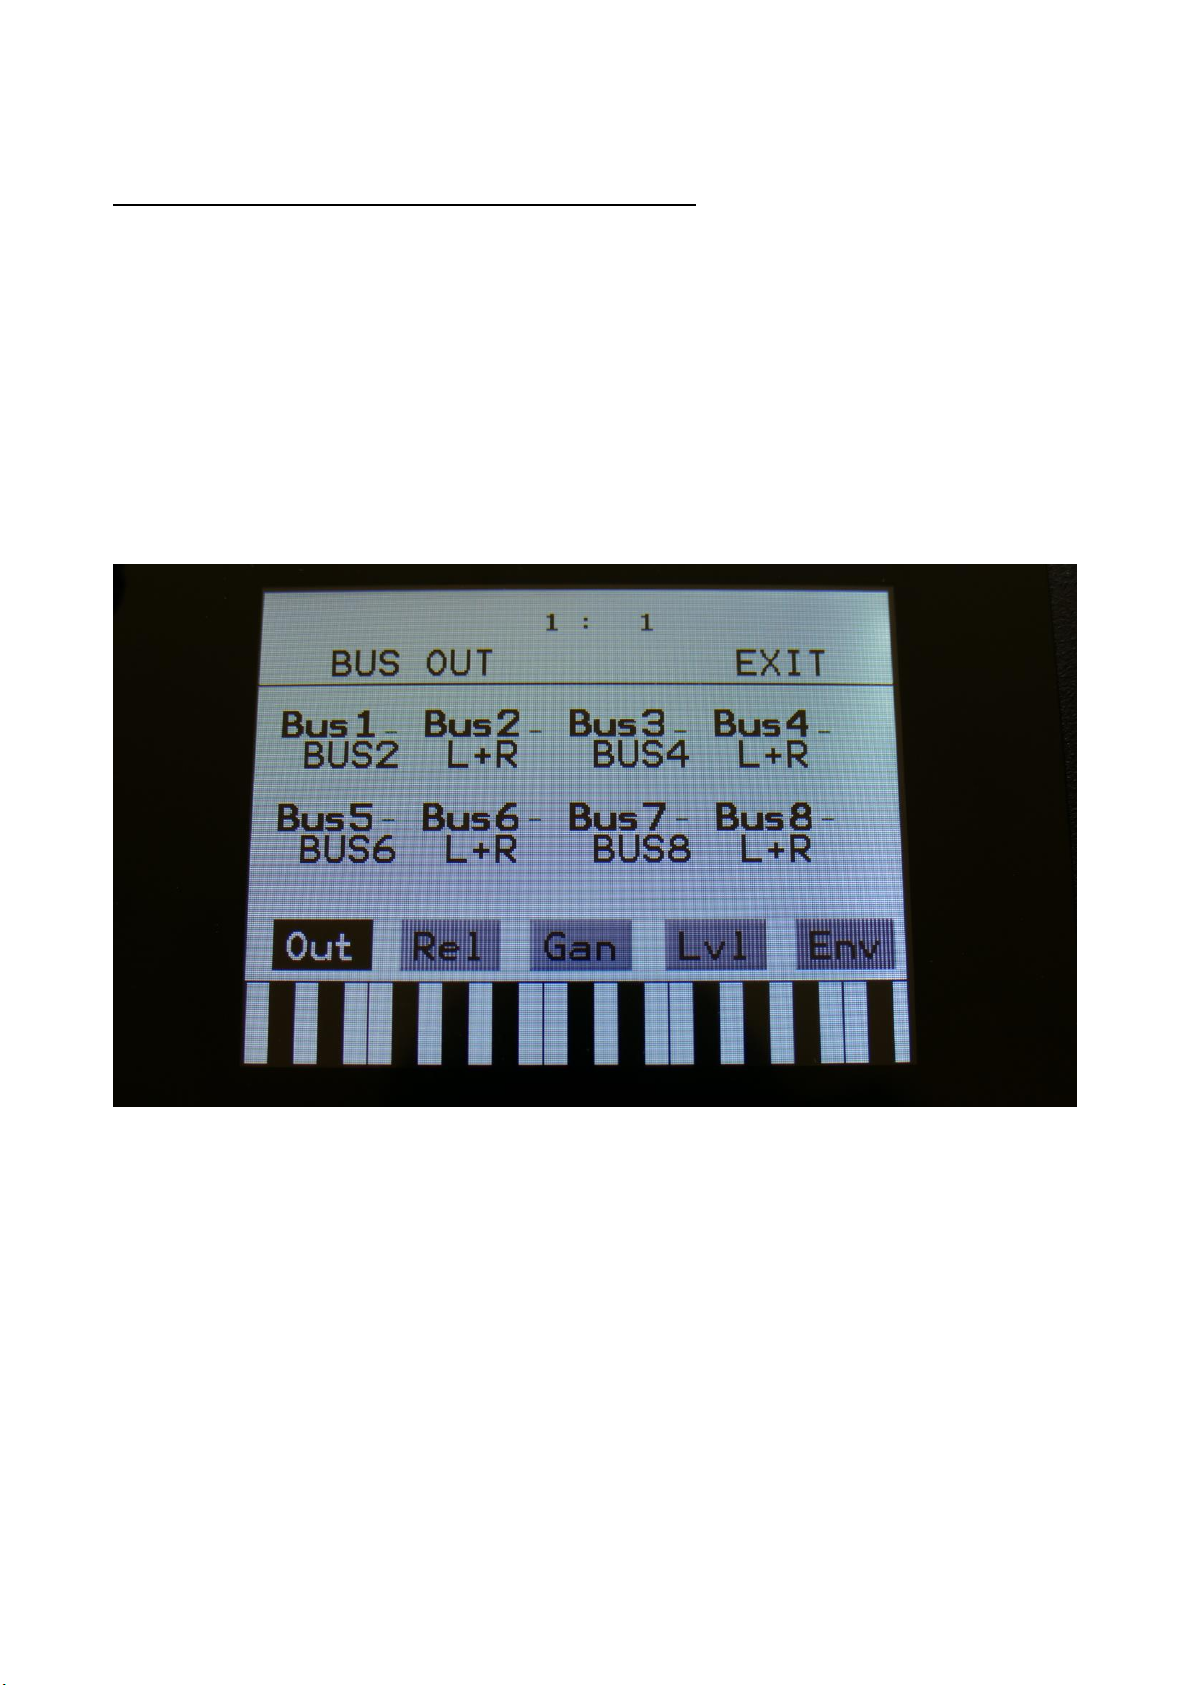
-It is now possible to output one Audio BUS to another Audio BUS. Page 8
-A BUS Follower/Envelope OFF position has been added. Page 9
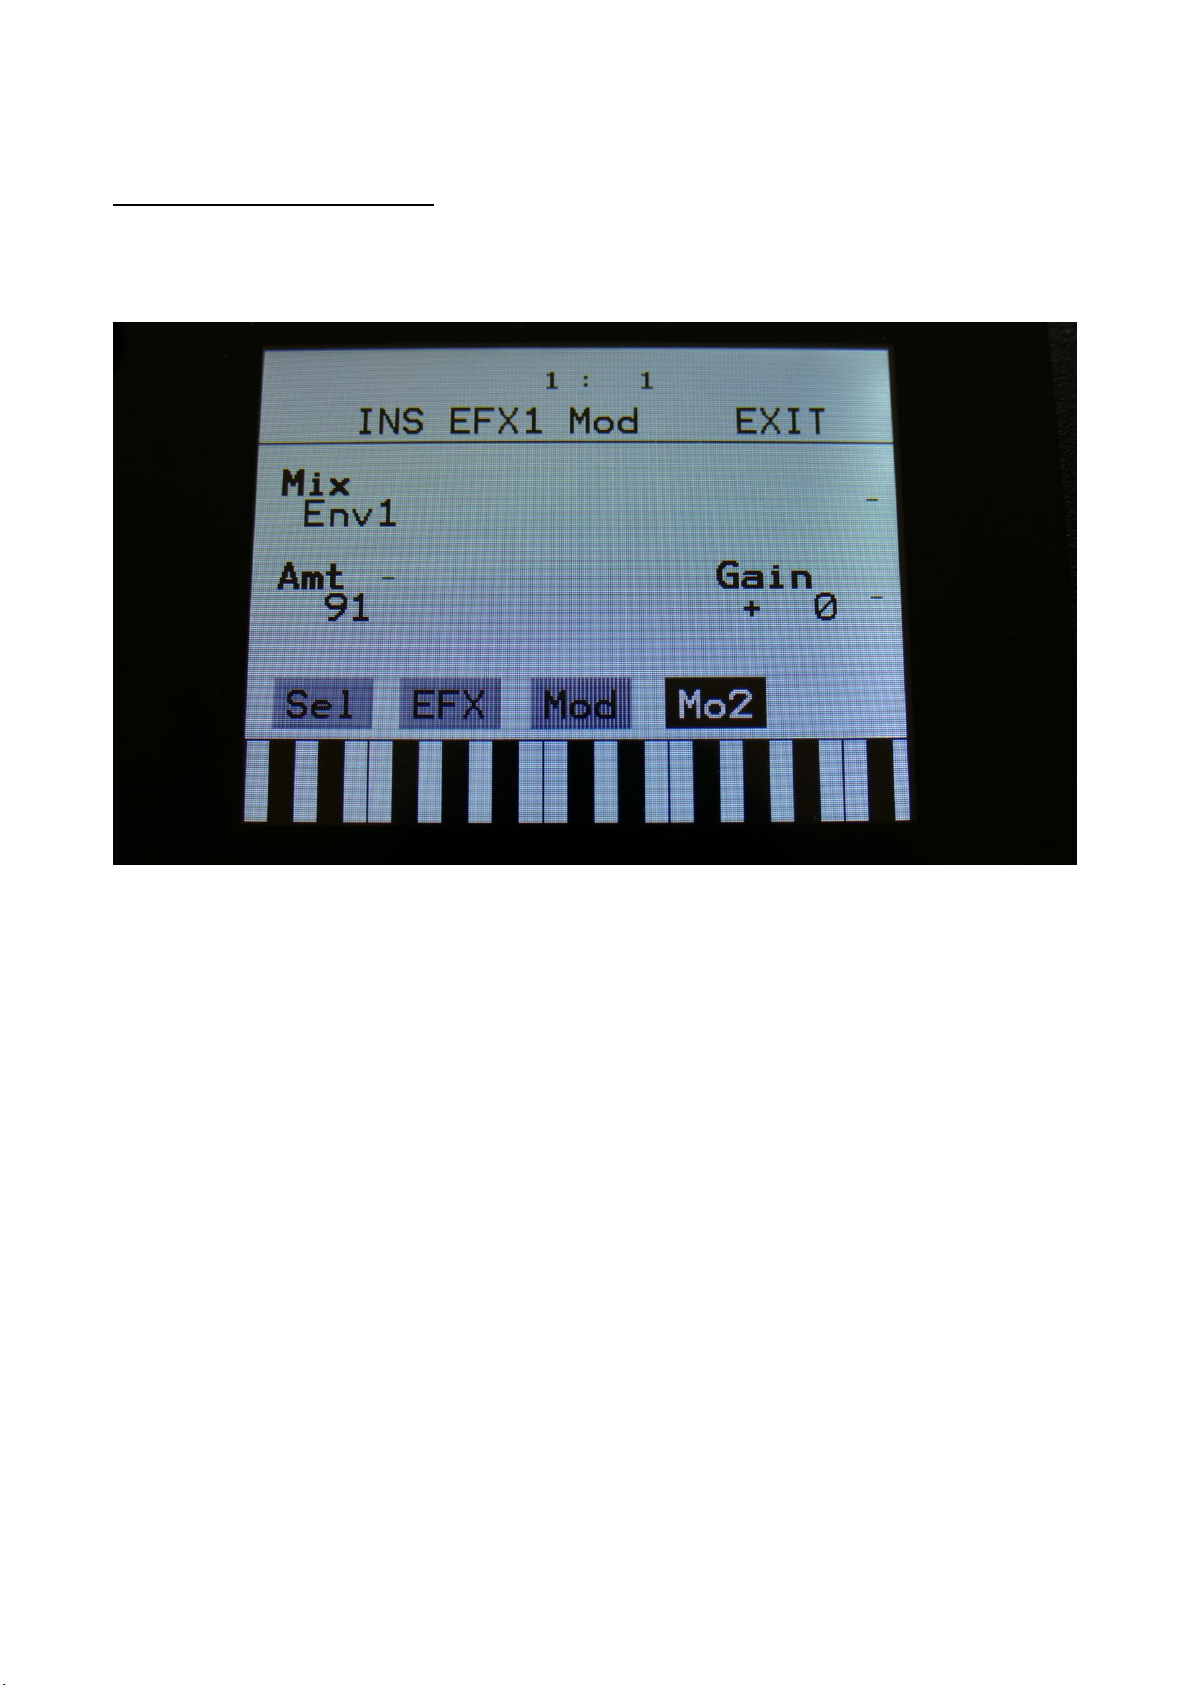
-Insert effects input gain can now be adjusted Page 10
-When recording an audio track, the BPM of this is now included in the sample name
Page 11
-Audio inputs can now be swapped Page 12
-Quick Edit Knobs can now be switched off Page 13
-Some page names on the BUS pages have been changed, to make it look less cryptic. Page 14
A few things, that were missing in the User Manual, has now been added:
-Chop Mode parameter description Page 17
-How to set up (stereo) samplings Page 18
Bug Fixes:
In my eager to make everything run as fast as possible, I unfortunately managed to create a bug, in
an earlier update, which got the audio inputs sample frequency lowered. I sincerely apologize for
this, but now it is back to 44.1 KHz. Thanks a ton to Joakim Gleisner for doing all the necessary
measurements, to detect this.
The 2 Morph knobs would not work in their entire range, when controlled via MIDI. Now they will.
If a part that was set to external, was the selected part, the Morph knobs stopped working. This
has now been fixed.
If a knob was set up to modulate the output effects Mix and Pan, the Quick Edit function would
not be switched off. This has now been fixed.
Clear Controller Track were using the track number selected by the Note Tracks. Now it is using
the Controller Track number.
3
Parametric EQ insert effect
A parametric EQ with different characteristics has been added to the insert effects.
The parameters:
Mix: The output of the EQ is inverted. This means, that when the Mix parameter is set to 256, the
EQ is actually subbed from the audio input. Set the Mix parameter to different values, to obtain
different EQ effects, or just turn it fully up to 511, to get a normal parametric EQ.
Freq: Sets the frequency, at which the EQ will cut or boost.
Q: Sets the width of the frequency band, that will be cutted/boosted.
Type: Sets the EQ characteristics. The types available are:
Band1: Cut/boost the frequency/range, selected by Freq/Q.
Band2: Like Band1, but with a slightly sharper sound.
Band3: Like Band2, but with an even sharper sound.
Low: Cut/boost the frequencies below the frequency selected by Freq.
High1: Cut/boost the frequencies above the frequency selected by Freq.
High2: Like High1, but with a sharper sound.
FAT: Like Band3, but it fattens the sound a bit.
Nrw: Turning this up, will narrow the frequency band affected by the EQ.
Boost: Turning this up, will boost the output gain of the EQ.
4
C/B: Cut/Boost. Setting this to a negative value, will damp frequencies on the input signal. Setting
it to a positive value, will boost frequencies on the input signal.
5
EQ Modulation
Freq1/Freq2: Will modulate the EQ frequency.
Q: Will modulate the EQ frequency width.
C/B: Will modulate the cut/boost parameter.
6
Sequencer Steps Offset Adjust
It is now possible to adjust the offset of all steps in a sequencer sub track, from step 1 to the
selected last step, by turning one knob.
To do this, touch the knob select bars in the bottom of any steps page, to select step editing with
knobs. Now touch the active knob select bar one more time, and it will switch to “All”.
You can now, by turning Edit Knob 1, adjust the offset of all steps at the same time. Middle
position of Edit Knob 1 is zero, above middle will turn the offset up, below middle will turn the
offset down.
SPECIAL NOTE FOR THE POSITION SUB TRACK:
When adjusting the offset of the step positions on the position sub track, the positions will “roll
over” around the selected last step. This means, that if you are turning the offset up, the last steps
before the last step, will now be placed on the first steps of the track. Likewise, if you turn the
offset down, the first steps of the track, will now be placed on the last steps of the track.
SPECIAL NOTE FOR THE SUB-POSITION SUB TRACK:
Offsets can’t be adjusted on this. If “All” is selected on the sub-position track, the offset of the
position track will be adjusted, without any visualizing.
7
Position Rotation Modulation
Position Track Rotation has now been added as a modulation destination on the sequencer note
tracks.
This will do exactly the same, as when adjusting the offset of all steps of the position track, but it is
done by a modulation source.
On the Note Track Mod page, simply select “Rota” as the modulation destination, select the
modulation source, and turn up the modulation amount.
8
Output An Audio BUS to another Audio BUS
Many LD3 users has let me know, that they often needs to connect the output of an audio bus, to
another audio bus, in order to place effects before/after the audio bus follower VCA. This could be
done by adding a jack cable from an audio output to an input.
But now you can save the cable! Now you can simply output a bus to another bus internally in
LD3! Bus1 can output to Bus2, Bus3 can output to Bus4, Bus5 can output to Bus6, Bus7 can output
to Bus8.
To do this, simply go to the BUS OUT page, and select the Bus output to be another Bus, instead of
an audio output or output effect.
9
BUS Follower/Envelope OFF position
If you would like to just use the Audio Bus Follower as a modulation source, without it affecting
the output level of the Bus itself, this is now possible, by setting the Env to OFF, on the BUS ENV
page.
10
Insert Effects Input Gain
On the Insert Effects Mo2 page, it is now possible to adjust the Insert Effect input gain, using the
new Gain parameter:
11
Audio Track BPM
When recording an audio track, the BPM of this is now included in the sample name –
A058_05_120_AUDTR -Preset number_Track Number_BPM.
12
Audio Inputs Swap
If you, for some reason, would like to swap the audio inputs, this is now possible.
Input 1 and 2 can be swapped, and input 3 and 4 can be swapped, using the “i1<>2” and “i3<>4”
parameters on the MOR>COMMON2 page:
13
Quick Edit Knobs Off
If you don’t need the default functionality of the Edit Knobs (the parameters, that they are
assigned to, when they are not used as modulation sources), it is now possible to switch them off,
by using the “Qedit” parameter, on the MOR>COMMON2 page:
14
Bus Sub Pages Naming
Some page names on the BUS pages has been changed, to make it look less cryptic (I think).
15
16
17
Chop Mode parameter
LD3 has different modes, for automatically generate non-destructive chop points on a sampling. It
can create chop points by peaks, wave cycles or by dividing the sampling into a fixed number of
equally sized chops.
The parameter on the Sample Chops page, that was named Wave in previous OS versions, was
renamed to Mode in V 8.15, but somehow this change didn’t make it to the user manual.
The following chop modes, that determines how LD3 will chop a sampling, can be selected:
Peak: It will generate the chop points from peak detection, according to the settings of the Sens
and Dec parameters.
Wave: It will generate the chop points from zero point detection, according to the settings of the
Sens and Dec parameters. When auditioning chops in this mode, the playback will be looped.
A number between 2 and 64: It will divide the sample length by the selected number, and
generate equally sized chop points from that, regardless of the settings of the Sens and Dec
parameters.
18
How to set up (stereo) samplings
In this chapter it will be explained, how to set up a sampling for a part, and some extra steps, that
is required for setting the filters and VCA/BUS in stereo mode, when setting up a stereo sampling.
From the Preset Select page, touch “EDIT” to enter the Synth main page.
19
From the Synth main page, touch the box named “OSC”, to enter the oscillator pages.
20
Touch the “SEL” touch button, to enter the oscillator mode selection page.

Other Gotharman Desktop manuals

Gotharman Tiny LD User manual

Gotharman

Gotharman Tiny LD User manual

Gotharman Little deFormer 3 Installation guide

Gotharman

Gotharman Little deFormer 3 Installation guide

Gotharman Tiny LD User manual

Gotharman

Gotharman Tiny LD User manual

Gotharman Little deFormer 3 Technical manual

Gotharman

Gotharman Little deFormer 3 Technical manual

Gotharman Little deFormer 3 Technical manual

Gotharman

Gotharman Little deFormer 3 Technical manual

Gotharman Tiny LD User manual

Gotharman

Gotharman Tiny LD User manual

Gotharman Gotharman's Little deFormer User manual

Gotharman

Gotharman Gotharman's Little deFormer User manual

Gotharman Gotharman's Little deFormer User manual

Gotharman

Gotharman Gotharman's Little deFormer User manual

Popular Desktop manuals by other brands

Lenovo ThinkCentre M57 user guide

Lenovo

Lenovo ThinkCentre M57 user guide

Compaq AP400 - Professional - 64 MB RAM troubleshooting guide

Compaq

Compaq AP400 - Professional - 64 MB RAM troubleshooting guide

Sony VAIO SVL24145CXB manual

Sony

Sony VAIO SVL24145CXB manual

Zotac GAMING MEK1 user manual

Zotac

Zotac GAMING MEK1 user manual

Compaq EN Series Technical reference guide

Compaq

Compaq EN Series Technical reference guide

Dell OptiPlex 990 Desktop Tech sheet

Dell

Dell OptiPlex 990 Desktop Tech sheet

Digital Equipment DEC 3000 Options guide

Digital Equipment

Digital Equipment DEC 3000 Options guide

Dell OptiPlex 3070 Tower Service manual

Dell

Dell OptiPlex 3070 Tower Service manual

Lenovo ThinkCentre M72e Vodič za uporabnika

Lenovo

Lenovo ThinkCentre M72e Vodič za uporabnika

Festo MPS PA Compact manual

Festo

Festo MPS PA Compact manual

HP Workstation xw6000 supplementary guide

HP

HP Workstation xw6000 supplementary guide

Zotac ZBOX MAGNUS ONE user manual

Zotac

Zotac ZBOX MAGNUS ONE user manual

Dell Dimension 9200C owner's manual

Dell

Dell Dimension 9200C owner's manual

Gigabyte G-MAX FB user manual

Gigabyte

Gigabyte G-MAX FB user manual

Lenovo IdeaCentre B750 Hardware Maintenance Manual

Lenovo

Lenovo IdeaCentre B750 Hardware Maintenance Manual

OMT-Veyhl OV1015 user guide

OMT-Veyhl

OMT-Veyhl OV1015 user guide

HP Xw6400 - Workstation - 4 GB RAM Declaration of conformity

HP

HP Xw6400 - Workstation - 4 GB RAM Declaration of conformity

Lenovo ThinkCentre 8700 Hardware Maintenance Manual

Lenovo

Lenovo ThinkCentre 8700 Hardware Maintenance Manual

manuals.online logo
manuals.online logoBrands
  • About & Mission
  • Contact us
  • Privacy Policy
  • Terms and Conditions

Copyright 2025 Manuals.Online. All Rights Reserved.