Gotharman Tiny LD User manual

1
Gotharman’s Tiny LD
Picture shows a proto type, and will be replaced as soon as the final model is ready.
Granular Workstation
User Manual V10.26

2
Content Of This Manual
Introduction 9
Very Special Thanks To 11
In The Box 12
Getting Started 13
User Interface 19
Preset Select Screen 22
Operating Tiny LD 26
Trigger synth/sampler parts manually 26
Starting/stopping Sequencer 27
Selecting a Part/Track 28
Selecting Effects Processors 28
Note Tracks Steps view/edit 29
Mute/Unmute Note Tracks 30
Copy Morph Layer A to B 31
Panic 31
Compare Preset 32
Exit from any page 33
Shortcut to Save Preset 33
Upper and Lower Parameter Rows 34
Audio Bus System 35
Tiny LD Structure 36

3
Synth/Sampler Parts 37
Modulation Sources 38
Accessing The Synth Part Pages 45
Editing The Parameters 47
Parameters Randomizer 48
Trigger Setup 50
Zone Setup 52
Audio Bus Setup 53
Oscillator/Sampler/Noise 58
Granular Modulators 69
Random Generators 71
Digital Filters 72
VCA 81
Envelope 1 and 2 85
LFO 1 to 16 89
Audio Inputs Setup 92
Analog FilterBoard 93
Effects Processors 106
Insert Effects 1 to 8 108
List of Insert Effects 109
Insert Effects Select Page 111
Mix Modulation and Backwards 113
Chorus 115
Distortion 117
Bit Crush 119
Pitch Shifter 121
Resonator 124
Stretcher 126
FM 128
Glitch Shifter 1, 2 and 3 130
Pitch Shaper 132
FAT 134
Filters 136
Filters 2 139
Compressor 141
Expandor 143
PitchShaper2 145
Delays 148
Variator 150

4
Time Stretch 152
Sample Pitch 154
Output Effects 1 and 2 156
List of Output Effects 157
Output Effects Select Page 159
Mix/Pan Modulation and Backwards 162
Delays 164
Granulator SQ 167
Variator 170
Reverb 172
Granulator (unsynced) 174
Xfade Granulator 177
Abstruct0 180
Time Stretch 183
Sample Pitch 185

5
Sequencer 187
Entering The Sequencer 192
Sequencer Main 195
Clear Sequence 197
Note subtrack 198
Gate Time subtrack 201
Velocity subtrack 203
Position subtrack 205
Sub Position subtrack 207
Templates and Note Scales 209
Templates for Position subtrack 211
Note Track Mod page 213
Clear Note Track 215
Double Note Track 216
Realtime Recording of Notes 217
Step Recording of Notes 219
Track/Part Internal/External Operation 222
Audio Track Recording 225
Controller tracks 235
Controller Track templates 239
Controller Tracks CC page 241
Clear Controller Track 243
Double Controller Track 244
Controller Tracks Realtime recording 245
Recording Parameter Tweaks 248
Pitch Bend and CC recording auto setup 249
Controller Tracks Step Recording 251
Synth and Sequencer Morphing 252

6
More… Parameters/Setup 253
Common Settings 256
Morph Setup 258
Common Settings 2 262
Initialize Preset 263
Parameter Snap Mode 264
FilterBoard Setup 265
FLASH Memory Check 266
Delete Sample Bank 267
Delete All Presets and Songs 268
C.P. 269
Preset/Song Mode 270
Display Update Rate 271
Save Preset 272
Song Mode 276
Accessing Song Mode 277
Song Edit page 281
Song Select page 283
Song Realtime Recording 285
Save Song 289
Initialize Song 293
Copy/Paste 295
Sample Record and Edit 298
Recording a Sampling 299
Edit a Sampling 306
Adjusting Start/End Points 308
Sample Chops 309
Wave Chop System 313
Deleting Last Recorded Sampling 321
Deleting Other Samplings 323
Graphical Sample Editing 324
Wave Builder 338

7
USB 341
USB Sample Preview 343
Open A Directory 344
Importing Files 345
Importing Multiple Files 347
Reload Multiple Files 348
Import Samplings As Chops 350
Make a New Directory 353
Delete File From USB Drive 354
Export Samples, Presets and Songs 355
Updating Tiny LD Firmware 356
MIDI Specs 364
Parameters CC Control 366
Parameters CC numbers list 368
Effects parameters 1 and 2 371
Controlling Parameters From Controller Tracks 372
Safe Boot Mode 373
Installing Analog FilterBoard 374

8
I hope that you will deform some great tracks

9
Introduction
Thank you very much for purchasing/consider to purchase a Gotharman’s Tiny LD.
Tiny LD are a multi-timbral and polyphonic granular workstation with 16 parts. The granular
functions in it includes oscillator/sampler granular modulators and special granular effects.
Each of the 16 parts has a stereo oscillator/sampler, 2 filters with 16 different filter types, a stereo
VCA, 3 envelopes, 4 random generators and 2 granular modulators, a random one and a
sequenced one. Additional modulation sources includes 16 global LFO’s, 32 sequencer controller
tracks, 8 audio bus envelope followers, touch screen keyboard Y position and MIDI keyboard,
velocity, aftertouch, pitch bend and CC’s.
The samplers can hold up to 43 minutes of samplings/ maximum 2.048 samplings. Samplings can
be chopped by level peaks, wave zero points, or in equally sized slices. Up to 64 chop points are
possible for each sampling. Samples are stored in FLASH memory, and played back directly from
this, so: No loading times!
Each part can be send to up to two of 8 audio busses at the same time. Pan modulation can
control the send level to each of the 2 busses.
On the audio busses up to 8 insert effects and an analog filter can be placed, for processing the
sounds from the parts and from its audio inputs.
The output from the audio busses can be sent to any or both of the 2 audio outputs and to any or
both of the 2 output effect processors.
The 16 parts can be sequenced from a build-in sequencer, that has 16 note tracks, with up to 64
steps each, and 32 controller tracks, with up to 128 steps each. Each note track has a position
track, that makes it possible to alter the position of each step, making polyphonic step sequencing
and various direction modes possible. A sub position track is also available for micro timing.
Realtime, step time and xox style recording are possible. Knob movements and MIDI CC’s can be
recorded, both in realtime and step time on the controller tracks.
Both the note tracks and the controller tracks can also control external MIDI devices, with up to
128 notes of polyphony.
Audio tracks can be recorded on the note tracks. These can be instantly chopped for true
deforming manipulation.
10
The sound generating parts, the LFO’s, the effects processors and the sequencer has 2 layers of
parameter settings, layer A and layer B, that can be independently adjusted, and morphed
between, using the Morph and Seq Morph knobs.
All the parameter settings can be stored in any of 1024 rewritable preset locations, and recalled at
any time.
1024 song locations are available, for programmed playback of presets, and for tracks mute
automation.
I hope that you will enjoy your Tiny LD for a long time, and deform a lot of great tracks.

11
Very special thanks to:
Will be updated, when pre-ordering ends.
For supporting this project from the start. I sincerely appreciate your help.

12
In The Box
In the Tiny LD box should be:
-Tiny LD itself
-A power supply –Multi plug –Works in most countries.
If any of these items are missing, please get in touch with Gotharman’s.

13
Getting Started
Connecting:
On the right end panel of your Tiny LD, you will find the power switch, connection for power
supply, stereo audio outputs, and USB.
You would probably like to connect the audio outputs to a mixer or an amplifier, or anything else
that ends out in a speaker/a set of speakers. Since Tiny LD doesn’t have built in speakers, it just
needs to be connected to something, that can transfer its amazing sound to you. These should be
connected, using ¼” mono jack cables.
The left audio output (marked “AUDIO OUT L(hp)) doubles as a stereo headphone connector.
Please make sure that nothing is connected to the right audio output, when plugging headphones
into this connector.

14
To the USB connector, a USB drive can be connected.
This should be:
-Maximum 32 GB
-FAT formatted
With a USB drive connected, you can:
-Import, export and back up samples as .wav files
-Import deFormer .lds samples
-Import, export and back up Tiny LD/LD3 presets and songs
-Update Tiny LD
-PLEASE NOTICE: The included factory samples CANNOT be exported. So if you want to keep these,
you should take care not to delete them. A USB stick with the factory samplings might be available
in the future.
To import a .wav file from another device, it must be:
-Mono or stereo
-44.1 KHz sample rate –Tiny LD will import other sample rates, but they will play back in a wrong
speed
-16 bit or 24 bit native PCM
-Standard wav’s or broadcast wav’s

15
On the left end panel of your Tiny LD, you will find the stereo audio inputs and MIDI in and out.
Connect any line stereo/mono audio sources to the audio inputs, for sampling and/or processing
through Tiny LD’s effects and optional analog filter.
If the Tiny LD touch screen keyboard and step buttons seems a bit too limited, you might want to
connect a MIDI keyboard to MIDI in, in order to take full advantage of Tiny LD’s fully chromatically
playable sounds. It is also possible to connect anything that transmits a MIDI clock, if you would
like the sequencer of Tiny LD to sync to the rest of your setup.
On MIDI out, MIDI clock, MIDI CC’s from the Tiny LD edit knobs, and notes and CC’s from its
sequencer are transmitted. Connect any MIDI gear to this, that you would like to control from Tiny
LD.

16
Starting Up
Connect the supplied power adaptor to the Power input, and to a 100V to 240V power source –
Usually a wall socket.
It’s a 9V, minimum 2.0A type with a 2.1 mm DC plug, with positive middle. The power supply on
the picture is only for reference. The actual one might look different.
Some Tiny LD’s might have been shipped out with a power adaptor, that has multiple tips. If you
have received one of these, you should use the tip with the blue ring, and make sure that the 2
parts are alligned to the text “Tip”:
Please look at the picture, on the next page….

17

18
Turn it on
Push the “I” on the power switch. Your Tiny LD should now turn on.

19
The User Interface
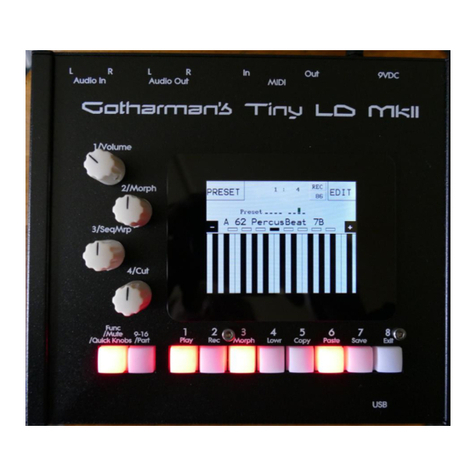
Tiny LD has a highly sensitive and responsive capacitive touch display, 8 step/trigger/part
select/function buttons, a Func/Mute button, and a Steps/Parts 9-16 select/Part Select button. It
has 4 Edit Knobs for controlling and editing parameters and sending MIDI CC’s, that doubles as
Volume, Morph and sequencer Morph knobs. Only Edit Knob 4/Cut are assignable, to control
other parameters.
Pushing the Trigger 1-8 buttons, with Func/Mute and 9-16/Part unlit, will trigger the respective
Tiny LD part. Each trigger button will send a settable note number (Settable in the Synth “Trig””
section). When a trigger is trigged, the button will light up.
Pushing the Trigger 1-8 buttons, with Func/Mute unlit and 9-16/Part lighting up, will trigger the
respective Tiny LD part 9 to 16.
When on any of the sequencer pages, the trigger buttons works as steps on/off buttons. With the
9-16/Part button unlit, step 1 to 8 of the selected sequencer page, can be switched on and off, by
pushing the trigger buttons. With the 9-16/Part button lighting up, steps 9 to 16 of the same page
can be switched on and off.

20
With the Func/Mute button lighting up, the functions written just below the steps/parts numbers
of the 8 trigger buttons, will ba active.
When the Func/Mute button is held down, it is possible to mute/unmute the 16 note tracks, by
pushing any of the 8 step buttons. If the 9-16/Part button is lighting up, part 9 to 16 will be
muted/unmuted.
When the 9-16/Part button is held down, the 8 step buttons functions as Part Select buttons.
Pushing any of these, will select part 1 to 8, if the 9-16/Part button is unlit, or part 9 to 16, if the 9-
16/Part button is lighting up.
The 1/Volume knob adjusts the audio output volume, when located on the (Main) Preset Select
Page, and on the Main Synth Page. When located inside an edit page, it will adjust the first
parameter on the page. If the “Lowr” function is turned on, it will adjust parameter 5.
The 2/Morph (MIDI CC#1) knob morphs between synth layer A and B, when located on the (Main)
Preset Select Page, and on the Main Synth Page. When located inside an edit page, it will adjust
parameter 2 on the page. If the “Lowr” function is turned on, it will adjust parameter 6.
The 3/SeqMrp (MIDI CC#2) knob morphs between sequencer layer A and B, when located on the
(Main) Preset Select Page, and on the Main Synth Page. When located inside an edit page, it will
adjust parameter 3 on the page. If the “Lowr” function is turned on, it will adjust parameter 7.
The 4/Cut (MIDI CC#4) knob are adjusting the Cutoff frequency of digital filter 1 of the selected
part, unless it is assigned to modulate one or more parameters, when located on the (Main) Preset
Select Page, and on the Main Synth Page. When located inside an edit page, it will adjust
parameter 4 on the page. If the “Lowr” function is turned on, it will adjust parameter 8.
Other manuals for Tiny LD
2
Table of contents
Other Gotharman Desktop manuals

Gotharman
Gotharman Gotharman's Little deFormer 3 Technical manual

Gotharman
Gotharman Little deFormer 3 Technical manual

Gotharman
Gotharman Tiny LD User manual

Gotharman
Gotharman Little deFormer 3 Installation guide

Gotharman
Gotharman Tiny LD User manual

Gotharman
Gotharman Gotharman's Little deFormer User manual

Gotharman
Gotharman Gotharman's Little deFormer User manual

Gotharman
Gotharman Little deFormer 3 Technical manual