Govee H7141 User manual

Govee Smart Humidifier
User Manual
Model
:
H7141


Safety Instructions
Specifications
Getting Started
Getting to Know Your Smart Humidifier
Filling with Water
01
03
03
03
05
06
Using Your Smart Humidifier
LED Indicators
08
09
Pairing Your Smart Humidifier with Govee Home App
Using the Aroma Box
Care & Maintenance
Descaling the Humidifier
09
10
11
12
Cleaning the Aroma Pad 14
Reassembling
Troubleshooting
15
16
Package Includes
Table of Contents

READ AND SAVE THESE INSTRUCTIONS
General Safety
Only use the humidifier as described in this manual.
When not in use for an extended period, turn the humidifier off and disconnect the plug from
the outlet.
Do not use the humidifier in wet environments.
Keep the humidifier out of reach from children.
Do not attempt to disassemble the humidifier or its components.
Always unplug the humidifier from power before cleaning it or detaching the water tank from
the humidifier base.
Always place the humidifier on a flat, horizontal surface before using.
Only fill the water tank with clean water. Never fill the water tank with any other liquids.
Do not place the humidifier near heat sources such as stovetops, ovens, or radiators.
Do not place the humidifier directly on carpets or rugs.
Do not use non-Govee humidifier parts as replacement parts for this product.
Do not cover the nozzle while the humidifier is on, as this may damage the humidifier.
Remove the water tank from the base before moving the humidifier.
Do not immerse the humidifier base, power cord, or power plug in water.
If the humidifier is damaged or is not functioning properly, stop using it and contact
Customer Support immediately.
Not for commercial use. Household use only.
To reduce the risk of fire, electric shock, or other injury, always follow all instructions and
safety guidelines.
Ensure that the plug fits properly into a polarized outlet.
Do not handle the power cord or plug with wet hands. Keep the power cord and plug away
from liquids.
Your humidifier has a polarized plug (one prong is wider than the other), which fits into a
polarized outlet in only one orientation. This is a safety feature to reduce the risk of electric
shock. If the plug does not fit, reverse the plug to the correct orientation. If it still does not fit,
do not bypass this safety feature and try forcing the plug into the outlet; instead, do not use it
with the outlet.
Power Cord & Plug
Do not add essential oils, supplemental water treatment liquids, or water filters into the
water tank or base chamber, as this may damage the humidifier and cause leaks.
Only add essential oils to the aroma pad.
Risk of Leaks and Electric Shock
Safety Instructions
01

LIRE ET CONSERVER CES INSTRUCTIONS
La sécurité générale
Utilisez l'humidificateur seulement comme décrit dans ce manuel.
Lorsqu'il n'est pas utilisé pendant une période prolongée, éteignez l'humidificateur et
débranchez la fiche de la prise.
N'utilisez pas l'humidificateur dans des environnements humides.
Gardez l'humidificateur hors de la portée des enfants.
N'essayez pas de démonter l'humidificateur ou ses composants.
Débranchez toujours l'humidificateur du secteur avant de le nettoyer ou de détacher le
réservoir d'eau de la base de l'humidificateur.
Placez toujours l'humidificateur sur une surface plat et horizontale avant de l'utiliser.
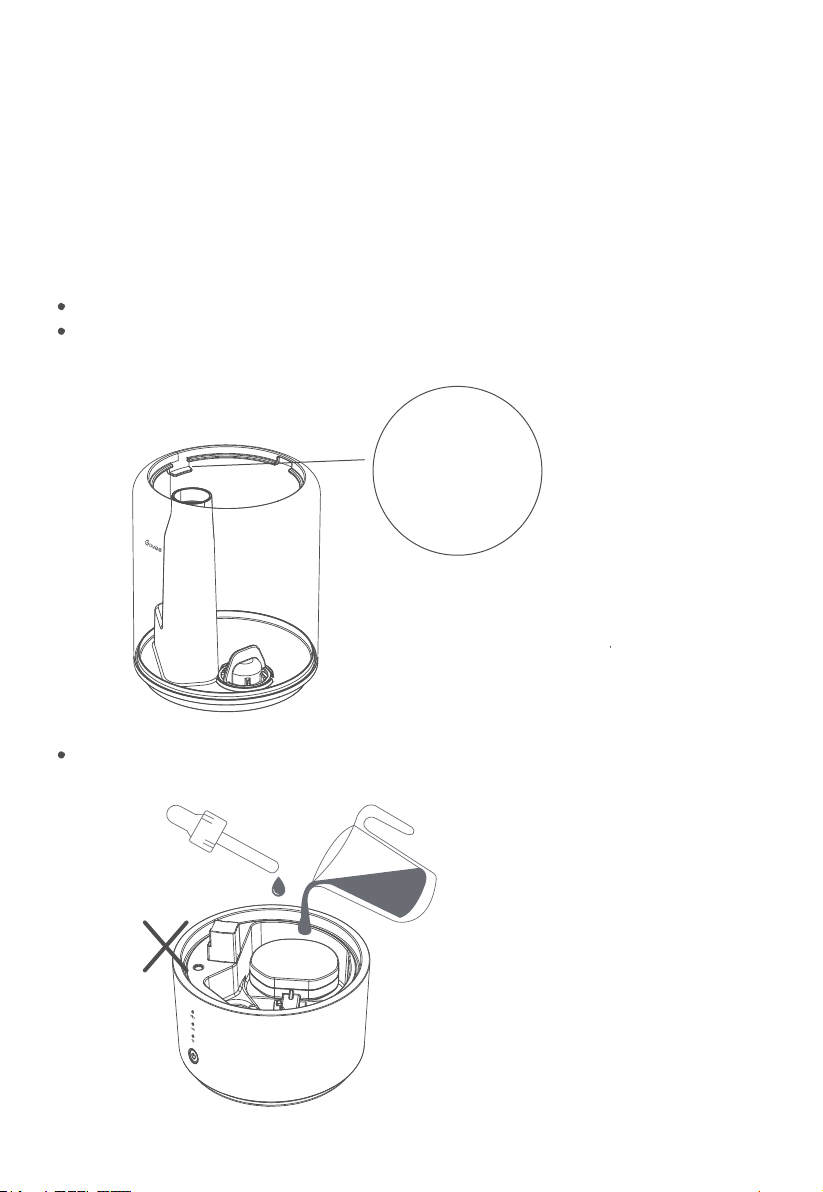
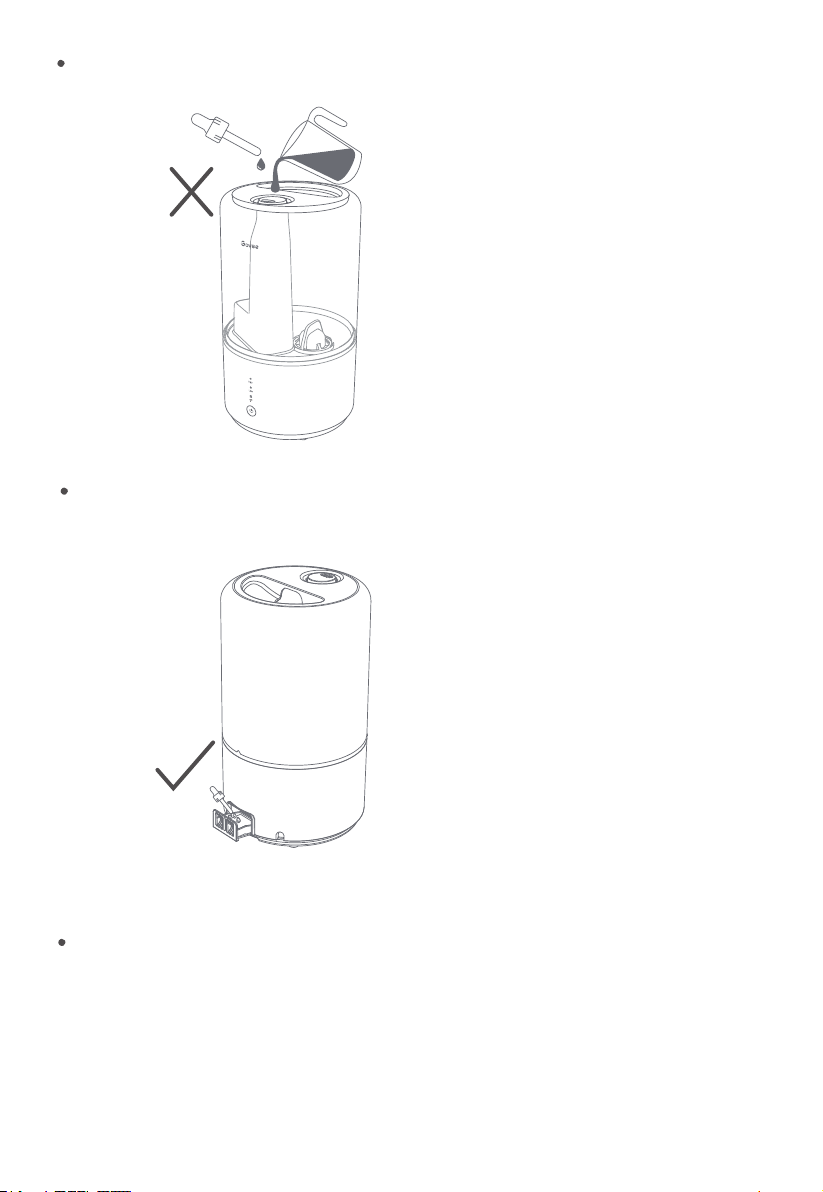
Ne remplissez le réservoir d'eau qu'avec de l'eau propre. Ne remplissez jamais le réservoir
d'eau avec d'autres liquides.
Ne placez pas l'humidificateur à proximité de sources de chaleur telles que des fourneaux de
cuisine, des fours ou des radiateurs.
Ne placez pas l'humidificateur directement sur des tapis ou des moquettes.
N'utilisez pas de pièces d'humidificateur autres que Govee comme pièces de rechange pour
ce produit.
Ne couvrez pas la buse lorsque l'humidificateur est allumé, car cela pourrait endommager
l'humidificateur.
Retirez le réservoir d'eau de la base avant de déplacer l'humidificateur.
N'immergez pas la base de l'humidificateur, le cordon d'alimentation ou la fiche dans l'eau.
Si l'humidificateur est endommagé ou ne fonctionne pas correctement, arrêtez de l'utiliser et
contactez immédiatement le service client
Pas pour un usage commercial. Usage domestique uniquement.
Pour réduire le risque d'incendie, de choc électrique ou d'autres blessures, suivez toujours
toutes les instructions et consignes de sécurité.
Assurez-vous que la fiche s'insère correctement dans une prise polarisée.
Ne manipulez pas le cordon d'alimentation ou la fiche avec les mains mouillées. Gardez le
cordon d'alimentation et la fiche à l'écart des liquides.
Votre humidificateur a une fiche polarisée (une broche est plus large que l'autre), qui s'insère
dans une prise polarisée dans un seul sens. Il s'agit d'une fonction de sécurité pour réduire le
risque de choc électrique. Si la fiche ne rentre pas, inversez la fiche dans le bon sens. S'il ne
rentre toujours pas, ne contournez pas cette fonction de sécurité et essayez de forcer la fiche
dans la prise. Au lieu de cela, ne l'utilisez pas avec la prise.
Le cordon d'alimentation & la fiche
N'ajoutez pas d'huiles essentielles, de liquides de traitement d'eau supplémentaires ou de
filtres à eau dans le réservoir d'eau ou la chambre de base. Cela pourrait endommager
l'humidificateur et provoquer des fuites.
N'ajoutez que des huiles essentielles au coussin aromatique.
Le risque de fuites et de choc électrique
La consignes de sécurité
02

Package Includes
Item
Smart Humidifier
Cleaning Brush
Aroma Pads (1 Pre-Installed)
Quick Start Guide
User Manual
Quantity
1
1
3
1
1
Specifications
Power Supply
Rated Power
Water Tank Capacity
Max Run Time (Low Mist Setting)
Noise Level
Effective Range
Dimensions
Weight
AC 120V, 60Hz
Getting to Know Your Smart Humidifier
20W
0.79 gal/3L
≤ 28dB
107–290 ft²/10–27 m²
6.7x 6.7x11.6 inches/17x17x29.5cm
2.65 lb/1.2kg
Up to 30 hours
Note: The humidifier may run for a longer
or shorter time depending on the
environmental temperature and humidity.
a. Mist Nozzle
b. Water Tank Cover
c. Max Water Line (Tank)
d. Water Tank
e. Mist Tube
f. Filter
g. Base
h. Air Outlet
i. Micro Switch
j. Indicator Light
k. Power Button
l. Transducer
m. Transducer Heat Sink
n. Float
o. Float Brackets
p. Aroma Box
q. Aroma Pad
r. Air Inlet
s. Screw Nut
t. Noise Silencer
u. Power Cord
v. Cleaning Brush
03

04
a
b
c
d
e
f
u
v
h
g
o
m
l
i
j
k
s
t
n
p
q
r

1. Remove all packaging, tape, and protective foam before first use.
2. Place the humidifier on a hard, flat, water-resistant surface. The humidifier should be at least
12 inches/ 30cm away from any walls.
3. Mist should be directed away from walls, furniture, bedding, and appliances.
Getting Started
12in/30cm
12in/30cm
05
Remove the tape in the water tank
Remove the foam

Do not add water or essential oils directly into the base chamber.
1. Remove the water tank cover by holding the tank cover and pulling upward.
2. Remove the tank from the base. Fill the tank with room-temperature water.
Do not fill with hot water.
Filling with Water
We recommend using purified or distilled water to fill the tank.
Do not fill past the tank’s max water line.
Note:
06
Max Water Line
Max

Do not add water or essential oils directly into the mist tube.
Do not add essential oils directly into the humidifier. Only add essential oils to the
aroma pad.
Do not use water treatment liquids or third-party water filters with this humidifier.
07

Custom Mode: The humidifier will produce mist at the high and the medium setting, before
switching to the low setting.
Auto Mode: When connected to a Govee thermometer hygrometer, the humidifier will adjust
its mist according to the humidity value provided by the thermohygrometer.
When detaching the tank from the base: The humidifier’s fan will stop within 5 seconds
and mist will stop being produced. If the tank is properly placed back onto the base within 3
minutes, the humidifier will continue working; if not, the humidifier will automatically turn off.
No water left in the tank: The humidifier will stop producing mist when there is not enough
water in the tank. The fan will stop working within 5 seconds. Once sufficient water is added
back into the tank, the humidifier will restart after the Power button is pressed.
Using Your Smart Humidifier
3. Reattach the water tank cover and place the tank back on the base.
Besides the on-device buttons, Govee Home App can also be used to control the below
functions (as well as other app functions).
Functions & Controls
1. Plug in your humidifier. Press the Power Button repeatedly to cycle through the following mist
settings: Custom Mode, High, Low, and Off.
2. During the pairing process, follow in-app instructions to press the Power Button to connect the
humidifier with Govee Home App. Press the Power Button for 10 seconds to restore the humidifier
to factory settings and disconnect it from Bluetooth and Wi-Fi network.
Note:
08
Note:

Working Status
High mist
Low mist
Tank is detached from base
Indicator Status
High Mist indicator light shows solid blue
Low Mist indicator light shows solid blue
High/Low Mist indicator lights flash red and
dim in 3 minutes
High/Low Mist indicator lights show solid
red and dim in 3 minutes
2. Rotate the nozzle to adjust mist direction.
3. Press the Power Button to turn off the humidifier.
LED Indicators
Pairing Your Smart Humidifier with
Govee Home App
No water left in the tank
Custom mode or Auto mode
Display off
Ready for Wi-Fi connection
Wi-Fi connecting
Wi-Fi connected
High/Low Mist indicator lights show solid blue
All indicator lights dim
Wi-Fi indicator light slowly flashes blue
Wi-Fi indicator light quickly flashes blue
Wi-Fi indicator light shows solid blue
Due to ongoing updates and improvements, Govee Home App’s interface and features may
be slightly different than those shown in the manual. In case of differences, follow the
in-app instructions.
09

1. To download Govee Home App, scan the QR code or search for “GOVEE” in the Apple App
Store (iOS devices) or Google Play Store (Android devices)
1. Pull out the aroma box from the back of the base.
2. Put 8 to 10 drops of essential oil on the aroma pad.
3. Push the aroma box back into the humidifier.
4. Turn on the humidifier. The humidifier will automatically diffuse the essential oil.
2. Turn on your smartphone’s Bluetooth.
3. Open Govee Home App, tap the “+” icon in the top right corner, and search for “H7141.”
4. Tap the device icon and follow the on-screen instructions to complete pairing.
Note: Choose “Allow” to the permissions requested when opening Govee Home App for the
first time.
Note: You can use Govee Home App to connect your smart humidifier to Amazon Alexa or
Google Assistant. Follow the in-app instructions to connect Govee Home App to each
voice assistant.
Using the Aroma Box
10

Do not add essential oils, water treatment liquids, or third-party water filters directly into the
water tank or base chamber. Only add essential oils to the aroma pad.
The aroma pads can be cleaned and reused after diffusing essential oils.
The aroma effect is intended to be light. This humidifier is not a dedicated aroma diffuser.
Note:
Care & Maintenance
Cleaning the Humidifier
The humidifier should be cleaned after a week of use or before being stored away.
Cleaning Steps
1. Unplug the humidifier.
2. Remove and rinse the water tank cover.
3. Remove the water tank from the base and pour out any water from the tank and base chamber.
4. Rinse the tank and base chamber with room temperature water.
11

Do not let water into the air inlet or outlet when cleaning the humidifier's base with
running water.
If water does accidentally enter the base’s inlet or outlet, place the humidifier base in a
ventilated place to dry before using.
Note:
Descaling the Humidifier
1. Fill the tank with 3 cups/ 710 mL of distilled white vinegar.
2. Put the tank cover on and swish the vinegar around the tank.
3. Place the tank on the base and soak for 15–20 minutes. Vinegar will drain into the base
chamber and loosen scale (mineral buildup) in the tank and in the base chamber
(including the transducer and float).
12

Note:
It is unnecessary to remove the float for cleaning in normal circumstances.
If the float is removed, make sure to place it back in the correct position as inaccurate
positioning may cause the humidifier to leak.
4. Remove the tank, remove the tank cover, and pour out all vinegar.
5. Remove the float from the base chamber by pulling it out of the float bracket. One side of
this bracket is open to allow the float’s prongs to be removed from the bracket.
6. Place the float in a small container. Fill with enough vinegar to cover the float. Let it soak for
15–20 minutes.
7. Use a soft cloth and the included cleaning brush to remove scale from all parts.
13

8. Rinse all parts until the vinegar smell is completely gone.
9. Dry all parts with a cloth. Make sure all parts are completely dry before reassembling
or storing.
Cleaning the Aroma Pad
1. Pull out the aroma box from the back of the base.
2. Remove the aroma pad and rinse under warm running water.
3. Dry with a clean cloth and place it back into the aroma box.
Note: Do not pour liquid cleaners or detergents into the aroma pad or box.
14

Reassembling
The float must be correctly reconnected if removed. Inaccurate positioning may cause the
humidifier to leak.
1. Reinsert the float back into the base chamber.
a. Lower the float into the base chamber.
b. Make sure the correct side of the float is facing up.
c. Place the larger prong into the open side of the float brackets.
2. Place the tank back on the base. Refill the tank if necessary.
3. Finally, place the tank cover back on the water tank.
Storing
Follow the cleaning instructions and allow all parts to dry completely before storing. Store the
humidifier in a cool, dry place.
15

Troubleshooting
The troubleshooting section below is for solving frequently asked questions for the humidifier.
If your problem persists, please contact customer support.
For Smart Humidifier
Problem Possible Solution
Humidifier doesn’t turn on.
Makes sure the power cable is securely
connected and press the Power Button again.
The water temperature may be too low. Use room
temperature water.
Add at least 1L of purified or distilled water into the water tank.
Little or no mist comes out.
Turn the mist level to a higher setting.
Add at least 1L of purified or distilled water into the water tank.
There may be too much water in the base chamber. Empty the
base chamber and refill the water tank (not the base chamber)
and place the water tank properly onto the base.
Make sure the air inlet on the bottom of the base is not blocked.
The humidifier should not be set on carpet or other surfaces that
may block the air inlet.
Make sure the nozzle is not blocked or clogged.
Make sure the humidifier is on a level surface.
Clean the water tank and base chamber.
Set the mist level to a lower setting.
Water temperature may be too low. Turn the mist level to the
highest setting and let the humidifier run for a while, then
adjust to the desired setting.
The humidifier uses up water based on the environmental
temperature and humidity. If your environment is cold and/or dry,
the humidifier will run out of water faster.
If the water tank or base was washed with detergent, rinse
thoroughly with clean water to remove any detergent.
The water usage of the
humidier is too fast.
Humidifier produces an
unusual smell.
Humidifier makes a loud or
unusual noise.
If the humidifier is new, unplug and rinse all parts, then place in
a cool, dry place for 12 hours.
If essential oils were placed on the aroma pad, rinse the pad under
clean water and allow it to dry.
White dust appears around
the humidifier.
The humidifier may be malfunctioning. Stop using the humidifier
and contact Govee Customer Support.
We recommend using purified or distilled water to fill the
humidifier. Avoid using water with high mineral content.
16

Custom Mode: The humidifier will produce mist at the high and the medium setting, before
switching to the low setting.
Auto Mode: When connected to a Govee thermometer hygrometer, the humidifier will adjust
its mist according to the humidity value provided by the thermohygrometer.
When detaching the tank from the base: The humidifier’s fan will stop within 5 seconds
and mist will stop being produced. If the tank is properly placed back onto the base within 3
minutes, the humidifier will continue working; if not, the humidifier will automatically turn off.
No water left in the tank: The humidifier will stop producing mist when there is not enough
water in the tank. The fan will stop working within 5 seconds. Once sufficient water is added
back into the tank, the humidifier will restart after the Power button is pressed.
For App & Connectivity
Make sure the silicone sealing ring around the water outlet
valve is secure.
Avoid running the humidifier in a room with over
60% relative humidity.
Check the water tank for leaks. If there are leaks, contact
Govee Customer Support.
Make sure the float in the tank is in place and is
correctly installed.
Do not shake the humidifier.
Make sure to place the humidifier on a flat, level surface.
Add more essential oil. For best results, use pure essential oil.
The room may be larger than the humidifier’s effective range.
Use in a room smaller than 107–290 ft²/10–27 m².
Water leaks from the humidifier.
Clean the water tank and base chamber regularly.
Fill the water tank.
Place the water tank properly on the base.
Auto mode can’t be used or isn’t
working correctly.
Humidity may be too high. Turn down the mist level, turn off the
humidifier, or open a door or window to the room.
Condensation forms around
humidifier or windows.
Essential oil has little or no smell.
Only a little humidification effect.
Indicator light blinks red or
bright red.
Mold grows inside the humidifier.
Make sure the Govee thermohygrometer is properly connected
and is in the same room as the humidifier.
1. Cannot connect to Govee Home App.
Make sure the Bluetooth of your smartphone is enabled and your smartphone is not
connected with other Bluetooth Humidifiers.
Enable the smartphone’s Location Services.
Try connecting with another smartphone.
Make sure your app is updated to the latest version.
Make sure you have connected to the 2.4GHz network, and confirm the network is
working correctly.
Make sure the Wi-Fi password you entered is correct.
Shorten the distance between the humidifier, Wi-Fi router, and the smartphone.
Make sure your humidifier and the Wi-Fi router are not placed near. appliances that
produce electromagnetic radiation (e.g. microwave ovens, refrigerators, etc.).
If you are using a VPN, try turning it off and then connecting the humidifier. Disable portal
authentication for your Wi-Fi network. If portal authentication is enabled, this humidifier
will not be able to access your Wi-Fi network, and setup will fail. Portal authentication means
that you need to sign in to your Wi-Fi network through a web page before you can use
the Internet.
17
Other manuals for H7141
1
Table of contents
Other Govee Humidifier manuals