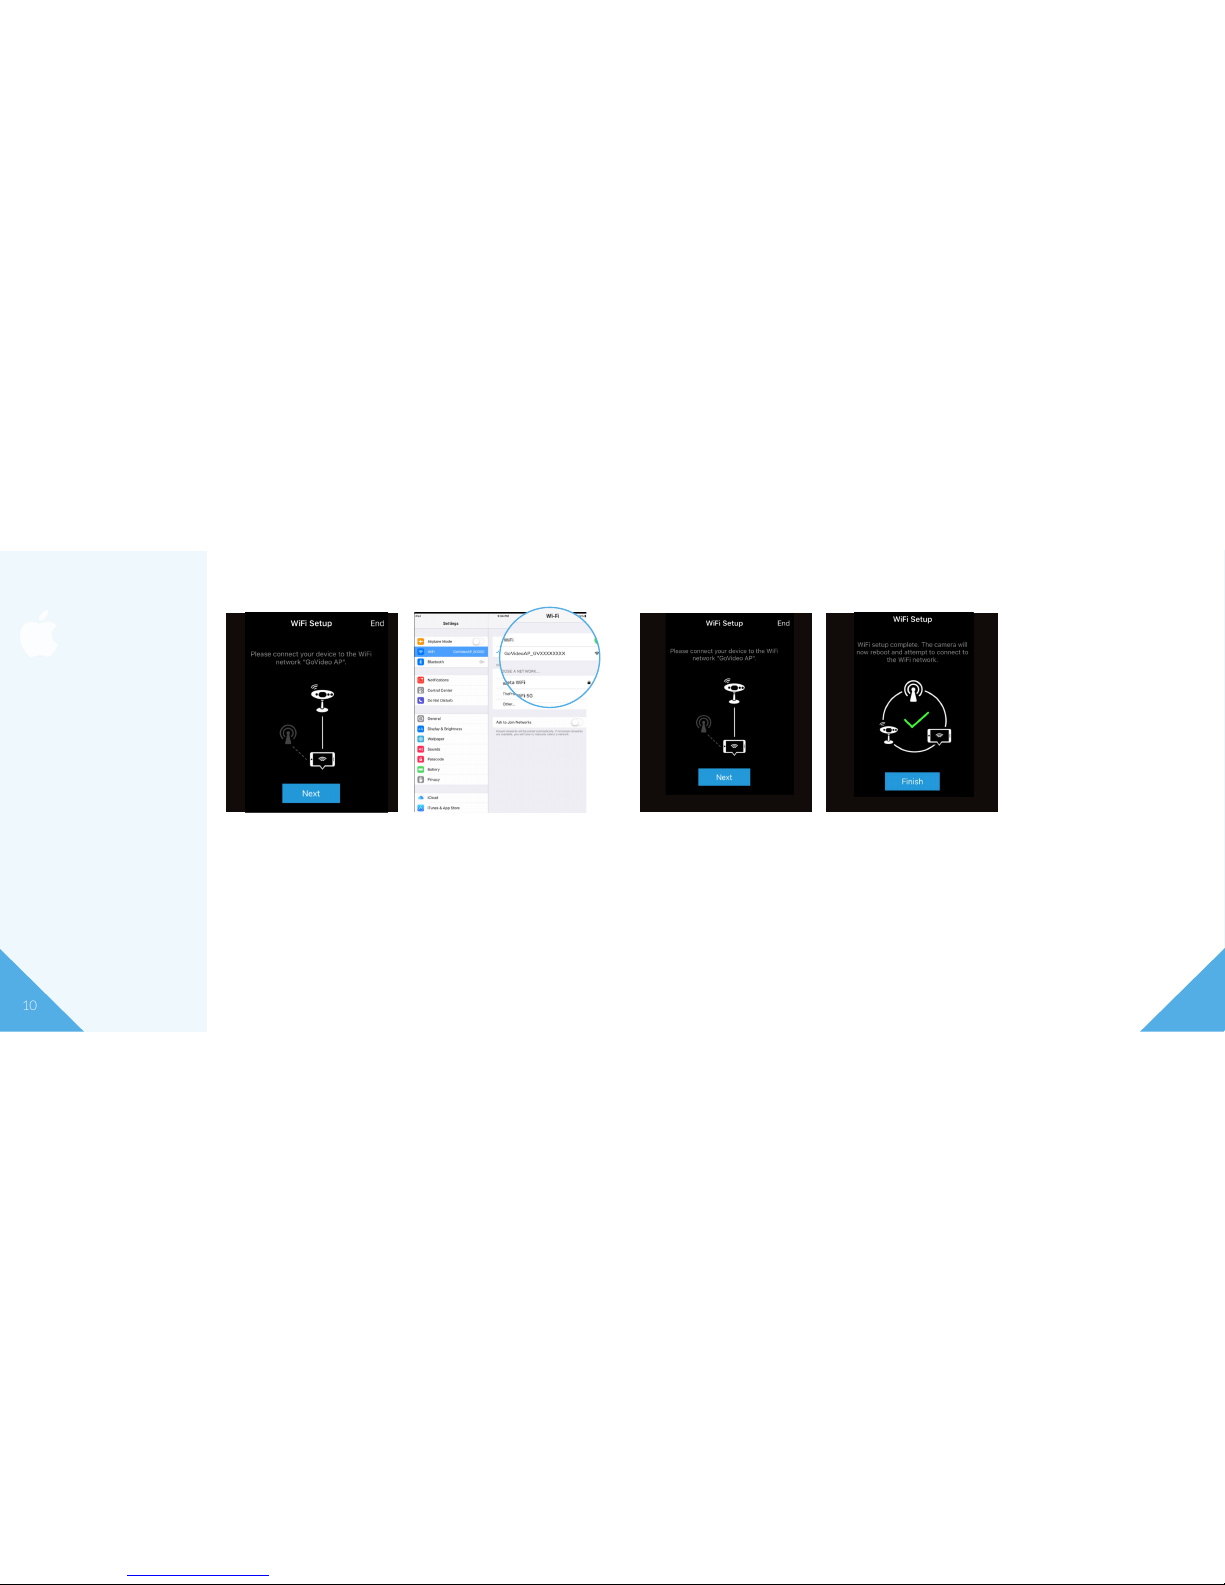
manuals.online logo
Brands
  1. Home
  2. •
  3. Brands
  4. •
  5. GoVideo
  6. •
  7. Security Camera
  8. •
  9. GoVideo Clio User manual

GoVideo Clio User manual

1
Hi, I’m Clio.
Setup and walkthrough guide
2 3
Table of Contents 05
06
08
12
16
18
- Welcome
- Activating a New User
- Working with Apple (iOS)
- Working with Android
- Renaming Your Cameras
- Time Zone Change
4 5
Welcome to the GoVideo Family!
We would like to welcome you to the GoVideo Family.
By this time you have opened the box, now let’s get to know Clio.
In the box you should nd
the following items:
(If the camera is not slow ashing green, press the reset button for 3
seconds. See the diagram.) Looking from the top down.
(Make sure to unscrew the Plastic Cover.)
Directions for preparing your camera:
1. Remove all the pieces from their plastic bags.
2. Screw antenna into camera.
3. Screw the power cord into the camera.
4. Plug the power cord into the power plug.
5. Plug the power plug into an outlet.
6. Wait 1 minute. You should see a slow ashing
green LED light.
1 camera 1 power
cord
1 antenna 1 power
plug
1 mounting
plate
1 bag of
screws
Reset Button
6 7
Activating New User
Before you can begin:
Download and install
the GoVideo App to your
phone/tablet from the
mobile app store (govideo-
cam on IOS and govideo on
Android). You will also need
your username and pass-
word which will be provided
by your GoVideo dealer.
Step 1 Step 2
Enter your email address and
the password provided by the
GoVideo dealer.
Select Login.
An activation code will be sent
to the email address you provid-
ed. Open this email to view the
4 digit activation code. Enter
this code into the GoVideo app.
Select Continue.
Step 3 Step 5Step 4
Choose a new password for the
GoVideo app. Enter the pass-
word you selected twice.
Select Submit
At this point, you are logged
into the GoVideo app and can
view a list of cameras that
are currently linked to your
account.
Choose a nickname for the
phone/tablet being used. This
selected nickname will be used
to identify and distinguish what
devices are currently logged in.
Select Continue
Examples: John’s Tablet, Jane’s Phone, etc.
8 9
Step 1 Step 2 Step 3 Step 5Step 4
Find the UID in the list of cam-
eras that matches the UID on
the back of your camera. Select
the gear icon next to the UID to
enter Setup.
Once in setup select WiFi Setup. If your WiFi is turned off in the
settings of your iPhone/iPad
you will see this screen. Please
turn on your WiFi in the iOS
settings and select Next. If your
WiFi is already turned on in
your iPhone/iPad you will not
see this screen and can skip this
step.
Enter the WiFi password for
the WiFi network you want to
connect to and then select Next.
Note: You can select the eye icon
in the password box to reveal the
password to ensure it has been
entered correctly.
If your iPhone/iPad is not
connected to the WiFi network
you want to connect the camera
to, please do so now. Once
connected to the desired WiFi
network select Next.
Working with Apple (iOS)
Before you can begin:
GoVideo cameras can only be
connected to 2.4GHz WiFi
networks. Please ensure
your iPhone/iPad is con-
nected to the same 2.4GHz
network that you want to
connect your GoVideo
camera to.
10 11
Step 6 Step 7
In order for the WiFi settings
to be pushed to the camera,
you will now need to switch the
WiFi network to the GoVideo-
AP network. To do this, go to
the iOS Settings page and
select WiFi.
Locate the GoVideoAP WiFi
network and select it to connect to
it. Once connected to the GoVideo
Ap WiFi network navigate back to
the GoVideo App.
Note: The GoVideoAP WiFi network
will not require a password to connect.
Step 8 Step 9
Once you have navigated back to
the GoVideo App, select the Next
button to connect the camera to
the WiFi network.
Note: If the WiFi password is incor-
rect the camera will not be connected
to the WiFi network and you will not
see live video stream. If you do not
see live video stream after ve min-
utes, please press and hold the reset
button for 3 seconds and return to
Step 1 (see diagram on page 5).
The camera will now be added
to the WiFi network. Please
wait 5 minutes for the camera
to reboot and then check the
live video stream.
Note: If your rst try fails to connect
the camera, please wait 30 seconds
and try again. Some customer’s rout-
ers require 30 seconds before this
step can be completed.
Working with Apple (iOS)
12 13
Step 1 Step 2
Find the UID in the list of cam-
eras that matches the UID on
the back of your camera. Select
the gear icon next to the UID to
enter Setup.
Once you are in the Setup
category, select the WiFi Setup.
Step 3 Step 5Step 4
If the WiFi is turned off in the set-
tings of your Android device you
will see this screen. Please turn on
your WiFi in the device settings
and select Next. If your WiFi is
already turned on in your Android
device you will not see this screen
and can skip this step.
Enter the WiFi password for
the WiFi network you want
to connect to and then select
Next.
Note: You can select the eye icon
in the password box to reveal the
password to ensure it has been
entered correctly.
Select the WiFi network you
want to connect the camera to
and then select Next.
Working with Android
Before you can begin:
GoVideo cameras can only be
connected to 2.4GHz WiFi
networks. Please ensure
your phone/tablet is con-
nected to the same 2.4GHz
network that you want to
connect your GoVideo cam-
era to.
14 15
Step 6
Select the GoVideoAP network for the camera you
want to connect. Once selected press the Next button
to connect the camera to the WiFi network.
Note: If the rst try fails to connect the camera, please wait
30 seconds and try again. Some customer’s routers require
30 seconds before this step can be completed.
Step 7
Note: If the WiFi password is incor-
rect the camera will not be connected
to the WiFi network and you will not
see live video stream. If you do not
see live video stream after ve min-
utes, please press and hold the reset
button for 3 seconds and return to
Step 1 (see diagram on page 5).
The WiFi settings will now be
pushed to the camera so it can
be added to the WiFi network.
Working with Android
Before you can begin:
GoVideo cameras can only be
connected to 2.4GHz WiFi
networks. Please ensure
your phone/tablet is con-
nected to the same 2.4GHz
network that you want to
connect your GoVideo cam-
era to.
16 17
Step 1 Step 2
Find the UID in the list of cam-
eras that matches the UID on
the back of your camera. Select
the gear icon next to the UID to
enter Setup.
Once in Setup select Camera
Info.
Step 3 Step 5Step 4
In the Camera information page
select the edit icon in the top
right corner of the screen.
Once the camera name is saved,
the app will return to the Cam-
eras screen. On the Cameras
screen, you will see the new
name of the camera displayed.
Enter the desired camera name
and then select Save.
Renaming Your Cameras
Prerequisites:
The customer has activated
the account and connected the
camera to the internet.
18 19
Step 1 Step 2
Find the UID in the list of cam-
eras that matches the UID on
the back of your camera. Select
the gear icon next to the UID to
enter Setup.
Once in Setup select Camera
Settings.
Step 3 Step 4
In the Camera Settings page
select Time Zone.
Use the up and down arrows
to select the time zone that the
camera is in. When nished,
press the back arrow in the top
left corner until you are back to
the camera list.
Time Zone Change
Prerequisites:
Customer has activated the
account and connected the
camera to the internet.
866-511-0000
www.GoVideo.com

Other manuals for Clio

1

Other GoVideo Security Camera manuals

GoVideo SONA Manual

GoVideo

GoVideo SONA Manual

GoVideo NOA User manual

GoVideo

GoVideo NOA User manual

Popular Security Camera manuals by other brands

Moog Videolarm SView FDP7C12N-9 Installation and operation instructions

Moog Videolarm

Moog Videolarm SView FDP7C12N-9 Installation and operation instructions

Steren CCTV-207 user manual

Steren

Steren CCTV-207 user manual

Panasonic AW-HE38HKPC operating instructions

Panasonic

Panasonic AW-HE38HKPC operating instructions

COHU 2740 SERIES Installation and operation manual

COHU

COHU 2740 SERIES Installation and operation manual

ACTi Z94 Hardware manual

ACTi

ACTi Z94 Hardware manual

Teledyne Quasar Premium Quick install guide

Teledyne

Teledyne Quasar Premium Quick install guide

JVC KY-PZ100 Configuration guide

JVC

JVC KY-PZ100 Configuration guide

Dalsa P-2 Series user manual

Dalsa

Dalsa P-2 Series user manual

Samsung 911SNV6430 quick start guide

Samsung

Samsung 911SNV6430 quick start guide

TeleEye DM870 user manual

TeleEye

TeleEye DM870 user manual

TVT Digital TD-9452A3-PA quick start guide

TVT Digital

TVT Digital TD-9452A3-PA quick start guide

Euro Video EVC-TI-BX213D user manual

Euro Video

Euro Video EVC-TI-BX213D user manual

Super Circuits CD33-2 user manual

Super Circuits

Super Circuits CD33-2 user manual

Vivotek MD7560X Quick installation guide

Vivotek

Vivotek MD7560X Quick installation guide

EverFocus EHD630s operating instructions

EverFocus

EverFocus EHD630s operating instructions

ELRO C703IP.2 manual

ELRO

ELRO C703IP.2 manual

Swann StyleCam SW211-STY Specification sheet

Swann

Swann StyleCam SW211-STY Specification sheet

I-View AnyCam DM-12MIPS Operation manual

I-View

I-View AnyCam DM-12MIPS Operation manual

manuals.online logo
manuals.online logoBrands
  • About & Mission
  • Contact us
  • Privacy Policy
  • Terms and Conditions

Copyright 2025 Manuals.Online. All Rights Reserved.