GP GONPED User manual

OWNER'S MANUAL 2022
GONPED E-BIKES
GONPED E-BIKE OWNER’S MANUAL

Introduction
Thank you for purchasing an GONPED E-BIKE .We believe this technology, with the benefits of electric
propulsion,provides you with the perfect vehicle to increase your mobility,extend your normal rides, and best of all,
increase your fun!
Firstly ,please take the time to read through and understand the instructions. We highly recommend you seek the
assistance of your local bike shop with assembly.
The E-BIKES are designed for all-terrian riding but also for regular on-road riding. Please do obey all laws and regulations
regarding Electric Assisted Bicycles and/or Motorized Vehicle regulations and their usage in your area. PURSUIT
recommends you to ware a helmet during riding this electric bike.
This Owner's Manual provides important information regarding the assembly, riding, and maintenance of this bike, please
make sure reading it before you take the bike out for the first ride.
Page 1

Warnings on Safety
You need to practice riding electric bikes, it can be dangerous to ride. The user or consumer assumes all risk of personal
injuries, damage, or failure of the bicycle or system and all other losses or damages to themselves and others and to any
property arising as a result of using the bicycle. There are risks related to the use of an electric bicycle which cannot be
predicted or avoided, and which are the sole responsibility of the rider. As with all mechanical components, the bicycle is
subjected to wear and high stresses. Different materials and components may react to wear or stress fatigue in different
ways. If the design life of a component has been exceeded, it may suddenly fail possibly causing injuries to the rider. Any
form of crack, scratches or change of coloring in highly stressed areas indicate that the life of the component has been
reached and it should be replaced. For replacement parts, technical information and warranty assistance, please contact
us.
PLEASE DO NOT DISASSEMBLE THE ELECTRONIC COMPONENTS IN ANY CASE !
Page 2

General Warnings
IMPORTANT INFORMATION BEFORE YOUR FIRST RIDE
BATTERY
Fully charge the batteries prior to the first ride. Remove the battery before attempting to service, making
adjustments or performing any maintenance on this electric bike. Removing the battery will help ensure
the motor is not started inadvertently while service or maintenance is being performed. See Page 12 for
battery removal instructions. The battery should be removed anytime the bike is stored or is left
unattended to prevent unauthorized use or accidental engagement of the motor. Keep out of reach of
children. Failure to remove the battery may result in serious injury or death.
Do not use a broken battery because its attery acid is highly corrosive and can cause serious burns if it
comes in contact with your eyes or skin. Please turn to a doctor for medical assist if this occurs.
You may charge your dual batteries at the same time or separately, make sure the battery (batteries) is (are)
fully charged before your first ride. Watch out for the electric shock when attempting to plug the charger plug.
Page 3

Gerneral Warnings
Brakes application
During your ride, the excess force on the front brake, can cause you to lose balance and fall. This is an
electric bike, it shares the same mechanic features with non-electric bikes. Pursuit E-bikes recommends a
mild start and also avoid harsh braking.
The Pursuit E-bikes comes equipped with hydraulic disc brakes. These brakes are different from other general
types of brakes associated with bikes. Disc brakes squeeze a hub-mounted disk between two pads. Stopping
power on your bike can vary depending on adjustments and pad thickness and wear. Consult your local bike shop
about brake options and adjustments according to your specific needs.
Disc brakes come with sharp edges that can cut you, make sure you or any other people take extra
caution when touching it if they have to. Also they can because extremely hot after using, DO NOT touch it
until it cooled down.
More Brake Warnings
Disc brakes have varying amounts of braking power depending on adjustments and pads conditions. Excessive
or sudden application of the front brake could pitch the rider over the handlebars which may result in serious injury
or death.
Check the braking system, and make sure it functions properly before the first ride. Pursuit E-bikes has examined
every single bike before packing, but the transportation could bring potential damage to the brakes, check it before
each ride. Page 4

Gerneral Warnings
TRANSPORTATION OF PURSUIT E-BIKES
- Always remove battery (batteries) from bike before transporting the bike
- Never lay your bike on the chain side, use the kick stand or lay it to any strong vertical object that is
enough to support the bike to stand.
INSPECTION BEFORE EACH RIDE
Before each ride, make sure you go through the check list to ensure a safe ride. Never ride a bike with damages
or deffects, get it repaired or turn to local bike shops for repair.
Tire inflation
Make sure to check tire pressures using a tire pressure gauge. The tires should be set between
7psi and 15 psi.
Tires and Wheels
1.Spin each wheel and check that the tires are in good shape with no cuts or abrasions. If these are found,
replace the tire immediately.
2.Inspect the rim for trueness by spinning it and watching for any side-to-side or up-and-down wobble. If any
movement is noted do not ride this bike until the rim is repaired.
Page 5

Gerneral Warnings
Handlebar stem and front wheel
Make sure the front wheel and handlebar stem are aligned in the proper orientation of each other. Turn the handlebar from
side to side with the front wheel locked between your knees to test the stem connection of the fork. If any movement is noted
do not ride the bike until this is corrected. Inspect cable routing to be sure the handlebars can turn freely without binding or
pinching the cables. Check to be sure that your handgrips on the handlebars are in good condition and the bars are not
protruding through the grip.
Seat Position
The saddle should be adjusted for proper fit and is an important factor in riding safely. Place your pedals in the 6 o’clock and
12 o’clock position. Your bottom leg should be very slightly bent when the ball of your foot is placed on the lower pedal. If
it’s bent too much you need to raise the saddle. If you have to rock your hips to reach or can’t easily reach, you must lower
the saddle. Ensure that the saddle is straight and level.
Seat and seat post
Check that the seat is securely mounted on the seat post by lifting up and down on the seat. This should not tilt or move. Next,
check the security of the seat post in the frame by attempting to rotate the seat. If the seat rotates, then the seat tube is not
properly clamped into the frame.
Respect local regulations and rules / Private Property
Remember each area in which you may ride your bike may have specific regulations.
Always respect private property and never trespass. Respect the rights of others with
whom may be sharing the trail with you; ie: hikers, cyclists, equestrians. Stay on your
designated trail and do not destroy vegetation and minimize your impact on the
environment. If you are unsure of your local laws or regulations please
contact your local conversation officer before riding on designated wildlife areas.
Page 6

Gerneral Warnings
An electric bike like any mechanical device is subject to fatigue, stress
and wear. Over time and due to use, the frame and its components can
fail. The environment and type of riding the bike is subjected to can
greatly reduce its useful lifespan. If proper care and maintenance are not
performed your bike and or its components can fail causing serious injury
or death.
Page 7

Thunder
Page 10
Unbox and Assembly
Pursuit E-bikes recommends that all the ebike be assembled, inspected and adjusted by a professional ebike
mechanic or ebike shop before riding. For more information on assembly, check out our assembly and maintenance
videos at www.jacsebikes.com
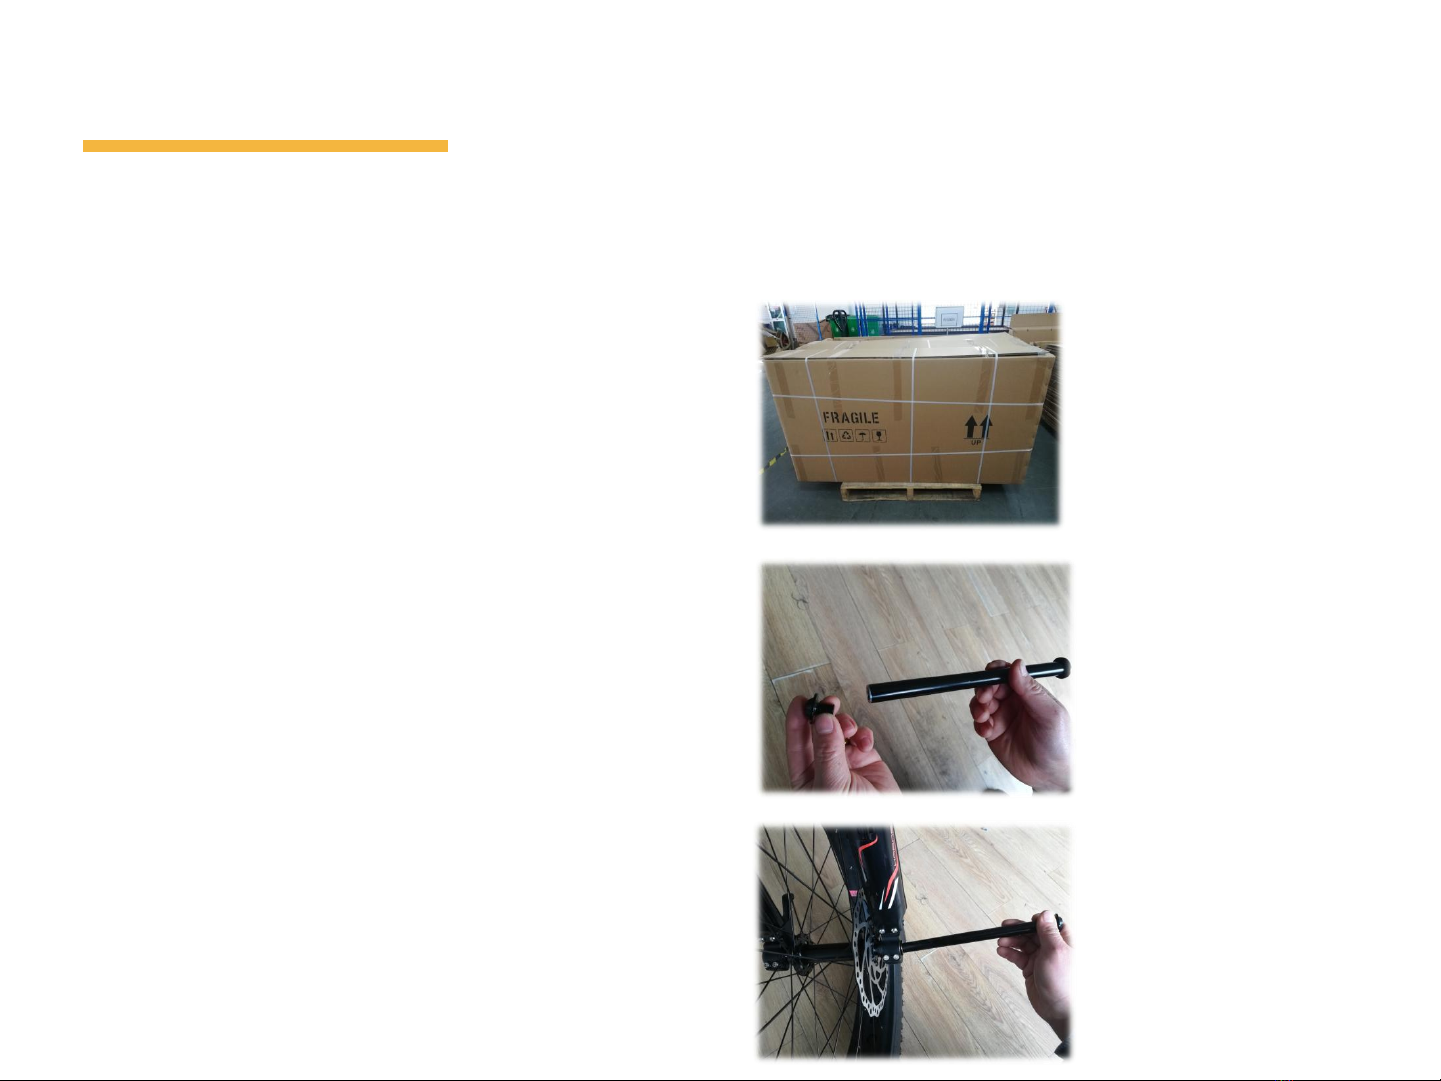
2-Remove all bubble wrap and
other packaging materials and
place them back in the box
1. You will need :6mm Hex key
1-Pls remove the bike from the box
carefully.
a. Remove the front wheel and
front fork,and pedal and charger
from the box first.
b. Take out all the rest parts of your
ebike from the box.
3.Attach the front wheel
a. Place the axle into the Barrel
shaft of the dropouts on the front
fork.
b.Tighten the nut on the left and
right side.
Page 12

Unbox and Assembly
c.Also tighten the silver 2 nut(left
and right) to fix the front wheel.
4.Installing the handlebar:
a. Using a 6mm Hex key, remove
the 4 screws from the front of the
stem and remove the bracket.
b. P lac e the han dleb ar on t h e
stem ,then put the bracket and 4
screws back into place.
Page 13
Unbox and Assembly
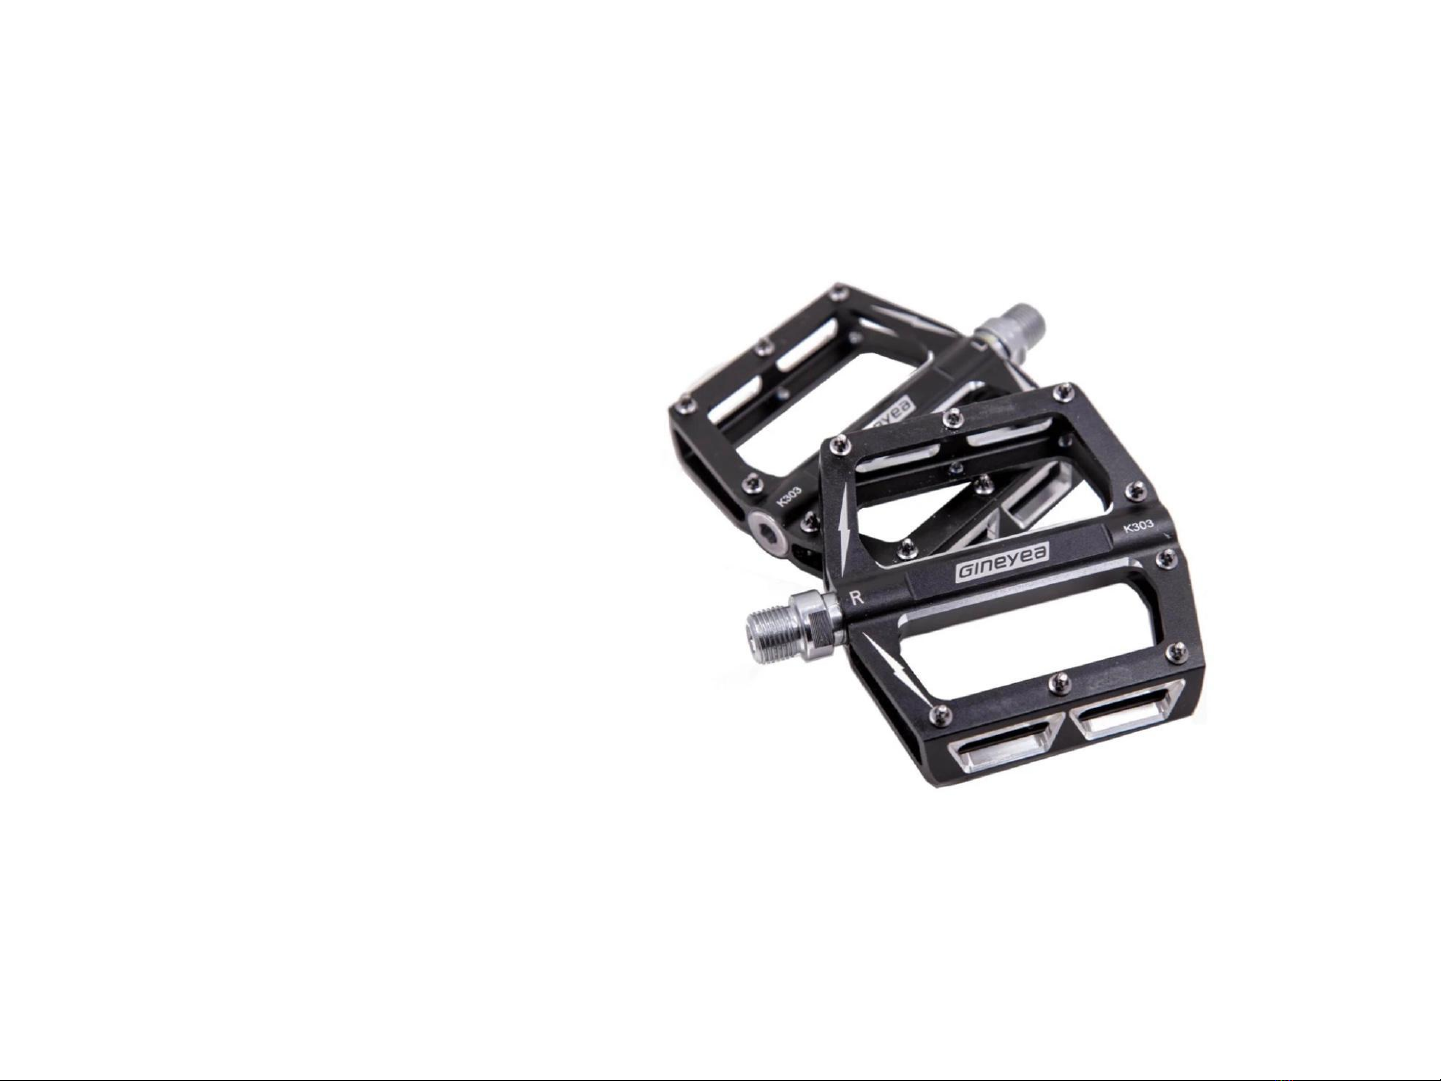
5.Attach the pedals
a. The pedals are left and right
side specific. The end near the
threads will have an L or R on
them,indicating Left and Right.
b. Put a small dab of grease on the
th r ead s of each p e d a l before
inserting into the crank.
c. T h e r ig h t s i d e i s t h r e a d e d
normally, and the left is reverse
threaded. This must be screwed in
o p p o s i t e t o t h e r i g h t ( t o t h e
left).The greased pedal should
threa d o n s m oot h l y, DO N O T
CROSSTHREAD!
Page 14

Bike Using Gudience
1. How To Charge And Power On
1) Battery
a.The battery will be mostly charged when you receive it. It is better to use
it first to drain it down and then charge it. This is also the case if you
haven’t used the bike for a few months.
b. To charge the battery, remove the rubber plug from the side of the bike.
Plug the charger into the power outlet and wait until the light on the
charging unit is illuminated. Plug the other end of the cord into the bike.
The light will change to green when it’s charged.(2 batteries,two charging
ports).
c. There is a charging port that you can charge for the battery one time.
Page 15
Bike Using Gudience
d. The battery does not have to be installed in the bike to charge
i. Remove the battery from the bike by inserting the key, turning it 90 degrees and pulling firmly on the handle.
iii. The charger will get hot, so make sure to keep it away from all flammable materials and surfaces.
iv. During normal use you can charge it after every ride regardless of battery level, there is no battery memory
and therefore consistent charging won’t damage the battery.
v. The charging unit will automatically stop charging once the battery is full for safety.
vi. Always charge in dry, ventilated conditions away from sunlight, ideally 50-80 degrees Fahrenheit.
vii. Only use the original charger, DO NOT use any aftermarket chargers or charging accessories.
Page 16
Bike Using Gudience
e. For long term battery storage, it is best to leave the battery at about 20% (1/4 lights). Always store the battery
in a cool place (colder than 65*F). For best results, do not store for longer than 4 months without cycling the
battery; use it to de-charge, then re-charge to 20%.
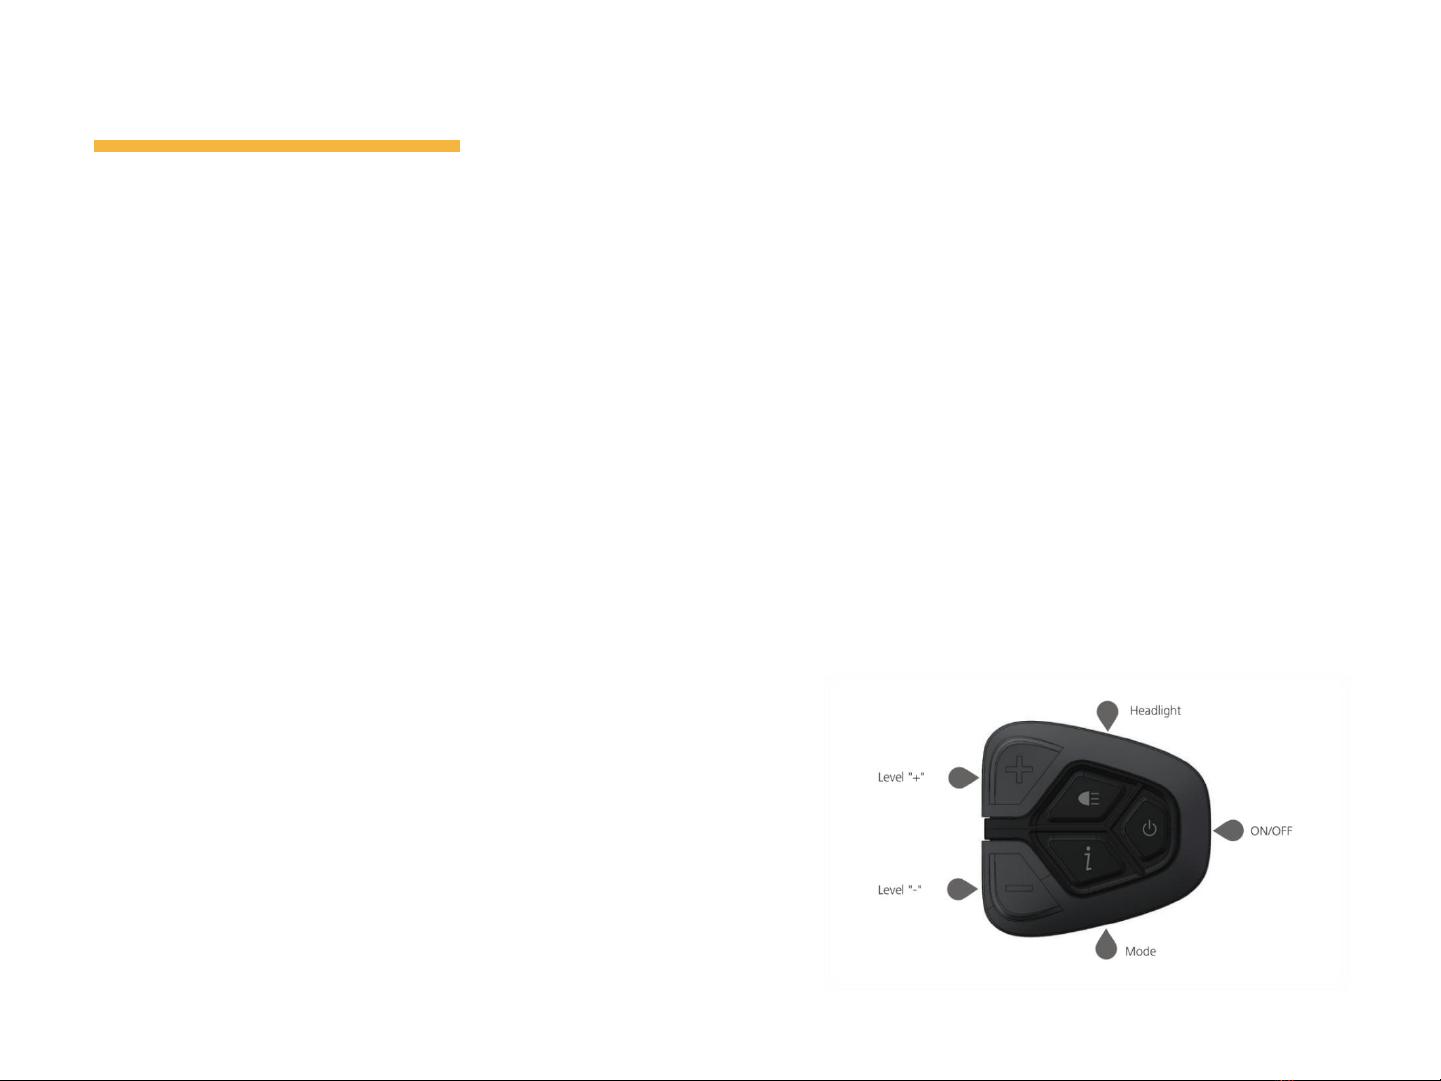
2- Powering the Unit On
a. Make sure the battery is fully inserted and locked into the bike.
b. Get on the bike, ready to ride.
c. Turn on the switch of the display.
Page 17

Bike Using Gudience
General riding information
Once you have inspected your bike and all components are in proper working condition, you are ready to test
ride your new bike. A few important general rules for riding include but are not limited to:
1.Strap on your helmet that meets safety testing requirements.
2.Have reflectors and lights installed on your bike.
3. Use proper hand signals.
4.Avoid loose clothing.
5.Ride on the correct side of the roadway with flow of traffic.
6.Always wear bright color and reflective clothing.
7.Ride single file if riding with others.
8.Obey all traffic laws and regulations and traffic signals.
9. Watch for parked car doors opening unexpectedly.
10.Watch for pedestrians stepping out, pets and children playing near roadways.
10. Keep a safe stopping distance between you and other vehicles.
11.Never carry a passenger Never ride with earbuds or headphones.
12. Use caution when crossing railroad tracks and carefully cross at a 90 degrees angle.
13.Mount a horn or bell on to your bike to signal others of your approach.
Page 18

Maintenance and Inspection
1- Before First Ride (After Initial Build and Inspection):
a. Adjust seat to comfortable height.
b. Adjust the saddle rails fore/aft positioning for comfort.
c. Adjust the handlebar, shifter and brake lever position to your liking.
d. Squeeze brake levers and test the braking power with the bike in a stand, or just walking alongside the bike.
DO NOT attempt to ride the bike if the brakes are not adjusted properly.
2- Before Every Ride:
a. Check tire pressure and tread wear. Check the sidewalls for damage.
b. Check the brakes, ensure brakes have adequate power and appropriate amount of brake pad remaining.
c. Check that wheels are straight and turning freely. Ensure spokes are consistently tight.
d. Check the Chain tension and lube the chain to reduce friction and increase shifting precision.
e. Check that the handlebars and stem are secure; and tighten all stem bolts
3- After Every ride:
a. Wipe down frame with soap and water. DO NOT use a power washer or high-pressure hose, this could
damage the motor and electrical components.
b. Mud and dirt can be washed away with a low-pressure hose, avoiding direct flow with the electrical
components and motor
assembly.
4- Monthly Maintenance:
a. Check for loose spokes.
Page 19

Maintenance and Inspection
i. Squeeze the spokes together to check the spoke tension. Spokes should flex slightly and return to their
original position.
See your local bike shop for wheel truing and spoke replacements if necessary. Tighten any loose spokes with a
spoke wrench.
b. Check forks for damage and air pressure (if applicable).
i. The fork legs should move freely. Check the seals where the stanchions enter the lower legs of the forks.
These seals can wear over time, and if not kept clean can damage the fork stanchions as well.
c. Check cassette and chainring for wear/damage.
i. Ensure the chain flows freely around the front chainring and each gear in the rear. Inspect the teeth in the
front chainring as well as each individual cog in the rear. It is typical for grease and dirt to build up along the
sides of the chainring, cassette cogs, and pully wheels on the rear derailleur.
ii. Use a bicycle degreaser or chain cleaner and a brush to clean and degrease the chain and drivetrain
components. Re-Lube with bicycle specific chain lube, and wipe off excess.
5- General Safety Tips
a. The user assumes the responsibility for the risk of injury or death as a result of riding or using products. It is
the responsibility of the user to know and obey all local laws, rules, and regulations regarding the use of electric
assisted bicycles.
b. Always wear an appropriate helmet when riding.
c. Your bike is designed for use by persons 16 years of age and older. Always follow local laws and regulations
regarding age restrictions and the use of electric bicycles.
Page 20

Maintenance and Inspection
d. Riders must have the physical coordination, reaction time and mental capacity to ride and manage traffic,
road conditions, sudden
situations, as well as respect and obey the local laws governing bicycle and electric bicycle use.
e. If you have an impairment or disability, consult your physician before riding any bicycle.
f. Turn off battery before performing any repairs or maintenance. Any turning of the cranks will cause the motor
to engage, which could result in injury.
Page 21

Trouble Shooting
No
Faults
Causes
Troubleshooting
1
Battery gauge lights up
but bicycle does not
operate
1)Power cord is not properly plugged into
battery2)Brake cut-off engaged or faulty3) Speed
sensor adjusted too low4) Blown fuse5)Loose motor
wire connector6)Loose connectors7) Broken
wire8)Throttle disengaged or faulty
1) Properly plug in power cord to battery2) Disengage brake
cut-off or replace3) Adjust speed sensor4) Replace fuse5)
Check motor wire connector6) Check all connectors7) Inspect
all wires8) Engage throttle or replace
2
Bicycle operates but
battery gauge does not
light up
1)Loose connectors2) Damaged wires3) Faulty battery
gauge
1) Check throttle connectors2) Inspect all wires3) Replace
battery gauge
3
Bike has reduced speed
and/or range
1) Speed sensor is not adjusted2) Low batteries3)
Faulty batteries4)Low tire pressure5) Brakes dragging
against rim
1) Adjust speed sensor2)Charge batteries for recommended
time3) Replace batteries4)Inflate tires to recommended
pressure5) Adjust brakes and/or rim
4
Bicycle has intermittent
power
1)Loose connectors2) Loose fuse3) Damaged wires
1) Check all connectors2) Check fuse connector3) Inspect all
wires
5
Charger light does not
operate
1)Power outlet faulty2)Charger is not plugged to wall
or battery properly3)Charger light or charger is faulty
1) Try another outlet2) Check all plugs3) Replace charger
6
Charger completes
charging in an unusually
short amount of time
1) Faulty charger2) Faulty batteries
1) Replace charger2) Replace batteries
7
Chain jumping off
freewheelsprocket or
chain ring
1) Chain ring out of true2) Chain ring loose3) Chain
ring teeth bent or broken4) Rear or front derailleur
side-to-side travel out of adjustment
1)Re-true if possible, or replace2)Tighten mounting
bolts3)Repair or replace chain ring/set4) Adjust derailleur
travel
8
Gear shifts not working
properly
1) Derailleur cables
sticking/stretched/damaged2)Front or rear derailleur
not adjustedproperly3)Indexed shifting not adjusted
properly
1) Lubricate/tighten/replace cables2) Adjust derailleur3)
Adjust indexing
Page 22
Table of contents


