Elah CHASER 1000 User manual

Owner’s Manual
EL–C1000
All rights reserved, photos and content property of
ÓElah International LLC

Page 2
Table of Contents
Front Cover------------------------------------ 1
Table of Contents---------------------------- 2
Technical Information----------------------- 3
Warning Statement-------------------------- 4
Safety Information--------------------------- 5
Chaser 1000 Parts List-------------------- 6
Tool Kit & Assembly------------------------ 7–10
Seat Installation------------------------------ 10 - 11
Seat Adjustment----------------------------- 11
Installing the Handlebar------------------- 12
Handlebar Adjustment--------------------- 13
Folding the Handlebar -------------------- 13
Charging the Batteries ------------------- 14
Chaser 1000 Operation ------------------- 15
Adjusting the Brakes --------------------- 16
Maintenance --------------------------------- 17
Battery Replacement ------------------- 17
Troubleshooting -------------------------- 18
Warranty -------------------------------- 19

Page 3
Technical Information
Type of Motor 48V Hub Brushless DC Motor
Motor Power 1000W
Battery Type Sealed Lead Acid Battery x4 (48V12Ah)
Charger 100-240VAC50-60HZ,1.8A-2.0A amps
Charging Time 6-8 hours
Rated Speed 33km/h ---38km/h (23.6 mph)
Single Charge distance Up to 35KM (21.75 miles)
Maximum Capacity 158kg (350lbs)
Unit Net Weight 1000W/48V12Ah lead acid battery 64KG (141lbs)
*Note: Speed and distance may vary depending upon the road condition and
weight load.

Page 4
Warning Statement
STOP ----- IMPORTANT!
Before you ride your Chaser 1000, please read this carefully:
Your existing insurance policy may not provide coverage for your
Chaser 1000 or electric vehicles. You should contact your insurance
company to confirm if coverage is provided.
Please do not ride your Chaser 1000 until you have read this owner’s
manual completely and you fully understand all its contents. This
manual contains critical information for your safety. If you have any
questions about the safe operation of your Chaser 1000, you should
contact your authorized dealer.
It is very important that you follow all the safety instructions within this
manual to ensure maximum safety.
Failure to comply with all the standards outlined in this manual could
result in fire/ or serious injury.
Authorized dealers will not be liable for any damage or injuries
caused by unsafe or faulty assembly or unauthorized repairs. Any
repairs carried out by unauthorized service technicians are the sole
responsibility of the owner and the Warranty becomes void.
Our Chaser 1000 range of products is designed to be ecologically
conscious, please dispose of used batteries in compliance with local
laws.
If you are using your Chaser 1000 outdoors, please be aware of all state
and local laws governing the use of such vehicles. State and local
ordinances may vary, and you must make sure you comply with all
applicable laws.

Page 5
Safety Information
Before riding your Chaser 1000, please read and be sure you understand this
manual completely. The Chaser 1000 is not a toy and should always be operated
safely. Elah International LLC will not be liable for any damages or injuries to any
person. Any questions you may have about the safe operation of your Chaser
1000 should be directed to your authorized dealer.
Failure to comply with the safety warnings and operating instructions included in
this manual could result in serious injury to the operator and others.
The Chaser 1000 is not designed for end user repairs. An authorized Chaser
1000 repair technician should carry out repairs. We will not be liable for any
damage or injuries due to repairs by unauthorized individuals.
The Chaser 1000 should only be operated by individuals 16 years of age or
older. The Chaser 1000 is not a toy and should always be used responsibly.
Safety Instructions
ü Always wear approved safety equipment when operating the Chaser 1000
ü Observe the maximum weight capacity of 350lbs
ü Only one person should ride the Chaser 1000 at a time.
ü The Chaser 1000 should always be operated safely under safe conditions.
ü Before riding, inspect the Chaser 1000 to ensure all quick releases and
pivot points are secured properly. Make sure the handlebars are secured
and the hand brake is in operating condition.
ü Check the battery to ensure it is properly charged.
ü The power ignition must be off when charging.
ü Remove your Chaser 1000 from charge once it is charged. Do not
leave the charger plugged in any longer than 8 hours.
ü Charge the battery when only the low power mark is illuminated on the
display.
ü Do not expose the Chaser 1000, batteries, or charger to wet conditions.
ü Always drive on paved surfaces.
ü Be careful when riding on wet or uneven surfaces.
Always wear a helmet when riding the Chaser 1000

Page 6
Chaser 1000 Parts List
1. Front Wheel
2. Disc Brake
3. Electric motor
4. Headlight (pod)
5. Front fork
6. Basket
7. Folding Handlebar Connection
8. Ignition Key (pod)
9. Throttle
10. Headlight Switch
11. Green Button for Horn
12. Handlebar height adjustment
13. Power Indicator (pod)
14. Seat Post
15. Seat Height Adjustment
16. Handbrake
17. Safety Wheels
18. Rear Wheels
19. Battery Cover
20. Electrical Connectors
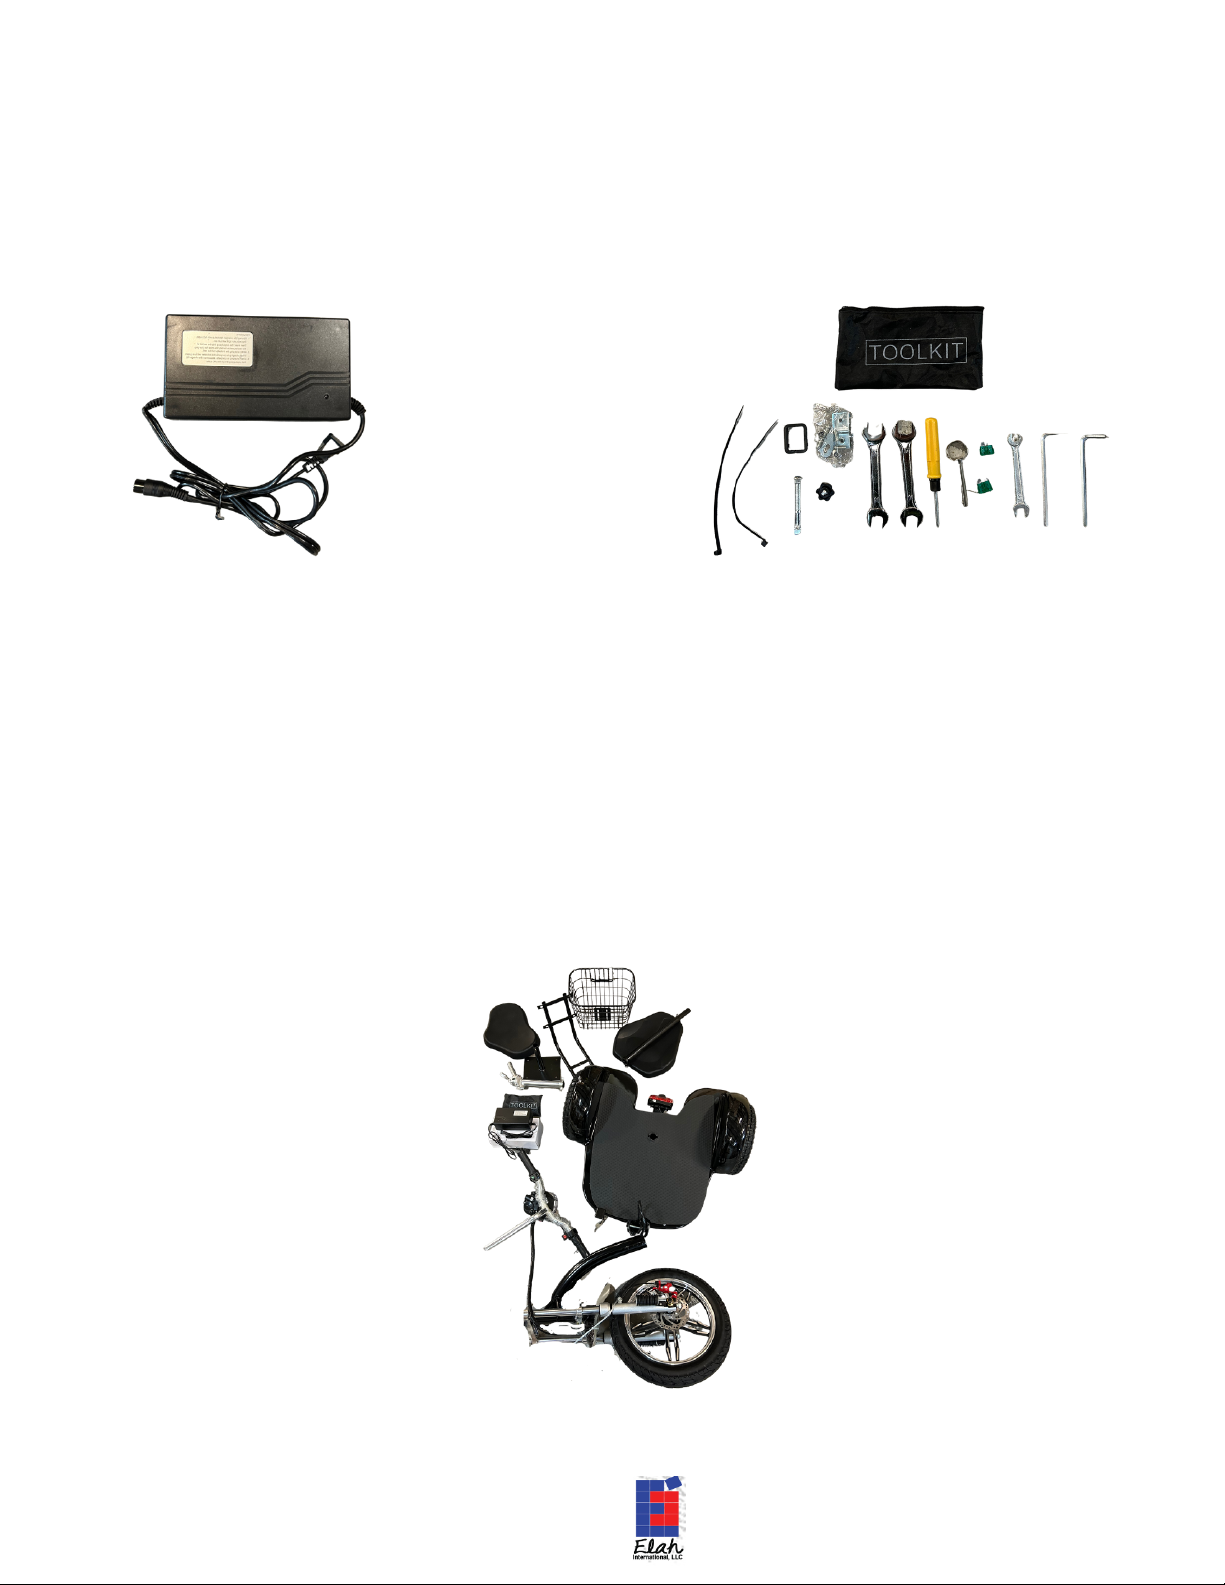
Page 7
Tool Kit
Charger
Assembling the Chaser 1000
1.) Unpack the Chaser 1000 and inspect all the parts to ensure all are
included.
Tool
Kit

Page 8
2.) Place your Chaser 1000 on a flat, clean surface. Place a block 3.5”
under the front, by the battery. This will make it easier for the next
step.
3.) Remove the Battery Cover at the base of the scooter. Unscrew the
two bolts at the end of the base.
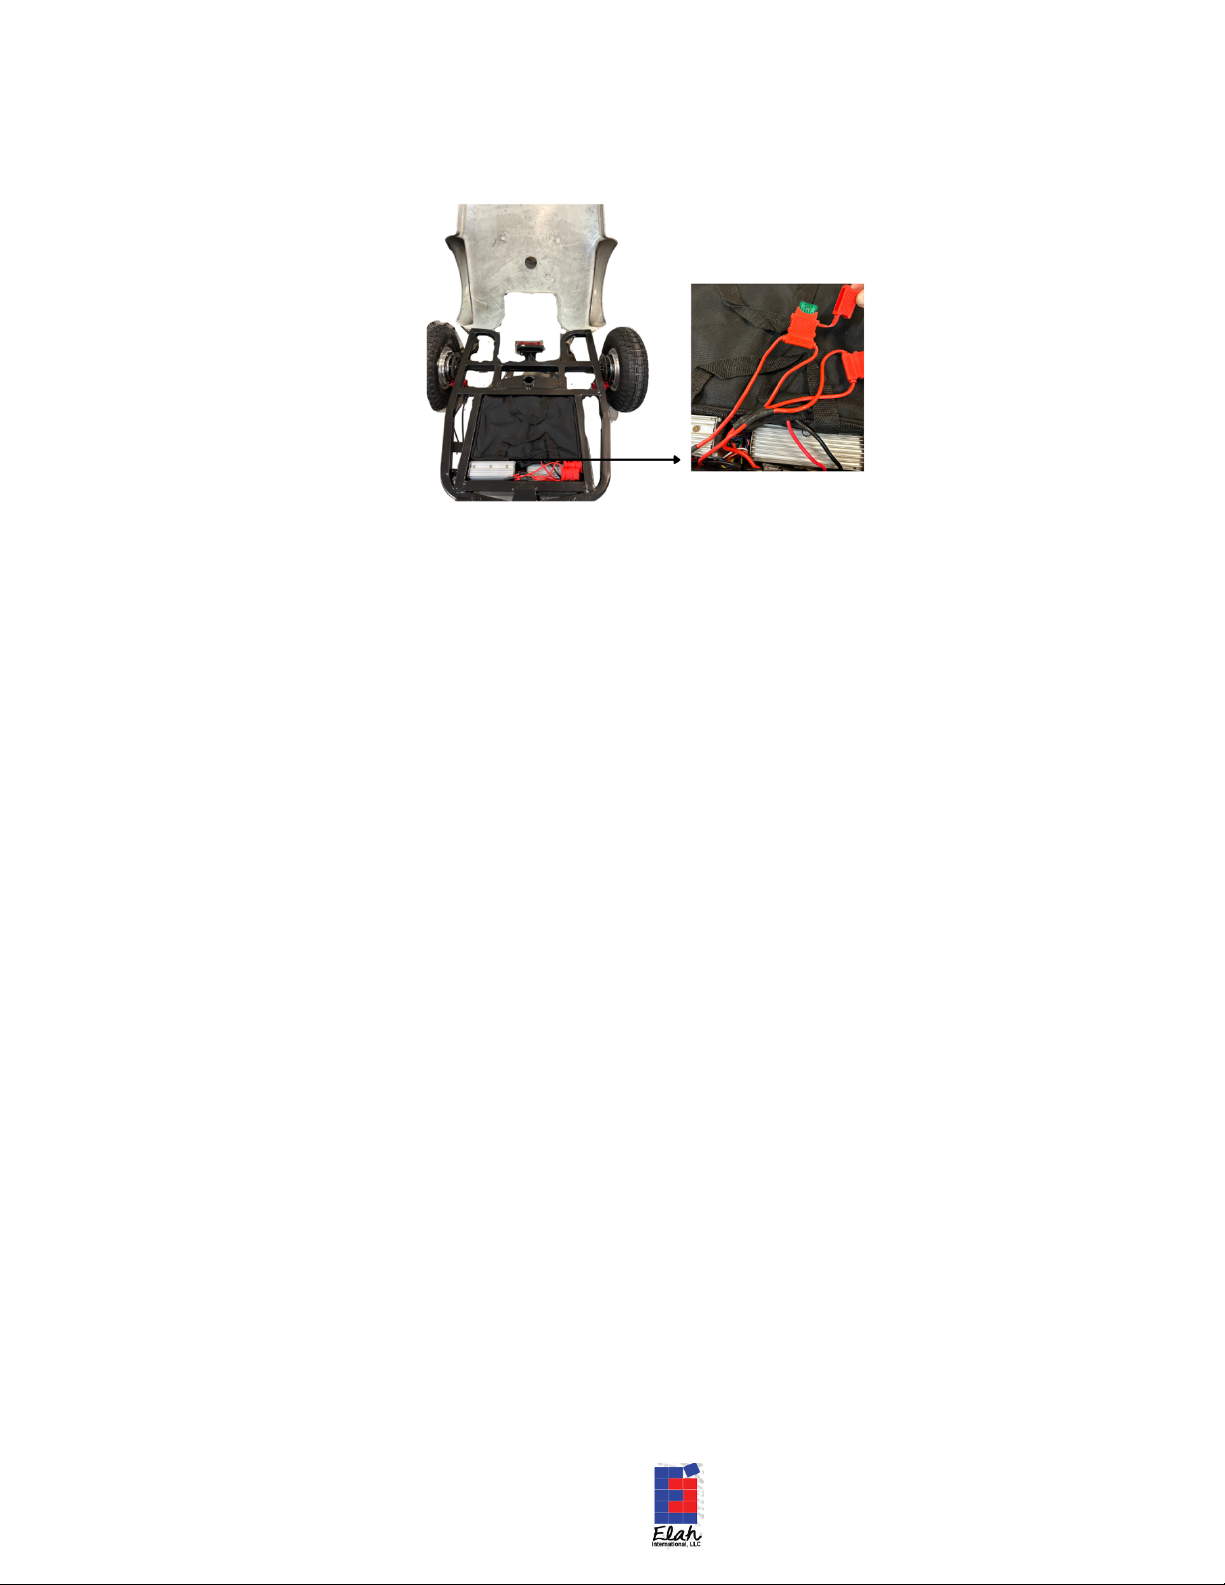
Page 9
4.) Once the cover is removed, locate the Red Inline Fuse Folder. Insert
the Green 30 AMP blade fuse into the Red Inline Fuse Folder. Tuck
the wires without pinching and reinstall.
5.) After reinstalling, the battery pack put the base cover back on and re-
screw the bolts to the appropriate holes.
6.) Connecting the neck to the base - Remove the bolts and nuts from the
connecting tube clamp. Place the connecting tube into the top opening.
Align the bolt holes.
7.) Slide the two bolts through the holes connecting the tube and neck.
Twist the bolts, do not hammer them through.

Page 10
8.) Tighten the bolts and nuts using the wrenches in the tool kit. Also,
tighten the small bolts on the outside of the tube clamp securely.
9.) To assemble the seat, make sure that the parts needed are in your
possession (backrest, seat, seat post, and backrest railing.) Next,
unscrew the bolts in the backrest cushion and seat cushion. Next,
screw the post to the seat cushion and the railing to the backrest.
Seat Installation

Page 11
10.) After the seat is installed, make sure to lock it in place with the pin
under the base of the scooter.
Seat Adjustment
To adjust the seat, undo the quick release, push the brass button, and adjust as
required.
To remove the seat pole, undo the two bolts and then lift the seat pole.
When installing the seat make sure these bolts are tight.
WARNING: Do not attempt to
adjust the seat during operation.
Always remove the key before
adjusting. Failure to do so could
result in personal injury or
damage to the equipment.
Page 12
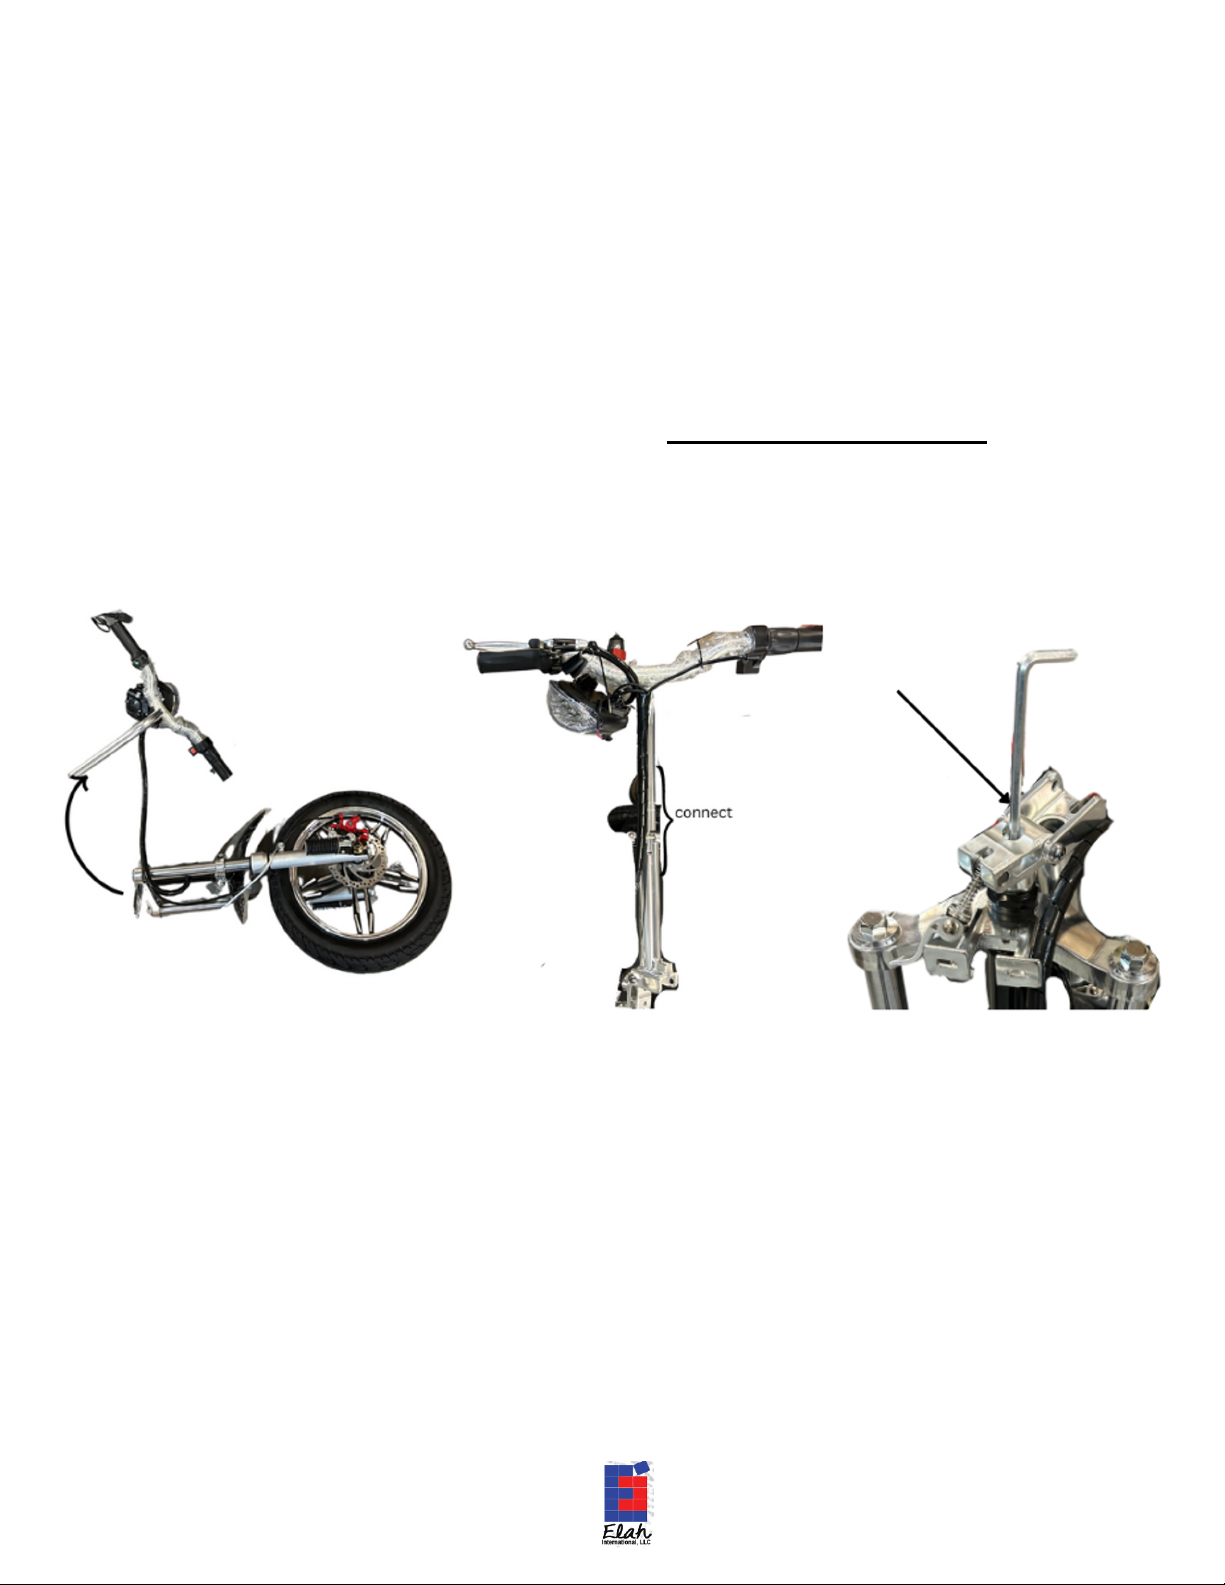
Installing the Handlebar
11.) Insert the handlebars fully into the tube. Insert the spline into
the slot located in the center of the forks. Make sure the front tire
and handlebars are both facing forward and straight. Release the
quick connect latch from the bottom of the handlebar. Press the
silver button located on the right side of the quick-connect latch to
fold the handlebars over. Locate allen head bolt in the center of the
forks. Keep handlebars in the same forward position and
tighten allen head bolts securely. Double Check This Step. Flip
the handlebars backup and secure the quick connect latch.
Page 13
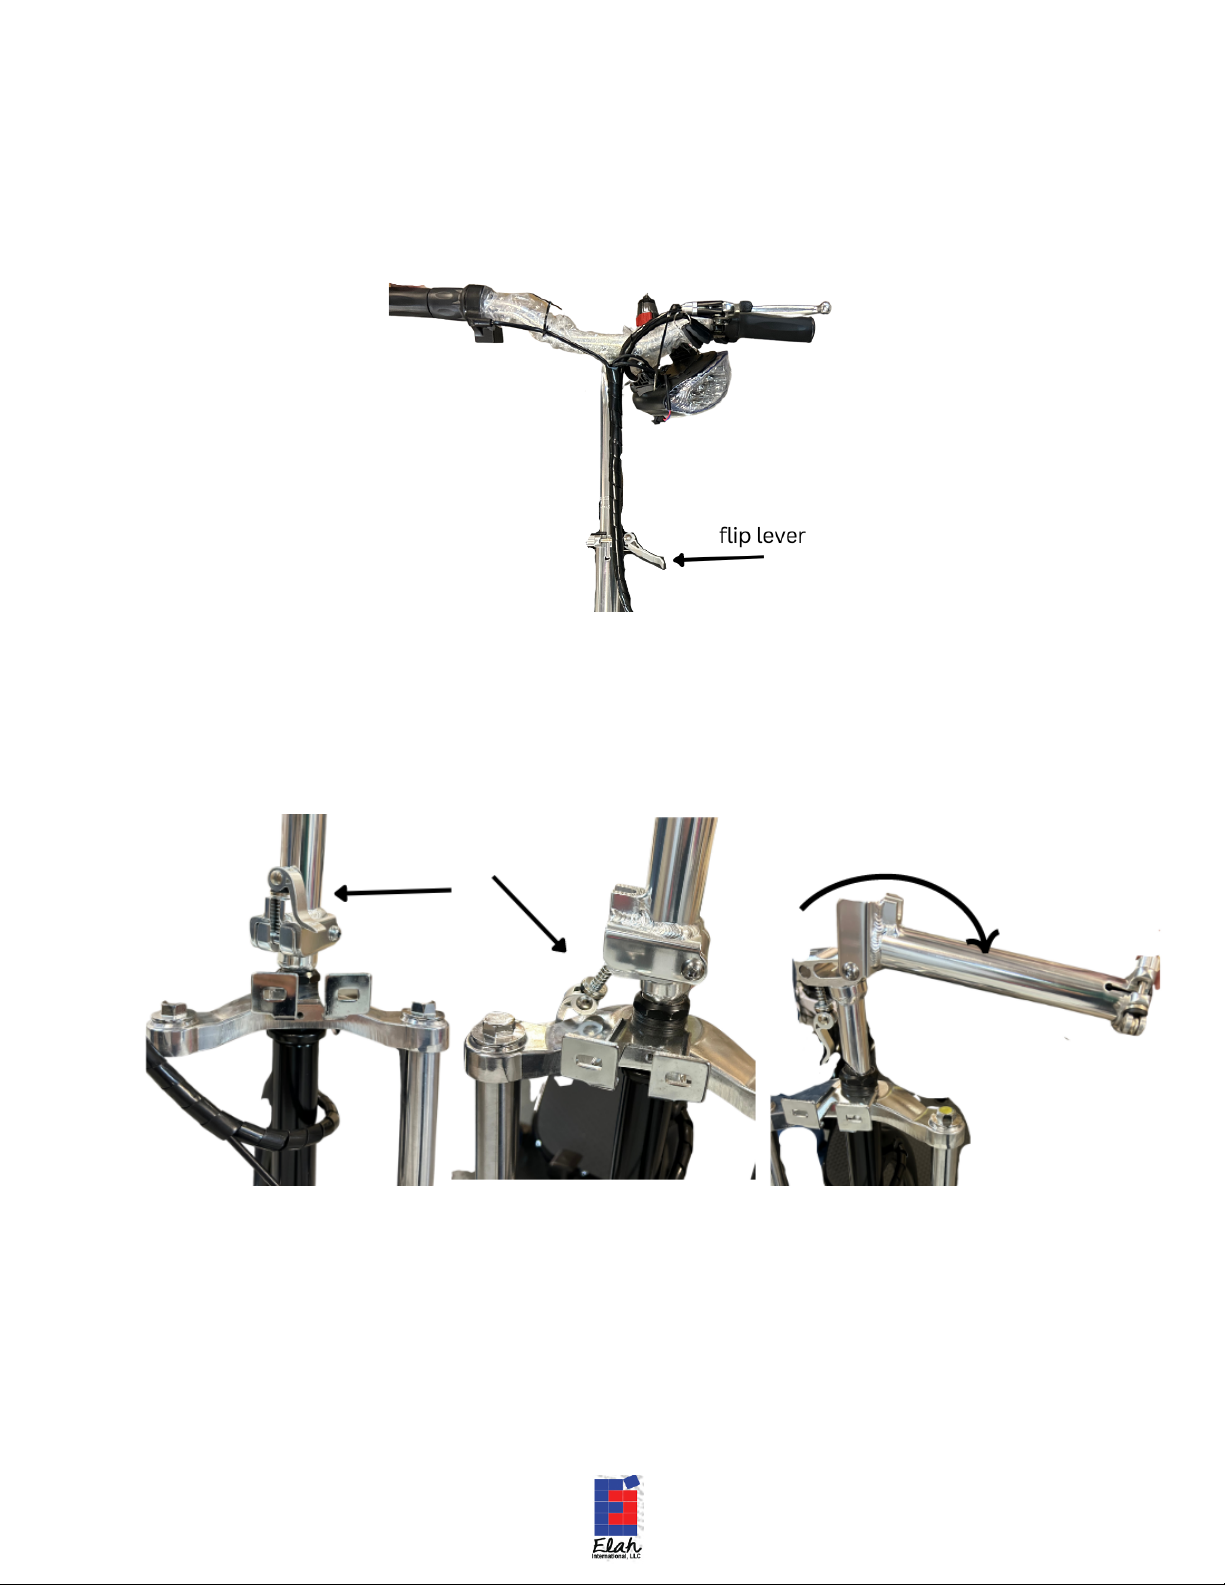
Handlebar Adjustment
To adjust the handlebar, flip the lever on the neck of the handlebar and slide the
pole up and down to the desired height.
Folding the Handlebar
To fold the handlebar, flip the silver clasp at the base of the neck of the handlebar
out of its slot then press the silver button in and gently fold the handlebar down.
Page 14
Charging the Batteries
Before riding your Chaser 1000 for the first time, the unit should be fully charged. Ride
your Chaser 1000 until the battery is fully discharged before recharging it. Doing this
3-5 times will ensure maximum battery efficiency and scooter performance.
The batteries should be recharged frequently, at least once every 30 days for the
longest battery life. Leaving the battery uncharged for more than 3 months will
significantly decrease the battery lifespan.
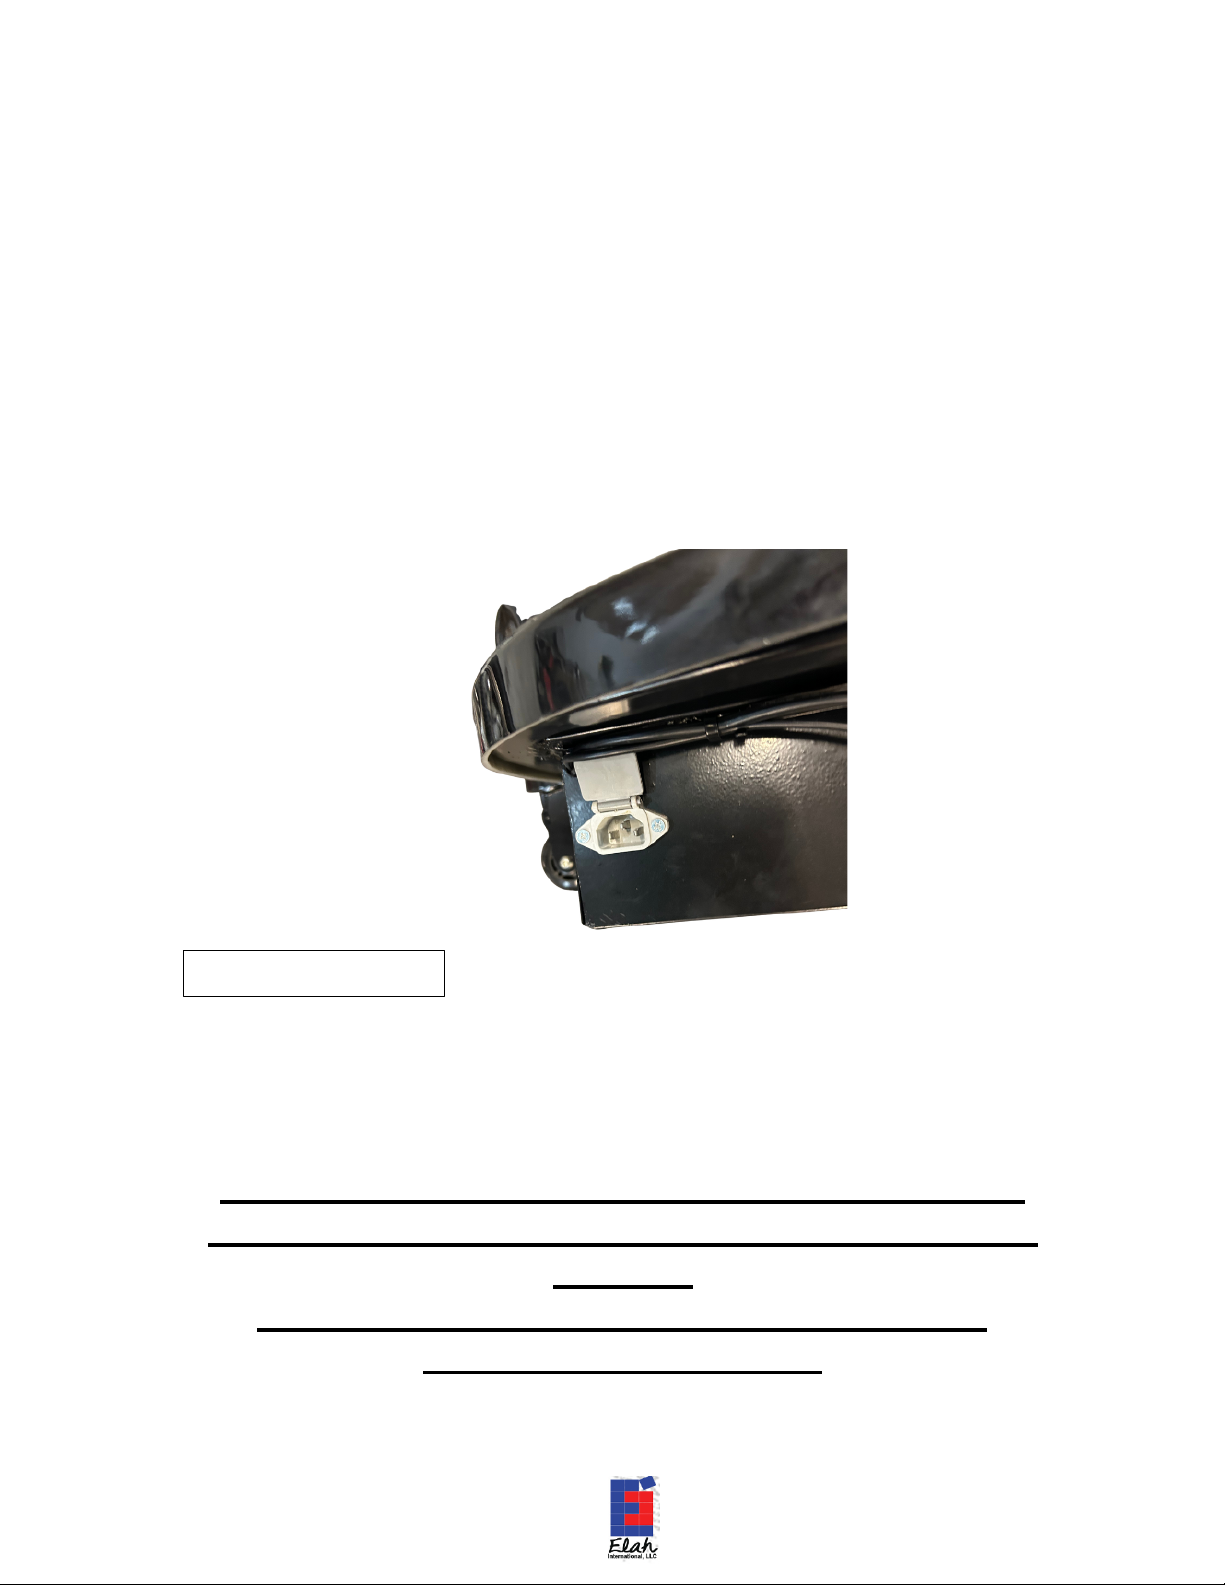
To charge the batteries, plug the charger into the socket located at the side of the
battery compartment, then plug the charger into the wall outlet. The light on the
charger will be red when the unit is charging the batteries. When the light turns green,
the charge is complete.
Be sure the charger is properly connected to the Chaser 1000. The connector
is indented so that it will only fit one way. Do not force the connection. It
should slide easily into the unit when correctly aligned.
WARNING
Never leave the charger plugged into either the
Chaser 1000 or the electric outlet for longer than
8 hours.
Leaving your charger connected for a long
period can cause a fire.
IMPORTANT
Page 15
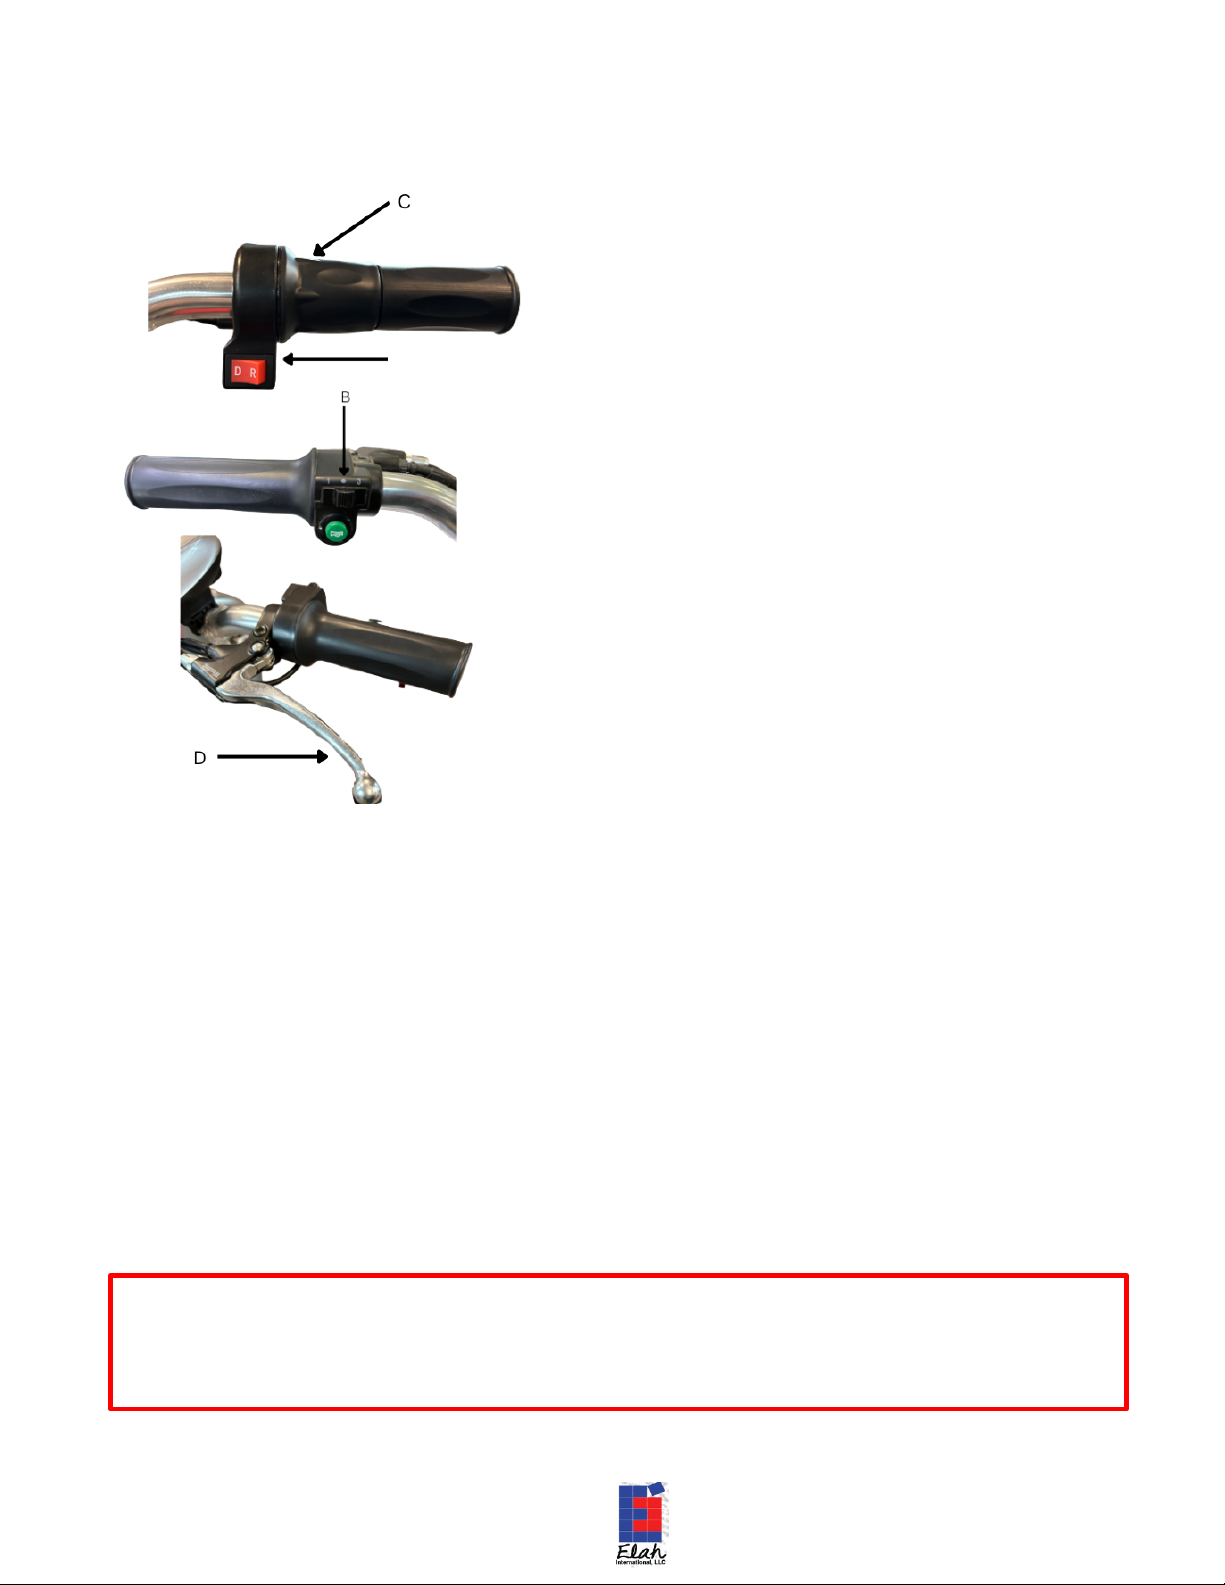
Chaser 1000 Operation
First, put the key in the ignition.
A.) The red toggle switch is the
control for forward and reverse.
The battery gauge on the throttle will
illuminate, indicating the battery is
engaged. At full power, the entire
gauge will be illuminated. As the
power decreases, the lights go out
starting from red to green and then to
yellow, when there is no illumination,
the battery is completely drained, and
your Chaser 1000 must be recharged.
B.) The 3-speed switch on the left side
shows 1 – 3, 1 being low speed, the
symbol in the middle being medium
speed, and 3 being the highest speed.
The left-side green switch is the horn.
To stop your Chaser 1000, disengage C.) the Throttle and engage D.) the hand
break. Be aware the brake is very sensitive. When the brake is applied this kills
the power to the throttle.
If you are parking your scooter on an incline, engage the hand parking brake by
tightly holding the hand brake and pushing the parking brake paddle towards
you. Pull the handbrake lever towards you to release.
When parking the scooter, always remove the key for additional security.
WARNING: Before you become well acquainted with how to operate your scooter, it
is recommended that you preset the speed to its lowest setting, failure to do so can
result in personal injury or damage to the equipment.
A
Page 16
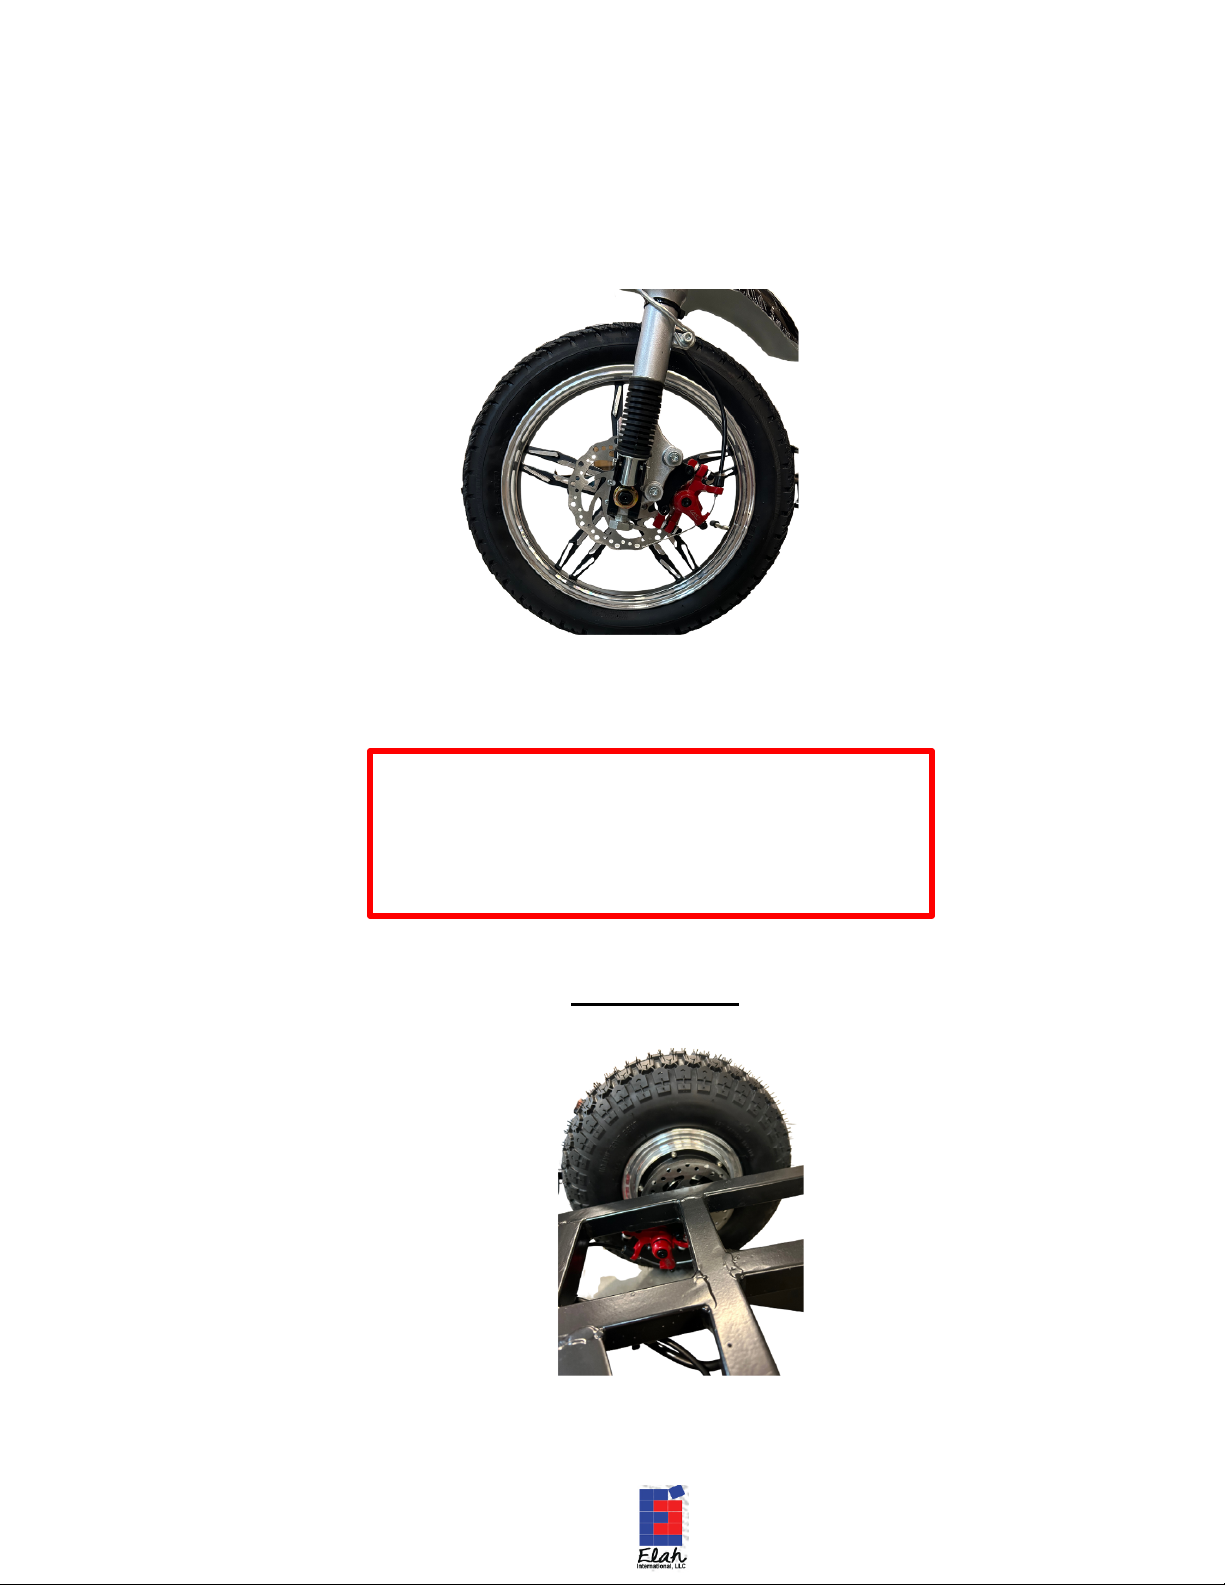
Adjusting Brakes (Service Professional Only)
To adjust the sensitivity of the hand brake, either tighten or loosen the wire
shown on the left. First, loosen the nut and then push the wire back toward the
brake to lessen sensitivity or pull the wire to increase sensitivity.
New feature:
Rear disc brakes
WARNING: Elah does not recommend the end user
adjusting the brakes. Brakes should be serviced by a
professional. Failure to adjust the breaks properly could
cause serious injury. Always test breaks before each
use.

Page 17
MaintenanceFront Facing
Your Chaser 1000 requires minimum maintenance to give you years of
service. Always follow these simple procedures before your ride.
• Make sure the battery is fully charged.
• Never leave the battery uncharged for more than 30 days, as this will
negatively impact performance and battery lifespan.
• Inspect all connections each time you ride to ensure nothing is loose and
wires are not frayed or damaged.
• Make sure tires are inflated to their proper pressure as indicated on the
tires.
• Test brakes to ensure they are operating before increasing speed.
• Properly adjust the helmet to each rider for maximum protection.
Battery Replacement
(Service Professional Only)
Battery replacement should be done by a Chaser 1000 authorized service dealer.
The batteries are in the battery compartment on the footboard. To access the
batteries, remove the screws that hold down the battery cover and carefully
disconnect the wires from the battery terminal, marking each wire to ensure that it
will be reconnected to the correct connector. Replace the batteries and reconnect
the wires to the correct connectors. Replace and secure the cover. Fully charge
the batteries before attempting to use them.

Page 18
Troubleshooting
Problem
The key is in the ON position, but the
Chaser 1000 does not move.
The Chaser 1000 rides roughly and is
difficult to steer.
The handlebar wobbles and doesn’t feel
tight.
Chaser 1000 doesn’t brake completely.
Chaser 1000 will not recharge within 10
hours.
Most Likely Cause
The battery may not be adequately charged.
Check the battery level indicator on the pod. If
the red lights are not illuminated, charge the
battery before using the Chaser 1000. Check
reset button.
The brake may be engaged. Disengage the
brake.
Check the tire pressure before operating the
Chaser 1000. Check this regularly to ensure
safe operating.
Immediately stop operation and check to
ensure all connections have been tightened
sufficiently.
Brakes may need adjusting. See brake
adjustment in this manual or contact your
Chaser 1000 dealer.
Check connector is correctly inserted into the
side of your Chaser 1000. Check power to
outlet. Battery may be malfunctioning. Contact
your Chaser 1000 dealer.

Page 19
Warranty
WHAT IS INCLUDED:
• One-year coverage from factory defects from the date of purchase
• Six-month coverage from factory defects on the battery from the date of purchase
WHAT IS NOT INCLUDED:
• Body Panel Wear
• Tires
• Upholstery (cushions), Seats, and Handgrips
• Keys
• Screws, Nuts, and Bolts
• Paint Panels
• Damage caused by abuse, accident, loss, negligence, wear or use.
• Damage caused by improper operation, maintenance, or storage.
• Damage caused by using the scooter for business purposes or other unintended use.
HOW TO GET WARRANTY SERVICE:
To obtain a Warranty service, please call your authorized dealer.
DO NOT RETURN YOUR PRODUCT TO ANY ADDRESS.
Please call an authorized dealer or where you purchased your product. They will explain the procedure for
obtaining Warranty claims.
For questions concerning your Chaser 1000, Please contact your dealer.
Operate your Chaser 1000 Scooter in accordance with the operation and always use the
instructions in this manual. Any unauthorized repair, alteration, willful abuse, accident, or misuse
of the product shall nullify this warranty. This warranty is non-transferable and is made to the
original owner, provided that the purchase was made through an authorized supplier of the
product. The warranty is limited to the repair or replacement of parts found to be defective in
material or workmanship, provided that such parts have been subjected to normal conduction of
use and service after said defect is confirmed by the manufacturer’s inspection. Any installation,
labor, construction, transportation, or other related costs/expenses arising from defective parts,
repair, replacement, or otherwise will not be covered by this warranty, nor shall the manufacturer
assume responsibility for the same. The owner/ user assumes all risks, if any, including the risk of
any direct, indirect, or consequential loss or damage arising out of the use or inability to use the
product, except as provided by law.

Page 20
NEED MORE HELP?
ELAHINTERNATIONAL.COM
SALES@ELAHINTERNATIONAL.COM
1.800.867.2151
This manual suits for next models
1
Table of contents
Popular Scooter manuals by other brands


Segway-Ninebot
Segway-Ninebot KickScooter Max G2 product manual

AUTOMOBILI LAMBORGHINI
AUTOMOBILI LAMBORGHINI E-MOBILITY AL1 user manual

Be Cool
Be Cool Sparrow Original instructions

Little E
Little E Kids Electric Balance Bike user manual

Yamaha
Yamaha Zuma YW125B owner's manual

Milly Mally
Milly Mally CRAZY Operational manual