GPO PASSION 8x42 User manual

PASSION HD
BINOCULARS
8x42
10x42
8,5x50
10x50
12,5x50
gp-optics.com

Deutsch
English
Français
Italiano
Español
Swenska
Norsk
Dansk
Gebrauchshinweis / Garantie
Instruction for use / Guarantee
Modo d´emploi / Garantie
Instruzioni d´impiego / Garanzia
Mode de empleo / Garantia
Bruksanvisning / Garantie
Kayttöohje / Takuu
Pokyny k pouzivani / záruka

Bitte lesen Sie diese Sicherheitshinweise sorgsam durch
und befolgen Sie diese Anweisung bei der Verwendung
des Produktes.
Bitte schauen Sie auf keinen Fall mit dem Fernglas oder
einem anderen optischen Gerät in die Sonne, helle Licht-
quellen oder laserbasierte Lichtquellen. Dies kann zu irre-
parablen Augenverletzungen führen da die Optik wie ein
Brennglas wirkt.
Bewahren Sie das Fernglas so auf, das es nicht in die
Hände von Kindern gelangen kann. Bewahren Sie eben-
falls alle Anbauteile so auf das nichts in die Hände von
Kindern gelangen kann. Insbesondere Kleinteile (Ver-
schluckungsgefahr) und der Trageriemen (Einfädelungs-
gefahr) sind sicher und umsichtig zu lagern.
Bitte berühren Sie metallische Oberflächen nicht, wenn
das Produkt durch Sonneneinstrahlung aufgeheizt, oder
durch Kälteeinwirkung abgekühlt ist.
Verwenden Sie nach der Anwendung immer die mitgelie-
ferten Schutzdeckel um Beschädigungen bei Sonnenein-
strahlung durch den Brennglaseffekt zu vermeiden.
Vermeiden Sie unsachgemäße Stöße am Produkt.
Sehr geehrter Kunde, wir freuen
uns sehr das Sie sich für das PAS-
SION HD aus unserem Hause ent-
schieden haben und wollen uns für
das entgegengebrachte Vertrauen
bedanken. Wir sind allzeit bestrebt
Ihnen all unsere Unterstützung zur
Verfügung zu stellen, damit Sie
lange Freude an unvergesslichen
Momenten haben.
Enjoy your Passion
Information zur sicheren Anwendung
Lassen Sie Reparaturen nur von autorisierten Werkstätten oder
der GPO GmbH & Co. KG durchführen. Bei unsachgemäßer
Verwendung und Öffnung der Produkte durch nicht autorisierte
Werkstätten, erlischt der Garantieanspruch.
DE

Montage der Trageriemen
Es besteht die Möglichkeit den Trageriemen mit einseitig-
oder beidseitig montierter Okularschutzkappe zu montieren.
Okular-
schutzkappe
Objektivschutzkappe
Neopren-
trageriemen Augenmuschel
Stativadapter
Fokussierung
und Dioptrien
Ausgleich
Trageband-
anbindung
Einseitig montiertem
Okularschutzdeckel:
Beidseitig montiertem
Okularschutzdeckel:
DE

Einstellen des richtigen Augenabstandes
Das Fernglas verfügt über einen Mechanismus unterschiedliche Au-
genabstände einzustellen. Als Augenabstand bezeichnet man die
Distanz zwischen den beiden Pupillen. Der richtige Augenabstand
wird durch knicken der Mittelachse der beiden Fernglashälften er-
reicht. Den richtigen Augenabstand haben Sie eingestellt, wenn Sie
mit beiden geöffneten Augen ein kreisrundes Bild sehen.
Einstellung der Augenmuschel
Die Drehaugenmuschel verfügt über drei Rastpositionen für unter-
schiedliche Anwendungen. Durch die Rastungen kann man den
Abstand des Auges zur Okularlinse justieren. Somit kann man den
Augenabstand individuell nach den persönlichen Vorlieben ergo-
nomisch einstellen. Unterschieden wird dabei die Verwendung mit
oder ohne Brille.
Wenn Sie durch zu starkes Drehmoment gegen den Uhrzeigersinn
über den Anschlag hinaus drehen, lösen Sie die Augenmuschel
und können diese herausschrauben. Dieses ist gewünscht um
die Augenmuschel zu reinigen oder gegen andere optionale
Augemuscheln zu ersetzen. Um die Augenmuschel wieder in den
ursprünglichen Bauzustand zu versetzen, drehen Sie einfach im
Uhrzeigersinn die Augenmuschel wieder hinein.
Anwendung ohne Brille:
Bei der Anwendung ohne
Brille, drehen Sie die Augen-
muschel gegen den Uhrzeiger-
sinn komplett heraus.
Anwendung mit Brille:
Als Brillenträger drehen Sie die
Augenmuschel im Uhrzeiger-
sinn ganz hinein.
DE

Einstellen der Dioptrien
Um eventuelle Differenzen in der Sehkraft zwischen beiden
Augen auszugleichen kann man das Fernglas individuell auf die
Bedürfnisse einstellen.
Im Anschluss schließen Sie das rech-
te Auge und blicken mit dem linken
Auge durch das Fernglas auf ein
Objekt. Stellen Sie dieses Objekt
nun scharf.
Im Anschluss schließen Sie das linke
Auge und blicken mit dem rechten
Auge durch das Fernglas auf ein
Objekt. Stellen Sie dieses Objekt nun
mit dem Fokussierrad scharf.
Ziehen Sie dazu das Fokussierrad
heraus. Nun sehen Sie eine Skale.
Positionieren Sie die 0 auf dem
Indexpunkt der sich auf der Mittel-
brücke befindet.
Nun drücken Sie das Fokussierrad
wieder hinein in die Ausgangs-
stellung (Indexskala ist nicht mehr
zu sehen).
Ihr Fernglas ist nun auf Ihre individuellen Bedürfnisse eingestellt.
DE

Aufbewahrung und Lagerung
Bewahren Sie Ihr Fernglas nach dem Gebrauch, trocken in der
mitgelieferten Tasche an einem gut belüfteten Ort auf.
Sollten Sie Ihr Produkt in einer Region mit hoher Luftfeuchtigkeit
verwenden lagern Sie Ihr Produkt bitte in einem luftdichten Behält-
nis mit Feuchtigkeits-Absorptionsmittel um möglichen Pilzbelag zu
vermindern.
Ersatzteilversorgung
Sollten Sie Ersatzteile oder Zubehörteile für Ihr Fernglas benötigen,
wenden Sie sich bitte einen Fachhändler oder an die GPO GmbH
& Co. KG.
Pege, Reinigung und Wartung
Die Reinigung der Optik kann mittels dem im Lieferumfang enthal-
tenen Optikreinigungstuch durchgeführt werden.
Halten Sie die Optischen Flächen stets sauber und entfernen
Sie Verschmutzungen durch Fett (Fingerabdrücke), Öle oder
Wasserflecken umgehend um eine dauerhafte optische Qualität
zu gewährleisten.
Zur Reinigung hauchen Sie die optischen Flächen leicht an und
verwenden im Anschluss das Optikputztuch um die Verunreinigen
auf den Linsenoberflächen zu säubern. Bitte beachten Sie das
grobe Schmutzpartikel entweder durch Blasebalg oder mit einem
sauberen Haarpinsel entfernt werden müssen. Ansonsten kommt
es zu Beschädigung der optischen Beschichtung bis hin zu Kratzern
in den Linsen. Alle äußeren mechanischen Bauteile sowie die
Gummiarmierung können Sie mit einem weichen, sauberen und
leicht angefeuchteten Putztuch reinigen.
Bitte verwenden Sie nicht das Optikreinigungstuch zur Reinigung
der äußeren Bauteile und Gummiarmierung.
DE

Zubehör
8x42 10x42 8,5x50 10x50 12,5x50
Tragetasche •••••
Neopren
Trageriemen •••••
Putztuch •••••
Objektivschutz-
kappen Set •••••
Okularschutz-
kappe •••••
Bedienungs-
anleitung •••••
Technische Daten
8x42 10x42 8,5x50 10x50 12,5x50
Vergrößerung 8x 10x 8,5x 10x 12,5x
Objektiv-
durchmesser (mm) 42 42 50 50 50
Austrittspupille (mm) 5,25 4,2 5,88 5 4
Sehfeld (m/100m) 125 112 105 103 91
Naheinstell-
grenze (m) 22333
Dioptrien-
verstellung (dpt.) +/- 4 +/- 4 +/- 4 +/- 4 +/- 4
Augenabstand (mm) 19,5 17 19,5 19,5 16,5
Pupillendistanz (mm) 57-75 57-75 58-76 58-76 58-76
Stickstoffüllung •••••
Wasserdicht •••••
Länge (mm) 130 130 135 135 135
Gewicht (g) 830 840 940 960 965
DE

Please carefully read these safety instructions and follow
these guidelines when using this product.
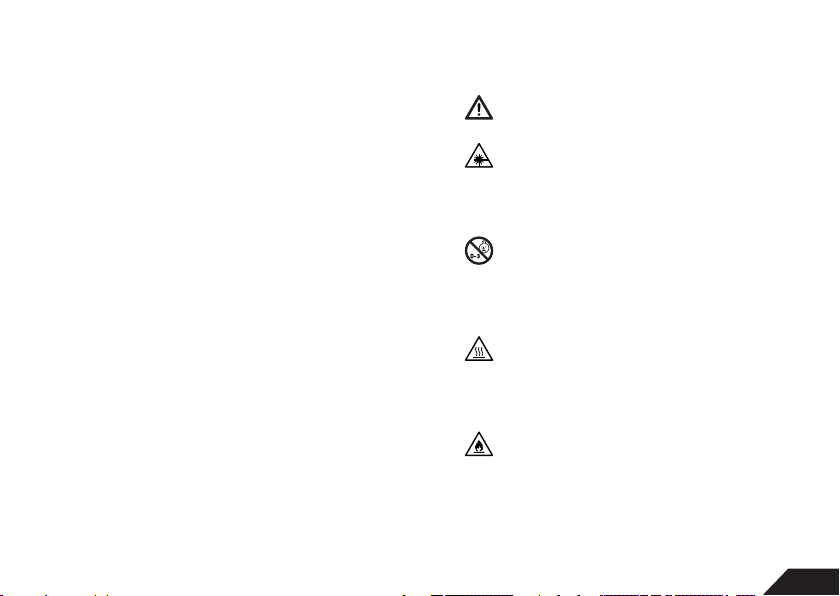
Never look directly into the sun, bright light sources or
laser based light sources through your binocular. This
can cause irreparable eye damage. Optics in binoculars
function as a magnifying glass, therefore dramatically
increasing the intensity of the light source.
Store the binocular and all accessories included with
this product out of the reach of children. Some of our
products may contain small parts which could create a
choking hazard for small children, or nylon straps which
could create a strangulation hazard.
Be cautious when touching metal parts when the
product has been stationary and extensively exposed
to the sun or to freezing cold, as extremely hot or
extremely frozen metal components may cause an injury
to exposed skin.
After using this product, always use the protective covers
provided to avoid accidental light magnifying, which may
create a fire.
Avoid improper shock, such as dropping this product. It
is an optical instrument and damage may occur
Dear customer, we are delighted
that you have chosen our PASSION
HD and would like to thank you for
trusting in our products. It is impor-
tant for us to provide you with the
best product and if ever needed,
the best service support available
so that you can enjoy your outdoor
passion to the fullest.
Enjoy your Passion
Safety information
Repairs should be solely handled by an authorized repair location
or GPO GmbH & Co. KG. The improper and unauthorized usage,
disassembly or repair of the products by non-authorized repair
business may result in the termination of this products warranty.
For service or repair, please contact GPO GmbH & Co. KG.
EN

Mounting of the shoulder strap
You have the possibility to mount the shoulder strap with either
a single or double mounted ocular protective cap conveniently
attached to the strap.
Ocular
cover
Objective cover
Neoprene
strap Eyecup
Tripod Adapter
Focus and
diopter setting
Shoulder
strap inter-
face
Single mounted ocular
protective cap:
Double mounted ocular
protective cap:
EN

Eyecup adjustment
The rotary eyecup has three break positions for different applica-
tions. The different break positions allow you to custom adjust
the distance between your eye and the ocular lens. This beneficial
feature allows you to be able to adjust the eye distance to your
personal preferences. This adjustment creates additional benefits
for use with and without eye glasses.
NOTE: If you rotate the rotary eyecup counterclockwise, passed
the stop-point where the eyecup is fully extended, the eyecup can
come loose, begin to completely unscrew and may become de-
tached. This is an important feature when the eyecup needs to be
cleaned or replaced. Reinstalling the eyecup, or retightening it if it
becomes loose, simply rotate the eyecup clockwise until it is tight.
Tighten only with a “snug” effort with your hands. DO NOT
OVERTIGHTEN AND DO NOT TIGHTEN WITH TOOLS OR PLYERS, as
this may cause damage to the product.
Use without glasses:
Most frequently, users not wearing
eyeglasses will need to adjust the
rotary eyecup completely up. Twist
the eyecup counterclockwise until the
eyecup is fully extended. Users not
wearing eyeglasses may also find the
full field of view more comfortable
with the eyecup slightly rotated
down. For this purpose, there are
additional break positions for your
use and your personal preference.
Use with glasses:
Most frequently, users wearing eye-
glasses will need to adjust the rotary
eyecups completely down. Twist the
eyecups clockwise.
Adjustment of the interpupillary distance (ipd)
The rotary eyecup has three break positions for different applica-
tions. The different break positions allow you to custom adjust the
dw”, the IPD of s open.
EN

Adjustment of the diopter
Since most users have a minor visual acuity difference between
their left eye and right eye, the diopter is an adjustment feature
that allows the user to custom focus each side of the binocular to
the correct vision of each eye. To compensate for possible imbalan-
ces of the vision between both eyes, you can adjust this binocular
to your individual needs. The diopter adjustment is located by
slightly “pulling out” on the center focus wheel until it “clicks”.
Make sure the interpupillary distance (IPD) is adjusted correctly.
See instruction above.
Step by step:
Make sure the interpupillary distance (IPD) is adjusted correctly.
See instruction above.
Make sure the diopter is not exposed and that the center focus
wheel is turning smoothly, not clicking. (note: if the center wheel
is clicking, the diopter is exposed and the focus wheel must be
pressed in until it clicks down)
Cover or close your RIGHT eye
Using the center focus wheel, focus
your LEFT eye on your selected
object until the picture is sharp.
Cover or close your LEFT eye. Using
the center focus wheel, with the
wheel pulled out, focus your RIGHT
eye on your selected object until the
picture is sharp. You will feel the
focus wheel clicking.
Press the center focus wheel in until
it clicks down to its original position,
not rotating it from your last focus.
(the index scale is no longer visible).
Pull out the focusing wheel, expo-
sing the center diopter. A scale is
visible and the focus wheel will click
when turning.
Your binocular is now adjusted to your personal visual
acuity in each eye. The diopter is locked in place and will not
need further adjustment. You can now view any object at
any distance by using the center focus wheel.
EN

Proper strorage
After using the binocular it is recommended to store it dry, in the
case that came with your product, in a well-ventilated room, at
normal to low humidity levels, in normal room temperatures.
If you use your product in a region with high humidity, store your
product in an airtight container with a humidity absorption aid to
avoid any exterior fungus adhesion
Spare parts
If you need spare parts or accessories for your binocular, please
contact an authorized dealer or GPO GmbH & Co. KG.
Care, cleaning and maintenance
You can clean the optics of your product with the optical
micro-fiber cleaning cloth provided with your product, or by using
other lens cleaning equipment solely intended for optical cleaning
purposes.
Be sure to keep the optical surfaces clean and immediately remove
any dirt or oil debris caused by grease (finger prints), oil or water
spots to guarantee consistent optical quality.
To clean the exterior lenses of your product, be sure to first remove
any granular dirt or debris that may cause scratching during the
cleaning process. Be aware that rough granular dirt particles must
be removed with either an air bellows or a clean hair brush. Other-
wise, this may lead to damage of the optical coating or scratches
on your lens. Once large debris is removed, slightly breath onto
the optical surfaces to create a damp fog, then use the dry optical
cleaning micro-fiber cloth provided to clean the lens surfaces. All
other outside mechanical parts, as well as the rubber armor, can
be cleaned with a normal soft, clean and slightly damp cloth.
Please do not use the optical cleaning micro-fiber cloth to clean
the outside parts or the rubber armor. This micro-fiber cloth must
remain free of any physical granular debris.
EN

ACCESSORIES
8x42 10x42 8,5x50 10x50 12,5x50
Carrying bag •••••
Neopren shoulder
strap •••••
Micro-fiber
cleaning cloth •••••
Objective protective
caps set •••••
Ocular protective
cap •••••
Manual •••••
TECHNICAL SPECS
8x42 10x42 8,5x50 10x50 12,5x50
Magnification 8x 10x 8,5x 10x 12,5x
Objective
diameter (mm) 42 42 50 50 50
Exit pupil (mm) 5,25 4,2 5,88 5 4
Field of View (m/100m) 125 112 105 103 91
Close focus
distance (m) 22333
Diopter adjust-
ment (dpt.) +/- 4 +/- 4 +/- 4 +/- 4 +/- 4
Eye relief (mm) 19,5 17 19,5 19,5 16,5
Pupil distance
(IPD) (mm) 57-75 57-75 58-76 58-76 58-76
Nitrogen filling •••••
Water proof •••••
Length (mm) 130 130 135 135 135
Weight (g) 830 840 940 960 965
EN

FR
Veuillez lire attentivement ces remarques concernant la
sécurité et suivez ces instructions lors de l‘utilisation du
produit.
Veuillez ne jamais observer directement le soleil, les
sources lumineuses vives ou des sources laser avec les
jumelles ou tout autre appareil optique. Vous risquez
sinon des lésions oculaires irréparables, l‘optique agissant
comme un verre ardent (effet loupe).
Conservez les jumelles dans un lieu hors de portée des
enfants. Conservez également tous les autres accessoires
rapportés dans un lieu hors de portée des enfants.
Conserver en lieu sûr et soigneusement les petits com-
posants (risques d‘ingestion accidentelle) et les lanières
(risque de s‘empêtrer).
Veuillez ne pas toucher les surfaces métalliques lorsque le
produit est brûlant du fait des rayonnements solaires et
est refroidi sous l‘action du froid.
Utilisez toujours après usage le couvercle protecteur
fourni pour éviter les dommages dus aux rayonnements
solaires générés par l‘effet de verre ardent (effet loupe).
Soumettre le produit à des chocs inappropriés.
Cher client, nous sommes heureux
que votre choix se soit porté sur
notre produit PASSION HD et vous
remercions de votre conance.
Nous nous efforçons à tout moment
de vous apporter notre soutien an
que vous puissiez proter long-
temps de moments inoubliables.
Enjoy your Passion
Informations pour une utilisation
en toute sûrete
Ne laissez réaliser les réparations que par des réparateurs agréés
ou par GPO GmbH & Co. KG. Tout droit à la garantie expire en
cas d‘utilisation inappropriée ou d‘ouverture des produits par des
réparateurs non agréés.

FR
Montage de la laniere
Il est possible de monter la lanière avec un capuchon d‘oculaire
monté des deux côtés.
Capuchon
d‘oculaire
Capuchon de
l‘objectif
Courroie
néoprène Bonnette
Adaptateur
de pied
Focalisation et
compensation
des dioptries
Attache de
la lanière
Capuchon d‘oculaire
monté d‘un côté:
Capuchon d‘oculaire
monté des deux côtés:

FR
Reglage de l‘espace interpupillaire
Les jumelles ont un mécanisme pour régler les écarts interpu-
pillaires différents. Cet espace désigne l‘écart entre les pupilles.
L‘écart interpupillaire correct s‘obtient en pliant l‘axe médian
des deux moitiés de jumelles. L‘espace interpupillaire correct est
réglé lorsque vous voyez une image circulaire en gardant les yeux
ouverts.
Reglage de la bonnette
La bonnette a trois crans de positionnement pour diverses
applications Ces crans permettent d‘ajuster la distance de l‘œil par
rapport à la lentille de l‘oculaire. Ainsi, l‘espace interpupillaire peut
être réglé de manière personnalisée et ergonomique. On distingue
entre une utilisation avec ou sans lunettes.
Si vous forcez la butée en appliquant un couple trop fort dans
le sens antihoraire, vous desserrez les bonnettes et pouvez les
dévisser. Vous pouvez le faire pour nettoyer les bonnettes ou les
remplacer par d‘autres bonnettes en option. Rentrer simplement
la bonnette en la tournant dans le sens horaire afin de la remonter
dans son état initial.
Lors d‘une utilisation sans
lunettes, tournez la bonnette
entièrement dans le sens
antihoraire.
Les porteurs de lunettes
tournent entièrement la bon-
nette dans le sens horaire.

FR
Reglages de dioptries
Afin de pouvoir compenser les différences de dioptrie entre les
deux yeux, on peut ajuster les jumelles aux besoins individuels.
Fermez ensuite l‘oeil droit et
regardez un objet de l‘oeil gauche à
travers les jumelles. Réglez jusqu‘à
ce que l‘objet devienne net.
Fermez ensuite l‘oeil gauche et
regardez un objet de l‘oeil droit à
travers les jumelles. Réglez à l‘aide
de la molette de focalisation jusqu‘à
ce que l‘objet devienne net.
Tirez la molette de focalisation.
Vous voyez alors un cadran. Posi-
tionnez le 0 sur le point de repère
situé sur le pont central.
Enfoncez de nouveau la molette de
focalisation en position initiale (le
cadran n‘est plus visible).

FR
Manipulation et stockage
Conservez vos jumelles après l‘usage en lieu sec et bien ventilé
dans l‘étui fourni.
Si vous utilisez votre produit dans une région marquée par une
forte humidité, veuillez conserver votre produit dans un récipient
étanche à l‘air avec un produit absorbant l‘humidité pour réduire
l‘apparition des moisissures.
Pieces de rechange
Si vous avez besoin de pièces de rechange ou des accessoires pour
vos jumelles, veuillez vous adresser à votre revendeur spécialisé ou
à GPO GmbH & Co. KG.
Entretien, nettoyage et maintenance
Le nettoyage de l‘optique peut être réalisé au moyen du chiffon
spécial optique fourni.
Maintenez toujours propres les surfaces optiques et supprimez
immédiatement les saletés dues à la graisse (marques de doigt),
l‘huile ou les taches d‘eau afin de garantir une qualité optique
durable.
Pour nettoyer, faire légèrement de la buée en soufflant sur les
surfaces optiques puis utilisez le chiffon optique afin de débarrasser
les surfaces des lentilles des saletés. Notez-bien que les particules
de saleté grossières doivent être éliminées au soufflet ou avec un
pinceau propres. Sinon, le revêtement optique peut être endom-
magé et les lentilles rayées. Vous pouvez nettoyer tous les compo-
sants mécaniques extérieurs ainsi que l‘armature en caoutchouc
avec un chiffon souple, propre et légèrement humide.
Veuillez utiliser le chiffon de nettoyage optique pour nettoyer les
composants extérieurs en caoutchouc.

FR
Accessoires
8x42 10x42 8,5x50 10x50 12,5x50
Etui •••••
Lanières néoprène •••••
Chiffon •••••
Set de capuchons
objectifs •••••
Capuchon
d‘oculaire •••••
Instructions de
service •••••
Caracteristiques
8x42 10x42 8,5x50 10x50 12,5x50
Grossissement 8x 10x 8,5x 10x 12,5x
Diamètre de
l‘objectif (mm) 42 42 50 50 50
Pupille de
sortie (mm) 5,25 4,2 5,88 5 4
Champ visuel (m/100m) 125 112 105 103 91
Mise au point
minimale (m) 22333
Réglage des
dioptries (dpt.) +/- 4 +/- 4 +/- 4 +/- 4 +/- 4
Ecart
interoculaire (mm) 19,5 17 19,5 19,5 16,5
Ecart
interpupillaire (mm) 57-75 57-75 58-76 58-76 58-76
Enveloppe
azotée •••••
Etanche à l‘eau •••••
Longueur (mm) 130 130 135 135 135
Poids (g) 830 840 940 960 965
This manual suits for next models
4
Table of contents
Languages:
Other GPO Binoculars manuals