GPO Brooklyn User manual

Troubleshooting
Guide

2
CONTENT
Introduction 3
Control Locations 4
Power 6
Battery 7
Volume 8
Radio 9
Tape 12
CD 13
USB 14
Bluetooth 15
AUX IN 16
Headphones 17
Microphone 18

33
INTRODUCTION
Thanks for purchasing the GPO Brooklyn Boombox. This iconic
1980s design combines classic styling with a range of modern
functionality. Featuring built-in speakers and a range of playback
modes, the Boombox will allow you to enjoy Radio, CD, USB
and Bluetooth sound anywhere inside or outside your home! For
that real authentic 80s feel, the Brooklyn Boombox also features
cassette tape playback.
If you’re having trouble getting the most from your Brooklyn
Boombox, please consult this Troubleshooting guide and the
product manual.

4
1
2
34
5
6
7
8
9
10
11
12
15
14
16
17
19
20
20
20
20
29
30 31
32
21
22
23
24
26
27
28
25
18
13

5
Control Locations
1.
2.
3.
4.
5.
6.
7.
8.
9.
10.
11.
12.
13.
14.
15.
16.
17.
18.
19.
20.
21.
22.
23.
24.
25
26.
27.
28.
29.
30.
31.
32.
FRONT
LED Display
FM Radio Tuner Display
Info Button
Mode Select Knob
Output Level Switch
Playback Controls
Play/Pause
Previous
Rewind
Stop
Fast Forward
Next
Record
Search Knob (External Ring)
Search Knob (Central Control)
Menu Button
Mode Switch
Tape Counter
Balance Knob
Treble Knob
Cassette Slot
Volume Knob
Bass Knob
Power Button
Tape Playback Controls
Record
Play
Rewind
Fast Forward
Stop/Eject
Pause
Headphone Jack
Speakers
SIDE
Microphone Jacks
AUX IN Jacks
AUX OUT Jacks
LINE IN Jack
USB Slot
REAR
Battery Compartment –
NOTE, DO NOT OPEN
LED Charging Indicator
Power Jack
TOP
Handle
Aerials
CD Slot
CD Eject Button

6
Power
The unit won’t turn on
To switch on the unit, press the Power button on the front of the unit.
If the unit will not switch on, ensure that the battery is fully charged.
The rst time charge will take around four hours.
Once this charge has been completed, the LED light on the rear of the
unit will turn blue.
If you wish to use the unit without fully charging the battery, discon-
nect the white connector from the connection point within the battery
compartment.
You can now run the unit directly from the mains.
Reconnecting the battery
Further help
If you are still experiencing problems, contact our customer service
team on 0330 024 0383.
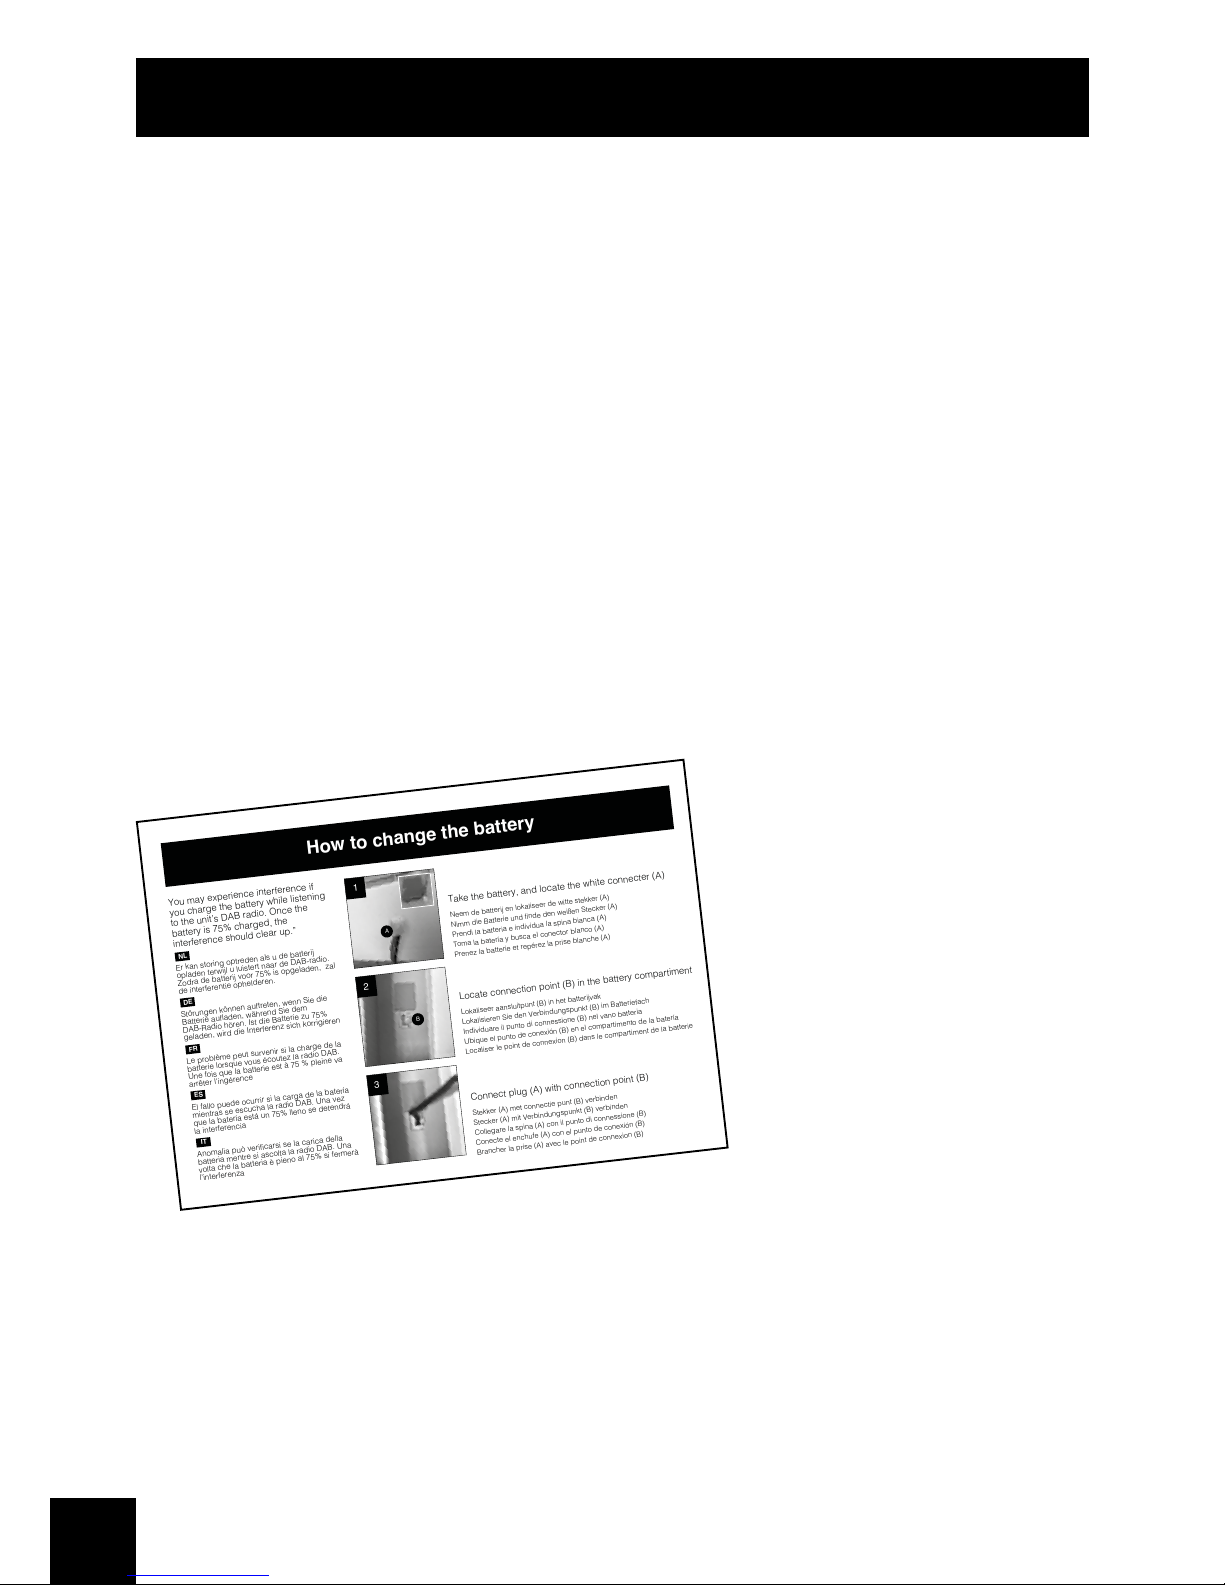
How to change the battery
Take the battery, and locate the white connecter (A)
Neem de batterij en lokaliseer de witte stekker (A)
Nimm die Batterie und finde den weißen Stecker (A)
Prendi la batteria e individua la spina bianca (A)
Toma la batería y busca el conector blanco (A)
Prenez la batterie et repérez la prise blanche (A)
Locate connection point (B) in the battery compartiment
Lokaliseer aansluitpunt (B) in het batterijvak
Lokalisieren Sie den Verbindungspunkt (B) im Batteriefach
Individuare il punto di connessione (B) nel vano batteria
Ubique el punto de conexión (B) en el compartimento de la batería
Localiser le point de connexion (B) dans le compartiment de la batterie
Connect plug (A) with connection point (B)
Stekker (A) met connectie punt (B) verbinden
Stecker (A) mit Verbindungspunkt (B) verbinden
Collegare la spina (A) con il punto di connessione (B)
Conecte el enchufe (A) con el punto de conexión (B)
Brancher la prise (A) avec le point de connexion (B)
1
2
3
A
B
You may experience interference if
you charge the battery while listening
to the unit’s DAB radio. Once the
battery is 75% charged, the
interference should clear up.”
Er kan storing optreden als u de batterij
opladen terwijl u luistert naar de DAB-radio.
Zodra de batterij voor 75% is opgeladen, zal
de interferentie ophelderen.
Störungen können auftreten, wenn Sie die
Batterie aufladen, während Sie dem
DAB-Radio hören. Ist die Batterie zu 75%
geladen, wird die Interferenz sich korrigieren
Le problème peut survenir si la charge de la
batterie lorsque vous écoutez la radio DAB.
Une fois que la batterie est à 75 % pleine va
arrêter l'ingérence
El fallo puede ocurrir si la carga de la batería
mientras se escucha la radio DAB. Una vez
que la batería está un 75% lleno se detendrá
la interferencia
Anomalia può verificarsi se la carica della
batteria mentre si ascolta la radio DAB. Una
volta che la batteria è pieno al 75% si fermerà
l'interferenza
NL
DE
FR
ES
IT
C
M
Y
CM
MY
CY
CMY
K
brooklyn_battery_diagram_HRes.pdf 1 06/12/2017 12:14

7
Battery
Please note: If the unit is being charged and the battery is less than
75% charged, there will be interference on the DAB radio channels. To
correct this issue, please fully charge the battery before use.
The battery isn’t charging
First, ensure that the battery is connected properly as per the “recon-
necting the battery” image on the previous page.
Now, ensure that the unit is properly connected to the mains.
If the 240V power cable is connected correctly, the LED light on the
rear of the unit will glow a solid red.
Once the battery is fully charged, the light will glow a solid blue.
The battery drains too quickly
Once fully charged, the GPO Brooklyn Boombox will provide you with
up to six hours playback, depending on the features which you use.
If your unit cuts out during play back, ensure that the battery is fully
charged before use.
Fully charging the battery will take approximately four hours.
Further help
If you are still experiencing problems, contact our customer service
team on 0330 024 0383.

8
Volume, Bass, Treble and
Balance Controls
Please note: refer to the volume, bass, treble and balance levels on
the LED screen located on the front of the unit, not the markers on the
control knobs.
No sound is coming from the unit
Ensure that the unit is turned on and fully charged.
Ensure that the selector is in the right position for your chosen function.
Ensure that the volume has been set properly. Rotating the volume
knob clockwise turns up the volume.
Rotating the knob more than 360o will set the unit to maximum volume,
and the LED screen will display “MAX.”
For further information, consult the sections of this guide which cover
your chosen function.
Sound is only coming from one speaker
Adjust the balance control so that the LED screen displays “00”.
Further help
If you are still experiencing problems, contact our customer service
team on 0330 024 0383.

9
Radio
Please note: If the unit is being charged and the battery is less than
75% charged, there will be interference on the DAB radio channels. To
correct this issue, please fully charge the battery before use.
DAB Radio
There is no sound coming from the unit
Ensure the unit is fully charged or plugged into the mains.
Ensure that the unit is turned on and that the selector has been set to
DAB.
Ensure that the volume has been set correctly.
The DAB reception is poor
Adjust the unit’s aerials to see if this improves reception.
Ensure that the unit’s battery is not charging, as this many generate
interference as detailed above.
Change the unit’s location. Nearby appliances with ampliers or mov-
ing parts can generate interference.
Ensuring that the unit is as far as possible from televisions, hi- ampli-
ers and mechanical appliances such as washing machines can help to
reduce interference.
If relocating the unit does not help, a full factory reset of the unit may
be required:
To perform a DAB Factory Reset, press the Menu Button, then use the
Search Knob to select System, then Reset. You will be asked to con-
rm your decision by using the Search Knob to select “Y” on the LED
before pressing the Search Knob a nal time.

10
Once a full reset has been completed, you will need to re-scan for DAB
channels:
1. To scan automatically, press the Menu button and then use the
external part of the Search Knob to select Full Scan
2. Push in the central part of the Search Knob to begin the automatic
DAB station scan
3. To scan manually, use the central part of the Search Knob to select
Manual Scan
4.Push in the central part of the Search Knob to begin the manual DAB
station scan
5. Select your chosen station by pushing in the central part of the
Search Knob. The station will now be added to the DAB station list
FM Radio
There is no sound coming from the unit
Ensure the unit is fully charged or plugged into the mains.
Ensure that the unit is turned on and that the selector has been set to
FM Radio.
Ensure that the volume has been set correctly.
The radio reception is poor
Fine-tune the radio to ensure you are receiving the strongest signal.
Adjust the unit’s aerials to see if this improves reception.
Ensure that the unit’s battery is not charging, as this many generate
interference as detailed above.

11
Change the unit’s location. Nearby appliances with ampliers or mov-
ing parts can generate interference.
Ensuring that the unit is as far as possible from televisions, hi- ampli-
ers and mechanical appliances such as washing machines can help to
reduce interference.
Further help
If you are still experiencing problems, contact our customer service
team on 0330 024 0383.

12
Tape
There is no sound coming from the unit
Ensure the unit is fully charged or plugged into the mains.
Ensure that the unit is turned on and that the selector has been set to
tape.
Ensure that the volume has been set correctly.
Ensure that the tape has been inserted correctly and that the unit’s
tape door is rmly closed.
Ensure that the tape has been rewound fully before beginning play-
back.
Nothing is recording to the tape cassette
Ensure the unit is fully charged or plugged into the mains.
Ensure that the unit is turned on and that the selector has been set to
the correct mode (eg. DAB if you wish to record from DAB radio).
Ensure that the tape has been inserted correctly and that the unit’s
tape door is rmly closed.
Ensure that the tape has been rewound fully before recording.
Ensure that you are using an empty tape which is able to record.
Remember – if a cassette has holes in the top corners, these need to
be blocked with sticky tape or paper to allow for recording.
Further help
If you are still experiencing problems, contact our customer service
team on 0330 024 0383.

13
CD
The CD is not playing
Ensure the unit is fully charged or plugged into the mains.
Ensure that the unit is turned on and that the selector has been set to
CD.
Ensure that the volume has been set correctly.
Ensure that the CD has been inserted correctly with the label facing
towards the rear of the unit.
Ensure that the CD is free from scratches and damage.
If the CD is still not playing, remove and re-insert the CD.
The CD is not reading
Ensure the unit is fully charged or plugged into the mains.
Ensure that the unit is turned on and that the selector has been set to
CD.
Ensure that the volume has been set correctly.
Ensure that the CD has been inserted correctly with the label facing
towards the rear of the unit.
Ensure that the CD is free from scratches and damage.
If the CD is still not reading, remove and re-insert the CD.
Further help
If you are still experiencing problems, contact our customer service
team on 0330 024 0383.

14
USB
The USB is not playing
Ensure the unit is fully charged or plugged into the mains.
Ensure that the unit is turned on and that the selector has been set to
USB.
Ensure that the volume has been set correctly.
Ensure that the USB has been inserted correctly.
If the USB is still not playing, remove and re-insert the USB.
The USB is not reading
Ensure the unit is fully charged or plugged into the mains.
Ensure that the unit is turned on and that the selector has been set to
USB.
Ensure that the volume has been set correctly.
Ensure that the USB has been inserted correctly.
Ensure that the USB contains the correct les in an MP3 format.
If the USB is still not reading, remove and re-insert the USB.
Further help
If you are still experiencing problems, contact our customer service
team on 0330 024 0383.

15
Bluetooth
There is no sound coming from the unit
Ensure the unit is fully charged or plugged into the mains.
Ensure that the unit is turned on and that the selector has been set to
Bluetooth.
Ensure that the volume has been set correctly.
The unit will not pair with the chosen device
First, turn the unit off and on using the power button.
Ensure that the unit is turned on and that the selector has been set to
Bluetooth.
Check that your device is not already paired with a different device.
Attempt to pair with the GPO Brooklyn again.
If prompted, enter the key 0000.
Further help
If you are still experiencing problems, contact our customer service
team on 0330 024 0383.

16
AUX IN
There is no sound coming from the unit
Ensure the unit is fully charged or plugged into the mains.
Ensure that the unit is turned on and that the selector has been set to
AUX IN.
Ensure that the volume has been set correctly.
Ensure that the cables have been connected properly, using the col-
ours on the units and cables as a guide.
Check to ensure that the cables are undamaged.
Ensure that the device you are attempting to connect is powered on
and working.
Further help
If you are still experiencing problems, contact our customer service
team on 0330 024 0383.

17
Headphones
There is no sound coming from the headphones
Ensure the unit is fully charged or plugged into the mains.
Ensure that the unit is turned on and that the selector has been set to
the correct function.
Ensure that the volume has been set correctly.
Ensure that the headphones are connected to the headphone port, and
that this port is free of debris.
Please note – headphones with built-in microphones may not work
correctly.
Further help
If you are still experiencing problems, contact our customer service
team on 0330 024 0383.

18
Microphone
The microphone input is not making a sound
Ensure the unit is fully charged or plugged into the mains.
Ensure that the unit is turned on and that the selector has been set to
the correct function.
Ensure that the volume has been set correctly.
Ensure that the microphone is connected to the microphone port, and
that this port is free of debris.
Please note – headphones with built-in microphones may not work
correctly.
Further help
If you are still experiencing problems, contact our customer service
team on 0330 024 0383.

19

www.gporetro.com
IMPORTED AND DISTRIBUTED BY:
ProTelX Ltd, Unit 6, Park 17 Industrial Estate, Moss Lane,
Whiteeld, Manchester, M45 8FJ UK
Other manuals for Brooklyn
2
Table of contents
Other GPO Portable Stereo System manuals