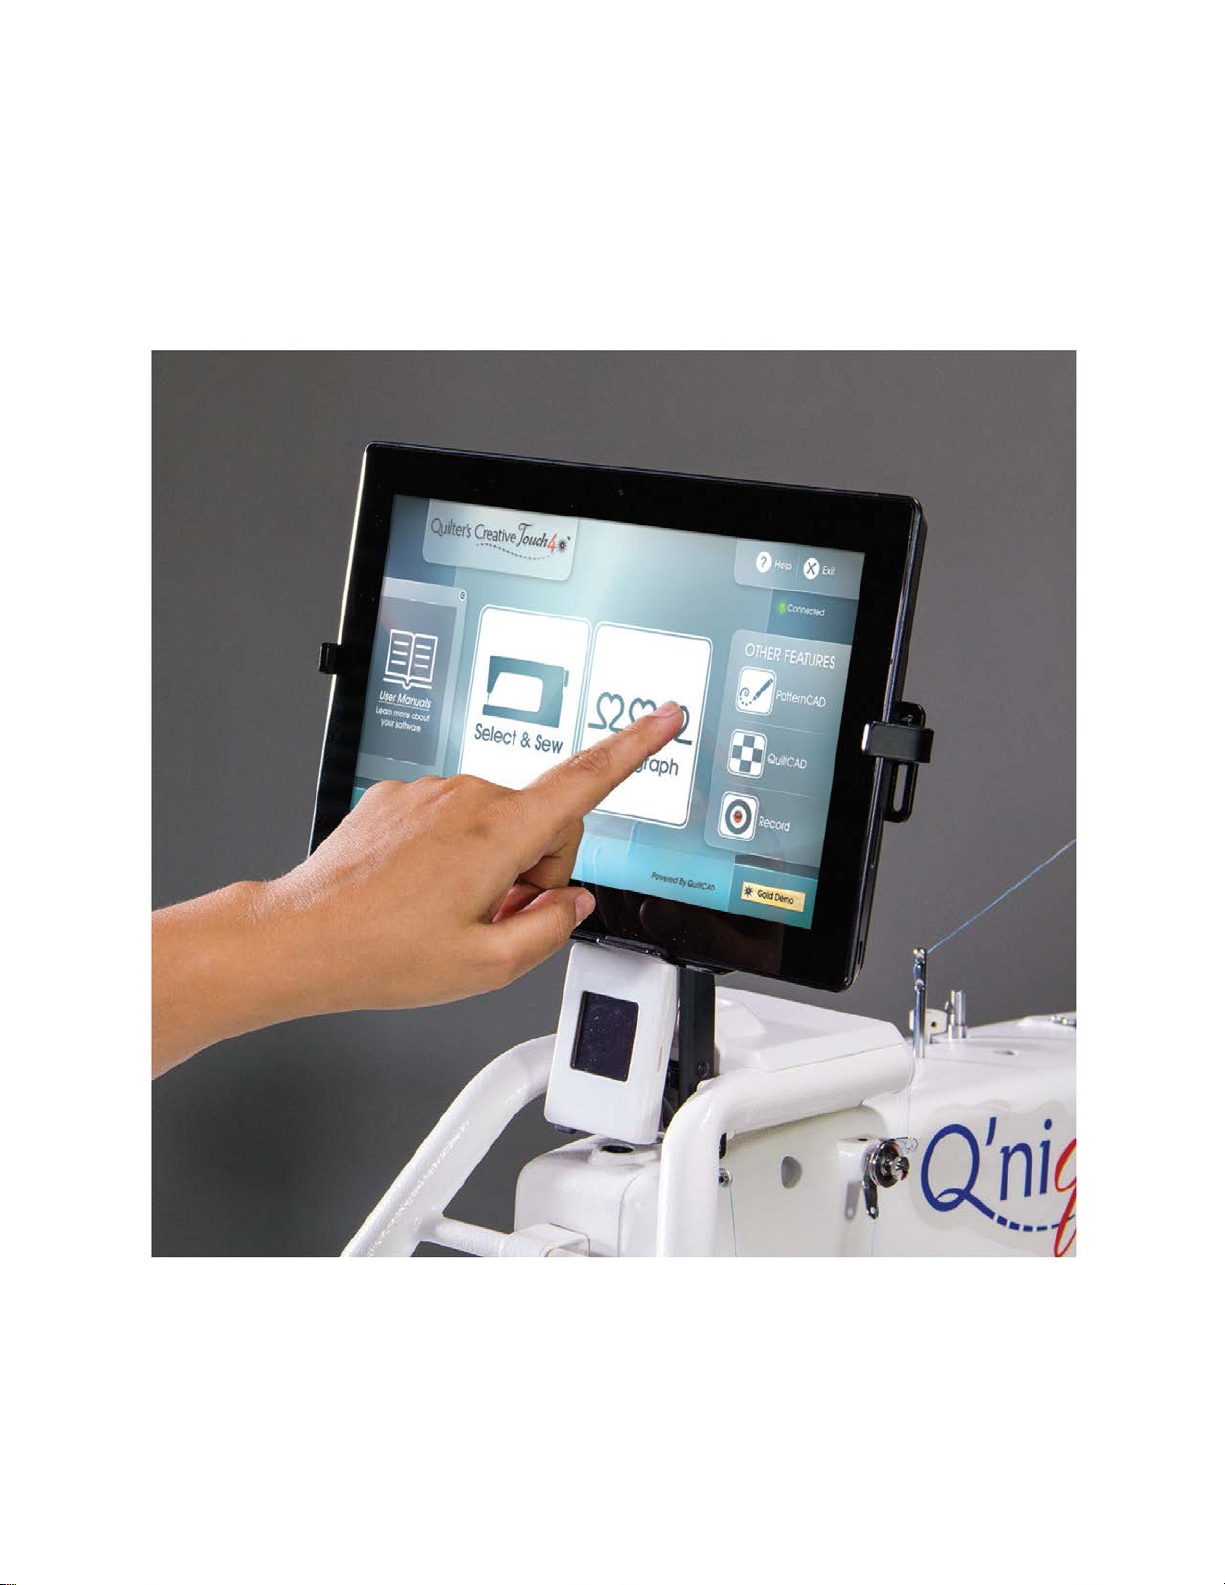
Grace Company QuiltMotion User manual

QuiltMotion
Frame Assembly Instructions
Copyright June 25, 2020
Grace Company
(Reproduction Prohibited)
Version 1.2

ii
?
X
Warranty
1-800-264-0644
Warranty Information for your QuiltMotion.
The QuiltMotion has a One-Year limited warranty on all parts. The Grace Company will repair or replace,
at its discretion, any part with problems due to our manufacturing or defects in materials. This warranty
does not cover parts damaged through misuse, improper storage, improper assembly, loss, natural
events, and willful destruction. Parts must be returned to the Grace Company, shipping prepaid, before
we can repair or replace them. We will promptly return the repaired/replaced part at our expense if done
within a year of the purchase date.
|Warranty QuiltMotion

iii
|Choose your Frame QuiltMotion
Continuum Frame
Turn to page 1 Q-Zone Queen Frame
Turn to page 20
Q-Zone Hoop-Frame
Turn to page 37 Q’nique Frame
Turn to page 54
Choose your Frame from the images below.
Proceed to the page number associated with your
Frame.

iv
|Choose your Frame QuiltMotion
GQ Frame
Turn to page 71
Bernina & Bernina V2
Turn to page 118
SR2 & SR2+ Frames
Turn to page 97
Majestic Frame
Turn to page 134
Pinnacle Frame
Turn to page 71 Next Generation Frame
Turn to page 71

v
GMQ Pro Frame
Turn to page 151 Little Gracie II Frame
Turn to page 151
|Choose your Frame QuiltMotion
Gracie King/Queen Frame
Turn to page 169

B
A
vi
Part Name
(quantity) Part Name
(quantity)
Part Name
(quantity) Part Name
(quantity)
Part Name
(quantity) Part Name
(quantity)
Part Name
(quantity) Part Name
(quantity)
Part Name (quantity)
Part Name
(quantity) Part Name
(quantity)
Part Name (quantity)
Part Name
(quantity) Part Name
(quantity)
|Parts List Box 1 QuiltMotion
Motor Plate
Clamp (5)
Back Belt
Clamp (2)
Q-Zone Hoop-
Frame QM Belt
Bracket (2)
Majestic QM Belt
Bracket Left (1) Majestic QM Belt
Bracket Right (1)
SR2 & SR2+ QM
Belt Bracket (2) Wood Frame QM
Belt Bracket (2)
Next Generation
QM Belt Bracket (2)
Motor Plate (1)
Continuum QM
Belt Bracket (2)
Q-Zone Queen QM
Belt Bracket (2)
Top Belt Bracket (1)
Belt Tensioner (2) Front Belt
Clamp (2)

vii
|Parts List Box 1 QuiltMotion
QCT Bracket
Q’nique 15 (1)
QCT Bracket
Q’nique 19 (1) QCT Bracket
Q’nique 21 (1) QCT Angle Support
Bracket (1)
Long Belt (1) Short Belt (1)
QCT Top Plate
U-Bracket (1)
Tablet Tray (1)
Power Strip
(1)
M6 Knob (1)
QCT Bracket
Top Plate (1)

viii
|Parts List Box 1 QuiltMotion
M6 x 40mm
SBHCS (2) M6 x 25mm
SBHCS (6)
M5 x20mm
SBHCS (4) M5 x 10mm
SBHCS (8)
M6 x 20mm
SBHCS (7)
M5 x 35mm
SBHCS (1)
M6 x 10mm
SBHCS (8)
M6 x 40mm
Hex Bolt (6)
M6 x 20mm
Hex Bolt (4) M6 x 10mm
Hex Bolt (4) Hex Nut M6 (15)
M6 Metal
Spacer (2) M6 Plastic
Spacer (2)
2.5mm Allen
Wrench (1) 3mm Allen
Wrench (1) 4mm Allen
Wrench (1)
2mm Allen
Wrench (1)
10mm &
13mm Box End
Wrench (1)
M6 x 25mm
Hex Bolt (2)

ix
|Parts List Box 1 QuiltMotion
Stylus (1)
6P/6C QuiltMotion
Cable (1) 7’ QuiltMotion
USB Cable (1) Male to Male USB
Adapter Cable (1) Q’nique to
QuiltMotion USB (1)
Sewing Cable (Juki
2000Q/2010Q) (1)
Sewing Cable
(Juki 98) (1) Sewing Cable 3
Prong (Janome) (1)
Zip Tie Mount (6)
Velcro Strips (6)
Zip Tie (8) Cable Wrap (1)
Software Box (1) Cloth (1) Long Arm Sewing
Board (1) Short Arm Sewing
Board (1)

1
|Continuum Frame QuiltMotion
Bottom Carriage
Step 1: Motor Plate Installation: ........................................................................................page 2
Step 2: Power Strip Installation: ........................................................................................ page 3
Top Belt Bracket
Step 3a: Short Belt Installation - Q’nique 15” & 19”............................................................. page 5
Step 3b: Short Belt Installation - Q’nique 21”......................................................................page 7
Step 3c: Short Belt Installation - Top Plate .........................................................................page 9
Continuum Frame
Step 4: Long Belt Installation...........................................................................................page 10
Step 5: Aligning the Belts ................................................................................................page 16
|Table of Contents Continuum

2
Step 1 –Motor Plate Installation
Parts Needed:
Tools Needed:
4mm Allen Wrench
10mm & 13mm Box End Wrench
Motor Plate (1) M6 x 20mm
SBHCS (5) M6 Nut (5)
1-2: Attach the Motor Plate to the Bottom Carriage
using (5) M6 x 20mm SBHCS and (5) M6 Nuts
through the slots in the Bottom Carriage.
1-1: InserttheMotorPlateintotheBottomCarriage
at an angle.
|Continuum Frame QuiltMotion
Motor Plate Front of Carriage
Back of Motor Plate
Front of Carriage
M6 x 20mm SBHCS
M6 Nut
Back of Carriage

3
Power Strip (1) M6 x 10mm
SBHCS (2) M6 Nut (2)
Step 2 - Power Strip Installation
Parts Needed:
2-2: Plug the Motor Plate into the Power Strip.
2-1: Attach the Power Strip to the back of the
Bottom Carriage and center it on the end using (2)
M6 x 10mm SBHCS and (2) M6 Nuts.
Tools Needed:
4mm Allen Wrench
10mm & 13mm Box End Wrench
|Continuum Frame QuiltMotion
M6 Nut
M6 x 10mm SBHCS
Power Strip
Back of Carriage
Power Strip
Motor Plate

4
Q’nique 15
Turn to page 5
Q’nique 21
Turn to page 7
Q’nique 19
Turn to page 5
G-Series Top Plate
Turn to page 9
|Continuum Frame QuiltMotion
Step 3 –Choose your Machine or Top Plate.
Proceed to the page number associated with your
Machine or Top Plate.
G-Series 2 Top Plate
Turn to page 9

B
A
B
A
5
Step 3a –Short Belt Installation - Q’nique 15” & 19”
Parts Needed:
Back Belt Clamp (1) M6 x 25mm
SBHCS (2) M5 x 20mm
SBHCS (2) M5 x 10mm
SBHCS (2)
Top Belt
Bracket (1) Short Belt (1) Belt Tensioner (1) Front Belt
Clamp (1)
Tools Needed:
3mm Allen Wrench
4mm Allen Wrench
3-1a: Place the more curled end of the Short Belt
into the Back Belt Clamp. Place the Front Belt
Clamp over the belt and attach with (2) M5 x 20mm
SBHCS to the Top Belt Bracket on Bracket Side A.
Note: The teeth of the belt should be facing
towards the Top Belt Bracket.
|Continuum Frame QuiltMotion
3-2a: Turn the right knob of the Belt Tensioner
counter clockwise and remove the tensioner knobs.
Short Belt
Back Belt Clamp
M5 x 20mm SBHCS
Front Belt Clamp
Top Belt Bracket
Bracket Side A

A
B
6
3-3a: Assemble the Belt Tensioner onto the
opposite end of the Top Belt Bracket on Bracket
Side A using (2) M5 x 10mm SBHCS.
3-4a: Re-Install the Belt Tensioner Knobs.
3-6a: Attach the Top Belt Bracket to the bottom of
the Sewing Machine using (2) M6 x 25mm SBHCS.
Note: Be sure the Belt Tensioner is at the back of
the machine. Slide Top Belt Bracket as far to the
rear as possible.
3-5a:RemovetheThreadStandfromyourmachine.
See your machine manual for instructions.
|Continuum Frame QuiltMotion
Belt Tensioner
M5 x 10mm SBHCS
Top Belt Bracket
Thread Stand
Top Belt Bracket
M6 x 25mm SBHCS
Belt Tensioner
Bracket Side A

B
A
B
A
7
Step 3b –Short Belt Installation - Q’nique 21”
Parts Needed:
Back Belt Clamp (1) M6 x 25mm
SBHCS (2) M5 x 20mm
SBHCS (2) M5 x 10mm
SBHCS (2)
Top Belt
Bracket (1) Short Belt (1) Belt Tensioner (1) Front Belt
Clamp (1)
Tools Needed:
3mm Allen Wrench
4mm Allen Wrench
3-1b: Place the more curled end of the Short Belt
into the Back Belt Clamp. Place the Front Belt
Clamp over the belt and attach with (2) M5 x 20mm
SBHCS to the Top Belt Bracket on Bracket Side B.
Note: The teeth of the belt should be facing
towards the Top Belt Bracket.
|Continuum Frame QuiltMotion
3-2b: Turn the right knob of the Belt Tensioner
counter clockwise and remove the tensioner knobs.
Short Belt
Back Belt Clamp
M5 x 20mm SBHCS
Front Belt Clamp
Top Belt Bracket
Bracket Side B

B
A
8
3-3b: Assemble the Belt Tensioner onto the
opposite end of the Top Belt Bracket on Bracket
Side B using (2) M5 x 10mm SBHCS.
3-4b: Re-Install the Belt Tensioner Knobs.
3-6b: Attach the Top Belt Bracket to the bottom of
the Sewing Machine using (2) M6 x 25mm SBHCS.
Note: Be sure the Belt Tensioner is at the back of
the machine. Slide Top Belt Bracket as far to the
rear as possible.
3-5b:RemovetheThreadStandfromyourmachine.
See your machine manual for instructions.
|Continuum Frame QuiltMotion
Belt Tensioner
M5 x 10mm SBHCS
Top Belt Bracket
Thread Stand
Top Belt Bracket
M6 x 25mm SBHCS Belt Tensioner
Bracket Side B

9
Tools Needed:
10mm & 13mm Open End Wrench
Step 3c –Short Belt Installation - Top Plate
Parts Needed:
Short Belt (1) Belt Tensioner (1)
M6 x 20mm
Hex Bolt (2)
Front Belt
Clamp (1) Back Belt Clamp (1)
M6 x 10mm
Hex Bolt (2) M6 Nut (4)
|Continuum Frame QuiltMotion
3-1c: Place the most curly end of the Short Belt
into the Back Belt Clamp. Place the Front Belt
Clamp over the belt and place (2) M6 x 20mm Hex
Bolts through the Belt Clamp.
3-2c: Assemble the completed assembly (from
Step 3-1b) to the front end of the Top Plate using
(2) M6 Nuts.
Note: The teeth of the belt should be facing
towards the Top Plate.
Short Belt
Back Belt Clamp
M6 x 20mm Hex Bolt
Front Belt Clamp
Belt Clamp Assembly
M6 Nut

10
3-3c: Assemble the Belt Tensioner onto the
opposite end of the Top Plate using (2) M6 x 10mm
Hex Bolts and (2) M6 Nuts.
Continuum QM
Belt Bracket (2) Belt Tensioner (1)
Long Belt (1)
Step 4 –Long Belt Installation
Parts Needed:
Tools Needed:
3mm Allen Wrench
Front Belt
Clamp (1)
Back Belt Clamp (1)
M5 x 20mm
SBHCS (2) M5 x 10mm
SBHCS (2)
|Continuum Frame QuiltMotion
M6 Nut
M6 x 10mm Hex Bolt
Belt Tensioner

11
4-1: Place the most curly end of the Long Belt into
the Back Belt Clamp. Install the Front and Back
Belt Clamps to the Continuum QM Belt Bracket
using (2) M5 x 20mm SBHCS.
4-2: Install the Belt Clamp Assembly onto the Left
Frame Leg.
Note: Belt Clamp Assembly will be adjusted at a
later time.
4-4: Turn the right knob of the Belt Tensioner
counter clockwise and remove the tensioner knobs.
4-3: Secure the Belt Clamp Assembly to the frame
using (2) pre-installed M6 x 16mm Set Screws.
Note: Do not tighten Set Screws at this time.
|Continuum Frame QuiltMotion
Continuum QM Belt Bracket
Front Belt Clamp
M5 x 20mm SBHCS
Long Belt
Belt Clamp Assembly
Long Belt
Back Belt Clamp
M6 x 16mm Set Screw
Belt Clamp Assembly
Table of contents
Other Grace Company Sewing Machine manuals

Grace Company
Grace Company Q'nique 19 X User manual

Grace Company
Grace Company Q'nique 21 User manual

Grace Company
Grace Company Q'nique 16X Manual User manual

Grace Company
Grace Company NM-EZ3 User manual

Grace Company
Grace Company Sure Stitch User manual

Grace Company
Grace Company Q-Zone Queen User manual

Grace Company
Grace Company Cuite Quick setup guide

Grace Company
Grace Company Q'nique 16X ELITE User manual

Grace Company
Grace Company G Series User manual