manuals.online logo
Brands
  1. Home
  2. •
  3. Brands
  4. •
  5. Grace
  6. •
  7. Amplifier
  8. •
  9. Grace M9XX User manual

Grace M9XX User manual

Other manuals for M9XX

2

Other Grace Amplifier manuals

Grace m801 User manual

Grace

Grace m801 User manual

Grace 801R User manual

Grace

Grace 801R User manual

Grace m501 User manual

Grace

Grace m501 User manual

Grace ALiX User manual

Grace

Grace ALiX User manual

Grace m802 User manual

Grace

Grace m802 User manual

Grace Grace 901 User manual

Grace

Grace Grace 901 User manual

Grace m802 User manual

Grace

Grace m802 User manual

Grace BiX User manual

Grace

Grace BiX User manual

Grace GDI-PA40TI Manual

Grace

Grace GDI-PA40TI Manual

Grace GDI-PA40TI User manual

Grace

Grace GDI-PA40TI User manual

Grace Lunatec V3 Manual

Grace

Grace Lunatec V3 Manual

Grace Felix User manual

Grace

Grace Felix User manual

Grace m906 User manual

Grace

Grace m906 User manual

Grace REX User manual

Grace

Grace REX User manual

Grace FELiX2 User manual

Grace

Grace FELiX2 User manual

Grace LUNATEC V2 User manual

Grace

Grace LUNATEC V2 User manual

Grace m201mk2 User manual

Grace

Grace m201mk2 User manual

Grace ROXi User manual

Grace

Grace ROXi User manual

Grace m108 User manual

Grace

Grace m108 User manual

Grace M9XX User manual

Grace

Grace M9XX User manual

Grace m801 User manual

Grace

Grace m801 User manual

Grace 801R Quick start guide

Grace

Grace 801R Quick start guide

Grace m902 User manual

Grace

Grace m902 User manual

Grace m108 User manual

Grace

Grace m108 User manual

Popular Amplifier manuals by other brands

Magnat Audio EDITION FOUR Owner's manual/warranty document

Magnat Audio

Magnat Audio EDITION FOUR Owner's manual/warranty document

Inter-m PA-2000A Operation manual

Inter-m

Inter-m PA-2000A Operation manual

Yamaha TX6n owner's manual

Yamaha

Yamaha TX6n owner's manual

Peavey TNT 150 user guide

Peavey

Peavey TNT 150 user guide

Bosch LBB 1903/10 Installation and user instructions

Bosch

Bosch LBB 1903/10 Installation and user instructions

Avocent Emerge DA1200D Installer/user guide

Avocent

Avocent Emerge DA1200D Installer/user guide

Redgum RGi35 operating instructions

Redgum

Redgum RGi35 operating instructions

Cambridge Audio AXA25 user manual

Cambridge Audio

Cambridge Audio AXA25 user manual

Alpine MRP-M200 owner's manual

Alpine

Alpine MRP-M200 owner's manual

Technical Pro H1502UrBT user manual

Technical Pro

Technical Pro H1502UrBT user manual

FMS EMGZ307 operating manual

FMS

FMS EMGZ307 operating manual

Racal Instruments 5601 user manual

Racal Instruments

Racal Instruments 5601 user manual

Valcom V-1094A Technical specifications

Valcom

Valcom V-1094A Technical specifications

Cambridge Audio 851D user manual

Cambridge Audio

Cambridge Audio 851D user manual

QSC 3800 Specifications

QSC

QSC 3800 Specifications

NAD C300 owner's manual

NAD

NAD C300 owner's manual

Rotel RMB-1077 owner's manual

Rotel

Rotel RMB-1077 owner's manual

Peavey Monitor 300 Series operating guide

Peavey

Peavey Monitor 300 Series operating guide

manuals.online logo
manuals.online logoBrands
  • About & Mission
  • Contact us
  • Privacy Policy
  • Terms and Conditions

Copyright 2025 Manuals.Online. All Rights Reserved.

m9XX Audiophile Headphone Amp / DAC
Owner’s Manual Revision E
11/06/2015
race Design / Lunatec LLC
4689 Ute Highway, Longmont, CO 80503
info@gracedesign.com
w ww.gracedesign.com
1.303.823.8100
Page 1 of 15
Table of Contents
Welcome.....................................................................................................................................3
Connections and Controls........................................................................................................4
REAR PANEL............................................................................................................................................................................................. 4
USB Connector #1 - Data / Signal / Bus Power Input.......................................................................................................... 4
USB Connector #2 - High Power Input.................................................................................................................................... 4
TOSLINK Optical Input.................................................................................................................................................................. 4
Line Outputs..................................................................................................................................................................................... 4
FRONT PANEL.......................................................................................................................................................................................... 4
Headphone Outputs...................................................................................................................................................................... 4
7-Segment LED................................................................................................................................................................................ 5
Volume Control (top panel)......................................................................................................................................................... 5
Operation...................................................................................................................................5
Unpacking Your m9XX.................................................................................................................................................................. 5
Setting Up Your m9XX................................................................................................................................................................... 5
Powering Up Your m9XX.............................................................................................................................................................. 5
Connecting Headphones............................................................................................................................................................. 6
Line Output Operation................................................................................................................................................................. 7
Volume and Mute Control........................................................................................................................................................... 7
Crossfeed Circuitry......................................................................................................................................................................... 7
Computer Conguration.............................................................................................................................................................. 8
Installing the Windows USB driver............................................................................................................................................ 9
Using the Setup enu............................................................................................................11
Navigating the Setup Menu..................................................................................................................................................... 11
Setup Menu Items........................................................................................................................................................................ 11
Specications..........................................................................................................................14
Cleaning and aintenance....................................................................................................15
Warranty Information.............................................................................................................15
Page 2 of 15
Welcome
The m9XX, a collaborative eort between race Design and Massdrop, represents a new level of
performance for compact, personal audio playback devices. With zero Ohm output impedance
headphone outputs and a remarkable USB bus power supply design, the m9XX delivers
unprecedented playback performance with compact, stylish ergonomics.
Setup and operation is of the m9XX simple. While mostly plug and play, there are a few operational
concepts that are helpful to understand. We encourage you to read this manual thoroughly to
familiarize yourself with the unit so you can use and enjoy it to its fullest extent.
If you have any questions, please visit our website for more information - www.gracedesign.com,
or feel free to call us directly at 1.303.823.8100. We’d love to hear from you!
Page 3 of 15
m9XX
TOSLINK
LR 5.0V, 2A USB 2.0
MADE BY GRACE DESIGN
IN LYONS, COLORADO USA
m9XX
LEFT HEADPHONE
JACK
RI HT HEADPHONE
JACK
7-SE MENT
DISPLAY
LINE OUT
JACKS
TOSLINK
INPUT
USB #1
DATA+BUS POWER
USB #2
HI H POWER DC
VOLUME CONTROL
WITH PUSH-BUTTON
Connections and Controls
REAR PANEL
USB Connector #1 - Data / Signal / Bus Power Input
Asynchronous USB 2 interface for bit perfect, zero interface induced jitter DAC operation.
Accommodates 44.1kHz to 384kHz PCM and 64X - 128X DSD. Driverless operation with MAC OS.
USB Class 2 operation with Windows up to 384kHz with free driver download from race Design.
When nothing is connected to the USB connector #2, the m9XX is bus powered through this
interface and operates in Low Power mode.
USB Connector #2 - High Power Input
Use this power connection to operate the m9XX in High Power mode. This connector carries only
DC power and no USB data. Once the included low noise 2A USB power supply is plugged into this
input, the m9XX will enter High Power mode (indicated by “HP” on the 7-segment display).
TOSLINK Optical Input
Accepts up to 96kHz, 24 bit PCM digital audio signal. Automatic de-emphasis equalization. The
m9XX setup menu contains an input select option that toggles between the USB input or the
TOSLINK input. See the Setup Menu section in this manual for more setup information.
Line Outputs
Unbalanced, level controlled line outputs via a pair of gold plated RCA phono jacks. These outputs
are designed to connect to a power amp, powered speakers, preamps, or headphone amps. When
headphones are connected to the right hand jack, the line output signal is muted.
FRONT PANEL
Headphone Outputs
Parallel headphone outputs wired to high quality TRS jacks. When headphones are connected to
the right hand jack, the line output signal is muted.
Page 4 of 15
7-Segment LED
Displays level setting from 0 - 99. This display is also used for navigating the m9XX setup menu. The
volume control step size is 0.5dB. The right hand decimal point comes on to indicate the 0.5dB
value. For instance, “65.“ indicates a volume setting of 65.5dB.
Volume Control (top panel)
Top mounted rotary encoder provides precise, stepped level control. Its push-button feature is
used to mute all signals (single push and release) or access the setup menu (push and hold).
Operation
Unpacking Your m9XX
The m9XX arrives in simple but protective Korrvu™ packaging. We recommend that you save this
box in the event you wish to store or ship your unit in the future. The box will contain the m9XX,
printed owner's manual, a 2A USB wall power supply and 2 USB type B mini cables – one 6' and one
10'. If you are missing any of these items, please contact race Design at 1.303.823.8100.
Setting Up Your m9XX
The m9XX is designed to sit on your desktop or atop your audio center. Its small, low prole stature
easily ts on any desk or media center furniture. Put your unit wherever you like, as long as it's
within reach. The top mounted volume control will sit comfortably under your hand whenever you
need to control your system volume, quickly mute or change settings.
Headphone jacks are on the front and inputs and line outs are on the back, so your cabling will
remain clean and simple.
Powering Up Your m9XX
There is no power switch. Power is automatically applied when either of the USB jacks are
connected. If you wish to power o the m9XX, simply disconnect the USB connection.
The m9XX can be powered from the your computer’s USB Bus in Low Power mode via the #1 USB
connector. In this mode the internal supplies operate at lower voltage to conserve power. This is
useful if you are traveling and do not have access to AC wall outlet.
If you connect the included 2A USB power supply to the #2 USB connector, the m9XX switches into
High Power mode. The #1 USB 2 port will maintain an active connection to your computer, but no
Page 5 of 15
power will be drawn from the computer port. If running in High Power mode and the power supply
is disconnected, the m9XX will reboot.
Below is a summary of all of the powering and signal input congurations:
1. Low Power, USB input: One USB cable from the computer to the m9XX #1 USB input.
m9XX receives power and audio from the computer.
2. High Power, USB input: One USB cable from the computer to the m9XX #1 USB input and
one USB cable from the external 2A DC power supply to the m9XX #2 high power DC input
connector. The m9XX receives audio from the computer and receives power from the
external DC supply.
3. Low Power, TOSLINK input: One USB cable from a standard USB power source (computer
or 0.5A USB power supply) connected to the m9XX #1 USB input. TOSLINK optical cable
connected to the TOSLINK input. (This would be an unusual setup where you don't have
access to a high power DC power supply.)
4. High Power, TOSLINK input: One USB cable from the 2A DC power supply to the m9XX #2
high power DC input connector. TOSLINK optical cable connected to the TOSLINK input.
m9XX receives audio from TOSLINK and power from the external DC supply.
5. Self Powered ode: This mode is for connecting your mobile device (iOS, android) to the
m9XX. Mobile devices generally cannot provide any power. In this mode the m9XX will
report that it is self powered. To enter self powered mode, rst connect the USB cable from
the external 2A DC power supply to the m9XX #2 high power DC input connector, then
connect your device to the m9XX #1 USB input. For iOS, you will need the 'Apple Lightning
to USB Camera Adapter', for supported Android devices you will need an 'On The o' USB
cable.
Connecting Headphones
There are 2 ¼” headphone output jacks on the front, which are wired in parallel. The second jack on
the right is a switched type. If you have the line outputs connected to a power amp or powered
monitors, connecting headphones to this jack will automatically mute the line outputs, allowing
you to eectively ‘toggle’ between the headphone and speaker outputs.
IMPORTANT NOTE: The m9XX has very low output impedance, measuring around 0.08 Ohms.
Ohm's law states that as the load impedance approaches 0 Ohms, even a small voltage will result in
high current ow. When a headphone plug is inserted in to the headphone jack of any headphone
amplier, there is a brief moment when the output of the amplier gets shorted to ground. If there
is music playing when this happens, there will be high current ow which will likely cause the
Page 6 of 15
supply current to the m9XX to rapidly rise above the maximum current which a computer or
external USB power supply can deliver.
If an over-current condition occurs, the m9XX's processor will detect it, immediately mute the
audio and turn o the internal audio power supplies. This will protect the m9XX from damage and
prevent it from drawing excess current from your computer or power supply. When this happens
the LED display will indicate OC (Over Current) momentarily. Once the over-current condition is
removed, the m9XX audio power supplies will be turned back on and music will resume.
While this does not hurt the m9XX, it is good practice nonetheless to mute the audio push down
once on the volume knob) or pause your playback source while plugging or unplugging
headphones.
Line Output Operation
The RCA phono line output jacks are provided to connect the m9XX to an amplier, powered
speaker system, or preamplier. Use RCA interconnects to connect from the m9XX to the
unbalanced line inputs of your external device. These outputs follow the volume / mute control. A
volume level of 90 is “unity gain” and will allow the m9XX to produce a 2V output signal for a 0dBFS
digital input signal.
The signal feeding the rear panel line out jacks is "normalled" through the right hand headphone
jack. This is so that if you have speakers connected to the line outputs, they will mute when you
plug headphones into the right hand jack. If you want to hear speakers and headphones at the
same time, simply use the left hand jack. Note that the crossfeed circuit feeds these connectors.
When listening to loudspeakers you may want to turn crossfeed o.
Volume and Mute Control
A high quality, light action stepped rotary encoder is used for volume and mute functions. Turn the
knob clockwise to increase volume, counterclockwise to decrease the volume. A single push and
release will mute all outputs. When the unit is muted, the 7 segment LED will dim and pulsate to
indicate mute is active. Another single push and release de-activates mute. The m9XX attenuator is
a hybrid design. Most of the volume control duties are handled in the digital domain with 32 bit
processing but there are two analog gain ranges as well. This allows a full 99dB of volume control
range, preserves a very low noise oor for IEMs, and allows high peak output voltage for low
eciency planar magnetic phones.
Crossfeed Circuitry
A completely analog crossfeed circuit electronically simulates the signal crossfeed that occurs in a
natural acoustic space. The crossfeed function can be switched on or o from the Setup Menu.
Page 7 of 15
How does crossfeed work? When listening to loudspeakers in a room, your left ear hears sound
primarily from the left speaker (and vice versa) but also receives a signal from the right speaker at a
lower level and with some time delay compared to the right ear. As well, the right speaker sound
that reaches the left ear does not have a at frequency response as the sound waves have traveled
around the shape of your head before reaching your left ear. The brain uses delay, level and
frequency response characteristics to process the location of a sound and hence, create an aural
image.
However, when listening through headphones, each ear only hears the sound from one transducer
and the mixing of signals between the ears does not exist. In this situation the brain is left without
many of the psycho acoustic clues required to generate a properly distributed image and an
accurate sound stage. The result is that instruments seem to cluster in the far left, far right or center
of your head. Since the vital clues are absent, the brain has a dicult time deciding how to process
the sounds coming from the headphone, which can result in listening fatigue when listening for
extended periods of time. The m9XX contains crossfeed circuitry which electronically simulates the
signal crossfeed that occurs in a real acoustic space and helps the brain establish instrument
locations across the entire sound stage. While it is dicult to perfectly model the very complex
level, delay and frequency response characteristics of the head, the crossfeed circuitry in the m9XX
gives the brain some of the basic clues it needs and the result is a very pleasing simulation of an
acoustic space while maintaining the tonality and balance of the original source.
Computer Conguration
The m9XX computer audio connection is an asynchronous USB interface. With asynchronous mode
USB operation, the m9XX USB DAC becomes the clock master to which the computer’s USB bus is
synced. The computer is synced to a crystal-based audio clock signal and the system works with
dramatically lower jitter. No phase-lock loop or sample rate conversion is necessary, which means
bit-perfect playback from a computer with eectively zero interface induced jitter.
Regardless of the type of computer you will use to playback audio, it must have at least one
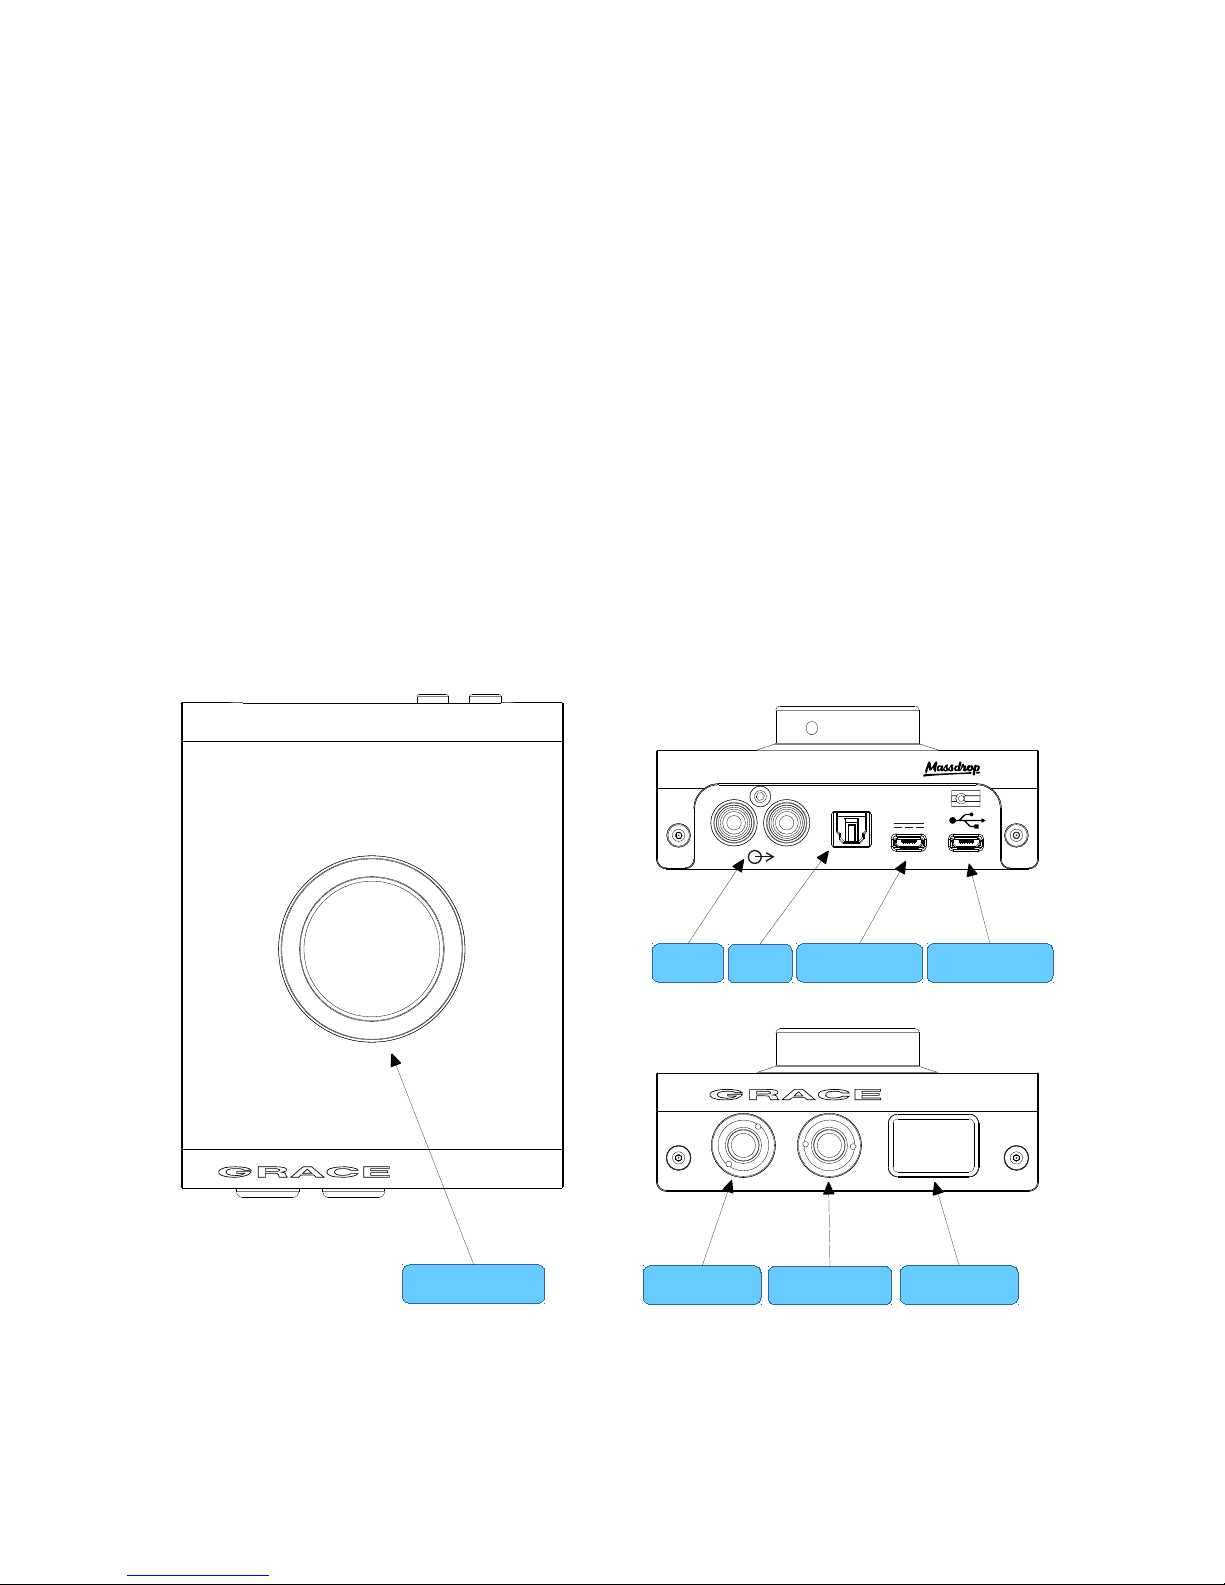
available USB 2 (or 3) port. The m9XX ships with 2 standard USB type A to USB type B micro cables,
one 6' and one 10'. The type A connector plugs into the computer and the type B micro connector
to the #1 USB m9XX input.
The m9XX can operate as a USB Audio Class 1 or Audio Class 2 device. In USB 1 mode the m9XX
supports driverless operation on Mac OS and Windows at sample rates up to 96kHz. In Audio Class
2 mode the m9XX supports driverless operation on Mac OS at sample rates up to 384kHz. On
Windows, Audio Class 2 operation requires downloading and installing a free driver, which can be
found on our website – http://www.gracedesign.com/support/support.htm.
Driverless operation on Mac OS basically means ‘plug and play’. The m9XX will automatically show
up in your computer’s list of supported audio devices as ‘m9XX’. In most cases, simply choose that
Page 8 of 15
as your audio playback device. Dierent operating systems and audio players will pose their own
set of congurations in setting up the m9XX as the audio playback device. We will direct you to a
very well written and comprehensive document by our friend and colleague Charles Hansen from
Ayre Acoustics. http://www.ayre.com/usb.htm. This is an invaluable resource for computer/USB
audio setup information for most current operating systems, and we strongly urge you to
familiarize yourself with the information pertaining to your specic OS.
In the event that you have any setup issues which aren’t addressed by these resources, feel from to
contact us directly at 303.823.8100 M - Friday 9 – 5 MST, or you can email our service department -
service@gracedesign.com.
Installing the Windows USB driver
To download the Windows driver, visit our support page-
http://www.gracedesign.com/support/support.htm
Under m9XX, locate and save the driver le titled 'XMOS Stereo USB Audio Class2 Driver'.
Begin with your m9XX disconnected from your computer. Double click on the driver le to run and
follow the instructions in the installation dialog:
1. Open install dialog. 2. Accept terms and click next.
Page 9 of 15
3. Choose default location and install. 4. Success.
5. Connect your m9XX. 6. Ready to go!
In USB 1 mode, the m9XX will show up in the OS playback
device dialog as 'm9XX'
In USB 2 mode, the m9XX will show up in the OS playback
device dialog as 'X OS USB Audio'
Page 10 of 15