Grand-Pro A1 User manual

UserManual
ROBOT VACUUM CLEANER
Please read this manual carefully before using
Model : A1
A1

Battery Installation and Removal
Cleaning Cloth Installation and Removal
Troubleshooting
FAQs
Warranty Card
Product Introduction
Maintenance
Maintenance
Product Parameter
Side Brush Installation and Removal
Operaation
Battery Charging
Package Content
Illustration
Remote Controller
First Operation
Main Unit Control Board
--------------------07
-------------------------------------------10
-------------------08
-------------------09
---------------------------------------12
----------------------------------14
-----------------------------------01
---------
------------------
-----------------------------13
-----------------------
-----------------------------11
----------
--------------------
----------------------------04
---------------------------06
------------------ - --------------------01
--------------------- ---------------------------02
----------- ---------------------------03
-------------- --------------------------- 04
----------------------------05
----------------------------------------15
Catalog
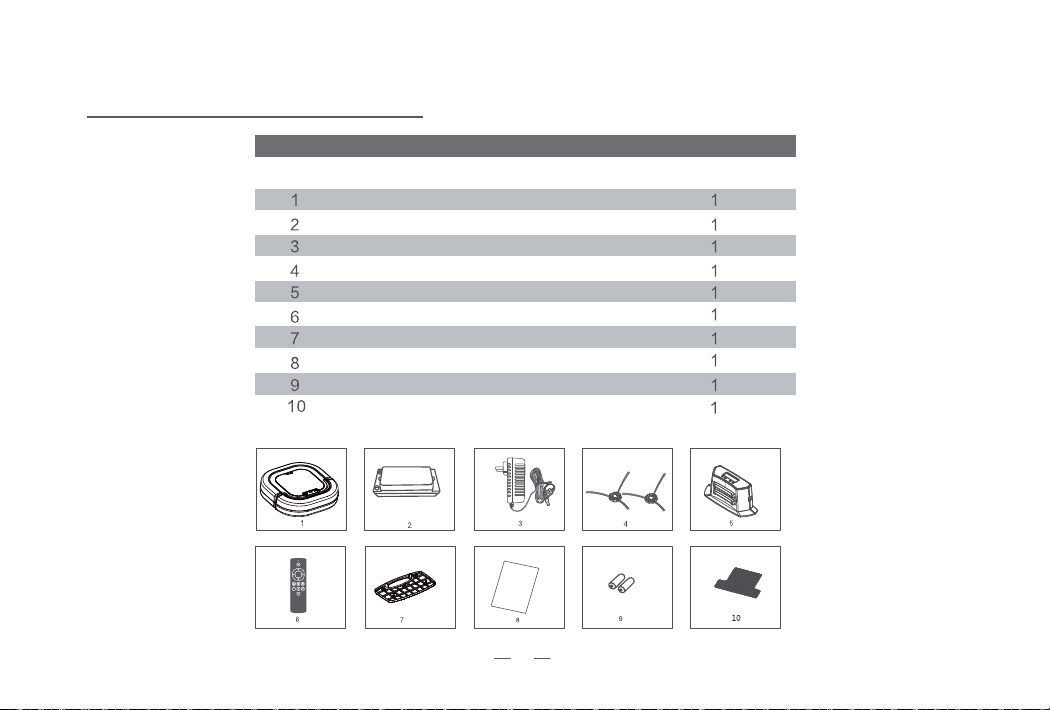
Package Content
Main Unit
Rechargeable Battery
Power Adapter
Side Brushes
Docking Station
Remote Controller
Filter(Installed)
User Manual
Battery for Remote Controller
Cleaning Cloth
Pair
Pair
User
Manual
Content QuantityNumber
1
ProductIntroduction

ProductIntroduction
MainUnit
Start/Stop Button
Dust Box Lid
Bumper
Power Button
Power Adapter Plughole
Power Adapter Plughole
Contact shrapnel
LCD Control panel
Vacuum Port
Anti-drop Sensor
Anti-drop Sensor
Universal Wheel
Big Wheel
Big Wheel
Battery Lid
Magic Stick
Electrodes for Charging
Anti-drop Sensor
Side Brush
Notice
Use 24V 1000mA power adapter only!
This power adapter for indoor use only!
Wet hands DO NOT touch power adapter, plug and cords.
2

Introduction
Start
Front
Left
Back
Right
Stop
Random Clean Mode
Random Clean Mode
“Z” Clean Mode
“Z” Clean Mode
Mop Mode
Mop Mode
Edge Clean Mode
Edge Clean Mode
Fan
Fan
Charge
Charge
Spiral Clean Mode
Spiral Clean Mode
Remote Controller Introduction
Number Description
Start
Front
Left
Right
Stop
Back
Press start to enter automatic clean mode.
Press once, the robot will move front. It will move back for 3.9in if it gets
stopped by obstacles.
Press once or long press to move left.
Press once or long press to move right.
Press once or long press, the robot will move back for 8 inches. Notice that there
is no anti-drop sensor on the back of the robot, so please mind the steps when
you control it to move back.
Press once to stop.
The robot will enter random clean mode.
The robot will clean against wall.
The robot will spin in circles to clean, use this function for Main cleaning area.
The robot will clean with “Zig-Zag” pattern.
The robot will immediately enter mopping mode once this button is pressed.
The robot will immediately enter vacuuming mode once this button is pressed.
The robot will immediately go back to docking station to charge once this
button is pressed.
1. The robot will clean with the clean mode you choose.
2. When the robot is charging on the docking station,press “Start”
to let it leave the docking station and then clean the room according
to the mode you choose.
RemoteController
3

FirstOperation
BatteryCharging
01 Direct charge with power adapter
1. Plug in the adapter. You will see a flashing green light
if it is being charged
successfully.
2. Green light on if fully charged.
3. Red light on, needs to be charged now.
02 Charge with docking station
1. Connect the adapter to docking station.
2. Make sure the electrodes of docking station and the
robot are connected.
3. You will see a flashing green light if it’s being charged
successfully.
Notice : If the robot be moved when it is at the
docking station, the power light will turn to green.
The robot will go back to docking station if it runs out
of battery.
03 Instructions of Power Light
1. Green Light Flashes : being charged
2. Green Light ON : fully charged
3. Red Light ON : needs to be charged
Power adapter plug
plughole
Plughole
Plug
4

FirstOperation
ControlPanel
Include 2 led lights,1 button,and a Remote control
signal receiver.
Malfunction Light(Red) Battery Light(Green)
Start/Stop Button
Remote control
signal receiver
LED Light Instructions
Malfunction Light
(Red)
Battery Light(Green) Robot Status
On
On
Flashes
On
On
On
Flashes Off Charging
Off
Off
Fully Charged
Low battery
Robot get hung
Side Brushes or big whell
get stuck
Abnormal Charging
Red light and green light flashes in turn
MultipleCleanModes
1. Automatic Clean Mode : The robot will clean your room and
switch to different clean modes according to environment.
2. Spiral Clean Mode : Use this mode for main cleaning area,
and then the robot will spin in circles to clean.
3. Edge Clean Mode : The robot will clean the room perimeter
and navigate around furniture and obstacles.
4. ”Z” Clean Mode : This “Zig-Zag” clean mode cleans fastly and
effectively in large areas if there’s not too much furnitures.
5

ControlPanelofDockingStation:
Formatofschedules:
Functionsofbuttons:
GeneralOperation
“Set” : Press ”Set”to switch between setting the “CLK”present
time and” ”the working schedule.
A. Set present time :
Press “Set” once, ”SET“ ,”CLK” will flash.
Press “Select” to switch aming time setting modes of Hour,
Minute,and Day of Week.
Press “+”and “-” for adjustment of the digits.
Press “Set”again when finish time setting.
B. Set working schedule :
Press “Set”twice, “ ”(on the left side of the screen)will flash.
Press ”Select” to switch among “Hour”/”Minute”/”Day of
Week” to do the setting as described in paragraph A.If no
time setting was done before,the screen will show”--:--”,
press”+” and “-” to adjust the digits.
*** With “ ”shown on the LCD display indicates the working
schedule is set completely.
“+” : Press “+”for increment adjustment purpose.
“-“ : Press “-“for decrement adjustment purpose.
a. Work everyday(Su-Sa light on).
b. Five days a week(Mo-Fr light on).
c. Six days a week(Mo-Sa light on).
d. Two days a week(Su and Sa light on ).
e. Once a week(Any one day of the week light on).
ON
Battery Indicator
Present Time Setting Hour Minute Day of Week
Completed setting for
time of cleaning
6

Side Brush Installation and Removal
Installation
Just press it in. Hold and pull it out.
Removal
Installation and Removal of Remote Controller Battery
01 Press the round button and push to open the battery lid.
02 Put in the two AAA batteries and make sure that the positive and
negative electrodes are correct. Close the battery lid.
FirstOperation
1. Place the robot upside down on a flat surface.
2. Install the brush with red bracket to the left and the
green to the right.
7

Battery Installation and Removal
1. Please turn off the robot before installing or removing
battery.
2. As seen in picture below, press A and push the battery
lid in direction B.
3. Put in the battery into battery bay with correct direction,
make sure that the electrodes are connected.
4. Close the battery lid.
Battery Bay
Electrodes
Use only authentic batteries supplied by GRAND-PRO.
Use of third-party batteries will void your warranty
and may cause property damage or injury.
Notice
FirstOperation
8
Table of contents


