Grate Heater 2017 User manual

HEAT& GLOQUALITYSYSTEMS
REGISTERED BY SGS ICS
001-900B 1/06
Congratulations!
YouhavepurchasedaqualityHeat&GloGrateHeater.
Printed in U.S.A. Copyright 2006,
Heat & Glo, a brand of Hearth Technologies Inc.
20802 Kensington Boulevard, Lakeville, MN 55044
Grate Heater Heat Exchanger
- Installation and Operating Instructions -
The Grate Heater can be used in a wood-burning ma-
sonry fireplace with anyset of glass doors and features
a concealed blower that retains the natural beauty of
your fireplace. With proper care and maintenance, the
Grate Heater is a safe and efficient insert for your fire-
place.
This unit is recommended for use with a glass door en-
closure. Using the Grate Heater in conjunction with glass
doors produces maximum performance from the fireplace
and presents a lower operating fuel cost.
Model
Width
Depth
Weight
2017
20 in.
17 in.
48lbs.
2220
22 in.
20 in.
52lbs.
2422
24 in.
22 in.
56lbs.
INSTALLATION INSTRUCTIONS:
All units come with a front grill 1-3/8 inch high and 48
inches wide. This unit will force more heated air into the
room and allow a more comfortable temperature during
thebrisk wintermonthsbyhavingone(1)venting outlet.
After installing, avoid building a raging fire in the fire-
place. The fan will distribute more heat directly to the
room if the burn cycle is even. Overfiring can cause
discoloration to any glass door unit and may damage
theheatexchanger.
Step 1.
Verify that the Grate Heater is the proper size for the
fireplace.
Step 2.
For fireplaces with existing glass doors, make sure
they can be elevated 1-3/8 inch. Remove the glass
doors. Insert the Grate Heater and reposition the glass
door on top of the riser bar. This will elevate the glass
door 1-3/8 inch.
Step 3.
Mount extender bars on the heat exchanger with the
metalscrews provided(see Figure1).
Step 4.
Place the glass door enclosure on the front of the ex-
changer,making sure the glassdoor and heatexchanger
arecentered in thefireplace.
Step 5.
Remove the extender bars and cut them so the total
riser bar width is the same as the glass enclosure. Cut
the cord shield to the desired length and slide it on the
extender bar where cord is introduced (this protects the
cord from heat). Place the end caps on the ends of the
extender bars with the notched cap on the cord side
(see Figure1).
Step6.
Reposition and secure the glass door according to the
glassdoor instructionmanual.
Step 7.
For a dropped hearth installation, the back legs come
standardwith 1/2 inch nuts and it is recommended that
1/2 inch x 2-1/2 inch bolts be used. (Not included).
Step 8.
Plug cord into nearest outlet. Exchanger will start when
temperature reaches 1100 F and turn off at 900 F.
Printed in U.S.A Copyright 2006,
The Original Grate Heater
Distributed exclusively by:
The Alaskan Fireplace Company
9820 Durand Ave., Sturtevant, WI 53177 1
Installation and Operating Instructions
Note: Grate heater fan should be plugged in at all
times when the unit is inuse,otherwise damage to
the motor will occur.
Toll-Free 1-866-667-8454
NorthlineExpress.com www.NorthlineExpress.com

OPERATING INSTRUCTIONS
1. On initial start-up of the Grate Heater, there will be
some smoke produced.This is aburn-off of oil used
in manufacturing of this unit. The smoke will sub-
side after the first firing. The fan should be left on
low speed,withthefireplace doorsopen.Thesmoke
can be minimized by placing a damp cloth over the
heat outlet.
2. The blower sliding vent should only be open when
glass doors are not used or in the event of a power
failure or blackout. Under these conditions the vent
is used to cool the blower.
3. This unit is equipped with a three (3) wire ground
cord for protection. Never remove the ground lead.
Besurethe electrical plug providedis plugged into a
proper three (3) prong outlet. If an extension cord is
used, be sure it has the proper ground and is of the
same or greater valuethan the cord provided on the
Grate Heater.If theextensioncordis toolight the fan
may fluctuate its speed and operate improperly.
4. Periodicremovalandcleaningofashesonthesquare
tubing will increase heat output and maximize effi-
ciency.
5. Under normal use the blower on the Grate Heater
shouldbeoiledevery4,000hoursofoperation.There
is an opening on the top of the motor where the
lubricantcanbe applied(see Figure2).
LOG
RETAINER
STEEL
BASKET
WIDTH
SHEET
METAL SCREW
THERMALSENSOR
TAB
DEPTH
THERMOSTAT
AIROUTLET
CORD SHIELD
MOTOR
BOX
RISER BAR
HEAT SHIELD
SLIDING VENT
AIR INLET
END CAP
RHEOSTAT
EXTENDER
Figure 1. Grate Heater
THERMOSTAT
OIL PORT
GROUND
WIRE
(GREEN)
MOTOR
RHEOSTAT
CORD
Figure 2. Wiring and Oil Port
2
Toll-Free 1-866-667-8454
NorthlineExpress.com www.NorthlineExpress.com

TROUBLESHOOTING
1. Blower will not turn on.
If afire has not been started on the heat exchanger,
thefan will not comeon. Because the Grate Heater
is thermostatically controlled, it will not turn on until
the thermostat, located onthe top of the motor box,
reaches 1100 F.After you start the fire it will normally
take 15 to 30 minutes before the fan will turn on.
The blower will automatically turn off at a tempera-
ture of 900 F.
2. Blower turns on and off while fire is burning.
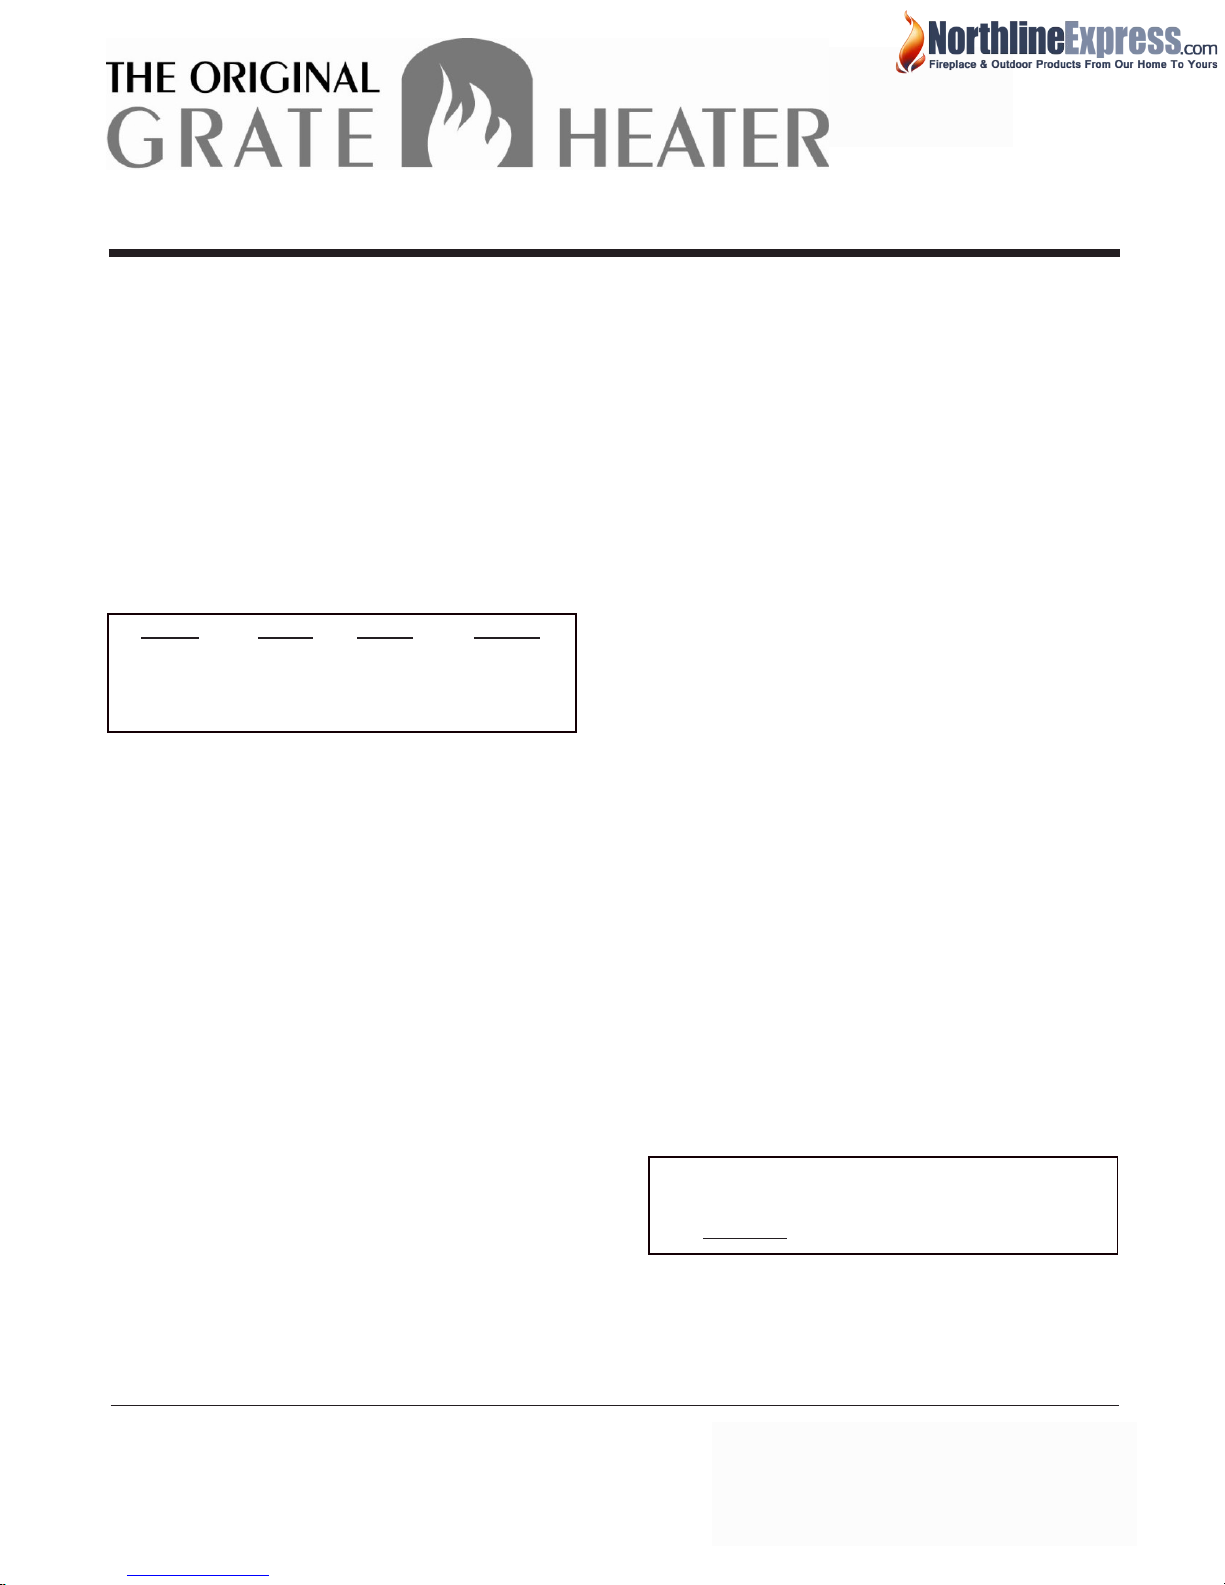
Check the thermal sensor tab which is 1 inch wide
and 4 inches long, located on the top of the motor
box,extendingoverthe thermostat(seeFigure1).It
conductstheheatfrom the Grate Heatertothesen-
sor so the motor is activated. If the motor is starting
and stopping, you may need to tighten this tab so it
is touching the thermostat. This can be done with a
standard screwdriver. Tighten the tab only so it is
touching the thermostat. Do not overtighten.
3. Motor hums upon starting.
Be sure the Grate Heater is unplugged before
checking for potential problems.
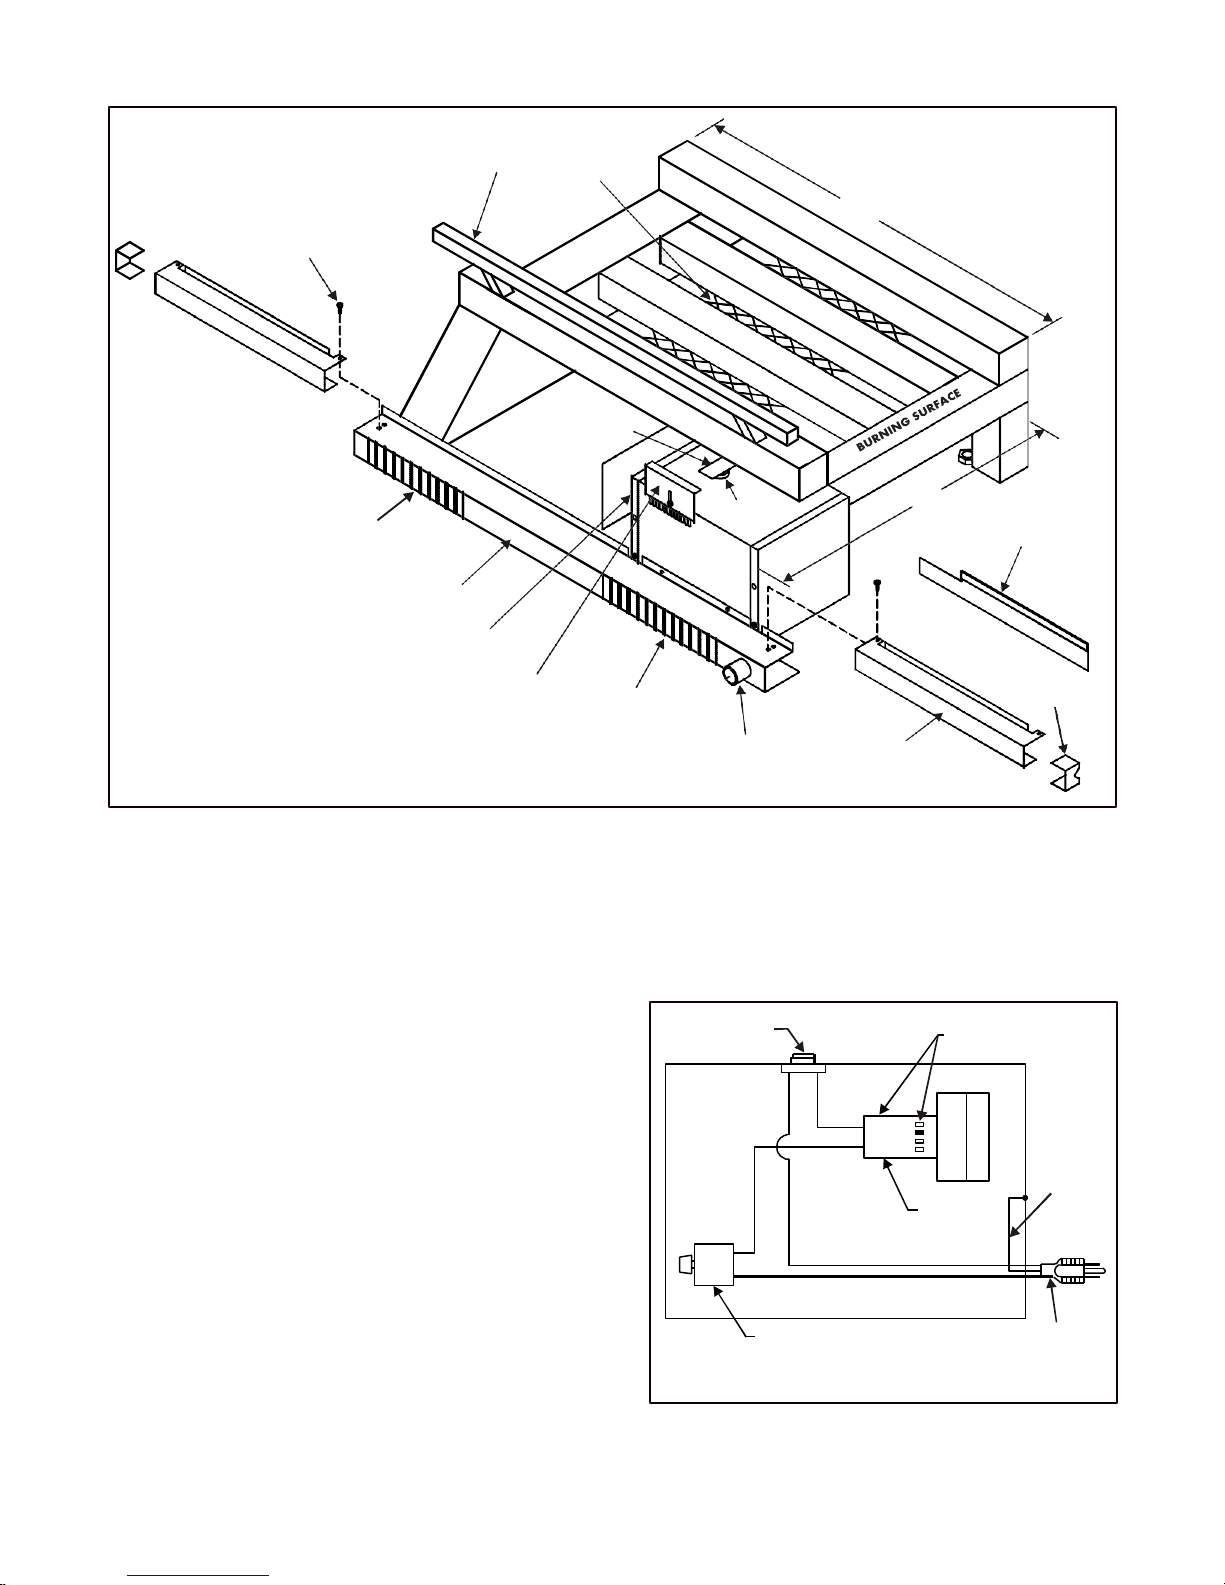
Remove the left side panel of the motor box by tak-
ing out the front screw of the motor box. (There is a
screw on the backside, but it is only a guide to hold
the panel in place). Push forward and the panel will
come free.After removing this panel check to see if
the motor is in place. Two (2) sheet metal screws
top and bottom holdthe motor in the housing.If one
of the screws has come loose (from vibration) the
motor cannot turn freely. To correct this, reattach
the two (2) screws which will secure the motor and
allow it to turn freely.
4. Blower will not turn on after the fire has been
started.
If the motor does not turn on after starting a fire,
several items can be checked. Be sure the unit is
unplugged beforecheckingforpotentialproblems.
Check the thermal sensor as indicated in Step 2.
Check the motor and the wiring to the motor. The
motor must be free to turn and the wiring must be
intact and attached to both the thermostat and the
rheostat. If you notice that any of the wires coming
from the motor are bare, it will be necessary to re-
place the motor. This can be done by removing the
two(2) screwsthat attach the motor to the housing.
If the problem is in the thermostat, the thermostat
must be replaced. The thermostat is held in place
bytwo (2) rivets which canbe drilled out from the top
with a 1/8 inch drill bit. When replacing the thermo-
stat use either rivets or sheetmetal screws to hold it
in place.
The rheostat, the speed control in the front of the
heater, may also need to be replaced if it is operat-
ing improperly. To remove the rheostat, take the
knob off and then loosen the screw on the front of
the heater. Using a pair of pliers, release the heyco
connector or stress relief (located on the right side
of the front, behind the extender) so the wiring to
the rheostat is free. Unplug the connectors and re-
place the rheostat.
With proper care and maintenance, your Grate Heater
should give you years of efficient heat circulation while
maintaining the natural beauty of your fireplace.
SERVICE PARTS LIST
DESCRIPTION
SERVICE PART NO.
Blower Motor
SRV01-500
Rheostat
SRV01-510
HighLimitSwitch
SRV01-531
ReplacementCord
SRV01-550
WARRANTY
The Original Grate Heater has a full three-year warranty
from the date of purchase on square tubing and a one
year on all electrical components. Units must be
operated in accordance with operating instructions.
Damage due to shipping, abuse or misuse is not
covered. Cost of return shipping is also not covered.
3
Toll-Free 1-866-667-8454
NorthlineExpress.com www.NorthlineExpress.com
This manual suits for next models
2
Table of contents
Popular Indoor Fireplace manuals by other brands

buschbeck
buschbeck fireplace operating instructions

kozy heat
kozy heat Nicollet NCL-195 Installation and operation manual

Amantii
Amantii ZECL-30-3226-BG Assembly, installation and operation instructions

Dimplex
Dimplex TOLUCA TLC20 Operating instructions manual

Oak Plus
Oak Plus EF-2050FU User instruction

Wildfire
Wildfire RAVEL 550CF User instructions & Installation instructions

Panadero
Panadero HOGAR F-820-S Usage and maintenance instructions

Comfort Glow
Comfort Glow QF4570R owner's manual

Dimplex
Dimplex CASSETTE M instructions

IN & OUT HOUSE
IN & OUT HOUSE EF279A instruction manual

Consolidated Dutchwest
Consolidated Dutchwest FA288CCL General instructions

Barbecook
Barbecook FERRO 800 quick start guide