GREADIO HD-838 User manual

1
User Manual
Portable AM/FM Clock Radio
Thank you for purchasing our products.
Please read this manual carefully before
using this product. If you encounter any
difficulties or problems during use, please
contact us for further assistance.
MEM./
SCAN

2
Contents
Warranty
Power Instruction
Time Setting
Alarm Clock Setting
Snooze of Alarm Clock
Turn ON/OFF Radio
Radio Operation
Earphone Jack
FM Stereo
Lock Switch
Low Battery Protection
Sleep Timer
Use the Antenna
Safety Instructions
Technical Indicators

3
MEM./
SCAN
LCD display
Station storage/
memory scanning
Tune down/
Time -/Alarm
snooze
Band switch
Tune up/
Time+/Alarm
snooze
M
M
TIME
AL
6. Whip antenna
7. Time setting/Timing switch/alarm
clock setting
8. Memory+
9. Memory-
10. Lock/ Stereo button
11. Earphone jack
Front
TOP
6 7 8 9 10 11
-+

4
RightSide
Back
Volume +
Volume -
Radio On/Off
switch/ Sleep off
button
Wrist buckle
Back label
Battery
compartment

5
AM band
Preset station
channel (frequency)
AMunit
FM unit
Alarm clock
Snooze
Sleep mode
Stereo
locking
Battery indication
Time/frequency
Time in pm
Time in am
FM band
Scanning
1
2
3
5
7
6
8
4
9
10
11
12
13
14
15
16

6
Warranty
Battery instruction
•This radio has full 12 months warranty against
manufacturing defects.
•The warranty period begins from the date of
purchase.
1.Press and hold the battery cover to push it
back to open the battery compartment, and insert
2. Battery indicator reference:
Note: please use excellent high performance
or alkaline batteries.
2 “AAA” batteries into the battery compartment
according to the polarity direction shown in the
battery compartment.Then close the battery cover.
a. 2.91-3.1V for 3-bar power b. 2.61-2.9V for 2-bar power
c. 2.21-2.6V for 1-bar power d. <2.2V for 0-bar power.

7
Turn Off State
Turn On State
Turn Off State Turn On State
1. When the radio display the clock, it is
turned off situation.
2. When it is turned off, all the button except
BAND can't be used.
Note: The clock will still be displayed when
the radio is turned off. If you need to turn off
the clock, you need to unplug the battery.
1. When the radio is turned on, it will display
FM, and the radio is turned on now.
2. When the radio opened, other keys can
be used.

8
Kindly Remind:
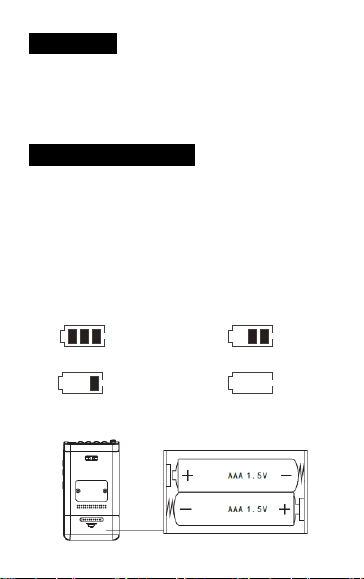
1. The battery is low when the radio is with low
voltage, blurred display, low volume, distortion
or automatic shutdown. In this case, please
replace the batteries timely.
2.
Please do not allowed to mix new and old
batteries or those with different types for use.
3. To prevent leakage of the electrolyte or
bursting,never charge, heat, or disassemble the
dry batteries.
4. When the batteries are not in use for a long
time, please take them out to prevent the
components inside from being damaged due to
leakage of electrolyte.
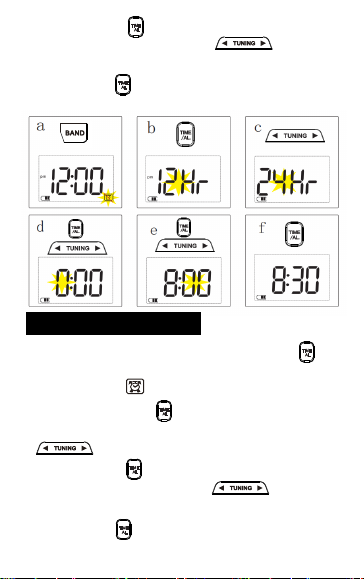
Time setting
2. Press the “ ” button to select “24Hr
/12Hr” mode. The time will be displayed in a.m.
(am) and p.m. (pm) under the 12Hr mode.
3. Press the “ ” button to flash the time in hour,
and then press the “ ” button to adjust
the time in hour.
TIME
AL
TIME
AL
1.When " "is displayed on the screen, you
need to press the " " button to turn it
off.
In the time display,l
ong press the
“ ”
button for 2 seconds until the “24Hr/12Hr”char-
acter flashes on the screen.

9
4. Press the “ ” button to flash the time in
minute, and then press the “ ” button to
adjust the time in minute.
Alarm clock setting
1. In the time display, short press the “ ”
button to enable the alarm clock, with the alarm
clock symbol “ ” displayed on the screen.
2. Long press the “ ” button for 2 seconds to
flash the time in hour, and then press the
“ ” button to adjust the time in hour.
3.
Press the “ ” button to flash the time in
minute, and then press the “ ” button to
adjust the time in minute.
4. Press the “ ” button to confirm and save the
time setting.
TIME
AL
TIME
AL
TIME
AL
TIME
AL
TIME
AL
TIME
AL
long press
5. Press the “ ” button to confirm and save the
time setting.

10
Snooze of alarm clock
1. The alarm clock will snooze automatically in
2 minutes of continuous playing without any
button operation after the alarm rings, which will
close automatically after 6 cycles.
2. After the alarm clock rings and press once the
“ ” button, the alarm clock character
“SNOOZE” on the display flashes, indicating that
it has entered the snooze; the snooze interval is
5 minutes. It will ring again in 5 minutes and then
snooze for cycles.
3. To close the alarm clock, press any button
(except for the “ ” button).
1 2
Alarm clock enabled
Symbol flashing Alarm clock snoozing
Character flashing

10
Turn on/off Radio
Radio operation
•Short press the “ ” button to turn on the radio
and will display the band frequency before the
last turn off.
•When you have finished the listening, press once
the “ ” button and the LCD screen displays
the current time.
Note: In radio state, long press the “ ” button
for 2 seconds to enter the sleep mode.
1
Short press Short press
(Turn on) (Turn off)
2
Press the “ ” button to turn on the radio, select
FM/AM with “ ” button. Extend the antenna to
get better signal reception, especially listening to
the FM radio.
Radio-on state
FM/AM

11
a. In radio state, press “ ” to select the FM/
AM band.
Auto scan & stored stations
b. Long press the “ ” button for 2 seconds
and release it, then the radio will start to scan the
station automatically. When a station is received,
it can be automatically stored in the memory
space. Total 20 storage spaces for the AM/FM
band (P01-20).
c. After finished of the scanning, press the
“ ” button to call up the stations in the
memory space (P01-20).
Tune the stations
1.Short press the “ ” button to call up the
stations (P01-20) in the memory space.
2.Long press the “ ” button for 2 seconds
and then release it, then the stations will be
searched automatically. The search is completed
after the stations are received.
Manually store the stations
a. Press the “ ” button to turn on the radio.

12
f. Press the “ ” button to confirm and save
the settings.
c. Press the “ ” button to tune to a favorite
station frequency.
d. Press the “ ” button to flash the storage
space address (P--) and the character (PRESET)
e. Press the “ ” arrow button to select the
location of the memory space you desire.
Manually search stations
a.In radio state, short press the “ ” to
search station one by one.
b. Long press the “ ” button for 2s, it will
search station automatically until find a station
which had good signal.

13
Adjust the volume
Press the “V+” button to increase the volume
while press the “V-” button to decrease in the
radio-on state. The display shows the current
volume level. Range of volume levels: “V00-V38”
Earphone Jack
FM stereo
This radio is designed with an "EARPHONE"
port. To avoid affecting others, just insert the
earphone to its jack.
Note: In the weather alert mode, please
unplug the earphones for receiving the
weather alert information.
1. When listening to the AM/FM radio program,
plugging in the stereo earphone into the
earphone jack ( ), you may listen with the
left
and right channels.
M
M
TIME
AL +
-

2. If you want to listen with the stereo sound,
the display will show the stereo indication
“ ” after short press the” ” button and
then you may listen with the left and right
channels.
3.When the earphone is unplugged, the radio
will play with the speaker in the mono.
Stereo enabled Stereo disabled
Lock switch
1. Long press the “ ” button to flash the lock
symbol “ ” on the display, and then all of the
other buttons will not work.
2. To disable the lock function, just long press
the “ ” button to disappear the lock symbol
“ ” on the display. In the disabled state, the
backlight will not work after pressing the panel
control button (except for the Lock button).
Locked Unlocked
14

15
2.When the battery voltage is as low as 2.5V
or lower, the backlight will flash when turning
up the volume of the radio. The volume should
be turned down appropriately to extend the
service life of the batteries.
Sleep Timer
This radio is designed with a function of automatic
timed shutdown in sleep. When enabled before
going to bed, it will automatically shut down at
the set time, so as to avoid power consumption
for a long time.
a. In the radio state, long press the sleep off
button “ ” to enter the sleep setting. Then,
the display shows the sleep indication “ ”
and the shutdown time “90”.
Backlight
The buttons on the control panel are all provided
with backlight switches. Press any button to turn
on the backlight inside the display. It will facilitate
the operation in a dark environment and could
automatically turn off after 10 seconds.
Note:
1.The backlight will not work after pressing
any button on the control panel in the locked
state (except for the Lock button).

16
b. Press “ ” to select the FM/AM band.
b.Short press“ ”button to adjust the sleep
off time. (Unit: minute)-90-60-45-30-15--10
c. After adjusting the shutdown time, press the
“ ” button to confirm and save the sleep
time, the
d. The radio will automatically shut down on the
set sleep off time. If any need of shutdown in
advance, just press the “ ” button.
Long
press
aShort
press
b
Short
press
cShort
press
d

17
b. Press “ ” to select the FM/AM band.
Use the antenna
1. When listening to the FM broadcasts, this
radio uses a whip antenna to receive the FM
radio signals. Before listening, please pull out
the whip antenna and change its length and
direction for best reception of signals.
2. When listening to the AM broadcast, this radio
receives the medium wave signals with its built-
in magnetic antenna with high Directionality. So
for listening, please rotate the radio to get the
best reception of signals.
Note: The broadcast signals inside buildings
with the steel structure and the high-rise
buildings will be shielded to some extent. It
is recommended to use the radio near the
window to improve the listening effect.

18
Low battery protection
Safety instructions
This radio is designed with the low-voltage
shutdown function. When the voltage is as low
as 2.1V during the playing, it will stop playing and
return to the state only with the time displayed.
Purpose of the “low-voltage shutdown”:
1. Prevent the batteries from running out and
causing no display of the time.
2. Keep the clock running, leaving no need in
time setting after replacement of the batteries.
Note: Turning down the volume or listening
with the earphone could extend the service
life of the batteries.
1. Avoid violent shocks or falling to the ground.
2.
Do not expose it to direct sunlight, high
temperature or humidity.

19
3. Cassettes, magnetic cards and other magnetic
recording software should be placed away from
the body speaker to prevent the recordings from
being erased or noise on the cassette.
4. If there is any debris falling into the radio,
please check it with qualified maintenance
personnel before use.
5. When cleaning the case, wipe it with a soft
cloth dampened with detergent solution. Never
use strong solvents such as alcohol, thinner to
clean.
6. When walking or driving, please try not to use
the earphone to avoid traffic accidents.
7. Do not pull or fold the earphone cord, which
may cause the copper wire inside the earphone
cord to break.
8. Keep listening at the proper volume so that
you can pay attention to your surroundings while
listening to ensure safety.
9. In dry and cold seasons, items such as
chemical fiber, silk that are prone to static
electricity may affect or damage the sensitive
elements inside the radio. This radio is provided
with corresponding protective measures, but
please try to avoid rubbing it with the above
items.
Table of contents
Other GREADIO Portable Radio manuals