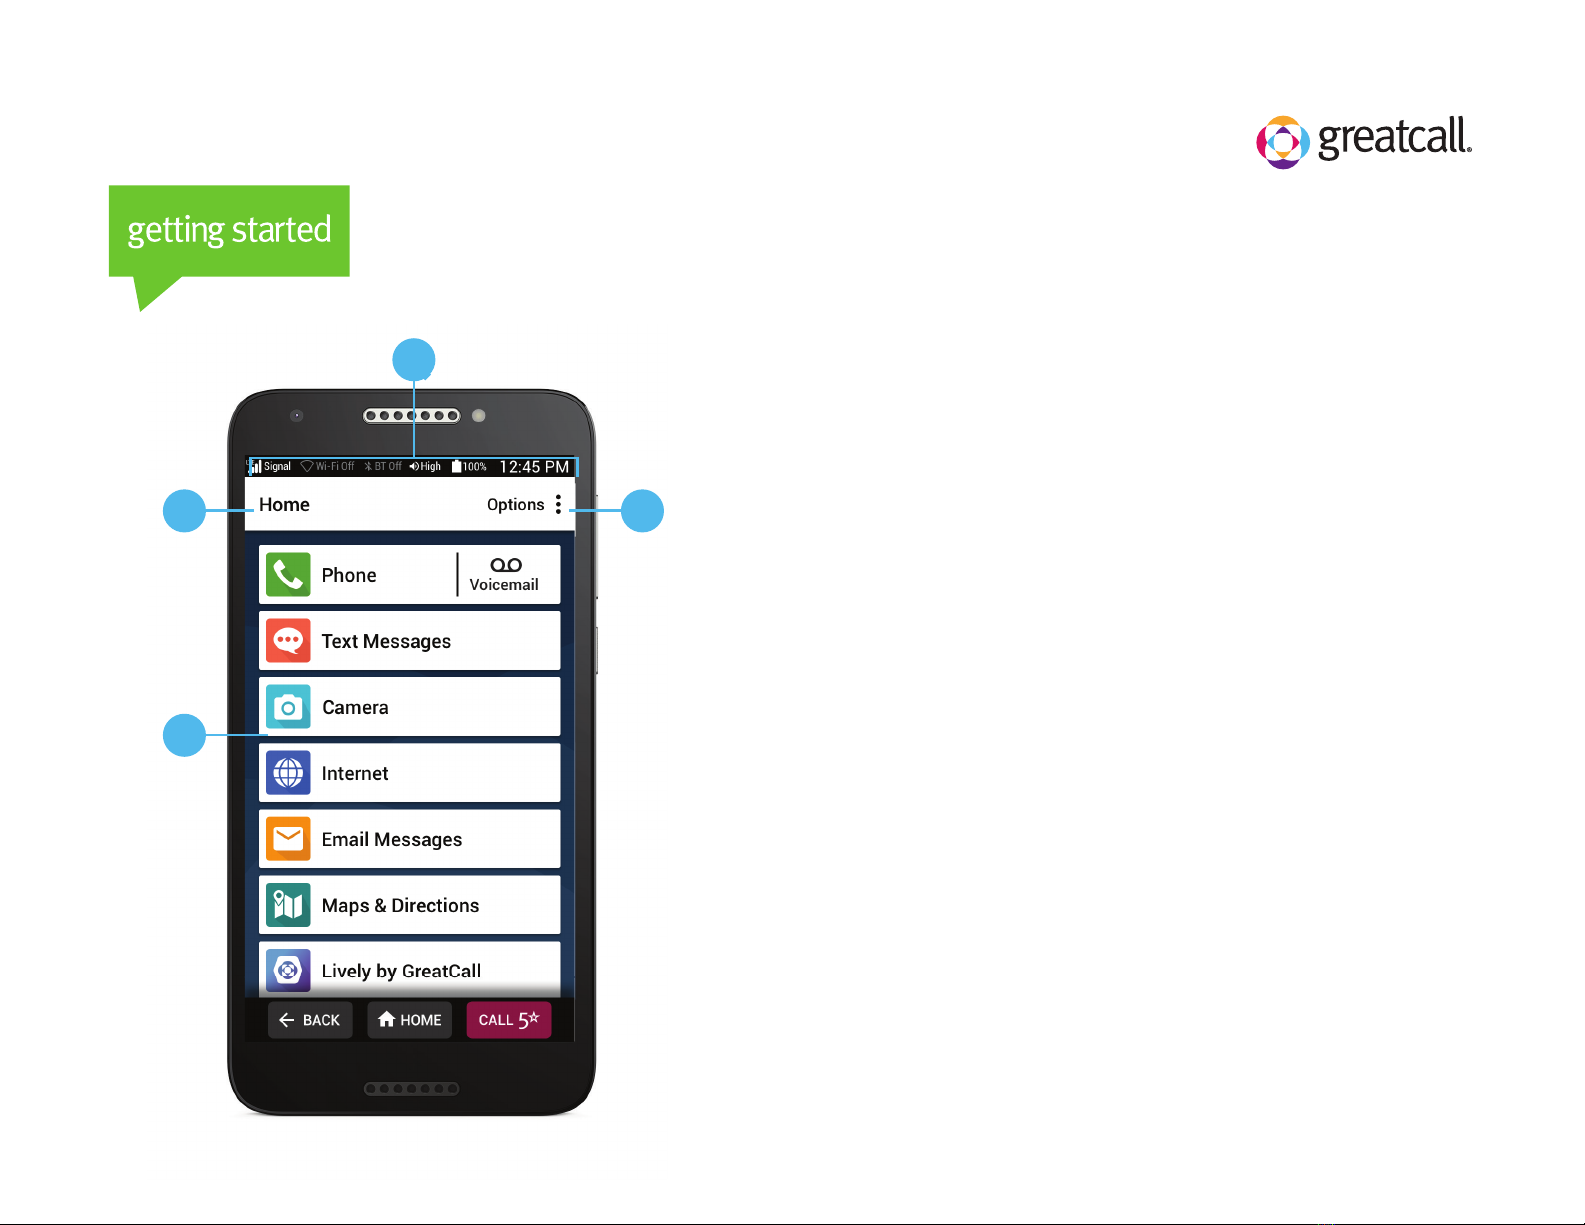
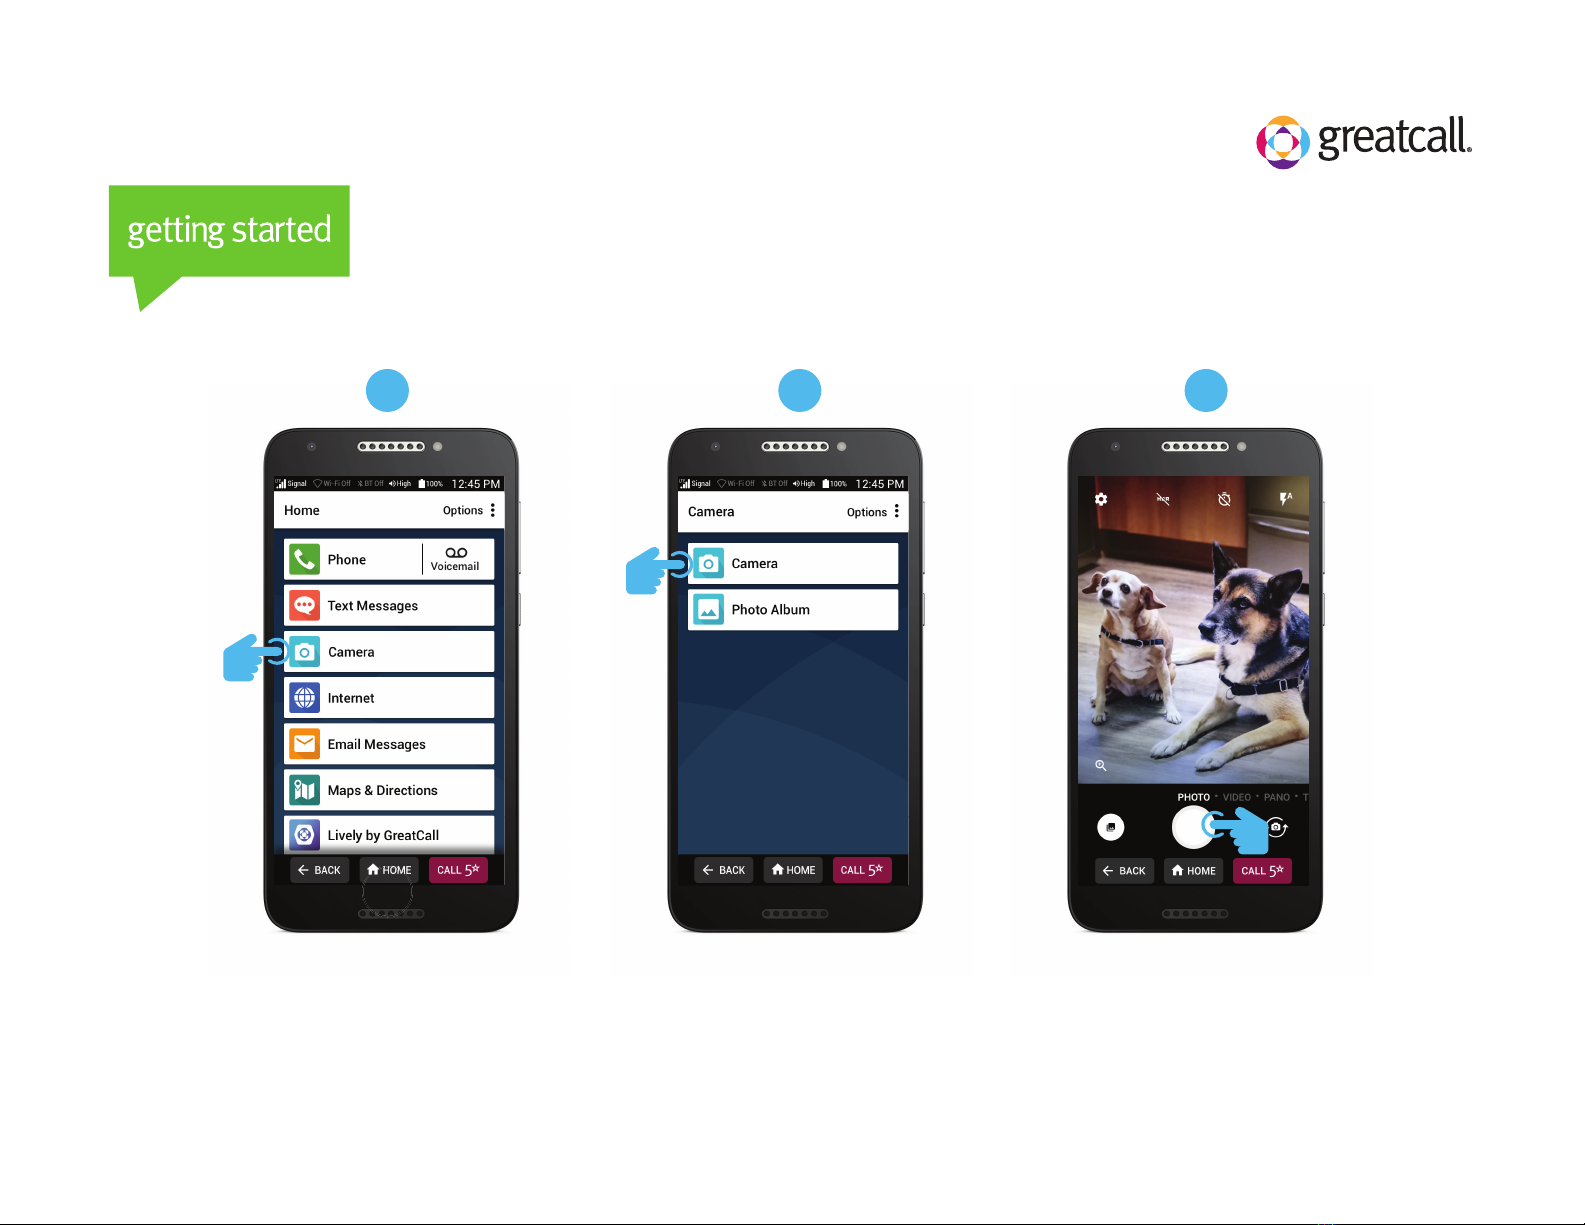
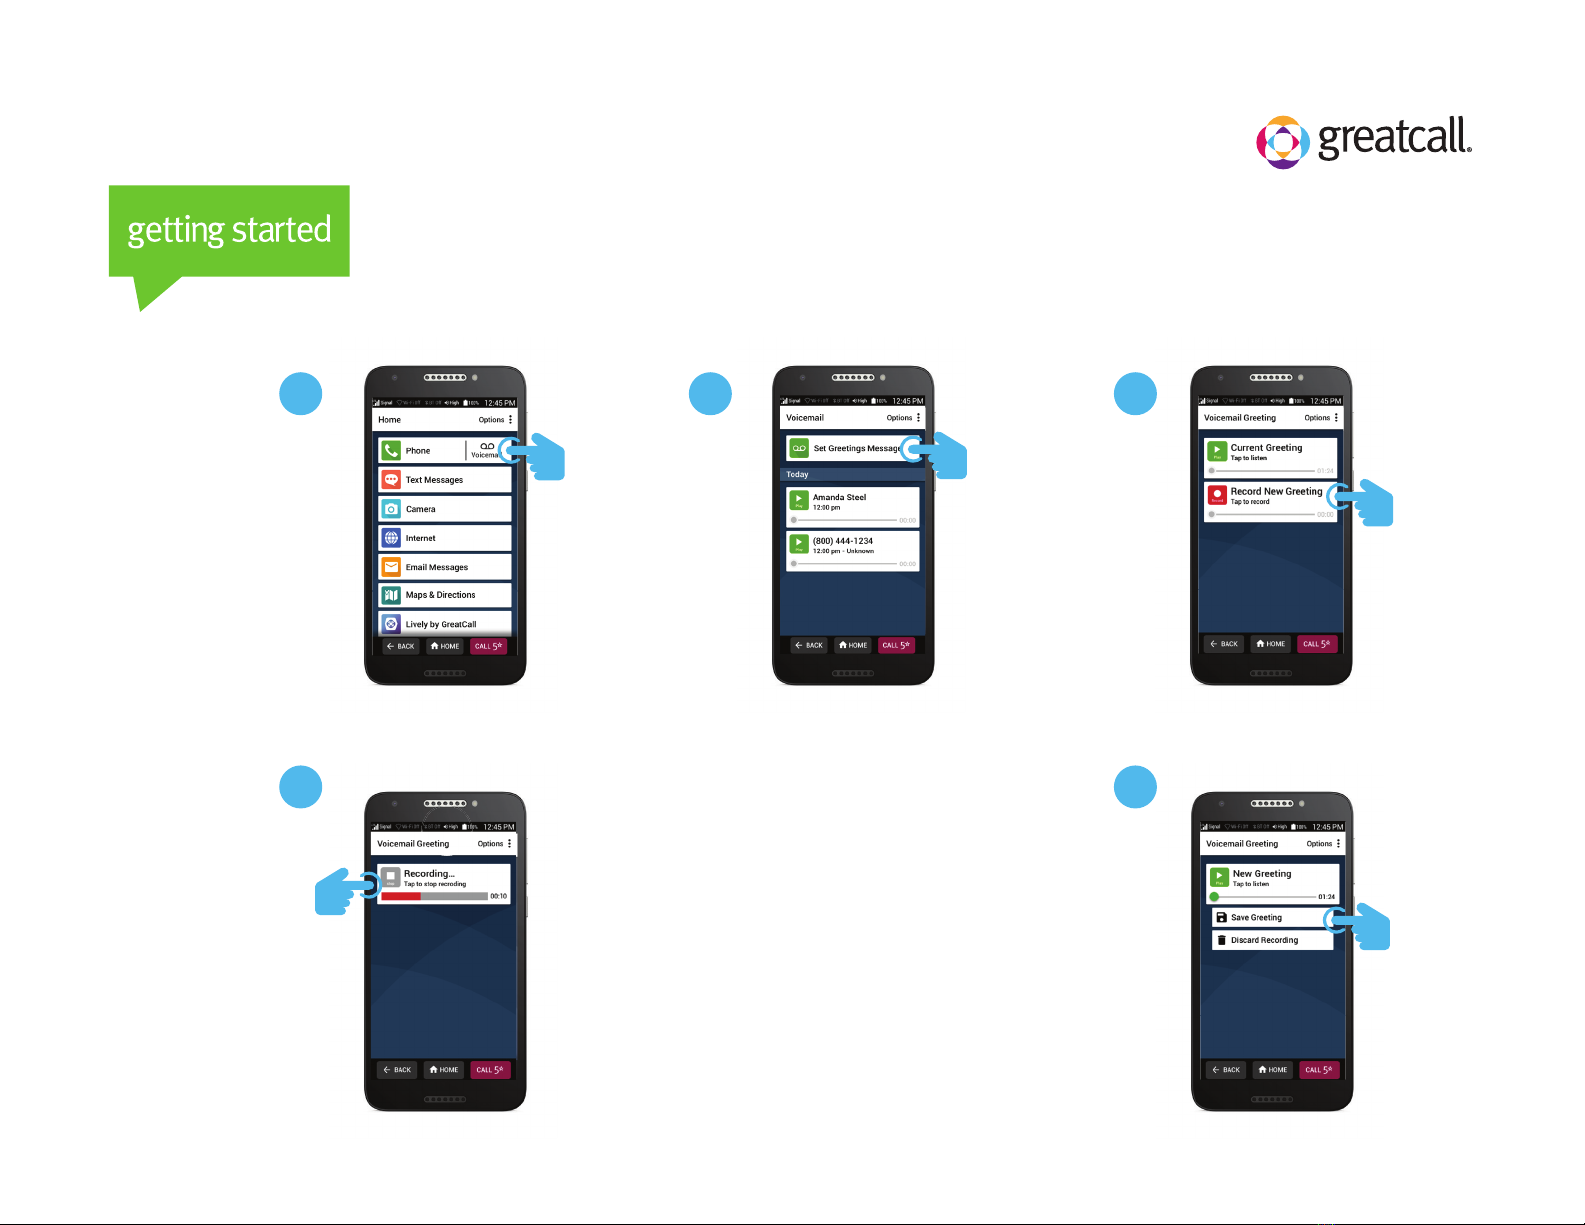
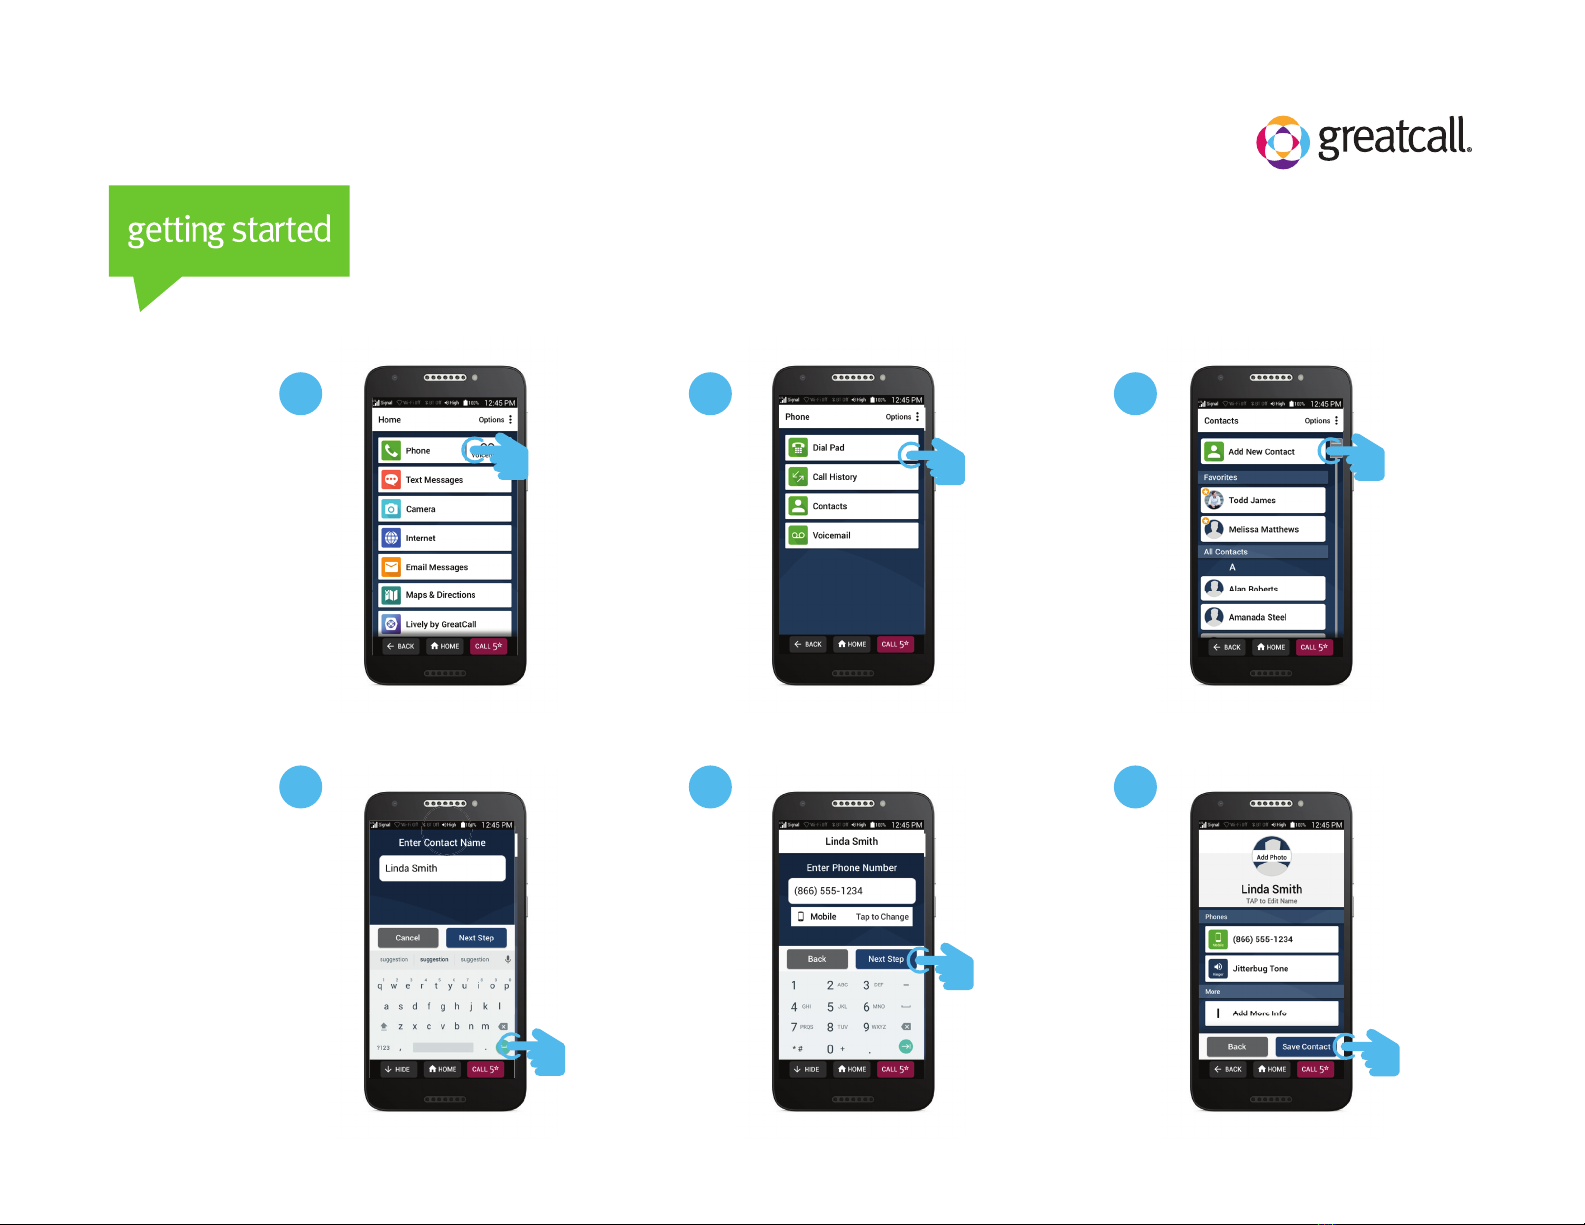
GreatCall Jitterbug Smart2 User manual

Phone Overview
Important buttons on your Jitterbug Smart
A) Volume Button: PRESS upper end of button to
increase volume, PRESS the lower end to decrease
volume
B) Power/Lock Button: PRESS and release to lock your
phone, HOLD DOWN to power your phone on or off
C) Back Button: TAP to return to the previous screen
D) Home Button: TAP to return to the home screen
E) 5Star Button: PRESS and HOLD to get help in any
unsafe or uncertain situation (requires Health &
Safety package)
IMPORTANT: Locking your phone will help
increase battery life and prevent accidental calls.
A
B
C D E

Home Screen
Understanding your Jitterbug Smart Home Screen
A) Title Bar – Name of the screen you are viewing.
B) Status Bar – Shows you wireless connectivity, ringer
volume, battery and current time information.
C) Options – TAP to view more options relevant to the
screen you are currently viewing.
D) App List – A list of the apps you use most.
A
D
B
C

2
How to Make a Call
1 3
From the Home Screen,
TAP Phone.
TAP Dial Pad. Enter the 10-digit phone
number and TAP CALL.

How to Send a Text Message
1 2 3
From the Home
Screen, TAP
Text Messages.
TAP Create
New Message.
Tap Enter
Number.
Enter the 10-digit
phone number
and TAP Next.
Compose
your text
message
using the
keyboard.
TAP Send.
5 64

How to Use Voice Typing
21 3
When using the
keyboard, TAP the Talk icon.
Speak your message. If needed, edit your message using
the keyboard or by using the
Talk icon again. TAP Send.

How to Take a Picture
21 3
On the Home Screen,
TAP Camera.
TAP Camera. TAP where you want to
focus, then TAP the circle
Shutter button.

How to Set Up Your Voicemail Greeting
1 2 3
From the Home
Screen, TAP
Voicemail.
TAP Set
Greetings
Message.
Tap Record
New Greeting
and begin
speaking your
greeting.
4
TAP Stop to finish
your recording.
TAP Save Greeting if you are satisfied or
Discard Recording if you would like to
record a new greeting.
5

How to Add a New Contact
1 2 3
From the Home
Screen, TAP
Phone.
TAP Contacts. Tap Add New
Contact.
4
Enter contact
name and
TAP Next Step.
Enter contact
phone number
and TAP Next
Step.
TAP Save
Contact.
5 6

How to Set Up Wi-Fi
1 2 3
From the Home
Screen, DRAG to
scroll down and
TAP Phone
Settings.
TAP Internet &
Devices.
4
TAP the switch to
turn on Wi-Fi and
then TAP
your network
name.
Enter the
network
password
and TAP
CONNECT.
5

How to Set a Lock Screen Using a Pin
1 2 3
5 6
On the Home
screen, Scroll and
TAP Phone
Settings
Scroll and TAP
Android
Settings
TAP Lock
Screen
4
TAP Screen lock. TAP PIN.TAP Require
PIN to start
device or TAP
No thanks.

How to Set a Lock Screen Using a Pin (con’t.)
7 8 9
Enter a pin
(minimum of
4-digits) and
TAP CONTINUE.
IMPORTANT: Write
down your pattern and
store it somewhere safe
Reenter your
PIN to confirm
and TAP OK.
Choose how
you’d like
notifications
to be
displayed and
TAP DONE.
Your lock screen
and PIN are now
set. TAP HOME.
11
You are ready
to use your
phone.
10

How to Set a Lock Screen Using a Pattern
1 2 3
5 6
On the Home
screen, Scroll and
TAP Phone
Settings
Scroll and TAP
Android
Settings
TAP Lock
Screen
4
TAP Screen lock. TAP PATTERN. TAP Require
pattern to start
device or TAP No
thanks.

How to Set a Lock Screen Using a Pattern (con’t.)
7 8 9
Draw a pattern
connecting at least
four dots and TAP
CONTINUE.
IMPORTANT: Write down your
pattern and store it
somewhere safe.
Your pattern
will be
recorded TAP
CONTINUE.
Choose how
you’d like
notifications
to be
displayed and
TAP DONE.
Your lock screen
and pattern are
now set. TAP
CONFIRM.
11
TAP HOME.
12
You are ready
to use your
phone.
10

How to Set a Lock Screen Using a Password
1 2 3
5 6
On the Home
screen, Scroll and
TAP Phone
Settings
Scroll and TAP
Android
Settings
TAP Lock
Screen
4
TAP Screen lock. TAP PASSWORD. TAP Require
pattern to start
device or TAP No
thanks.

How to Set a Lock Screen Using a Password (con’t.)
7 8 9
Enter a password
and TAP THE
CONTINUE
ARROW.
IMPORTANT: Write down your
password and store it
somewhere safe.
Reenter your
password to
confirm it
and TAP
CONTINUE.
Choose how
you’d like
notifications
to be
displayed and
TAP DONE.
Your lock screen
and password are
now set. TAP
HOME.
11
You are ready
to use your
phone.
10

On the Home
screen, Scroll and
TAP Phone
Settings.
Setting Up a New Google Account
1 2 3
5 6
Scroll and TAP
Android
Settings.
Scroll and TAP
Accounts.
4
TAP Add account. TAP Google.TAP Create
account.

Setting Up a New Google Account (con’t.)
7 8 9
11 12
Select For myself. Enter your First
name. TAP
Next.
Enter your Last
name. TAP
Next.
10
Enter your
birthday and
gender. TAP
Next.
Create and
email address.
TAP Next.
Create a
password.
TAP Next.

Setting Up a New Google Account (con’t.)
13 14 15
17 18
Add a phone
number if you
like. Scroll
down.
TAP either Skip
or Yes, I’m in.
Privacy and
Terms. Scroll
down.
16
TAP I agree. TAP Next.Scroll down.

Setting Up a New Google Account (con’t.)
13 14 15
TAP ACCEPT>. Your Google
account is now
set up. TAP
HOME.
Your are now
ready to start
using your
phone.

On the Home
screen, Scroll and
TAP Phone
Settings.
Setting Up an Existing Google Account
1 2 3
5 6
Scroll and TAP
Android
Settings.
TAP Accounts.
4
TAP Add account. TAP Google.Enter your
Email or
phone
number. TAP
Next.
Table of contents