Greemotion GM-2013 User manual

GM-2013
Firepit Dining Table

1 - 9
EN ES
SAFETY INSTRUCTIONS AND WARNINGS:
• The product is to be used exclusively for its intended purpose.
• Regularly check the condition and functionality of the product. If you notice
any damage, the product should no longer be used.
• Only use the product on solid and level ground.
• Make sure the product is positioned securely.
• WARNING! Risk of clamping/crushing ngers during assembly and
disassembly of the product.
CLEANING AND MAINTENANCE
The eects of the weather can cause slight alterations to the appearance of
the garden furniture. Please store the garden furniture in a dry place during
winter. To clean the piece of furniture, use a damp cloth and for more
stubborn dirt use a mild soap solution and a soft brush. Never use aggressive
cleaning agents, pressure washers or steam jets to clean the product. To
clean the cushion/seat cover quickly, use a damp soft cloth. Some stains can
be removed with a mild soap solution and a soft brush. Never use abrasive
cleaning agents or solvents. Make sure that the cushion lling does not
become wet and that no moisture damage or mould can build up
on the inside! When it rains or there is moisture in the air, the cushions and
pads should be taken indoors and stored in a protected and dry location.
Cushions/pads that have become wet should be allowed to dry out
completely. Do not ll damp cushions/pads! The covers can be removed,
allowing them to be washed in the washing machine. Remove the cover, turn
it inside out and zip close. Wash the cover with similar colours in the washing
machine.
IMPORTANT:
Be sure to read the washing instructions on the sewn-in care label on the
covers!
FR
INDICATIONS DE SÉCURITÉ ET AVERTISSEMENT :
L’article doit uniquement être utilisé conformément à l’usage prévu.
• Vériez régulièrement l’état et le bon fonctionnement de l’article. Si vous
constatez des dommages, l’article ne doit plus être utilisé.
• N’utilisez l’article que sur une surface plane et rigide.
• Veillez à ce que l’article soit stable.
• ATTENTION ! Risque de coincement /d’écrasement lors du montage et du
démontage de l’article.
NETTOYAGE ET ENTRETIEN
Les intempéries peuvent modier légèrement l’aspect des meubles de jardin.
Entreposez les meubles de jardin au sec pendant l’hiver. Pour nettoyer les
meubles de jardin, utilisez un chion humide et doux. En cas de salissures
tenaces, utilisez une brosse souple et un savon doux. Ne nettoyez jamais les
meubles de jardin avec des détergents agressifs, un nettoyeur à haute
pression ou un jet de vapeur. Ne nettoyez jamais les meubles de jardin avec
des détergents agressifs, un nettoyeur à haute pression ou un jet de vapeur.
Utiliser un chion humide et doux pour nettoyer rapidement les housses de
coussin/de siège. Les taches individuelles peuvent être éliminées à l’aide
d’un savon doux et d’une brosse souple. Ne jamais nettoyer avec des
détergents ou solvants agressifs. Veillez à ce que les rembourrages de
coussin/de garniture ne soient pas mouillés et que des détériorations dues à
l’humidité et des moisissures n’apparaissent pas à l’intérieur! Par temps
humide ou pluvieux, rentrer les coussins/garnitures et les entreposer dans un
lieu sec et protégé.
Bien laisser sécher les coussins/garnitures mouillés. Ne pas recouvrir des
coussins/garnitures mouillés! Les housses peuvent être retirées an de les
nettoyer en machine. Retirez les housses, retournez-les et fermez les
fermetures à glissière. Lavez les housses en machine avec du linge de la
même couleur.
IMPORTANT:
Lors du nettoyage des housses, respectez impérativement les instructions
d’entretien présentes sur l’étiquette cousue!
INDICACIONES DE SEGURIDAD Y ADVERTENCIAS:
• Utilice el artículo exclusivamente conforme a las instrucciones de uso del
mismo.
• Compruebe periódicamente el estado y la función del artículo. En caso de
que observe daños, deje de utilizarlo.
• Use el artículo únicamente sobre una supercie plana y rme.
• Asegúrese de que el artículo está estable.
• ¡ATENCIÓN! Existe riesgo de atrapamiento o aplastamiento al montar y
desmontar el artículo.
LIMPIEZA Y MANTENIMIENTO
Las condiciones meteorológicas pueden cambiar la apariencia de los
muebles de jardín. Durante el invierno, almacene los muebles de jardín en un
lugar seco. Para limpiar los muebles de jardín, use un paño suave y húmedo,
y para la suciedad más difícil, use una solución jabonosa y un cepillo suave.
No limpie nunca los muebles de jardín con detergentes agresivos, con un
limpiador de alta presión o con un chorro de vapor. Para limpiar rápidamente
los cojines/las fundas de los asientos, use un paño suave y húmedo. Las
manchas superciales se pueden eliminar con una solución jabonosa y un
cepillo suave. No las limpie en ningún caso con detergentes abrasivos ni
disolventes. Asegúrese de que el relleno de los cojines/las colchonetas no se
moja y de que no se crea moho ni se generan daños por la humedad en el
interior. Cuando llueva y haya un clima húmedo, meta dentro de casa los
cojines/las colchonetas y guárdelos en un lugar seco y protegido. Deje que se
sequen bien los cojines/las colchonetas húmedos o mojados. ¡No use cojines
ni colchonetas húmedos!
Para limpiar debidamente las fundas en la lavadora, extráigalas. Retire las
fundas, deles la vuelta y cierre la cremallera. Ponga las fundas con colores
similares en la lavadora.
IMPORTANTE:
Cuando limpie las fundas, asegúrese sobre todo de comprobar primero las
indicaciones de mantenimiento de la etiqueta.
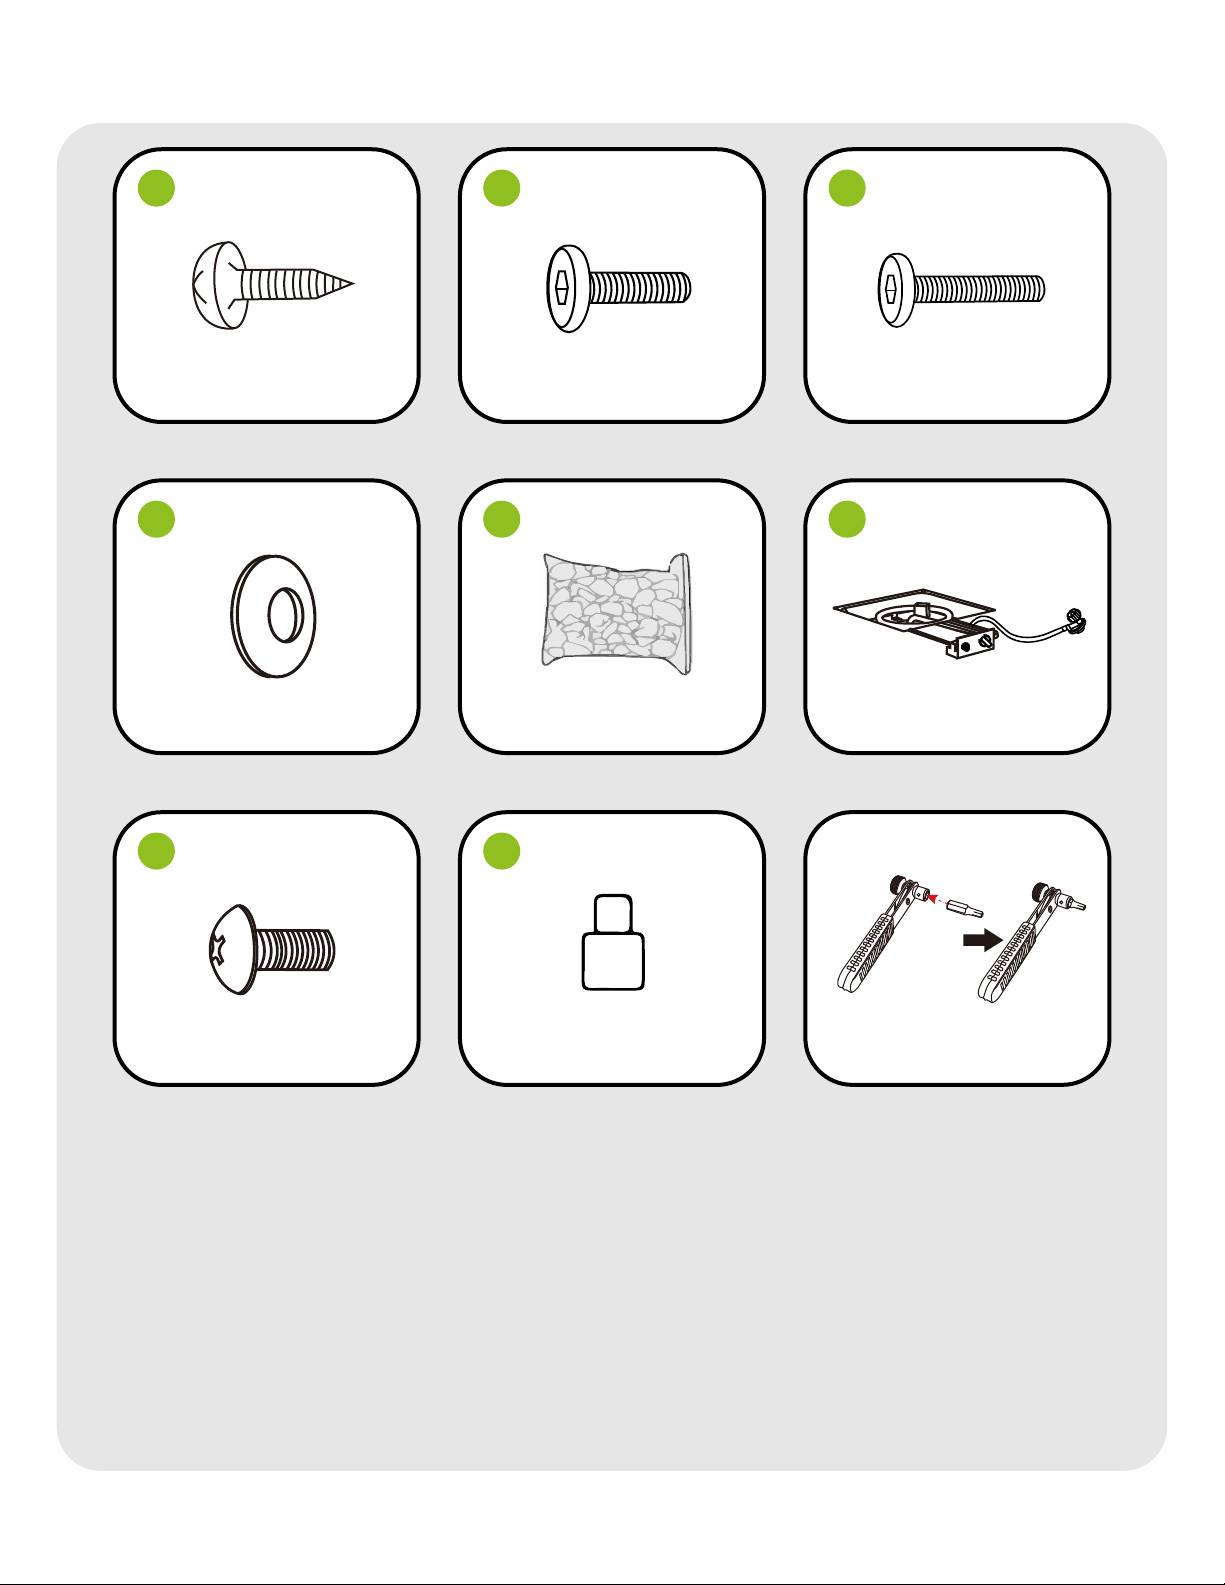
Before assembly, open all of the packaged cartons. FIGURE 1 Lay out all of the
parts on a level, non-abrasive surface. Open the hardware kit for all of the
nuts, bolts, and washers. Make sure that you have all of the parts listed. If any
parts are missing or damaged, call the help line at 1-888-980-5122
You will need the following tools:
- Phillips Screwdriver (Not included)
1-888-980-5122
greemotionusa.com
/greemotionUSA
Need Help?

2 - 9
WARNING
DANGER: FIRE OR EXPLOSION HAZARD - If you smell gas:
-Shut o gas to the appliance.
-Extinguish any open ame.
-If odor continues, leave the area immediately.
-After leaving the area, call your gas supplier or re department.
Failure to follow these instructions could result in re or explosion, which could cause property damage, personal injury, or death.
Improper installation, adjustment, alteration, service or maintenance can cause property damage, personal injury or loss of life. Refer to the owner’s information manual
provided with this appliance. Installation and service must be performed by a qualied installer, service agency, or the gas supplier.
INSTALLER: Leave this manual with the appliance.
CONSUMER: Retain this manual for future reference.
CARBON MONOXIDE HAZARD:
-This appliance can produce carbon monoxide which has no odor.
-Using it in an enclosed space can kill you.
-Never use this appliance in an enclosed space; such as a camper, tent, car, or home.
WARNING:
-If the information in this manual is not followed exactly, a re or explosion may result causing property damage, personal injury, or loss of life.
-Do not store or use gasoline, or other ammable vapors and liquids, in the vicinity of this or any other appliance.
-An Propane-cylinder not connected for use shall not be stored in the vicinity of this or any other appliance.
-Use the correct bolts as indicated. Do not tighten any of the bolts until the appliance is completely assembled.
-Do not sit or stand on this appliance.
-Keep children away during assembly. This item contains small parts that can be swallowed by children.
-Do not use indoors or inside of any enclosure.
-Retain these assembly instructions for future reference.
-Installer - Leave these instructions with the owner.
When an appliance is for connection to a xed piping system, the installation must conform with local codes or, in the absence of local codes, with the National Fuel Gas
Code, ANSI Z223.1 NFPA 54; National Fuel Gas Code; Natural Gas and Propane Installation Code, CSA B149.1; or Propane Storage and Handling Code, CSA B149.2, as
applicable.
If the appliance is not in use, the gas must be turned o at the supply cylinder. Storage of an appliance indoors is permissible only if the cylinder is disconnected and
removed from the appliance. Cylinders must be stored outdoors in a well-ventilated area and out of children’s reach. Disconnected cylinders must have a dust cap secured
at the end of the valve and cannot be stored in a building, garage, or any other enclosed area. The pressure regulator and hose assembly supplied with this appliance must
be used. Replacement pressure regulators and hose assemblies must be the ones specied in this manual.
Keep the appliance area clear and free from combustible materials, gasoline, and other ammable vapors and liquids. Solid fuels should not be burned in this gas
appliance. Inspect the hose before each use of the appliance. The hose assembly must be replaced prior to the appliance being put into operation if there is evidence of
excessive abrasion, wear, or if the hose is damaged. The replacement hose assembly is specied in this manual. The burner must be inspected before each use.
The burner must be replaced prior to the appliance being put into operation if it is evident that the burner is damaged. The replacement burner is specied in this manual.
The burner should always be cleaned: Disconnect it from the appliance, use a cleaner to remove blockages attached on the ports, and drain the blockages from the gas
inlet. A high pressured stream of water may also be used.
The cylinder supply system must be arranged for vapor withdrawal. The cylinder used must include a collar to protect the cylinder valve.
The Propane-gas supply cylinder to be used must be:
1. Constructed and marked in accordance with the U.S. Department of Transportation (D.O.T.) Specications for Propane-Gas Cylinders, or the Standard for Cylinders,
Spheres and Tubes for Transportation of Dangerous Goods; and Commission, CAN/CSA-B339 as applicable;
2. Provided with a listed overlling prevention device;
3. Provided with a cylinder connection device compatible with the connection for the appliance.
Do not use this appliance if any part has been under water. Immediately call a qualied service technician to inspect the appliance and to replace any part of the control
system and any gas control that has been under water. This appliance is for outdoor use only in a well-ventilated space and should not be used in a building, garage, or any
other enclosed area. Other cylinders may be acceptable for use with the appliance provided that they are compatible with the appliance retention means and accompanied
by illustration(s) depicting the cylinder mounted to the appliance utilizing the cylinder retention means and the point of contact between the cylinder and the retention
means. The cylinder should be 12 inches in diameter and 18 inches high. The capacity is 20lbs of propane.
Locate the gas hose and make sure that it is not in any pathways where people may trip over it or in any areas where the hose may be subject to accidental damage.
The Procedure for Checking for Gas Leaks:
Never test for leaks with a ame. Prior to rst use, at the beginning of each season, or every time your propane gas tank is changed, you must check for gas leaks. Follow
these three steps:
1. Make a soap solution by mixing one part liquid detergent and one part water.
2. Make sure that the burner is o and then turn the gas on at source.
3. Apply the soap solution to all gas connections, especially to the inlet/manifold pressure tap on the gas valve after reading the pressure. Bubbles will appear in the soap
solution if the gas connections are not properly sealed. If you have a gas leak, tighten gas connections, turn o the gas at the source, disconnect the fuel line from your
appliance, and call 1-888-980-5122 for repair assistance.

2 - 9
PARTS
1
1PC
REAR FRAME
2
1PC
FRAME A
3
1PC
FRAME B
4
1PC
BOTTOM FRAME
5
1PC
FRONT DOOR
6
1PC
CROSS BRACE
7
1PC
TABLE TOP
8
1PC
LOWER CONNECTOR
9
1PC
UPPER CONNECTOR
10
1PC
COVER
4 PC
TILE B
12
TILE A
11
4 PC

HARDWARE
3 - 9
13
2 PC
SCREW ST4.2*16
14
10 PC
BOLT M6*15
15
4 PC
BOLT M6*25
16
WASHER d6.5*D13*1.0
14 PC
17
1 PC
LAVA ROCKS
18
1 PC
BURNING SYSTEM
TOOLS
19
4 PC
BOLT M6*10
20
1 PC
TOUCH UP PAINT
Ⅰ
Ⅱ

4 - 9
ASSEMBLY INSTRUCTIONS
Fasten the frame A (#2) and the frame B (#3) to the
rear frame (#1) by using bolts (#14) and washers
(#16). Keep the bolts loose.
Note:
The labels marked “2” and “3” on the frames should
coincide with Figure 1 to ensure proper assembly.
Fasten the bottom frame (#4) and cross brace (#6)
to the frames (#2 and #3) by using bolts (#15),
washers (#16) and screws (#13).
14
16
1
2
2
3
3
3
4
2
15
16
16
13
15
6
1 2
Fasten the lower connector (#8) to the corner of
the bottom rim of the frame B (#3) by using bolt
(#14) and washers (#16). Then, insert the front door
(#5) into the connector tab of the lower connector
(#8).
Note:
The lower connector (#8) is marked with an “E”.
Insert the upper connector (#9) into the holes of
the front door (#5). Fasten the upper connector
(#9) to the frame B (#3) by using bolt (#14) and
washers (#16). Completely tighten all of the nuts
and bolts. Close the doors.
Note:
Shut the doors lightly. Do not slam the doors to
close.
3 4
4
35
8
14 16
E
8
3
3
5
9
5
5
3
F
93
3
14 16

5 - 9
ASSEMBLY INSTRUCTIONS
Place the table top (#7) onto the frame assembly.
Fasten them together by using bolts (#14) and
washers (#16). Fasten the burning system (#18) to
the table top (#7) by using bolts (#19). Make sure
that all of the bolts have been tightened completely.
Note:
The igniter valve should be facing towards the front
left side of the appliance.
Place the tiles (#11 and #12) onto the table top
(#7).
Note:
If any EVA foams on the table top (#7) are missing,
there are extra EVA foams in the hardware kit.
5 6
Open the front door (#5) and place the tank into
the bottom frame (#4). Secure in place by using
the plastic screw.
Note:
Secure the tank in place by turning the plastic
screw clockwise as illustrated above.
Attach the burning system (#18) to the tank by
rotating clockwise to its connector. See Figure 8.
7 8
14
16
7
Igniter
Valve
19
19
19 19
18
A
12 11
7
4
5
Plastic
Screw
18
Caution: The Tank
must face this way.
Rotate
Clockwise

6 - 9
ASSEMBLY INSTRUCTIONS
Place the lave rocks (#17) into the steel bowl. Place the cover (#10) onto the burning system
(#18) to cover the lava rock set. See Figure 10.
Note:
1. In order to protect the burner system, when the
re is not in use and on rainy days, the cover
should be used.
2. To repair any scratches on the table top, use the
touch-up paint for table top (#20) provided.
WARNING
Failure to position the parts in accordance with these
diagrams or failure to use only parts specically
approved with this appliance may result in property
damage or personal injury.
Requires an AAA battery (sold separately).
• Always purchase the correct size and grade of battery.
• DO NOT mix old and new batteries.
• Replace all batteries of a set at the same time.
• DO NOT mix alkaline, standard (carbon zinc), or
rechargeable (nickel cadmium) batteries.
• Clean the battery contacts and those of the device
prior to battery installation.
• Ensure the batteries are installed correctly with regard
to polarity (+and-).
• Remove batteries when product is not in use.
• Remove used batteries promptly.
• Non-rechargeable batteries are NOT to be recharged.
• DO NOT Dispose of batteries in re. Batteries may
explode or leak.
Recycle or Dispose of batteries according to local and
federal government requirements.
SPECIFIC WARNINGS:
1) Both children and adults should be aware of the
hazards of high surface temperatures and should
keep their distance in order to avoid burns and
ignition of clothing.
2) Children should be under adult supervision when
in the vicinity of this appliance.
3) Clothing or any other ammable materials should
not be hung from or near this appliance.
4) Any guard or protective device removed for
servicing the appliance must be replaced prior to
use.
5) Installation and repair should be done by a
qualied person. The appliance should be inspected
before use and at least annually by a qualied
service technician. Frequent cleaning may be
required.
It is imperative that the control compartment,
burners, and circulating air passageways of the
appliance be kept clean at all times.
9 10
Fire Shield
Note:
The fire shield on the
burner system must be
exposed.
Note:
The lava rocks cannot be
exposed over top of the
steel cover surface.
17
18
10

7 - 9
SWITCH USAGE INSTRUCTIONS
Step 1: Lighting
Open the igniter button and install an AAA battery
(not included), then secure the cap back on. Before
use, make sure that the control knob is in the “OFF”
position. Turn the propane cylinder gas valve to fully
open position. Press down on the control knob and
turn counter clockwise to the "LOW" position. Push
in the gas control knob all the way and hold.
Continue to press the ignition button for 15 seconds.
CARE AND MAINTENANCE:
1. Do not use aerosol polish or any other ammable material to clean the burner while it is in use.
2. Inspect and clean the burner regularly. Use a wire-bristle brush to clean the burner surface. A straightened paper
clip is useful to remove debris or rust from the small burner ports.
3. Wash frame parts with mild soap and water, rinse thoroughly, and dry completely. Do not use bleach, acid, or any
other solvents on the frame parts.
4. Inspect and tighten all of the bolts and fasteners on a regular basis to ensure the proper performance and
safety of your appliance.
5. When not in use, we recommend that it be stored in a dry and secure area. Always disconnect the propane
gas tank rst and store it safely outside.
6. The minimum clearance from the sides, rear, and top of unit to adjacent combustible construction: 2' (61 cm)
from the sides, 2' (61 cm) from the rear, and 5' (152.5 cm) from the top.
7. Improper lighting operations will cause serious injury and explosion.
Caution:
The gas pressure regulator provided with this appliance must be used. This regulator is set for an outlet pressure of
11 inches water column.
TYPES OF GAS
Min.Gas supply for input Adj.
Maximum Inlet Pressure
Manifold Pressure
Gas Rating
PROPANE GAS
25 psi
250 psi
11 in.w.c
46,000 Btu/hr
Step 2: Adjusting and Shutting Down
If the burner is not lit, press down the control knob
and turn clockwise to the "OFF" position. Repeat
step 1 after 5 minutes. When the burner is lit, press
down the control knob and turn it to the desired
heat output position between “LOW” and “HIGH”.
Press down and turn the control knob clockwise to
the "OFF" position to shut down the appliance.
Turn o the cylinder gas valve.
Note: To extinguish the ame, push the control
knob in and rotate clockwise.
OFF/Arrêt
LOW/
Min.
HI/
Max.
ON/ Allu-
mage
OFF/ Arrêt
CLOSE
AAA
OPEN
OFF/Arrêt
LOW/
Min.
HI/
Max.
ON/ Allu-
mage
OFF/ Arrêt

8 - 9
LIGHTING AND SHUTTING DOWN
Instructions for lighting and shutting down the
appliance:
1. Read instructions before lighting.
2. Press down the control knob to " LOW ", at the same
time push in the ignition button and keep the button
depressing for 15 seconds.
3. If the burner is not lit in 5 seconds, press down the
control knob and turn clockwise to the "OFF" position.
Repeat from step 2 after 5 minutes.
4. Adjust ame to desired height with the control knob.
Use of your appliance
causes carbon residue
to build up on the lava
rocks inhibiting the
airow and leading to a
more yellow ame.
Stir up the lava rocks
regularly to remove
these deposits and
maintain a blue ame.
SAFETY INSTRUCTIONS
This outdoor appliance is not intended to be installed in or on recreational vehicles and/or boats.
1. Only use the regulator with hose assembly supplied with your appliance. A replacement regulator with hose assem-
bly must be the one specied in this manual.
2. Have your propane gas tank lled by a reputable propane gas dealer and visually inspected and requalied at each
lling.
3. Never ll the gas tank beyond 80 percent full. Have your propane gas dealer check the release
valve after every lling to ensure that it remains free of defects.
4. Always keep propane gas tanks in an upright position. Do not store (or use) gasoline or other ammable
vapours and liquids in the vicinity of this appliance.
5. Propane gas tanks not connected for use must NOT be stored inside of the appliance or in the vicinity of this or any
other gas appliance.
6. Do not subject the propane gas tank to excessive heat. Never store an propane gas tank in a garage or any
other indoor location. Always disconnect the propane gas tank rst and store it safely outside.
7. Propane gas tanks must be stored outdoors in a well-ventilated area and out of children’s reach. Disconnected
propane gas tanks must not be stored in a building, garage, or any other enclosed area.
8. When your appliance is not in use, the gas must be turned o at the gas tank.
9. The regulator with hose assembly should be inspected before each use. If there is excessive wear, any abrasions, or if
the hose is cut, it must be replaced prior to use of the appliance.
10. Keep the gas regulator hose away from hot surfaces. Avoid unnecessary twisting of the hose. Visually inspect the
hose for cuts, cracks, excessive wear, or damage prior to each use of the appliance. If the hose is damaged DO NOT use
the appliance. Call 1-888-980-5122 for an authorized replacement hose.
11. Never allow children to play near your appliance.
WARNING:
Very hot while in operation! Never lean over the appliance while it is in use. Do not touch the stone, glass screen or the
spark guard while the appliance is in operation. Wait until the appliance has cooled down after use. Failure to comply
with these instructions may result in serious bodily injury.
Yellow
Blue
Incorrect
Flame
Correct
Flame

REMOVING THE TANK
CARE INSTRUCTIONS
9 - 9
Note:
Close the valve tightly before removing the tank.
Step A:
To remove the fuel supply hose from the tank, rotate
counter-clockwise. See Figure A.
Step B:
Remove the tank from the tank-support assembly
and through the tank fastener.
Note:
To replace the tank, repeat Step 7 and Step 8 in the
assembly instructions.
NOTE:
You must make periodic checks to ensure that all
connections are secured.
Keep this manual for future reference.
Counter-Clockwise Plastic
Screw
A B
Table of contents
Other Greemotion Outdoor Furnishing manuals

Greemotion
Greemotion GM-1011 User manual

Greemotion
Greemotion Cyprus GM-2006 User manual

Greemotion
Greemotion GM-2020-2PK User manual

Greemotion
Greemotion Auckland 131637 User manual

Greemotion
Greemotion Lucca 128773 User manual

Greemotion
Greemotion Sandor GM-1013 User manual

Greemotion
Greemotion Tampico Lounge-Set 134499 User manual

Greemotion
Greemotion Monza Comfort User manual

Greemotion
Greemotion Palma 131847 User manual

Greemotion
Greemotion 131867 User manual