Green Panther COMFORT 21 H User manual
Note: Please read the following instructions before use. This book contains important information on SAFETY, ASSEMBLY, OPERATION
& DISCLAIMER: DUE TO CONSTANT UPGRADATION, FEATURES AND SPECIFICATIONS ARE SUBJECT TO CHANGE WITHOUT NOTICE
COMFORT 21 H
GREEN PANTHER
LAWN MOWER
Multi-Purpose Professional
Lawn Mower
Fuel Efficient
Powerful Honda Engine To cover large area
in less time
User Manual

2
MANUAL CONTENTS Page No.
Introduction 3
Safety instructions 4
Setting up 5
Engine Oil 6
Removing Mulch Plugs 7
Maintenance 8
Benefits for you 10
Useful Mulch Mowing tips 11
Spare parts 12
Free Service coupon 16
Warranty Card 18
Do’s & Dont’s 19
CARTON CONTENTS Quantity
Green Panther COMFORT 21 H Lawn Mower
1
User manual 1
Engine manual 1
Grass catcher assembly
FREE ACCESSORIES
Spare Blade (4 Blades) 1Set
Safety Articles 1Set
Repair Tools For Enigne 1Set
Repair Tools For Mower 1Set
NB. Mowers which have the mulch option will have the
mulch Plug fitted into the rear chute of the mower.

3
INTRODUCTION
Congratulations on your purchase of Green Panther COMFORT 21 H Lawn Mower. This manual
covers the setting up, operation and maintenance of the Green Panther COMFORT 21 H Lawn
Mower. Please read and understand this owner’s manual before using the mower. If any point
is unclear, contact The manufacturer or agent. To emphasise special information the following
WARNING and CAUTION highlights are used.
MAINTENANCE
Please keep the manual and the engine booklet for your future reference.
They contain important information about your mower.
TECHNICAL SPECIFICATION
MODEL COMFORT 21-H LAWN MOWER STEEL DECK
TYPE SELF PROPELLED
ENGINE HONDA/GXV-160 /OHV
ENGINE STARTING EASY PULL START SYSTEM
AREA TO COVER AN AREA OF 2000M2
DRIVE SPEED(MIN-MAX) 0-3.96 KM/HR
CUTTING HEIGHT 15MM-75MM-10STAGES-SINGLE LEVER
CUTTING WIDTH 21"/533MM
NET/GROSS WEIGHT 42.5KGS/45.5KGS
WHEELS 8"-FRONT & REARX45MM TYRE WIDTH WITH BALL BEARING
DISK BLADE FLAIL -SWING BACK BLADE SYSTEM-4 BLADES, DISK TYPE
SAFETY BREAK LEAVER FOR IMMEDIATE STOP
GRASS DISCHARGE REAR COLLECTION
GRASS BAGS SEMI HARD PLASTIC CATCHER-70LITRES
ACCESSORIES-FREE SPARE BLADE 1SET(4BLADES), SAFETY ARTICLES, USER MANUAL,
REPAIR TOOLS FOR ENIGNE & MOWER

4
SAFETY INSTRUCTIONS
• Never mow while barefoot or wearing open sandals. Wear long trousers and heavy shoes
• Know your controls. Read the owner’s manual carefully.
Learn how to stop the engine quickly in any emergency
• Make sure the lawn is clear of sticks, stones, bones, wire and debris.
They could be thrown by the blade
• Stop the engine and disconnect the spark plug wire before clearing
blockages, checking, or working on the mower.
• Before using, always visually inspect to see that blades, blade bolts and cutter
assembly are not worn or damaged. Replace worn or damaged blades in
sets to preserve balance.
DAMAGED BLADES AND WORN BOLTS ARE MAJOR HAZARDS.
• Check all nuts, bolts and screws often; always be sure the mower is in
a safe operating condition. Use only genuine replacement parts.
• Refuel outdoors only. Do not smoke while fuelling engine. Add fuel
before starting the engine. Never remove the cap off the fuel tank
or add fuel while the engine is running or the engine is hot.
If fuel is spilled, do not attempt to start the engine but move the machine away from the
area of the spill and avoid creating any source of ignition until fuel vapors have dissipated.
• Do not mow whilst people, especially children or pets are in the mowing area.
• Replace worn or faulty silencers (mufer)
• Mow only in good daylight.
• Never use the mower unless the grass catcher or guards
(rear ap) provided by the manufacturer are in position.
• Start the engine carefully with feet well away from the blade.
• Do not operate the engine in a conned space where exhaust fumes
(carbon monoxide) can collect.
• Stop the engine whenever you leave the mower, even for a moment.
• Do not allow children or people unfamiliar with these instructions
to use the mower.
• Store the mower in a well-ventilated room away from naked ames
found in hot water heaters.

5
• Do not over-speed the engine or alter governor settings.
Excessive speed is dangerous and shortens the mower life.
• It is advisable to wear suitable eye protection when operating a mower.
• Turn the fuel off at the conclusion of mowing and reduce the throttle
setting during engine run-out.
• Store fuel in a cool place in a container specically designed for the purpose.
In general, plastic containers are unsuitable.
• Stop the engine, disconnect the spark plug wire and inspect the mower if:
a) the mower begins to vibrate abnormally; or b) after striking a foreign object.
• Never cut grass while walking backwards
• Stop the engine before pushing the mower across gravel drives,
walks or roads. Always walk, never run
• Mow across the face of slopes, never up and down.
• Exercise extreme caution when changing direction on slopes.
Do not mow excessively on steep slopes.
• Never pick up or carry a mower when it is operating
SETTING UP
Preliminary
• Open the lawn mower carton carefully folding back the carton top aps.
• Lift out the plastic grass catcher components.
• With the aid of a second person carefully lift the lawn mower
out of the carton and place on a level surface.
• Loosen the two handle bar pivot bolt knobs (A) (where tted).
• Fold the handle bars out straight, inline with the lower handle bars. Tighten the two handle
bar pivot bolt knobs (A) or the cam locks (B) to secure the handle bars in position.
• Remove and discard the white protective packing sheet from the mower.
Handle bar pivot bolt knobs
Fig 1
6
ENGINE OIL
•The 4 stroke engine fitted to the lawnmower is shipped with no oil in the sump
•Oil must be added before attempting to start the engine otherwise damage to the engine will occur.
ENGINE FUEL
• Use only fresh unleaded fuel in the lawnmower engine
OPERATION -Mulch Mowers
Installing the Mulch Plug
• With the engine stopped, raise the rear ap of the mower and remove the grass catcher
• Insert the long right hand side of the mulch plug rst into the rear chute of the mower.
Refer to figure 7
• Rotate the left hand side into the rear chute of the mower and push it as far forward as possible.
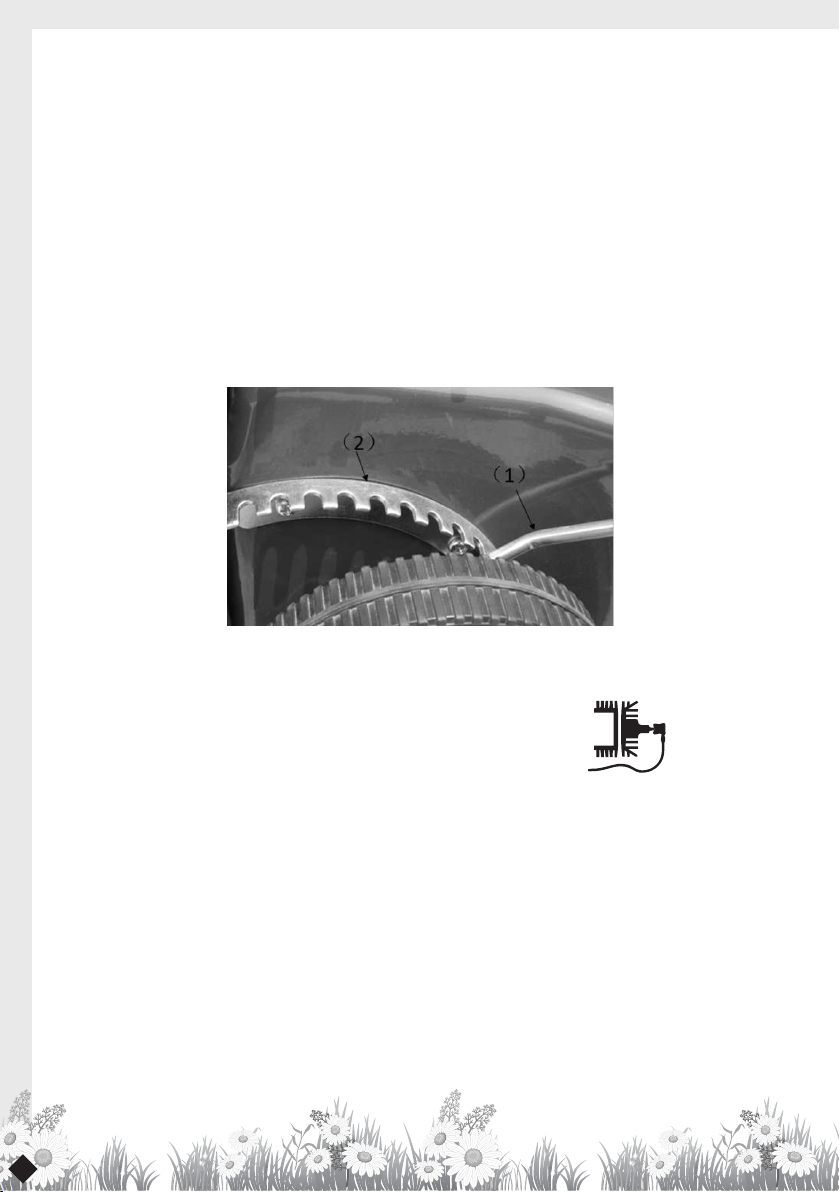
• Align the two locating pins (1) (on the underside of the mulch plug) with the slots (2) in the top
surface of the back ledge (3) of the mower base and lower the mulch plug until the lower face
rests at on top of the back ledge of the mower base. Refer to gures 7 & 8
• Lower the rear ap. To ensure the mulch plug is correctly seated, the rear ap should close
against the vertical face of the mulch plug legs with clearance to the horizontal extensions.
Adjusting the Cutting Height

7
REMOVING THE MULCH PLUG
• With the engine stopped, raise the rear ap of the mower.
• Grasp the rear of the mulch plug and lift up and away from the mower.
• Guide the mulch plug out by rotating the shorter left hand side to the
right and then guiding the longer right hand section until clear of the mower.
OPERATION -All mowers
To start the engine
Refer to the engine owner’s manual for detailed starting procedure. Ensure that the engine oil is at the
correct level and that the fuel tank is full of fresh unleaded fuel.
• Move the throttle control lever to the :- “CHOKE” position (where tted) - or the “FAST” position
and prime the engine. Refer to the engine owner’s manual.
• Grasp rope handle and pull slowly until resistance is felt. Then pull the cord rapidly to overcome
compression, prevent kickback and start engine. Repeat if necessary
• If a “Choke” is tted move the throttle control lever to the “FAST” position after the engine starts
.
TO STOP THE ENGINE
Move the throttle control lever to the “STOP” position, Wait till the engine comes to a complete stop before
removing or fitting the grass catcher or mulch plug to the mower, or attempting any maintenance work on
the mower.
Mulch plug installation (A) - Push Mower Mulch plug installation (B) - Push Mower
8
MAINTENANCE
Engine air cleaner
Refer to the engine owner’s manual for detailed maintenance instructions. The engine air cleaner
elements must be serviced after every 25 hours of normal mowing. The elements must be serviced
more regularly if the mower is used in dusty conditions. Replace immediately if the element is
damaged.
Spark plug
Refer to the engine owner’s manual for detailed maintenance instructions. For best results, remove
the spark plug every 50 hours for gap checking and replace every 100 hours of use. Replace the spark
plug at any time if it is found that the electrodes are pitted or burned or the porcelain cracked. For
replacement refer to engine owner’s manual for correct spark plug.
Muffler
Check the condition of the mufer periodically for rust and cracks. Replace if found to be damaged
as this can lead to increased exhaust noise. Replace only with a genuine original equipment part.
Blades
Check the condition of the blades and central fasteners at regular intervals, or after striking a solid
object, or if the mower begins to vibrate abnormally. The blades with use, will lose their sharp edge
and the quality of the grass finish will deteriorate. When this happens, all the blades should be
removed and replaced with a new set of blades. Always use genuine replacement blades and only
replace blades in sets to maintain balance.
CAUTION
Always ensure the engine is stopped
and the spark plug lead is removed
before attempting any maintenance
on the mower. Secure the mower
safely when titled upwards to access
the underside
Warning
Before carrying out any maintenance on the mower remove the spark plug lead from
the spark plug to prevent accidental starting
!
!

9
Cutting Assembly
•With the engine stopped, remove the spark plug lead and grass catcher or mulch plug.
•Set the height of cut lever to the high cut position, and fold the handle bars.
•Tilt the mower so the spark plug is up.
•Inspect the cutting assembly for damage and wear.
•Check the disc retaining bolts. Tighten the centre bolt to 5762Nm and the three concentric bolts
to 8-11Nm.
•Return the mower to its normal position and re-attach the spark plug lead
Blade Change
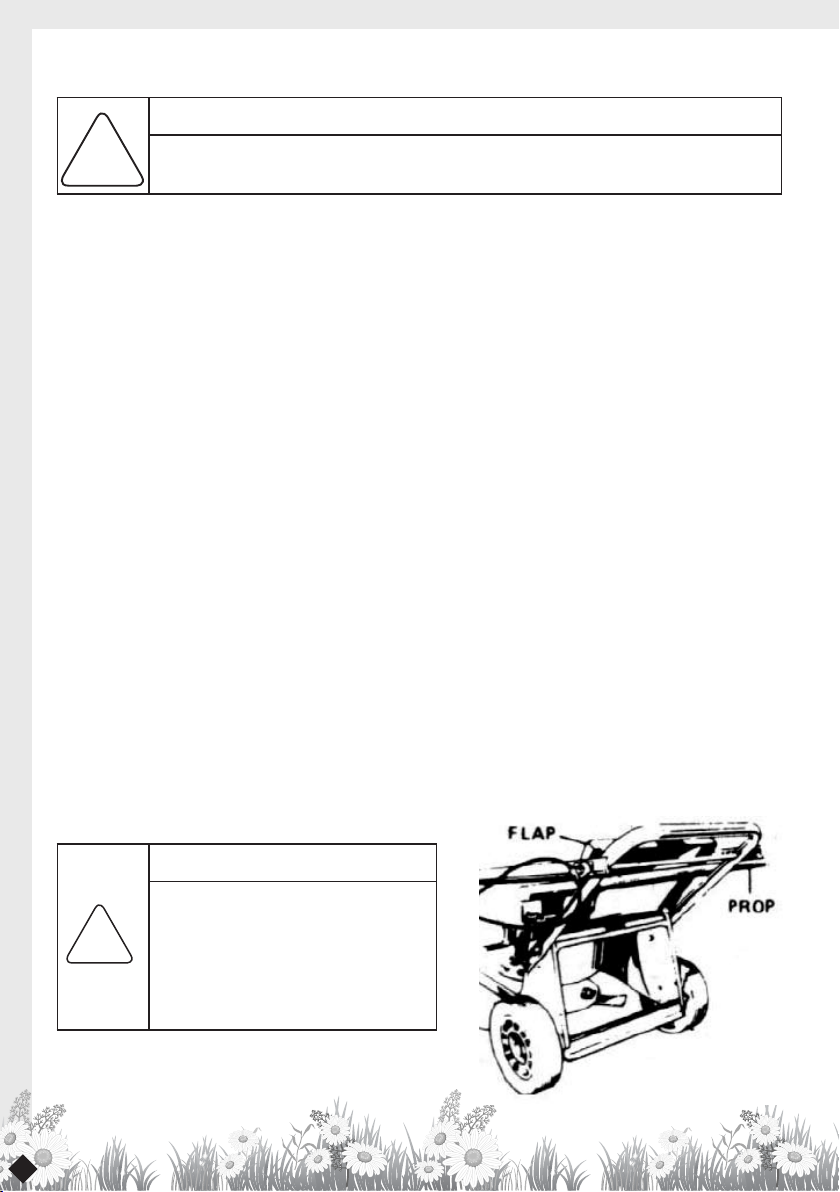
•with the engine stopped, spark plug lead and grass catcher or mulch plug removed.
open the discharge ap and prop in the open position.
•set the mower to the high cut position and fold the handle
bar forward.
•Rotate the cutting assembly carefully to access the blade
retaining bolts. refer fig 16
•using gloves and a suitable spanner, remove the blade assembly.
• Retain the “D” plates and discard the blades and fasterners.
NB. Mowers fitted with a circular cutting disc must be fitted with a “D”plate
•Fit new blades and fasten in the correct order. refer fig 16
Cleaning
To ensure safe operation and long life it is recommended to clean the mower after every use. This will
prevent corrosion, overheating and fire risk while ensuring ultimate performance.
Cleaning the underside of the mower
Place the mower outdoors on a at surface.
• Set the cut height to maximum.
• With the engine stopped, remove the grass catcher or mulch plug and lift open the discharge ap.
• Use a garden hose to wash out all the grass clippings.
• Inspect the underside and repeat the cycle if still not clean.
Cleaning the upper side of the mower
•Use a dry cloth or soft brush to remove all loose clippings.
•Use a damp cloth with mild detergent to clean away oil or other grime.
•Wash the grass catcher and/or mulch plug separately from the mower with a hose.
Wash all clippings out of the inside, outside and from the grass catcher mesh.
•Let the mower dry before storing.

10
BENEFITS FOR YOU
Because you mulch as you mow the time and cost savings are also significant:
•Eliminating raking of leaves before mowing
(Mulch mowing picks up and converts fallen leaves into mulch).
•Eliminating raking of cut grass.
•Saves time spent emptying the catcher.
•Automatically disposing of grass clippings.
•Eliminating the need to dispose of clippings at the refuse tip.
BENEFITS TO YOUR LAWN
Research has shown that lawns are usually cut too short, grass, like any other plant life, relies on
photosynthesis to regenerate and survive. Reduced leaf size (from cutting too low) can seriously
effect a lawn by:
• Making it more susceptible to disease.
• Encouraging weeds to take hold.
• Exposing the soil to:
- greater evaporation
- temperature extremes
- erosion
Raising the cut height and using mulch mowing follows the best practice for nurturing a healthier
more attractive lawn with less water usage.
MULCH MOWING INFORMATION
Some models are fitted with an option for mulch mowing. A mulch plug is supplied with these mowers and
it is installed in the rear discharge chute (as noted in the “OPERATION” section of this manual) to perform
mulch mowing. The following information provides advice on mulch mowing .
MULCH MOWING
The mulch mowing setup reduces the grass clippings into very fine particles.
The design allows for the even distribution of the grass particles at the base of the lawn. The mulched
clippings can then:
•Break down quickly, releasing nutrients into the soil, saving on fertilizer costs.
•Reduce evaporation of moisture from the soil which reduces watering costs and effort.
• Help to control temperature extremes protecting the roots of the grass.
•Assist in controlling soil erosion.
Table of contents
Other Green Panther Lawn Mower manuals


Popular Lawn Mower manuals by other brands


DEWEZE
DEWEZE ATM-725 Operation and service manual

Weed Eater
Weed Eater 180083 owner's manual

Husqvarna
Husqvarna Poulan Pro PP185A42 Operator's manual

Better Outdoor Products
Better Outdoor Products Quick Series Operator's manual

Cub Cadet
Cub Cadet 23HP Z-Force 60 Operator's and service manual

MTD
MTD 795, 792, 791, 790 Operator's manual


