Green Panther GPEA-2MO-196L User manual

Note: Please read the following instructions before use. This book contains important information on SAFETY, ASSEMBLY, OPERATION
& DISCLAIMER: DUE TO CONSTANT UPGRADATION, FEATURES AND SPECIFICATIONS ARE SUBJECT TO CHANGE WITHOUT NOTICE
Multi-Purpose Professional
Lawn Mower
Fuel Efficient
196cc Powerful Engine To cover large area
in less time
User Manual
GPEA-2MO-196L
Two Men Earth Auger
196ccOHV
HIGHPOWER
EASYSTARTING
GPEA-2MO-196L
TWOMEN
EARTHAUGER

2
MANUAL CONTENTS Page No.
Introduction .............................................................................................................................. 3
Safety instructions.................................................................................................................... 4
Maintenance and Storage ....................................................................................................... 11
Service, Troubleshooting and Repair ....................................................................................... 12
Powerhead and Auger Parts Diagram...................................................................................... 14
Powerhead and Auger Part List ............................................................................................... 15
Powerhead and Auger Engine Parts Diagram.......................................................................... 17
Powerhead and Auger Engine Part List ................................................................................... 18

3
REGISTRATION AND WARRANTY
THANK YOU . . .
For purchasing the Earth Auger Powerhead, We guarantee that this powerhead conforms to
safety standards for usability and durability. With proper care,your Powerhead/Auger will provide
many years of service.
Please take the time to read this manual carefully to learn how to correctly operate and maintain
your powerhead/auger. Congratulations on your investment in quality.
MODEL IDENTIFICATION
Your earth auger powerhead has a model/serial number decal located on the side of the engine
near the muffler. Engine serial number is located on the top plate of the muffler guard. Write
these numbers and the model number in the space provided. You will need these numbers if you
order parts.
Model Number...................................................................................................................................
Serial Number....................................................................................................................................
Engine Serial Number........................................................................................................................
Date of Purchase................................................................................................................................
Place of Purchase...............................................................................................................................

4
OWNER’S RESPONSIBILITY
Accurate assembly and safe and effective use of the
earth auger unit is the owner’s responsibility.
1. Read and follow all safety instructions.
2. Carefully follow all assembly instructions.
3. Maintain the earth auger unit according to directions
and schedule included.
4. Ensure that anyone who uses the earth auger unit
is familiar with all controls and safety precautions.
CAUTIONS AND IMPORTANT NOTES
Two symbols which draw attention to information
of special interest appear throughout this manual.
These comments range in importance from helpful
hints to warnings about risk of personal injury.
Please take the time to read and understand them.
IMPORTANT SAFETY PRECAUTIONS
Operate earth auger unit according to safety
instructions and recommendations outlined here and
in stetted throughout the text. Make sure anyone who
uses the earth auger unit has read the instructions and
is familiar with the controls.
This symbol points out important safety instructions which if not followed could endanger your
personal safety. Read and follow all instructions in this manual and any others provided with this
equipment.
1. The earth blade is very sharp. Use extreme caution when drilling a hole or replacing the blade.
2. Do not carry the earth auger unit between holes with the engine running.
3. The auger should not rotate when the engine is idling.
4. Always keep hands and feet clear of rotating auger.
5. Do not wear loose clothing while operating the earth auger unit.
6. Do not allow children to operate this earth auger unit. Do not operate the earth auger unit without proper
instruction.
7. Do not operate any power equipment under the influence of alcohol or drugs.
SAFETY INSTRUCTIONS
!
CAUTION
Indicates A Situation which May Cause
Personal Injury Or Damage To The Earth
Auger Unit Or Property
IMPORTANT
Provides Helpful Information For Proper Assembly,
Operation, Or Maintenance Of Your Earth Auger Unit.

5
REGISTRATION FORM
Complete and return Warranty Card. Your powerhead has a model/serial number decal located on the muffler
side of the engine. Record this number and the model number in the space provided on page 2 of this manual.
You will need these numbers if you order parts.
SPARK PLUG INSTALLATION
If your powerhead does not have the spark plug already installed for you. You will have to install it following the
instructions given below.
1. Locate the spark plug in the parts packet.
2. With powerhead laying on side labeled “THIS SIDE UP WHEN NOT IN USE,” place spark plug in spark plug hole.
NOTE: A resistor spark plug must be used for replacement.
3. Turn by hand until snug.
4. Use a wrench or socket to tighten to 180 inch-pounds of torque. DO NOT OVERTIGHTENED.
OPERATION
1. Read manual and follow instructions for fuel type, starting, etc.
2. The clutch will transfer maximum power after about two hours of normal operation. During this break-in period
clutch slippage may occur. The clutch should be kept free of oil or other moisture for efficient operation. Each
powerhead is tested at the factory, but is not operated for the full break-in period.
3. The earth auger unit should be operated no more than 20 degrees in any direction during continuous use and
limited to 30 degrees intermittently. Recommended for adequate lubrication and fuel delivery.
4. When digging in heavy soil, pump the earth auger unit with an up and down motion in the hole for every one
foot of depth.
5. Never run engine indoors. Exhaust fumes are deadly.
6. Do not use an earth auger in ice.
PRE-START CHECKLIST
1. Read and understand the engine manual and operator’s manual that came with your unit.
2. Fill oil sump or check oil level. Check oil level often during engine break-in.
3. Fill fuel tank. Use unleaded, regular gasoline.
4. Be sure spark plug wire is attached to spark plug.
Fig 1

6
PETROL AND OIL
Quality
To operate the engine, we recommend Pure 90 octane Petrol only. To ensure that the engine operates correctly
throughout the life of the engine. Use 20W - 40 engine oil.
The EARTH AUGER is shipped WITHOUT OIL IN THE ENGINE
Working on a level surface,tip the earth auger on its carrying handlebar as shown.
Oil Recommendations
Oil is a major factor affecting performance and service life. Use 4-stroke automotive detergent oil.
SAE 20W - 40 is recommended for general use.
NOTE:
Using non detergent oil can shorten the engine’s service life,and using 2-stroke oil can damage the engine.
Oil Level Check
Check the engine oil level before each use,or every 10 hours if operated continuously. Rest the earth auger on a
level surface with the engine stopped.
1. Tip the earth auger on its carry handlebar as shown.
2. Remove the oil filler cap/dipstick and wipe it clean.
3. Insert and remove the dipstick without screwing it into the filler opening. Check the oil level shown on the
dipstick.
4. If the oil level is low,fill to the edge of the oil filler hole with the recommended oil. Avoid overfilling or under
filling, as the oil capacity is small. Be sure the engine is in a level position, as shown. NOTE: Running the engine
with a low oil level can cause engine damage. This type of damage is not covered by the DISTRIBUTOR’S
LIMITED WARRANTY.
5. Screw in the filler cap/dipstick securely.

7
Oil Change
Drain the used oil while the engine is warm. Warm oil
drains quickly and completely.
1. Place a suitable container below the engine to
catch the used oil.
2. Remove the oil filler cap/dipstick.
3. Drain the used oil through the oil filler opening.
Allow the used oil to drain completely.
Please dispose of used motor oil in a manner that
is compatible with the environment. We suggest
you take used oil in a sealed container to your local
recycling center or service station for reclamation.
Do not throw it in the trash, pour it on the ground,
or pour it down a drain.
!
CAUTION
Never store engine with fuel in the tank
indoors. Fuel and fuel vapors are highly
flammable.
An adult must always handle and fill the
engine with fuel.
Always handle gas in a well ventilated area,
outdoors, away from flames or sparks.
Do not start engine if fuel is spilled. Wipe
off excess fuel and allow to dry. Remove
engine from area to avoid sparks.
IMPORTANT
THIS ENGINE USES PETROL ONLY!

8
NORMAL OPERATION
1. The clutch will transfer maximum power after about
two hours of normal operation. During this break-in
period clutch slippage may occur. The clutch should
be kept free of oil and other moisture for efficient
operation.
2. Cultivate without placing excessive body weight
on the unit. The mini cultivator operates most
efficiently with the weight of the unit itself.
3. Never run engine indoors. Exhaust fumes are
deadly.
!
CAUTION
Never add Petrol when engine is running
or hot from operation. Never fill the tank
indoors.
Do not smoke when filling fuel tank.
Never fill fuel tank completely. Fill tank to
1/2” below bottom of filler neck to provide
space for fuel expansion. Wipe any fuel
spillage from engine and equipment before
starting engine.
Do not hold throttle lever wide open while
starting. Loss of control of powerhead/ auger
could result.
Never run engine indoors or in enclosed,
poorly ventilated areas. Engine exhaust
contains carbon monoxide, an odorless
and deadly gas.
Keep hands, feet, hair and loose clothing
away from any moving parts on engine
and equipment.
Temperature of muffler and near by areas
may exceed 150° f. Avoid these areas.
Before to ring unit, disconnect spark plug
wire from spark plug and attach it to
retaining post.
Never store engine with fuel in tank
indoors or in enclosed, poorly ventilated
areas, where fuel fumes may reach an
open flame, spark or pilot light.
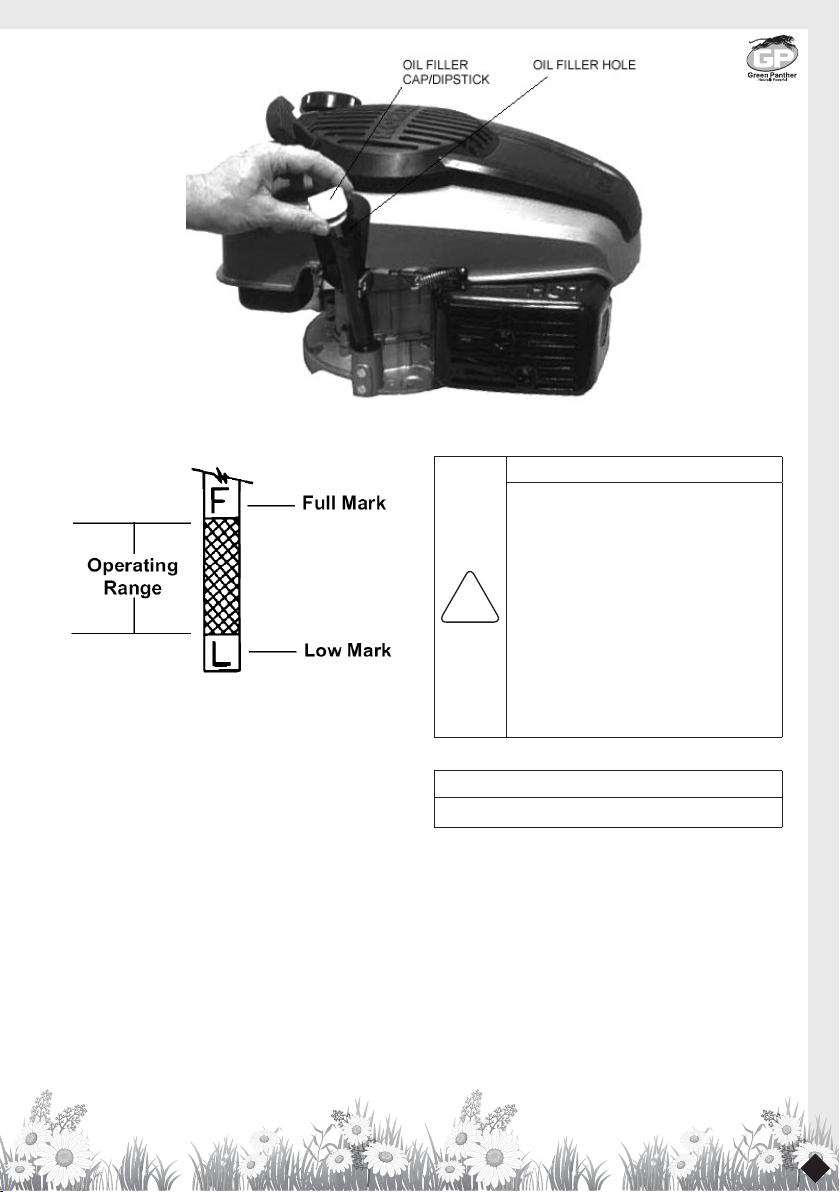
4. With the engine resting on the carrying handlebar
on a level surface,fill with the recommended oil to
the edge of the oil filler hole. Do not overfill.
5. Screw in the filler cap/dipstick securely.
Filling Fuel Tank
1. Shut-off engine and allow engine to completely
cool before refilling the fuel tank.
2. Move to a well ventilated area, outdoors, away
from flames and sparks.
3. Clean debris from area around the fuel cap.
4. Loosen fuel cap slowly. Place the cap on a clean,
dry surface.
5. Carefully add fuel without spilling.
6. Do not fill Petrol tank completely full, allow space
for fuel to expand.
7. Immediately replace fuel cap and tighten. Wipe off
spilled fuel and allow to dry before starting engine.
IMPORTANT
NEVER MIX OIL WITH PETROL.

9
STARTING AND STOPPING ENGINE
•Moveenginetoawellventilatedarea,outdoors,to
prevent carbon monoxide poisoning.
•Move to an area away from flames or sparks, to
avoid ignition of vapors if present.
•Removealldebrisfrom aircleanerholesandfuel
tank cover to ensure proper air flow.
STARTING
To Start Engine:
1. Open fuel shut-off valve.
2. Flip the on/off switch to on position.
3. Grasp starter handle and pull rope out, slowly, until
it pulls slightly harder. Let rope rewind slowly. Then
pull rope with a rapid full arm stroke. Let rope return
to starter slowly.
To Stop Engine:
1. Flip the on/off switch to the off position.
2. Close fuel shut-off valve
NOTE: This EARTH AUGER engine adopts automatic
choke, will open or close the choke valve automatically
according to the environment and the temperature of
the engine, when the engine start is successful, the
choke valve will automatically open.
STEPS FOR CLEANING AIR FILTER
Optional Foam Precleaner maintenance:
To run a year or every 25 hours cleaning or replacement
of the Optional Foam Precleaner, In the mud or dust
more cases, Shorter replacement, Please according to
the following instructions to maintain.
1. Counterclockwise rotation knob, Open the air
cleaner cover
(Figure 1);
Figure 1

10
2. Remove the Optional Foam Precleaner, in warm water, clean with cleaning agent;
3. Thoroughly rinse clean the Optional Foam Precleaner, until all the cleaning agent to remove, hand squeeze out excess
water (Don’t throw),then let the strainer;
4. Reinstall the Optional Foam Precleaner;
5. Reinstall the Air Cleaner Cover, and then fixed knob.
Air Cleaner Element maintenance:
To run every 25 hours Need to check whether there is no dust, whether there is loose or damaged parts,In the
mud or dust very much, inspection cycle to shorten,Each run for a year or 100 hours,The Air Cleaner Element
must be replaced.
1. Counterclockwise rotation knob,Open the air cleaner cover
(Figure 1);
2. Remove the Optional Foam Precleaner and Air Cleaner Element; NOTE: Please do not use water to clean the Air
Cleaner Element, also do not use compressed air blowing, because this can damage the Air Cleaner Element.
3. If the Air Cleaner Element is dirty, please replace with new.
4. Reinstall the Optional Foam Precleaner;
5. Reinstall the Air Cleaner Cover, and then fixed knob.

11
MAINTENANCE AND STORAGE SAFETY
1. Always allow muffler to cool before filling fuel tank.
2. When storing for over one (1) month, Remove Fuel and
oil from the Engine
3. Do not fill Do not fill the FUEL when engine is
running or is hot.
4. The gear case has four (4) oz. of grease installed at
the factory. It is recommended that once a year the
gear case be split and the grease level checked. Add
greaseonlyif levelofgreaseisbelow topofthegears.
DO NOT OVERFILL.
5. For cold weather operation, store the unit in a cool
environment. Transferring the unit from a warm
to a cold place can cause the build up of harmful
condensation.
ENGINE MAINTENANCE
Refer to the engine manual included in your parts packet
for information on engine maintenance. Your engine
manual provides detailed information and a maintenance
schedule for performing the following tasks:
1. Check oil level every five (5) operating hours and
before each use.
2. Change oil after first two (2) operating hours and every
25 operating hours thereafter, more often if operated
in extremely dusty or dirty conditions. Change oil
while engine is still warm from recent running.
3. Frequently remove dirt and debris from cooling fins, air
intake screen, levers and linkage. This will help ensure
adequate cooling and correct engine speed.
4. Check air cleaner.
5. Check spark plug yearly or every 100 operating hours.
6. Check engine and auger often for loose nuts and bolts.
MAINTENANCE AND STORAGE
!
CAUTION
To Prevent accidental starting : Engine
must be turned off and cool, and spark
Plug wire must be removed from spark
plug
Before checking and adjusting engine or
equipment.
Do not operate auger before reading
the engine manual provided in the parts
packet.
IMPORTANT
Engine can overheat and become damaged if debris
blocks the cooling fins or recoil housing.
IMPORTANT
Never run engine without complete air cleaner
installed on engine.

12
STORAGE
Follow the steps below to prepare your earth auger
unit for storage. Read your manual for detailed
instructions on preparing the engine for storage.
1. Drain the fuel system. Run the engine until it stops.
2. Change oil.
3. Remove spark plug, pour one (1) ounce of clean
engine oil into spark plug hole. Cover hole with
a rag. Pull starter handle slowly several times to
distribute oil. Install spark plug. Do not connect
spark plug wire.
4. Clean entire earth auger unit.
5. Store your earth auger unit in a clean, dry building
that is inaccessible to children.
SERVICE INFORMATION
we build quality and durability into the design of our products and careful maintenance by you, can guarantee a
repair-free life for your earth auger unit.
Most repairs will be minor, and easily fixed by following the suggestions in the trouble shooting guide in this
section. The guide will help you pinpoint the causes of common problems and identify remedies.
For more complicated repairs, you may want to rely on your retailer or an authorized mechanic (contact your
retailer for a list of authorized mechanics in your area). A parts catalog is included in this section.
We will always be glad to answer any questions you have, or help you find suitable assistance. To order parts
or inquire about warranty,call or write us at the address found in the next column under the section or during
repair parts.
ORDERING REPAIR PARTS
Parts can be obtained from the store where your earth auger powerhead was purchased or direct from the
factory. To order from the factory, call or write to:
Please include the following information with your order:
1. Part numbers 2. Part description
3. Quantity 4. Model number and serial number
MAINTENANCE AND STORAGE
SERVICE, TROUBLESHOOTING AND REPAIR
!
CAUTION
Do not store earth auger unit with fuel
in tank in doors or in enclosed, poorly
ventilated areas, where fuel fumes may
reach an open flame, spark, pilot light
or an ignited object. Drain fuel outdoors
away from any ignition sources. Use only
approved fuel containers.
For long term storage: close fuel shut- off
valve and store earth auger unit in an
upright position. Failure to do so can cause
oil leakage over a prolonged period.

13
SERVICE, TROUBLESHOOTING AND REPAIR
!
CAUTION
Practice safety at all times. Engine must be
turned off and allowed to cool, and spark
plug wire must be disconnected before
attempting any maintenance or repair.
TROUBLESHOOTING
PROBLEM POSSIBLE CAUSE REMEDY/ACTION
Engine will not start 1. Power switch off
2. Spark plug wire disconnected
1. Flip switch to on position
2. Connect spark plug wire to spark plug
Engine runs rough, floods
during operation
1. Dirty air cleaner
2. Carburetor out of adjustment
1. Clean or replace air cleaner
2. Take to authorized Briggs & Stratton
service center
Engine is hard to start
1. Stale fuel
2. Spark plug wire loose
3. Dirty carburetor
1. Drain old fuel and replace with fresh.
2. Make sure spark wire is securely
attached to spark plug
3. Clean carburetor
Engine misses or lacks
power
1. Clogged fuel tank
2. Clogged air cleaner
3. Improper carburetor adjustment
4. Spark plug dirty, improper gap, or
wrong type
1. Remove and clean
2. Clean or replace
3. Take to authorized service center
4. Replace spark plug and adjust gap
Auger turns at idle 1. Idle speed too high
2. Broken clutch spring
1. Adjust idle speed lower
2. Replace both springs
Auger turns, but has no
power
1. Carburetor out of adjustment
2. Broken transmission
3. Worn clutch shoes
4. Worn engine lower seal
1. Take to authorized service center
2. Return to factory
3. Replace clutch shoes and springs
4. Take to authorized service center
Auger cuts slowly 1. Damaged point 1. Buy a new fishtail point

14
POWERHEAD AND AUGER PARTS DIAGRAM

15
POWERHEAD AND AUGER PART LIST
SL.NO PART NO. DESCRIPTION QTY.
1 GPEA-2MO-196-01P ENGINE, 196 CC 1
2 GPEA-2MO-196-02P WOODRUFF KEY #6 1
3 GPEA-2MO-196-03P ROTOR, CENTRIFUGAL CLUTCH COMPLETE 1
4 GPEA-2MO-196-04P MOUNT RING 1
5 GPEA-2MO-196-05P BOLT 5/16-18×1 4
6 GPEA-2MO-196-06P MAIN HANDLEBAR ASSEMBLY 1
7 GPEA-2MO-196-07P BOLT, PHILLIPS TRUSS HD 10-24 X 1-1/4" 1
8 GPEA-2MO-196-08P CABLE, THROTTLE 43-1/2" 1
9 GPEA-2MO-196-09P TRIGGER ASSEMBLY, LONG THROW 1
10 GPEA-2MO-196-10P CLUTCH DRUM 1
11 GPEA-2MO-196-11P BEARING, BALL R12 DOUBLE LIP 3
12 GPEA-2MO-196-12P GEAR CASE, UPPER HALF 1
13 GPEA-2MO-196-13P BALL BEARING R10 2
14 GPEA-2MO-196-14P GEAR, 7T PINION THREADED 1
15 GPEA-2MO-196-15P GASKET, POWERHEAD TRANSMISSION 1
16 GPEA-2MO-196-16P GEAR 48T /10T 1
17 GPEA-2MO-196-17P RING, SNAP EXTERNAL 3/4" 2
18 GPEA-2MO-196-18P DOWEL PIN, STEEL 1/4" X 1/2" 1
19 GPEA-2MO-196-19P GEAR, 44T 3/4" HOLE 1
20 GPEA-2MO-196-20P GEAR CASE, LOWER HALF 1
21 GPEA-2MO-196-21P SHAFT, OUTPUT 7/8" 1
22 GPEA-2MO-196-22P BOLT, SHCS 1/4-20 X 2-1/2" 4
23 GPEA-2MO-196-23P BOLT, SHCS 1/4-20 X 1-1/2" 2
24 GPEA-2MO-196-24P TRANSMISSION ASSEMBLY 30:1 1
25 GPEA-2MO-196-25P BOLT 3/8-16 X 1-1/2 HH 1
26 GPEA-2MO-196-26P NUT 3/8-16 HEX LOCK BI-WAY 1
27 GPEA-2MO-196-27P SHOCK TOP 1-PC 1
28 GPEA-2MO-196-28P SHOCK SPRING 1
29 GPEA-2MO-196-29P CUSHION RUBBER 1
30 GPEA-2MO-196-30P SPRIMG WASHER 12 2
31 GPEA-2MO-196-31P BOLT M12X1.25X14 2

16
SL.NO PART NO. DESCRIPTION QTY.
32 GPEA-2MO-196-32P EARTH AUGER 4 1
33 GPEA-2MO-196-33P BOLT-HEX, 1/4-28 X 5/8”, GRADE 5 2
34 GPEA-2MO-196-34P NUT 1/4-28 BI-WAY LOCK 2
35 GPEA-2MO-196-35P EARTH BLADE, 4 1
36 GPEA-2MO-196-36P FISHTAIL POINT 1
37 GPEA-2MO-196-37P LOCK-WASHER, SPRING 5/16" 8
38 GPEA-2MO-196-38P BOLT, HEX HD 5/16-18 X 1-1/2" 8
39 GPEA-2MO-196-39P PLASTICH HANDLE 4
40 GPEA-2MO-196-40P HANDLE 4
41 GPEA-2MO-196-41P POSITION PIN 2
42 GPEA-2MO-196-42P WASHER-FLAT, 1/4” 4
43 GPEA-2MO-196-43P EARTH AUGER 12”\14" 1
44 GPEA-2MO-196-44P EARTH BLADE 12”\14” 1
45 GPEA-2MO-196-45P NUT 5/16-18 2
46 GPEA-2MO-196-46P WASHER-LOCK 5/16 2
47 GPEA-2MO-196-47P BOLT 5/16-18X2-3/4 2
48 GPEA-2MO-196-48P WASHER-LOCK 3/8 1
49 GPEA-2MO-196-49P BOLT 3/16-16X2 1
50 GPEA-2MO-196-50P JOINT LEVER CASTING 1
51 GPEA-2MO-196-51P NUT M27X1.5 1
52 GPEA-2MO-196-52P SPRING PLATE 1
53 GPEA-2MO-196-53P WASHER 1
54 GPEA-2MO-196-54P NUT,BY-WAY LOCK 5/16-18 8
55 GPEA-2MO-196-55P SHOCK SPRING 1
56 GPEA-2MO-196-56P WASHER-FLAT, 5/16” 2
57 GPEA-2MO-196-57P BOLT-HHCS, 5/16-18 X 2”, GRADE 5 2
58 GPEA-2MO-196-58P NUT, BI-WAY LOCK 5/16-18 2
59 GPEA-2MO-196-59P SWITCH,ROCKER 1

17
POWERHEAD AND AUGER ENGINE PARTS DIAGRAM

18
POWERHEAD AND AUGER ENGINE PART LIST
S.N PART NO. DESCRIPTION
1 GPEA-2MO-196L-01E NUT,M6
2 GPEA-2MO-196L-02E RECOIL ASSEMBLY WITH
STANDARD HANDLE
3 GPEA-2MO-196L-03E ENGINE HOOD
4 GPEA-2MO-196L-04E NUT,M14
5 GPEA-2MO-196L-05E RECOIL CLUTCH
6 GPEA-2MO-196L-06E FLYWHEEL, MAGNETO
7 GPEA-2MO-196L-07E SPRING, CLUTCH
8 GPEA-2MO-196L-08E FUEL TANK
9 GPEA-2MO-196L-09E FUEL CAP, MANUAL
VENTING
10 GPEA-2MO-196L-10E ENGINE BODY
11 GPEA-2MO-196L-11E IGNITION COIL
12 GPEA-2MO-196L-12E BOLT M6X25
13 GPEA-2MO-196L-13E ENGINE WIRE
14 GPEA-2MO-196L-14E GASKET
15 GPEA-2MO-196L-15E THE FUEL TANK BRACKET
16 GPEA-2MO-196L-16E FUEL FILTER
17 GPEA-2MO-196L-17E OIL PIPE CLAMP
18 GPEA-2MO-196L-18E FUEL PIPE
19 GPEA-2MO-196L-19E GOVERNOR ROD
20 GPEA-2MO-196L-20E GOVERNOR SPRING
21 GPEA-2MO-196L-21E CONTROL ARM
22 GPEA-2MO-196L-22E NUT,M6
23 GPEA-2MO-196L-23E CONTROL ARM SQUARE
HEAD BOLT
24 GPEA-2MO-196L-24E GOVERNOR BRACKET
ASSEMBLY
25 GPEA-2MO-196L-25E SPRING
26 GPEA-2MO-196L-26E BOLT,M6X12
27 GPEA-2MO-196L-27E SWITCH, ROCKER
S.N PART NO. DESCRIPTION
28 GPEA-2MO-196L-28E THE AIR FILTER
ASSEMBLY
29 GPEA-2MO-196L-29E BOIT,M6X25
30 GPEA-2MO-196L-30E BASE, INTAKE
31 GPEA-2MO-196L-31E NUT,M6
32 GPEA-2MO-196L-32E AIR CLEANER ELEMENT
33 GPEA-2MO-196L-33E OPTIONAL FOAM
PRECLEANER
34 GPEA-2MO-196L-34E AIR CLEANER COVER
35 GPEA-2MO-196L-35E OIL CAP
36 GPEA-2MO-196L-36E GASKET,AIR CLEANER
37 GPEA-2MO-196L-37E CARBURETOR
38 GPEA-2MO-196L-38E PACKING,CARBURETOR
39 GPEA-2MO-196L-39E INSULATIR,CARBURETOR
40 GPEA-2MO-196L-40E PACKING,INSULATOR
41 GPEA-2MO-196L-41E CARBURETOR STUD
42 GPEA-2MO-196L-42E SPARK PLUG
43 GPEA-2MO-196L-43E MUFFLER STUD
44 GPEA-2MO-196L-44E GASKET, MUFFLER
45 GPEA-2MO-196L-45E PACKING,CARBURETOR
46 GPEA-2MO-196L-46E PACKING,CARBURETOR
47 GPEA-2MO-196L-47E MUFFLER
48 GPEA-2MO-196L-48E COVER, MUFFLER
49 GPEA-2MO-196L-49E NUT, M6
50 GPEA-2MO-196L-50E OIL DIPSTICK
51 GPEA-2MO-196L-51E O TYPE RUBBER RING
52 GPEA-2MO-196L-52E OIL DIPSTICK ASSEMBLY
53 GPEA-2MO-196L-53E OIL SCALE BASE

19
1st Free Service Coupon ISO 9001-2008
CERTIFIED COMPANY
FREE SERVICE COUPON (30 Days / 20 hrs (Which ever is earlier)
Model
PDI Date
Dealer’s Office Seal & Signature
Service No.
Purchase bill no. Date
Serial Number
Operations:
• Check and Test the Fuel Mixture.
• Check and Clean the Air Filter
• Check, Clean and Adjust the Spark plug
• Check and Adjust the Carburetor Tuning
• Check and Sharpen the cutting Tools
• Start and Check the Noise, Vibration, Loosen / Fasteners etc.
• Product familiarization on Usage
• Routine maintenance and Storage
Customer Signature.........................................
Conditions: Operations listed have been performed to my entire satisfaction without any labour charges. Only consumables were charged.
WARRANTY AND FREE SERVICE COUPON
GPEA - 2MO - 196L Two Men Earth Auger
2nd Free Service Coupon ISO 9001-2008
CERTIFIED COMPANY
FREE SERVICE COUPON (30 Days / 20 hrs (Which ever is earlier)
Model
PDI Date
Dealer’s Office Seal & Signature
Service No.
Purchase bill no. Date
Serial Number
Operations:
• Check and Test the Fuel Mixture.
• Check and Clean the Air Filter
• Check, Clean and Adjust the Spark plug
• Check and Adjust the Carburetor Tuning
• Check and Sharpen the cutting Tools
• Start and Check the Noise, Vibration, Loosen / Fasteners etc.
• Product familiarization on Usage
• Routine maintenance and Storage
Customer Signature.........................................
Conditions: Operations listed have been performed to my entire satisfaction without any labour charges. Only consumables were charged.
WARRANTY AND FREE SERVICE COUPON
GPEA - 2MO - 196L Two Men Earth Auger
3rd Free Service Coupon ISO 9001-2008
CERTIFIED COMPANY
FREE SERVICE COUPON (30 Days / 20 hrs (Which ever is earlier)
Model
PDI Date
Dealer’s Office Seal & Signature
Service No.
Purchase bill no. Date
Serial Number
Operations:
• Check and Test the Fuel Mixture.
• Check and Clean the Air Filter
• Check, Clean and Adjust the Spark plug
• Check and Adjust the Carburetor Tuning
• Check and Sharpen the cutting Tools
• Start and Check the Noise, Vibration, Loosen / Fasteners etc.
• Product familiarization on Usage
• Routine maintenance and Storage
Customer Signature.........................................
Conditions: Operations listed have been performed to my entire satisfaction without any labour charges. Only consumables were charged.
WARRANTY AND FREE SERVICE COUPON
GPEA - 2MO - 196L Two Men Earth Auger
Bungalow | Hotels | Gardens | Stadium | Resorts | Lawns | Parks | Golf Course

20
1. LIMITED WARRANTY PERIOD : For a period of six months from the date of Sale / delivery of the product which ever is earlier. 2. LIMITED
WARRANTY OBLIGATION : Replacement of defective part(s) by authorized dealer are free of charges. If found defective by reasons of defective
material / poor workmanship, parts will be replaced and there will be no value re-imbursement. 3. TERMS & CONDlTlONS : a. Claims under
warranty will be accepted on submission of Warranty Card duly filled and stamped by authorized dealer together with the original purchase
document. : b. Shipping / transportation / Incidental charges incurred in replacing defective parts under warranty shall be borne by the purchaser.
WARRANTY null & void if
(i) Lack of maintenance, (ii) Incorrect use of the machine or tampering, (iii) Use of non-genuine spare parts, (iv) Usage of acids, solvents, or any
flammable materials, (v) Non-usage of filter water / clear water / soft water & using water above 40°C temperature, (vi) While using the pressure
washers to draw water which is contaminated with dust & solvents (eg. paint thinners, gasoline, oil, etc.), (vii) Repair done by unauthorized
service people, (viii) Those parts subject to wear & tear due to normal operations and plastic parts, rubber items etc, (ix) Loose connections,
faulty electrical fixtures & fluctuations in power supply.
4. Should any failure occur during or after the warranty period, customer does not have the right to interrupt payment / price discount.
5. Incidental or consequential damages like inconvenience commercial loss, loss of tie, mental agony etc.
6. Loss of any nature due to operation or non-operation is not covered under warranty.
7. All free service are at Dealer’s service point only.
8. Warranty ceases if service is not done periodically.
9. The attached card should be completed and returned to Ratnagiri Impex Pvt. Ltd. for registration immediately after sale / delivery.
10. The warranty is void unless you register the warranty card with Ratnagiri Impex Pvt. Ltd.
11. The decision of Ratnagiri Impex Pvt. Ltd., in settling the warranty is final in all respects.
12. All disputes are subject to Bangalore Courts Jurisdiction
Table of contents
Other Green Panther Lawn Mower manuals