Green Star XGS-HLS8000V User manual

XGS-HLS8000V
Deutsch 03
Nederlands 23
English 28
Français 33

2
A
3
4
7
6
5
1
2
1
5
4
3
7
6
9
8
11
10
12
13

GB
Thank you for purchasing the
GreenStar
wood splitter and the confidence in our products.
!!! Please read carefully the Operating Instructions before putting the appliance into operation !!!
A.V. 2
Any reprints, even partial, are subject to approval. Technical changes reserved! Pictures just for illustration purposes!
GB
Do you have any technical questions
?
A claim
?
Do you need spare parts or the Operating Instructions
?
To be able to identify your appliance when claimed, we need to know its serial No., order No. and the year of production.
All these details can be found on the type label. Enter the details below for future reference:
Serial No. Order No. Year of production:
Marking on the appliance
Explanation of symbols
The following symbols are used in these Operating Instructions
and/or on the appliance:
Product safety:
Product corresponds to
appropriate standards of the EU
Prohibitions:
General prohibition
(in connection with another icon) No smoking!
No open fire! Using in enclosed places
prohibited!
Warning:
Warning/attention Warning against dangerous
voltage
Keep a sufficient safe distance! Warning! Risk of getting jammed!
Commands:
Read the Operating Instructions
before use
Use protective glasses and
earphones!
Use safety gloves Use safety shoes!
Environment protection:
Dispose waste professionally so
as not to harm the environment.
Packing cardboard material may
be delivered to collecting centres
for recycling.
Any damaged and/or disposed
electric or electronic devices must
be delivered to appropriate
collection centres.
Package:
Protect against humidity This side up
Careful – fragile
Technical data:
Connector Engine power
Split wood length
(with splitting cross) Hydraulic pressure
Splitting lift Split wood length (without splitting
cross)
Splitting force Weight
Appliance description (pic. 1)
1. Handle
2. Splitting knife
3. Clamping plate
4. Service arm
5. Handle covering
6. Table holder (in front)
7. Table blocking
8. Splitter table
9. Wheels
10. Switch / plug
11. Lift adjusting rod
12. Motor
13. Table holder (side)
Appliance
BASIC 6T/W WOOD SPLITTER
Robust design, splitting knife out of special steel, all steel parts
with high-quality powder coating, high-quality hydraulic pump.
Engine with overheating fuse.
GB EU Declaration of Conformity
We,
ereby declare the conception and construction of the below-
mentioned appliances correspond - at the type of construction being
launched - to appropriate basic safety and hygienic requirements of EC
Directives.
28

In case of any change to the appliance not discussed with us
the Declaration expires.
Marking of appliances:
GreenStar woo d splitter
Order No. GS-HLS8000V
Date/producer signature: Dec 30,200 9
Appropriate EU Directives
:
2004/108/EG
2006/95/EG
2006 /42/EG
Harmonised standards used:
EN 609-1/A 2:200 9
EN 60204- 1/A1:200 9
EN 61000-3-11:2000
EN 61000-3-2:2006
EN 55014-2/A1:2001
EN 61029-1/A12:2003
EN 55014-1:2006
ZEK 01.2-08
Certi cation place:
TÜV SÜD Product Service GmbH, Ri dlerstrasse 65, DE-80339 Munich
Guarantee
The guarantee relates exclusively to faults caused by material
defect or manufacturing defect.
Original proof of purchase with the purchase date needs to be
attached for claims in the guarantee period.
The guarantee does not cover any unauthorised use such as
appliance overloading, violent use, damage by third party or
foreign items. The failure to follow the Operating Instructions
and assembly instructions and ordinary wear and tear is not
included in the guarantee.
Safety instructions
General
For safety reasons it is necessary to respect and follow safety
instructions speci ed in t hese Operating Instructions and
instructions on the appliance relating to appliance operation,
maintenance and repairs.
Operating sta
Using the wood splitter can be associated with some
risks. Therefore only trained and experienced persons can
handle the appliance and work with it. The operating sta
must wear tight, close- tting clothing and protective
shoes.
Workplace
To ensure safe wood splitting, it is necessary that the
workplace is at and enables stability keeping and su cient
free moving. All obstacles need to be removed from access
paths when bringing the splitter and taking it away. Su cient
workplace lighting must be ensured.
Make sure no persons are present in the workplace
during appliance operation or make sure they keep a
su cient safe distance.
Work preparation
Current supply needs to be interrupted by pressing the red
button on the switch
and
disconnecting the plug at any repairs
or maintenance work and when leaving the wood splitter.
Interrupting the current supply by putting the switch to
OFF position is not su cient. GreenStar
wood splitters are
fundamentally supplied with hardened splitting knives.
However, if you detect any slight deformation of the knife edge
after splitting wood containing an y invisible foreign particles,
e.g. out of concrete, steel, etc. then remove it by a le or
grinding o . Keeping the splitti ng knife permanently sharp
increases the working output.
TIP: Occasionally grease the splitting knife with fat (for
problem wood).
The function of safety equipment (especially the two-lever
operation) needs to be checked before the splitter is put
into operation for the rst time.
ATTENTION! Make sure the splitting table is safely
secured to the splitter before the splitter is put into
operation.
Technical data
Technical data: Basic 6T/W
Connector:
230 V~50 Hz
Engine power:
3,0 kW P1/ S6 40%
Engine revolutions:
2800 revolutions a
minute
Max. splitting force:
6 tons
Max. splitting lift:
485 mm
Forward feed rate:
4-5 cm/s
Backward feed rate:
10-12 cm/s
Hydraulic oil tank:
4 l (oil type - HLP 46)
Table adjustment:
570 / 770 / 1,060 mm
Max. diameter of split wood:
App. 400 mm
max. hydraulic pressure:
210 bar
Splitting pillar:
100 mm x 100 mm
Table dimensions:
App. 400 x 280 mm
Weight:
96 kg
Order No. 02020
Disposal
The disposal instructions are based on icons placed on the
appliance or its package. The description of their meaning can
be found in the “Marking on the appliance“ chapter.
Operating sta requirements
The operating sta must carefully read the Operating
Instructions before using the appliance.
Quali cation
Apart from the detailed instruction by a professional no special
quali cation is necessary for using the appliance.
Minimum age
Only persons over 18 years of age can work with the
appliance.
An exception includes youngsters if they work within their
professional education the purpose of which is to obtain
knowledge supervised by a trainer.
Maintenance and treatment (pic. 2)
Always keep the wood splitter clean.
Change hydraulic oil after 500 running hours. Use common
hydraulic oil (HLP 46).
Grease the splitting pillar with fat
before each use – this will increase the life of slide jaws
.
Use only original spare parts when changing the constructional
elements. Regularly check tightness and rmness at hydraulic
hoses and hose couplings.
Attention:
-
Fill in oil only when the splitter pillar is in an inserted
position
-
Regularly grease the splitting pillar and splitting knife
with multipurpose fat (pic. 2/A)
Assembly of service arms, wheels, splitting cross and
table (pic. 3 and 4)
Assembly of service arms - pic. 3
Feed the service arm (A) into the switching cradle (C) and
screw with hexagonal bolt (D), bed (E) and check nut. Tighten
the check nuts to such an extent that the service arm could be
moved. Now connect the service arm (B) according to the
described method on the right. Protective arches (F) on both
service arms are always assembled using 2 bolts with cross
groove (G).
TIP: Grease metal couplings with fat from above and
below before that!
29

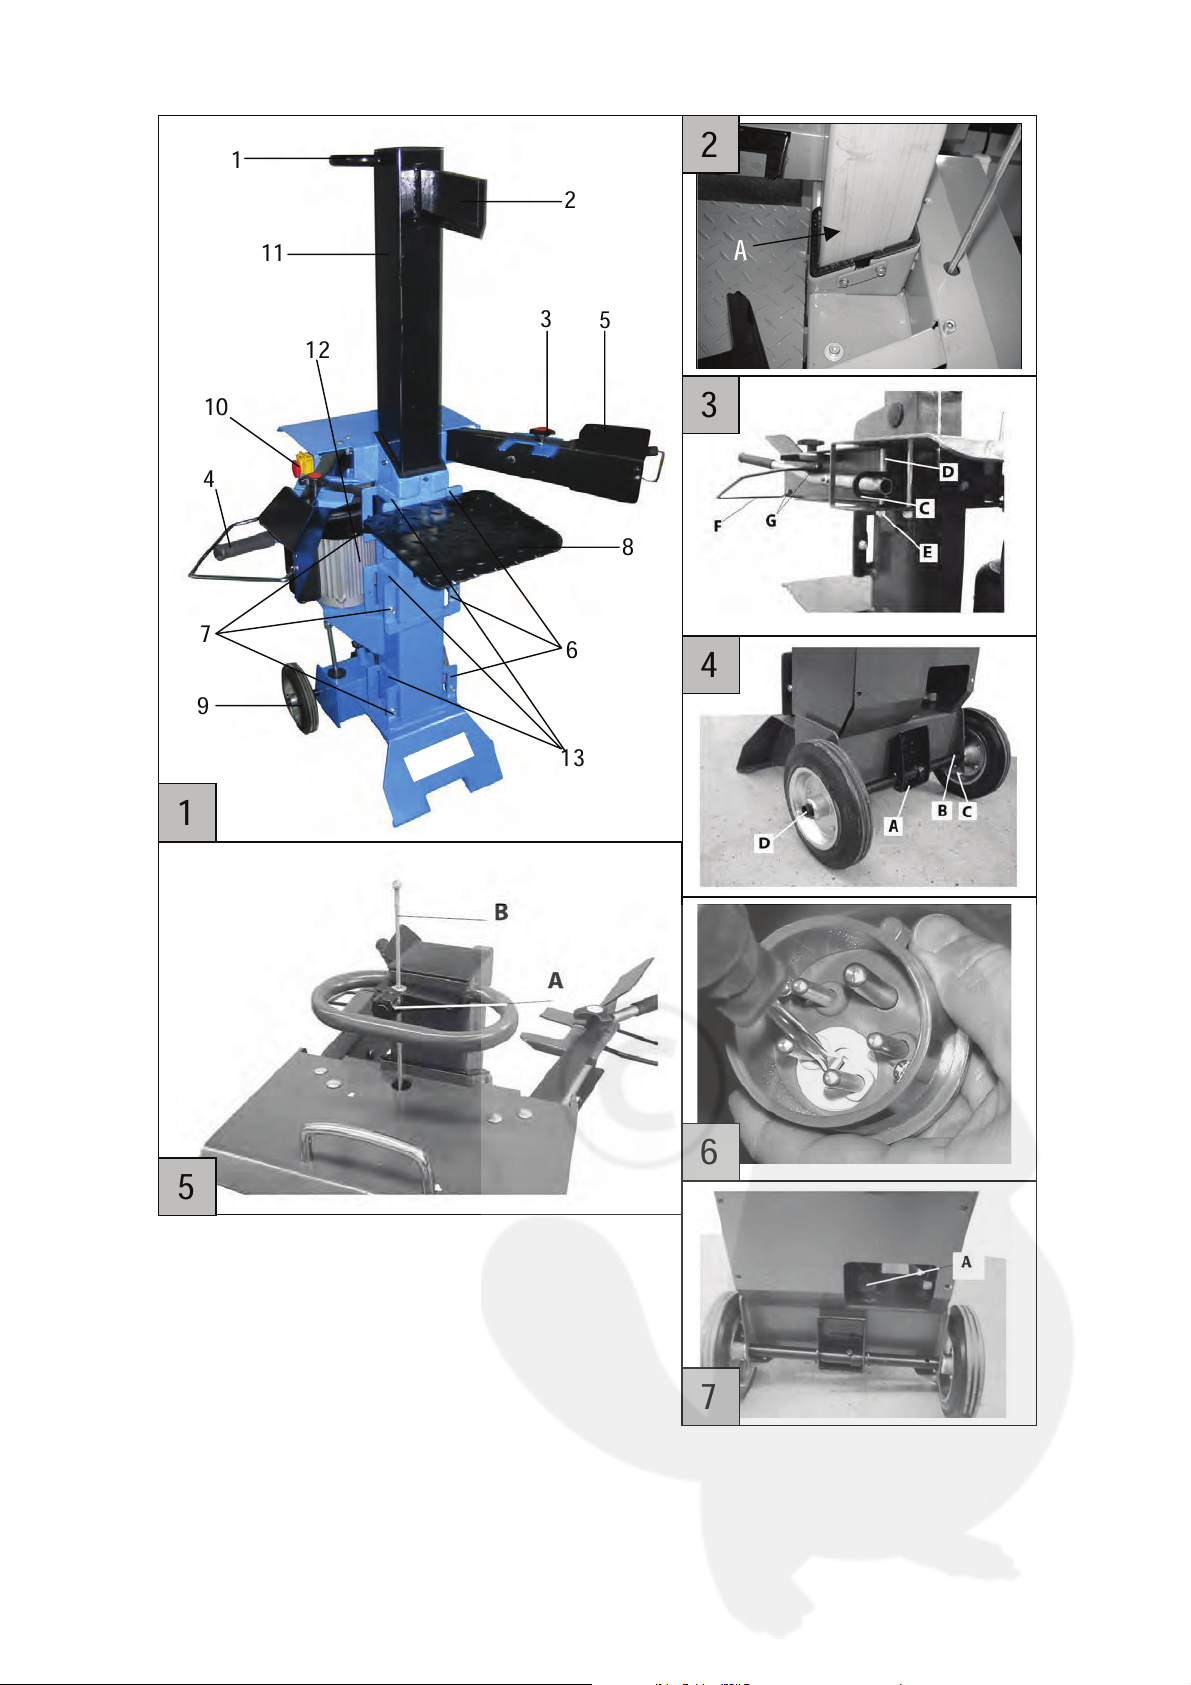
Assembly of wheels – pic. 4
Put the wheel axis with the foot lever (A) through both holes on
the oil tank. Put the M6 socket-head screw (B) through the
wheel axis and screw it with the check nut on the plate (C).
Then install the turning wheel on both sides and secure it with
a safety pin (D) on both sides. Slightly bend the safety pin to
prevent falling out.
Table assembly - pic. 1
Depending on the split wood length, the table board can be
fixed in three heights - 570 mm, 770 mm and 1,060 mm.
Table locking levers (pic. 1/7) are fixed in every assembly
position. Insert the table board to the required holders (pic.
1/12). Now secure the table board by the locking lever on
both sides.
Lift adjusting (pic. 5)
The working output can be increased for wood pieces smaller
than app. 50 cm and for more wood pieces by shortening the
backward movement of the splitting knife.
Proceed as follows:
Put a short piece of wood on the splitter table and move the
splitting knife as low as app. 2 cm above the wood. Switch the
splitter off (red button on the switch and disconnect the plug).
Now you can shorten the backward movement using the fixed
rod (pic. 5/B) by fixing the rod in the required height with the
adjusting screw (pic. 5/A).
Area of application
The appliance can only be used for wood processing. The split
material must have the following dimensions:
- Minimum diameter: 120 mm
Maximum diameter: 300 mm
- Wood splitting along fibre is only allowed.
- Risk of getting jammed at branchy wood when splitting.
- Jammed piece of wood is released by tipping on the
wood.
- Cutting the split wood out prohibited!
Split wood length adjusting
Wood of various lengths can be split depending on the splitter
type:
Electric/hydraulic connection (pic. 6 and 7)
Plugging
All splitters are fitted with undervoltage release in the switch in
accordance with provisions of branch professional
organisations “CE“, etc. The release prevents automatic
starting of the appliance in case supply is interrupted as a
result of power failure, unintentional unplugging, defective
fuse, etc. The appliance must unconditionally be switched on
again by pressing the green switching button.
Wilful holding or blocking of the switching button with no
directly earthed conductor automatically leads to switch failure.
In this case that can subsequently be identified the guarantee
expires.
The appliance meets EN 61000-3-11 requirements and is
subject to special connection conditions. That means that
use on optionally selected connection points is
inadmissible.
The appliance can lead to occasional voltage fluctuations
under unfavourable power conditions.
The appliance is only designated to be used for connection
points not exceeding the maximum allowed impedance of
Zmax = 0,233 .
As a user, you must make sure your connection point on
which you want to use the appliance meets the above-
mentioned requirements – after agreement with your
electricity supplier if necessary.
Hydraulic equipment
Tightness needs to be checked at hydraulic hoses and
couplings after app. 4 running hours and tighting must be
provided if necessary.
Only at 400 V appliances: It is necessary to be particular
about the running direction of the engine (see the arrow
on the engine) as running in wrong running direction can
damage the oil pump. In such a case, all claims arising
from the guarantee expire. If necessary, have the running
direction changed by reversal of polarity of the plug by a
professional electrician. See pic. 6! (three-phase current
models only!)
Hydraulic oil/tank
Common hydraulic oil (e.g. HLP 46 or oil of different producer
of identical viscosity) can be filled in all splitters. Oil change is
not necessary.
Vent the tank before each operation by screwing the filling
screw out and in (pic. 7/A).
Operation
Attention: Make sure wood is cut at right angle, if
possible, and seated closely on the splitting table. Cross-
cut or extremely branchy wood can slide or bend the
service arms.
Always put wood on surfaces (tables) designated for
this purpose (never on the frame). That could damage the
splitter.
1. Start the engine by pressing the green switching button.
Attention: Be particular about the running direction of
the engine at 400 V models!
2. Keep the feeder cable as short as possible at 230
V models and select as big cross section as possible.
3. When the temperature is low, let the splitter run idle
for app. 15 minutes so that oil warms up to
corresponding temperature.
4. Put the split material on the table and hold it using
clamping plates on the lever.
5. Splitting starts by pressing both levers down (as soon as
the splitting knife enters wood tip the lever slightly out
while pressing it down. This will prevent holding sheets
(arms) from bending).
6. Lift at least one lever after you have finished splitting – the
splitter pillar will automatically go up.
It is strictly prohibited to operate the wood splitter in two
persons with one holding wood and the other one
pressing on the clamping plates. Blocking one lever
(clamping plate) is prohibited, too.
Transport instructions
Transport
All wood splitters are fitted with big wheels. Grasp the handle
on the splitting pillar with one hand and handle above the
engine with the other hand and slightly tilt the splitter to you for
transport purposes. The splitter can effortlessly be moved in
this position.
To prevent hydraulic oil leakage, never transport the splitter
laid down
.
Always let the splitting knife go absolutely down for transport.
Residual risks and protective measures
Warning!!!
Taking out of operation, any change, blocking,
disassembly, changeover or assembly of all parts on
safety and protective equipment of the appliance is strictly
prohibited and can have serious consequences, i.e. life
threatening injuries if not observed.
The producer cannot be held liable for material damages
or injuries caused as a result of such negligence.
All guarantee claims towards the producer immediately
expire at each of the above-mentioned negligence.
The splitter can only be operated by one person. Remove
wood remnants that could block or negatively influence
the safety and service elements near the splitter and
workplace during operation.
30

Mechanical residual risks
Threat Description Protective measure(s) Residual risk
Jamming Parts of body can get jammed or amputated
when splitting as a result of hydraulic knife
going down.
There is a risk the split wood gets jammed.
Please be aware that wood is strongly tight
when being removed and fingers can get
jammed in the splitting crack.
Always use the two-hand safety
operation. Do not interfere in the
splitting process.
Two persons must never work with the
appliance
Get out any jammed piece of wood.
Beware of falling wood – it can injure
your legs.
Worn-out or damaged aid
must immediately be
replaced.
Have an eye to bystanders!
Always wear safety shoes
when working.
Cutting Parts of body can get jammed or amputated
when splitting as a result of hydraulic knife
going down.
Always use the two-hand safety
operation. Do not interfere in the
splitting process.
Worn-out or damaged aid
must immediately be
replaced.
Common
accidents
Violent splitting can cause serious injuries when
dry wood is processed.
Pieces of wood created during splitting can fall
down and injure especially legs of the working
person.
Splitting wedge extension can get in the table
and thus cause appliance damage or serious
injuries of persons.
Never interfere in the splitting process.
Always keep a sufficient safety
distance.
Always operate the appliance carefully
and cautiously.
Always wear specified protective
clothing and work carefully.
Always wear protective glasses when
working with the appliance.
Always wear specified protective
clothing and work carefully.
Wear corresponding safety shoes to the
specified protective clothing.
Always disassemble the table before
working with the splitting wedge
extension (see page 12)
Worn-out or damaged aid
must immediately be
replaced.
Always have an eye to
bystanders.
Getting
caught,
winding up
Wide clothing, jewels and long hair can get
caught by moving parts.
Always wear close-fitting clothing; do
not wear jewels and protect your hair
with a hairnet.
Electrical residual risks
Threat Description Protective measure(s) Residual risk
Direct
electric
contact
Faulty cable or plug can be a cause of electric
shock.
Always have any faulty cables or plugs
replaced by a specialist. Use the
appliance with a safety switch against
stray current (FI).
Check the feeder cable
before each use
Indirect
electric
contact
Injury by conductive parts of exposed electrical
or faulty construction parts
Always disconnect the plug at
maintenance work.
To be operated only with a safety
switch against stray current (FI).
Noise threat
Threat Description Protective measure(s) Residual risk
Hearing
damage
Long-term working with the appliance can
damage hearing.
Always wear earphones.
Neglect of ergonomic principles
Threat Description Protective measure(s) Residual risk
Negligent
use of
personal
protective
aids
Appliance operation without corresponding
protective aids can cause serious external and
internal injuries.
Always wear specified protective
clothing and work carefully.
Inadequate
local lighting
Insufficient lighting represents a high safety
risk.
Always ensure sufficient lighting when
working with the appliance.
31

Other threats
Threat Description Protective measure(s) Residual risk
Thrown-away
items or
spraying
liquids
Mechanical particles can injure your eyes when
splitting.
Always wear protective glasses when
working with the appliance.
Failures
Failure Cause Removing
Splitter with no output
-Wrong running direction (only at 400 V)
-Too little hydraulic oil
-Booster rod bent; no full pushing of the hydraulic
lifter
-Wood with too many knags and splitting knife
gets jammed
-Service arm bent
-Have the running direction changed by
a specialist
-Fill in hydraulic oil
-Adjust the rod mechanism; tighten
appropriate nuts
- Grease the splitting knife with fat
- Put the service arm to the starting
position
Green switching button keeps
releasing after being pushed
-Directly earthed conductor is not connected
-Faulty fuse, etc. (only at 400 V)
-Running at 2 phases (at 400 V)
-Have the cable or power checked by a
specialist
-Check the cable
Hydraulic pump is whistling;
intermittent running of the
splitting knife
-Too little hydraulic oil in the tank -Fill in hydraulic oil
No other works than those for which the appliance has been made and those described in the Operating Instructions can be
executed with this appliance.
32
Table of contents
Popular Log Splitter manuals by other brands

ATIKA
ATIKA ASP 12 TS Original instructions

Boss Industrial
Boss Industrial 3PT16T21 Assembly & operating instructions

Wallenstein
Wallenstein WP845 Operator's manual

Zgonc
Zgonc Yellow Gardenline New Generation 400V YPL... instruction manual

Swisher
Swisher L111-283044 owner's manual

Gude
Gude GHS 500/8TB Translation of the original instructions