Updated 20.05.18
I
IM
MP
PO
OR
RT
TA
AN
NT
T
I
IN
NS
ST
TA
AL
LL
LA
AT
TI
IO
ON
N
R
RE
EQ
QU
UI
IR
RE
EM
ME
EN
NT
TS
S
F
FO
OR
R
T
TH
HE
E
G
GR
RE
EE
EN
NP
PL
LA
AT
TE
E
®
®
P
PI
ID
D
I
IN
NB
BE
EN
NC
CH
H
B
BA
AR
RB
BE
EC
CU
UE
E
U
UN
NI
IT
T
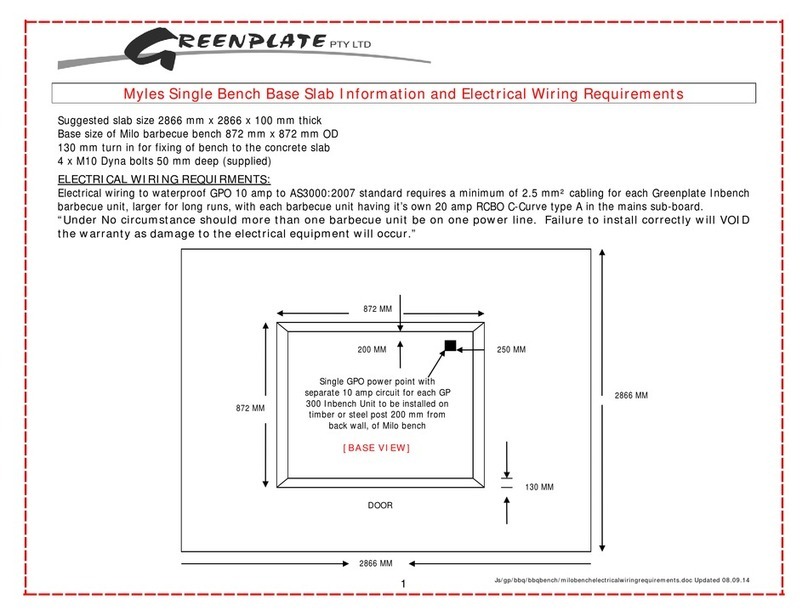
1. Correct wiring of the Greenplate ® Barbecue is essential. Incorrect installation will void the Warranty. Each Greenplate ®
barbecue plate must have its own 10 amp circuit with a 20 amp RCBO C-Curve type A. Having a rated residual operating current
not exceeding 30mA in the sub-board, as per AS3000.2007 standard requires a minimum of 2.5 mm² cabling for each unit for
longer runs larger cabling will be required. If unsure contact Greenplate Pty Ltd service on 0411 845 534. An Australian
approved 3 pins, 10 amp electrical extension lead is required as a supply cord, maximum length 2 meters. All electrical work
must be carried out by appropriated electrical licenced personnel in accordance with the National wiring rules.
2. Unit must be installed in a weather proof enclosure to IPX4 or equivalent, minimum 50 mm clearance around electrical housing is
required. Please protect barbecue plate and benches from industrial fallout during any construction as rust from filings or
chemicals will not be covered under warranty
3. Benches not supplied by Greenplate Pty Ltd must be adequately cross ventilated. Ventilate bench to allow free air flow through
cabinet. Failure to ventilate the bench can result in premature failure of equipment, this is not covered under warranty. Cross
Ventilation area of 0.035m² required. All Greenplate ® benches are pre-fitted with adequate ventilation.
4. Cut square hole into bench top where desired (490 mm x 490 mm). Carefully lower Greenplate ® 300 unit into opening. Install lockdown U
bracket, threaded drain pipe and washers as per (Figure 3.). Position Remote ON/Off push button switch to your desired location (19 mm
hole). Mount switch plate, instruction and safety labels to outside of bench.
5. Ensure appropriate grease collection bin and bag (supplied) is placed under the drain tube.
6. Plug extension lead (not supplied) into input socket of the unit (Figure 1.) and then into wall socket outlet having an earth contact (10 amp,
230 VAC) and turn ON (at wall only). Set thermostat to your required temperature (Figure 1.) 320°C is recommended, for general use.
7. Switch on mains power, wait thirty seconds BBQ will beep once for 50 hz twice for 60 hz. Unit will ‘energize’ printed circuit board. Press
switch. A buzzer will sound once and the push button switch will light red when BBQ is heating and green when desired cooking
temperature is reached. The timer is preset to switch off the barbecue after 28 minutes. To stop barbecue during cycle press and hold the
switch for 5 seconds.
8. A security setting is available by switching the micro switch # 2 on the PCB control board to on position all other dipswitches off.
This selects the press and hold, for the six seconds delay function, and should be accessed by qualified personnel only.
9. Buzzer will sound three times at the end of the 28 minute cooking cycle.
10. Clean the plate prior to use with warm soapy water to remove any dirt and for safe hygienic cooking. Ensure the plate is cleaned
regularly to maintain its appearance and longevity.
11. This appliance is not intended for use by persons (including children) with reduced physical, sensory or mental capabilities, or
lack of experience and knowledge, unless they have been given supervision or instruction concerning use of the appliance by a
person responsible for their safety. Children should be supervised to ensure that they do not play with the appliance.
12. WARNING: Charcoal or similar combustible fuels must not be used with this appliance
Greenplate Service Line 0411 845 534
Greenplate is a registered trademark
ABN 71 112 123 038 | ACN 112 123 038
UNIT 2/15 NATASHA STREET
CAPALABA 4157 QUEENSLAND AUSTRALIA
WEB: www.greenplate.com.au EMAIL: info@greenplate.com.au
PHONE: (07) 3245 3008 FACSIMILE: (07) 3245 3009


