GreenTech Capwall User manual

User Manual Capwall
E-Mail: info@greenteche.com
https://www.greenteche.com
BETTER ENERGY BETTER LIFE
— 1 —
GREEN TECH
Max. and min. cell
temperature & serial number
Stop & E-stop
switch
Capwall
Wall Mountable Energy Storage System
Scope This user manual is applied to Graphene Supercapacitor Battery
Capwall manufactured by Shanghai Green Tech Co.,Ltd.
Product Description
Product name: Capwall
Model: GTEM-400V14400-W
Mounting Option
Flat Floor
Solid wall
1. Product Drawing
System voltage
System current
System SOC
System status
Green Tech trade mark
Rubber foot*4
Charge/discharge terminals
Internal debugging CAN interface
Label of system specifications
Label of caution and emergency situations
Start Switch
Wall mounted hang buckle
Label of serial number
Max. and min. cell voltage
& serial number
Relays status
‘1’is on,
‘0’is off
External communication CAN interface
High voltage warning label

User Manual Capwall
E-Mail: info@greenteche.com
https://www.greenteche.com
BETTER ENERGY BETTER LIFE
— 2 —
GREEN TECH
Negative socket
Stop button
2. Inspection when arrived hand
A. Check the box to make sure not be damaged and then open the box.
B. Take out the module put at flat floor and check all the accessories.
C. Rotate clockwise ( pulled out ) the stop button,press and hold the switch until the screen lights up and release the switch.check
the display show “OK”.
Remark: take photo or video immediately and contact the local reseller or Green Tech if meet any unusual condition.
3. Battery power on & off operation
(1) Battery power on operation
First, make sure that the ‘STOP’ button is not locked and can be rotated,
Press and hold the start switch(5S) until the screen lights up and release the switch. The BMS starts the self-test until the correct
voltage, current, SOC and temperature information are displayed on the screen. The BMS self-test is completed and the battery can
be used normally. If the battery doesn't work properly, please contact the after-sales service engineer.
(2) Battery power off operation
Press the ‘STOP’ button
In case of emergency, please quickly press the stop button to cut off the battery and restart the battery after troubleshooting,
4. Battery External Connection Description
Positive HZ8.0 Negative HZ8.0 Cable 4AWG
The positive socket is orange, corresponding to the orange positive plug, and the negative socket is black, corresponding to the
negative black plug. When connecting the power cable, do not short circuit the positive and negative, so as not to damage the
battery and cause danger.
Please align the positioning slot on the plug and socket and insert it. When pulling out the plug, press the key on the side of the
plug, rotate the plug, and pull out after the slot is aligned.
Positive socket
Key
Ethernet communicate port
Start Switch

User Manual Capwall
E-Mail: info@greenteche.com
https://www.greenteche.com
BETTER ENERGY BETTER LIFE
— 3 —
GREEN TECH
5. Communication Function
a) Communication Interface Definition
b)Communication Mode
The internal debugging CAN interface is used to connect the upper computer of BMS to view the detailed parameter information,
status, fault detection and troubleshooting of the system.
External communication CAN interface is used to connect inverter and other communicable devices (communication protocol should
be matched) for system information transmission and detection.
6. Installation
a) Install on floor
b) Wall mounting
The Capwall must be mounted on the solid wall.
X2/X10(RJ45)
Internal debugging
CAN interface
External communication
CAN interface
Pin 1
NC
NC
Pin 2
NC
NC
Pin 3
NC
NC
Pin 4
I-CAN-H
V-CAN-H
Pin 5
I-CAN-L
V-CAN-L
Pin 6
I-CAN- GND
V-CAN- GND
Pin 7
NC
NC
Pin 8
NC
NC
X2/X10(RJ45) port
1,Screw the 4pcs rubber feet at the
bottom of the Capwall tightly.
2,Put it by vertically at clean,
drafty and flat floor.
1,Mark position of 5 holes. Drill holes with φ8 drill,and
depth at least 80mm.Install the expansion tubes, then
install the bracket and tighten the expansion bolts.
2,Put the Capwall on the wall and lock
the hang buckle with bracket.

User Manual Capwall
E-Mail: info@greenteche.com
https://www.greenteche.com
BETTER ENERGY BETTER LIFE
— 4 —
GREEN TECH
58V
324V
60A
3A
-60A
453V
453.6
V
7. Charging-discharging
Charge-discharge profile
Note:If the charger needs to set the floating charge voltage, it is recommended to set the UFloat value to 453V.
8. Specifications
Part Number
GTEM-400V14400-W
Energy storage
14.4KWh
Nominal Voltage
400V/DC
Maximum Charge Voltage
453.6V/DC
Discharge Cut-off Voltage
324V/DC
ESR/AC @1KHz 50% SOC
<100mΩ
Max. Continuous Charge Current
60A
Max. Continuous Discharge Current
60A
Round Trip Efficiency
98%
Cooling Method
Natural
Cells Self-discharge Rate
2% per month
Recommended Depth of Discharge
≤90%
Maximum Depth of Discharge
100%
Ingress Protection Rating
IP42
Shell Material
Metal & ABS plastic
Monitoring Data
System voltage,current, temperature,SOC,SOH,cycle,cell’s voltage
Charging Temperature Range
0°C to +55°C
Discharging Temperature Range
-20°C to +60°C

User Manual Capwall
E-Mail: info@greenteche.com
https://www.greenteche.com
BETTER ENERGY BETTER LIFE
— 5 —
GREEN TECH
9. Battery Management System (BMS)
(1) BMS Electrical Diagram
The system is function modularity design.
a) The interface of charge and discharge is integrated.
b) The cell voltage and battery temperature is detected by BMS.
(2) Smart BMS Parameter
10. Troubleshooting
NO.
Item
Parameter
Remark
1
Cells Balancing
Active
Smart active balancing
2
Over-temperature
55℃
Shutdown
3
Short Circuit Protection
300A
Fused and need to change fuse block
4
Charging Cut-off Voltage
453.6V
Shutdown
5
Discharge Protection Voltage
324V
Shutdown
6
GPS/GPRS
Option
System status

User Manual Capwall
E-Mail: info@greenteche.com
https://www.greenteche.com
BETTER ENERGY BETTER LIFE
— 6 —
GREEN TECH
Alarm Status
Description
Solution
OK
The system is in normal state
TVol.OH 1&2&3
The total system voltage
exceeds the alarm value
1. TVol.OH 1&2, Alarm information, the system can be used
normally, The battery is about to be fully charged.
2. TVol.OH 3, When the system voltage reaches the charging
cut-off voltage , ‘KG 1 = 0’ (charging relay is off), charging is
prohibited and the system can discharge normally. When the
voltage reaches the recovery threshold, the charging relay is
on(‘KG 1=1’) and the system returns to normal state.
TVol.OL 1&2&3
The total system voltag is
lower than the alarm value
1. TVol.OL 1&2, Alarm information, the system can be used
normally, The battery is running out
2. TVol.OH 3, The system voltage reaches the discharging cut-off
voltage , The system will shut down automatically. Please restart
the battery and charge it immediately.
DVol.OH 1&2&3
A cell voltage exceeds the
alarm value
1. DVol.OH 1&2, Alarm information, the system can be used
normally, The battery is about to be fully charged.
2. DVol.OH 3, A cell voltage reaches the charging cut-off
voltage , ‘KG 1 = 0’ (charging relay is off), charging is prohibited
and the system can discharge normally. When the voltage reaches
the recovery threshold, the charging relay is on(‘KG 1=1’) and the
system returns to normal state.
DVol.OL 1&2&3
A cell voltage is lower than
the alarm value
1. DVol.OL 1&2, Alarm information, the system can be used
normally, The battery is running out
2. DVol.OL 3, A cell voltage reaches the discharging cut-off
voltage , The system will shut down automatically. Please restart
the battery and charge it immediately.
VC Fault 1&2&3
The voltage difference
between single cells exceeds
the alarm value
1. VC Fault 1&2, Alarm information, the system can be used
normally, Please charge once with less than 3A current until the
battery is fully charged.
2. VC Fault 3, The system will shut down automatically. Please
contact the after-sales personnel to maintain the battery system.
It is forbidden to disassemble the battery without permission to
avoid harm
Temp. OL 1&2&3
The temperature of the cell
lower than the alarm value.
1. Temp. OL 1&2, Alarm information, the system can be used
normally, It is recommended to reduce the charging power or
discharge power, or turn off the battery system for several hours,
and then continue to use it when the temperature drops,
2. Temp. OL 3, When the temperature is lower than 0 ℃,
charging is forbidden and the discharge power is reduced as much
as possible; When the temperature is lower than - 20 ℃, charging
& discharging is forbidden.The battery system will automatically
shut down and stand for a few hours until the temperature
rise ,then restart the battery to continue to use. If the problem is
not solved after restart, please contact your local dealer.
Temp. OH 1&2&3
The temperature of the cell
exceeds the alarm value.
1. Temp. OH 1&2, Alarm information, the system can be used
normally, It is recommended to reduce the charging power or

User Manual Capwall
E-Mail: info@greenteche.com
https://www.greenteche.com
BETTER ENERGY BETTER LIFE
— 7 —
GREEN TECH
discharge power, or turn off the battery system for several hours,
and then continue to use it when the temperature rise,
2. Temp. OH 3, The battery system will automatically shut
down and stand for a few hours, then restart the battery to
continue to use. If the problem is not solved after restart, please
contact your local dealer.
TC Fault 1&2&3
The temperature difference
between single cells exceeds
the alarm value.
1. TC Fault 1&2, Alarm information, the system can be used
normally, It is recommended to turn off the battery system for a
few hours and then restart the battery
2.TC Fault 3, The system will shut down automatically. It is
recommended to turn off the battery system for a few hours, and
then restart the battery. If the fault is not eliminated, please
contact your local dealer.
Charge OC 1&2&3
Charging current exceeds
alarm value
1 Charge OC 1&2, Alarm information, the system can be used
normally, This fault is eliminated when the charging current is
reduced.
2 Charge OC 3, The battery will automatically turn off the charging
relay and prohibit charging. When the charging power is reduced,
restart the system manually to recover.
Discharge OC 1&2&3
Discharging current exceeds
alarm value
1 Discharging OC 1&2, Alarm information, the system can be used
normally, This fault is eliminated when the Discharging current is
reduced.
2 Discharging OC 3, The battery will shut down automatically .
When the discharging power is reduced, restart the system
manually to recover.
SOC OL 1&2&3
SOC is too low, power is about
to run out.
SOC OL 1&2&3, Alarm information, the system can be used
normally, Please charge the battery system in time.
Insul Insp Fault
1&2&3
The insulation resistance is
too low
Insul Insp Fault 1&2&3, If the alarm message appears during the
BMS start-up self-test stage or during the use of the battery,
please turn off the battery and contact the local dealer to
checkthe insulation resistance value of the battery and remove
the fault.
Insul CC Fault 1&2&3
The insulation monitor is not
in normal working condition.
Insul CC Fault 1&2&3, If the alarm message appears during the
BMS start-up self-test stage or during the use of the battery,
please turn off the battery and contact the local dealer to check
the insulation monitor of the battery and remove the fault.
DCM Fault 1&2&3
Incorrect connection of
communication line
DCM Fault 1&2&3, Please contact the local dealer to check
whether the communication cable is connected correctly, or
whether the communication connector is loose or off.
Temp. Line Fault
1&2&3
The temperature sensor is not
working properly.
Temp. Line Fault 1&2&3, Please contact the local dealer to check
whether the temperature sensor is loose or falling off.
Vol. Line Fault
1&2&3
The temperature acquisition
line is not working properly
Please contact the local dealer to check whether the temperature
acquisition line is loose or falling off.

User Manual Capwall
E-Mail: info@greenteche.com
https://www.greenteche.com
BETTER ENERGY BETTER LIFE
— 8 —
GREEN TECH
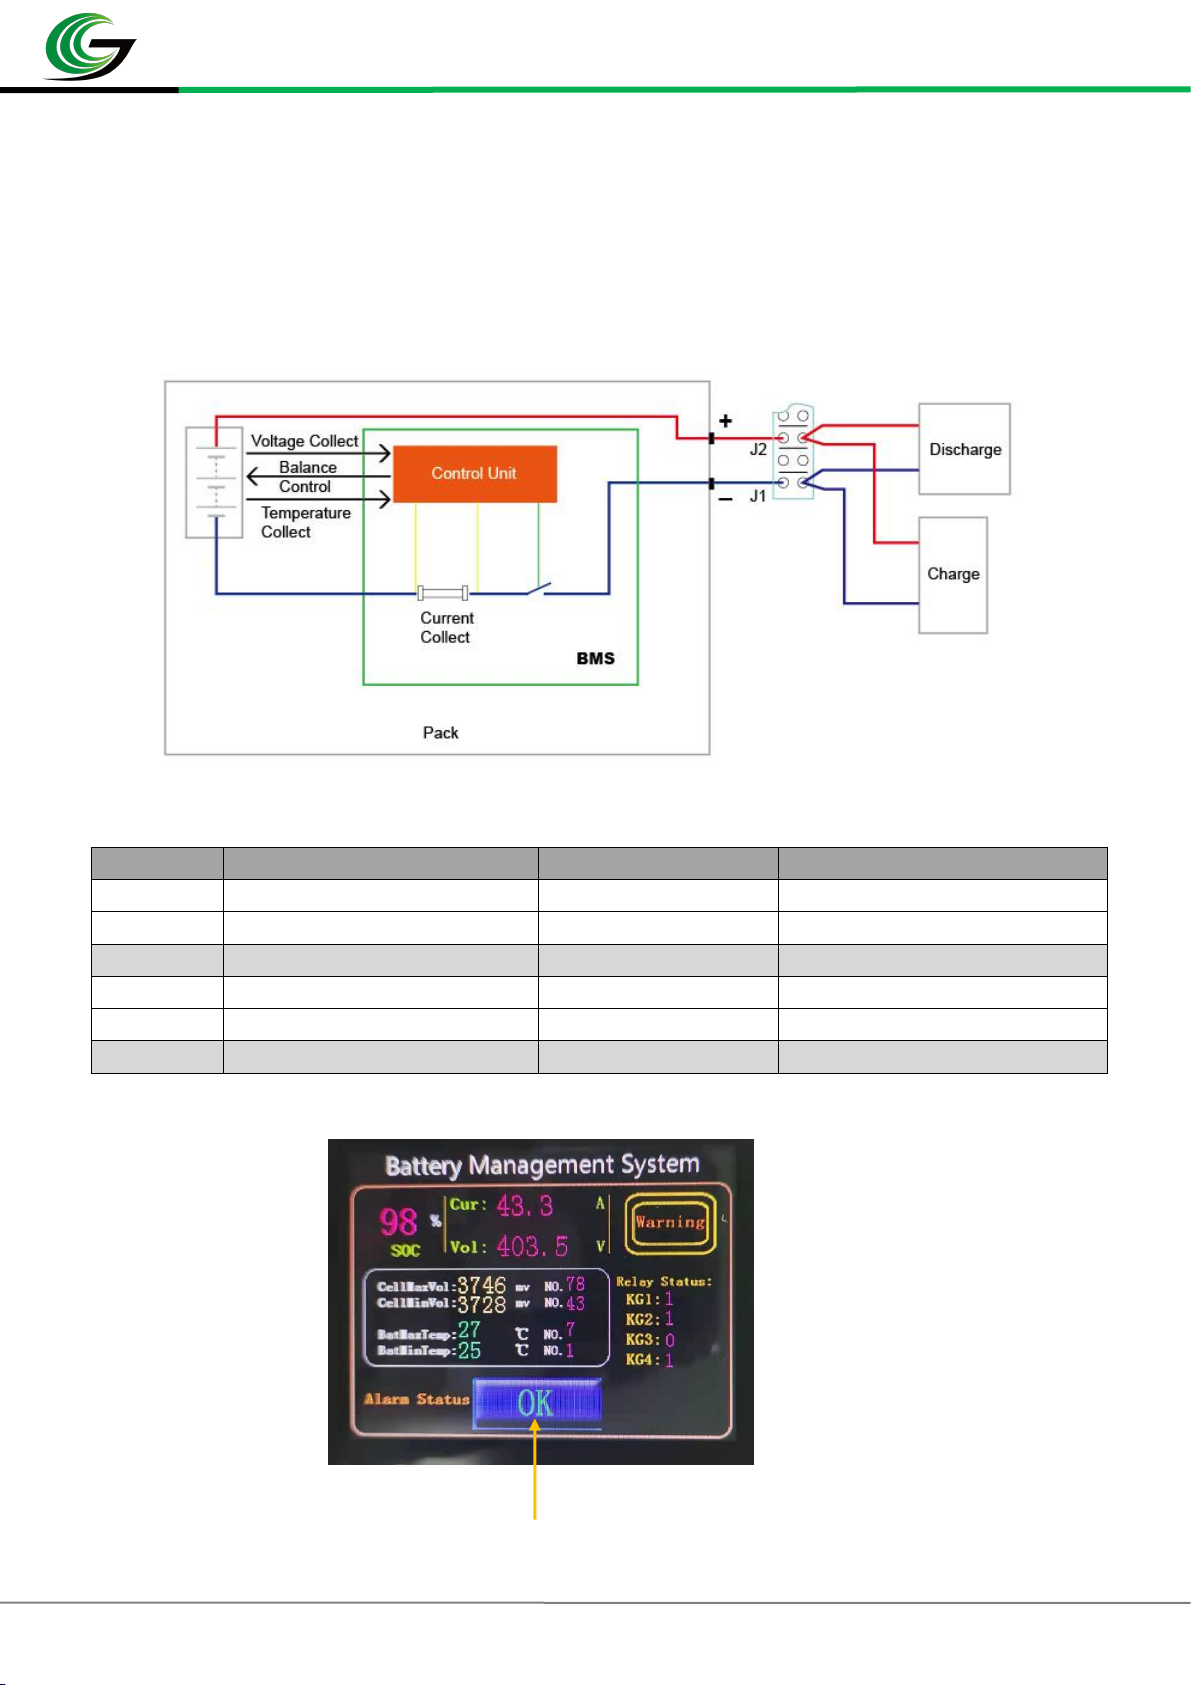
11. Inverter Connection and Setting
1) Compatible inverters
a) Connect the communication cable with inverter
b) Choose “Lithium Battery ” Mode
c) Choose “Green Tech Battery System”
d) Following the inverter installation guide set step by step
2) Incompatible inverters
a) Do not connect the communication cable
b) Might need to connect temperature detector with inverter (usually offer from inverter manufacturer)
c) Choose “Lead Acid Battery” mode
d) Set the charging voltage,float charging voltage and charging current.
e) Following inverter’s user manual installation guide of Lead acid battery mode.
12. Caution
Place the module out of the reach of children and infants.
Do not place the module in microwave ovens or other similar appliances.
Do not remove the product label.
Do not attempt to open or service the battery pack.
Do not expose to temperatures above 80℃.
Do not short-circuit the positive and negative terminals of the battery with wire or other metallic objects.
Do not transport or store the module with metallic items.
Do not expose the module to direct heat or flame, and do not use or store it near a fire or a location, subject to high
temperatures. In addition, do not immerse or dampen the module in water, saltwater, or any other liquid.
Do not puncture the module with any sharp objects, hit it with a hammering device or similar device, step on it, drop it or subject
it to strong shock.
Do not use module if it is damaged or deformed.
Immediately cease use of the module if it produces strange smells or smokes or becomes abnormally hot.
If the module fluids leak and come into contact with an eye, do not rub the eye and immediately flush it with plenty of water
before seeking medical assistance.
13. Notes
The pictures in the file are only for reference.
We reserve the final explanations of the items in this specification. This proposal is applicable for prototype.
Specifications subject to change without notice.
Shanghai Green Tech Co.Ltd.
No.5 Bibo Road Zhangjiang High Technology Park Pudong 201203 Shanghai,China
Tel:+86-21-50310528
E-mail: servic[email protected]
Https://www.greenteche.com
This manual suits for next models
1
Other GreenTech Power Supply manuals
Popular Power Supply manuals by other brands

Agilent Technologies
Agilent Technologies 6023A operating manual

Teledyne
Teledyne T3PS40381P Programming manual

Allen-Bradley
Allen-Bradley ControlLogix 1756-PA75/B installation instructions

Vector
Vector Start-It Comapct VEC016 Owner's manual & warranty

Gallagher
Gallagher PowerBox manual

Puls
Puls PIANO PIM60.241 installation manual