Grilla Kong Ceramic Kamado Grill KG-24-A User manual

Operators
Manual
PELLET
SMOKER Grill
GR-500-A
SAVE THIS MANUAL FOR FUTURE USE
Operation
Manual
KG-24-A
Ceramic
Kamado Grill
SAFETY NOTICE: FOR OUTDOOR USE ONLY!
WARNING: Electric shock can kill or result in serious injury. Precautions should
always be followed to reduce the risk of fire, electric shock, and injury.
SAFETY PRECAUTIONS
SAVE THIS MANUAL FOR FUTURE USE
GrillaGrills.com

KONG®CERAMIC KAMADO GRILL OPERATION MANUAL 3
SAFETY AND Maintenance
• The Kong is intended for outdoor use only. Never
use the grill indoors and don’t leave it burning
unattended. Keep children and pets at a safe
distance while the grill is in use.
• The grill may emit hot embers while in use. Due
to the potential for carbon monoxide poisoning,
never light the grill, let it smolder, or allow it to
cool down within a confined space.
• Use caution when opening the grill after its top
and bottom vents are closed to extinguish the
fire. A sudden rush of air could create a flashback.
To avoid this problem, lift the lid slightly and allow
any built-up steam and heat to escape before
opening completely.
• Never use the product in a car, van, boat, or tent,
and do not use it under any awnings or gazebos.
Use the Kong outdoors in an area where there is
adequate clearance for ventilation, and clear the space
around the grill of hanging tree limbs or ammable
objects.
• Never use lighter uid, alcohol, gasoline, or any
other flammable substance to light your grill.
When lighting the Kong, use a lighter that complies
with EN1860-3. Use lump charcoal to achieve the
longest burn and lowest amount of ash. When the
grill is in use, lift the lid slightly to allow air to enter
safely and slowly, thus minimizing flare-ups and
backdrafts.
• Assume that the product will always be hot
when in use, and use heat-resistant gloves when
touching any of its cooking surfaces or assembly.
Allow the Kong to cool down completely before
moving it and never move the equipment while it
is in use.
• Inspect the grill prior to each use and replace any
damaged or worn parts as needed.
• When moving the Kong, never lift it by the grill’s
hinge. With two people holding the bottom and
back of the unit, use one hand to grab the bottom
vent (on the inside of the grill) and slowly lower it
into the metal stand or table.
• Lubricate the moving parts inside the hinge at
least twice yearly to ensure that the lid’s opening
and closing mechanism remains
in good condition.
The Kong is a versatile grill that can be used for a wide variety of cooking activities, including grilling, smoking,
and baking. Thanks to the Kong’s innovative heat retention properties, the grill achieves and maintains high
temperatures that are ideal for quickly cooking hamburgers, hot dogs, and other foods. Meats can be made even
more flavorful with the addition of wood chips. The Kong is also excellent for cooking meats that require lower
temperatures over a longer period of time.
Important – Please Read Before You Get Started
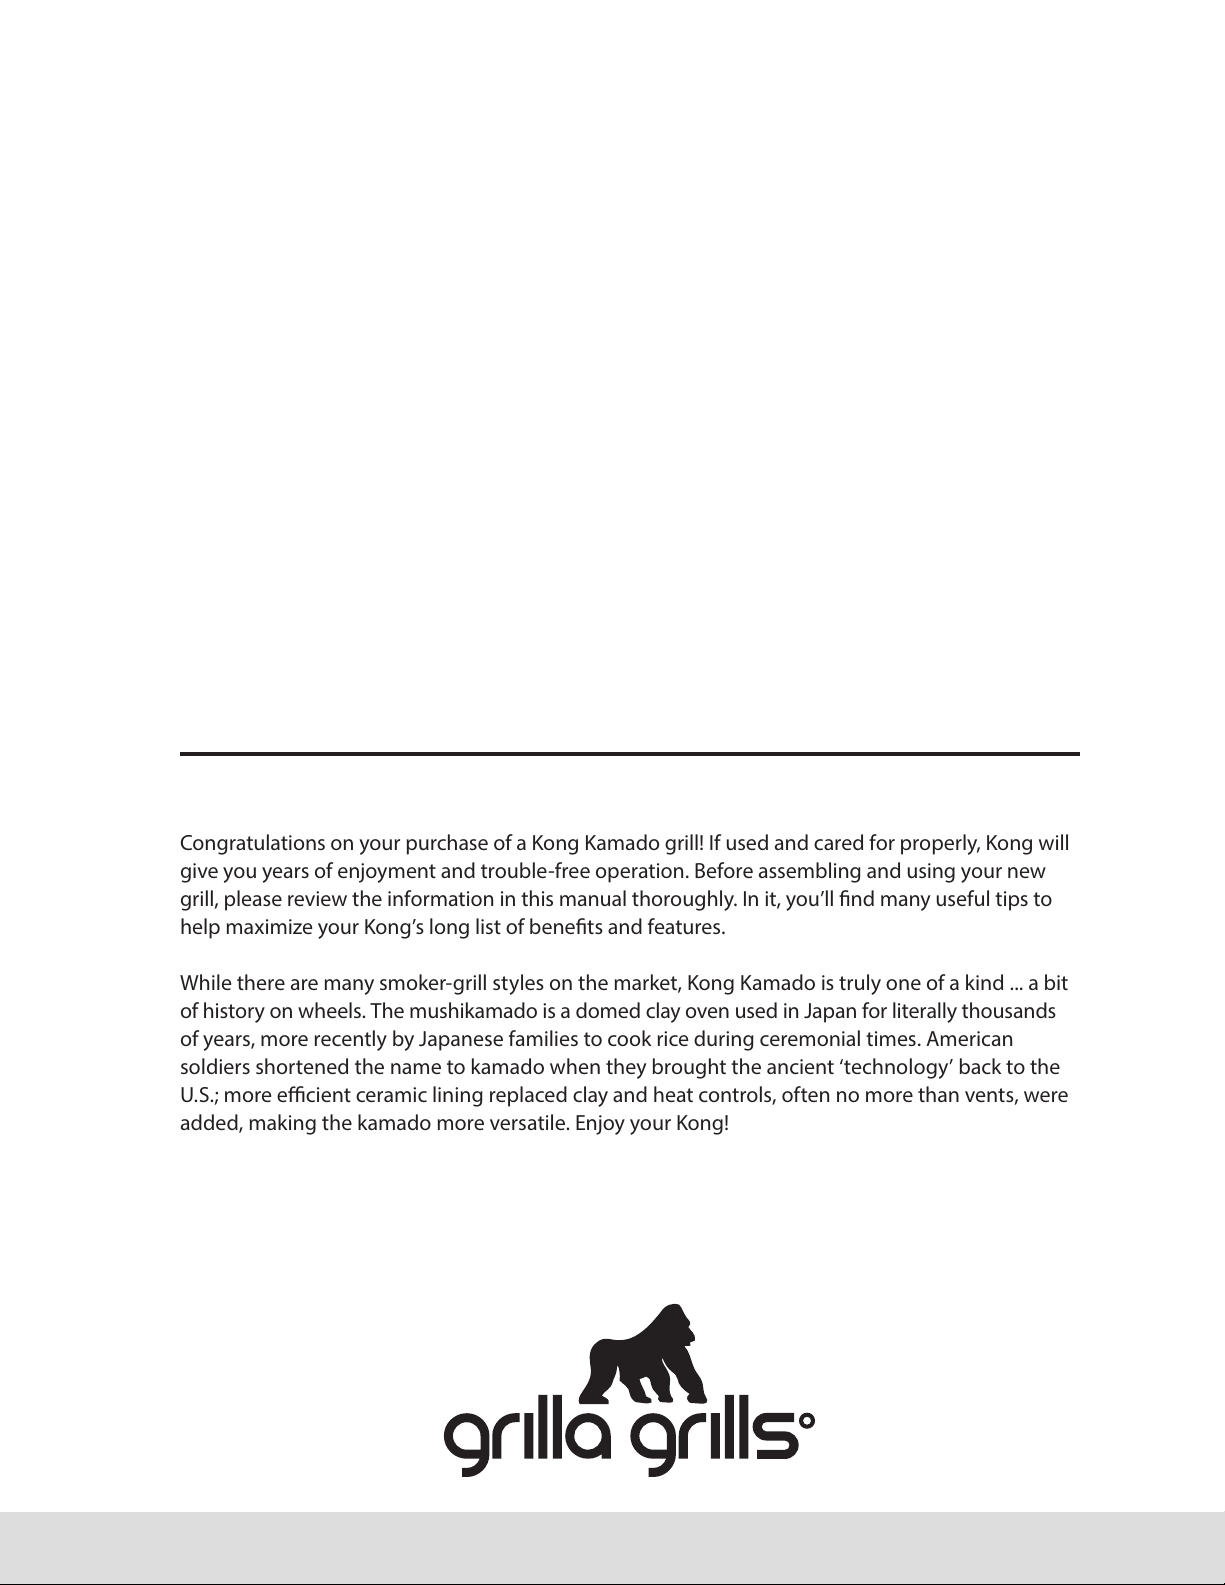
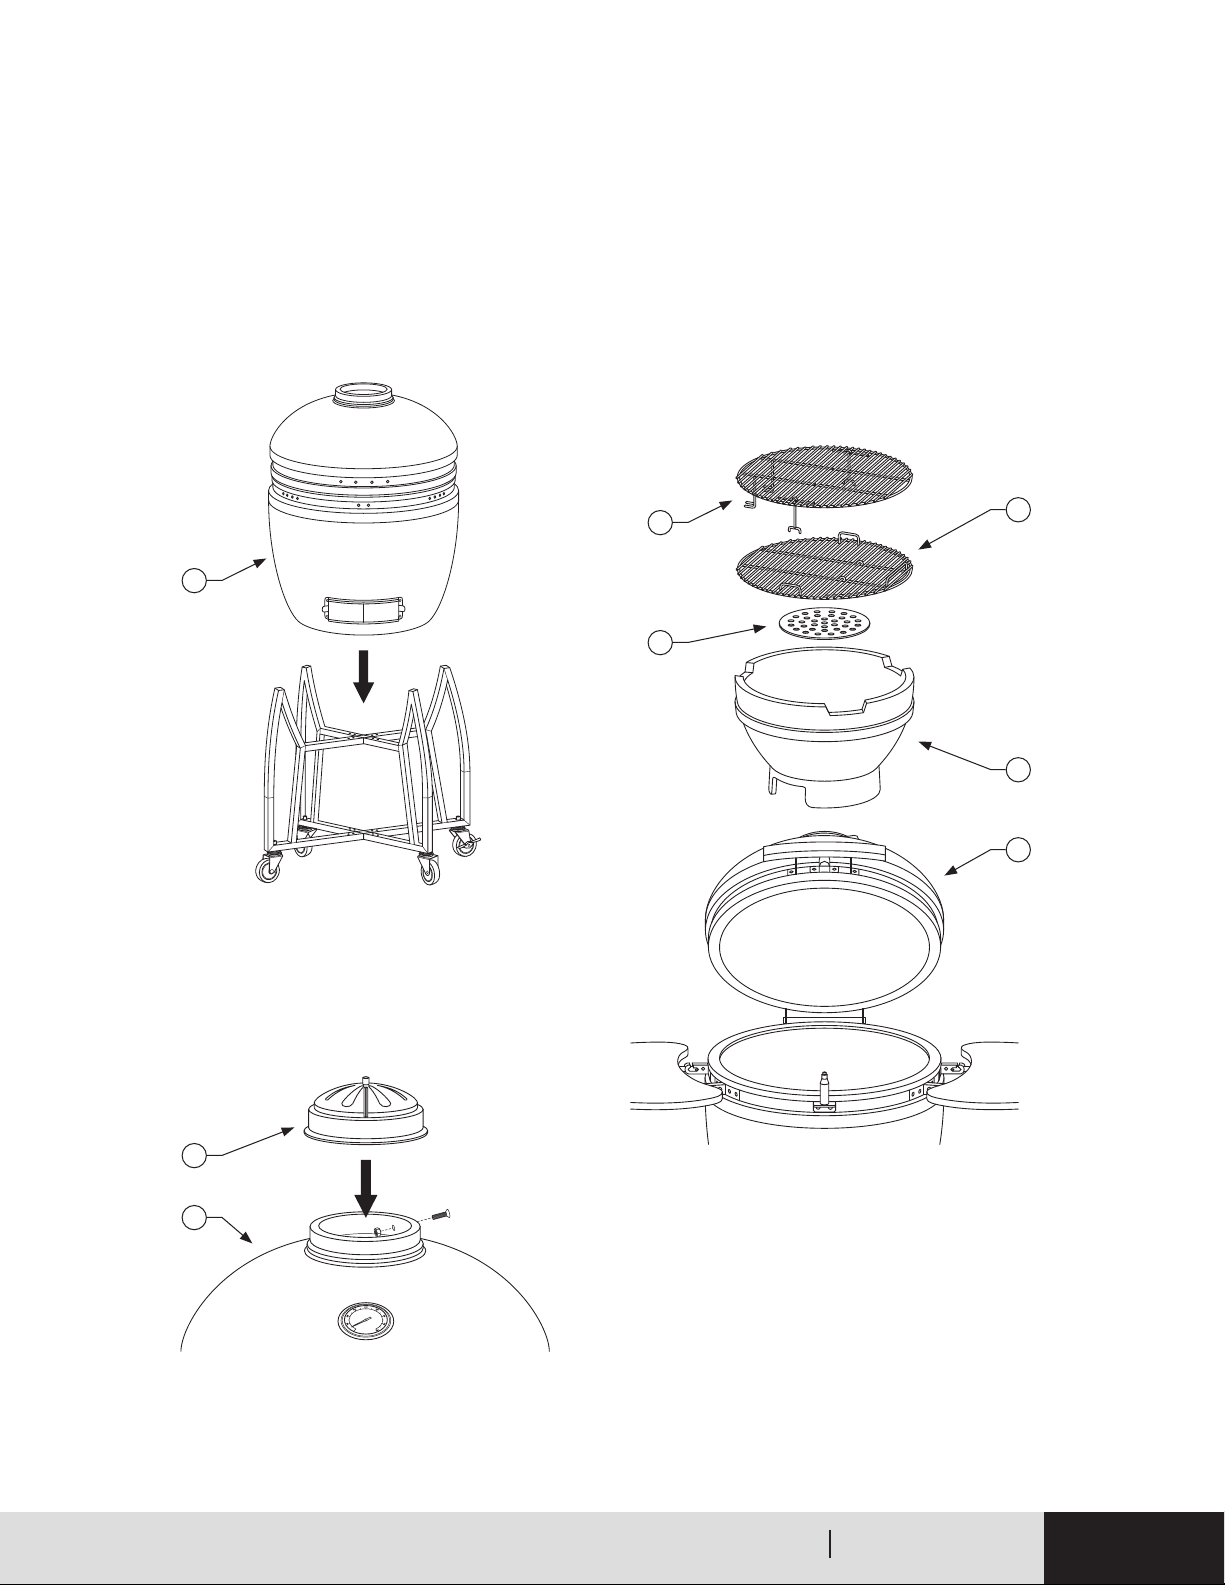
Before assembling your new Kong®, place the entire assembly on a soft surface to avoid scratching the paint. As you assemble
the grill, leave all bolts and nuts loosely tightened until all parts are assembled. Never over-tighten the bolts and use only
moderate pressure to avoid damaging the components, hardware, or the grill itself. Extract all packaging before assembling
your grill, and read all instructions before getting started. Please note safety warnings in the instructions.
This grill is intended for residential use only.
SAVE THESE INSTRUCTIONS.
WARNING: Warning on Installation Clearance:
• Maintain a MINIMUM distance of 18 inches (45.7 cm) from the grill to combustible construction at the rear,
side and top.
• A minimum of 40 inches (102 cm) is required when operating this grill under overhead combustibles.

KONG®CERAMIC KAMADO GRILL OPERATION MANUAL4©2022 AOB PRODUCTS COMPANY
Congratulations on your purchase of a Kong Kamado grill! If used and cared for properly, Kong will
give you years of enjoyment and trouble-free operation. Before assembling and using your new
grill, please review the information in this manual thoroughly. In it, you’ll nd many useful tips to
help maximize your Kong’s long list of benets and features.
While there are many smoker-grill styles on the market, Kong Kamado is truly one of a kind ... a bit
of history on wheels. The mushikamado is a domed clay oven used in Japan for literally thousands
of years, more recently by Japanese families to cook rice during ceremonial times. American
soldiers shortened the name to kamado when they brought the ancient ‘technology’ back to the
U.S.; more ecient ceramic lining replaced clay and heat controls, often no more than vents, were
added, making the kamado more versatile. Enjoy your Kong!
THE
KONG®

KONG®CERAMIC KAMADO GRILL OPERATION MANUAL 5
failure to follow this operational manual
in its entirety will void all warranties.
TABLE OF CONTENTS
i n t r o d u c t i o n
o p e r a t i o n
Safety And Maintenance
Assembly
Kong 101: How to Operate Your Kong
Operation
Cooking Guides
Parts Diagram
Troubleshooting and Frequently Asked Questions
Limited Warranty Information
4
5
8
11
13
14

KONG®CERAMIC KAMADO GRILL OPERATION MANUAL6©2022 AOB PRODUCTS COMPANY
parts diagram
PART DIAGRAM PART #
Top 9 (Top)
Body 9 (Bottom)
Firebox 8
Top Vent 10
Thermometer 15
Tray Brackets 13/14
Left Tray 16
Right Tray 17
Handle 11

KONG®CERAMIC KAMADO GRILL OPERATION MANUAL 7
parts diagram (cont.)
PART DIAGRAM PART #
Upper Cooking Grid 6
Main Cooking Grid 5
Charcoal Grate 7
Damper 18
Bracket Crosspiece 4
Base cart 1
Screws 19
Wheel 2
Locking Wheel 3

KONG®CERAMIC KAMADO GRILL OPERATION MANUAL8©2022 AOB PRODUCTS COMPANY
ASSEMBLY
Kong®Grill Assembly Instructions
Two adults are needed to assemble the grill.
Tools Needed: Box Cutter, Phillips Screwdriver, 10mm Wrench
important: Do not lift grill by the hinge when inserting into cradle.
1. Attach the four pre-threaded castor wheels (2 &
3) to each of the four brackets (1) by hand-tight-
ening them in the hole.
2. To assemble the cart, insert the two crosspiec-
es (4) into two of the four brackets (1) from
both the top and bottom.
3. Continue to insert the crosspieces (4) into the
other two brackets (1). Secure the brackets (1)
to the crosspieces (4) by using the 16x screws.
Please note the position shown in the diagram.
4. Make sure the cart is secure and all of the bolts
are tight before placing the Kamado Grill (9)
into it. Press down on the castor levers to lock
the castor wheels to ensure the Kamado cannot
move.
5. To place the Kamado Grill (9) on the cart, first
remove all of the items that are inside of the
grill to make lifting easier. Place one of your
hands in the bottom vent of the Kamado and
the other under the grill.
caution:Use a minimum of two people when lifting the Kamado Grill onto the cart. Lifting by the hinge or
the side tables could result in injury and damage to the product.
1
1
4
3

KONG®CERAMIC KAMADO GRILL OPERATION MANUAL 9
ASSEMBLY(cont.)
6. Place the Kamado Grill on the cart with the
bottom vent facing to the front of the cart,
allowing the vent to open and close without
any interruption.
7. Once grill is securely seated in the cart, attach
the top vent (10). Align the side notch with the
thermometer at the front and set over the top
opening. Secure with pre-attached bolt and nut.
8. Add the firebox (8), charcoal plate (7), and
cooking grill (5) inside of the Kamado Grill.
Please reference the diagram below. The
raised cooking grid (6) can be placed atop the
cooking grill (5), if required.
9
6
7
10
9
5
8
9

KONG®CERAMIC KAMADO GRILL OPERATION MANUAL10 ©2022 AOB PRODUCTS COMPANY
ASSEMBLY(cont.)
9. Attach the 2x table brackets (13) to the Kamado
Grill (9) using the 8x pre-attached bolts with
their corresponding washers, locking washers,
and nuts per bracket. Please note the position
shown in the diagram below.
Carefully pull the grill when moving. To prevent the potential of grill tipping over, never push grill.
When the grill is in the desired location, push down the tabs on the locking casters to set the locks.
10. Attach the 2x table brackets (14) to the Kamado
Grill (9) using the 8x pre-attached bolts with their
corresponding washers, locking washers, and nuts
per bracket. Please note the position shown in
the above diagram.
11. Insert the 2x table hinges into each of the table
brackets (13 & 14).
12. To attach the handle (11) to the lid of the
Kamado Grill (9), use the 2x pre-attached bolts
with their corresponding washers, locking
washers, and nuts per bracket.
The Kamado Grill is now ready to use. Please
ensure that grill curing instructions
are read thoroughly prior to use.
14
11
9
9
12
13

KONG®CERAMIC KAMADO GRILL OPERATION MANUAL 11
Operation
Putting the Kong®in Place for Use
Because the Kong is very heavy and difficult to move, enlist at least two to three persons to help you move
it to its final destination. First, remove all of the grill’s internal components and the bottom (i.e, the “outer
shell”) to the destination of choice. Don’t loosen the grill’s outer bands or the lid’s hinge assembly. Carefully
place the unit on a wood table or metal stand, remembering that the manufacturer’s warranty will not cover
any damage inflicted by mishandling of the grill.
Once the unit is in place, you simply need to install the firebox and inside components as follows:
• Firebox: The firebox is a one-piece unit with an air vent installed on the front of the unit. Carefully
position the firebox in the bottom of the grill, aligning the vent holes with the air control vent. This will
ensure proper airflow to your Kong.
• Inside components: Place the ceramic bottom plate in the bottom of the firebox (the plate fits into the
base of the firebox with its surface facing upward). Put the bottom grate at the firebox’s mid-base with
the divider slots facing upward.
Lighting the Kong
First, place a newspaper roll and either solid relighters or lighter cubes on the Kong’s charcoal plate. Next,
put two to three handfuls of lump charcoal over the top of the newspaper. Open the bottom vent and use
either a long-nosed lighter or safety matches to light the newspaper. Once the newspaper catches, build a
small bed of hot embers by keeping the bottom vent and lid open for at least 10 minutes.
warning:Never use gasoline, lighter fluid, alcohol, or other flammable substance to light or relight
your grill. Never overload the unit with fuel as intense heat may damage your grill.
The charcoal will heat up and should be allowed to remain red hot for at least 30 minutes before you use
your Kong for the first time. Leave the coals in position once they are lit, don’t try to turn or stoke them; this
will ensure a more uniform and efficient burn.
Be sure to use heat-resistant hand protection when touching the grill’s hot cooking surfaces or ceramics.
You’ll find a cooking temperature guide in this manual.
How to Extinguish Your Grill
Extinguish the Kong by closing all of the vents and the lid, stop adding fuel, and then letting the fire go out
naturally. Never use water or any other liquid to extinguish the charcoal; this may damage the ceramic Kong.
After Using Your Grill for the First Time
After using your grill for the first time, inspect all nuts and bolts to ensure that they are tight. Check and
tighten the metal band connecting the Kong’s lid to its base as this component will naturally expand from
the high temperatures and could become loose.

KONG®CERAMIC KAMADO GRILL OPERATION MANUAL12 ©2022 AOB PRODUCTS COMPANY
Storing, Cleaning and Maintaining Your Grill
If you’re storing your Kong outside, be sure to cover it
once it has cooled off completely. If possible, store the
unit under the cover of a shed, lanai, or garage to en-
sure that it’s completely protected (particularly during
the winter months).
Your Kong grill is self-cleaning and can be heated up
to 260°F degrees for 30 minutes to scorch off any food
and debris. Never use water or other cleaning prod-
ucts on your Kong as they may cause the unit’s porous
walls to crack. If soot is visible and excessive on the
grill, remove the carbon remnants before using the
grill again. Open the grill’s bottom vent and sweep the
soot into a small container.
Always use a non-abrasive cleaner to clean the Kong’s
grills and plates and only once the unit has cooled
completely. Note that the cooking grill is not dish-
washer safe and should be cleaned using only warm
water and a mild detergent.
The Kong’s outer surface should be cleaned regularly
with a damp cloth and mild detergent (once the grill
has cooled). Be sure to tighten the bands and apply oil
to the unit’s hinges a few times a year.
Refueling Your Grill
The Kong will remain at a high temperature for several
hours if you keep the unit’s top and bottom vents
closed. Should you need longer cooking times (for
slow-smoking or cooking a whole cut of meat), for ex-
ample, you may need to add more charcoal. To do this,
simply open the grill’s lid, add the charcoal, and then
continue cooking according to directions.
Low-Temperature Cooking Guide
1. Using the instructions listed on page 8, light the
lump charcoal. Once lit, do not attempt to move
or stoke the coals.
2. Fully open the Kong’s bottom vent and open the
lid for10 minutes in order to create a bed of hot
ember.
3. Monitor the grill until the temperature has risen
to the intended level.
4. Close the Kong’s bottom vent to maintain
this temperature.
5. The Kong is now ready for low-
temperature cooking.
6. When opening the lid, be sure to lift it only
slightly, allowing the air to enter the unit slowly
and safely. This will prevent flare-ups and any
backdrafts.
High-Temperature Cooking Guide
1. Using the instructions listed in this manual,
light the lump charcoal, close the Kong’s lid,
and open the top and bottom vents.
2. Close the unit’s bottom vent halfway and moni-
tor the temperature for the next few minutes.
3. The Kong is now ready for high-
temperature cooking.
4. When opening the lid, be sure to lift it only
slightly, allowing the air to enter the unit slowly
and safely. This will prevent flare-ups and any
backdrafts.
Using Your Kong as a Smoker
1. Use the instructions listed on page 8 to light
the Kong.
2. Monitor the unit until it has risen to the desired
temperature.
3. Leave the bottom vent open slightly, but close
the top vent while continuously
monitoring the temperature.
4. Use heat-resistant hand protection to place wood
chips in a circle on top of the hot charcoal.
(You can prolong the smoking process by soak-
ing the chips or cooking planks in water for 15
minutes first.)
5. The Kong is now ready for smoking.
6. When opening the lid, be sure to lift it only
slightly, allowing the air to enter the unit slowly
and safely. This will prevent flare-ups and any
backdrafts.
operation (cont.)

KONG®CERAMIC KAMADO GRILL OPERATION MANUAL 13
Troubleshooting & FAQ
Is it safe to use my Kong year-round?
Absolutely – the Kong performs well in all climates.
Can I leave my Kong outside in the rain?
Yes. The exterior shell’s lead-free porcelain glaze is
thermally bonded and able to withstand the elements,
but we recommend a protective grill cover when the unit
is not in use.
When should I use liquid lighter uid in
the Kong?
Never. The ceramic will absorb the smell of the liquid and
will impact how your food tastes. Using lighter uid in the
Kong will also void the manufacturer’s warranty.
How to adjust grill temperature?
If you are cooking slowly and at low temperatures, close
both vents before the thermometer reaches 220°F. For
medium roasting, let the grill reach about 300°F then
shut down the vents to halfway. For high heats, wait until
the temperature reaches 500 to 550°F and then close the
vents halfway.
How can I quick reduce the temperature of the grill?
Close both the bottom slide door and the top vent
completely, and leave them like this until the desired
cooking temperature is reached. Then, readjust the slide
door and the top vent to regulate the temperature.
Can I leave the Kong’s lid open
while cooking?
No. Cooking with the lid open will result in dried-out food
and a loss of all the great benets of using a ceramic grill.
Can I use my Kong for smoking?
Yes. You’ll just need to adjust the grill’s temperature to
between 150 to 250°F. To add avor, sprinkle in some of
your favorite wood chips.
Can I cook different kinds of food
at the same time?
Absolutely. One of the best features of the Kong is that
it allows you to cook dierent food simultaneously and
at varied temperatures.
Do the interior walls of the grill need to be
cleaned?
No. To maintain the Kong, simply clean the
cooking grates and remove the ashes. The exterior
glazed surface can be washed with warm water
and a mild detergent.
Can I bake pizza or bread in my Kong?
Yes. You can use a ceramic baking stone to bake pizza,
breads, or other baked goods in the Kong.
Should I use a drip pan in my grill?
Yes, as this will help prevent ame-ups, particularly
when roasting large pieces of meat.
Should I raise or lower the cooking rack(s)?
This isn’t necessary. In the Kong, the heat circulates
around the food so there’s never a need to place the
grill closer to the charcoal.
How do I remove the ash that’s in the bottom of the
Kong?
Open the grill’s bottom vent and use an ash tool to rake
out the remaining ashes. If you’re using natural lump
charcoal, you’ll need to do this after about 8 to10 uses
(a big buildup of ash will reduce airow and impact the
grill’s heating properties).
Should I be concerned about tiny cracks in the
Kong?
No. These are completely normal and will not impact
the grill’s performance or durability.
For more Kong information and FAQ, visit GrillaGrills.com

KONG®CERAMIC KAMADO GRILL OPERATION MANUAL14 ©2022 AOB PRODUCTS COMPANY
LIMITED WARRANTY INFO
LIMITED WARRANTY
Under the Limited Warranty, we will repair or replace your Grilla Grills product at no charge to you if it is found to be
defective during the applicable warranty period. The Limited Warranty does not cover products or component parts
which have been lost or stolen; or subject to misuse, intentional damage, modications, or repairs made or attempted
by anyone other than a qualied technician following Grilla Grills procedures; or damage that is cosmetic only and
does not aect the product's operation or performance (as determined by us at our sole discretion).
WARRANTY PERIOD
Four (4) Year Warranty
Conditions of Limited Warranty
• During the term of the limited warranty, Grilla Grills' obligations shall be limited to replacement of covered,
failed components. Grilla Grills will repair or replace parts returned to Grilla Grills, freight prepaid, if the part(s)
are found by Grilla Grills to be defective upon examination. Grilla Grills shall not be liable for transportation
charges, labor costs, or export duties.
• Grilla Grills takes every precaution to utilize materials that retard rust, including the use of high-temperature
paint where advisable. Even with these safeguards, the protective coating can be compromised by various
substances and conditions beyond Grilla Grills’ control. High temperatures, excessive humidity, chlorine,
industrial fumes, fertilizers, lawn pesticides, and salt are some of the substances that can affect paint and
metal coatings. For these reasons, the limited warranties DO NOT COVER RUST OR OXIDATION.
• The warranty is based on residential use. Warranty coverage does not apply to products used in
commercial applications.
Exceptions to the Limited Warranty
There is no written or implied performance warranty on Grilla Grills, as the manufacturer has no control over the
installation, operations, cleaning, maintenance, or the type of fuel burned. This limited warranty will not apply, nor
will Grilla Grills assume responsibility if your product has not been installed, operated, cleaned and maintained
in strict accordance with the manufacturer’s instructions. The warranty does not cover damage or breakage
due to misuse, improper handling, or modications. NEITHER THE MANUFACTURER NOR THE SUPPLIERS TO THE
PURCHASER ACCEPTS RESPONSIBILITY, LEGAL OR OTHERWISE, FOR THE INCIDENTAL OR CONSEQUENTIAL DAMAGE
TO THE PROPERTY OR PERSONS RESULTING FROM THE USE OF THIS PRODUCT. ANY WARRANTY IMPLIED BY LAW,
INCLUDING BUT NOT LIMITED TO IMPLIED WARRANTIES OF MERCHANTABILITY OR FITNESS, SHALL BE LIMITED TO
ONE (1) YEAR FROM THE DATE OF ORIGINAL PURCHASE. WHETHER A CLAIM IS MADE AGAINST THE MANUFACTURER
BASED ON THE BREACH OF THIS WARRANTY OR ANY OTHER TYPE OF WARRANTY EXPRESSED OR IMPLIED BY LAW,
MANUFACTURER SHALL IN NO EVENT BE LIABLE FOR ANY SPECIAL, INDIRECT, CONSEQUENTIAL OR OTHER DAMAGES
OF ANY NATURE WHATSOEVER IN EXCESS OF THE ORIGINAL PURCHASE PRICE OF THIS PRODUCT. ALL WARRANTIES
BY MANUFACTURER ARE SET FORTH HEREIN, AND NO CLAIM SHALL BE MADE AGAINST MANUFACTURER ON ANY
ORAL WARRANTY OR REPRESENTATION. Some states do not allow the exclusion or limitation of incidental or
Grilla Grills® warrants that its products are free from defects in materials and workmanship for the applicable
warranty period, subject to the conditions below.

KONG®CERAMIC KAMADO GRILL OPERATION MANUAL 15
LIMITED WARRANTY INFO (cont.)
consequential damages, or limitations of implied warranties, so the limitations or exclusions set forth in this
limited warranty may not apply to you. This limited warranty gives you specific legal rights and you may have
other rights, which vary from state to state.
The limited warranty for four (4) years is in lieu of all other warranties expressed or implied, at law or otherwise.
Grilla Grills does not authorize any person or representative to assume for Grilla Grills any obligation or liability
in connection with the sale of this product. This means that no warranties, either expressed or implied, are
extended to persons who purchase the product from anyone other than Grilla Grills or an authorized Grilla Grills
Distributor.
Procedure for Warranty Service
Call Grilla Grills at (616) 392–7410 for repair or replacement of your covered parts. Be prepared to furnish the
following information:
• Purchaser’s name, model and serial number of grill and date of purchase.
• An accurate description of the problem.
© 2022 AOB Products Company. All rights reserved.

save this manual for future use
Manual #4000277 | Ver. 002
Table of contents
Other Grilla Grill manuals