GROM Audio MAZ8 User manual

MAZ8
GROM Interface Installation into Mazda 08-12 using MAZM vehicle
specific harness and osi-Tap clips
icture 1: MAZM vehicle specific harness
Tools needed
1. Wire crimp tool
2. Panel trim removal tool (optional)
3. Philips screwdriver
Check http://gromaudio.com/installs/index.html for video guide of the car stereo removal and
GROM adapter installation into Mazda.
Important compatibility notes
G OM adapter for the Mazda 08.5+ uses AUXILA Y mode of your stereo. You will lose the use of the external
factory AUXILA Y or other external stereo options to gain the use of G OM USB, iPod, Android phone, Bluetooth or
MP3.
rev 2.0
1

MAZ8
reparation
1. It is recommended to disconnect the car battery before performing the installation.
Turn off the car engine and remove the key from the ignition.
2. While using the stereo removal tools carefully remove the radio from the dash (see the video guides at
http://gromaudio.com/installs/index.html)
Installation
3. Locate the vehicle specific cable (MAZM) and red colored Posi-Tap clips that came with your adapter
4. Connect MAZM harness to the port at the back of the radio.
Note: If the port is occupied with a different factory harness – disconnect this harness; insert Grom MALE connector
to the slot at the back of the stereo, reconnect the disconnected factory harness back to the stereo using the female
end of the MAZM harness.
If the port at the back of the stereo is empty – FEMALE port of MAZM cable is not used– do not connect it to anything.
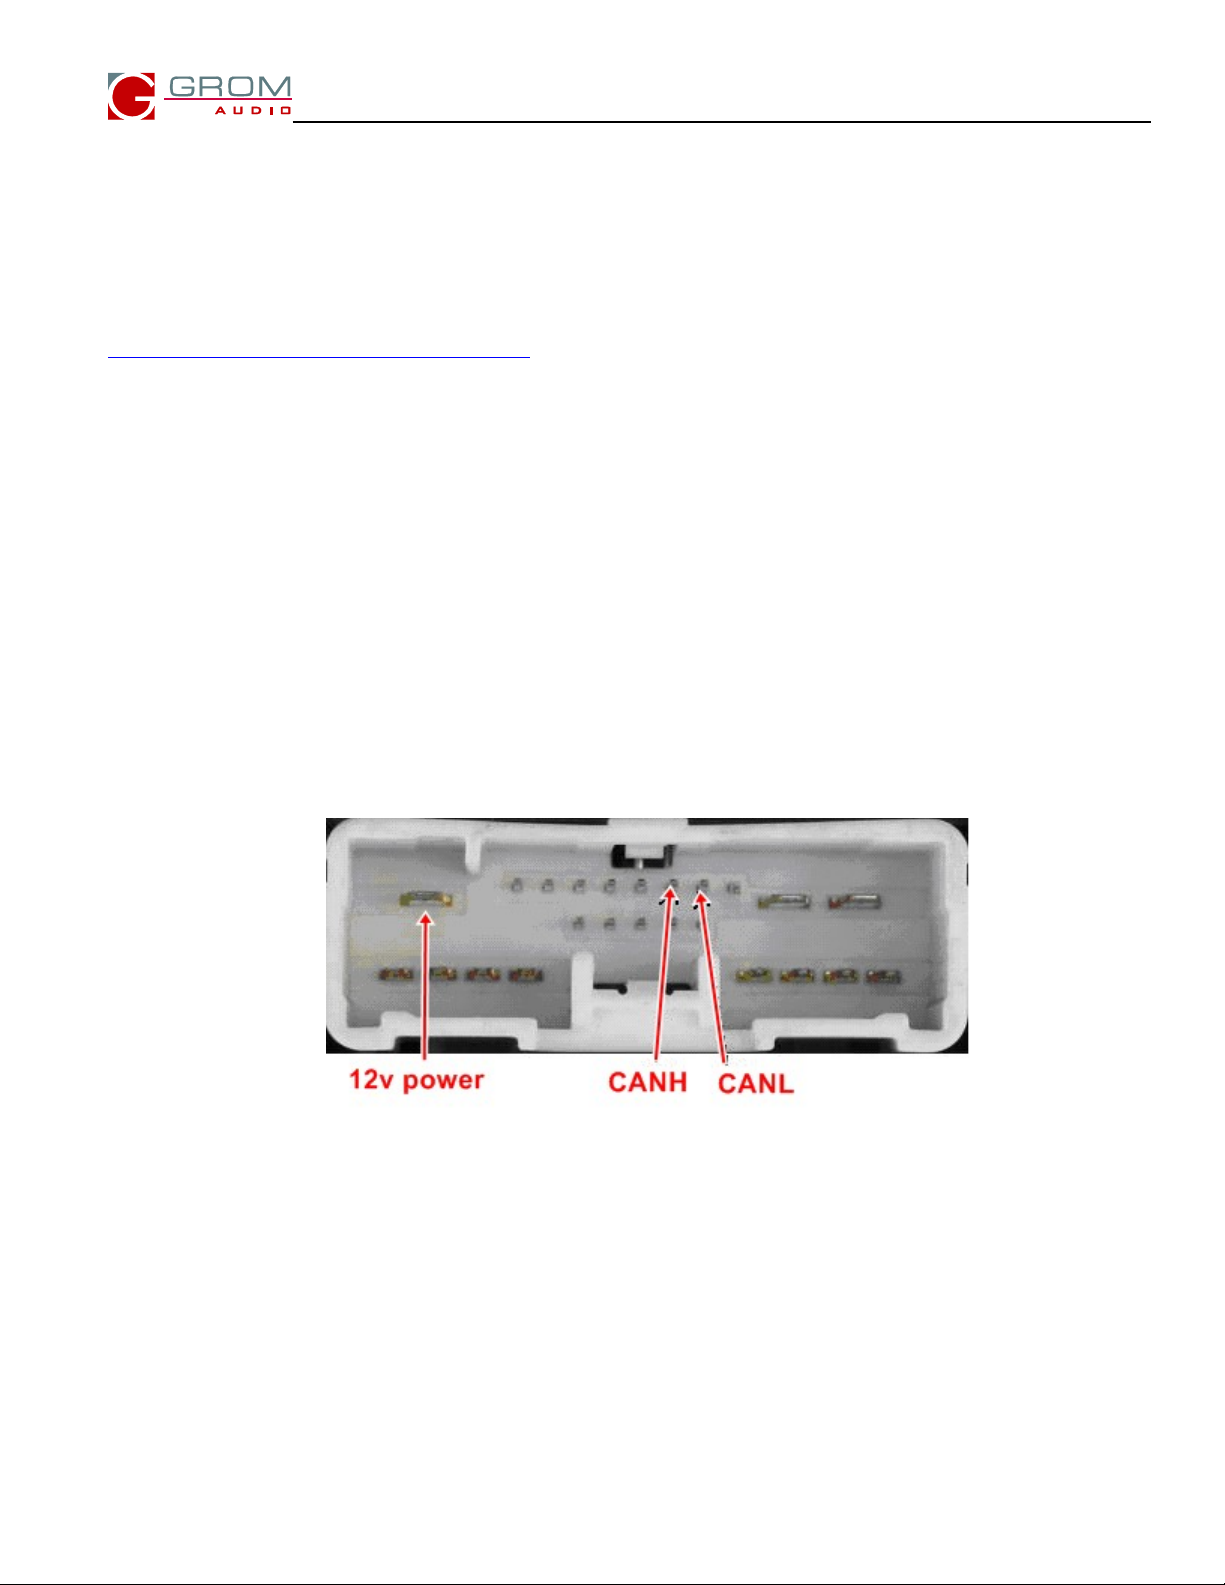
5. Locate the main radio harness (same cable that is connected to port shown below), locate the wires that are
coming from CANH and CANL connector locations according to the picture below.
Wiring diagram - main radio harness with CANH and CANL position
6. Locate the appropriate wires marked as CANH and CANL on the MAZM harness
7. Using 2 red colored Posi-Tap clips provided with your package connect CANH and CANL wires that come from the
main stereo harness to the appropriate wires on your MAZM harness (wires that are marked with CAN-L and CAN-H).
efer to the diagram below for information on how to use Posi-Tap connectors, make sure to have a secure
connection..
rev 2.0
2

MAZ8
How to connect the wires using osi-Taps.
The wires that come from your stereo are “HOT” wires referring to the diagram.
Attention: Don’t forget to strip the free hanging CAN-H and CAN-L wires from your vehicle specific harness MAZM.
WARNING! THERE IS NO NEED TO CUT ANY WIRES THAT COME FROM YOUR STEREO WHEN USING
OSI-TA S!
8. If you have any problems with using Posi-Taps please see the installation demonstration here:
http://gromaudio.com/docs/posi-tap.pdf or contact us for the help.
9. oute the G OM harness MAZM to the bottom compartment or glove box and connect the G OM unit to the
vehicle specific harness (MAZM).
Note: We recommend mounting GROM unit in easy access location should you need to access the module in
the future.
10. Test the unit operation BEFO E mounting the stereo back into the dashboard. Cycle the ignition and press the
AUXILA Y button. Stereo should show IPOD 1 00'00 or similar on the display. If it is not - see Troubleshooting
section.
11. If the correct operation of the unit is confirmed mount the stereo back to the dash. If not – please see the
troubleshooting section of the G OM adapter manual and this insert.
rev 2.0
3

MAZ8
12. Congratulations! You have installed G OM adapter and you may use it right now with your portable player.
To activate the GROM-USB2i adapter please press MEDIA button
on your car stereo once.
Troubleshooting
The stereo cannot recognize the GROM adapter for Mazda
1. Make sure that the 12v, CANH and CANL are connected securely according to the wiring diagram.
2. Make sure that you put the stereo into AUXILA Y mode.
3. Make sure that if the factory IPOD was present it is not connected to the stereo anymore.
Need to contact us?
Please use the form at http://gromaudio.com/support.html. Your question will be answered as soon as possible by a
G OM representative..
Disclaimer
• This product is not affiliated with any of the OEM manufactures
• Modifying the radio may void any outstanding warranty it may have.
• There are no warranties expressed or implied by purchase of this product
• While every care has been taken to provide a quality product, we cannot guarantee the G OM adapter to function
correctly if installation is not done according to the instructions in this guide.
• Keep your eyes on the road while driving!
• We’re not liable for misuse of this product. Misuse includes improper installation, damage to the board or radio while
trying to install, and illegal use of the radio
We recommend seeking the help of a professional car stereo installer if you are not sure in your abilities to perform
the installation.
rev 2.0
4
Table of contents