Grout Groovy VERTICAL GROUT CLEANING MACHINE User manual

User Guide
1
VERTICAL GROUT CLEANING MACHINE
Need Help? www.GroutGroovy.com | 866-269-9404

Thank you for purchasing the Grout GroovyTM grout cleaning
machine! All of our knowledge and experience with oor care
has come together to complete this one-of-a-kind, electric grout
cleaner. It’s an incredibly lightweight, safe, and easy way to clean
dirty tile grout anywhere in your home. Save time, money, your
back and knees. Grout Groovy™ can be used to clean tile grout.
Thank you for Choosing
Grout GroovyTM
Need Help? www.GroutGroovy.com | 866-269-9404
2
The Grout Groovy™ has a 1-year limited warranty from date of purchase.
This limited warranty is for normal, home use. The limited warranty is void if
product is used commercially. We will repair or replace the Grout Groovy™
at our discretion for defects in materials or workmanship. The nylon cleaning
brush is not covered under warranty, unless damage is a result of matrials or
workmanship. It will eventually wear down after extended use. Other failures,
resulting from improper use, maliciousness, and deliberate abuse, improper
or “non-approved” components replacing the factory ones, operator error,
negligence or accidents, repairs or alterations, improper installation or typical,
normal wear and tear may result in the item not being covered under warranty.
To take advantage of this warranty, the product or part must be returned to us
with shipping charges prepaid. Proof of purchase date and an explanation of
the defect and your contact information must be included with the product.
If our inspection verifies the defect, we will either repair or replace the product
at our discretion or we may elect to refund the purchase price if we cannot
readily and quickly provide you with a replacement. We will return repaired
products at our expense, but if we determine there is no defect, or that
the defect resulted from causes not within the scope of our warranty, then
you must bear the cost of returning the product. Contact Grout Groovy™
for warranty information, parts or service at (866) 903-8058 or go to www.
groutgroovy.com.
This warranty is expressly in lieu of all other warranties, expressed or implied.
Individual state law may affect your rights under the warranty. This warranty
gives you specific legal rights and you may also have other rights which vary
from state to state.
Limited Warranty

Need Help? www.GroutGroovy.com | 866-269-9404
SAFETY INSTRUCTIONS
• Keep the power cord away from sharp objects.
• Keep your hands and feet away from cleaning brush.
• Always wear shoes that are not slippery so you do not
fall on wet floor, and keep hands and feet away from the
cleaning brush.
• Never use replacement parts and accessories not provided
or recommended by the manufacturer.
• If the cord becomes damaged during use, disconnect the
cord from the power supply immediately and discontinue
use.
• Remove the plug from the wall socket after using the
machine, before servicing, or when the machine is not in
use.
• Do not immerse the machine in water or other liquid.
• Do not use the machine if the guard is damaged or worn.
• Make sure that the cleaning brush is properly secure to the
machine in accordance with the instructions.
• Do not use worn cleaning brushes.
• Only use the machine in an upright position, with the
cleaning brush pointing to the ground.
• Do not use worn cleaning brushes.
• Only use the machine in an upright position, with the
cleaning brush pointing to the ground.
Safety Instructions
3
Beware that after releasing the trigger the cleaning brush may
continue to rotate for a short period.
WARNING!
When using the machine the safety rules contained in this manual
must be followed. For your own safety and bystanders please read
these instructions before operating the machine.
WARNING!

Need Help? www.GroutGroovy.com | 866-269-9404
Product Information/Parts list
The rubber traction band is used to help guide the machine in
case of “slippery” tile.
NOTICE!
4
PARTS LIST (fig. B)
1) Detail corner
brush
2) Wrench
3) Phillips
screwdriver
4) Traction band
5) Guide wheel
6) Nylon brush
7) Phillips machine
screw
3
2
1
56
7
B
4
A
2
1
3
4
5
6
7
PRODUCT
INFORMATION (fig. A)
1) On/off trigger
2) Safety button
3) Main handle
4) Guide handle
5) Guard
6) Cleaning brush
7) Guide wheel
with traction band
installed
8) Power cord
8

Need Help? www.GroutGroovy.com | 866-269-9404
5
Assembly
1. Assemble the Grout Groovy
TM
(fig. C).
• Insert the top of the machine, (1)
containing the handle and trigger, into the
bottom of the machine (3). It will only go
together one way.
• Insert the Phillips machine screw (2) into
the hole that is now aligned and tighten
with the
screw driver
provided in
the parts
package.
Just snug it
- don’t over
tighten!
2. Insert guide
wheel into motor hub (fig. D).
3. Remove the two Phillips machine
screws from the splash guard, and put splash guard on
opposite side of motor (fig. E).
4. Insert two Phillips machine
screws back into the holes
in the splash guard using the
Phillips screwdriver.
1
3
2
C
E
D
Need Help? www.GroutGroovy.com | 866-269-9404
6
When using Grout Groovy
TM
on tile floors other than porcelain
or ceramic, please be careful with expensive tile products like
marble, granite, slate, or wood-looking tile. Test in a small area
first and check for any scratching of tile surfaces prior to cleaning
tile grout.
NOTICE!
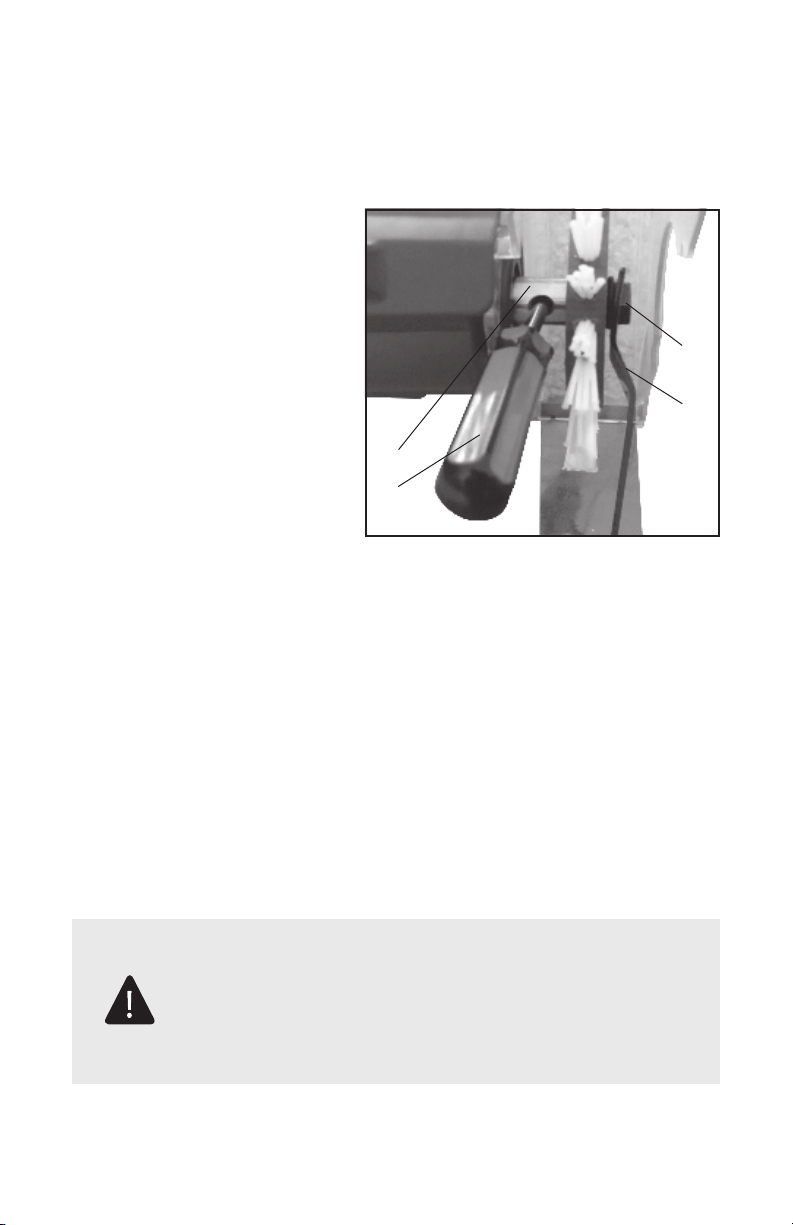
INSTALLING A NEW CLEANING BRUSH (fig. E)
• Unplug the machine from power source.
• Remove the old nylon cleaning brush by loosening the
spindle nut (2), using
the wrench (1), while
holding the spindle
(4) using the supplied
screwdriver (3).
• Insert the shaft of the
new brush onto the
spindle with the cut out
of the hub facing the
machine.
• When mounting the
brush wheel, use the
wrench (1) provided to
avoid damage to the machine.
• Tighten the spindle nut while holding the spindle using the
supplied screw driver (3). Don’t over tighten!
To purchase replacement nylon brushes or any Grout GroovyTM
parts, or for general questions, please call toll free 866-269-
9404 or go to www.groutgroovy.com.
E
4
3
2
1

Need Help? www.GroutGroovy.com | 866-269-9404
7
Quick Start Guide
1. Prepare the surface to be cleaned.
• Apply a small amount of soap or a mild household cleaning
solution to your grout.
2. To use Grout GroovyTM (fig. A, pg 4), depress the safety
button on the main handle and squeeze the on/off trigger.
• To turn the machine off release the on/off trigger.
• Holding the machine with both hands, make sure the
underside of the machine is kept level and guide the
machine at a constant speed over the grout area moving
forward and backward similar to using a vacuum cleaner.
• There is no need to apply preasure. The nylon brush
provides plenty of scrubbing power.
3. For stubborn, dirty grout, repeat if necessary.
4. For corners and tight spaces use the detail corner prush
(fig. B, pg 4).
5. After grout is clean, mop or towel floor until clean.
CAUTION: Risk of eye injury, use safety glasses or similar eye
protection. To reduce the risk of electric shock, replace damaged
cord immediately. To reduce the risk of injury to persons, do not
operate without guards in place. To reduce risk of electric shock,
do not expose unit to water or operate unit on wet ground. Double
insulation - when servicing, use only identical replacement parts.
To reduce the risk of electric shock, disconnect from the supply
circuit when cleaning or servicing.
NOTICE!

8
PLEASE DO NOT RETURN THIS PRODUCT TO THE PLACE
OF PURCHASE.
We want you to be completely satisfied with your purchase.
Please contact us with any questions or concerns. The team at
Grout GroovyTM is happy to be of service. Contact us directly at
866-269-9404
.
Need Help? www.GroutGroovy.com | 866-269-9404
STORING THE MACHINE WHEN NOT IN USE
The machine should be stored in such a manner that it is
protected against the effects of:
• High humidity, heat, moisture, or with cleaning products/
chemicals that may cause damage to the machine.
• Exposure to acids, or fumes from acids, which might induce
deterioration.
• Any temperature low enough to cause condensation on the
cleaning brush when removed from storage to an area of
higher temperature.
Storage
Table of contents
Popular Scrubber manuals by other brands

Windsor
Windsor Saber Cutter SC326 10052220 operating instructions

Powr-Flite
Powr-Flite PFX1380 SERIES Operators manual and parts lists

Olympus
Olympus M200H operating manual

Clarke
Clarke BEXT 100H Operation?and safety

JOHNY VAC
JOHNY VAC JVC70BCT user guide

RCm
RCm Elan Series Instruction and maintenance handbook


