Gryphon Omin-1 User manual

®
Gryphon
Diamond
Wire-Saw
made in U.S.A.
Oil both 1/4" shafts frequently
Do not run with cover off
Wear Eye Protection
Patent Pending
Instructions
Gryphon Diamond Wire Saw model Omni-1
• Always wear eye protection •
• Do not run blade dry- use plenty of water •
• Keep ngers clear of moving parts •
• Do not operate with nger guard removed •
• Do not operate with front cover removed •
Important - Fill Base completely with water before use
Front
Cover
Motor Housing
Motor
Switch
Light
Switch
Upper
Blade
Guide
Fresh
Water
Reservoir
Base
Platform
Fresh
Water
Valve
Right Side of Saw
Barbed Fitting
Fresh
Water
Fill Spout
Used
Water
Valve
Used Water
Drain Barbed Fitting Left Side of Saw
Fresh Water Feed Tube
Vertical
Shafts
Blade
Chuck
Connecting
Rod
Aluminum
Block
Lower
Wrist
Pin
Upper
Wrist
Pin
Gryphon Wire Saw Parts Identication
Motor Assembly
Assembly Step 1
Turn the base of your saw upside down. Push the long piece of tubing from your parts
bag onto the barbed tting. Tubing inside diameters vary widely from batch to batch and
from manufacturer to manufacturer. Soaking one end of your tubing in hot water helps to
overcome a too-tight t. Insert tube onto barbed tting
Assembly Step 2
Place motor assembly on top of base. Slip a plastic washer onto each of the two
plastic thumbscrews found in your parts bag. Insert thumbscrews into blue grom-
mets at the upper outside corners of the water tray. Tighten screws into motor
assembly snug tight only.

Tubing
Step 3 Complete
Insert
Finger
Guard
in Slot
Motor
Assembly
Rotor
Assembly Step 4
Installing your rst Blade:
Remove the two nylon screws from the Front Cover and lift off the Front Cover.
The Rotor may stop in any position (A). Turn the Rotor by hand until the Blade Chuck is in its
lowest position (B). (Note: it is not necessary to remove the Front Cover when changing blades.
Just pull down on the old blade until the nut appears).
Assembly Step 3
Push the short piece of tubing from your parts bag onto the barbed tting
at the bottom of your water tray.
Thread the other end of the tubing trough the hole just
below the blade guide.
Take the nger guard from your parts bag and push
it into the “T” shaped slot at the bottom of the motor
assembly.
Assembly Step 5
Turn the Front Cover face down. Remove the four screws that secure the Battery Holder
Lid. Lift off the Battery Holder Lid.
Install two AA ashlight batteries (not included) into the battery holder. Be careful to
follow the polarity shown on the battery holder. Turn the switch on. If the lamp does
not light, one or both of your batteries may be installed backwards.
Re-install the Battery Holder Lid. Start screws by twisting counter-clockwise until you feel
the threads drop into place. Then twist the screws clockwise until they are snug tight.
Over tightening will strip the treads. Never operate the saw with the Battery Holder Lid
removed, as the batteries may fall into the mechanism.
Re-install the Front Cover and tighten the two plastic screws which you removed earlier.
Remove the bottom guide by pulling forward on the guide. Drop the
unpainted end of a new blade into the bottom guide hole (C).
Thread the top painted end of the blade into the hole in the top guide (D).
Continue pushing the blade up into the blade chuck until it stops. Tighten
the 7/16” nut snugly with the provided wrench. Replace the bottom guide. To
remove a worn blade reverse this process.
C
D
Blade Chuck
7/16" Nut
Insert
Blade
D
Front View
Battery
Holder
Lid
A B

Preparing to Saw
Place a container on the oor. Put the end of your long drain hose into the container.
Important: Fill the base up to the
overow with water. The water
provides cooling for the blade and
extends guide life.
Overflow
®
Gryphon
Diamond
Wire-Saw
made in U.S.A.
Oil both 1/4" shafts frequently
Do not run with cover off
Wear Eye Protection
Do not remove Finger Guard
Used water valve
Fill the water tray 3/4 full with water
Unscrew the water tray screw until water begins to
ow onto the blade. Unscrewing further increases
the water ow.
Wear eye protection. Turn the switch on and you may
begin sawing. You may push the glass in any direction.
When sawing is nished, screw in the water tray screw
until water no longer ows onto the blade.
At the end of the day, you can drain the water in the
base by unscrewing the base screw until water begins
to ow through the long hose into the container on the
oor.
Start up Maintenance
It is necessary to keep the two steel vertical shafts lubricated with light oil. If your shafts do not feel oily to the touch, wipe
Sewing Machine Oil or other light oil on them with your ngers. Do not use vegetable oil. Do not use spray lubricants.
These shafts are ground to micro nish in order to make your blade chuck last a long time. If you allow your shafts to rust or
become dry you will drastically reduce the blade chuck life.
Sawing
Put on eye protection. Start the water ow to the blade. The water feed hose should touch the blade. Turn the switch on
and saw in any direction.
Pulling the glass towards you pulls the blade away from the water feed and may make it difcult to see your pattern line. If
this happens, increase the water ow by unscrewing the water tray feed screw a little more.
As you near the end of your cut, ease off on the pressure you apply to the glass to minimize risk of breakage.
Vertical
Shafts
Blade
Chuck
Fill the water reservoir
with water

Stretching your $$$$
Most cuts will be done by pushing away from you and from side-to-side. This will dull the diamond on the blade front and sides,
but leave the back relatively sharp. By loosening the Blade Chuck’s 7/16” nut and turning the blade 180 degrees, you can
extend your useful blade life.
Note that the blade should never be installed upside-down. To do so will drastically shorten your guide and Blade Chuck life.
Just like a band saw, or any other diamond tool, these blades will become dull from use and you will have to push harder to
make cuts. Pushing extremely hard can break your blade. Finally the blade will need to be replaced. The beauty of the Gryphon
Wire Saw is that the blades are inexpensive. 15 of the Wire Saw blades cost the same a one band saw blade, but 15 Wire Saw
blades will cut nearly twice as much glass under normal use as one band saw blade.
Replacement blades are offered in a choice of three grits. The Super Power blade is the best all-around choice for general cutting, but you can chose a ner or coarser
grit blade depending upon your application.
The Ultra Power blade has the largest diamond particles, and cuts the fastest. It is recommended for difcult glass, tile and stone, or where speed is important. This
blade also has the longest life.
The Power blade offers the nest diamond particles and provides the smoothest surface nish.
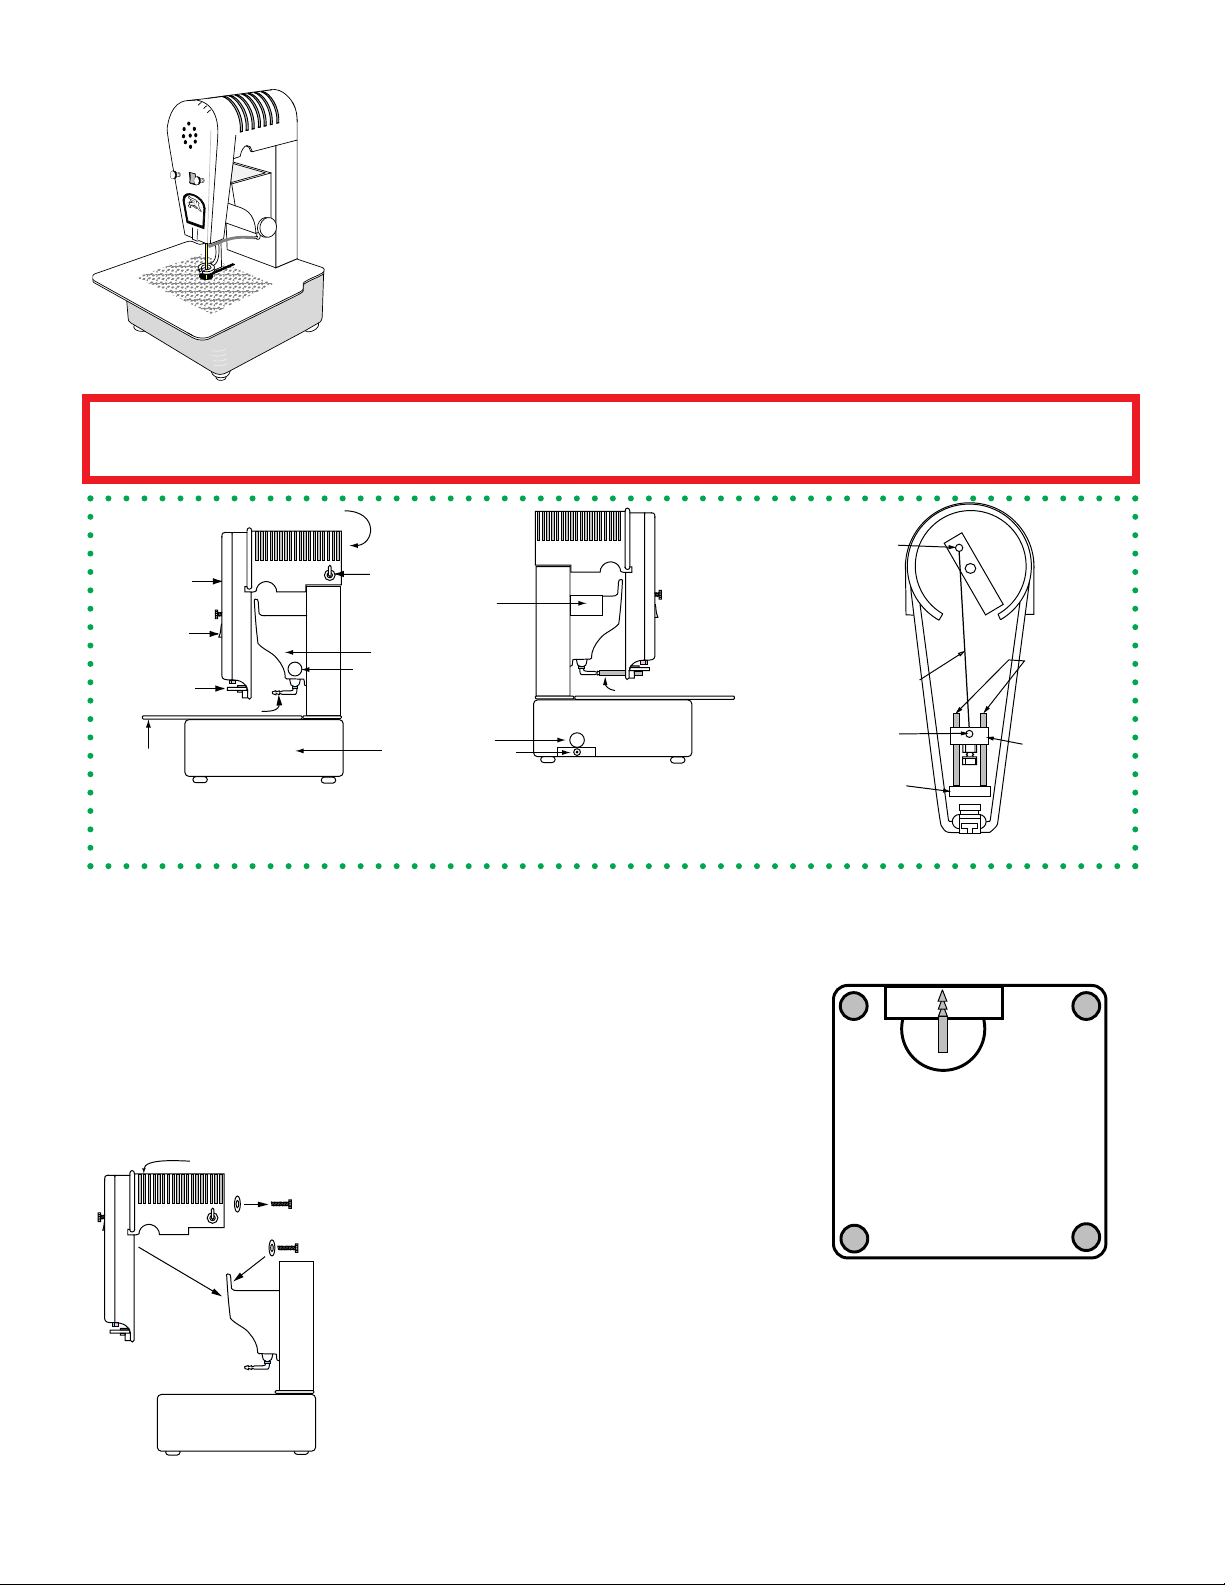
Changing parts
Blade guides pull straight out toward the saw front. They snap in place, so expect a little resistance when
removing and replacing them. Replace the guides when the blade hole becomes sloppy. Note that the
upper and lower blade guides are not interchangeable.
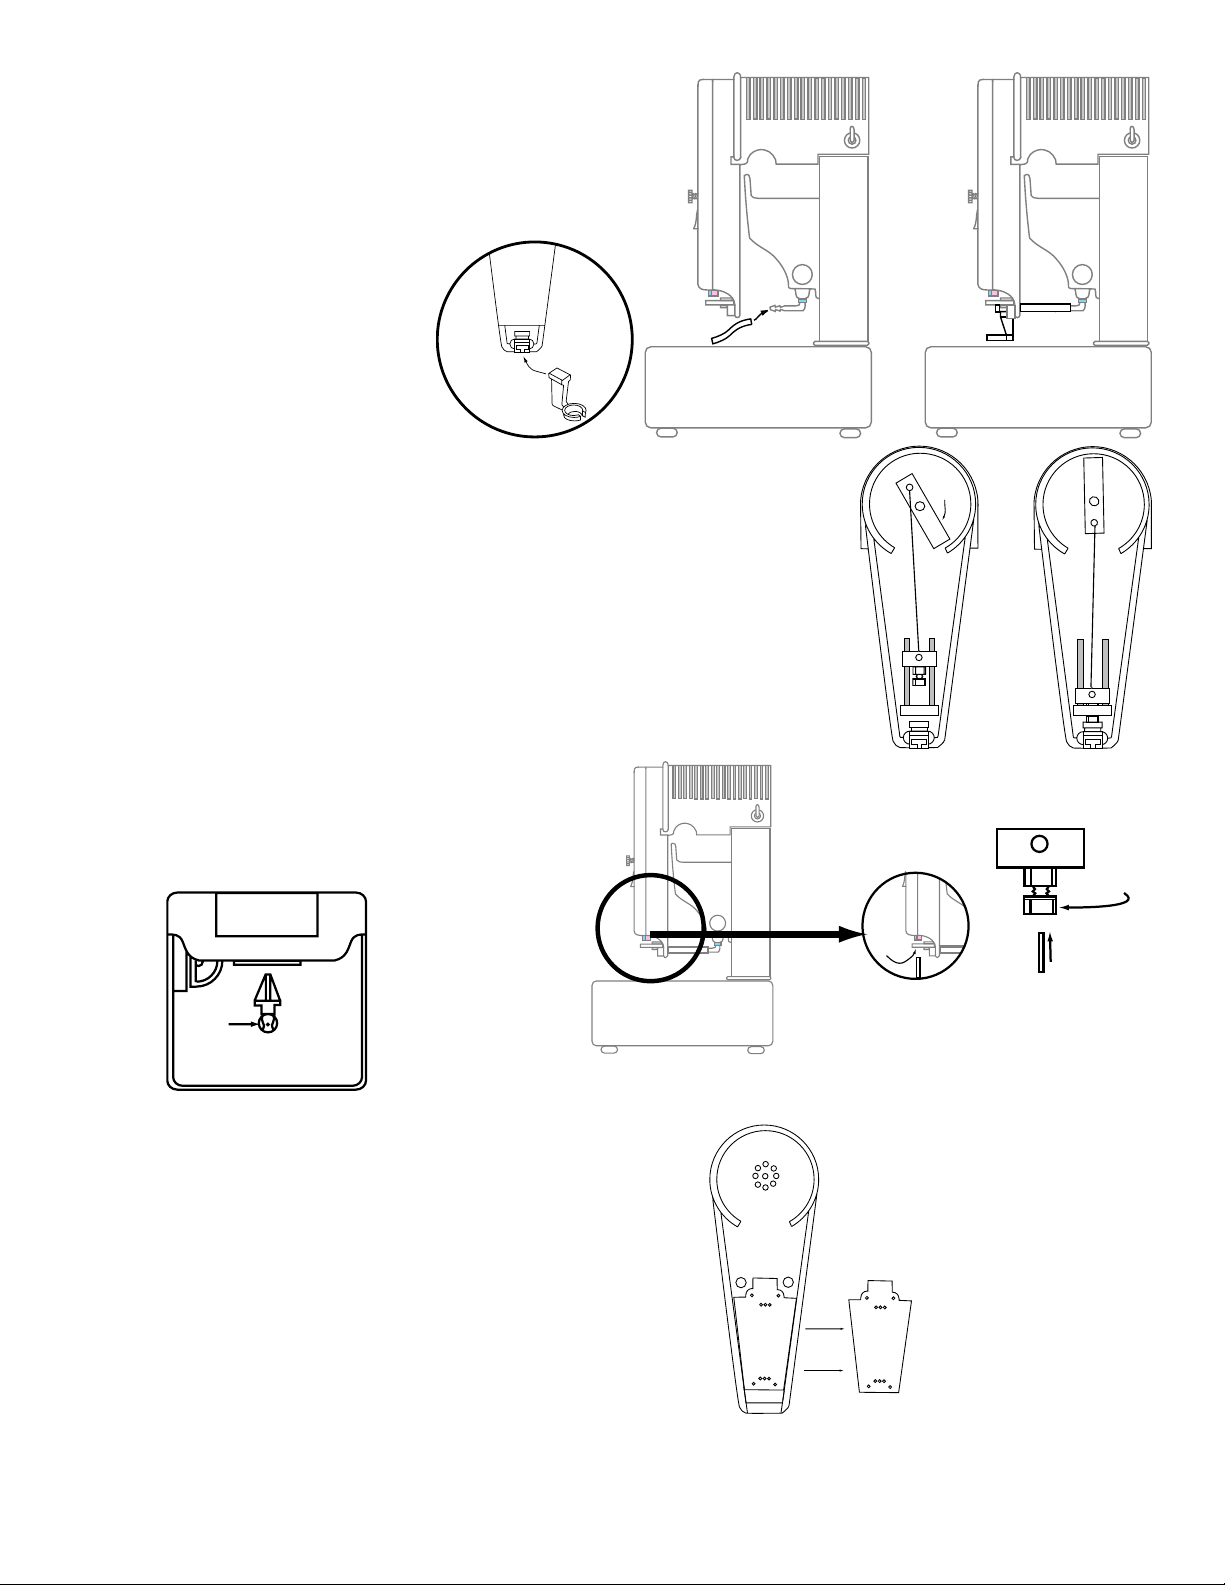
If the blade chuck wears from use the saw will become quite loud when running. To change:
1. Remove blade.
2. Loosen set screw in upper wrist pin.
3. Slide connecting rod out of upper wrist pin.
4. Pull connecting rod and blade chuck up and out of saw.
5. Loosen set screw in lower wrist pin and pull out connecting rod.
6. Put the wrist pin into a new blade chuck.
7. Push connecting rod into lower wrist pin hole until it stops, then tighten set screw.
8. Replace assembly onto the two vertical shafts and thread connecting rod into the upper wrist
pin.
9. Turn the rotor to down position as shown in the diagram to the right.
10. Insert the thin (gauge) end of your chuck wrench between the top of the aluminum block and
the blade chuck.
11. Push the blade chuck downward until the chuck wrench is held snugly.
12. Tighten the set screw on the upper wrist pin and remove
the chuck wrench. Oil both vertical shafts to complete the
replacement.
Unclogging the drain line
Usually wiping the end of the drain line and blowing into it will clear debris from the passage. Occasionally you may need to remove the barbed tting and clean it with
a needle.
UP
UP
Vertical
Shafts
Blade
Chuck
Connecting
Rod
Aluminum
Block
Lower
Wrist
Pin
Upper
Wrist
Pin
Thin (gauge) end of wrench
Chuck Wrench
Warranty
Your new Gryphon Diamond Wire Saw is warranted for one year from date of purchase. All mechanical parts with the exception of the
blade and blade guides are guaranteed against failure for one year. If such a failure occurs for any reason other than abuse or misuse
during this period, it will be repaired (or at our option replaced) free of charge FOB our factory. Retain your sales receipt for proof of
purchase. Should repairs ever be required, return the saw to Gryphon Corporation.
© 2003 Gryphon Corporation • 12417 Foothill Blvd. • Sylmar • California • 91342 • (818) 890-7770 • www.gryphoncorp.com
Table of contents
Other Gryphon Saw manuals
Popular Saw manuals by other brands

KENTMASTER
KENTMASTER 203 Operating & installation instructions

Femi
Femi 2201 SPECIAL Instructions for use and maintenance

Jet
Jet Bench JMS-10CMS Operating instructions and parts manual

Craftsman
Craftsman 315.212050 Operator's manual

Grizzly
Grizzly G0513 SERIES owner's manual

GMC
GMC BS230L instruction manual