GTD GTD-LM1506 User manual

LEDNon‐polarBeam
GTD‐LM1506
User’sManual
GuangzhouGTDLightingTechnologyCo.,Ltd.
Tel:+86‐20‐61808296
Fax:+86‐20‐61812282
http://www.gtd‐lighting.com

GTD‐LM1506UserManual
1
©2017GTDallrightsreserved.Information,specifications,diagrams,images,andinstructionshereinaresubjectto
changewithoutnotice.GTDlogoandidentifyingproductnamesandnumbershereinaretrademarksofGTD.Copyright
protectionclaimedincludesallformsandmattersofcopyrightablematerialsandinformationnowallowedbystatutoryor
judiciallaworhereinaftergranted.Productnamesusedinthisdocumentmaybetrademarksorregisteredtrademarksof
theirrespectivecompaniesandareherebyacknowledged.Allnon‐GTDbrandsandproductnamesaretrademarksor
registeredtrademarksoftheirrespectivecompanies.
GTDandallaffiliatedcompaniesherebydisclaimanyandallliabilitiesforproperty,equipment,building,andelectrical
damages,injuriestoanypersons,anddirectorindirecteconomiclossassociatedwiththeuseorrelianceofany
informationcontainedwithinthisdocument,and/orasaresultoftheimproper,unsafe,insufficientandnegligent
assembly,installation,rigging,andoperationofthisproduct.
GuangzhouGTDLightingTechnologyCo.,Ltd.|27FuYuanYiRoad,Guangzhou510805,P.R.China
+86‐20‐61808296|+86‐20‐61812282fax|www.gtd‐lighting.com|contact@gtd‐china.com

GTD‐LM1506UserManual
2
Contents
Safetyinstructions...................................................................................................................................................................3
Generalguidelines...................................................................................................................................................................4
Packingandshipping...............................................................................................................................................................5
Unpacking.......................................................................................................................................................................................5
Packingafteruse.............................................................................................................................................................................5
Accessories.............................................................................................................................................................................5
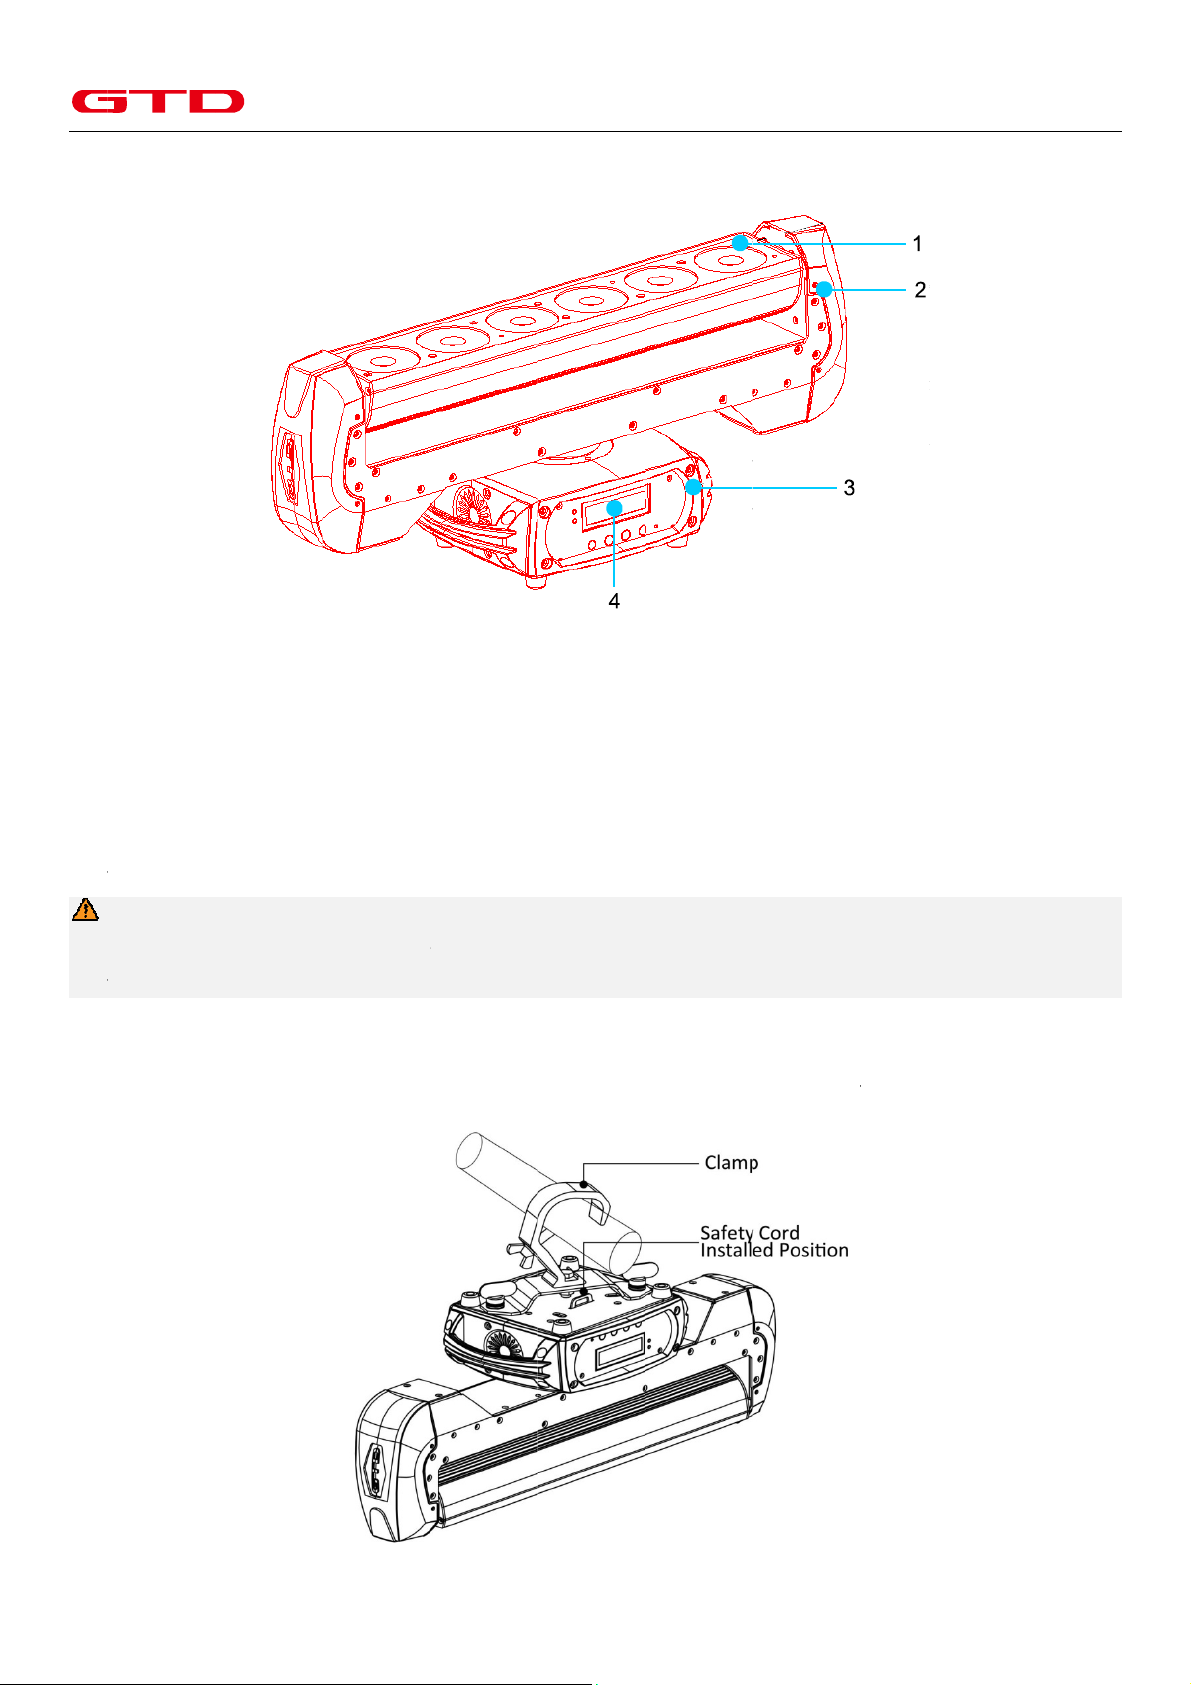
Productintroduction...............................................................................................................................................................6
Installation..............................................................................................................................................................................6
Clampsinstallation..........................................................................................................................................................................6
Deviceinstallation..........................................................................................................................................................................6
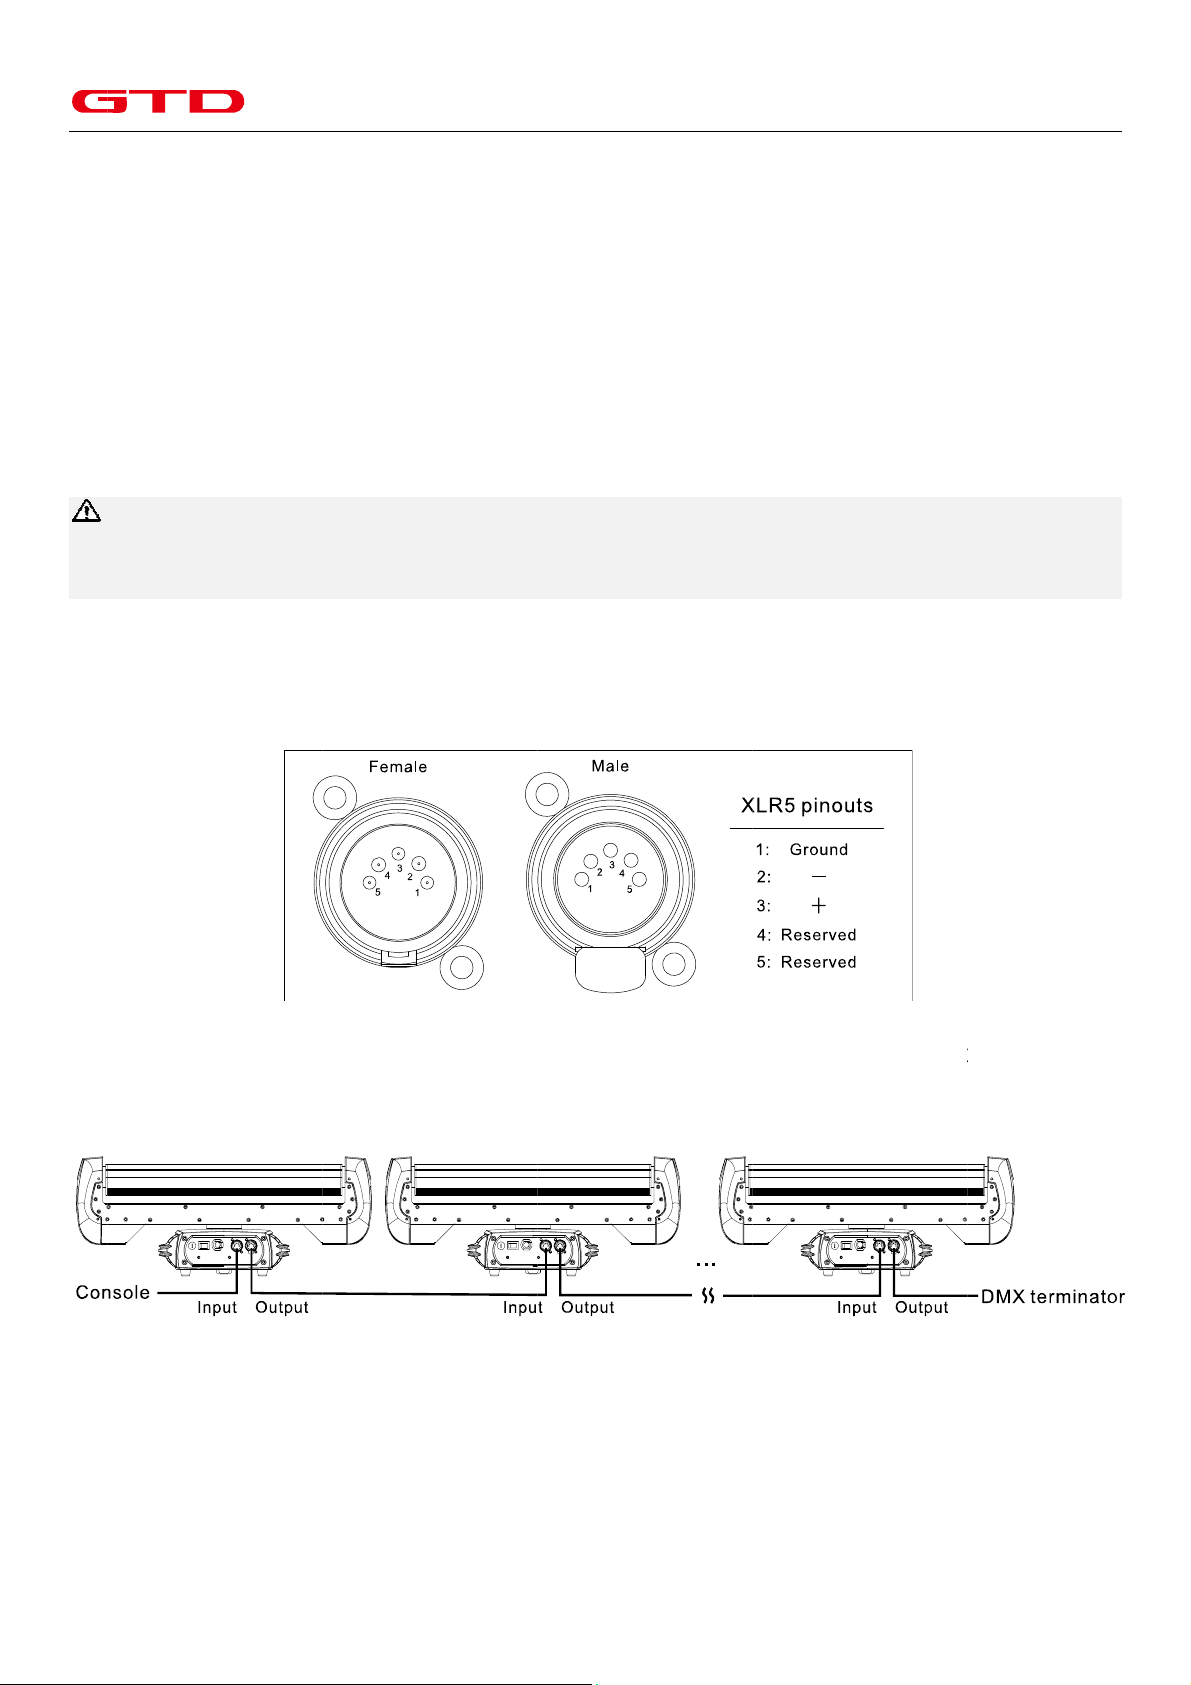
Power/Controlconnection.....................................................................................................................................................7
Powerconnection...........................................................................................................................................................................7
Controlconnection.........................................................................................................................................................................7
Testing............................................................................................................................................................................................7
Controlpanel..........................................................................................................................................................................8
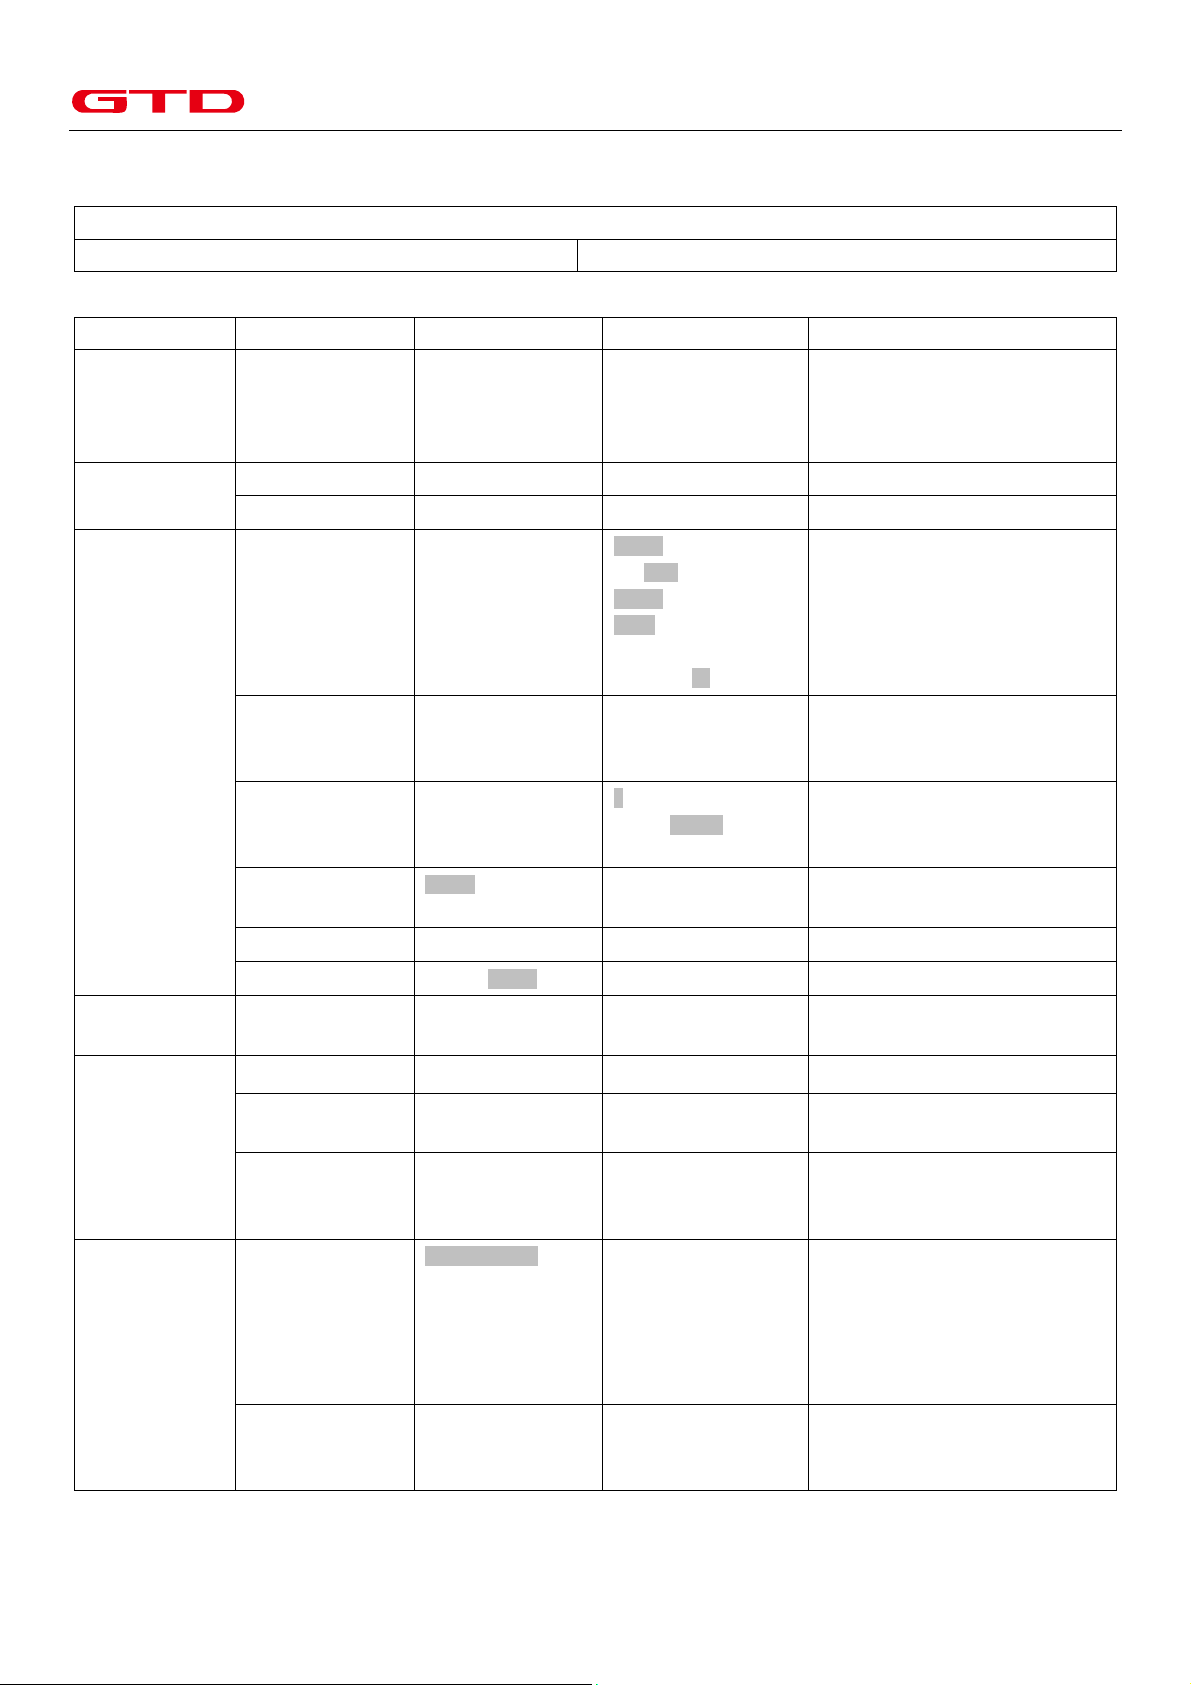
Menustructure.......................................................................................................................................................................9
DMXprotocol........................................................................................................................................................................11
Technicalspecification...........................................................................................................................................................13
Cleaningandmaintenance....................................................................................................................................................15
Troubleshooting....................................................................................................................................................................16
Systemwiringdiagram..........................................................................................................................................................17
Sparepartslist......................................................................................................................................................................18
Appendix1............................................................................................................................................................................18

Sa
f
y
y
y
f
etyinstr
u
Onlyqual
i
(brackets
)
Beforeap
mustbe
e
dimmers
y
Neverlo
o
blindness
.
u
ctions
WARNIN
G
Beforeus
i
tothesaf
e
manual.
T
fixture,d
u
DANGER!
Hazardou
s
WARNIN
G
Burnhaza
WARNIN
G
Firehazar
INDOORS
Donotex
It’sessen
t
connectio
WARNIN
G
Wearpro
t
i
fiedandcer
t
)
includedwi
t
plyingpowe
r
e
arthed(gro
u
y
stem.
o
kdirectlyin
t
.
G
!
i
ngthefixtur
e
tyinstructi
o
T
hemanufac
t
u
etothedisr
s
voltage.Ri
s
G
!
rd.Hotsurfa
G
!
d.
USEONLY!
posefixture
f
t
ialthatthe
f
ns.
G
!
t
ectiveeyew
e
t
ifiedperson
t
hthisfixtur
e
r
tothefixtu
r
u
nded)andi
t
othelight
s
e,readthel
a
o
ns.Pleasec
h
t
ureofthisfi
x
egardofthe
s
koflethalo
r
ce.Donott
o
f
orrainand
m
f
ixtureispr
o
e
ar.Neverlo
nelshouldp
e
shouldbeu
r
e,checktha
t
nstalledina
s
ourceofthi
s
3
a
testversion
h
eckwww.gt
d
x
ture,areno
t
information
r
severeelec
t
o
uch.
m
oisture.
o
perlygroun
d
okdirectlyi
n
erforminsta
sedforinsta
l
t
thesource
v
ccordance
w
s
fixtureto
p
oftheprodu
d
‐lighting.co
m
t
responsibl
e
printedinth
t
ricshock.
d
ed.Onlyqu
a
n
tothelight
s
llationofthi
s
l
lation.
v
oltagematc
w
ithlocalele
c
p
reventrisk
o
ctuserman
u
m
forthelat
e
e
fordamage
s
isusermanu
a
lifiedperso
n
s
ource.
s
fixtureand
hesthefixtu
r
c
tricityregul
a
o
finjuryto
y
GTD‐
L
u
al,payingp
a
e
strevision/
u
s
,resultingf
r
al.
n
nelshould
p
onlytheori
g
r
e'srequire
m
a
tions.Don
o
y
ourretina,
w
L
M1506User
M
a
rticularatte
u
pdateofth
e
r
ommisuse
o
p
erformelec
g
inalrigging
m
ent.Everyfi
x
o
tconnecti
t
w
hichmayi
n
M
anual
ntion
e
user
of
this
trical
parts
x
ture
t
toa
n
duce

GTD‐LM1506UserManual
4
Generalguidelines
yNeveropenthisfixturewhileinuse.
yThefixtureshouldbekeptclean.DONOToperatethefixtureinextremeheatordustyenvironments.Avoidcontact
withchemicalliquid.
yThisfixtureisaprofessionallighteffectdesignedforINDOOR/DRYLOCATIONSONLYonstage,innightclubs,
theatres,etc.
yMinimumdistancetolightedobjectsmustbe3.28feet(1m).
yMaximumtempoftheexternalsurface140˚F(60˚C).
yMaximumambienttemperature113˚F(45˚C).
yMinimumdistanceofinflammablematerialsfromthesurface1.6feet(0.5m).
yLEDlampshouldbechangedifdamagedordistortedinshapeduetoextremeheat.
yCover,prismorLCDMenuFunctionDisplaywithvisibledamagessuchascracksorscratchesmustbereplacedto
ensureperformanceofthefixture.
yDisconnectthefixturefrompowerbeforechanginganypartsoraccessories.
yMakesurethattheinstallationareacanholdaminimumpointloadof10timestheweightofallinstalledfixtures,
clamps,cables,auxiliaryequipment,etc.Checkthatthecover,clampsandlocksareundamaged.Certifiedsafety
cablesmustalwaysbeusedwheninstallingthefixture.
yThefixtureisonlyintendedforinstallation,operationandmaintenancebyqualifiedprofessional.Instructions
statedinthemanualmustbecomplied.
yThefixturemustbekeptinawell‐ventilatedplaceatleast50cmawayfromanywallsurface.Checkifthefansor
ventilationopeningsareunblocked.
yBrokenordamagedcablescanonlybefixedorchangedbycertifiedtechnicians,certifiedlocaldistributorsorthe
manufacturertoensureoperationalsafety.
yDonotstickfiltersorothermaterialsontothelens.DonotmodifythefixtureorinstallotherthanGTD
manufacturedparts.
yForquestionsregardingsafetyoperation,pleasecontactourtechnicalpersonnelorcalltheservicehotline+8620
61808296.

Pa
c
Un
p
N
All
p
da
m
Pho
t
Flig
h
Ope
out
c
Car
d
Ope
the
f
Pac
1.
2.
Ac
c
N
Acc
e
c
kingand
p
acking
N
otes
p
roductsare
m
agedduring
t
ographicevi
h
t‐Case
nthecover
o
c
arefully.
d
boardbox
ntheboxa
n
f
oamfromt
h
kingafter
u
Switchofft
h
atleast15
m
Flightcase:
alongwith
upsidedow
n
Cardboard
b
othersetof
c
essories
Item
User
M
Clam
p
Powe
r
N
otes
e
ssoriesare
s
shipping
qualitycont
delivery,th
denceofthe
o
ftheflight‐
n
dtakeoutt
h
h
etop,puta
w
u
se
h
efixturean
d
m
inutesbefo
r
Wrapthefi
x
alltheacce
s
n
.
b
ox:Wrapth
packagingf
o
M
anual
p
s
r
cable
s
ubjecttoch
a
rolledandc
h
ecustomer
damagemu
s
caseandre
m
h
ewholeset
w
aytheacce
s
d
waitforat
l
r
epacking.
x
tureinplas
t
s
sories.Clos
e
efixturein
p
o
amontopt
h
Qty
1
1
1
a
ngewithout
h
eckedfora
mustnotify
s
tbeprovid
e
m
ovethepla
s
ofpackagin
g
s
sories,and
t
l
east5minu
t
t
icbags.Hol
d
e
thecover.
p
lasticbags.
P
h
encarefully
Unit
pc
set
pc
anypriorw
r
5
nyfaultsbe
f
theshipper
e
d.
s
ticpacking
g
foamwhic
h
t
hentakeou
t
t
esbeforedi
s
d
itbytheh
a
Only3layer
P
utitinthe
p
putitinside
Notes
‐
G‐clampwit
r
ittennotice.
f
oretheyar
e
andmanuf
a
b
ags.Holdt
h
h
containsb
o
t
thefixture
w
s
connectingi
a
ndles,andt
sareallowe
p
ackagingfo
a
thecardboa
r
h1/4‐turnfast
e
e
dispatched
a
cturertofil
h
ehandleso
f
o
ththefixtu
r
w
rappedint
h
tfromACpo
hencarefull
y
dwhenpili
n
a
malongwit
h
r
dbox.
e
ners,forØ42
‐
GTD‐
L
tocustomer
l
eadamage
f
thefixture
r
eanditsac
c
h
eplasticba
g
wer.Coold
o
y
placeitinsi
n
gupthefli
g
h
alltheacc
e
‐
52mm,Max.2
0
L
M1506User
M
s.Ifthefixt
u
insurance
c
firmlyandt
a
c
essories.Re
m
g
.
o
wnthefixtu
r
detheflight
g
htcases.D
o
e
ssories.Plac
e
0
0kg
M
anual
u
reis
c
laim.
a
keit
m
ove
r
efor
case
o
not
e
the

Pr
o
1
3
Ins
t
Cla
m
The
posi
t
W
Use
safe
t
De
v
1.
2.
o
ductintr
o
Lens
Base
t
allation
m
psinstall
a
fixturecan
b
t
iononthe
b
W
arning
oneclamp
w
t
ycablewhi
c
v
iceinstalla
Makesure
t
Theclamp
i
chassis.Fas
t
o
duction
a
tion
b
eplacedon
b
aseofthefi
x
w
henmounti
c
hgoesthro
u
tion
t
hereisnod
a
i
smounted
o
t
entheclam
p
2H
o
4LC
thestageo
r
x
ture.
ngthefixtu
r
u
ghthemou
n
a
mageonth
e
o
nthechas
s
p
tightly.
o
lder
DMenuFun
c
r
mountedo
n
r
e.Turnthe
s
n
tingholeon
e
clampsors
a
s
isofthefix
t
6
c
tionDisplay
n
thetrussf
a
s
crewsattac
h
thebase.D
o
a
fetycables
b
t
ure.Horizo
n
a
cinganydir
e
h
edtothecl
o
notattacht
b
eforeinstall
n
tallyinsert
t
e
ction.Attac
amptolock.
hesafetyca
b
ation.
t
heclampin
t
GTD‐
L
htheclamp
s
Alwaysrem
b
leontheha
tothemou
n
L
M1506User
M
s
tothemou
embertous
e
ndle.
n
tingholeso
M
anual
nting
e
the
fthe

Po
w
Po
w
Con
n
y
y
y
y
N
Itis
Cod
e
Co
n
The
the
c
dist
a
Con
n
fixt
u
last
the
p
Tes
t
Con
n
into
w
er/Con
t
w
erconnec
t
n
ectionmet
h
L(Live)Br
E(Earth)
Y
N(Neutra
Thevolta
g
stronglyr
e
switched
o
N
otes
essentialth
a
e
sofPractic
e
n
trolconne
c
fixturehas5
‐
c
onsoleand
f
a
nceofsigna
n
ecttheCon
u
re’sDMXIN
fixture‘sout
p
p
in2andpin
t
ing
n
ectthefixt
u
operation.
t
rolconn
e
t
ion
h
od:
ownwire
Y
ellow/Gre
e
l)Bluewire
g
eandfrequ
e
commende
d
o
n/offindiv
a
teachfixtu
e
forSafeEle
c
c
tion
‐
pinXLRcon
n
f
ixture,and
b
lcableis15
0
sole’sDMX
O
PUTandso
o
p
utconnect
a
3)asshown
u
retoACpo
w
e
ction
e
nbi‐colorwi
encyofthe
d
thateach
f
idually.
reiscorrect
l
c
tricalWork.
n
ectorsforD
b
etweenfixt
u
0
meters.Ad
d
O
UTPUTtot
h
o
n.Itisreco
m
a
DMXtermi
n
below:
w
er.Checki
f
re
powersourc
e
f
ixturearet
o
l
ygrounded
MXdatainp
u
u
resmustbe
d
itionalDMX
5
h
efirstfixtu
r
m
mendedn
o
n
ator.(Thet
e
f
theLEDla
m
7
e
mustbei
n
o
beconnect
e
andtheele
c
u
tandoutpu
madewith
2
5
12signal‐a
m
r
e’sDMXINP
o
ttoconnec
t
e
rminatoris
a
m
pisonand
t
n
compliance
e
dtothepo
c
tricalinstall
a
t(3‐pinopti
o
2
corescreen
e
m
plifierarer
e
UT,thenth
e
t
morethan
a
XLRconne
c
t
hefixtureis
withtheon
e
wersource
s
a
tionconfor
m
o
nal)assho
w
e
dDMXsign
a
e
commende
d
e
firstfixture’
32unitson
a
c
torwitha¼
independen
t
GTD‐
L
e
smarkedo
s
eparatelys
o
m
stoallrel
e
w
nbelow.Co
n
a
lcable.Ma
x
d
forlongerd
sDMXOUT
P
a
singleDM
X
Wand120
Ω
t
lycontrolla
b
L
M1506User
M
nthefixture
o
thattheyc
a
e
vantStand
a
n
nectionbet
w
x
imumconn
e
istance.
P
UTtothes
e
X
universe.O
n
resistorbet
w
b
lebeforep
u
M
anual
.Itis
a
nbe
a
rds/
w
een
e
cting
e
cond
n
the
w
een
u
tting

GTD‐LM1506UserManual
8
Controlpanel
yThecontrolpanelfeaturestouch‐sensitivebuttonsandLCDdigitaldisplayforquickandeasysetupofaddresscode
andfunctionsmenu.
yPressUPorDOWNtovieworselectthefunctionmenu.
yPressENTERtochooseafunctionandenterintocorrespondingsubmenu.Eachmenurepresentsaspecific
functionofthefixture.
yPressENTERtoselectthespecificfunctionandsavethechangesorenterintothesubmenu,thenpressUPor
DOWNtochangethevalueoftheselectedfunction(increaseordecrease).
yPressMENUtoreturntothepreviousmenuorexit.
yLEDindicators:
¾Poweron:REDpowerLEDindicatoron
¾Signalon:GreenDMXindicatoron
¾NoSignal:GreenDMXindicatoroff

GTD‐LM1506UserManual
9
Menustructure
LM1506–MenuStructure
Revision:AValidfromfirmwareversion:1.0
Level1Level2Level3Level4Info
RunsettingAddressSetting
ValueDisplay
SlaveAddress
Auto‐Program
Address:001~XXX
Pan……,All,Off
Slave1,2,3
Master/Slave
SettingtheDMXaddress
Displaythechannelvalue
Choosetheslaveaddress
Runautoprograminmasterorslave
DeviceInfoTemperatureBodyTemperatureXXX’C/’FBodytemperature
SoftwareVersionX.X Thesoftwareversion
SystemSettingStatusSettingConsoleSetAddr
NoSignalStatus
PanReverse
ScanSpeed
Mic.Sensitivity
StandbyTime
Enable/Disable
Off/Hold/Auto/Music
Enable/Disable
Quick/Middle/Low/Slow
0~99%
Disable/1~20~99Min
Addresscanbechangedbyconsole
Thestatuswhilenosignal
ScanFeedback
Changethescanspeed
Microphonesensitivity
Standbytime
FanSpeedSmartControl
HighSpeed
LowSpeed
Autofansspeed
Fanshighspeed
Fanslowspeed
DisplaySettingBacklightTime
KeyLock
1~80Min/Disable
Enable/Disable
Backlightofftime
Press<menu>3stounlock
TemperatureUnitCelsius
Fahrenheit
Temperatureunit
ValueDefaultPan……Pan=XXXThedefaultvalue
RestoreDefault Restore/Cancel Restoretodefaultvalue
ResetSystemReset
ScanReset
Systemreset
Panantiltmotorreset
ChannelAdjustTestModePan…… Everychanneltest
ManualModePan
:
Pan=XXX
:
Manualcontrol
AdjustModeInputPassword
Pan
:
Password=XXX(99)
Pan=XXX
:
Thepasswordofadjustmode
Fixedallbeginposition
ChannelSettingChannelModeStandardMode
BasicMode
ExtendedMode
CustomMode1
CustomMode2
CustomMode3
Standardchannelmode
Basicchannelmode
Extendedchannelmode
Customchannelmode1
Customchannelmode2
Customchannelmode3
SetCustomMode1
SetCustomMode2
SetCustomMode3
MaxChannel
Pan
:
Channel=XX
Pan=CH01
:
Changethechannelorder

Le
v
Au
t
N
Sett
v
el1
t
oProgram
N
otes
ingshighligh
t
Level2
SelectPro
g
ProgramE
SceneEdit
RecordSc
e
t
edinlightg
r
L
g
.
P
P
P
dit
A
:
A
S
e
ne
S
r
eyaredefa
u
L
evel3
P
rogramUnit1
P
rogramUnit2
P
rogramUnit3
A
uto‐Program
1
A
uto‐Program
1
S
ceneEdit:001
S
ceneXX‐>XX
u
ltvalues.
10
Lev
e
Pro
g
Pro
g
Pro
g
1
1
0
Run
Ste
p
Ste
p
‐250Pan,
Sce
n
Inp
u
e
l4
g
ram1~10
g
ram1~10
g
ram1~10
p
1=Scenexxx
p
8=Scenexxx
……Pan=xxx
n
eTime=xxx
u
tByConsole
Info
Choo
s
Choo
s
Choo
s
Choo
s
:
Choo
s
Editt
h
Editt
h
Gets
c
Reco
r
GTD‐
L
s
ebuild‐inpro
g
s
ebuild‐inpro
g
s
ebuild‐inpro
g
s
ethescenefo
s
ethescenefo
h
echannelDM
h
escenetime
c
eneDMXfor
m
r
dsceneform
c
L
M1506User
M
g
ramforslave
1
g
ramforslave
2
g
ramforslave
3
rprogram1
rprogram10
X
m
console
c
onsole
M
anual
1
2
3

GTD‐LM1506UserManual
11
DMXprotocol
LM1506‐DMXProtocol
Revision:BValidfromfirmwareversion:1.0
DMXmode
NameDMXvalueDMXpercentage Function
Default
DMX
Value
Standard/Extended
(33ch)
Basic
(13ch)
11Strobe/Shutter
0310.0%12.2%Closed
0(0%)
326312.5% 24.7%Open
6412725.1% 49.8%Synchronousstrobefromslowto
fast
128 15950.2% 62.4%Open
160 22362.7% 87.5%Randomstrobefromslowtofast
224 25587.8% 100.0%Open
22Intensity02550.0% 100.0%Nolight→Fulllight0(0%)
33Red102550.0% 100.0%Nolight→Fullred0(0%)
44Green102550.0% 100.0%Nolight→Fullgreen0(0%)
55Blue102550.0% 100.0%Nolight→Fullblue0(0%)
66White102550.0% 100.0%Nolight→Fullwhite0(0%)
73Red202550.0% 100.0%Nolight→Fullred0(0%)
84Green202550.0% 100.0%Nolight→Fullgreen0(0%)
95Blue202550.0% 100.0%Nolight→Fullblue0(0%)
106White202550.0% 100.0%Nolight→Fullwhite0(0%)
113Red302550.0% 100.0%Nolight→Fullred0(0%)
124Green302550.0% 100.0%Nolight→Fullgreen0(0%)
135Blue302550.0% 100.0%Nolight→Fullblue0(0%)
146White302550.0% 100.0%Nolight→Fullwhite0(0%)
153Red402550.0% 100.0%Nolight→Fullred0(0%)
164Green402550.0% 100.0%Nolight→Fullgreen0(0%)
175Blue402550.0% 100.0%Nolight→Fullblue0(0%)
186White402550.0% 100.0%Nolight→Fullwhite0(0%)
193Red502550.0% 100.0%Nolight→Fullred0(0%)
204Green502550.0% 100.0%Nolight→Fullgreen0(0%)
215Blue502550.0% 100.0%Nolight→Fullblue0(0%)
226White502550.0% 100.0%Nolight→Fullwhite0(0%)
233Red602550.0% 100.0%Nolight→Fullred0(0%)
244Green602550.0% 100.0%Nolight→Fullgreen0(0%)
255Blue602550.0% 100.0%Nolight→Fullblue0(0%)
266White602550.0% 100.0%Nolight→Fullwhite0(0%)

St
N
Do
n
DMX
m
andard/Exte
n
(33ch)
27
28
29
30
31
32
33
N
otes
n
otswitchof
f
m
ode
n
dedBasic
(13ch)
7
8
9
10
11
12
13
f
thefixture
w
Name
Panrotati
Pan
Tiltrotati
o
Tilt
Specialcon
t
w
ithinthefir
s
DMX
on
0
128
188
196
0
0
o
n
0
128
188
196
0
0
t
rols
0
10
60
70
120
130
140
150
160
170
180
190
200
210
220
s
tminuteaft
12
valueDM
1270.0
%
18750.
2
19573.
7
25576.
9
2550.0
%
65535 0.0
%
1270.0
%
18750.
2
19573.
7
25576.
9
2550.0
%
65535 0.0
%
90.0
%
593.9
%
6923.
5
11927.
5
12947.
1
13951.
0
14954.
9
15958.
8
16962.
7
17966.
7
18970.
6
19974.
5
20978.
4
21982.
4
25586.
3
erswitching
Xpercentage
%
49.8%
2
%73.3%
7
%76.5%
9
%100.0%
%
100.0%
%
100.0%
%
49.8%
2
%73.3%
7
%76.5%
9
%100.0%
%
100.0%
%
100.0%
%
3.5%
%
23.1%
5
%27.1%
5
%46.7%
1
%50.6%
0
%54.5%
9
%58.4%
8
%62.4%
7
%66.3%
7
%70.2%
6
%74.1%
5
%78.0%
4
%82.0%
4
%85.9%
3
%100.0%
on.Waitfor
Function
Nofunction
Pancontino
u
slowtofast
Stop
Pancontino
u
slowtofast
Pan
Pan,fine(LS
Nofunction
Tiltcontino
u
slowtofast
Stop
Tiltcontin
o
fromslowt
o
Tilt
Tilt,fine(LS
B
Nofunction
Reserved
Resetallmo
t
Nofunction
Built‐inprog
Built‐inprog
Built‐inprog
Built‐inprog
Built‐inprog
Built‐inprog
Built‐inprog
Built‐inprog
Built‐inprog
Built‐inprog
Reserved
atleast5mi
n
GTD‐
L
u
srotationCW
u
srotationCC
W
B)
u
srotationCW
f
o
usrotationC
C
o
fast
B
)
t
orafter5sec
o
ram1
ram2
ram3
ram4
ram5
ram6
ram7
ram8
ram9
ram10
n
utestoswit
c
L
M1506User
M
Def
a
D
M
Val
u
0(0
%
from
W
from
0(0
%
0(0
%
f
rom
C
W
0(0
%
0(0
%
o
nds
c
honthefix
t
M
anual
a
ult
M
X
u
e
%
)
%
)
%
)
%
)
%
)
t
ure.

GTD‐LM1506UserManual
13
Technicalspecification
Optical
yLightsource:15W(RGBW4‐in‐1),quantity:6pcs
yExpectedaveragelifetime:50000hours
yBeamangle(fixed):4°(50%peakangle),7°(10%peakangle)
Photometric
yTotalOutput(Lumen):1900lumens
Electrical
yPowerinput,nominal:AC100‐240V,50/60Hz
yMax.Powerconsumption:149W,maxcurrent:1.5A,PF≥0.9
yPowersupplyunit:Auto‐rangingelectronicSMPS
yMainfuse:250V/3.15A
Controlandprogramming
yControlchannels(DMX):33/13/33
yProtocol:DMX‐512
yDisplay:GraphicLCDbacklit
y16‐bitcontrol:Dimmer,pan/tilt
Physical/Installation
yWeight:6kg(13.2lbs.)
yIPrating:IP20
yMaterial:Aluminum,steel,plastic
yMountingpoints:Twoquarter‐turnlockingpoints+attachmentpointsforsafetywire
yMinimumdistancetocombustiblematerials:1.64ft.(0.5m)
yMinimumdistancetoilluminatedsurfaces:3.28ft.(1m)
Dynamiceffects
yPan/Tiltmovement:Continuousrotationonpan/tilt
yStrobe:1‐25Hz,synchronized,pulseeffects
yDimmer:0‐100%,16‐bit,electroniclineardimming
Thermal
yOperatingrange:14˚Fto113˚F(‐10˚Cto+45˚C)
yStartuprange:5˚Fto113˚F(‐15˚Cto+45˚C)
yStoragerange:‐40˚Fto140˚F(‐40˚Cto+60˚C)
yCooling:Activefan
yHumidity:≤85%

GTD‐LM1506UserManual
14
Connections
yACpower:NeutrikpowerCon
yDMXdatainput/output:Chassis5‐pinNeutrikXLR(in/out)
CertificationandSafety
yEMC:EN55103‐1:2009,EN55103‐2:2009,EN61000‐3‐2:2006+A2:2009,EN61000‐3‐3:2013
ySafety:EN60598‐2‐17:1989/A2:1991
Photometric

Cle
Itis
ont
GTD
N
Da
m
W
Disc
tou
org
a
y
y
y
y
y
aningan
d
requiredtha
t
heworking
e
Lighting.
N
otes
m
ageresulte
d
W
arning
onnectthefi
seasoftcl
o
a
nicsolvents
Ifthelens
IftheLED
Iftheligh
shouldbe
Iffixture
specificat
i
Thefixtur
thishapp
e
areopera
fixtureag
a
d
mainte
n
t
thefixture
s
e
nvironment
d
fromdust,
s
xturefrom
A
o
thtoclean
t
uchasalcoh
o
iscrackedo
r
lampbecom
tfromtheL
changedat
o
doesnotfu
n
i
onifitisblo
w
eisequippe
d
e
ns,pleasec
tional.Ifno
t
a
in.Anymai
n
n
ance
s
houldbeke
andproper
o
s
moke,oilor
A
Cpower,an
d
t
heopticalc
o
ltocleanth
r
otherwise
d
esdamaged
EDlampap
p
o
nce.AgedL
E
n
ction,chec
k
w
n.
d
withther
m
heckthatth
e
t
,callaquali
f
n
tenancewo
r
ptcleanand
o
peration.S
h
improperus
e
d
letitcool
d
omponents,
ereflector
m
d
amaged,re
p
ordeformed
p
earsdim,th
E
Dlampsru
n
k
thefuseo
m
al‐protectio
n
e
fansaren
o
f
iedtechnici
a
r
kshouldonl
15
wellmaintai
h
ouldyouha
v
e
isnotcove
r
d
ownforatl
e
andbecare
m
irror,dichro
i
p
laceitimme
inanywayi
t
isnormallyi
n
totheextre
nthepowe
r
n
devicetha
t
o
tblocked,a
n
a
n.Troubles
h
ybecarried
o
nedtoensu
r
v
eanyquest
i
r
edbywarra
n
e
ast15minu
t
ful,asthec
o
i
ccolorfilter
s
diately.
t
mustbere
p
ndicatestha
t
mityoftheir
r
socketof
t
t
willswitch
o
n
dcleanthe
m
h
ootandco
r
o
utbyqualif
i
r
eitsreliabili
t
i
ons,please
c
n
ty.
t
esbeforeo
p
o
atingisea
s
s
orhousing
o
p
laced.
t
itisreachi
n
lifemighte
x
t
hefixture.
R
o
fftheLEDl
m
iftheyare
r
rectthepro
i
edtechnicia
GTD‐
L
t
y.Itslifespa
c
onsultatec
h
p
eningtheh
o
s
ilyscratche
d
o
fthefixtur
e
n
gtheendo
f
x
plode.
R
eplacethe
f
ampincase
dirty.Check
blembefore
ns.
L
M1506User
M
nmainlyde
p
h
nicalengin
e
o
using.Mak
e
d
.Donotus
e
e
.
f
itslifespa
n
f
useofthe
s
ofoverheati
whetherth
e
switchingo
n
M
anual
p
ends
e
erof
e
sure
e
any
n
and
s
ame
ng.If
e
fans
n
the

GTD‐LM1506UserManual
16
Troubleshooting
ProblemPossibleCauseSuggestedCorrection
Noresponse
afterconnected
toA/Cpower
Powerswitchnotturnedon.Turnonpowerswitch.
Takeoutthefuseandcheckifitisblown. Locatetheblownfuse.Removethebrokenfuse.Inserta
replacementfuseofthecorrectamperage.
AbnormalA/Cinput(A/Cpowersocket,
powercables,luminairepowersocket).
ReplaceACpowersocketandpowercables,andthenadjustpower
socketforproperconnection.
NoDCvoltagefromswitchingpower
supply.
CheckiftheswitchingpowersupplyhasDCvoltageoutput.Replace
theswitchingpowersupply.
Noresponseor
wrongresponse
tothe
commandsof
thecontrol
system
DMXcablesdisconnectedfromfixture’s
DATAINconnector.ConnectDMXcabletothefixture’sDATAINconnector.
Opencircuitorshortcircuitfaultinthe
DMXcables.ReplaceDMXcablesasrequired.
WrongDMXaddressforthefixtureinthe
controlsystem.
Ensuretheaddressin“Runsetting>AddressSetting>Address”of
thefixtureisconsistentwiththeaddressinthecontrolsystem.
Misusein“Channelsetting>Channel
Mode”ofthefixture.
Choosethechannelmodein“Channelsetting>ChannelMode”of
thefixtureasrequiredbytheuser.
MalfunctioningofDMXcannoninput
/outputconnectors.Noinput/output
voltagetothemaincontrolboardofthe
fixture.
TroubleshootingtheDMXXLRsignalplateofthefixture,replacethe
maincontrolboardofthefixture.
LEDlampoff
Thereisnosignaloutputtothemain
controlboardPWM.Replacethemaincontrolboardorrepair.
NooutputtothedriveboardLED+/LED‐
ordriveboardover‐current,checkline
connectorifcontactbad.
Reconnecttheterminal,replacethedriverboard
NormalendofLEDlamplife,badwelding
orpoorheatdispersion.
RepairorreplaceLEDlightsourceorreplacethewholepieceof
aluminumboard,removethecoolingsystemfailure.
Decreased
brightness,
unevenpattern
projections
LEDlampaging,checktheservicetimeof
LEDlightsource,testLEDdriveboard’s
current.
ReplacetheLEDlightsourceoradjustthedriveboard’scurrent.
ReduceLED’sbrightness.
Excessivedustsorsmudgesontheeffect
assembly,focusmoduleandobjective
lens.
Followtheinstructionsstatedinthisusermanualtocleantheeffect
assembly,focusmoduleandobjectivelens.
Damagedordeformedeffectassembly,
focusmoduleorobjectivelens.
Replacethedamagedordeformedcomponents.

GTD‐LM1506UserManual
17
Systemwiringdiagram
PIN1
P.TIL1
TIL1 P.PIN1
JE
JE0
M.TIL
P.PIN
pan motor tilt motor
SLS0001C
SLS0001C
SMS0004A
JD
JD
J1
SMS0004A
J1
SCR0015D
VIN
JE1
JEB
JEC
LCR2005B
JEC JEB JEA
SCB0201A
JEC JEB
JEA
SCB0201A
JEA
LJB2003C
VIN P3 P4
VIN P3 P4
LJB2003C
LED1 LED2 LED3
LED1 LED2 LED3
12V fan
GTD-LM1506
DMX Kalong Signal Board
Fuse
Power line
SKL0006B
N
switching
power supply
EDS160-1228P
L
N
G
L
G
DC2 12V
GND
DC1 28V
J7
SDI2002B
VIN
FAN
JP11
J10
JF2
JE1
J20
P1 P2
P3
P1
P1

GTD‐LM1506UserManual
18
Sparepartslist
ItemP/NQty Notes
Displayboard 5809210034B1LM1506‐101E20SDI2002D
Scanningboard5809210211B1LM1506‐201B20SCR2005A
Driveboard5809210512B1LM1506‐301I20LCR2005C
Aluminumsubstrate5802010028A1LJB2003C
SwitchingPowerSupply1412050027A1EDS160‐1228P
Appendix1

GTD‐LM1506UserManual
19
Notes:
P/N:1502011058A
Time:March13th,2017
Table of contents
Other GTD Dj Equipment manuals