Guide Gear TS305 User manual

1 of 15
Congratulations on your Guide Gear® purchase.
Take your game to the next level with field-tested Guide Gear® products for a
confident, competitive edge that strikes the perfect balance between performance and value.
INSTRUCTION MANUAL FOR THE SAFE ASSEMBLY AND USE OF YOUR
4x4 6' TRIPOD TOWER & BLIND
(Manufacturer Item # TS305 / Sportsman’s Guide Item # 718070)
sportsmansguide.com
WARNING
Instructions (written and video) should be kept in a safe
place and reviewed at least annually. It is the
responsibility of the treestand owner to furnish the
complete instructions to any person that uses, borrows
or purchases the treestand.
Before beginning assembly, check your purchase
for damaged or missing parts. Do not use if you
identify damaged or missing parts. For help with
damaged or missing parts, call toll free at 844-688-0690
For all other issues, please contact Sportsman’s Guide customer
service at 1-800-888-3006
Mon.-Fri. 7:00am to 9:00pm, Sat.-Sun. 8:00am to 8:00pm CST or
go to sportsmansguide.com/customerservice/contactus
P/N: OMTS305
REV3: 04/30/2020
© 2020 SOG
All Rights Reserved
2 of 15
WEIGHT LIMIT
Weight Limits: 500lbs for two people (Includes hunter’s weight PLUS weight of all gear)
Weight Limits: 300lbs for one person (Max Weight limit for 1 person occupancy only!!, Includes hunter’s
weight PLUS weight of all gear)
DO NOT EXCEED MAXIMUM WEIGHT CAPACITY OF 500LBS !
THIS TREESTAND IS INTENDED FOR NO MORE THAN TWO PERSON USE ONLY!!
PARTS LIST
3 of 15

4 of 15
ILLUSTRATED PARTS BREAKDOWN
All images are representations. All fabric, paint and accessories are subject to change at
any time. Net weights of the products are approximate.
5 of 15
TOOLS REQUIREMENT
Tools needed: two 1/2” wrenches
IMPORTANT ASSEMBLY TIP: Do not tighten any nut and bolt combinations completely until all parts are
assembled together! Finger tighten plus one turn of a wrench only! This will temporarily hold the lock nut on the
bolt while helping align all parts! After all parts are assembled together, all nut & bolt combinations can be
completely tightened
ASSEMBLY INSTRUCTIONS
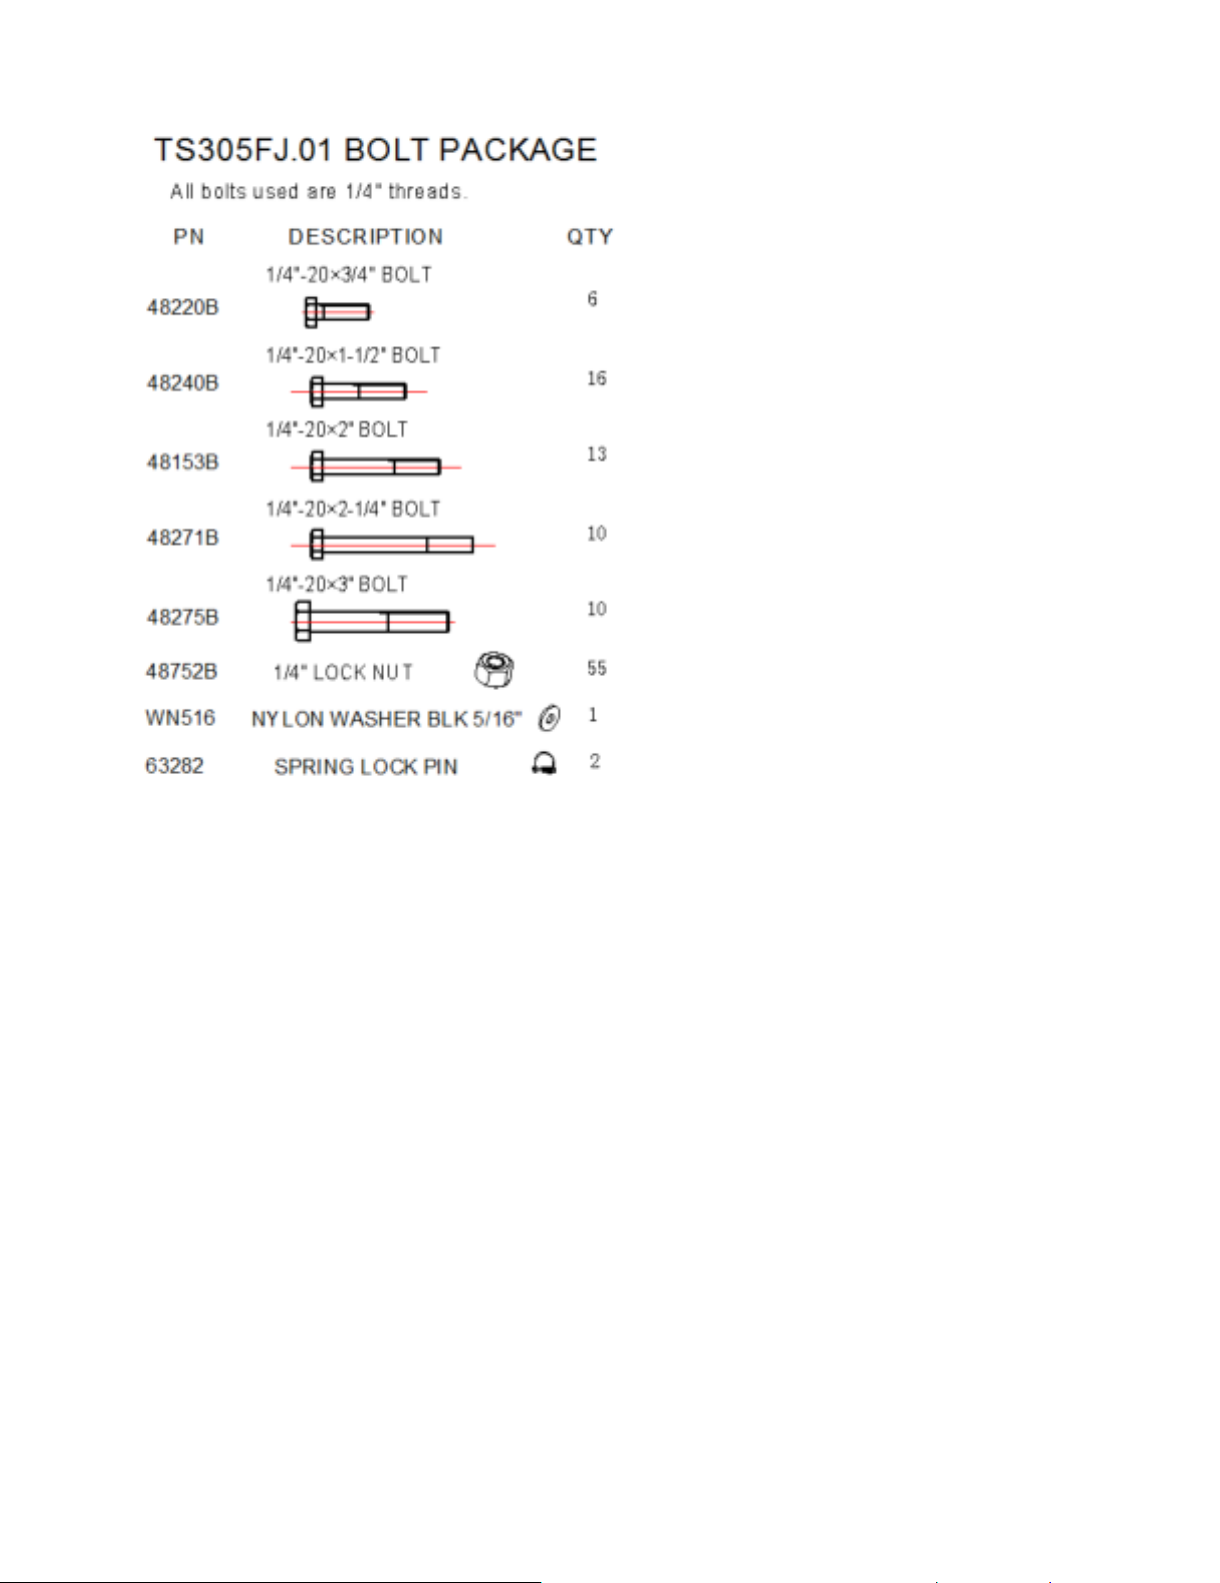
Step 1:Assemble the platform one (TS305.05) to the platform two (TS305.10) by using two 1/4"-20×2-1/4"
bolts (48271B) and two 1/4" lock nuts (48752B). The expanded metal should face up. Leave these hand tight for
now ( Figure 1).
Step 2:Attach the two platform braces (TS305.18) to the assembled platform by using eight 1/4"-20×3" bolts
(48275B) and eight 1/4" lock nuts (48752B). Please kindly noted the position of the platform braces need to
same as figure 2. Leave these hand tight for now (Figure 2).
Figure 1 Figure 2
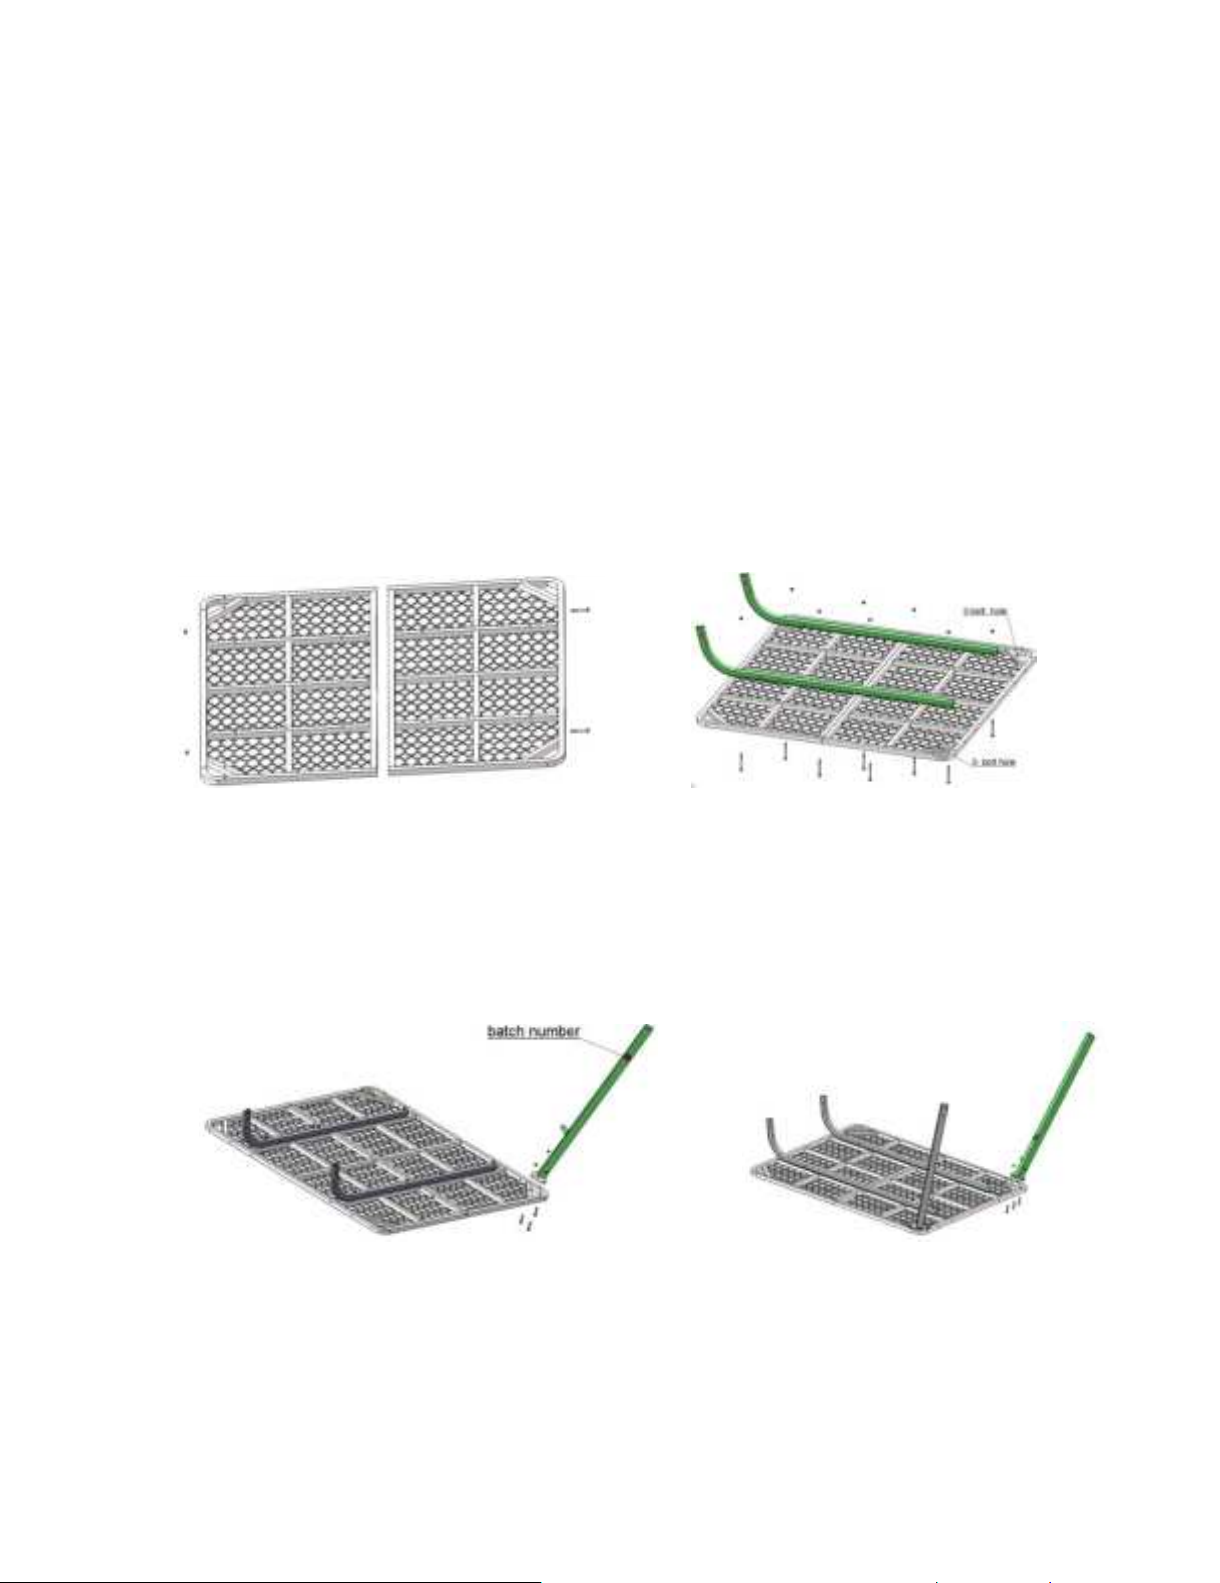
Step 3: Attach the right upper leg (TS305.21) to the platform by using three 1/4"-20 × 1-1/2" bolts (48240B) and
three 1/4" lock nuts (48752B). The right upper leg (TS305.21) has the batch number . Leave these hand tight
for now (Figure 3).
Step 4:Attach the left upper leg (TS305.09) to the platform by using three 1/4"-20 × 1-1/2" bolts (48240B) and
three 1/4" lock nuts (48752B). Leave these hand tight for now ( Figure 4).
Figure 3 Figure 4

6 of 15
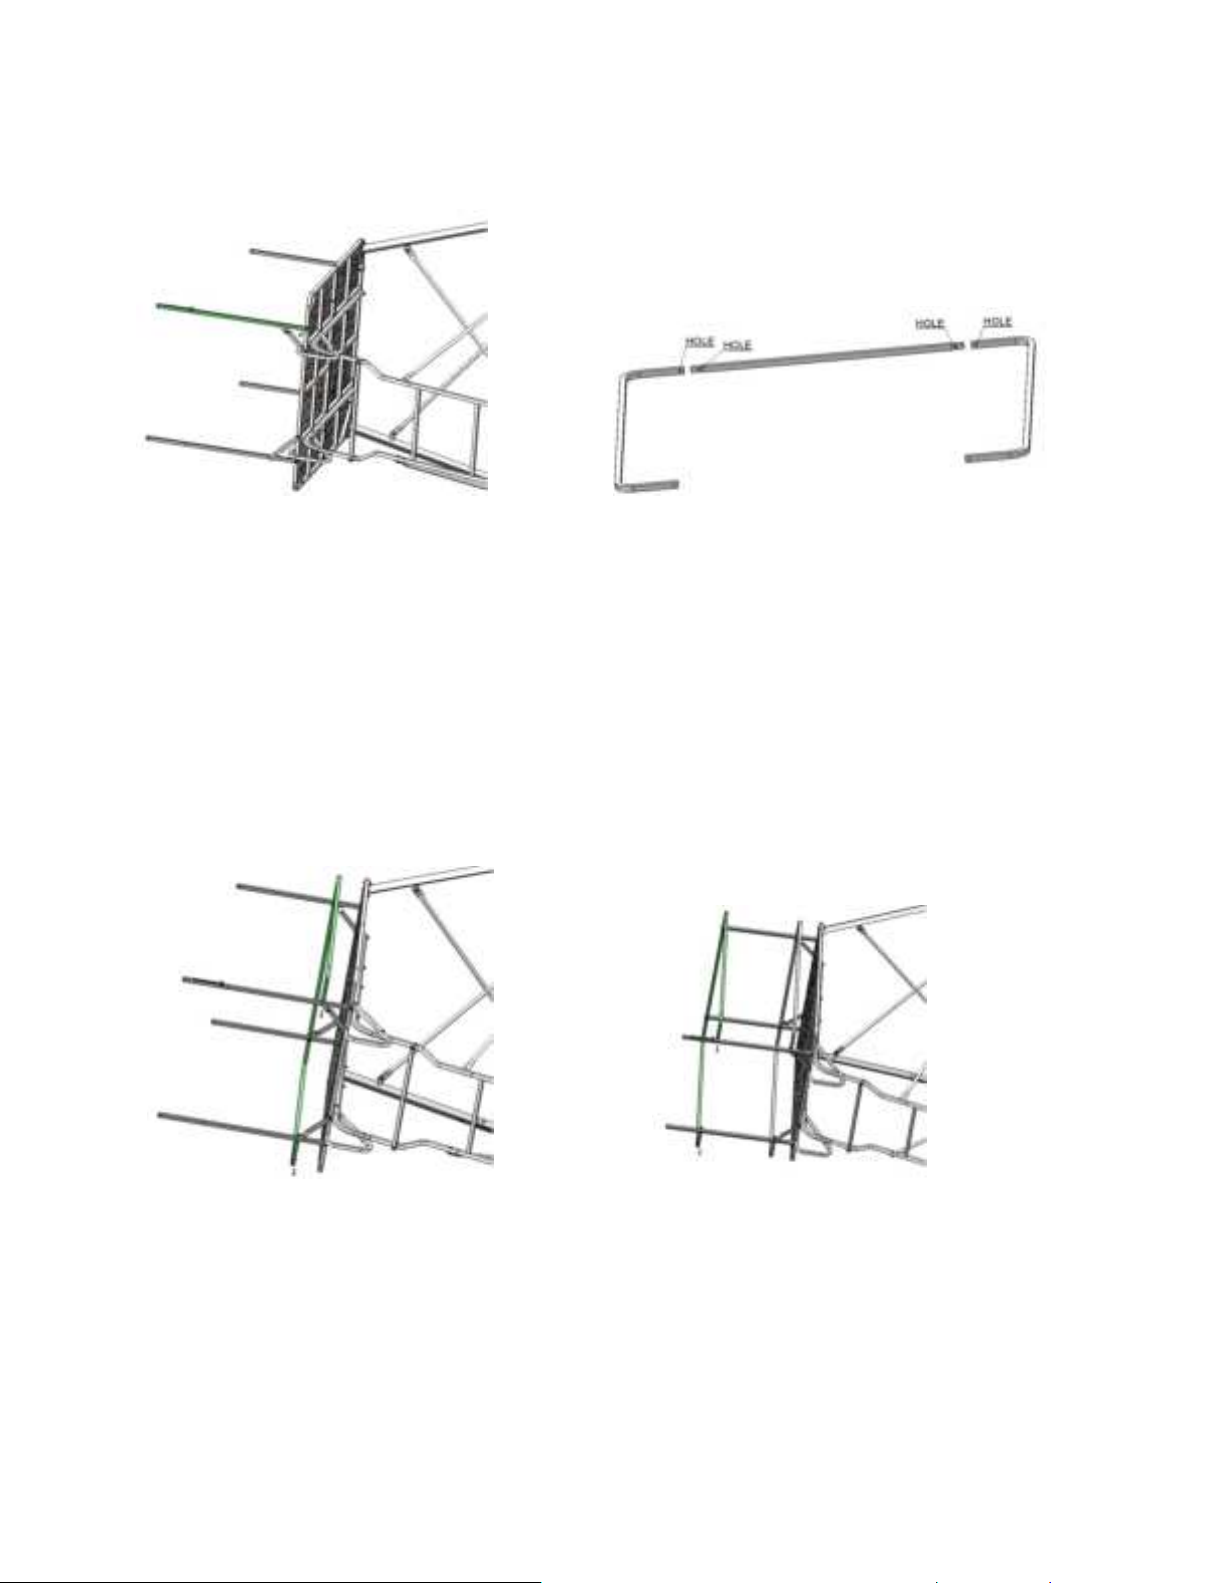
Step 5: Assemble the lower leg (TS305.28) and the attachment bracket brace (TS305.08) to the right upper leg
(TS305.21) by using two 1/4"-20×2-1/4" bolts (48271B) and two 1/4" lock nuts(48752B). Leave these hand tight
for now (Figure 5).
Step 6: Assemble the lower leg (TS305.28) and the attachment bracket brace (TS305.08) to the left upper leg
(TS305.09) by using two 1/4"-20×2-1/4" bolts (48271B) and two 1/4" lock nuts(48752B).Leave these hand tight
for now (Figure 6).
Figure 5 Figure 6
Step 7: Insert the two ladder extension tubes (TS305.20) into the two platform braces (TS305.18). (Figure 7).
Step 8: Attach the ladder step (TS305.19) to the two ladder extension tubes (TS305.20) by using two 1/4"-20×3"
bolts (48275B) and two 1/4" lock nuts(48752B). Leave these hand tight for now (Figure 8).
Figure 7 Figure 8
Step 9: Insert the ladder section (TS305.02)into the two ladder extension tubes (TS305.20). (Figure 9).
Step 10: Attach the two ladder hand rails (TS305.17) to the outside of two platform braces (TS305.18) by using
four 1/4"-20×2" bolts (48153B) and two 1/4" lock nuts (48752B). Leave these hand tight for now (Figure 10 ).
Figure 9 Figure 10

7 of 15
Step 11: Insert the one lower cross brace(TS305.04) into the one upper cross brace(TS305.03) by using one
1/4"-20×1-1/2" bolt (48240B) and one 1/4" lock nut(48752B). Repeat this step for other three cross braces.
Leave these hand tight for now (Figure 11).
Figure 11
Step 12: Attach the four cross braces to the ladder section (TS305.02) and the leg by using two 1/4"-20×1-1/2"
bolts (48240B), six 1/4"-20×3/4" bolts (48220B) and eight 1/4" lock nuts(48752B). Leave these hand tight for
now (Figure 12).
Figure 12
Step 13: Attach the four flat iron supports (TS305.14) to the platform by using four 1/4"-20×1-1/2" bolts (48240B)
and four 1/4" lock nuts (48752B). Leave these hand tight for now (Figure 13 & 14).
Figure 13 Figure 14
Step 14: Attach the two platform vertical rails (TS305.11) to the platform by using two 1/4"-20×2" bolts (48153B)
and two 1/4" lock nuts (48752B). Leave these hand tight for now (Figure 15).
Step 15: Attach the door upright rail (TS305.16) to the platform by using one 1/4"-20×2" bolt (48153B) and one
1/4" lock nut (48752B). Leave these hand tight for now. (Figure 16)
Figure 15 Figure 16
8 of 15
Step 16:Attach the door upright left rail (TS305.22) to the platform by using one 1/4"-20×2" bolt (48153B) and
one 1/4" lock nut(48752B). Leave these hand tight for now. (Figure 17)
Step 17:Insert one shooting rail bar(TS305.13) into the two shooting rail connectors (TS305.12). Repeat this
step for the other shooting rail. Leave these hand tight for now. (Figure 18)
Figure 17 Figure 18
Step 18:Attach the assembled shooting rail to the two platform vertical rails (TS305.11),the door upright rail
(TS305.16) and the door upright left rail (TS305.22) by using four 1/4"-20×2-1/4" bolts (48271B) and four 1/4"
lock nuts (48752B). Leave these hand tight for now. (Figure 19)
Step 19:Attach the assembled shooting rail to the two platform vertical rails (TS305.11),the door upright rail
(TS305.16) and the door upright left rail (TS305.22) by using four 1/4"-20×2" bolts (48153B) and four 1/4" lock
nuts(48752B). Leave these hand tight for now. (Figure 20)
Figure 19 Figure 20

9 of 15
Step 20:Attach the door crossbar(TS305.15) to the door upright rail (TS305.16) by using one 1/4"-20×2" bolt
(48153B), one nylon washer blk 5/16" and one 1/4" lock nut (48752B). Leave these hand tight for now.(Figure
21)
Step 21:Attach the door crossbar (TS305.15) to the door upright left rail(TS305.22) by using one spring lock pin
(63282). (Figure 22)
Figure 21 Figure 22
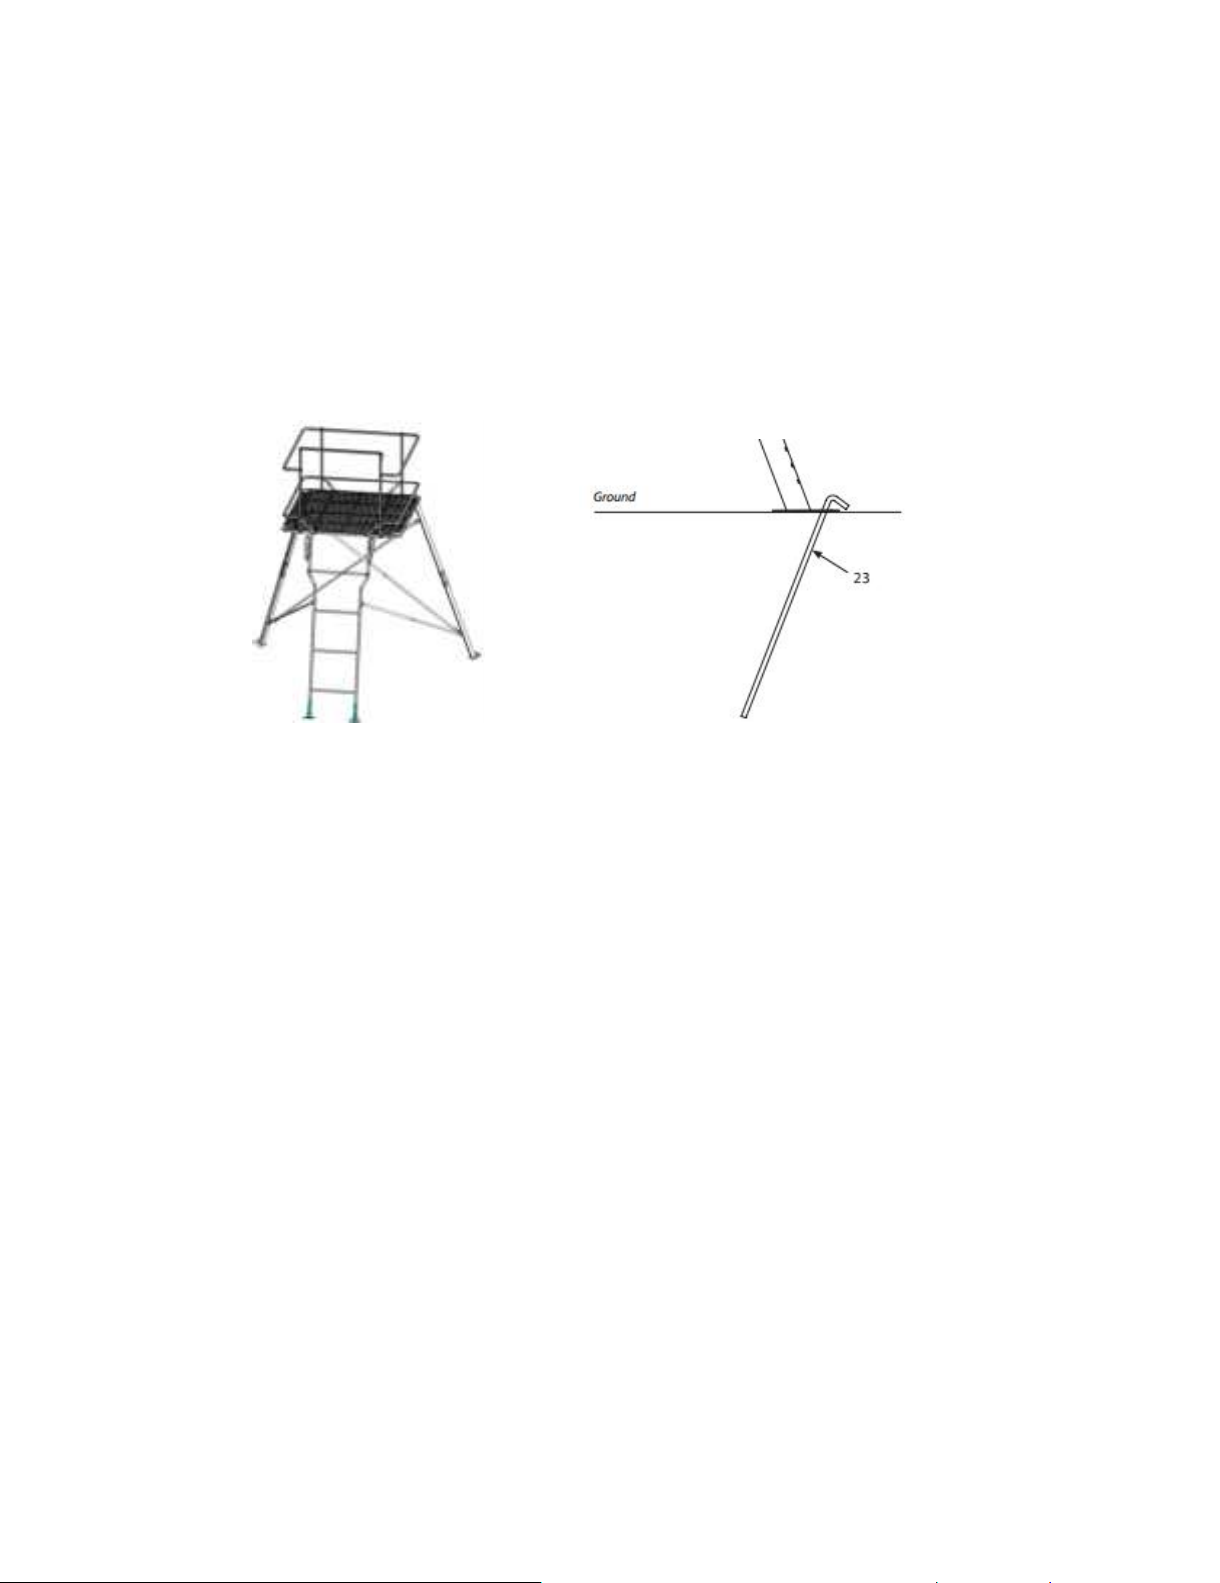
Step 22:Attach the two ladder feet (TS305.01) to the ladder section (TS305.02) by using two two spring lock
pins (63281). (Figure 23)
Figure 23
Step 23:You may now tighten all nut & bolt assemblies. Be sure not to over tighten as this could cause the
tubing to be crushed or damaged!
NOTE: Please recheck all nuts/bolts/pins to ensure all are tightened and installed correctly.
10 of 15
SETUP INSTRUCTIONS
Step 1: Find a suitable area to set up the Tripod. Ensure the ground is firm and level. Sloping ground or uneven
surfaces will cause instability. This instability could cause the tripod to tilt or shift as you ascend or descend the
ladder.
Step 2: Lay the assembled unit on its side, rungs facing up, with the foot platform resting on a box or table
capable of holding the weight of the unit. This will prevent excess stress on the leg sections and cross braces.
Step 3: Have four (4) able adults help with standing the Tripod up. Position one holding the ladder section. Have
two more on each leg column and have the final helper at the platform.Slowly walk the Tripod into position.
Ensure the platform is level (Figure 25)
Step 4: Insert the ground stakes into each leg section as shown in (Figure 26)
Figure 25 Figure 26
Step 5: Put the blind on the platform, remove the blind from the carry bag
Step 6: Grasp the webbing loop sewn onto the eyelet located in the center of the roof panel and pull outward
until the top section pops open.
Step 7: Locate webbing handles on side walls and begin to engage each hub by pulling firmly on the webbing
handles.
Step 8: When all three sidewall hubs are engaged, put the blind to the outside of the platform shooting rail.
Step 9: After attaching all velcro to the shooting rail and platform, the tower/blind is ready for use.
Step 10: Reverse setup & use instructions to take tower/blind down
This manual suits for next models
1
Table of contents
Popular Camera Accessories manuals by other brands

Viltrox
Viltrox EF-NEX Mount instructions

Calumet
Calumet 7100 Series CK7114 operating instructions

Ropox
Ropox 4Single Series User manual and installation instructions

Cambo
Cambo Wide DS Digital Series Main operating instructions

Samsung
Samsung SHG-120 Specification sheet

Ryobi
Ryobi BPL-1820 Owner's operating manual


