OPERATING THE CONSOLE
1.DISPLAY AND KEY FUNCTION:
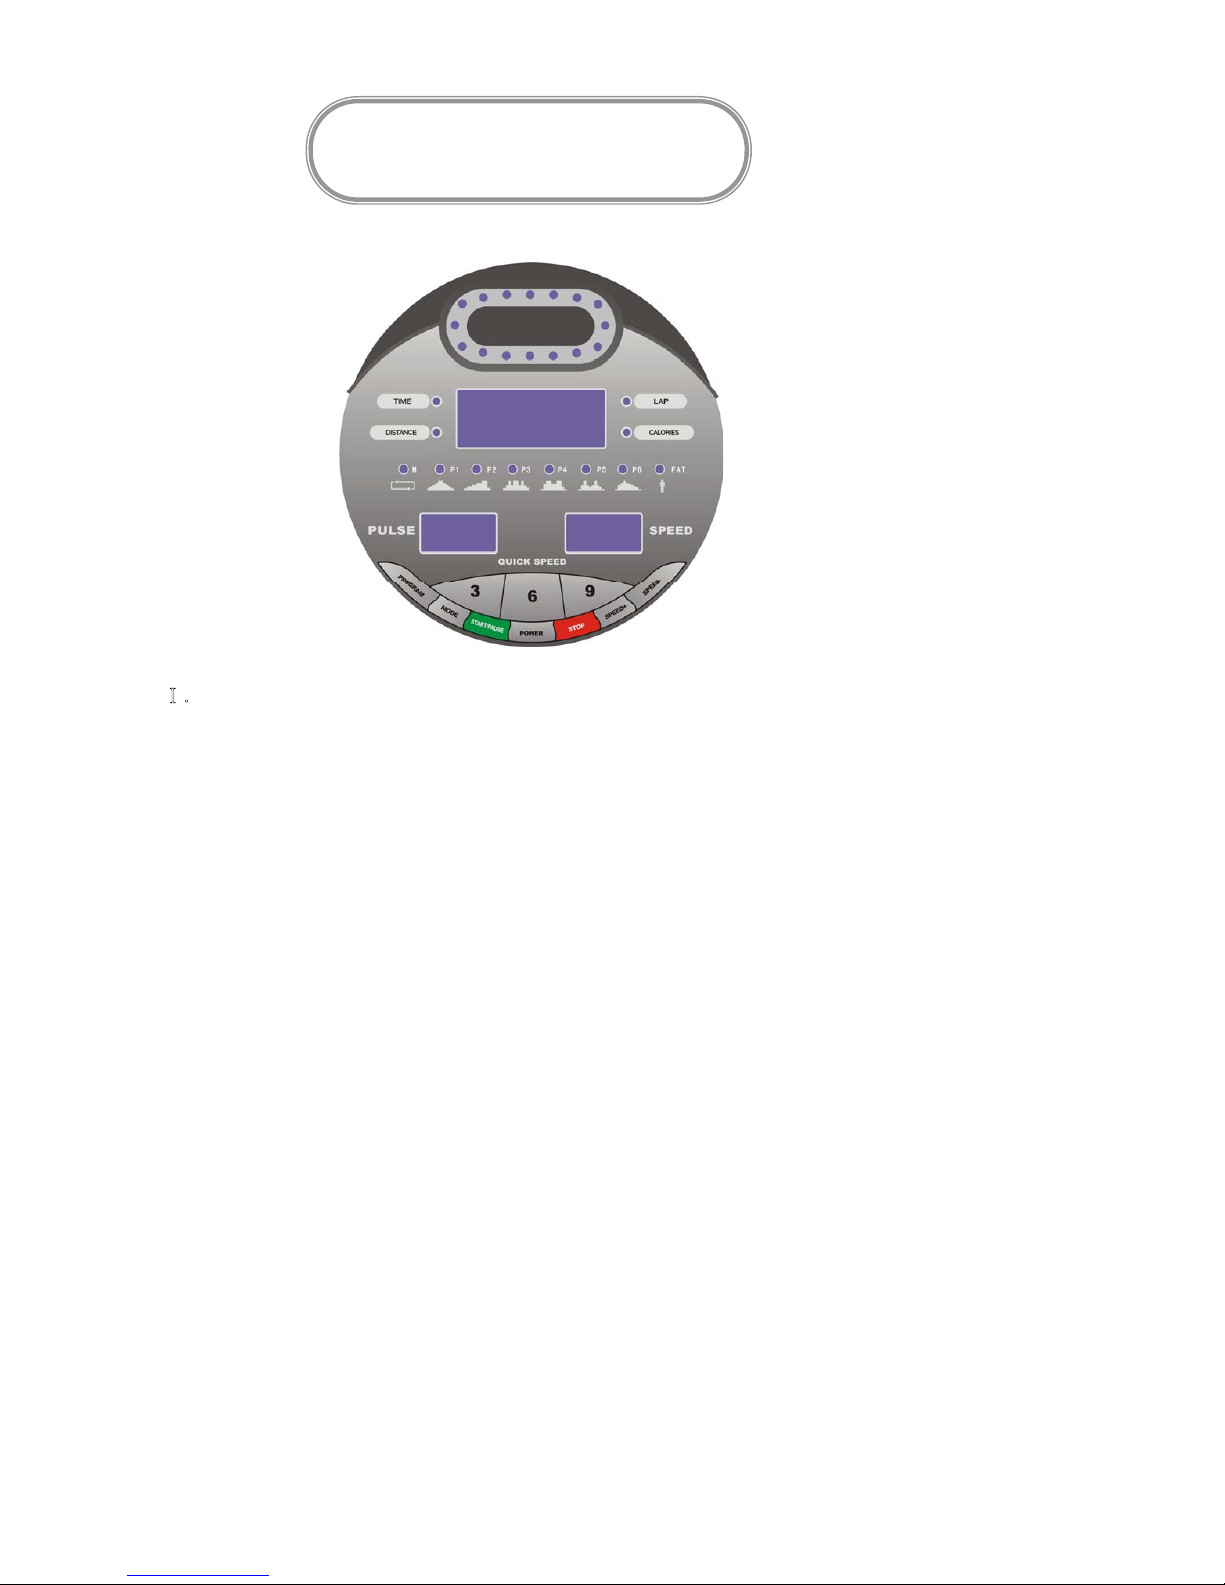
ĉˊInstructions about the console window
1.Display windows :three Windows and a runway light:
A: The left side window display: Heart range data.
B: The right side window display: Speed range data.
C: In the center the window display: Time , distance, calories, runway. When show a certain data
correspond of LED light would be flicker. Press the mode key to choose to fixed or time-sharing way to
show the data, when display time-sharing , the light will flicker in the windows.
D: Top side is 16 LED of simulation drill ground, each circuit is:400 meter.
E: In the center the window: handle normal modeˉ> handle countdown modeˉ> handle countdown
distance modeˉ>handle countdown calorie mode> P6-> handle normal modeˉ>
The light of the window will be flicker when you choose that window.
2.Fuction key:Program, mode, power supply, start/pause, speed +, speed –
Speed Key: 3,6,9
A:Āprogram ākey˖when the machine stops, press the “program” key can enter the circle choosing
program: handle normal modeˉ> handle countdown modeˉ> handle countdown distance modeˉ
>handle countdown calorie mode>P1- ->P2->P3->P4->P5->P6-> handle normal modeˉ>- - -/DŽ
B˖Āmodeākey˖press the key can enter the circle choosing program of the middle window. fixed show
timeˉ> fixed show calorieˉ>
C˖Āstart/pause ākey˖when press this keyˈthe motor can start the motor can pause when press this
key in the process of motor moving. in the state of pause, all the date keep unchanged, the speed
window show PAU .
D˖Āstopākey: press this key the motor will stop working ˈall the data turn 0 and then enter into handle
mode.
E˖Āpowerākey˖you can put on or off the power of the console at any state.
F˖”+” “-“ key:adjust sped in the running status and adjust parameter in the stop status.
G:Āquick speedākeyΨĀ3.6.9āDŽquick key of adjust the speed.
Owner’s Manual 10
CÓMO UTILIZAR LA CONSOLA
1.Funciones de la pantalla y de los botones
I.Instrucciones acerca de la pantalla de la consola.
1.Pantallas: tres ventanas y luz corrediza
A.Ventana de la pantalla izquierda: Información del ritmo cardiaco.
B.Ventana de la pantalla derecha: Información del ritmo de velocidad.
C.Ventana de la pantalla central: tiempo, distancia, calorías, correr. Cuando se muestra
información de alguna de las categorías, la luz correspondiente es intermitente. Pre-
sione el botón MODE para seleccionar la categoría y mostrar la información de manera
ja o de forma compartida. Cuando se muestra compartida, la luz será intermitente en
las ventanas.
D.La parte superior de la pantalla es un simulador de una pista de ejercicios. Cada
circuito es de 400 metros.
E.En la parte central de la ventana: opción normal > opción de conteo regresivo> opción
de conteo regresivo de distancia > opción de conteo regresivo de calorías > P6 > opción
normal
La luz de la pantalla será intermitente al seleccionar esa ventana.
2.Botones de funciones: programa, opción, fuente de energía, iniciar/pausa, velocidad
+, velocidad -, botón de velocidad: 3,6,9
A.Botón “program”: cuando se detenga el equipo, presione el botón “progama” para
ingresar a las opciones de programa: opción normal > opción de conteo regresivo >
opción de conteo regresivo de distancia > opción de conteo regresivo de calorías > P1
>P2 > P3 > P4 > P5 > P6 > opción normal
B.Botón “mode”: presione este botón para ingresar a las opciones en la ventana central:
mostrar tiempo de manera ja > mostrar calorías de manera ja.
C.Botón “start/pause”: cuando se presiona este botón, el motor se enciende y se puede
poner en pausa durante mientras el motor se encuentre en movimiento; toda la infor-
mación se mantendrá intacta y la ventana de velocidad mostrará la palabra PAU.
D.Botón “stop”: presione este botón para detener el funcionamiento del motor. Toda la
información se revertirá a 0 y el equipo quedará en la opción normal.
E.Botón “power”: con este botón se puede encender o apagar la consola en cualquier
momento.
F.Botón “+” y “-“: con este botón se puede regular velocidad para correr y regular los
parámetros mientras el equipo se encuentre detenido.
G.Botón “quick speed 3,6,9”: con este botón se puede regular la velocidad de manera
rápida.
OPERATING THE CONSOLE
1.DISPLAY AND KEY FUNCTION:
ĉˊInstructions about the console window
1.Display windows :three Windows and a runway light:
A: The left side window display: Heart range data.
B: The right side window display: Speed range data.
C: In the center the window display: Time , distance, calories, runway. When show a certain data
correspond of LED light would be flicker. Press the mode key to choose to fixed or time-sharing way to
show the data, when display time-sharing , the light will flicker in the windows.
D: Top side is 16 LED of simulation drill ground, each circuit is:400 meter.
E: In the center the window: handle normal modeˉ> handle countdown modeˉ> handle countdown
distance modeˉ>handle countdown calorie mode> P6-> handle normal modeˉ>
The light of the window will be flicker when you choose that window.
2.Fuction key:Program, mode, power supply, start/pause, speed +, speed –
Speed Key: 3,6,9
A:Āprogram ākey˖when the machine stops, press the “program” key can enter the circle choosing
program: handle normal modeˉ> handle countdown modeˉ> handle countdown distance modeˉ
>handle countdown calorie mode>P1- ->P2->P3->P4->P5->P6-> handle normal modeˉ>- - -/DŽ
B˖Āmodeākey˖press the key can enter the circle choosing program of the middle window. fixed show
timeˉ> fixed show calorieˉ>
C˖Āstart/pause ākey˖when press this keyˈthe motor can start the motor can pause when press this
key in the process of motor moving. in the state of pause, all the date keep unchanged, the speed
window show PAU .
D˖Āstopākey: press this key the motor will stop working ˈall the data turn 0 and then enter into handle
mode.
E˖Āpowerākey˖you can put on or off the power of the console at any state.
F˖”+” “-“ key:adjust sped in the running status and adjust parameter in the stop status.
G:Āquick speedākeyΨĀ3.6.9āDŽquick key of adjust the speed.
Owner’s Manual 10