Gymtech music-tv User manual

INSTALLATION
GYMTECH MUSIC-TV

1 | P a g e
CONTENT
EQUIPMENT ...................................................................................................................................................... 2
WHAT YOU NEED ......................................................................................................................................... 3
GYMTECH MUSIC-TV PLAYER...................................................................................................................... 3
TV-SCREENS.................................................................................................................................................. 4
PROJECTOR .................................................................................................................................................. 4
PROJECTOR SCREEN.................................................................................................................................... 4
AUDIO SYSTEM............................................................................................................................................. 5
INTERNET ...................................................................................................................................................... 5
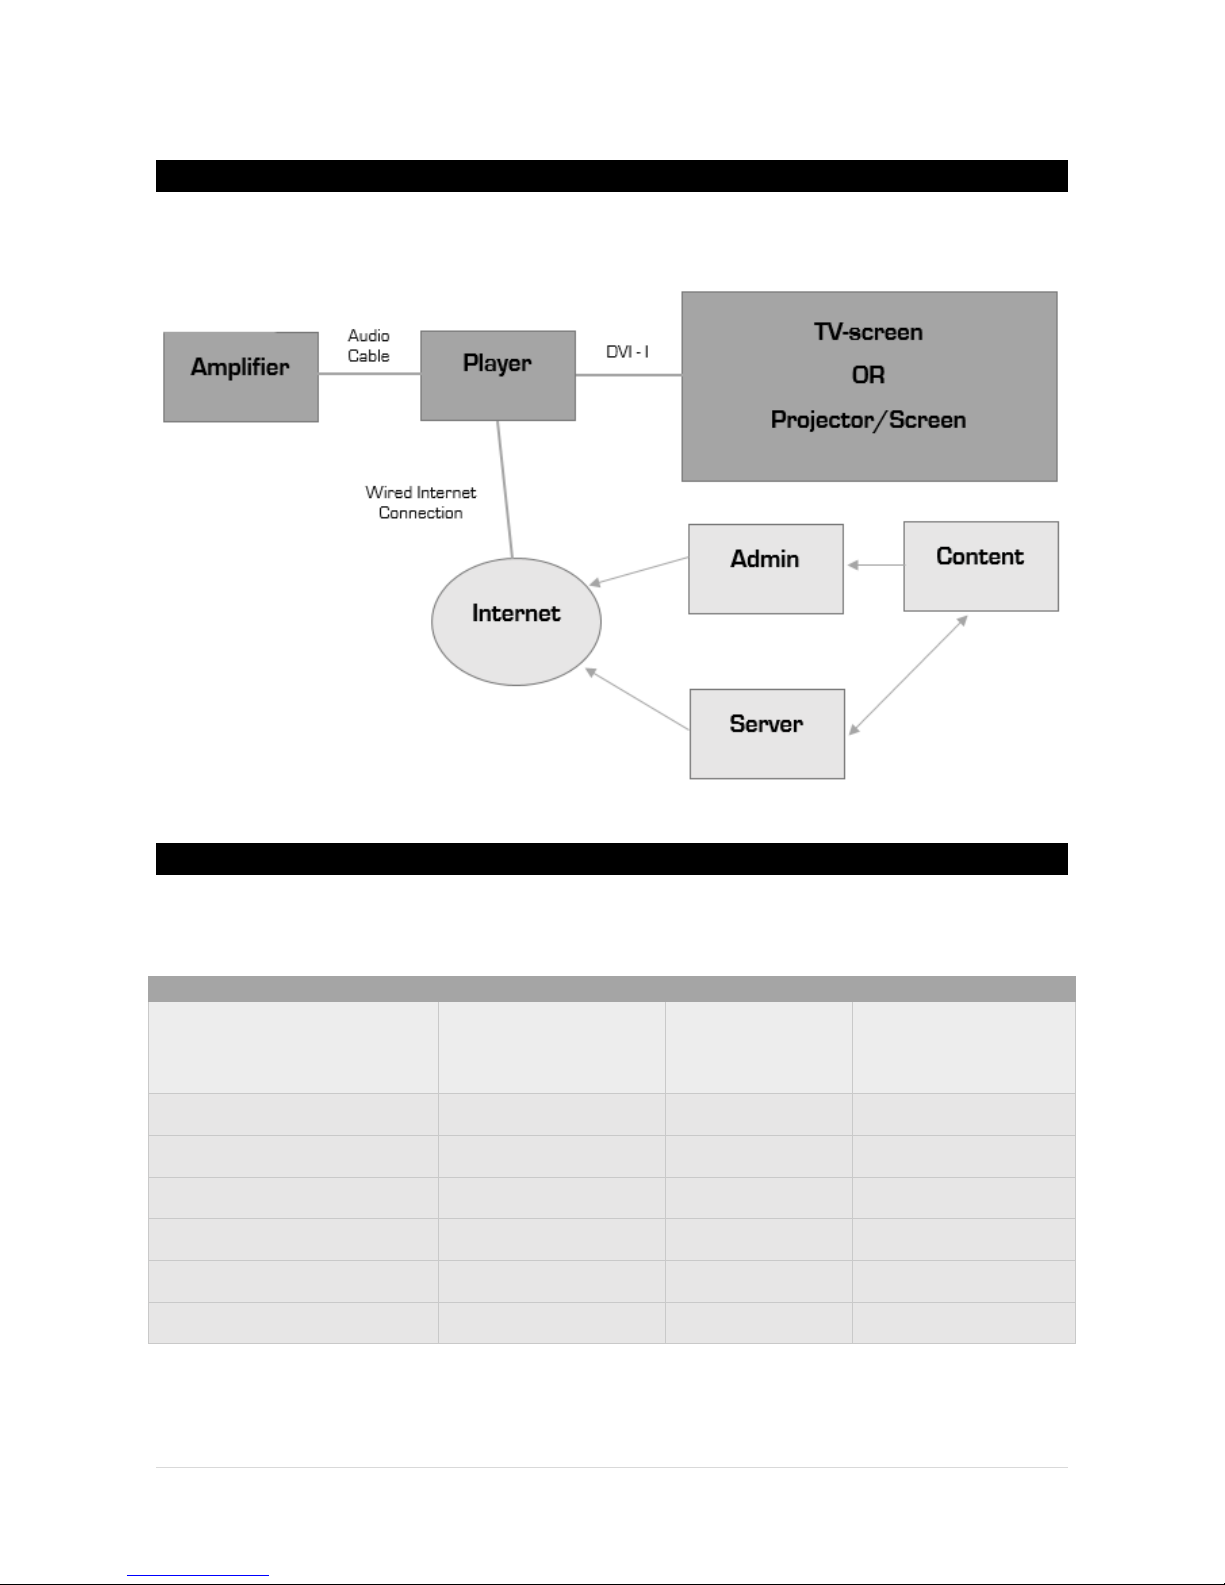
SYSTEM OVERVIEW...................................................................................................................................... 6
AV GUIDE....................................................................................................................................................... 6
PREPARATIONS ................................................................................................................................................ 7
INTRODUCING FIVE PREPARATIONAL STEPS............................................................................................. 8
STEP 1: PLACEMENT OF PLAYER ................................................................................................................ 8
STEP 2: PLACEMENT OF SCREEN................................................................................................................ 8
WALL CHOICE ........................................................................................................................................... 8
SCREEN AND AMBIENT LIGHT................................................................................................................. 8
STEP 3: PLACEMENT OF PROJECTOR......................................................................................................... 8
INSTALLATION HEIGHT............................................................................................................................. 8
STEP 4: POWER AND INTERNET ................................................................................................................. 9
STEP 5: CHECK YOUR CABLES .................................................................................................................... 9
CABLING & INSTALLATION ............................................................................................................................ 10
READY TO INSTALL?................................................................................................................................... 11
1: MOUNTING THE PLAYER ....................................................................................................................... 11
2: MOUNTING THE PROJECTOR ................................................................................................................ 12
3: FINAL ADJUSTMENTS............................................................................................................................ 13
VIDEO DISTRIBUTION.................................................................................................................................. 13
ADDITIONAL RECOMMENDATIONS........................................................................................................... 15

2 | P a g e
EQUIPMENT

3 | P a g e
WHAT YOU NEED
For the Gymtech Music-TV setup, you need the following hardware:
Gymtech Music-TV Player
TV-screens and/or Projector + Projector screen
Audio system
Internet connection
In order to get a better understanding of the functionality of the items listed above, a brief
introduction is provided below.
GYMTECH MUSIC-TV PLAYER
The system comes with this player:
Fujitsu introduces this player which comes in a metal case (19x25x5.2 centimeter / 7.5x9.5x2
inch) with a 1 TB 24/7 hard disk drive (HDD). The Player comes pre-loaded with Windows 7
embedded and the fully configured Studio Fitness Music-TV software. The Player is pre-loaded
with all content (i.e. no streaming) and whenever new content is available, the player will
automatically download and store it locally on the hard drive.
A constant internet connection is therefore a necessity.
The player is set to search for updates at night. Besides traffic generated by downloading new
content, the system will not use much internet bandwidth.
Gymtech Music-TV player
Relevant I/O Ports
4 x USB
1 x Mic-in, 1 x Line-out
2 x internet (RJ-45)
1 x DVI-I
1 x Display Port
Power Supply
65W/20V

4 | P a g e
TV-SCREENS
The TV-screens are the output device, which shows the content from the player. Basically you
can connect any TV-screen to the player, however we recommend that you only buy TV-screens
of good quality. The better quality of the TV-screen, the better quality of the images shown on the
screen.
The TV-screen must not have a “sleep”-function that you cannot disable and the TV-screen has to
be digital. You can connect any number of TV-screens to the player, this will simply require a
device that splits the signal from the player to the number of TV-screens.
We recommend that you buy large TV-screens, the bigger, the better.
PROJECTOR
The projector is the output device used to take the display from the player and project it onto a
projector screen. The projector is connected to the player via DVI-I, HDMI or VGA. You control
the projector manually with the included remote controller. Contact your hardware-provider for
more information.
PROJECTOR SCREEN
The screen is used for displaying the projected image. It is typically a projector-screen with a
frame, as seen in the picture below. Contact your hardware-provider for more information.

5 | P a g e
AUDIO SYSTEM
The audio system is used to play the sound of the music videos. The audio system is connected to
the player via an audio cable. Most use a pre-installed audio system.
INTERNET
The Gymtech Music-TV player need continuous access to the internet as changes and updates
are provided online. Without internet access, operating stability cannot be guaranteed, new
content cannot be downloaded and support cannot be provided.
In other words, the Gymtech Music-TV platform requires a cabled internet connection.
In daily operation, the internet download speed is recommended to be at least 2 Megabits per
second. Port 80 or Port 21 are used, these are standard ports for HTML and FTP.
If the network security is tightened, you need to open up communications for the addresses
below:
Servers
European Data Server
FTP access required
188.138.1.190
www.nfoo-eu.com
Image Server Denmark
FTP and HTML access required
Web12.gigahost.dk
www.nfoo.eu
Data Server 1, Denmark
FTP access required
87.104.148.167
Data Server 2, Denmark
FTP access required
78.143.64.134
Admin Homepage
FTP and HTML access required
85.25.43.42
http://nfoo-server.com
Admin Homepage
HTML access required
80.70.5.32
www.nfoo-server1.dk

6 | P a g e
SYSTEM OVERVIEW
To illustrate how the above-mentioned items are connected, a technical drawing of the general
principles of the Gymtech Music-TV system is included below:
AV GUIDE
To help you select the right hardware, we have outlined a few details and suggestions below:
TV
Projector
Projector Screen
Minimum screen size
Any size, but we recommend
large screens from 40” and
up
NA
3m (horizontal width) 1.78m
(vertical width) or 135” (the
bigger the better)
Minimum screen resolution
1280 x 720
1280 x 720
NA
Minimum ANSI lumens
NA
3000 lumen
NA
Display ratio
16:9
16:9
16:9
Source inputs
1 x VGA/HDMI + 1 audio
output
1 x DVI-I, HDMI, VGA
NA
Mounting
Wall
Ceiling
Wall
No ambient light
NA
3000 lumens
Low Gain

7 | P a g e
PREPARATIONS

8 | P a g e
INTRODUCING FIVE PREPARATIONAL STEPS
Knowing what hardware you need and having chosen the perfect setup for your gym/gyms, it is
time to start planning the installation. Below, we have listed five steps that will help you be fully
prepared for the installation. In the case that you already have TV-screens or a projector and
projector screen installed, only steps 1, 4, and 5 are relevant but we do recommend going
through all steps.
STEP 1: PLACEMENT OF PLAYER
Our recommendation: close/next to the audio system (allows staff to reboot the system if need
be, power will typically already be accessible and it is easy to connect the audio cable). Make sure
to hide the installation in order to protect it from irrelevant people tampering with it.
STEP 2: PLACEMENT OF SCREEN
Some considerations regarding placement of screens are listed below.
WALL CHOICE
We recommend placing the TV-screens and/or projector-screens on the walls from which most
of your members can see them. It can be close to your cardio-equipment but also in the area
with weights.
SCREEN AND AMBIENT LIGHT
We recommend placing the TV-screens and/or projector-screens in places with as little direct
light as possible. However with TV-screens it is not as crucial as with projector-screens. If you
chose projector-screens and know you have a lot of ambient light in the area where you want to
place it, select the right projector.
STEP 3: PLACEMENT OF PROJECTOR
INSTALLATION HEIGHT
The projector screen is recommended to be placed so that the bottom of the projector is in line
with the top of the projector-screen. Alternatively, and if the projector is placed higher, the
projector can correct keystone distortion by +/- 20% for perfect installation adjustment to the
screen. In other words, it is possible to get a high quality image even when placing the projector

9 | P a g e
slightly higher. Information on how to do this can typically be found in the projector user manual
or ask your preferred technician.
STEP 4: POWER AND INTERNET
Prior to installation it is of key importance to establish power for the following:
Gymtech Music-TV Player
TV-screens and/or projector
Make sure to establish power sockets as close to the above items as possible. Besides power, a
cabled internet connection should be established as close to the player as possible.
STEP 5: CHECK YOUR CABLES
You need the following cables to install the Gymtech Music-TV player:
DVI-I, VGA cable or HDMI cable
1
(Video cable)
Audio cable
Power cable
Internet cable
The video cable is to be connected between player and TV-screens/projector (NOTE: use the
correct adapter/cable). The audio cable is to be connected between player and audio system
(see System Overview above). When you have determined where to place the player, as well as
the screens and/or the projector and projector screen, it is time to determine the length of the
cables.
1
We will provide either a DVI-I to VGA or a DVI-I to HDMI adapter, just let us know which one you need

10 | P a g e
CABLING &
INSTALLATION

11 | P a g e
READY TO INSTALL?
A well-executed installation is crucial to get the most out of your Gymtech Music-TV. With that,
our recommendation is always to go through all preparations listed above and to have
professional people perform the installation.
Below, we go through the cabling for the player and the projector. We also provide quick tips for
the actual installation.
1: MOUNTING THE PLAYER
The player can be placed horizontally or vertically. It can also be mounted on the wall using the
wall bracket included in the package.
Doing so, simply requires mounting the bracket on the wall with four screws as shown below:
Most do, however, decide to place the player on top of the stereo or somewhere next to it; doing
so means no further installation than connecting the cables. Do note, however, that the player is
not meant to be moved around. Be careful when placing the player on top of amplifiers and other
electronics with strong EM fields. We recommend using the rubberized feet provided with the
product, mounted on the player whether horizontally or vertically.

12 | P a g e
You need to place the following cables: power cable, video cable (Use DVI-I to VGA/HDMI adapter
if needed), audio cable, and internet cable (see below).
2: MOUNTING THE PROJECTOR
Depending on the choice of projector and the ceiling height in your gym, the choice of ceiling
mounting will vary. Ask your preferred technician about the best choice for your gym/gyms.
When purchasing your projector and ceiling mounting, make sure installation manuals are
included.
The image below illustrates where to place the VGA and power cable on a standard projector:
Having installed the projector, we suggest checking the settings on the projector using the
projector remote control:

13 | P a g e
Turn the player on
Resolution: 1280x720 (
If you select “normal”, the image is projected in the same
resolution as the input signal
)
Direct Power on
Lamp dimming off
Make sure to adjust the projector in order for the image to fit the screen perfectly (see below).
Also, you will very likely need to adjust zoom and focus. More information can be found in the
Projector Manual or ask your preferred technician.
3: FINAL ADJUSTMENTS
Having followed the steps above, you are now ready to make the final adjustments. Make sure to
turn the player on.
IMPORTANT: do not turn on player before having installed the TV-screen and/or projector
and projector-screen properly
If everything is installed correctly, the player will start working immediately.
Also, make sure to test the network connection to the player (log in to your Studio Fitness Music-
TV admin account and check the internet information in the top right corner.
Finally, we suggest you test (and potentially adjust) the sound.
VIDEO DISTRIBUTION
The Gymtech Music-TV player comes with two video outputs eg. DVI-I (Main output) and Displayport v1.2
(secondary output).
We recommend our customers to use the main output DVI-I due to it being easier to setup as well as
delivering both an analog and digital video signal depending on preference and peripheral adapter.
If you wish to use other cable types than DVI-I this output can be converted to all common video cable
types on the market, by using an adapter (eg. DVI-I to HDMI).
Standard solution
+ Easy to use and understand
+ Signal can be split to multiple screens, using a splitter* (extra peripheral equipment).
- High price per meter for video cables
- Max cable length of 30 meters for HDMI
- HDMI cables are wider due to screening and are therefore harder to bend in sharp corners
- HDMI cables are complex and therefore harder to cut and reassemble.

14 | P a g e
HDMI over IP
+ Easy to implement or remove screens on the fly
+ Uses ordinary Ethernet networking cables (RJ45 CAT 5e/6)
+ Max cable length up to 100 meters for Ethernet cables
+ Easy to install Ethernet cables
+ Possibility to add multiple transmitting units
+ Future proof
+ Stronger network infrastructure
- Multiple screens require multiple receivers (1 receiver per. screen)
- High price on units

15 | P a g e
HDMI over Coax
+ Easy to implement or remove screens on the fly
+ Uses ordinary coax cables
+ Max cable length up to 500 meters for coax cables
+ Easy to install coax cables
- Same price range as ”HDMI over IP”
- Analog signal can easily be affected by EM fields, thereby loosing quality
- Multiple screens require multiple receivers (1 receiver per. screen)
- High price per meter for video cables (up to 30% more expensive per meter than Ethernet cable)
- Can require multiple units like splitters, combiners, modulators and amplifiers
* HDMI splitter: Can split a video signal to between 2 and 24 screens depending on unit.
Should you have any further questions regarding distribution of video, then please contact us or your local
electrician.
Links:
http://www.hdtvsupply.com/hdmioverlan.html
http://www.startech.com/AV/Extenders/HDMI/
http://www.networktechinc.com/extenders-video.html#hdmi
ADDITIONAL RECOMMENDATIONS
Do not go cheap on the TV-screens and/or projector: If the room has a lot of daylight go
for a projector with more lumens, or even better –go for a TV-screen solution. Make sure
the TV-screens are of a high quality
Make sure the TV-screens do not have a sleep-function that cannot be disabled
Make sure the picture fits the screen perfectly (correct mounting of projector and
screen)
Make sure the sound is adjusted
Table of contents