Häfele HDW-F60F User manual

INSTRUCTION
MANUAL
PRODUCTS NAME
Freestanding Nero Dishwasher HDW-F60F
Products Applied: 533.23.310
English

Thank you for choosing this product.
This User Manual contains important information on safety and instructions intended
to assist you in the operation and maintenance of your appliance.
Please take the time to read this User Manual before using your appliance and keep
this book for future reference.
Icon Type Meaning
WARNING Serious injury or death risk
RISK OF ELECTRIC
SHOCK Dangerous voltage risk
FIRE Warning; Risk of fire / flammable materials.
CAUTION Injury or property damage risk
IMPORTANT / NOTE Operating the system correctly

CONTENTS
1.SAFETY INSTRUCTIONS
1.1. General Safety Warnings
1.2. Installation Warnings
1.3. During Use
2.INSTALLATION
2.1. Machine Positioning
2.2. Water Connection
2.3. Water Inlet Hose
2.4. Drain Hose
2.5. Electrical Connection
3.TECHNICAL SPECIFICATIONS
3.1. General Appearance
3.2. Technical Specifications
4.BEFORE USING THE APPLIANCE
4.1. Preparing your Dishwasher for first use
4.2. Saltusage
4.3. Fill the salt
4.4. Test Strip
4.5. Water Hardness Table
4.6. Water Softener System
4.7. Setting
4.8. Detergent Usege
4.9. Filling the Detergent
4.10. Using Combined Detergents
4.11. Rinse-aid Usege
4.12. Filling the Rinse-aid and Setting
5.LOADING YOUR DISHWASHER
5.1. Recommendations
5.2. Alternative Basket Loads
6.PROGRAMME TABLE
7.THE CONTROL PANEL
7.1. Changing a Programme
7.2. Cancelling a Programme
7.3. Switching the Machine Off
1
1
1
2
4
4
4
4
5
5
7
7
7
8
8
8
8
9
9
9
9
10
10
10
10
10
12
12
15
16
17
18
18
18

8.CLEANING AND MAINTENANCE
8.1. Filters
8.2. Spray Arms
8.3. Drain Pump
9.TROUBLESHOOTING
10.PRACTICAL INFORMATION
11. THE PRODUCT FICHE
21
21
21
21
23
27
28

1
1. SAFETY INSTRUCTIONS
1.1 General Safety Warnings
1.2 Installation Warnings
•Read these instructions carefully before using your appliance and keep this manual
for future reference.
Please check the packaging of your machine before installation and the outer
surface of the machine once the packaging has been removed. Do not operate the
machine if it appears damaged or if the packaging has been opened.
•Packaging materials protect your machine from any damage that might occur
during transportation. The packaging materials are environmentally friendly as they are
recyclable. Use of recycled material reduces raw material consumption and decreases
waste production.
This appliance can be used by children aged from 8 years and above, and by
persons with reduced physical, sensory or mental capabilities or lack of
experience and knowledge if they have been given supervision or instruction concern-
ing the use of the appliance in a safe way and understand hazards
involved. Children should not be allowed to play with the appliance.
Remove packaging and keep it out of reach of children.
Keep children away from detergents and rinse aids.
There may be some residue left in the machine after washing. Keep children away
from the machine when it is open.
•Choose a suitable and safe place to install your machine.
•Only original spare parts should be used with the machine.
Unplug the machine before installation.
Your machine must only be installed by an authorised service agent.
Installation by anyone other than an authorised agent may cause your warranty to be
void.
Check that the indoor electrical fuse system is connected in line with safety regu-
lations.
All electrical connections must match the values on the plate.
Ensure the machine does not stand on the electrical supply cable.
Never use an extension cord or a multiple socket connection.
The plug should be accessible after the machine is installed.
••After installation, run your machine unloaded for the first time.
The machine must not be plugged in during positioning.

2
1. SAFETY INSTRUCTIONS
Always use the coated plug supplied with your machine.
If the electrical cable is damaged, it should only be replaced by a qualified
electrician.
••Connect the hose directly to the water inlet tap. The pressure supplied by the tap
should be a minimum of 0.03 MPa and a maximum of 1 MPa. If the pressure exceeds
1 MPa, a pressure relief valve must be fitted between the connection.
1.3 During Usage
•This machine is for domestic use only; do not use
•It for other purposes. Commercial use will void the guarantee.
Do not stand, sit or place loads on the open door of the dishwasher.
Only use detergents and rinse aids produced specifically for dishwashers. Our
company is not responsible for any damage that may occur due to misuse.
Do not drink water from the machine.
Due to the danger of explosion, do not place any chemical dissolving agents into
the machine’s washing section.
•Check the heat-resistance of plastic items before washing them in the machine.
Only put items in the machine which are suitable for dishwashing, and take care
not to overfill the baskets.
Do not open the door while the machine is in operation, hot water may spill out.
Safety devices ensure the machine stops if the door is opened.
The machine door should not be left open. It may cause accidents.
Place knives and other sharp objects in the cutlery basket in a blade-down posi-
tion.
For models with the automatic door-opening system, when the
EnergySave option is active, the door will open at the end of a program. To prevent
damage to your dishwasher, do not attempt to close the door for one minute after it
has opened. For effective drying, keep the door open for 30
minutes after a programme has ended. Do not stand in front of the door after the
auto-open signal sounds.
In the case of a malfunction, repair should only be performed by an authorised
service company, otherwise the warranty will be void.
Before repair work, the machine should be disconnected from the mains. Do
not pull the cable to unplug the machine. Switch off the water tap.
Operation at a low voltage will cause a decline in performance levels.
For safety, disconnect the plug once a program has finished.

3
1. SAFETY INSTRUCTIONS
To avoid an electric shock, do not unplug the machine with wet hands.
Pull the plug to disconnect the machine from the mains, never pull on the
cord.
RECYCLING
PACKAGING AND THE ENVIRONMENT
•Some machine components and packaging consist of recyclable materials.
•Plastics are marked with the international abbreviations:(>PE<, >PP<, etc. )
•The cardboard parts consist of recycled paper. They can be put into waste paper
containers for recycling.
•Material unsuitable for domestic waste must be disposed of at recycling centres.
•Contact a relevant recycling centre to obtain information about disposal of differ-
ent materials.
•Packaging materials protect your machine from damage that may occur during
transportation. The packaging materials are environmentally friendly as they are recy-
clable. The use of recycled material reduces raw material consumption and therefore
decreases waste production.
CE Declaration of Conformity
We declare that our products meet the applicable European Directives, Decisions and
Regulations and the requirements listed in the standards referenced.
Disposal of your old machine
The symbol on the product or on its packaging indicates that this product
may not be treated as household waste. Instead, it shall be handed over to
the applicable collection point for the recycling of electrical and electronic
equipment.
By ensuring this product is disposed of correctly, you will help prevent potential nega-
tive consequences for the environment and human health, which could otherwise be
caused by inappropriate waste handling of this product.
For more detailed information about recycling of this product, please contact your
local city office, your household waste disposal service or the shop where the product
was purchased.

4
2. INSTALLATION
2. INSTALLATION
2.3 Water inlet hose2.1 Machine positioning
2.2 Water connection
We recommend fitting a filter to your water
inlet supply in order to prevent damage to
your machine due to contamination (sand,
rust, etc.) from indoor plumbing. This will also
help prevent yellowing and deposit formation
after washing.
❗
NOTE: printing on the water inlet hose!
If models are marked with 25o•, the water
temperature may be max. 25o•C (cold water).
For all other models:
Cold water preferred; hot water max
temperature 60o•C
An Aquastop water spout is available
with some models. Do not damage it or allow
it to become kinked or twisted.
When positioning the machine, place it in an
area where dishes can be easily loaded and
unloaded. Do not put the machine in an area
where the ambient temperature falls below
0•oC.
Read all warnings located on the packaging
before removing the packaging and position-
ing the machine.
Place the machine close to a water tap and
drain. Take into consideration that the con-
nections will not be altered once the machine
is in position.
Do not hold the machine by its door or panel.
Leave an adequate distance around the
machine to allow ease of movement when
cleaning.
Ensure the water inlet and outlet
hoses are not squeezed or trapped and that
the machine does not stand on the electrical
cable while positioning.Adjust the feet so the
machine is level and balanced. The machine
should be placed on flat ground otherwise it
will be unstable and the door of the machine
will not close properly.
‼
WARNING: Use the new water
inlet hose supplied with your machine, do not
use an old machine’s hose.
‼
WARNING: Connect the hose
directly to the water inlet tap. The pressure
supplied by the tap should be a minimum of
0.03 MPa and a maximum of 1 MPa. If the
pressure exceeds 1 MPa, a pressure relief
valve must be tted between the connection.
‼
WARNING: After the connections
are made, turn the tap on fully and check
for water leaks. Always turn off the water inlet
tap after a wash program has nished.
‼
WARNING: Run water through
the new hose before connecting.

5
2. INSTALLATION
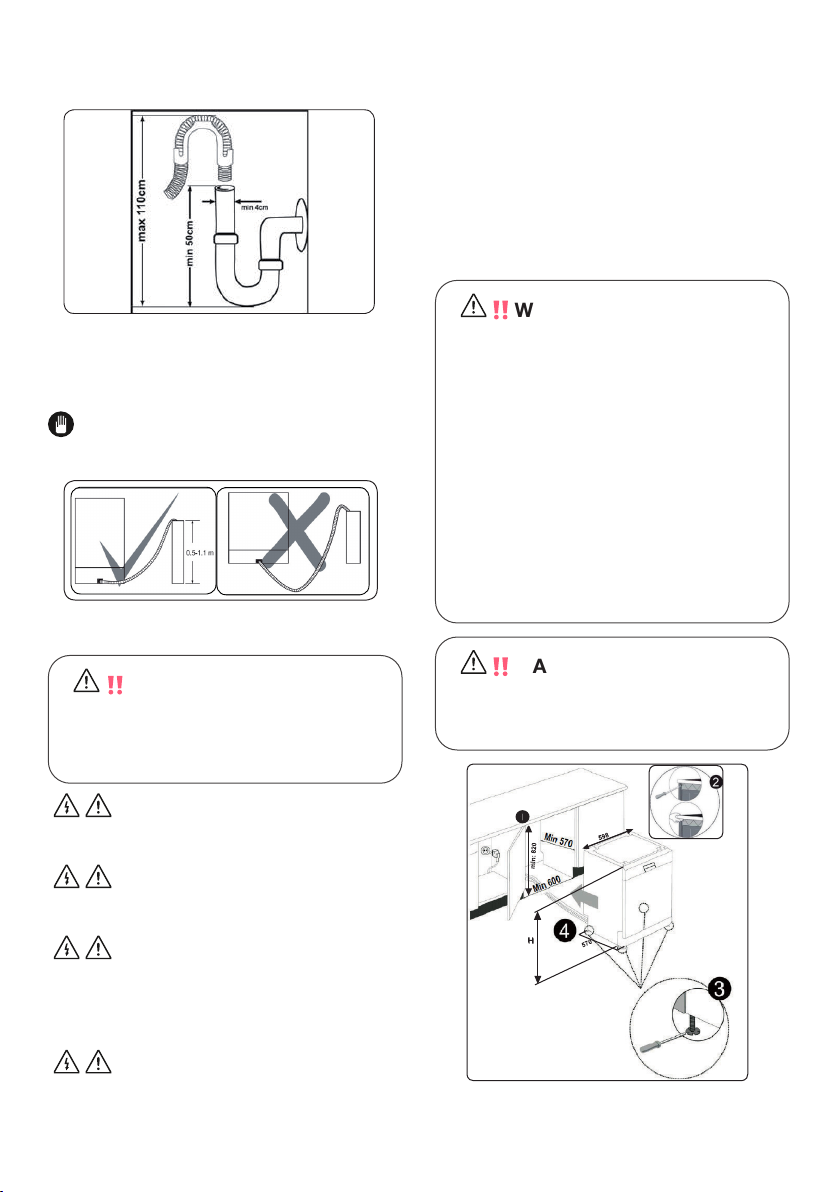
2.4 Drain Hose 2.6 Fitting the machine
undercounter
‼
WARNING: Your machine is set
to operate at 220-240 V. If the mains voltage
supply to your machine is 110 V, connect
a transformer of 110/220 V and 3000 W
between the electrical connection.
‼
WARNING: The countertop,
which the machine will be placed under,
must be stable in order to prevent
imbalance.
The top panel of the dishwasher must
be removed to t the machine under the
countertop.
To remove the top panel, remove the screws
that hold it on, located at the rear of the
machine. Then, push the panel 1 cm from
the front towards the rear and lift it. Adjust
the machine feet according to the slope of
the oor (3).
Fit your machine by pushing it under the
counter taking care not to crush or bend the
hoses (4).
‼
WARNING: After removing
the top panel of your dishwasher, the
machine should be placed in a space of the
dimensions shown in the gure below
Connect the water drain hose directly to
water drain hole or to the sink outlet spigot.
This connection should be minimum 50 cm
and maximum 110 cm from flor plane.
IMPORTANT: Items will not wash prop-
erly if a drain hose longer than 4 m is used.
If you wish to fit your machine undercounter,
there must be sufficient space to do so and
the wiring-plumbing must be suitable to do
so (1). If the space under the countertop is
suitable for fitting your machine, remove the
worktop as shown in the illustration (2).
Connect the product to a grounded
outlet protected by a fuse complying with the
values in the “Technical Specifications” table”.
The earthed plug of the machine
must be connected to an earthed outlet
supplied by suitable voltage and current.
In the absence of earthing installa-
tion, an authorised electrician should carry
out an earthing installation. In the case of use
without earthing installed, we will not be re-
sponsible for any loss of use that may occur.
The plug on this appliance may
incorporate 13A fuse depending on the target
country. (For Example UK, Saudi Arabia)
2.5 Electrical connection
e NW=ã á å =^
e OW=ã á å =_N
e PW=ãá å =_ O

6
A: If there is no felt on the top of the product;
you should take into account this product’s
height.
B1: If there is felt on the top of the product
with 2nd basket; you should take into account
this product’s height.
B2: If there is felt on the top of the product
with 3rd basket; you should take into account
this product’s height.
A B
All
Products B1 B2
Product’s
Height (•2 mm) 820 mm 830 mm 835 mm
2. INSTALLATION

7
3. TECHNICAL SPECIFICATIONS
3. TECHNICAL
SPECIFICATIONS
NO
1
2
43
5
6
7
8
9
10
11
12
3.1 General appearance
3.2 Technical specifications
1. Worktop
2. Upper basket with racks
3. Upper spray arm
4. Lower basket
5. Lower spray arm
6. Filters
7. Rating plate
8. Control panel
9. Detergent and rinse-aid dispenser
10. Salt dispenser
11. Upper basket track latch
12. Cutlery basket
13. Turbo Drying Unit: This system
enhances the drying performance of your
dishes
Capacity 15 place settings
Dimensions (mm)
Height
Width
Depth
850 (mm)
598(mm)
598(mm)
Net weight 54kg
Operating
voltage / frequency 220-240V 50Hz
Total current (A) 10(A)
Total power (W) 1750(W)
Water supply
pressure
Maximum:1 (Mpa)
Minimum:0.03 (Mpa)

8
4. BEFORE USING THE APPLIANCE
4. BEFORE USING THE
APPLIANCE
4.1 Preparing your dishwasher for
first use
4.3 Fill the salt (IF AVAILABLE)
4.2 Salt usage (IF AVAILABLE)
•Make sure the electricity and supply water
specifications match the values indicated in
the installation instructions for the machine.
•Remove all packaging material inside the
machine.
•Set the water softener level.
•Fill the rinse aid compartment.
For a good washing function, the
dishwasher needs soft, i.e. less
calcareous water. Otherwise, White lime
residues will remain on the dishes and the
interior equipment. This will negatively affect
your machine’s washing, drying and shining
performance. When water flows through
the softener system, the ions forming the
hardness are removed from the water and
the water reaches the softness required to
obtain the best washing result. Depending on
the level of hardness of the inflowing water,
these ions that harden the water accumulate
rapidly inside the softener system. Therefore,
the softener system has to be refreshed so
that it operates with the same performance
also during the next wash. For this purpose,
dishwasher salt is used.
Machine can only be used by special dish-
washer salt to soften the water. Do not use
any small grained or powdered type of salts
which can easily soluble. Using any other
type of salt can damage your machine.
To add softener salt, open the salt compart-
ment cap by turning it counter clockwise. (1)
(2) At first use, fill the compartment with 1 kg
salt and water (3) until it is almost overflow-
ing. If available, using a funnel (4) will make
filling easier. Replace the cap and close it.
After every 20-30 Cycles add salt into your
mach until it fills up (approx. 1 kg).
Only add water to the salt compartment
on first use.
Use softener salt specifically produced for
use in dishwashers.
When you start your dishwasher, the salt
compartment is filled with water, therefore
put the softener salt in prior to starting your
machine.
If the softener salt has overflowed and you
do not start the machine immediately, run
a short washing program to protect your
machine against corrosion.

9
4. BEFORE USING THE APPLIANCE
4.4 Test Strip
4.5 Water Hardness Table
4.6 Water Softener System
4.7 Setting
Run water
through
the tap (1min.)
Keep the strip
in the water
(1sec)
Shake the
strip. Wait (1min.) Set the hardness level of
your machine.
1
1
1
1
❗
NOTE: The factory hardness level setting is “3”. If the water is well water or has a hardness level
above 90 dF, we recommend that you use filter and refinement devices.
Level German
dH
French
dF
British
dE Indicator
1 0-5 0-9 0-6 L1 is shown on the display.
2 6-11 10-20 7-14 L2 is shown on the display.
3 12-17 21-30 15-21 L3 is shown on the display.
4 18-22 31-40 22-28 L4 is shown on the display.
5 23-31 41-55 29-39 L5 is shown on the display.
6 32-50 56-90 40-63 L6 is shown on the display.
The dishwasher is equipped with a water softener which reduces the hardness in the mains
water supply. To find out the hardness level of your tap water, contact your water company or
use the test strip (if available).
In order to change the salt level, follow the below steps:
•Open the door of the machine.
•Turn on the machine, and touch the Programme button as soon as the machine is turned on.
•Hold down the Programme button until “SL” disappears.
•The machine will display the last setting.
•Set the level by touching the Programme button.
•Turn off the machine to save the setting.

10
4. BEFORE USING THE APPLIANCE
4.8 Detergent usage
4.9 Filling the detergent
4.11 Rinse-aid usage
4.12 Filling the rinse-aid and setting
4.10 Using combined detergents
Only use detergents specifically designed for
domestic dishwashers. Keep your detergents
in cool, dry places out of reach of children.
Add the proper detergent for the selected
program to ensure the best performance.
The amount of detergent needed depends on
the cycle, load size, and soil level of
dishes. Do not fill detergent into the detergent
compartment more than required; otherwise
you can see whitish streaks or bluish layers
on glass and dishes and may cause glass
corrosion. Continued use of too much
detergent may cause machine damage. Us-
ing little detergent can result in poor cleaning
and you can see whitish streaksin hard water.
See the detergent manufacturer’s instruc-
tions for a further information
Push the latch to open the dispenser and
pour in the detergent.
Close the lid and press it until it locks in
place. The dispenser should be refilled just
before the start of each programme. If the
dishes are heavily soiled, place additional
detergent in the pre-wash detergent chamber
These products should be used according to
the manufacturer’s instructions.
Never put combined detergents into the inte-
rior section or the cutlery basket. Combined
detergents contain not only the detergent but
also rinse-aid, salt replacement substances
and additional components depending on the
combination.
We recommend you do not use combined
detergents in short programmes.
Please use powder detergents in such
programmes.
If you encounter problems when using
combined detergents, please contact the
detergent manufacturer.
When you stop using combined detergents,
make sure that water hardness and rinse aid
settings are set to the correct level.
The rinse aid helps to dry the dishes without
streaks and stains. Rinse-aid is required for
stain-free utensils and clear glasses. The
rinse aid is automatically released during the
hot rinse phase. If rinse aid dosage setting
set too low, whitish stains remains on dishes
and dishes do not dry and washed clean. If
rinse aid dosage setting set too height, you
can see bluish layers on glass and dishes.
To fill the rinse aid compartment, open the
rinse-aid compartment cap. Fill the compart-
ment with rinse aid to the MAX level and then
close the cap. Be careful not to overfill the
rinse aid compartment and wipe up any spills
In order to change the rinse aid level,
follow the below steps:
•Open the door of the machine.
•Turn on the machine, and touch the
Programme button as soon as the machine is
turned on.
•Hold down the Programme button until
“rA” disappears. Rinse aid setting follows
water hardness setting.
•The machine will display the last setting.
•Change the level by touching the pro-
gramme button.
•Turn off the machine to save the setting.
The factory rinse aid level setting is “4”.
If the dishes are not drying properly or are
spotted, increase the level. If blue stains form
on your dishes, decrease the level.

11
4. BEFORE USING THE APPLIANCE
Level Brightener
Dose Indicator
1Rinse-aid not
dispensed
r1 is shown on
the display.
21 dose is
dispensed
r2 is shown on
the display.
32 doses are
dispensed
r3 is shown on
the display.
43 doses are
dispensed
r4 is shown on
the display.
54 doses are
dispensed
r5 is shown on
the display.

12
5. LOADING YOUR DISHWASHER
5. LOADING YOUR
DISHWASHER
For best results, follow these loading
guidelines.
Loading the household dishwasher up to the
capacity indicated by the manufacturer will
contribute to energy and water savings.
Manual pre-rinsing of tableware items leads
to increased water and energy consumption
and is not recommended You can place
cups, glasses, stemware, small plates,
bowls, etc. in upper basket. Do not lean long
glasses against one another or they cannot
remain steady and may receive damage.
When placing long stem glasses and goblets,
lean them against the basket edge or rack
and not against other items.
Place all containers such as cups, glasses
and pots into the dishwasher with the open-
ing facing downwards otherwise water can
collect on items.
If there is cutlery basket in machine, you are
recommended to use the cutlery grid in order
to obtain the best result. Place all large (pots,
pans, lids, plates, bowls etc.) and very dirty
items in the lower rack.
Dishes and cutlery should not be placed
above each other.
‼
WARNING: Take care not to
obstruct the rotation of spray arms.
‼
WARNING: To avoid any
possible injuries, place long-handle and
sharp-pointed knives with their sharp points
facing down or horizontally on the baskets.
‼
WARNING: Make sure after
loading the dishes do not prevent opening
the detergent dispenser
5.1 Recommendations
Remove any coarse residue on dishes before
placing the dishes in the machine. Start the
machine with full load.
Do not overload the drawers or place
dishes in the wrong basket.
SOFT TOUCH
Top basket
Height Adjustable Rack
These racks are designed to increase the
capacity of the top basket. You can place
your glasses and cups on the racks.
You can adjust the height of these racks.
Thanks to this feature, you can place
different sizes of glasses under
these racks.
Thanks to height adjustment plastics
mounted on the basket, you can use your
racks in 2 different heights. In addition, you
can place long forks, knives and spoons
on these racks laterally, so that they do not
block the revolution of propeller.
The soft touch feature on the racks serves
••••••••••••••••The wineglass is placed in the area shown
at the picture.
Foldable racks
Foldable racks on the upper basket are
designed in order to let you place big items
easier such as pots, pans, etc. If requested,
each part can be folded separately, or all of
them can be folded and larger spaces can
be obtained. You can use foldable racks by
raising them upwards,or by folding down.

13
5. LOADING YOUR DISHWASHER
Height adjustment
The upper basket includes a mechanism
which enables the height of the basket to be
adjusted up (1) or down (2) without having to
remove the basket. Hold the basket on both
sides and pull it up or push it down, ensuring
both sides of the upper basket are in the
same position.
Direct wash function
This function is used to wash glasses, bottles
etc. by directing the water upwards while
the apparatus on the upper basket (shown
in the figure) is in vertical position. While the
apparatus is in horizontal position, water is
directed downwards, contributing to washing
the lower basket.
N
O

14
5. LOADING YOUR DISHWASHER
Upper Cutlery Basket
The upper cutlery basket is designed for
you to place forks, spoons and knives, long
dippers and small items.
The Upper Cutlery Basket is composed of
three pieces; if you need to space for the
dishes in the upper basket, you can slide the
left or right part of the upper cutlery basket in
order to obtain more space.
The middle part of the upper basket can be
movable down and up to obtain more space.
‼
WARNING: Knives and other
sharp objects must be placed horizontally in
the cutlery basket.

15
5. LOADING YOUR DISHWASHER
Incorrect Loads
Incorrect loading can cause poor washing
and drying performance. Please follow the
manufacturer’s recommendations for a good
performans result.
5.2 Alternative Basket Loads Lower
Basket
Top basket
Incorrect loads

16
6. PROGRAMME TABLE
Programme Duration (min) Description
P1 Eco 254
Standard program for normally soiled daily using
dishes with reduced energy and water
consumptions.
P2 Smart
50OC - 70OC109 - 179 Auto program for heavily soiled dishes.
P3 Smart
30OC - 50OC 72-91 Auto program for normally soiled delicate dishes.
P4 Steam
Wash 161 Suitable for heavily soiled dishes with effective
cleaning by steam.
P5 Hygiene 127 Suitable for heavily soiled dishes requiring
hygienic washing.
P6 Super 50’ 50 Suitable for normally soiled daily dishes with
faster program.
P7 Dual Pro
Wash 113
Suitable for both lightly soiled delicate glassware
on upper rack and
heavily soiled crockery on lower rack.
P8 Quick 30’ 30 Suitable for lightly soiled dishes and quick wash.
P9 Mini 14’ 14 Fastest program for lightly soiled and recently
used dishes and suitable for 4 place settings.
6. PROGRAMME TABLE
❗
NOTE: PROGRAMME DURATION MAY CHANGE ACCORDING TO THE AMOUNT OF DISHES,
TAP WATER, AMBIENT TEMPERATURE AND SELECTED ADDITIONAL FUNCTIONS
•Only use powder detergent for short programmes.
•Short programmes do not include drying step.
•To assist drying, we recommend slightly opening the door after a cycle is complete.
This manual suits for next models
1
Table of contents
Languages:
Other Häfele Dishwasher manuals

Häfele
Häfele HDW-F605B User manual

Häfele
Häfele HDW-FI60D User manual

Häfele
Häfele HDW-SI60AB User manual

Häfele
Häfele HDW65X User manual

Häfele
Häfele HDW-F60EB User manual

Häfele
Häfele HDW-HI60C User manual

Häfele
Häfele AQUA 12S User manual

Häfele
Häfele ASKO DFI644G User manual

Häfele
Häfele HDW-FI60AB User manual

Häfele
Häfele HDW-T5531B User manual
Popular Dishwasher manuals by other brands

Belling
Belling BDW60IC instruction manual

Jackson
Jackson CJ-20 Installation operation user manual

Bosch
Bosch SHE7ER55UC operating instructions

Electrolux
Electrolux ESL 4200LO user manual

gel-o-mat
gel-o-mat E LEGANCE 50/II K Instruction for installation and maintenance

Brandt
Brandt VI 310 operating instructions