HABCO SE40eHC Quick guide

SAFETY, INSTALLATION AND INSTRUCTION MANUAL
Commercial Refrigerators
Made In Canada
501 Gordon Baker Road, Toronto, Ontario
Canada M2H 2S6 Tel: 416-491-6008 Fax: 416-491-6982
Toll Free in Canada: 1-800-387-5398 Toll Free in U.S.A: 1-800-448-0244
www.habcotech.com


HABCO® TECHNICAL DOCUMENT - C098791 • 10310209
© HABCO Manufacturing Inc. “HABCO, Cassette, Cold Space Merchandiser” are registered trademarks of HABCO Manufacturing Inc. Domestic and International Patents. Page 2
HABCO® COMMERCIAL REFRIGERATORS-CASSETTE®
SAFETY, INSTALLATION AND INSTRUCTION MANUAL
CABINET MODELS: SE18, SE24, SE28, SE40e, SE42, SE46
HABCO Management Systems are Cered to ISO 9001-2015
IMPROPER OR UNSAFE use of this appliance other than intended by
the manufacturer, can result in death, serious bodily injury, property
damage and/or appliance damage!
This manual contains important informaon about product safety.
Read and understand this manual BEFORE operang the appliance.
Please keep this manual available for other users and owners before
they use the appliance. Store this manual in a secure locaon.
WARNING
DANGER: RISK OF FIRE OR EXPLOSION. FLAMMABLE REFRIG-
ERANT USED. TO BE REPAIRED ONLY BY TRAINED SERVICE PER-
SONNEL. DO NOT USE MECHANICAL DEVICES TO DEFROST RE-
FRIGERATOR. DO NOT PUNCTURE REFRIGERANT TUBING. R290
REFRIGERATION SYSTEM (CASSETTE) SHOULD ONLY BE USED IN
A HABCO UNIT THAT IS DESIGNED AND APPROVED FOR R290.
INTENDED USE
HABCO® Commercial Refrigerators are designed for the commercial
refrigerated storage and display. Not intended for use in outdoor, di-
rect sun, damp, extreme heat and/or cold condions.
MEANINGS OF SIGNAL WORDS AND SYMBOLS
WARNING indicates potenally hazardous situaons which,
if ignored, could result in death or serious injury.
WARNING indicates potenally hazardous situaons which,
if not avoided, may result in minor or moderate injury.
NOTICE emphasizes essenal informaon or that which may
cause appliance damage or environmental harm.
Secon Subject Page
INFORMATION AND TABLE OF CONTENTS ......................2
SAFETY .............................................................................3
A. INSPECTION & UNPACKING ............................................4
B. LOCATION ........................................................................4
C. ELECTRICAL ......................................................................4
D. START-UP ......................................................................... 5
E. THERMOSTAT LOCATION & ADJUSTMENT .......................5
F. LIGHTING ......................................................................... 6
G. CASSETTE® ACCESS & REMOVAL .....................................6
H. DOORS ............................................................................. 7
Easy Mount Swing Door Reversal ....................................7
Sliding Door Removal and Adjustment ............................8
I. PREVENTATIVE MAINTENANCE .....................................10
J. CLEANING PROCEDURES ...............................................10
K. TROUBLE-SHOOTING .....................................................12
ENERGY EFFICIENCY TIPS
HABCO® Commercial Refrigerators bearing the ENERGY STAR® logo are
manufactured and designed to perform within the most stringent en-
ergy efficiency guidelines. The following energy efficiency tips, however,
pertain to all commercial refrigerators and should be followed for best
energy efficiency results.
1. Maintain a clean condenser coil.
2. Turn off lighting when not in use.
3. Maintain clean door seals and ensure bottom door guide is
clear of debris at all times.
4. Do not install in direct vicinity of high heat or high humidity
sources such as heating vents, baseboard heaters, ranges,
and ovens, steam cookers, commercial dishwashers.
5. Do not install directly beneath undiffused air conditioning
vents.
6. Read, understand and observe Safety Warnings and Notices
in this manual as many of these points will also contribute
to energy savings and appliance efficiency.
Term Explanaon/Alternate Term
Commercial Refrigerator Appliance
Cassee® Self-Contained, Removable Refrigeraon Package
Compressor Refrigerant Compressing Motor Mounted to Front of Cassee®
Evaporator (Coil) Cooling Coil Mounted to Rear of Cassee®
Free&Clear™, Finless Condenser (Coil) Finless, Circular Formed Heat Exchange Coil Mounted to Front of Cassee®
Cassee® Chamber Refrigeraon Enclosure
Evaporator Chamber Cooling Coil Enclosure Located within Cassee® Chamber
Mechanically Fastened Areas Areas Requiring a Tool to Access
Trained Professional Trained Refrigeraon and/or Electrical Contractor
Owner Person or Company Holding Legal Title to Appliance
Header Upper Front Metal Panel

HABCO® TECHNICAL DOCUMENT - C098791 • 10310209
© HABCO Manufacturing Inc. “HABCO, Cassette, Cold Space Merchandiser” are registered trademarks of HABCO Manufacturing Inc. Domestic and International Patents. Page 3
WARNING
RISK OF DEATH, FIRE, EXPLOSION, ELECTRICAL SHOCK AND/OR OTHER PERSONAL INJURY!
• PLUG INTO A DEDICATED, 3 PRONG GROUNDED ELECTRICAL RECEPTACLE AND DO NOT USE EXTENSION CORDS, POWER BARS, AND/OR ADAPTERS TO
POWER THIS APPLIANCE. IF IN DOUBT, EMPLOY A CERTIFIED ELECTRICIAN TO CONFIRM YOUR POWER SUPPLY MEETS CRITERIA.
• DO NOT ALTER, IMPACT OR PLACE PRESSURE ON POWER CORD. ALLOW ADEQUATE SPACE FOR POWER CORD TO FLOAT FREELY BETWEEN CABINET AND
WALL AND DO NOT STRAIN AND/OR STRETCH POWER CORD TO REACH ELECTRICAL RECEPTACLE.
• INSPECT POWER CORD FOR ANY DAMAGE PRIOR TO POWERING AND WHENEVER HABCO® CASSETTE® IS EXCHANGED OR APPLIANCE IS MOVED. DO
NOT PLUG THIS APPLIANCE INTO WALL RECEPTACLE IF POWER CORD IS DAMAGED.
• DO NOT ACCESS MECHANICALLY FASTENED AREAS WITHOUT PERMISSION OF OWNER AND READING AND UNDERSTANDING PRODUCT MANUAL.
• DISCONNECT POWER BEFORE ACCESSING MECHANICALLY FASTENED AREAS.
• DO NOT INSTALL OUTDOORS, IN DIRECT SUN, DAMP, EXTREME HUMIDITY, HEAT AND/OR COLD CONDITIONS.
• DO NOT INSTALL APPLIANCE WHERE STORAGE, HANDLING AND/OR DISPENSING FLAMMABLE AND/OR EXPLOSIVE MATERIALS OCCUR.
• WHEN STORING APPLIANCE, BLOCK DOOR SLIGHTLY AJAR, BUT SECURE TO AVOID ACCIDENTAL ENTRAPMENT.
• WHEN DISPOSING OF APPLIANCE, REMOVE DOORS TO AVOID ACCIDENTAL ENTRAPMENT AND POTENTIAL OF SUFFOCATION.
• KEEP PLASTIC PACKAGING MATERIAL AWAY FROM CHILDREN AND ANIMALS, AND DISPOSE SAFE AND SECURE.
WARNING
POTENTIAL RISK OF PERSONAL INJURY!
• EMPLOY BEST HEALTH AND SAFETY LIFTING PRACTICES WHEN REMOVING SHIPPING PLATFORM(S); LEVELING CABINET; MOVING OR LIFTING
CASSETTE®; MOVING OR LIFTING DOORS; AND MOVING APPLIANCE. IF IN DOUBT, ASK FOR HELP.
• EMPLOY BEST HEALTH AND SAFETY PERSONAL PROTECTION PRACTICES AND ADHERE TO MANUFACTURER’S WARNINGS WHEN USING TOOLS AND
CLEANING AGENTS.
• DO NOT CLIMB AND/OR HANG ON CABINET, SHELVING AND/OR DOORS.
• USE CARE WHEN HANDLING OR CLEANING METAL PARTS.
• HOLD DOOR AGAINST CABINET WHILE REMOVING BRACKET AND FASTENERS. MAGNETIC DOOR GASKET WILL ASSIST. REMOVAL OF THE SET-SCREW
WILL LEAVE DOOR UNSECURED.
• PERSONAL PROTECTIVE EQUIPMENT (PPE) ARE REQUIRED WHEN SERVICING ANY PART OF THE APPLIANCE:
NOTICE
ESSENTIAL INFORMATION, OR THAT WHICH MAY CAUSE APPLIANCE DAMAGE OR ENVIRONMENTAL HARM!
• DO NOT LOCATE APPLIANCE IN DIRECT SUNLIGHT OR IN CLOSE PROXIMITY TO HIGH HEAT OR HIGH HUMIDITY SUCH AS FRYERS, RANGES, DISHWASHRS,
STEAM COOKERS AND/OR HEATING DUCTS.
• USE ONLY MILD ANTI-BACTERIAL, NON-ABRASIVE ‘DISH SOAP’ DETERGENT, AND SOFT CLOTH (OR BRISTLE BRUSHES WHERE SPECIFIED) FOR CLEANING
YOUR APPLIANCE. FOR STUBBORN RESIDUE, SUCH AS GREASE BUILD-UP ON CONDENSER (HEAT-EXCHANGE) COIL, EMPLOY THE SERVICES OF A
QUALIFIED PROFESSIONAL.
• CABINET MUST BE LEVELED FRONT TO BACK AND SIDE TO SIDE TO ENSURE OPTIMUM PERFORMANCE AND UTILITY.
• MAINTAIN A CLEAN CONDENSER COIL (BOX-SHAPED COMPONENT LOCATED BEHIND THE LOWER GRILL) TO PREVENT DAMAGE TO REFRIGERATION
PARTS AND POOR PERFORMANCE NOT COVERED UNDER WARRANTY. QUALIFIED PROFESSIONAL TO DISCONNECT POWER BEFORE ACCESSING
MECHANICALLY FASTENED AREAS.
• DO NOT OVERLOAD CABINET WITH PRODUCT AND/OR LOAD PRODUCT HIGHER THAN THE LOAD LEVEL LINE, LOCATED ON LEFT HAND INTERIOR WALL.
DO NOT OBSTRUCT AIR-RETURN GRILLS LOCATED INSIDE CABINET NEAR THE LOWER LEFT AND RIGHT OF THE REAR AIR DISTRIBUTION PANEL. DO
NOT OBSTRUCT EXTERIOR, LOWER FRONT GRILL. FAILURE TO COMPLY WILL RESULT IN RESTRICTED AIR CIRCULATION, SUBSTANTIALLY REDUCED COOLING
PERFORMANCE, FROZEN PRODUCT AND VOID WARRANTY. FAILURE TO COMPLY MAY RESULT IN RESTRICTED AIR CIRCULATION, SUBSTANTIALLY REDUCED
COOLING PERFORMANCE AND DAMAGE TO REFRIGERATION COMPONENTS.
• THERMOSTAT SETTING CHANGES MAY INCREASE REFRIGERATION TO FREEZING CONDITIONS. FREEZING CONDITIONS CAN DAMAGE REFRIGERATION
SYSTEM AND COMPONENTS, AND MAY CAUSE PRODUCT LOSS. ISSUES ARISING FROM ADJUSTMENTS OR CORRECTIONS DUE TO ADJUSTMENTS OF THE
THERMOSTAT FACTORY PRESET TEMPERATURE IS NOT COVERED UNDER WARRANTY.
• DO NOT PUSH, LEAN-ON OR FORCE STAINLESS STEEL TUBE EXTENDING FROM CABINET IN THE CASSETTE® REFRIGERATION CHAMBER. DO NOT FORCE
REFRIGERATION CASSETTE® WHEN REINSTALLING. SLIDE INTO PLACE GENTLY AND EVENLY, APPLYING EQUAL PRESSURE TO EACH SIDE OF CASSETTE®.
• ENSURE THAT APPLIANCE, REFRIGERANT AND/OR COMPONENTS ARE DISPOSED OF IN A MANNER IN KEEPING WITH LOCAL AND FEDERAL
REGULATIONS.
• APPLIANCE MUST BE RUN FOR A PERIOD OF 24 HOURS PRIOR TO USE.
• AFTER ACCESSING REFRIGERATION OR ANY OTHER MECHANICALLY FASTENED AREAS OF THE APPLIANCE, REFASTEN SECURELY.
• DO NOT USE CORROSIVE AGENTS SUCH AS SOLVENT OR ACID TO CLEAN THE FREEZER. DO NOT USE ABRASIVE CLOTHS OR CLEANSERS.
• DO NOT STORE OUTDOORS, IN DIRECT SUN, DAMP, EXTREME HEAT AND/OR COLD CONDITIONS.
• DO NOT INSTALL DIRECTLY BENEATH UNDIFFUSED AIR CONDITIONING VENTS.
• DOOR REVERSALS COMPLETED AT FACTORY ARE WARRANTED. ANY ISSUES AND SUBSEQUENT SOLUTIONS ARISING FROM CUSTOMER REVERSED
DOORS ARE THE RESPONSIBILITY OF THE END-USER. DOOR ADJUSTMENTS ARE NOT COVERED UNDER WARRANTY. INSPECT DOOR HARDWARE FOR
WEAR WHEN REVERSING OR SERVICING.
CONSEQUENTIAL, ECONOMIC AND/OR PRODUCT LOSS OR SPOILAGE IS NOT COVERED BY THIS LIMITED COMMERCIAL WARRANTY.
FAILURE TO COMPLY WITH THE INFORMATION OUTLINED IN THIS MANUAL WILL VOID
HABCO® COMMERCIAL LIMITED WARRANTY.
SAFETY - IMPORTANT! READ AND UNDERSTAND THIS INFORMATION FIRST
SERVICE AND MAINTENANCE MUST BE PERFORMED BY TRAINED PROFESSIONAL

HABCO® TECHNICAL DOCUMENT - C098791 • 10310209
© HABCO Manufacturing Inc. “HABCO, Cassette, Cold Space Merchandiser” are registered trademarks of HABCO Manufacturing Inc. Domestic and International Patents. Page 4
HABCO® Commercial Refrigerators, Powered by Cassee®, are designed
and engineered to the highest standards using only quality components
for years of reliable service. Any use of the product for purposes other
than which it was designed, will void any and all manufacturer’s war-
ranty, stated or implied.
A. INSPECTION & UNPACKING
1. A thorough inspecon of the appliance should be made prior
to formally receiving the goods from the carrier. If there are any
markings (ie. scus, dents, scratches) of the packaging, please note
this on the carrier’s delivery slip and have driver sign your copy
acknowledging damage. Common pracce will have the carrier re-
port your concerns before leaving the premises.
2. Advise your carrier, or HABCO (if shipped via our transport) of any
damage immediately, nong the following items.
3. Retain all packaging and forward HABCO a copy of the Delivery Slip
signed by carrier acknowledging damage, Serial Number of Unit,
and digital photos of area damaged and packaging next to locaon
of damage.
4. Once the appliance has been received in good condion, remove
stretch-wrap, corners protectors and bag.
WARNING: RISK OF SUFFOCATION! KEEP PLASTIC PACKAGING MATERIAL
AWAY FROM CHILDREN AND ANIMALS, AND DISPOSE SAFE AND SECURE.
5. Shipping Plaorm Removal:
WARNING: RISK OF PERSONAL INJURY! EMPLOY BEST HEALTH AND SAFETY
LIFTING PRACTICES WHEN REMOVING SHIPPING PLATFORM(S); LEVELING
CABINET; REVERSING DOORS; AND MOVING APPLIANCE. IF IN DOUBT, ASK
FOR HELP.
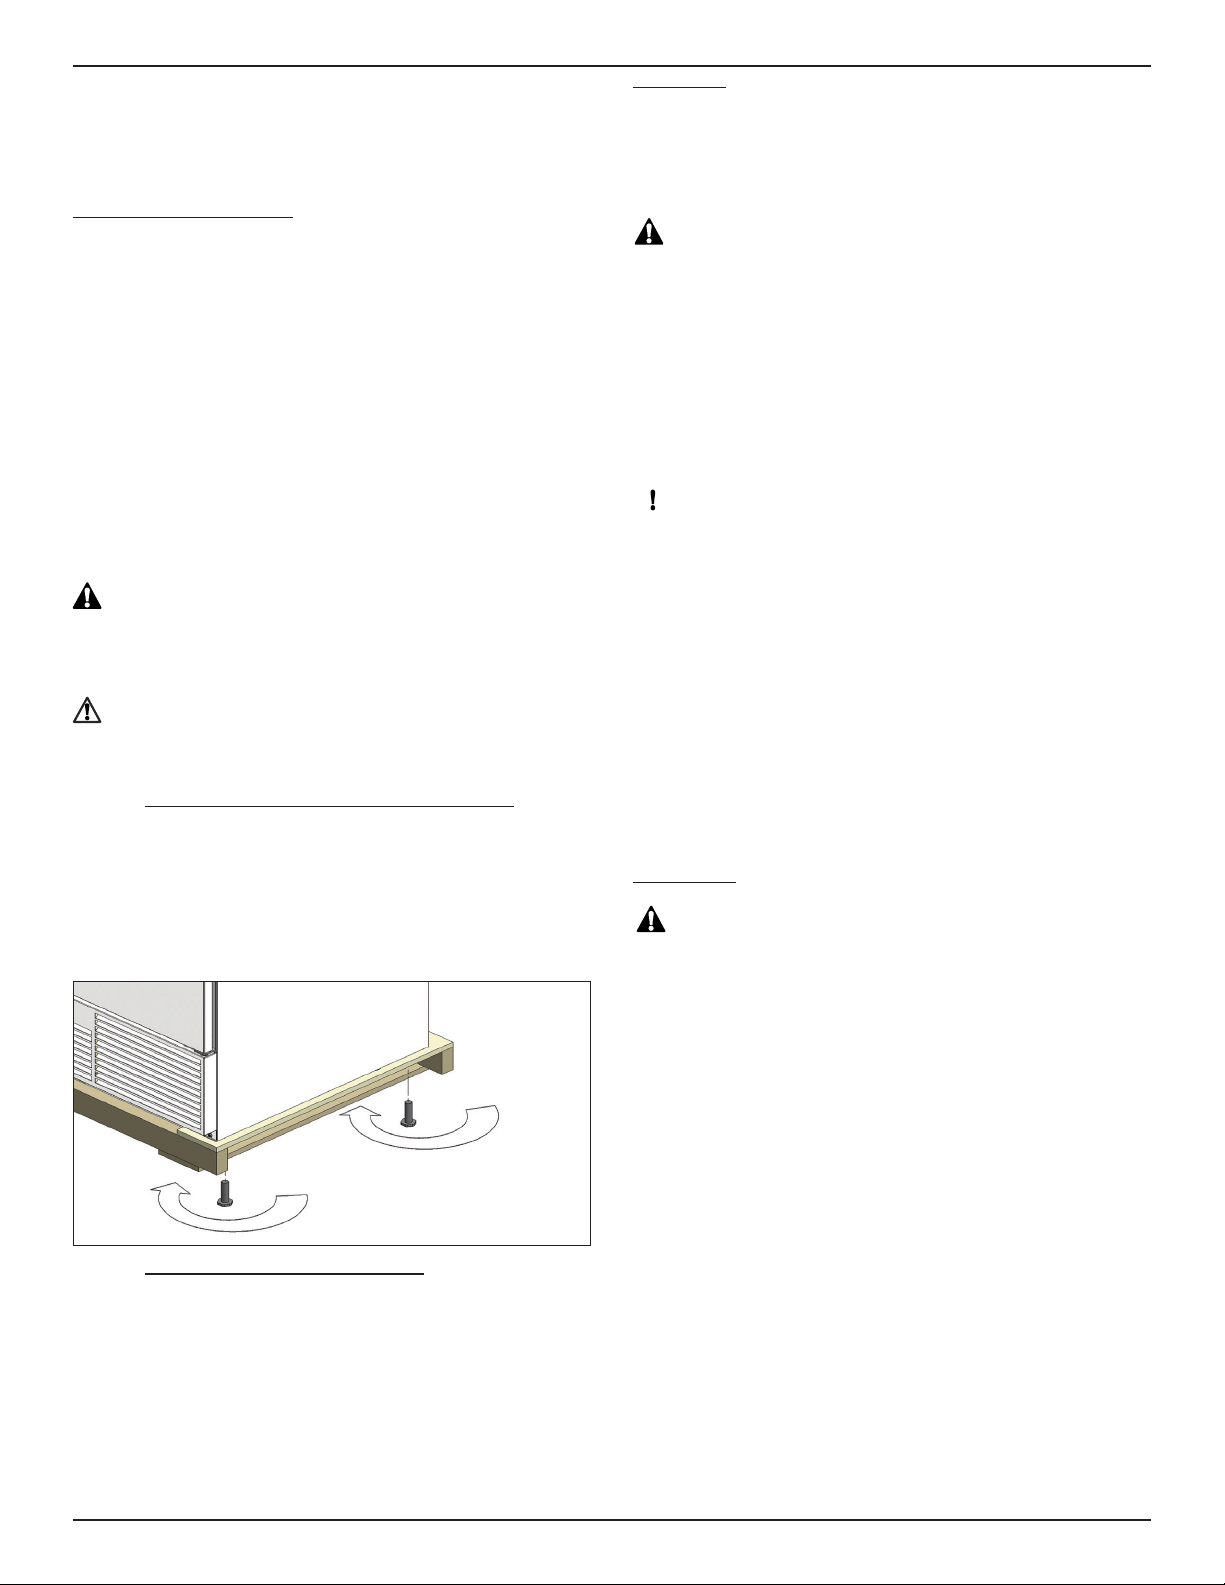
Shipping Pallet - Commercial Refrigeraon - FIG A1
a. HABCO® Foodservice and Commercial appliances are shipped
on pallets. Pallets are fastened with the appliance leg levelers.
Insets on each side of skid are provided to allow easy access
for 1-3/8” wrench or socket to remove the levelers and skid
respecvely. Once pallet is removed, reinstall levelers and
level cabinet front to back and side to side.
FIG. A1
b. CASTER KIT INSTALLATION - OPTIONAL
HABCO® Commercial Refrigerators may be equipped with an
optional caster kit. To install caster kit, follow these proce-
dures:
i. Install non-braking casters at rear of the refrigerator by
threading into existing leg leveler hole.
ii. Install braking casters at front of the refrigerator by threading
into existing leg leveler hole. WHEN ROLLING REFRIGERATOR
INTO POSITION, ENSURE THE FRONT CASTERS EXTEND OUT-
WARD FROM THE CABINET FACE.
iii. When in place, engage brakes on front casters.
B. LOCATION
1. Posion appliance on level oor. The appliance MUST be level,
otherwise door(s) may not close and condensate may not drain
property.
2. Allow 1” (2.54 cm) clearance at rear of appliance for power cord.
WARNING: RISK OF FIRE, AND ELECTROCUTION!
DO NOT ALTER, IMPACT OR PLACE PRESSURE ON POWER CORD. AL
LOW ADEQUATE SPACE FOR POWER CORD TO FLOAT FREELY BETWEEN
CABINET AND WALL AND DO NOT STRAIN AND/OR STRETCH POWER
CORD TO REACH ELECTRICAL RECEPTACLE.
DO NOT INSTALL OUTDOORS AND/OR IN DAMP CONDITIONS.
DO NOT INSTALL APPLIANCE WHERE STORAGE, HANDLING AND/OR DIS-
PENSING FLAMMABLE AND/OR EXPLOSIVE MATERIALS OCCUR.
3. Appliance must be posioned with front grill unobstructed.
NOTICE: RISK OF APPLIANCE DAMAGE!
DO NOT OBSTRUCT AIR-RETURN GRILLS LOCATED INSIDE CABINET NEAR
THE LOWER LEFT AND RIGHT OF THE REAR AIR DISTRIBUTION PANEL. DO
NOT BLOCK EXTERIOR, LOWER FRONT GRILL. FAILURE TO COMPLY MAY
RESULT IN RESTRICTED AIR CIRCULATION, SUBSTANTIALLY REDUCED COOL-
ING PERFORMANCE AND DAMAGE TO REFRIGERATION COMPONENTS
AND VOID WARRANTY.
DO NOT LOCATE APPLIANCE IN DIRECT SUNLIGHT OR IN CLOSE PROXIM-
ITY TO HIGH HEAT OR HIGH HUMIDITY SUCH AS FRYERS, RANGES, DISH-
WASHRS, STEAM COOKERS AND/OR HEATING DUCTS
DO NOT INSTALL DIRECTLY BENEATH UNDIFFUSED AIR CONDITION
ING VENTS.
DO NOT INSTALL OUTDOORS, IN DIRECT SUN, DAMP, EXTREME HEAT
AND/OR COLD CONDITIONS.
C. ELECTRICAL
WARNING: RISK OF DEATH, FIRE, EXPLOSION, ELECTRICAL SHOCK AND/OR
OTHER PERSONAL INJURY!
PLUG INTO A DEDICATED, 3 PRONG GROUNDED ELECTRICAL RECEP
TACLE AND DO NOT USE EXTENSION CORDS, POWER BARS, AND/OR
ADAPTERS TO POWER THIS APPLIANCE. IF IN DOUBT, EMPLOY A CERTI-
FIED ELECTRICIAN TO CONFIRM YOUR POWER SUPPLY MEETS CRITERIA.
DO NOT ALTER, IMPACT OR PLACE PRESSURE ON POWER CORD. AL
LOW ADEQUATE SPACE FOR POWER CORD TO FLOAT FREELY BETWEEN
CABINET AND WALL AND DO NOT STRAIN AND/OR STRETCH POWER
CORD TO REACH ELECTRICAL RECEPTACLE.
INSPECT POWER CORD FOR ANY DAMAGE PRIOR TO POWERING AND
WHENEVER HABCO® CASSETTE® IS EXCHANGED OR APPLIANCE IS MOVED.
DO NOT PLUG THIS APPLIANCE INTO WALL RECEPTACLE IF POWER
CORD IS DAMAGED.
DO NOT ACCESS MECHANICALLY FASTENED AREAS WITHOUT PERMIS
SION OF OWNER AND READING AND UNDERSTANDING PRODUCT
MANUAL.
DISCONNECT POWER BEFORE ACCESSING MECHANICALLY FASTENED
AREAS.
1. Check that the power supply conforms to the data plate located on
the upper le interior wall of the cabinet.

HABCO® TECHNICAL DOCUMENT - C098791 • 10310209
© HABCO Manufacturing Inc. “HABCO, Cassette, Cold Space Merchandiser” are registered trademarks of HABCO Manufacturing Inc. Domestic and International Patents. Page 5
D. START-UP
Tools Required: Phillips Screwdriver (Glass Swing Door Models).
NOTICE: NO PACKAGING MATERIAL IS LOCATED IN CASSETTE® CHAM
BER! DO NOT REMOVE LOWER AIR FLOW GRILL WITHOUT READING
AND UNDERSTANDING THIS MANUAL.
1. Ensure that you have received pieces supplied within cooler.
- Corresponding number of shelves standard with appliance.
- Corresponding number of shelf clips (four per shelf)
- Safety, Installaon and Instrucon Manual
- Door Handle with mounng screws (where applicable)
2. Install Door Handle (where applicable). Remove screws from han-
dle supplied. Locate interior door frame mounng holes beneath
the rubber gasket ap, and insert the screws outward so that the
screw-ends protrude on the outside of the door frame. Insert han-
dle posioning pins in upper and lower holes, and fasten screws to
handle.
3. Install shelving in the desired locaon (Fig D1), top tab rst, then
snapping boom tab securely into shelf pilaster. Shelf clips adjust-
able in 1/2” increments.
FIG. D1FIG. D1
4. POWER UP APPLIANCE. Allow adequate me for appliance to pull-
down to opmal temperature and load with product.
NOTICE: RISK OF APPLIANCE DAMAGE!
APPLIANCE MUST BE RUN FOR A PERIOD OF 24 HOURS PRIOR TO USE.
DO NOT OVERLOAD CABINET WITH PRODUCT. LOADING PRODUCT HIGHER
THAN THE LOAD LEVEL LINE. MAY RESULT IN RESTRICTED AIR CIRCULATION
AND SUBSTANTIALLY REDUCED COOLING PERFORMANCE AND/OR FROZEN
PRODUCT.
E. THERMOSTAT LOCATION & ADJUSTMENT
WARNING: RISK OF DEATH, FIRE, EXPLOSION, ELECTRICAL SHOCK AND/OR
OTHER PERSONAL INJURY!
DO NOT ACCESS MECHANICALLY FASTENED AREAS WITHOUT PERMIS
SION OF OWNER AND READING AND UNDERSTANDING PRODUCT
MANUAL.
DISCONNECT POWER BEFORE ACCESSING MECHANICALLY FASTENED
AREAS.
NOTICE: DIGITAL THERMOSTAT ADJUSTMENT FROM SPECIFIC PARAM
ETERS OUTLINED IN THIS GUIDE MAY CAUSE PRODUCT LOSS. ISSUES
ARISING FROM ALTERATIONS OF FACTORY PRESET PARAMETERS ARE
NOT COVERED UNDER WARRANTY.
All HABCO® Cassee® models are preset at the factory to maintain 33ºF
(1ºC) to 38ºF (3.3ºC). Your HABCO® Cassee® will be equipped with a
Micro-Processor Thermostat (Fig E1).
The HABCO® Commercial Refrigerator you have received has been fac-
tory calibrated for a customized temperature range as noted above.
The controller will require a short period of me to adjust to new tem-
perature readings aer door opening and product loading. Once the
controller stabilizes on the new product temperature, refrigeraon will
begin and recover rapidly.
1. SET POINT ADJUSTMENT
• Press and hold the WRENCH KEY;
• The current set point temperature will ash;
• Using ADJUST UP or DOWN KEY select desired Set Point;
• Press WRENCH KEY again to save new seng.
Tools Required: Phillips Screwdriver (for lower grill removal only)
Some Micro-Processor Thermostat equipped models may require remov-
al of lower grill (see secon G) to adjust thermostat. Note: Follow Warn-
FIG. E1FIG. E1
COOLING FAN(S)
ON MODE
UNIT COOLING
MODE ON SYMBOL
ADJUST
WARMER KEY
ADJUST
COLDER KEY
PRESS TO SILENCE
OUT-OF-RANGE
AUDIBLE ALARM*
2. CHANGING CONTROL DISPLAY SETTINGS BETWEEN °F AND °C:
i.
ii. -
ible
iii.
-

HABCO® TECHNICAL DOCUMENT - C098791 • 10310209
© HABCO Manufacturing Inc. “HABCO, Cassette, Cold Space Merchandiser” are registered trademarks of HABCO Manufacturing Inc. Domestic and International Patents. Page 6
F. LIGHTING
WARNING: RISK OF DEATH, FIRE, EXPLOSION, ELECTRICAL SHOCK AND/OR
OTHER PERSONAL INJURY!
DO NOT ACCESS MECHANICALLY FASTENED AREAS WITHOUT PERMIS
SION OF OWNER AND READING AND UNDERSTANDING PRODUCT
MANUAL.
DISCONNECT POWER BEFORE ACCESSING MECHANICALLY FASTENED
AREAS.
MAINTENANCE AND REPLACEMENT OF LED LIGHT STRIPS AND RELAT-
ED DRIVER COMPONENTS TO BE PERFORMED BY A QUALIFIED
TECHNICIAN ONLY.
• Solid door models’ lights are actuated automacally when door(s)
are opened.
• SE18/24/28 model Light Switch is located on the right front face of
the horizontal lighng assembly, as you face the appliance. Switch
controls both sign and interior on SE18M and SE24M.
• SE42/46 model Light Switch is located at the rear top of the center
post above the lighng array.
G. CASSETTE® ACCESS & REMOVAL FOR STANDARD MAINTENANCE
WARNING: RISK OF DEATH, FIRE, EXPLOSION, ELECTRICAL SHOCK AND/OR
OTHER PERSONAL INJURY!
DO NOT ACCESS MECHANICALLY FASTENED AREAS WITHOUT PERMIS
SION OF OWNER AND READING AND UNDERSTANDING PRODUCT
MANUAL.
DISCONNECT POWER BEFORE ACCESSING MECHANICALLY FASTENED
AREAS.
INSPECT POWER CORD FOR ANY DAMAGE PRIOR TO POWERING AND
WHENEVER HABCO® CASSETTE® IS EXCHANGED OR APPLIANCE IS MOVED.
DO NOT PLUG THIS APPLIANCE INTO WALL RECEPTACLE IF POWER
CORD IS DAMAGED.
DO NOT ACCESS MECHANICALLY FASTENED AREAS WITHOUT PERMIS
SION OF OWNER AND READING AND UNDERSTANDING PRODUCT
MANUAL.
DISCONNECT POWER BEFORE ACCESSING MECHANICALLY FASTENED
AREAS.
DANGER: RISK OF FIRE OR EXPLOSION. FLAMMABLE REFRIG-
ERANT USED. TO BE REPAIRED ONLY BY TRAINED SERVICE PER-
SONNEL. DO NOT USE MECHANICAL DEVICES TO DEFROST RE-
FRIGERATOR. DO NOT PUNCTURE REFRIGERANT TUBING. R290
REFRIGERATION SYSTEM (CASSETTE) SHOULD ONLY BE USED IN
A HABCO UNIT THAT IS DESIGNED AND APPROVED FOR R290.
WARNING: RISK OF PERSONAL INJURY!
EMPLOY BEST HEALTH AND SAFETY LIFTING PRACTICES WHEN REMOV-
ING SHIPPING PLATFORM(S); LEVELING CABINET; REVERSING DOORS; AND
MOVING APPLIANCE. IF IN DOUBT, ASK FOR HELP.
USE CARE WHEN HANDLING OR CLEANING METAL PARTS.
1. To access single door Cassee® loosen two bolts located on the
lower kick plate of the air ow grill (Fig G1).
FIG. G1FIG. G1
2. Then remove two screws located in ange at the top of air ow
grill. Grill will li up and o the boom screws (Fig G1) Gently
move grill away from front face of cabinet ensuring that you do
not pull wiring aached to digital controller (Fig G2). Swing grill
vercally upward and rest at le hand side of cabinet.
FIG. G2FIG. G2
i. Double Door Added Step
Double Door Cassee® models feature added support in
the form of a bracket located between the Cassee® base
and the Cassee® chamber ceiling. To remove the Cas-
see® from these models completely remove upper fasten-
ing screws, and slide Cassee® out of cabinet. Bracket will
remain axed to Cassee® (Fig G3).
FIG. G3FIG. G3

HABCO® TECHNICAL DOCUMENT - C098791 • 10310209
© HABCO Manufacturing Inc. “HABCO, Cassette, Cold Space Merchandiser” are registered trademarks of HABCO Manufacturing Inc. Domestic and International Patents. Page 7
3. Disconnect the Cassee® from receptacle upper right wall of
Cassee® chamber (Fig G4).
FIG. G4FIG. G4
4. Grasp mid-plaorm of the Cassee® ensuring plug is clear, and
gently slide out (Fig G5).
FIG. G5FIG. G5
5. Use of hand cart to transport the Cassee® is recommended to
minimize undue liing.
NOTICE: RISK OF APPLIANCE DAMAGE! AFTER ACCESSING REFRIGERATION
OR ANY OTHER MECHANICALLY FASTENED AREAS OF THE APPLIANCE, RE-
FASTEN SECURELY.
H. DOORS
WARNING: RISK OF DEATH, FIRE, EXPLOSION, ELECTRICAL SHOCK AND/OR
OTHER PERSONAL INJURY!
DO NOT ACCESS MECHANICALLY FASTENED AREAS WITHOUT PERMIS
SION OF OWNER AND READING AND UNDERSTANDING PRODUCT
MANUAL.
DISCONNECT POWER BEFORE ACCESSING MECHANICALLY FASTENED
AREAS.
WARNING: RISK OF PERSONAL INJURY! EMPLOY BEST HEALTH AND SAFE-
TY LIFTING PRACTICES WHEN REMOVING SHIPPING PLATFORM(S); LEVEL-
ING CABINET; REVERSING DOORS; AND MOVING APPLIANCE. IF IN DOUBT,
ASK FOR HELP.
NOTICE: HABCO® WARRANTS FACTORY DOOR REVERSAL ONLY. ANY IS
SUES AND SUBSEQUENT SOLUTIONS ARISING FROM FIELD REVERSED
DOORS ARE THE RESPONSIBILITY OF THE CUSTOMER. DOOR ADJUST
MENTS ARE NOT COVERED UNDER WARRANTY. INSPECT DOOR HARD
WARE FOR WEAR WHEN REVERSING OR SERVICING.
Easy Mount Swing Door Reversal
Door is mounted at factory with handle on le hand side and hinge on
right side.
1. Remove Lower Grill and Sign/Header Assembly – if applicable.
2. Door closed remove hinge tensioning bracket (Fig H1i) and save
two top retaining screws and one star washer (See Fig H1). Note:
Though door gasket magnet will hold door in place, ensure unfas-
tened door is secured from disengaging from cabinet.
FIG. H1
i
3. Tilt door sideways out of the upper cabinet mounted bracket notch
(Fig H2i) and li to remove door boom pivot pin from lower
mounng bracket. Save nylon washers, upper bushing and stop
spring from hinge sha as shown in (Fig H2ii) and any nylon wash-
ers from boom door pivot pin.
FIG. H2
i
ii
4. Remove upper cabinet mounted bracket and refasten screws to
the opposing side of the cooler (Fig H3). Remove lower cabinet
mounted bracket and re-install to opposing side of the cooler. En-
sure nylon bushing remains in place in lower mounng bracket
hole.
FIG. H3

HABCO® TECHNICAL DOCUMENT - C098791 • 10310209
© HABCO Manufacturing Inc. “HABCO, Cassette, Cold Space Merchandiser” are registered trademarks of HABCO Manufacturing Inc. Domestic and International Patents. Page 8
5. On the door, reverse door hinge (Fig H4i) and boom pivot plate
(Fig H4ii). Note: Floang steel fastening plates are installed inside
door frame to fasten hinge and boom pivot plate securely to
door. To ensure door hardware is refastened securely, stand door
upright and lt towards hinge side. Floang steel fastening plates
will slide into place (can be seen through mounng holes in door
when in posion). Refasten both Pivot Plate and Hinge.
FIG. H4
i
ii
6. Rotate door 180º to opposing hinge posion. Door hinge now at
top le with handle on right side.
7. Place nylon washer on lower door pivot pin. Posion the lower
door pivot pin with washer into the lower mounng bracket bush-
ing.
8. Place nylon washer and stop spring onto hinge post. Posion door
hinge post in the upper cabinet mounted bracket, sliding the hinge
post into outer notch located on the cabinet mounted bracket.
9. Door in posion, reinstall hinge tensioning bracket onto the square
poron of the hinge post at 45° angle from face of cabinet (Fig H5).
FIG. H5
10. Push hinge tensioning bracket into tensioned posion (ush to face
of cabinet mounted bracket) and fasten securely with set -screw
(center hole of the hinge tensioning bracket (Fig H6i)).
FIG. H6
i
a. Ensure door is mounted properly. Open the door 10° and it
should close by itself.
b. Reinstall lower air ow grill and sign/header assembly in place,
if applicable.
c. Restore power to appliance.
Sliding Door Removal and Adjustment
Instrucons below outline removal of HABCO® Sliding Doors for main-
tenance and door roller skew adjustment. Periodically, door skew may
require adjustment due to use and seling of cabinet.
Sliding Door Removal:
1. Looking up under the upper rail cover where the two sliding doors
meet in the center, make note of how the “V” shaped door track
sealer strip (Fig H7i), freely rests atop inner (Fig H7ii) and outer
door frame (Fig H7iii) edges to create a seal. Ensure that sealer
strip does not curl over and bind against the vercal surface of
door frame (Fig H8).
FIG. H7FIG. H7
i
ii iii
CORRECT
INCORRECT
FIG. H8FIG. H8
2. Standing in front of le hand sliding door, idenfy door roller re-
moval slot as this is where you will index the door roller (Fig H9).

HABCO® TECHNICAL DOCUMENT - C098791 • 10310209
© HABCO Manufacturing Inc. “HABCO, Cassette, Cold Space Merchandiser” are registered trademarks of HABCO Manufacturing Inc. Domestic and International Patents. Page 9
DOOR REMOVAL SLOT(S)
FIG. H9FIG. H9
3. Move right hand door to center posion within cabinet door open-
ing (Fig H10).
FIG. H10FIG. H10
4. Grasping right hand door rmly, one third from top, li door up-
ward and out o top track, then swing the door boom up and
away from boom track.
5. Remove door from cabinet, down and away, resng against right
front wall.
6. Remove inner, le door, in the same manner except rather than
liing up and out o track, li door rollers up and swing boom
of door into cabinet. Tilt door, liing and resng against le front
wall.
Correct Door Closure Spring Orientaon:
Right hand door closure spring must be installed on the right hook of
the le roller bracket (as shown Fig. H11). Conversely, the le hand
door closure spring must be installed on the le hook of the right roller
bracket.
FIG. H11FIG. H11
Sliding Door Reinstallaon:
1. Review door removal steps.
2. Grasping right hand door rmly, one third from top, li door into
center posion within cabinet opening.
3. Tilng the top of door inward, li it upward onto upper track using
roller slots for adequate clearance. Sll grasping the door rmly,
swing the boom into the lower track.
4. Ensure that both rollers are seated into the door track at top, and
door boom is contained within boom track.
5. Inspect upper horizontal top door track “V” shaped sealer strip to
ensure that it is not binding, but freely resng atop inner and outer
door frame edges to create a seal (Fig 4).
6. Test both inner and outer doors to ensure they do not bind. If there
is resistance on opening or closure, then check:
a. rollers are seated into upper door track;
b. upper horizontal top door track “V” shaped sealer strip is
freely resng on inner and outer door frame edges (should
move le and right, up and down slightly when shaken);
c. door frame(s) is posioned within boom “W” track.
Sliding Door Skew Adjustment:
HABCO® sliding doors have a skew adjustment feature.
Tools Required: Adjustable Wrench 3/16” Allen Key
1. Locate roller track cover at top of appliance above doors. Remove
screws located on both walls and ceiling behind roller track cover.
2. Remove doors, following instrucons within this secon.
3. Adjustable mounng brackets are pre-installed at the lowest set-
ng and tested for uid moon prior to packaging. At the lowest
seng, the door hangs at the lowest point relave to the boom
track of the cabinet (Fig H12).
4. Using wrench and Allen key reposion rollers, on one door rst, to
the mid-point seng. Reinstall door with spring and check that
there is no interference between the boom of door and boom
“W” track. If the door rides freely above the boom of the track,
adjust the second door similarly, and reinstall.
Note: Adjustment of door roller should only be made to mid-point
seng or mounng screw heads will interfere with reinstallaon.
5. Reinstall the roller panel cover with exisng screws.
SHOWN AT TOP OF OBLONG HOLE,
DOOR IN LOWEST POSITION
FIG. H12FIG. H12

HABCO® TECHNICAL DOCUMENT - C098791 • 10310209
© HABCO Manufacturing Inc. “HABCO, Cassette, Cold Space Merchandiser” are registered trademarks of HABCO Manufacturing Inc. Domestic and International Patents. Page 10
I. PREVENTATIVE MAINTENANCE
WARNING: RISK OF DEATH, FIRE, EXPLOSION, ELECTRICAL SHOCK AND/OR
OTHER PERSONAL INJURY!
DO NOT ACCESS MECHANICALLY FASTENED AREAS WITHOUT PERMIS
SION OF OWNER AND READING AND UNDERSTANDING PRODUCT
MANUAL.
DISCONNECT POWER BEFORE ACCESSING MECHANICALLY FASTENED
AREAS.
WARNING: RISK OF PERSONAL INJURY!
EMPLOY BEST HEALTH AND SAFETY LIFTING PRACTICES WHEN REMOV-
ING SHIPPING PLATFORM(S); LEVELING CABINET; REVERSING DOORS; AND
MOVING APPLIANCE. IF IN DOUBT, ASK FOR HELP.
EMPLOY BEST HEALTH AND SAFETY PERSONAL PROTECTION PRACTICES
AND ADHERE TO MANUFACTURER’S WARNINGS WHEN USING TOOLS AND
CLEANING AGENTS.
USE CARE WHEN HANDLING OR CLEANING METAL PARTS.
NOTICE: RISK OF APPLIANCE DAMAGE!
MAINTAIN A CLEAN CONDENSER COIL (BOX-SHAPED COMPONENT LO-
CATED BEHIND THE LOWER GRILL) TO PREVENT DAMAGE TO REFRIGERA-
TION PARTS AND POOR PERFORMANCE NOT COVERED UNDER WARRANTY.
QUALIFIED PROFESSIONAL TO DISCONNECT APPLIANCE FROM ELECTRI-
CAL RECEPTACLE PRIOR TO REMOVING AIR FLOW GRILL FOR MAINTE-
NANCE OR SERVICE.
USE ONLY MILD ANTI-BACTERIAL, NON-ABRASIVE ‘DISH SOAP’ DETERGENT
AND SOFT CLOTH OR BRISTLE BRUSHES FOR CLEANING YOUR APPLIANCE.
FOR STUBBORN RESIDUE, SUCH AS GREASE BUILD-UP ON CONDENSER
(HEAT-EXCHANGE) COIL, EMPLOY THE SERVICES OF A QUALIFIED PROFESSIONAL.
KEEP YOUR CONDENSER
(HEAT EXCHANGE) COIL CLEAN TO AVOID ELECTRICAL/COM-
PONENT OVERHEATING AND POTENTIAL OF FIRE; PREVENT
DAMAGE TO REFRIGERATION PARTS; AND, MAINTAIN OPTI-
MUM COOLING PERFORMANCE. FAILURE TO DO SO WILL VOID
WARRANTY.
Commercial Refrigerators require the grill to be removed for condenser
(heat-exchange) coil cleaning (Fig I1). All refrigeraon devices require
thorough cleaning of the condenser coil (heat exchange coil located be-
hind the lower grill). Visually inspect the condenser coil for build-up of
grease, oor wax, dust and lint monthly. At minimum, cleaning should
be completed on a monthly basis. Use a dusng wand (Fig I1) and a
vacuum with so bristle nozzle, to remove light dust and debris.
FIG. I1FIG. I1
If the build-up proves to be too dicult to manage, please contact a
qualied professional.
-An open box of baking soda placed on a shelf at the rear of the cabi-
net will help prevent odors. The box should be replaced every three
months.
-Maintain clean cooler, inside and out, at all mes.
J. CLEANING PROCEDURES
WARNING: RISK OF DEATH, FIRE, EXPLOSION, ELECTRICAL SHOCK AND/OR
OTHER PERSONAL INJURY!
DO NOT ACCESS MECHANICALLY FASTENED AREAS WITHOUT PERMIS
SION OF OWNER AND READING AND UNDERSTANDING PRODUCT
MANUAL.
DISCONNECT POWER BEFORE ACCESSING MECHANICALLY FASTENED
AREAS.
WARNING: RISK OF PERSONAL INJURY!
USE ONLY MILD ANTI-BACTERIAL, NON-ABRASIVE ‘DISH SOAP’ DETERGENT,
AND SOFT CLOTH (OR BRISTLE BRUSHES WHERE SPECIFIED) FOR CLEANING
YOUR APPLIANCE. FOR STUBBORN RESIDUE, SUCH AS GREASE BUILD-UP
ON CONDENSER (HEAT-EXCHANGE) COIL, EMPLOY THE SERVICES OF A
QUALIFIED PROFESSIONAL.
USE CARE WHEN HANDLING OR CLEANING METAL PARTS.
NOTICE: RISK OF APPLIANCE DAMAGE! AFTER ACCESSING REFRIGERATION
OR ANY OTHER MECHANICALLY FASTENED AREAS OF THE APPLIANCE, RE-
FASTEN SECURELY.
1. Interior Cabinet Cleaning: A mild mixture of an-bacterial deter-
gent and warm water with a so cloth may be used. Rinse and dry
thoroughly.
2. Interior Stainless Steel Cleaning: For general cleaning of the stain-
less steel oor please follow instrucons in secon (i) noted above.
3. Evaporator Chamber Cleaning: Refrigeraon Cassee® must be re-
moved according to Secon G of this manual. A mild mixture of
an-bacterial detergent and warm water with a so cloth, may be
used to clean the general surfaces within the appliance evaporator
chamber. Rinse and dry thoroughly. Inspect foam gaskets located
on cold air side of insulated Cassee® bulkhead for any signs of
bacterial contaminaon (decomposion and/or odor) . If contami-
naon is at all prevalent, the foam gaskets must be replaced. Call
for service.
4. Cleaning Condensate Drain Tubes: Refrigeraon Cassee® must be
removed according to Secon G of this manual. Condensate drain
tubes run from the evaporator pan to the condensate pan on all
HABCO® Cold Space Merchandiser® models.
NOTICE: RISK OF APPLIANCE DAMAGE! DO NOT PUSH, LEAN-ON OR FORCE
STAINLESS STEEL TUBE EXTENDING FROM CABINET IN THE CASSETTE®
REFRIGERATION CHAMBER. DO NOT FORCE REFRIGERATION CASSETTE®
WHEN REINSTALLING. SLIDE INTO PLACE GENTLY AND EVENLY, APPLYING
EQUAL PRESSURE TO EACH SIDE OF CASSETTE®.
i. Place a pan beneath the condensate-tray-end of the stain-
less steel tube. Remove debris with a nylon so bristle, bole
brush soaked in an-bacterial detergent and warm water.
Flush with a mild mixture of anbacterial detergent and warm
water several mes to remove debris or residue. Rinse thor-
oughly.

HABCO® TECHNICAL DOCUMENT - C098791 • 10310209
© HABCO Manufacturing Inc. “HABCO, Cassette, Cold Space Merchandiser” are registered trademarks of HABCO Manufacturing Inc. Domestic and International Patents. Page 11
5. Cleaning Refrigeraon Cassee® & Seals: A mild soluon of an-
bacterial detergent and warm water with a damp cloth or sponge
should be used to clean foam gaskets within the evaporator cham-
ber, and rubber Cassee® compression gaskets. Do Not Pull, Re-
move, Place Undo Stress on, or Submerge Cassee® or Gaskets
while cleaning. Dirt, abrasion and cleanser residue will reduce sup-
pleness of gaskets. Cleaning these items will enhance product life.
HABCO® does not otherwise recommend cleaning of the refrigera-
on Cassee® except for procedures outlined under “Preventave
Maintenance Procedures”, unless performed by a Qualied Profes-
sional.
6. Shelf Cleaning: Remove shelf from cabinet. Using so cloth with
mild soluon of anbacterial detergent and warm water, wash
shelf by hand.
NOTICE: RISK OF APPLIANCE DAMAGE! DO NOT SOAK SHELF IN ANY LIQ-
UIDS OTHER THAN WATER AND DETERGENT.
For areas of shelf where cloth cannot fully reach, use brush
(HABCO® P/N C097589) with soap soluon to remove any remain-
ing contaminants (see Figures J1 and J2). Once all contaminants are
removed, rinse and dry thoroughly with so cloth. Allow shelf to
air dry completely before returning it to cabinet.
FIG. J1FIG. J1
FIG. J2FIG. J2
7. Glass Cleaning: For everyday glass cleaning, a 50:50 Vinegar & Wa-
ter mixture is recommended.
8. Sliding Door Channel Cleaning: Sliding door channels should be
vacuumed daily to remove debris, which may hinder smooth op-
eraon. Use a mild soluon of an-bacterial detergent and warm
water with a so damp cloth for cleaning. For stubborn residue,
gently massage with soapy soluon and a so bristle nylon brush.
Occasionally, syrup or food products may dry and harden in the
tracks impeding the operaon of the doors. Remove Immediately!
Improper door closure will tax the refrigeraon system, increase
energy consumpon, and may cause excessive condensaon. Fail-
ure to maintain unobstructed door closure will lead to damage not
covered by HABCO® Limited Commercial Warranty.
9. Cleaning the Magnec Posive-Seal Gasket: A mild soluon of an-
bacterial detergent and warm water with a damp cloth or sponge
should be used to clean all appliance door gaskets. Do Not Pull, Re-
move, Place Undo Stress on, or Submerge Any Door Gaskets While
Cleaning.
10. Pilaster Removal for Cleaning: Remove product and shelving. Re-
move each pilaster strip and clean beneath. Replace pilasters.
11. Air Distribution Panel Removal for Cleaning: Remove pilasters and
rear Air Distribuon Panel. Carefully remove Air Distribuon Panel
from cabinet ensuring that edges do not scratch interior surfaces.
Sanize surfaces and reinstall Air Distribuon Panel.
12. Preparing the Refrigerator for Extended Shutdown & Storage:
WARNING: RISK OF ENTRAPMENT! WHEN STORING, ENSURE THAT DOOR
IS BLOCKED SLIGHTLY AJAR, BUT SECURED NOT TO OPEN.
NOTICE: RISK OF APPLIANCE DAMAGE! DO NOT STORE OUTDOORS, IN DI-
RECT SUN, DAMP, EXTREME HEAT AND/OR COLD CONDITIONS.
i. Disconnect power to refrigerator. Clean thoroughly following
secon J instrucons. Remove shelving and clean according
to instrucons. Leave an open box of baking soda inside with
door blocked slightly ajar, but secured not to open. Cover en-
re refrigerator with appropriate, breathable cover.

HABCO® TECHNICAL DOCUMENT - C098791 • 10310209
© HABCO Manufacturing Inc. “HABCO, Cassette, Cold Space Merchandiser” are registered trademarks of HABCO Manufacturing Inc. Domestic and International Patents. Page 12
K. TROUBLE-SHOOTING
Prior to calling for service, check the following:
• Is the appliance plugged-into dedicated, grounded 3 prong wall
receptacle?
• Is the circuit breaker thrown or fuse blown?
• Is there adequate power?
• Is the circuit prone to power uctuaons?
• Are there other appliances on the same circuit drawing power?
• Has an extension cord, power bar or adapter, been improperly
used to connect power?
• Is the appliance overloaded with product?
• Is there adequate venlaon?
• Is the condenser plugged with grease and/or dirt?
• Are the doors closing properly?
• Do the gaskets seal snugly?
• Is the lower guide track free from debris and spillage?
• Are the shipping pods/shipping pallet removed and is the appli-
ance level?
Informaon to Provide to Qualied Service Professional:
• Serial Number of appliance (upper le interior wall);
• Appliance Installaon Address and Contact Informaon;
• Installaon Locaon Hours of Operaon;
• Nature of Problem;
• Any reports of power interrupons;
• Recent service or maintenance completed on appliance;
• Has the appliance been relocated from original installaon;
• Clear access to the appliance;
• Safety, Installaon and Instrucon Manual.
Table of contents
Other HABCO Refrigerator manuals