habitat et jardin Netto User manual

1177_86887
Netto

1
175*140*40mm
380*170*160mm
P1111-10 / 7
P1116-2
P1116-1
P1116-4-41
P1116-4-17
P1116-6/F ZIP
P1116-body
X1
P1116-5 / 10 X1 1/1
X1 1/1
X1 1/1
X1 1/1
X1 1/1
X1 1/1
1/1
X1 1/1
80*80*30mm
Ø125*210mm
310*245*8mm
230*95*80mm
225*95*80mm
300*185*95mm
1177_86887

2

3
Battery: 11.1 V DC, 5000 mAh
Charging voltage: 12.6V DC, 1000 mAh
Motor Voltage: 12 V DC
- -
1. Suction head
2. Transparent suction head part
3. Cleaner body
4. Button
5. Charging hole
6. Connector
7. Handle
8. Standard filter bag
8-1: Small micro filter bag
8-2: Bigger micro filter bag
(optional, not into the shipment )
9. Basket
10. Charger
EN

4
It stop work automatically as soon as out of water.

5

6
GETTING STARTED
1. Charger set up (1)Plug one end of the charger into the
socket, and the charger is green.
(2)Then, plug one end of charger to
P1116, the charger is red, the charger is
working now.
(3)After charging 5-6 hours, the charger
becomes green, and P1116 is fully
charged.
NOTE: The Vacuum head can be lock and unlock, When the
vacuum head is not locked, it can be rotated in 360 degrees
and make the cleaning work more conveniently.Fig[a1][a2]
NOTE:
Charge the cleaner 5-6 hours prior to the first use.
Normally cleaner can be operated 90 minutes after fully charged.
2. Handle assembly
By arrow direction to assemble the body parts, and attention the SIGN from Open to Close.
(1). Portable handle
Connection into the product
itself. The portable handle is
used to pick up P1116 and
clean the wall, step, seat,
cornor.Fig[A]
3. Suction head assembly
Insert the Suction Head directly to the suction hole of the cleaner tightly by hand.
In order to have the better suction effect, please operate the
electric cleaner as the following instructions:
(2)No need to insert the suction head onto the electric cleaner
when suction the stones and other large garbage and so on, as
the picture “B” shows.
(1)Insert the suction head when suction the small pebbles and
leaves, as the picture “A” shows.
P1116 can also connect
to standard telescopic
poles by pictures.Fig[B]
A
(3). If needed, the pole can be
installed in the direction as the
picture “C” and “D”.
C D
(2). Telescopic pole(not
included)assembly
Brushes on the suction head can be removed by pulling out directly from the head.
For Vinyl, liner and fibreglass pools, it is recommended to keep the brushes on the suction head to
prevent damage to your pool.
Note: Thisproduct can work only under water, if
out of water, it will stop working.
360°
a1 a2
B
A B

7
(1)The cleaning steps of standard filter bag(A-B-C-D-E):
(a)Rotate the both fixing knobs (each beside the filter bag) in same direction to 180 degrees, pull out
the basket and filter bag from the rear of pool cleaner.
(b)Detach the filter bag from the filter basket.
(c)Clean the filter bag and filter basket.
(d)Install the filter bag back to the filter basket, the filter bag should be accordance with the slot in
both side.
5. Cleaning the cleaner after using the electric cleaner
4. Filter bag assembly
4.1 How to choose the filter bag
4.2 How to assemble the standard filter bag
4.3 How to assemble the small micro filter bag or bigger micros filter bag
5.1 Take the transparent body off the electric cleaner
(following the OPEN-CLOSE direction, rotate to OPEN
direction 90 degrees), and take the garbage out of the
transparent body, and then clean it.The tube in the transparent
body can be took out for cleaning the body completely.Fig[A]
5.2 Take out the rear part of filter bag, and take out the filter
bag, and get out the garbage, and then clean the filter bag.
(1). Cover the filter bag out of the basket;
(2). Assemble the whole filter basket into the machine body;
(3). Clock the filter basket by two buttons as follows C & D, please tightly close the buttons when
using.
(1). Put the filter bag into the basket ;
(2). Assemble the whole filter basket into the machine body;
(3). Clock the filter basket by two buttons as follows C & D, please tightly close the buttons when
using.
(3). Bigger micro filter bag ( it is optional, needs to buy it seperately )
It is used for dirty pools, or plenty of rubbish into the pools, such as beginning of season, after big
shower or rainning.
(1). Standard filter bag
It is used for the daily pools cleaning, for leaves, hairs, trees, fruits.
(2). Small micro filter bag
It is used for small debris, such as dusts, muds.
DCBA OPEN
CLOSE
DCBA OPEN
CLOSE
A
EDCBA
OPEN
CLOSE

8
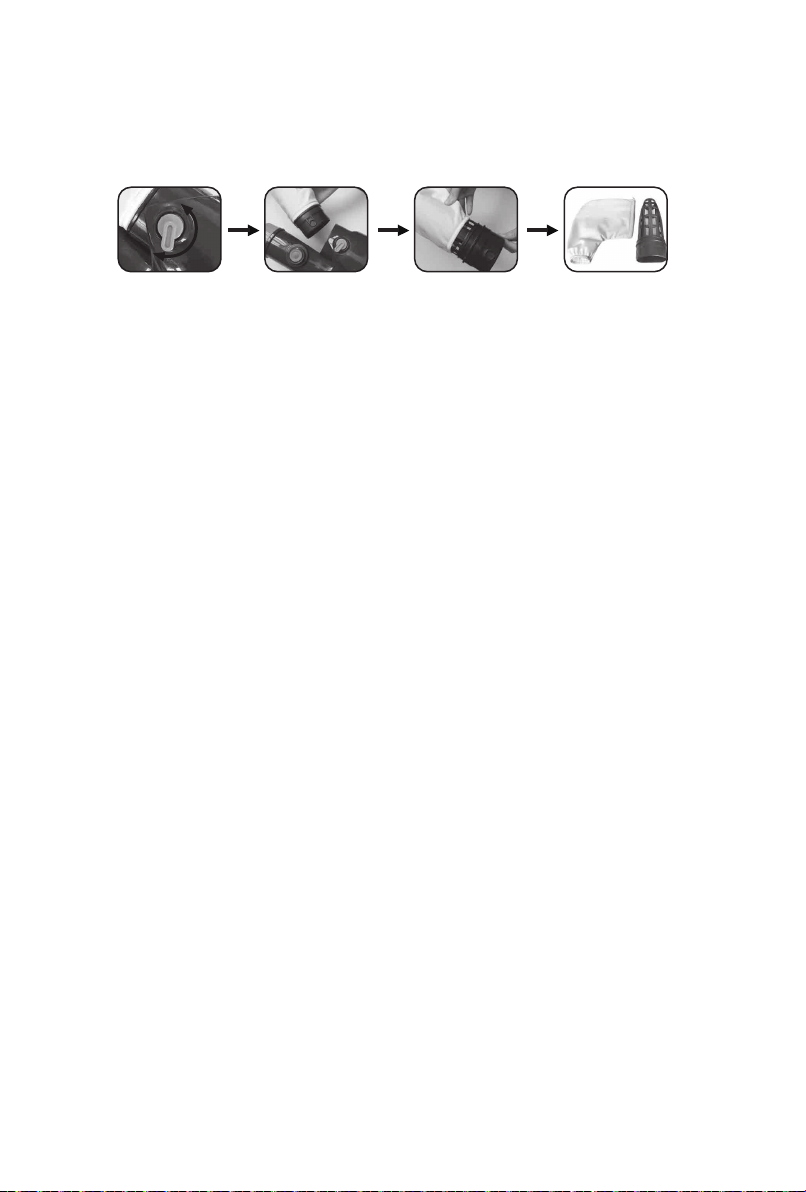
(2)The cleaning steps of small micro filter bag or bigger micro filter bag (A-B-C-D):
(a)Rotate the both fixing knobs (each beside the filter bag) in same direction to 180 degrees, pull out
the basket and filter bag from the rear of pool cleaner.
(b)Detach the filter bag from the filter basket.
(c)Clean the filter bag and filter basket.
(d)Install the filter bag back to the filter basket.
5.3 Check whether there is garbage on the impeller. If it has, take out the garbage, and clean the
impeller.
Take care not to touch wires together or allow them to contact any metal items, which would cause
sparking and/or short circuit the battery.
Never smoke or allow a spark or flame in the vicinity of the cleaner, batteries can generate gases
which could possibly ignite.
Do Not expose to fire or intense heat as this may result in an explosion.
A battery can produce a short circuit current high enough to weld a ring (or like item) to metal causing
a severe burn.
Wear complete eye protection, gloves and protective clothing when removing the battery pack.
CAUTION!
If a battery leak develops, avoid contact with the leaking acid and place the damaged battery in a
plastic bag.
If acid comes in contact with skin and clothing, wash immediately with plenty of soap and water.
If acid comes in contact with eyes, immediately flood eye with running cool water for at least 15
minutes. Get medical attention immediately.
WARNING!
Never attempt to disassemble a lithium battery.
Remove all personal items such as rings, bracelets, necklaces and watches when unwiring a lithium
battery from the vacuum unit.
6.1 BATTERY DISPOSAL
Your Rechargeable Pool Vacuum Battery is a lithium battery which must be disposed of properly is
required, please contact your local authority for information.
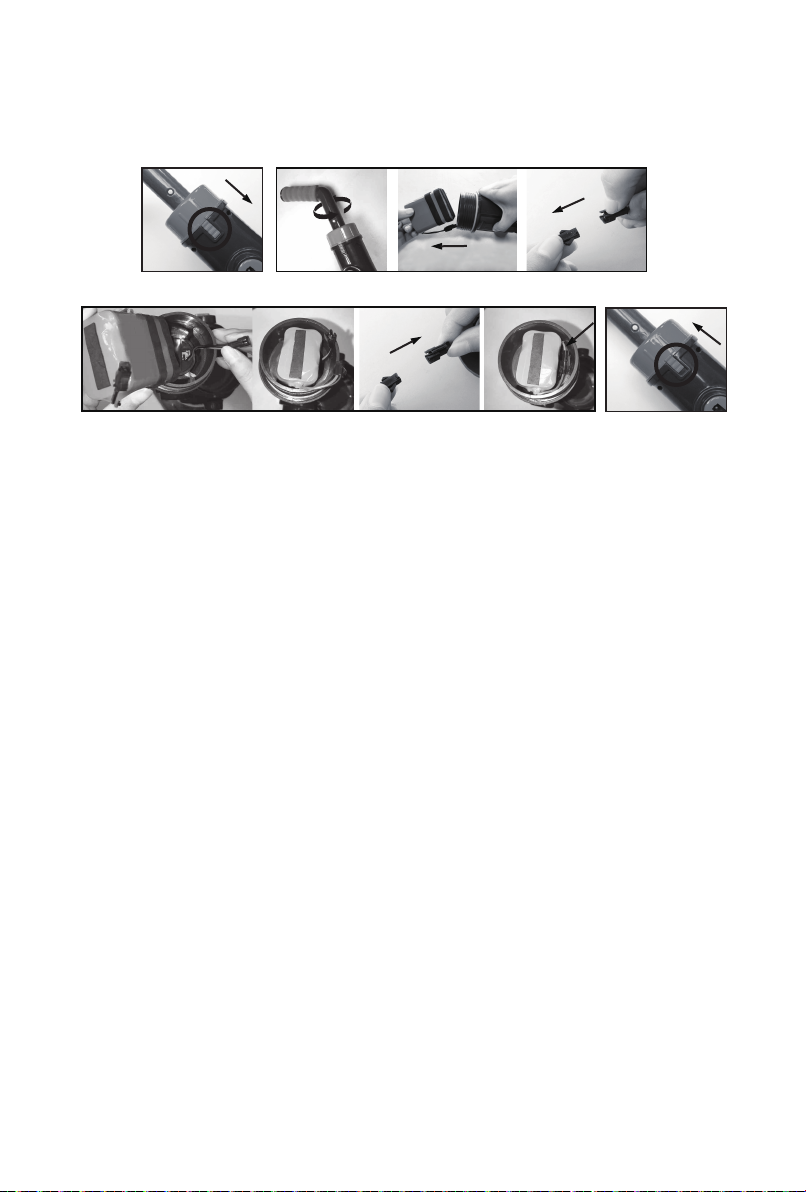
6. Battery assembly and replacement
(1) Push the button forward along the arrow direction, until it not stuck the slot of the connector.(as
picture “A” shows)
(2) Holding the body while reversing the connector , and removing the battery mounting from the
body.( as “b1”“b2” in picture “B” shows)
(3) Remove the used battery, and replace new lithium battery. Connect the battery and the fastener in
the battery holder first, see the place “c1” “c2”on picture “C”, then put in the battery.
Note:Please don’t pull the battery group heavily , and unlock the battery and the fastener,Fig[
b3]
Note:The battery should be in right place, about 10mm from the connection port, the wire in
the unoccupied place of the side.(see “c3” in picture “C”)
6.2 The steps of changing the battery
DCBA
OPEN
CLOSE

9
WARNING!
Do not use the cleaner if any damage is found.
Pollution of the liquid could occur due to leakage of lubricants.
Do not operate this cleaner when people/pets are in the water.
DO NOT use the cleaner without intact filter sock and sleeve in place. Using you cleaner without
intact filter sock and sleeve in place will VOID your warranty.
Risk of Suction Entrapment Hazard. This cleaner generates suction. Avoid hair, body or any loose
parts of your clothing to contact with the suction hole of the cleaner in operation.
Never insert body parts, clothing or other objects into the openings and moving parts of the cleaner.
Be sure the cleaner is fully immersed in the water before operating. DO NOT operate it outside of
water. It will lead to failure of the shaft seals/motor, and then VOID the warranty.
7. Operation
(4) Twist the connector into the body in clockwise, until the button can buckle in the slot of connector.
As picture“D”shows.
(5) Now you can use the cleaner according to the instruction normally.
DO NOT use this cleaner to pick up any toxic substance, flammable or combustible liquids such as
gasoline, or operate in the presence of explosive or flammable fumes.
DO NOT use this cleaner immediately after pool shocking. It is recommended to leave the pool
circulating for at least 24-48 hours.
Use original accessories delivered with this product .
CAUTION!
DO NOT leave the cleaner in the water when not in use.
The transparent suction part should be well installed before your powering the electric cleaner. (the
transparent suction part has the button protection system in case the impeller will get your hands hurt)
Note: This product can work only under water, if out of water, it will stop working.
c1 c3c2
b1 b3b2
D
C
BA

10
8. Trouble shooting
Problem Possible Cause Remedy
Battery is running out
Impeller is jammed
Impeller is broken
Detach the filter basket and filter bag, and
clean them.
(2)Take the rubbish out
Replace a new filter sock.
Power off the cleaner and visually check the
gap in middle of the cleaner to see if the
impeller is jammed. you can use your hand
to rotate the impeller two circles to make the
impeller rotation looser.
WARNING! Make sure cleaner is power
off when servicing the cleaner.
Charge the battery again. Normally cleaner
can operate 90 minutes after fully charged.
When the filter bag is
full
(2)Full with rubbish
Filter sock is damaged
Garbage flowing out from
the Transparent Suction
Head part
Garbage flow out from the
rear filter bag
Cleaner does not
capture the debris
Side pin broken Using the new V-Shape clip
Contact your dealer for impeller replacement.
Handle/pole connector
cannot be secured in assembly
The charger is out of
order WARNING! Using wrong charger will
result in damaging the cleaner /battery
and void the warranty.
Contact dealer for proper transformer.
Cleaner cannot be recharged
Battery is dead
WARNING! When you replace the
battery, please contact the local dealers to
purchase the original lithium battery in
case that the electric cleaner is destroyed.
Contact dealer for battery replacement.
(1)The soft rubber of rear impeller is like a
door in case the garbage in the filter bag will
flow backwards into impeller and the cover
of transparent suction head part.
(1)The soft rubber of
the rear impeller is
broken.

11
- -
Nettoyeur électrique rechargeable
Batterie:
Tension de charge:
Tension du moteur:

12
Veillez à ce que l’ aspirateur soir complètement immergé dans
l’ eau avant l’ opération. NE PAS utiliser l’ appareil en dehors de
l’ eau. Cela pourrait endommager le système/moteur et annulerait la
garantie.

13

14
MISE EN ROUTE
2. Montage du manche
attention au sign
1. Mise en place pour la recharge de la batterie
1.
2.
que le chargeur est en marche.
3. Après 5 ou 6 heures de charge,
qui indique que la charge de
P1116 est complète.
P1116
REMARQUE : entre 5 et 6
Normalement, la charge complète dure environ
90 minutes.
Remarque : ce produit fonctionne uniquement
fonctionner.

15
AC D
(1) Manche portable. Il est
pour prendre P1116 et
nettoyer les parois, les
marches, les sièges et les
(2)
(non inclus). P1116 peut
[Figure B].
(3)
dans les directions
[Figure D].
3. Assemblage de la tête pivotant
dans la base du couvercle transparent.
utiliser le nettoyeur comme ci-dessous:
cailloux et les
pour aspirer les pierres et autres grands
en les retirant directement de la tête.
Pour les piscines en liner et fibres de verre, il est
de la piscine.
4. Montage du filtre
4.1. Comment choisir le filtre
(1) Filtre standard
Il est emp
les feuilles, les cheveux, les branches ou les fruits.
(2) Filtre micro petit
(3)
(1)
(2)
(3)
Filtre
fortes pluies.
enlever
360°
a1 a2
B
DCBA OPEN
CLOSE
A B

16
(1)
(2)
(3)
5.1
5.2
DCBA OPEN
CLOSE
A
EDCBA
OPEN
CLOSE
DCBA
OPEN
CLOSE

17
2
c2c1
6.1
5.3
La batterie du nettoyeur électruque de piscine est une batterie au lithium qui doit être
recyclé, selon les normes existantes. Contacter les autorités locales pour plus
d’informations.
Remarque : ce produit fonctionne uniquement sous l'eau. En dehors de l'eau, il cesse de
fonctionner.
b3
c3

18
c1 c3c2
b1 b3b2
D
C
BA

19
This manual suits for next models
1
Table of contents