hager coviva Smartbox TKP100A User manual

zQuickstart
guide
aGuide de
démarrage rapide
eKurzanleitung
yGuida di avvio
rapido
TKP100A

RGB Light Signaling
A convenient way to be informed of the status of your home !
Flashing Fixed Flashing Fixed* Flashing
Critical Alert
such as Intrusion or
Fire
Error
Hardware or Software
Error
Technical alert
or installation warning
such as low battery on
an installed product
Energy saving
mode active for your
installation
Updating
Software update
in progress
*Note : Available in future releases

1
Pages 01-32
Pages 33-64
Seiten 65-96
Pagine 97-128
Instructions
zaey
Benvenuti nel
mondo coviva!
Welcome to the
universe of coviva !
Willkommen
in der coviva Welt!
Bienvenue dans
l’univers coviva !
Documentation available online at :
www.hager.com/coviva/documentation

TKP100A
Package content
1x TKP100 Controller and Back-cover
1x Wall-mounting plate
1x LAN Ethernet cable
1x Quickstart guide
1x TKC110 : 230V AC / 5V DC Power
supply
0005587...
GC 03/16
Warning :
Only use the provided
TKC110 Power Supply
to power the Controller.
Use of other or
inappropriate power
supply may damage
the Controller
2

Thank you !
and Welcome to the universe of coviva !
We thank you for choosing this high-performance home controller, that is designed to provide an easy, secured,
and seamless experience for your Smart Home. The TKP100 coviva controller can be used in conjunctions with
many peripherals from Hager range and more, to operate and interconnect your Smart Home applications such as :
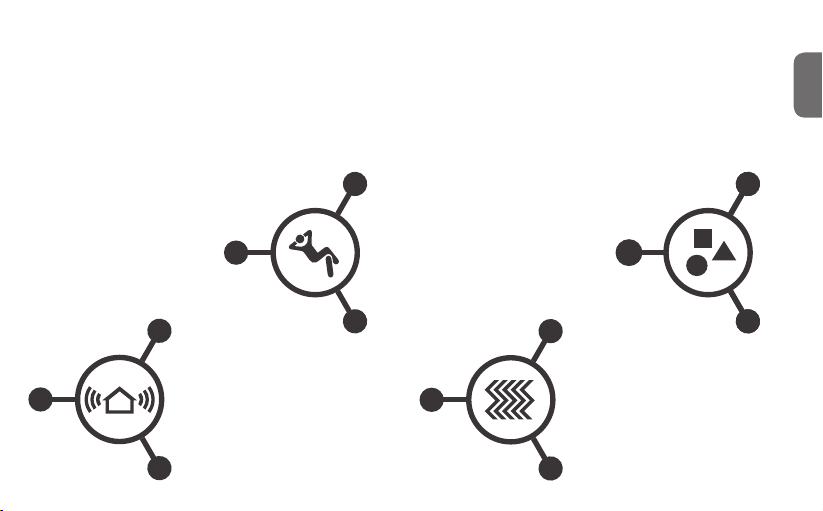
Security
In link with sepio alarm
range, the TKP100 coviva
controller becomes a
powerful IP transmitter, a
exible remote control, and
a friendly real-time notication
engine.
Comfort
The TKP100 coviva
controller is the perfect
interface to provide control,
visualisation, and logic ca-
pabilities to your quicklink
installation, ideal in retrot
and renovation applications.
Energy Efciency
Associated with electrical
heating outputs or hot-water
thermostatic valves, the
TKP100 coviva controller
becomes an intelligent energy
management unit, capable
of handling multiple zones
through an easy interface.
Connected Objects
The TKP100 coviva
controller enables you to
link to a number of state-of-
the-art connected objects
for more creative and inno-
vative applications !
z
3

4
User rights, roles & privileges
The TKP100 and its coviva App understand that you are different
By managing complementary installer and user access rights for proper secure operation and administration
of your system.
Installer
Role: Installs and maintains
the system.
• All rights at time of instal-
lation (before Handover)
•
Remote access on request,
with Referent user approval
after Handover
Referent User
Role: Owner of the system,
has highest user privilege
and extended rights.
• De ne other users
•
Has a Hager portal account
• One per installation (only)
Classic User
Role: User of the system
with normal rights
•
Can customize the system
• NB : no Hager portal
account needed
Restricted User*
Role: User of the system
with limited rights
• Limited customization
• NB : no Hager portal
account needed
(*) Available in a future release
4
Note : Detailed description of which actions are allowed or not for each User pro le is available in the online
documentation at: www.hager.com/coviva/users

z
Quickstart Installer Guide
5

TKP100 Controller Overview
The TKP100 controller is designed for easy access and intuitive use !
1 Main RGB Signalling
Used to display notications regarding your installation
2 USB Extension slots (x2)
Allows to install optionnal extensions such as WLAN/WiFi dongle TKH180
3 LAN connector
RJ45 Ethernet connector to connect the TKP100 controller to your local
home network (LAN)
4 Power Supply connect
5V DC input from the TKC110 AC/DC power supply
5 OK Button
The OK button allows you to acquit the current notications and turns off the
on-board RGB signaling for active notication.
6 RESET Button
The reset functions are described page 22
7 ONLINE Indicator
Indicates that the TKP100 controller is correctly connected to Internet
8 WLAN indicator
Indicates, when a WLAN/WiFi optional extension is installed on the TKP100,
its connection status
9 POWER Indicator
Indicates that the TKP100 controller is correctly powered ON
0005587...
GC 03/16
RESET OK
RESET OK
1
1
2
2
2
4
3
8
6 5
7
9
6

1Slide the back-cover downwards from the main
part of the TKP100 controller. 2Remove it by pulling away from the main part of
the controller, letting the rear USB extension slot appear
as well as the controller's ashcode and coviva ID.
The back-cover may be re-assembled by executing
the reverse procedure from the one described above.
TKP100 Controller Overview
Back-cover disassembly / reassembly
Note : When installed lying on a at surface, it is strongly recommended to leave the back-cover mounted,
for best stability and protection.
0005587...
GC 03/16
1
2
coviva ID and QR code
7

Preliminar Registration Steps
Become a coviva installer in 3 easy steps !
This page describes how to register as a coviva installer. It is a mandatory step to be able to perform the
installation. this sequence must be done only once for all, (before your rst installation), and doesn’t need
to be repeated for each new installation.
Create your Installer account
on Hager portal
• Go to the following web page :
www.hager.com/coviva/registration
or scan the following QR code :
• To nalize your Hager portal account activation,
you shall clik on the link sent in the con rmation
email.
1
8

z
Install the coviva mobile application
• Log in to your App store and download the free
coviva App.
Minimal requirements :
iOS version 7.1 or higher
Minimal requirements :
Android version 4.1 or higher
Login to the coviva App as Installer
• Click on the "Installer" icon and login using your
Hager portal registration (N.B : you must be
connected to internet).
• You are now logged to the App as an autorized
coviva installer !
2 3
Note : If you use a new mobile device, or after de-installing the coviva App, you should only repeat steps 2 and 3 as
described on this page
9

10
Installation of the TKP100 controller
The controller may be freely installed in your customer's home
Installation on a at
surface
• Simply place the
controller free standing
on a at surface.
Installation on a wall
• Use the included wall
adapter to x the TKP100
controller on a wall
(screws not included).
Installation in a home networking or multimedia enclosure
•
Home networking or multimedia enclosures allowing a minimum of 50mm host product depth can generally
be equipped with the TKP100 controller.
General Installation tips
The TKP100 is a radio controller and shall be as such
placed :
• as centrally as possible from its associated peripherals
•
away from metal planes,
armed concrete and other
radiofrequency perturbation sources.
Always avoid proximity of heat sources and humidity.
0005587...
GC 03/16
➡ ➡

z
11
Installation Procedure Overview
To install and con gure the TKP100A, simply register and follow
four easy steps
Preliminar step
Create your Installer account on Hager portal.
Install the coviva App and login.
Pair local products
and/or Alarm system
➥Page 12
➥Page 8
➥Page 16
➥Page 18
➥Page 19
1
2
3
4
Plug the TKP100 and
connect to it with
your mobile device
Customize the instal-
lation from the App
Handover and deliver
to your customer !
➡
➡
➡
11
Warning :
you will need your customer's email address
to perform the installation

12
Installation Step 1.A
Plug the TKP100 and connect locally to it with WiFi (WLAN) network :
Connect to the TKP100 using the local router
• Connect the controller to the customer’s WiFi
router with the provided LAN cable.
•
Activate the WiFi of your mobile device and register
it to the local WiFi network of your customer.
12
Note : To ensure the highest level of security, this
initial connection to the TKP100 has to be performed
locally (on installation site) and cannot be performed
from a remote location.
or
TKP100
LAN
Router
Connect to the TKP100 using the optionnal
TKH180 WiFi/WLAN extension
•
Alternatively, the optional TKH180 can conveniently
create a private "con guration hotspot" for you, useful
to easily install the entire system without the need to
access you customer’s WiFi router. Network name :
coviva - XXXXXXXXXXXX, (XXXXXXXXXXXX being
the coviva ID). No password is needed).
•
Nevertheless, to enable proper activation after instal-
lation and correct remote control and functionnality
in runtime, the controller must be permanently
connected to internet using the LAN connection.
LAN

Connect to your TKP100
controller
(detailled procedure on next page)
z
13
Installation Step 1.B
Create a new installation
In case you need to continue an already started installation…
• Click on "Current Installations" instead of "New installation",
• Continue working normally and nalize the installation !
Click on the "installer login" icon
Then, restart the installation
and when reaching Step 1.B,
select "New installation"
13
Note : The appearance on Android app may be slighty different, but the function is identical.

RESET OK
RESET OK
14
Installation Step 1.C
How to connect your coviva App to the TKP100 controller :
Remove the back cover and scan
your TKP100 unique QR code
• This QR code is located at
the rear side of the product
(behind the back cover).
Alternatively, you may also link your
App to the controller by typing the
unique identication code, called
the "coviva ID", that is located just
next to the QR code.
A great story begins
Your coviva app and TKP100 are
now communicating sweetly.
➡

z
15
Installation Step 1.D
Declare the Referent User..
..and install the latest updates !
You will be asked, before pairing any device, to
enter you customer’s email. The declared email will
receive the role of "Referent User" (cf page 4).
If an update of the TKP100’s software is available,
it is highly recommended that you accept it and let
it complete fully before continuing the installation.
The update is complete when the controller com-
pletely stops blinking.
Tip : In case you mistyped or entered a wrong (or invalid)
email, it is possible to step back to this declaration by
performing a "User’s reset", as described on page 22.
Then, restart the installation and when reaching Step
1.B, select "New installation".

16
Installation Step 2.A : Associating products
You can easily associate a number of quicklink products to your
TKP100 as follows :
Press the blue "+" Button in the
coviva App main page to add a
new Device to your installation
and select "Other device".
When asked by the coviva App,
identify the device to add by
pressing shortly the FCT button.
Your Product is now paired and
can be used in your installation !
16
Note : List of compatible quicklink devices can be found on www.hager.com/coviva/compatibility
123

Installation Step 2.B : Associating an Alarm System
You can easily associate a sepio Hager Alarm System to the TKP100
as follows :
"beep"
instal-
lation
mode
The control panel must
be in installation mode.
If it is not, enter :
#
2
#
#
master code
(factory: 0000)
Then
#
3
#
#
installer code (factory: 1111)
Press the blue "+"
Button in the coviva
App main page to add a
new Device, and select
"Alarm System".
After a few seconds, your
Alarm Control Panel serial
number (last 6 digits) shall
appear in the list. Con rm
the right Control Panel
serial by clicking "OK".
Note : Only one control panel can be paired to the TKP100.
You will nd more detailled information on alarm installation and settings on : www.hager.com/coviva/alarm
17
z
1 2
Your Alarm System is
now paired and ready for
use with coviva !
You will always be asked
to type the Alarm installer
code to access the Alarm
System visualisation
and
functions from the App.
3 4

18
Installation Step 3 : Customization
It is now time to make the system yours !
• The coviva App provides numerous possibilities to easily adapt the system to your customer’s need.
Here is a quick overview of what you can achieve with it :
Friendly Groups
The TKP100 paired devices appearing in the coviva
App can be freely grouped together for easy navigation.
Let covigrams work for you !
This exible and friendly logic engine manage
repetitive or conditionnal actions such as scenes
and scenarios, create custom actions, noti cations,
easily :
18
Note : There is much more to discover from the coviva App! To get an overview of what’s in for you, connect to
www.hager.com/coviva/app
Other manuals for coviva Smartbox TKP100A
3
This manual suits for next models
1
Table of contents
Languages: