Haier L32K1 User manual

1MFBTF 3&"% UIJT NBOVBM DBSFGVMMZ CFGPSF
PQFSBUJOH ZPVS 57 BOE SFUBJOJUGPS GVUVSF
SFGFSFODF
5'5-$%5&-&7*4*0/
/.
/.

$POUFOUT
5'5-$%UFMFWJTJPO0XOFST.BOVBM
$POUFOUT
8BSOJOH
*NQPSUBOU4BGFUZ*OTUSVDUJPOT
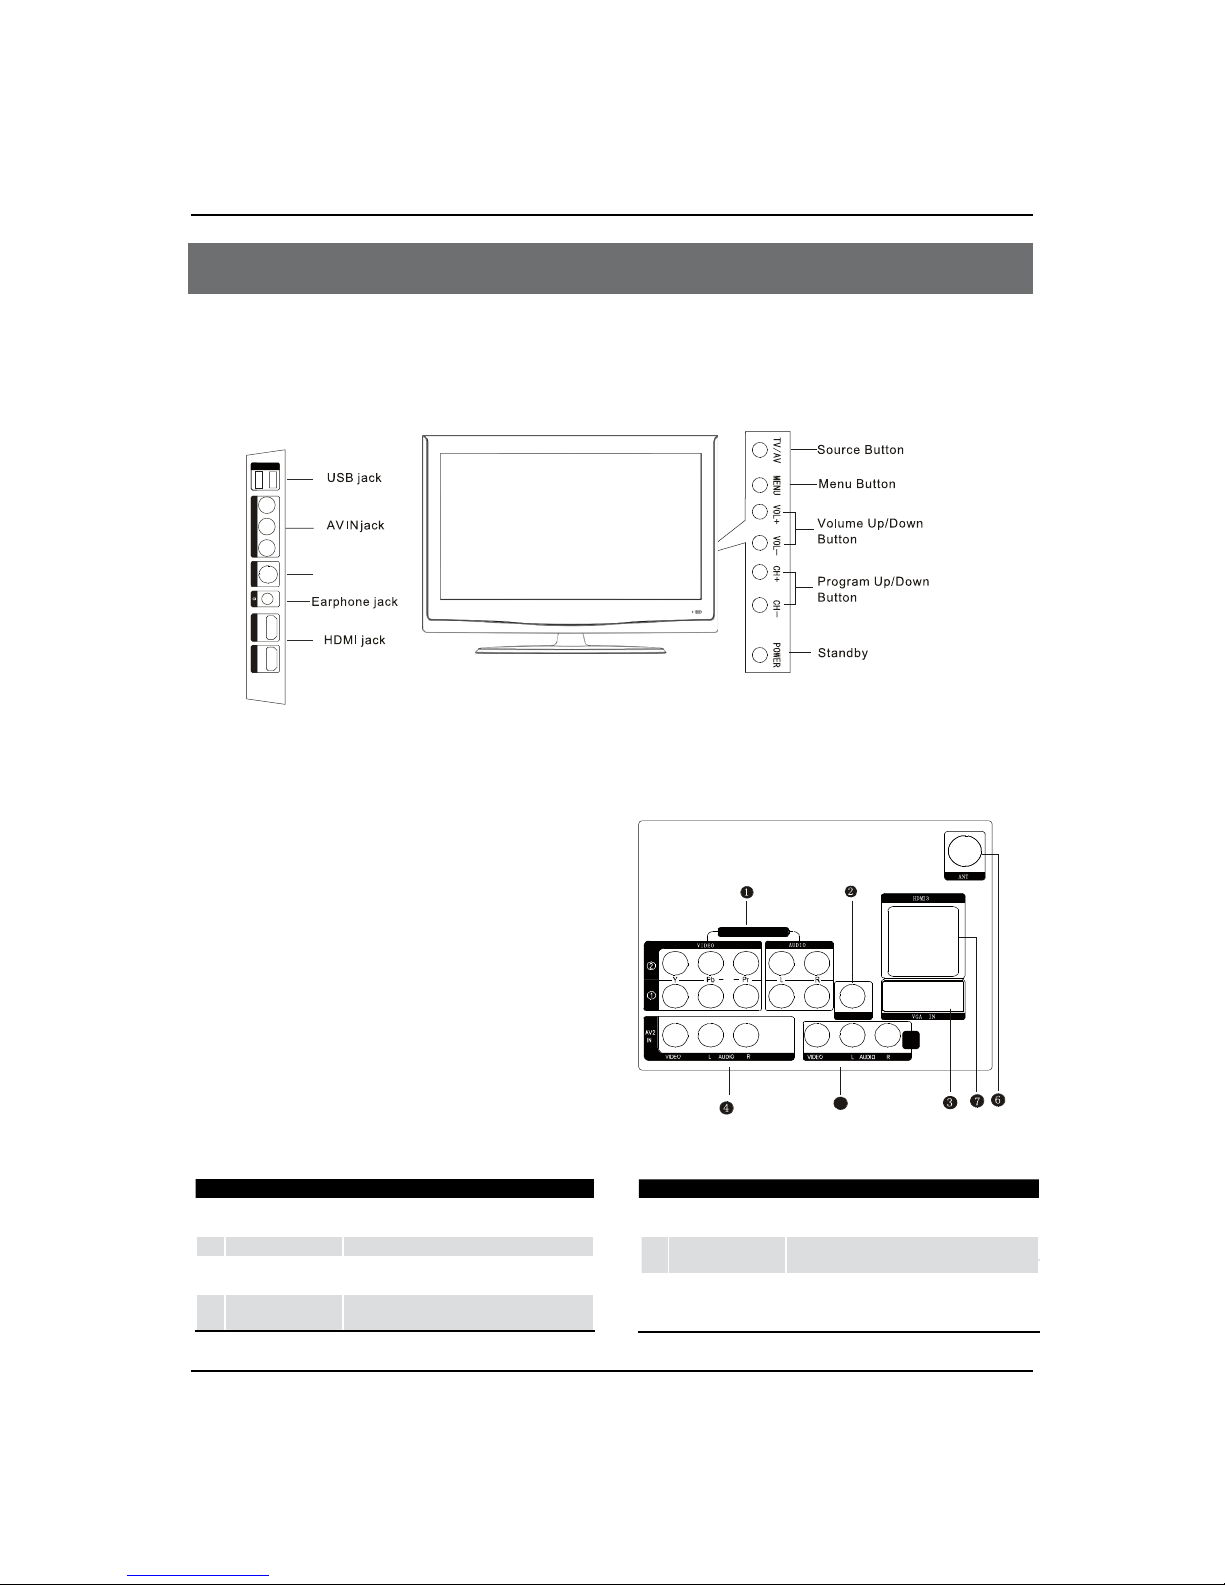
1BOFM$POUSPMBOE3FBS5FSNJOBMT
$POUSPM
1BOFM$POUSPM
3FBS5FSNJOBMT$POUSPM
3FNPUF$POUSPM
#BUUFSZMPBEJOH
1SFDBVUJPOT
3FNPUF$POUSPM'VODUJPO
'VODUJPOJOUSPEVDUJPO
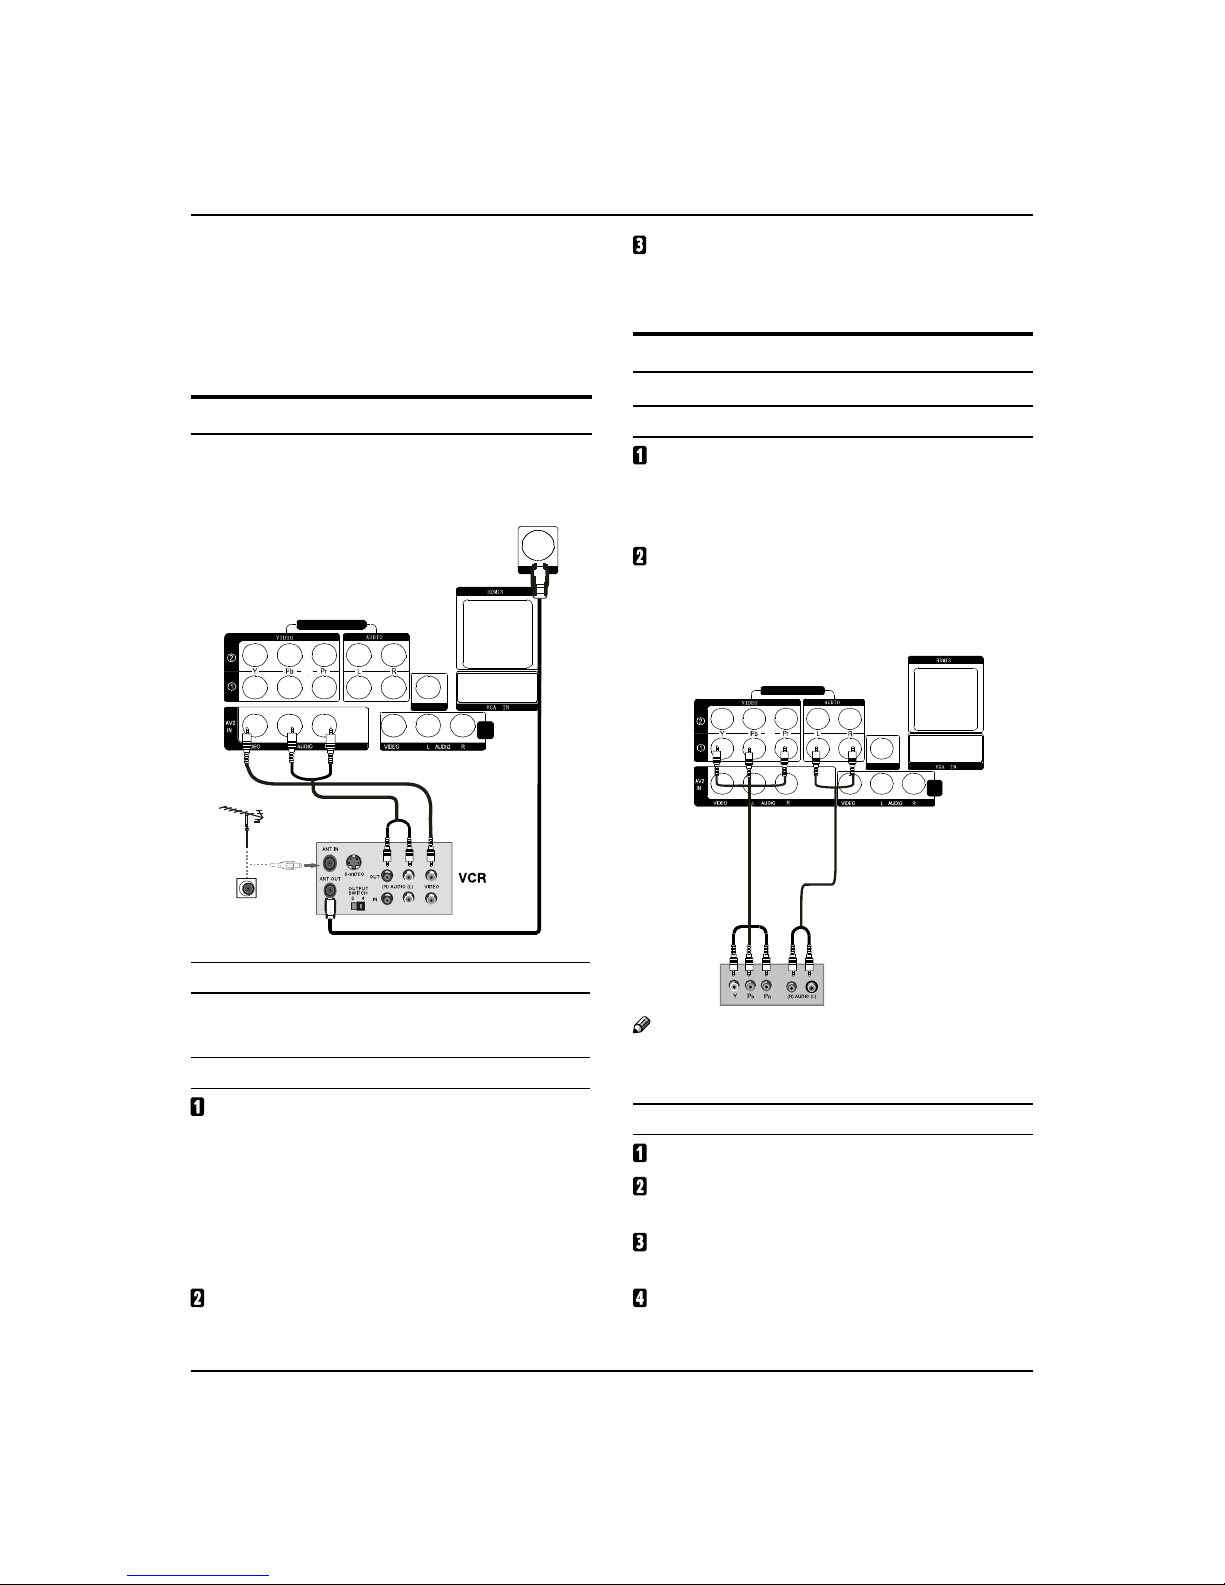
&YUFSOBM&RVJQNFOU$POOFDUJPOT
"OUFOOB$POOFDUJPO
$IPPTF:PVS$POOFDUJPO
7$3$POOFDUJPO
%7%4FUVQ
)%.*PS%7*4FUVQ
1$4FUVQ
.POJUPS0VU4FUVQ
$POOFDUJOH)FBEQIPOFT
1PXFSTPVSDF
#BTJD3FDFJWJOHBOE1MBZJOH
0QFSBUJPOT
4XJUDIJOH0/0''UIF57TFU
$IPPTFUIF.FOV-BOHVBHF
$IPPTFUIF*OQVUTPVSDF
4FBSDIJOH$IBOOFM
5VOJOH&EJU
"VUPNBUJDTFBSDI
&YDIBOHF
8BUDIJOH571SPHSBN
)PXUPTFMFDUUIFEFTJSFEQSPHSBN
)PXUPTFMFDUUIFEFTJSFETPVOE
.VUF4FUUJOH
2VJDLQSPHSBNWJFX
1JDUVSF$POUSPM'VODUJPOT
)PXUPTFMFDUUIFQJDUVSFNPEF
)PXUPDVTUPNJ[FZPVSPXOQJDUVSFTUBUVT
4PVOE$POUSPM'VODUJPOT
)PXUPDIPPTFBVEJPNPEF
)PXUPDVTUPNJ[FZPVSPXOBVEJPTUBUVT
5JNFS'VODUJPOT
4FUUJOHPG$VSSFOU5JNF
4FUUJOHPG0/0''5JNF
4FUUJOHPG0O$IBOOFM
4FUUJOHPG3FNJOE5JNFBOE3FNJOE$IBOOFM
'VODUJPO.FOV
'VODUJPO.FOV4FU
"EKVTU.FOV
-PDL4FUVQ
)PXUPVTFUIFQBTTXPSEGVODUJPO
4USFBNJOH.FEJB1MBZJOH4ZTUFN
4UBSU&YJU4USFBNJOH.FEJB1MBZJOH4ZTUFN
0QFSBUJOH.FUIPEPG4USFBNJOH.FEJB.FOV
1MBZJOHB1JDUVSF
1MBZJOHB.PWJF
1MBZJOH.VTJD
5FYU
4FUUJOHT
.BJOUFOBODF
5SPVCMFTIPPUJOH
4QFDJmDBUJPO
'PSNBU

Warning
TFT -LCD television Owner’s Manual 3
WARNING
!
WARNING:
TO REDUCE THE RISK OF ELECTRIC SHOCK DO NOT REMOVE COVER (OR BACK). NO USER SERVICEABLE PARTS
INSIDE. REFER TO QUALIFIED SERVICE PERSONNEL.
*To avoid electric hazards, it is strongly suggested that the back cover not be opened, as there is no any
accessory inside the casing.
*lf necessary, please contact authorized after-sales services.
*A lighting ash mark in a triangle: A potentially hazardous situation, which, if not avoided, could result in
serious injury by high voltage.
*An exclamation mark in a triangle: Major part or accessory of which technical specications must be followed if
it is to be replaced.
RISK ELECTRIC SHOCK
DO NOT OPEN
WARNING: To avoid fire or electric hazards, never place your television receiver in an area with heavy
moisture. Attention should be paid to avoid accidental scratches or impacts onto the screen.
CAUTION: SPlease read this manual carefully before using your television and keep this manual in a
good place for future reference.
STo achieve the best performance of your television, read this User’s Manual carefully and
properly store it for future reference.
SInformation of screen displays and figures in the User’s Manual may vary due to technical
innovations.
CAUTION: SUnauthorized disassembly of this product is prohibited.
Warning

Important Safety Instructions
4 TFT -LCD television Owner’s Manual
Important Safety Instructions

Important Safety Instructions
TFT -LCD television Owner’s Manual 5

Panel Control and Rear Terminals Control
6 TFT -LCD television Owner’s Manual
Panel Control and Rear Terminals Control
- This is a simplied representation of front panel.
- Here shown may be somewhat dierent from your TV.
Panel Control
32”/42”
Rear Terminals Control
1COMPONENT In Connect a component Video/Audio device to
these jacks
2VGA/DVI AUDIO Connect a VGA/DVI Audio device to these jacks
3VGA IN
Connect the monitor output connector from a PC
to the jack
4AV In Connect Video/Audio out from anVideo/Audio
device to these jacks
5
6
AV OUT Video/Audio output terminal
7
ANT In Connect cable antenna signal to theTV, either
directly or through your cable box
HDMI Connect a signal to HDMI
I
M
DHH2I
M
D1 1VA
OED
I
VR
-
OI
D
U
A-
L
USB2 USB1
COMPONENT IN
32”/42”
AV
OUT
S-VIDEO
S-VIDEO jack
VGA/DVI AUDIO

Remote Control
TFT -LCD television Owner’s Manual 7
Remote Control
Battery loading
1. Slide open the cover of the battery compartment on
the back of the remote controller.
2. Load two 7# (AAA) alkaline batteries in the
compartment, (plus and minus poles to respective mark)
3. Replace the cover of the battery compartment.
Precautions
As strong light may interfere the signals, change your
position to operate the remote controller if the television
cannot be turned on or o as you expect.
Keep the remote controller away from heat source or
humid area to ensure eective performance of the
remote controller.
Make sure that two AAA alkaline batteries are loaded.
The batteries must be of the same type. The batteries
must be located properly. The batteries are not
rechargeable.
Make sure that there is no obstacle between the remote
controller and television set.

Remote Control Function
8 TFT -LCD television Owner’s Manual
- The remote control cannot be operated unless the batteries are properly loaded.
- When using the remote control, aim it at the remote control sensor on the TV.
Function introduction
1POWER Press this key to start TV from standby mode, press it again to
return to standby mode.
2SCAN
3P.MODE
Press this key continuously to select the picture mode.
4FREEZE
5HDMI
.
6S.MODE Press this key continuously to select the sound mode.
7ARC Press this key to select the screen display proportion.
8SLEEP Displaying the sleep time.
9H. LOCK Refer to the Functional Description on Page 20
0
AFAVORITE
B0-9 These keys are used to select a channel.
CSOURCE
Press this key to open/close signal source options menu..
DDISPLAY
EMUTE Press this key to mute the sound, press it again to activate the
sound.
FRECALL
GVOL+ /- Used to adjust the volume when the screen menu is closed.
HCH+/-
Used to select a TV channel when the screen options menu is
closed, specically, press CH- to decrease the channel and press
CH+ to increase the channel.
IMENU
Press this key to display or exit the main menu..
J
EXIT
Clears all on-screen displays and returns to TV viewing from any
menu.
KTHUMBSTICK (Up/Down/
Left/Right)
Allows you to navigate the on-screen menus and adjust the
system settings to your preference.
LOK Press this key to conrm the selection.
MUSB Press this key for quick switching of streaming media.
NBACK Back button(only for USB)
OREC Noavailable.
PTIMESHIFT
QHELP
RPLAY/PAUSE Fast Reverse (only for USB)
SREV Fast Reverse(only for USB/Teletext).
TFWD Fast Forward(only for USB/Teletext).
UNEXT
Next(only for USB
/Teletext
).
VPREV
Previous(only for USB
/Teletext
).
WTEXT Press the buttononthehand,toswitchoteletext, press the button again.
XMIX
Y
HOLD
Pressingthebuttonwill stop the teletextpageautomaticallyupdating.
ZSUBCODE
Pressingthebuttonby entering its 4-digitnumbertoenterasecondarypage.
[PIP
PIP/Teletext Reveal.
\SWAP PIP/Teletext Size.
Remote Control Function
SCAN
H.LOCK
SLEEP
MUTE RECALL
USB
REC
TEXT
PIP SWAP MOVE ZOOM
MIX HOLD
SUBCODE
TIMESHIFT PLAY/PAUSE
HELP
BACK
HDMI
FREEZE
P.MODE
S.MODE
ARC
FAVORITE
SOURCE DISPLAY
VOL CH
MENU EXIT
INDEX
REV FWD PREV NEXT
ĉĊ
OK
Press once to display a frozen image of the current program, but audio
continues. Press again to return to the program.
39
40
Press to display the TV status information on the top of the TV screen.
Pressthebuttonwill superimpose the Teletextdataonthetopofthe TV picture.
Fast Reverse(only for Teletext).
Fast Reverse (only for USB/Teletext)
Press to jump back and forth between two channels.
ZOOM
MOVE
Press to open the favorite channel list in TV.
Press to select a device connrcted to the HDMI input.
Press the button to go to the index page of teletext.
PIP/Teletext Reveal.
ĉĊ
No available.
It is only available in TV mode.

External Equipment Connections
TFT -LCD television Owner’s Manual 9
Antenna Connection
- Antenna or Cable Service without a Cable Box Connections.
- For optimum picture quality, adjust antenna direction if needed.
Note:
* It is recommended that you'd better use 75coaxial cable to remove
the disturbance caused by airwave.
* Don't bind antenna cable and electric wire together.
To improve picture quality in a poor signal area,
purchase and install a signal amplifier.
If the antenna needs to be split for two Tv’s, install a
"2-WaySignal Splitter" in the connections.
If the antenna is not installed properly, contact your
dealer for assistance.
Note
All cables shown are not included with the TV.R
ANT.
External Equipment Connections

COMPONENT IN
AV1
OUT
COMPONENT IN
AV1
OUT
External Equipment Connections
10 TFT -LCD television Owner’s Manual
Choose Your Connection
There are several ways to connect your television,
depending on the components you want to connect and
the quality of the signal you want to achieve.
The following are examples of someways to connect
your TV. Choose the connection which is best for you.
VCR Connection
To avoid picture noise (interference), leave an adequate
distance between the VCR and TV.
Select the input source with using the SOURCE button
on the remote control, and then press
/
button to
select the source, press the
button to conrm.
DVD Setup
How to connect
Connect the DVD video outputs (Y, P
b/Cb, P
r/Cr)
to the COMPONENT (Y, P
b/Cb, P
r/Cr) input jacks on
the TV and connect the DVD audio outputs to the
AUDIO jacks on the TV’ as shown in the gure.
If your DVD only has an S-Video output jack, connect
this to the S-VIDEO input on the TV and Connect the
DVD audio outputs to the AV IN jacks on the TV, as
shown in the gure.
Note
If your DVD player does not have component
video output, use S-Video.
How to use
Turn on the DVD player, insert a DVD.
Use the S-Video button on the remote control to
select S-VIDEO or YPbPr/YCbCrmode.
Press Play button on external equipment for
program play.
Refer to the DVD player’s manual for operating
instructions.
Connection Option 1
Set VCR output switch to channel 3 or 4 and then tune
the TV to the same channel number.
Connection Option 2
Connect the audio and video cables from the VCR’s
output jacks to the TV input jacks, as shown in the
gure. When connecting the TV to VCR, match the
jack colors (Video = yellow, Audio Left = white, and
Audio Right = red). If you connect a S-VIDEO output
from VCR to the S-VIDEO input, the picture quality is
improved; compared to connecting a regular VCR to
the Video input.
Insert a video tape into the VCR and press PLAY on
the VCR. (Refer to the VCR owner’s manual.)
VGA/DVI AUDIO
VGA/DVI AUDIO

COMPONENT IN
AV1
OUT
I
M
DHH2IMD1 1VA
B2SU
O
ED
I
VR
-
O
I
D
U
A-
L
B1SU
External Equipment Connections
TFT -LCD television Owner’s Manual 11
HDMI or DVI Setup
To watch digitally broadcast programs, purchase and
connect a digital set-top box.
How to connect
Use the TV’s COMPONENT (Y, P•b/Cb, P
r/Cr) INPUT
jacks, VGA or HDMI port for video connections,
depending on your set-top box connections
available. Then, make the corresponding audio
connections.
How to use
Turn on the digital set-top box.
(Refer to the owner’s manual for the digital set-top box.)
Use SOURCE on the remote contralto select PC or
HDMI (Y, P
b/Cb, P
r/Cr) mode.
Press Play button on external equipment for
program play.
PC Setup
How to connect
Use the TV’s VGA IN port for video connections.
Then, make the corresponding audio connection. If
using a sound card, adjust the PC sound as required.
How to use
Turn on the PC and the TV.
Turn on the display by pressing the POWER button
on the TV’s remote control.
Use PC/DVI on the remote control to select VGA source.
Check the image on your TV. There may be noise
associated with the resolution, vertical pattern,
contrast or brightness in PC mode. If noise is
present, change the PC mode to another resolution,
change the refresh rate to another rate or adjust the
brightness and contrast on the menu until the picture
is clear. If the refresh rate of the PC graphic card
can not be changed, change the PC graphic card or
consult the manufacturer of the PC graphic card.
Note
Avoid keeping a xed image on the TV’s screen for
along period of Time. The xed image may become
permanently imprinted on the screen.
The synchronization input form for Horizontal and
Vertical frequencies is separate.
To obtain the best picture, do not play the USB,
YPbPr, HDMI or P source at the same time.
VGA IN
IA
S-VIDEO

I
MDHH2I
M
D1 1VA
B2SU
OE
D
IV R
-
OID
U
A-
L
B1SU
External Equipment Connections
12 TFT -LCD television Owner’s Manual
Monitor Out Setup
The TV has a special signal output capability which
allows you to hook up a second TV or monitor.
Connect the second TV or monitor to the TV’s AV OUT.
See the Operating Manual of the second TV or monitor
for further details regarding that device’s input settings.
VIDE AUDIOLR
O
AVI
OUT
Note
YP bPr, PC, HDMI, input sources cannot be used
for Monitor out.
When connecting with external audio equipments,
such as ampliers or speakers, please turn the TV
speakers o.
Connecting Headphones
You can connect a set of headphones to your set if you
wish to watch a TV program without disturbing the
other people in the room.
Plug a set of headphones
Into the 3.5mm mini-jack
socket on the rear panel
of the set.
Note
Prolonged use of headphones at a high volume
may damage your hearing.
You will not receive sound from the speakers when
you connect headphones to the system.
Power source
TO USE AC POWER SOURCE
Use the AC polarized line cord provided for operation on
AC. Insert the AC cord plug into a standard polarized AC
outlet.
Note
Never connect the AC line cord plug to other than
the specied voltage. Use the attached power cord
only.
If the polarized AC cord does not t into a non
polarized AC outlet, do not attempt to le or cut
the blade. It is the user’s responsibility to have an
electrician replace the obsolete outlet.
If you cause a static discharge when touching the
unit and the unit fails to function, simply unplug
the unit from the AC outlet and plug it back in. The
unit should return to normal operation. Polarized
AC Cord Plug.
Basic Receiving and
Playing Operations
Switching ON/OFF the TV set
In the manual, the OSD (on screen display) may be
dierent from your TV’s because it is just an example to
help you with the TV operation.
External Equipment Connections / Basic Receiving and Playing Operations
S-VIDEO

#BTJD3FDFJWJOHBOE1MBZJOH0QFSBUJPOT
5'5-$%UFMFWJTJPO0XOFST.BOVBM
4XJUDIJOH0/0''UIF57TFU
'JSTUDPOOFDUQPXFSDPSEDPSSFDUMZBOEUIFQPXFS
JOEJDBUPSXJMMMJHIU
1SFTT108&3POUIFSFNPUFDPOUSPMBHBJO
*GZPVXBOUUPFYDIBOHFUPTUBOEJOHCZTUBUVT
QMFBTFQSFTTEPXO108&3POUIFSFNPUFDPOUSPM
%JTDPOOFDUUIFQPXFSTVQQMZPSVOQMVHUIF
UFMFWJTJPOJGJUJTJOUFOEFEUPDPNQMFUFMZDFBTFUIF
UFMFWJTJPOQFSGPSNBODF
$IPPTFUIF.FOV-BOHVBHF
8IFOZPVTBUJTmFEXJUIZPVSTFUGPSUIFmSTUUJNF
ZPVNVTUTFMFDUUIFMBOHVBHFXIJDIXJMMCFVTFEGPS
EJTQMBZJOHNFOVTBOEJOEJDBUJPOT
1SFTT.&/6BOE
UPTFMFDU'VODUJPONFOV
1SFTT
CVUUPOUPTFMFDU'VODUJPONFOV
4FMFDUBQBSUJDVMBSMBOHVBHFCZQSFTTJOH
SFQFBUFEMZ
8IFOZPVTBUJTmFEXJUIZPVSDIPJDFQSFTT.&/6UP
SFUVSOUPOPSNBMWJFXJOH
/DQJXDJH (QJOLVK
0HQX7LPHRXW V
3LFWXUH2SWLPL]H
6RXQG 7XQLQJ $GMXVW
$IPPTFUIF*OQVUTPVSDF
*GUIF57JTOPUJO57NPEFQSFTT4063$&POUIFSFNPUF
DPOUSPMVOJUBOETJHOBMTPVSDFNFOVXJMMCFEJTQMBZFE
POUIF57TDSFFOBTTIPXOJOUIFCFMPXmHVSF1SFTT
UPTFMFDUUIF57PQUJPOBOEQSFTTUPDPOmSN
0,
UIFTXJUDIJOHUP57JOQVUUFSNJOBM"GUFSTXJUDIJOH
UIFTJHOBMTPVSDFNFOVEJTBQQFBSTBOEBUUIFVQQFS
SJHIUDPSOFSPGTDSFFOEJTQMBZTUIFJOGPSNBUJPOPGDVSSFOU
TJHOBMTPVSDF
1SFTTJOHUIJTLFZSFQFBUFEMZDBOFYJUGSPNUIFTJHOBM
TPVSDFNFOV
*ODBTFPGOPPUIFSPQFSBUJPOUIFTJHOBMTPVSDFNFOV
XJMMBVUPNBUJDBMMZEJTBQQFBSVQPOSFBDIJOHUIF04%
EJTBQQFBSBODFUJNFQSFTFUJOUIFNBJONFOV
&RPSRQHQW
&RPSRQHQW
86%
3&
+'0,
+'0,
+'0,
4FBSDIJOH$IBOOFM
*OUIJTTFDUJPOIPXUPVTFUIFSFNPUFDPOUSPMUPTFU
DIBOOFMJTFYQMBJOFE:PVDBOBMTPVTFCVUUPOTPOUIF57
TFUUPTFUDIBOOFM
5VOJOH&EJU
1SFTT.&/6POUIFSFNPUFDPOUSPMVOJUPS.&/6PO
UIF57TGSPOUQBOFMUPEJTQMBZNBJONFOVBOEUIFO
QSFTT
UPTFMFDU5VOJOHNFOV
1SFTT
UPTFMFDUUIF$IBOOFM&EJUPQUJPOBOE
UIFOQSFTT0,0,UPFOUFSTVCNFOV
&KDQQHO(GLW
$XWR 6HDUFK
3URJ([FKDQJH
6RXQG 7XQLQJ
.BOVBM4FBSDIV
1SFTT
UPTFMFDUUIF.BOVBM4FBSDI
PQUJPOBOEmOBMMZQSFTT
UPTUBSUNBOVBM
TFBSDI6QPOmOEJOHBQSPHSBNUIFTFBSDIXJMM
BVUPNBUJDBMMZTUPQBOEUIFQSPHSBNXJMMCFTUPSFE
POUPUIFDVSSFOUDIBOOFM:PVNBZTUPQUIFTFBSDI
CZQSFTTJOH0,PS.&/6
$GMXVW
%DFNJURXQG
%ODFN6WUHWFK
3,3
RQ
RQ
0RYH 2. 2.

#BTJD3FDFJWJOHBOE1MBZJOH0QFSBUJPOT
5'5-$%UFMFWJTJPO0XOFST.BOVBM
&KDQQHO(GLW
6HDUFK 0+]
)LQH7XQH 0+]
&RORU6\VWHP
6RXQG6\VWHP
6NLS 21
6RXQG 7XQLQJ
'JOF5VOFV
1SFTT
UPTFMFDUUIF'JOF5VOFPQUJPOBOE
UIFOQSFTT
UPTUBSU61PS%08/mOFUVOJOH
VOUJMPCUBJOJOHBSFMBUJWFMZHPPEQJDUVSFFõFDU5IF
mOFUVOJOHGVODUJPOJTGPSUIFQVSQPTFPGJNQSPWJOH
QJDUVSFFõFDUUISPVHImOFUVOJOHXIFOUIBUPGB
DFSUBJOQSPHSBNJTOPUHPPEFOPVHI/PSNBMMZUIF
PQUJNBMQJDUVSFFõFDUDBOCFPCUBJOFEXJUIPVUmOF
UVOJOHXIFOXBUDIJOH57QSPHSBNTBOEmOFUVOJOH
JTUPNFFUUIFOFFEPGBEKVTUJOHBDFSUBJOQSPHSBN
$PMPSTZTUFNV
1SFTT
UPTFMFDUUIF$PMPS4ZTUFNTPQUJPO
BOEUIFOQSFTT
UPTFMFDUDPSSFDUDPMPS
TZTUFN
5IF57JTEFTJHOFEXJUIUISFFTZTUFNTGPSZPVS
DIPJDFJF"VUP1"-4&$".BOE/54$(FOFSBMMZ
UIFTZTUFNJTTFUBT"VUPBOEJUJTOPUOFDFTTBSZUP
NBLFBOBEKVTUNFOU5IFTZTUFNJTOPSNBMMZTFUBT
"VUPEVSJOHBVUPTFBSDI
4PVOETZTUFNV
5IF57JTEFTJHOFEXJUIGPVSTZTUFNTGPSZPVS
DIPJDFJF%,.#(BOE*(FOFSBMMZJUJTOPU
OFDFTTBSZUPBEKVTUUIFTZTUFN5IFTZTUFNJT
OPSNBMMZTFUBT%,EVSJOHBVUPTFBSDI
4LJQV
8IFOUIFTLJQJTTFU0/UIFDIBOOFMXJMMCF
TLJQQFEXIFOQSFTTJOH$)
PS BOEPOMZDBO
CFTFMFDUFECZQSFTTJOHOVNFSJDBMLFZT
*GZPVXBOUUPSFDPWFSUIFTLJQQFEDIBOOFM
6TF%JSFDUEJHJU$IPPTJOHCVUUPOUPTFMFDUUIF
OVNCFSPGUIFDIBOOFMUPCFSFDPWFSFE
%PUIFBCPWFTUFQTBHBJO
1SFTT UPTFU4LJQBT0õ
"VUPNBUJDTFBSDI
1SFTT.&/6POUIFSFNPUFDPOUSPMUPEJTQMBZNBJO
NFOVBOEUIFOQSFTT
UPTFMFDU5VOJOH
NFOV/PUF0OMZXIFO5VOJOH-PDLJOUIF)-PDL
NFOVJT0õDBOUIF$IBOOFMNFOVCFTFMFDUFE
&KDQQHO(GLW
$XWR 6HDUFK
3URJ([FKDQJH
6RXQG 7XQLQJ
1SFTT
UPTFMFDUUIF"VUP4FBSDIPQUJPOBOE
UIFOQSFTT 0,UPFOUFSTVCNFOV
QSFTT
UPTFMFDUUIF"VUP4FBSDI PQUJPO
QSFTT0, UPFOUFSUIFBVUPTFBSDINFOVBGUFSXBSET
QSFTT UPTFMFDUUIF$POmSNPQUJPOBOE
mOBMMZQSFTT 0, UPDPOmSNUIFTUBSUJOHPGBVUP
TFBSDI
%VSJOHBVUPTFBSDIUIFTDBMFWBMVFPOUIFQSPHSFTT
CBSJTDPOUJOVBMMZJODSFBTJOHJOEJDBUJOHUIFBVUP
TFBSDIJTJOQSPHSFTT"GUFSmOJTIJOHUIFBVUPTFBSDI
UIF57XJMMQMBZUIFDIBOOFMTUBSUJOHUIFBVUPTFBSDI
5PTUPQUIFTFBSDIJOIBMGXBZKVTUQSFTT.&/60,
BOEUIF57XJMMQMBZUIFmSTUTFBSDIFEDIBOOFM
6RXQG 7XQLQJ
$GMXVW
$GMXVW
$GMXVW
3$/
'.
6RXQG 7XQLQJ
)RXQG&KDQQHOV
$GMXVW
$)
$XWR6HDUFKLQJ
&DQFOH

#BTJD3FDFJWJOHBOE1MBZJOH0QFSBUJPOT
5'5-$%UFMFWJTJPO0XOFST.BOVBM
&YDIBOHF
1SFTT.&/6POUIFSFNPUFDPOUSPMVOJUPS.&/6PO
UIF57TGSPOUQBOFMUPEJTQMBZNBJONFOVBOEUIFO
QSFTT
UPTFMFDU5VOJOHNFOV
1SFTT
UPTFMFDUUIF&YDIBOHFPQUJPOBOE
UIFOQSFTT0,
0,UPFOUFSJUTTVCNFOV
1SFTT
UPTFMFDUUIF5P$IBOOFMPQUJPOBOE
UIFOQSFTT
UPTFUUIFGPVOEUPCFFYDIBOHFEUP
6RXQG 7XQLQJ
3URJ
"GUFSBEKVTUJOHUIFDVSSFOUDIBOOFMBOEUIFGPVOEUP
CFFYDIBOHFEUPQSFTT
UPNPWFUIFDVSTPSUP
UIF&YDIBOHFPQUJPOBOEUIFOQSFTT0,0, UPTUBSU
FYDIBOHFBOEFYDIBOHFUIFQSPHSBNPODVSSFOU
DIBOOFMUPUIFDIBOOFMZPVTFUGPSFYDIBOHF
8BUDIJOH571SPHSBN
:PVDBOXBUDI57QSPHSBNJOBQSFTFUUJOHDIBOOFM
)PXUPTFMFDUUIFEFTJSFEQSPHSBN
6TJOH1SPHSBNOVNCFSCVUUPOT
%JSFDUMZFOUFSUIFDIBOOFMOVNCFSXJUIUIFOVNFSJD
LFZQBEPOUIFSFNPUFDPOUSPM*GUPTFMFDUDIBOOFM
OVNCFSTPGEPVCMFEJHJUBMPSUISFFmHVSFQSFTT
DPOUJOVPVTMZUIFOVNFSJDCVUUPOTJOUISFFTFDPOE
6TJOH$) CVUUPOT
1SFTT$) UPTFMFDUBDIBOOFMOVNCFSJOOVNCFS
JODSFBTJOHEJSFDUJPO1SFTT UPTFMFDUBDIBOOFM
OVNCFSJOOVNCFSEFDSFBTJOHEJSFDUJPO
)PXUPTFMFDUUIFEFTJSFETPVOE
1SFTT70-CVUUPOTPOUIFSFNPUFPSUIFGSPOUPG
UIF57TFUUPBEKVTUUIFWPMVNFMFWFM5IFSBOHFJT
_8IFOUIFWPMVNFCVUUPOTBSFQSFTTFEUIF
WPMVNFMFWFMJTEJTQMBZFEBVUPNBUJDBMMZPOUIF57
TDSFFO
.VUF4FUUJOH
1SFTT.65&CVUUPOPOUIFSFNPUFDPOUSPMBOEBJDPO
XJMMEJTQMBZPOUIFTDSFFO"UUIJTUJNFUIFTPVOEPG
UIF57TFUJTUVSOFEPõ
*GZPVXBOUUPSFDPWFSUIFTPVOEQSFTT.65&
CVUUPOBHBJOPSEJSFDUMZQSFTT70-CVUUPO
2VJDLQSPHSBNWJFX
4VQQPTFUIBUZPVQSFWJPVTMZXBUDIFEB57QSPHSBN
PO$IBOOFMCVUOPXZPVBSFXBUDIJOHB57
QSPHSBNPO$IBOOFMBTTIPXOJOUIFCFMPX
mHVSF
*GZPVXBOUUPSFUVSOUP$IBOOFMKVTUQSFTT
3&$"-- 'MBTICBDLPODF
*GZPVXBOUUPSFUVSOUP$IBOOFMBHBJOKVTUQSFTT
3&$"-- 'MBTICBDLPODFBHBJO
/PUF
5IJTGVODUJPOJTPOMZBWBJMBCMFJO57NPEF2
1JDUVSF$POUSPM'VODUJPOT
5IJTNFBOTUIFBEKVTUNFOUPGTQFDJmDDPOUFOUTJOUIF
QJDUVSFJGBMSFBEZJOOPSNBMDPOEJUJPOJUJTOPUOFDFTTBSZ
UPNBLFBOZBEKVTUNFOU
%VFUPEJõFSFOU57TJHOBMJOQVUTTPNFJUFNTNBZOFFE
UPCFBEKVTUFE5IFGPMMPXJOHNBLFTBEFTDSJQUJPOCZ
POMZUBLJOH57TJHOBMBTBOFYBNQMF
$GMXVW
$)
$)

Basic Receiving and Playing Operations
16 TFT -LCD television Owner’s Manual
How to select the picture mode
Press MENU to display main menu on the screen, and
then press
/
to select the Picture menu, afterwards
press
/
to enter the option to be adjusted.
Press
/
to move the cursor to the option to be
adjusted, and then press
/
to select Standard/
Vivid/Soft/User.
You can also press P.MODE on the remote control to
select Standard/Bright/Soft/ User/Vivid.
StandardV
The picture brightness and hue are moderate.
V
The picture is vivid, bright and dynamic.
SoftV
The picture is soft and in light color.
UserV
The picture eect is set by yourself to your preference.
How to customize your own picture status
Press MENU to display main menu on the screen,
and then press
/
to select the Picture menu,
afterwards press
/
to enter the option to be
adjusted.
Press
/
to move the cursor to the option to be
adjusted, and then press
/
to adjust it to your
desired eect.
Sound Tuning
Tint
Aspect Ratio Full Screen
BrightnessV
This will adjust the light output of the complete
picture, which will mainly aect the darker areas of
the picture.
ContrastV
This will adjust the intensity of bright parts in the
picture but keep the dark parts unchanged.
SharpnessV
This will adjust the sharpness of ne details in the picture.
Color:V
This will adjust the saturation level of the colors to suit
your personal preference.
Picture ModeV
Select the mode of picture(Standard/Bright/Soft/
User).
Palette:V
Press
/
to select the Palette option, and then
press OK to enter its submenu, and nally press
/
to select a toner pattern from six patterns (User,
Standard,Warm1, Warm2, Cool1and Cool2) to your color
preference. Normally, the Standard mode is selected.
If the User mode is selected, press
/
to enter
the palette menu, (as shown in the below gure),
and then press
/
to select a benchmark in the
range of 2500K15000K from warm color to cold
color, afterwards press
/
to adjust; if a dierent
benchmark is selected for adjustment, the original
adjustment data will be automatically cleared.
Adjust
TintV
Aspect RatioV
Select the mode of Aspect Ratio(Full screen/4:3/Zoom/
Cinema/Panorama).
Sound Tuning
Warm 1
Warm 2
Cool 1
Cool 2
+50
0
-50
ResetV
Return to factory default settings.
Adjust
Vivid
Color
Allows you to select the color mix(Tint) of the picture.

#BTJD3FDFJWJOHBOE1MBZJOH0QFSBUJPOT
5'5-$%UFMFWJTJPO0XOFST.BOVBM
4PVOE$POUSPM'VODUJPOT
)PXUPDIPPTFBVEJPNPEF
1SFTT.&/6UPEJTQMBZNBJONFOVPOUIFTDSFFO
BOEUIFOQSFTT
UPTFMFDUUIF"VEJPNFOV
BGUFSXBSETQSFTT
UPFOUFSUIFPQUJPOUPCF
BEKVTUFE
1SFTT
UPNPWFUIFDVSTPSUPUIFPQUJPOUP
CFBEKVTUFEBOEUIFOQSFTT
UPTFMFDU6TFS
4UBOEBSE.VTJD5IFBUFSNPEF
6TFSV
"TQBSFTFUUJOHUIBUDBOCFBEKVTUFEUPQFSTPOBMUBTUFT
4UBOEBSEV
/PSNBMTPVOEXJUINPEFSBUFCBTTBOEUSFCMFTFUUJOH
.VTJDV
%FTJHOFEUIFTPVOEUPCFTUTVJUNVTJDQSPHSBNT
5IFBUFSV
&OBCMFTFYUSBCBTTBOEUSFCMFUPFOIBODFUIFNPWJF
FYQFSJFODF
:PVDBOBMTPQSFTT4.0%&CVUUPOPOUIFSFNPUFDPOUSPM
UPTFMFDU6TFS4UBOEBSE.VTJD5IFBUFSNPEF
)PXUPDVTUPNJ[FZPVSPXOBVEJP
TUBUVT
1SFTT.&/6UPEJTQMBZNBJONFOVPOUIFTDSFFO
BOEUIFOQSFTT
UPTFMFDUUIF"VEJPJDPO
BGUFSXBSETQSFTT
UPFOUFSUIFPQUJPOUPCF
BEKVTUFE
1SFTT
UPBEKVTU
6RXQG 7XQLQJ
656 76 ;7
'LJLWDOWRQH
0$;; /RZ
7PMVNFV
1SFTT
UPBEKVTUUIFWPMVNFPGB57QSPHSBN
#BMBODFV
5IJTXJMMBEKVTUUIFPVUQVUPGUIFSJHIUBOEMFGU
TQFBLFSTUPPCUBJOUIFCFTUTUFSFPSFQSPEVDUJPOGPS
ZPVSMJTUFOJOHQPTJUJPO
5IFJOUFSNFEJBUFWBMVFJT8IFOJOEJDBUJPOWBMVF
PG#BMBODFJODSFBTFTUPXBSETPVOEPGUIFSJHIU
BOEMFGUTQFBLFSTCFDPNFTTUSPOHFSBOEXFBLFS
SFTQFDUJWFMZ8IFOJOEJDBUJPOWBMVFPG#BMBODF
EFDSFBTFTUPXBSETPVOEPGUIFSJHIUBOEMFGU
TQFBLFSTCFDPNFTXFBLFSBOETUSPOHFS
%JHJUBMUPOFV
5IJTTFMFDUUIFNPEFTGPSTPVOESFQSPEVDUJPOEFQFOEFOU
POUIFCSPBEDBTUTJHOBMTPSTJHOBMTGSPNFYUFSOBMJOQVUT
SFDFJWFE
4FMFDUUIFNPEFPGTPVOE6TFS4UBOEBSE.VTJD5IFBUFS
*GUIF6TFSNPEFJTTFMFDUFEQSFTT0,0,UPFOUFSUIF
TPVOENPEFNFOVBTTIPXOJOUIFCFMPXmHVSF
BOEUIFOQSFTT
UPTFMFDUBCFODINBSLJOUIF
SBOHFPG,GSPNCBTTUPUSFCMFBGUFSXBSETQSFTT
UPBEKVTUJGBEJõFSFOUCFODINBSLJTTFMFDUFE
GPSBEKVTUNFOUUIFPSJHJOBMBEKVTUNFOUEBUBXJMMCF
BVUPNBUJDBMMZDMFBSFE
6RXQG 7XQLQJ
8VHU
6WDQGDUG
0XVLF
7KHDWHU
'LJLWDOWRQH
G%
G%
4345495V
5IFTVSSPVOETPVOEGFBUVSFFYQBOETUIFBVEJP
MJTUFOJOHmFMEXJEFSBOEEFFQFSUPDSFBUFFYDFQUJPOBM
TPVOERVBMJUZGSPNUIF57TTQFBLFST
"7-"VUPNBUJD7PMVNF-JNJUV
5IJTXJMMSFEVDFTUIFEJõFSFODFTJOWPMVNFMFWFM
$GMXVW
$GMXVW
BNPOHCSPBEDBTUFST
."99#BTTV
5PBEKVTUUIFTVQFSCBTT1SFTT
UPTFMFDUTVQFS
CBTTPõMPXPSIJHI.FEJVN
3FTFUV
3FUVSOUPGBDUPSZEFGBVMUTFUUJOHT

Basic Receiving and Playing Operations
18 TFT -LCD television Owner’s Manual
Timer Functions
Setting of Current Time
The current time is calculated from the moment upon
turning the TV on. At rst, check whether the time
indicated on the TV's clock is consistent with the standard
time of your time zone; if not, adjust the clock as follows:
Press MENU on the remote control unit or MENU
on the TV’s front panel to display the main menu, and
then press
/
to select the Time menu, afterwards
press
/
to select the Current Time option.
Sound Tuning
Press to set hour and minute.
Press
/
to adjust the time.
After nishing time setting, press OK or MENU to conrm.
Setting of ON/OFF Time
This function allows the TV to automatically turn on or
enter standby mode upon reaching the preset time.
Press MENU on the remote control unit or MENU
on the TV's front panel to display the main menu,
and then press
/
to select the Time menu,
afterwards press
/
to select the On Time or O
Time option.
Press OK to enter the setting screen, and then
press
/
to select ON or OFF, if you select ON,
press to set hour and minute. ON indicates the
On/O Time function is enabled while OFF indicates
the function is disabled.
Sound Tuning
After nishing time setting, press OK or MENU to conrm.
Note
After setting the On/O Time function, if the TV2
is AC o or forcible DC o, the function will be
automatically cleared.
Setting of On Channel
This function is used in combination with the On/O Time
function. When the TV turns on upon reaching the On
time, it automatically enters the preset channel.
Press MENU on the remote control unit or MENU
on the TV's front panel to display the main menu,
and then press
/
to select the Time menu,
afterwards press
/
to select the On Channel
option.
Press
/
to set the On Channel or OFF.
Sound Tuning
Setting of Remind Time and Remind
Channel
The remind time and remind channel functions allow the
TV to automatically enter the preset channel at preset
time. If the TV is AC o or forcible DC o, the preset time
Adjust
Adjust
Adjust
will be cleared.
Press MENU on the remote control unit or MENU
on the TV's front panel to display the main menu,
and then press
/
to select the Time menu,
afterwards press
/
to select the Remind Time
option.
Sound Tuning
Adjust
/
/

Basic Receiving and Playing Operations
TFT -LCD television Owner’s Manual 19
Press OK to enter the setting screen, and then press
/
to select ON or OFF, if you select ON, press
/
to set hour and minute, and then press
/
to adjust time.
After nishing time setting, press OK or MENU to
conrm.
Press
/
to select the Remind Channel option,
and press
/
to set the found
.
Function Menu
Function Menu Set
Press MENU on the remote control unit or MENU
on the TV’s front panel to display the main menu, and
then press
/
to select the Time menu.
Press
/
to select the option to be adjusted,
and then press
/
to adjust it.
LanguageV
Two languages (i.e. Simplied and English)
are available for your choice.
Menu timeoutV
The option is for adjusting the menu display time.
Press
/
to set the desired time (5-15s).
Sound Tuning
Language English
Menu Timeout 15s
Picture Optimize
Background
Black Stretch
on
on
Picture OptimizeV
Press•MENU on the remote control unit to display
the main menu, and then press
/
to select
the Function menu.
Press•
/
to select the Picture Optimize option.
Press OK•to enter the submenu.
Press•
/
to select the option to be adjusted,
and then press
/
to adjust it.
Sound Tuning
3D Comb Filter
Adjust
Adjust
BackgroundV
Press
to set ON or OFF, if you select ON, the
TV screen will be black if no signals are available.
Black StretchV
PIPV
Press•MENU on the remote control unit to display
the main menu, and then press
/
to select
the Function menu.
Press•
/
to select the PIP option.
Press OK•to enter the submenu.
Press•
/
to select the option to be adjusted,
and then press
/
to adjust it.
Sound Tuning
PIP Mode
PIP Source
PIP Position
Adjust
PIP
PBP
PC
Left Down
Note
When PIP Mode is Small or Large, PIP Position can
be selected.
Press to set ON or OFF, if you select ON, the
dark&white areas of the picture will be more clarity.
PIP
/
/

#BTJD3FDFJWJOHBOE1MBZJOH0QFSBUJPOT
5'5-$%UFMFWJTJPO0XOFST.BOVBM
"VUP"EKVTUV
5IJTJTVTFEUPSFTFUUIFEFGBVMUTFUUJOHQBSBNFUFST
$MPDL
V
5IJTJTVTFEGPSBEKVTUJOH)1PTJUJPOBOE71PTJUJPOBT
XFMMBTSFMBUJWFQBSBNFUFSTJO1$NPEFT
1IBTF
V
5IJTJTVTFEGPSBEKVTUJOHUIFQIBTFPGQJYFMDMPDLJO
1$NPEF
3FTFUV
3FUVSOUPGBDUPSZEFGBVMUTFUUJOHT
-PDL4FUVQ
5IFUFMFWJTJPOIBTUIFGVODUJPOPGTFDVSJUZEFGBVMUMPDL
1BTTXPSEOFFETUPCFFOUFSFEXIFOUIFQSPHSBNMPDL
NPEFJTUPCFTFU
)PXUPVTFUIFQBTTXPSEGVODUJPO
1SFTT)-0$,UIF57TDSFFOXJMMEJTQMBZ&OUFS1BTTXPSE
UPQSPNQUUIFVTFSUPFOUFSBDPSSFDUQBTTXPSECZ
QSFTTJOHDPSSFTQPOEJOHOVNFSJDBMLFZTJGUIFQBTTXPSE
JTDPSSFDUUIFVTFSFOUFSTUIF-PDL4FUNFOVJGJODPSSFDU
UIFVTFSJTSFRVJSFEUPFOUFSBQBTTXPSEBHBJO
*GUIFSFJTOPPQFSBUJPOGPSBGFXTFDPOETUIFEJTQMBZXJMM
BVUPNBUJDBMMZEJTBQQFBS
5IF-PDL4FUNFOVJTBTGPMMPXT
/RFN6HW
*NBHF1PTJUJPOV
5IJTJTVTFEUPBEKVTUJOH)1PTJUJPOBOE71PTJUJPO
)4J[FV
5IJTJTVTFEGPSBEKVTUJOH)PSJ[POUBMTJ[FJO1$NPEFT
74J[FV
5IJTJTVTFEGPSBEKVTUJOH7FSUJDBMTJ[FJO1$NPEFT
&+
"EKVTU.FOV
5IF57DBOCFVTFEBTBEJTQMBZBOEZPVNBZBEKVTU
SFMFWBOUTFUUJOHT
1SFTT 4063$&UPTXJUDIUIF
TJHOBMJOQVUUPZPVTFMFDUFENPEF
1SFTT.&/6UPEJTQMBZUIFTDSFFONBJONFOVBOE
UIFOQSFTT
UPTFMFDUUIF"EKVTUNFOVBT
TIPXOJOUIFCFMPXmHVSF
6RXQG 7XQLQJ
,PDJH3RVLWLRQ
+6L]H
96L]H
$XWR$GMXVW
&ORFN
3KDVH
5HVHW
2.
2.
2.
1SFTT
UPTFMFDUUIFPQUJPOUPCFBEKVTUFE
1SFTT
UPBEKVTUJU
$GMXVW
5PTFUOFXQBTTXPSEV
"GUFSFOUFSJOHUIF-PDL4FUNFOVQSFTT
UP
TFMFDUUIF$IBOHF1BTTXPSEPQUJPOBOEUIFOQSFTT
UPEJTQMBZUIF$IBOHF1BTTXPSENFOV
BGUFSXBSETFOUFSBOFXEJHJUQBTTXPSECZQSFTTJOH
OVNFSJDBMLFZTBOESFQFBUFOUFSJOHUIJTQBTTXPSE
PODFBOEmOBMMZTFMFDUUIFPQUJPOUPCFDPOmSNFE
BOEQSFTT.&/6UPDPOmSNJOEJDBUJOHUIFTVDDFTTGVM
DIBOHFPGQBTTXPSE
*GUIFVTFSEPFTOPUXBOUUPDIBOHFUIFQBTTXPSEJO
IBMGXBZIFNBZQSFTT.&/6UPFYJUGSPNUIJTNFOV
/PUF
5IFJOJUJBMQBTTXPSEJTBOEUIFQBTTXPSETFUUJOH
XJMMOPUCFDIBOHFEBGUFSFYFDVUJOHUIF6OMPDL
PQUJPO
5VOJOH-PDLV
1SFTT
UPTFMFDUUIF5VOJOH-PDLPQUJPOBOE
UIFOQSFTT
UPTFU0/PS0''
*GTFU0/UIF5VOJOH.FOVJTOPUBWBJMBCMFJO57
NPEF5PNBLFBOZPQFSBUJPOSFMBUFEUPUIF5VOJOH
.FOVJUJTOFDFTTBSZUPFOUFSUIF-PDL4FUNFOVUPTFU
5VOJOH-PDL0''PSFYFDVUFUIF6OMPDLPQUJPO
6RXQG 7XQLQJ
$GMXVW
*NBHF1PTJUJPO
Other manuals for L32K1
1
This manual suits for next models
1
Table of contents
Other Haier TV manuals

Haier
Haier 29T9G User manual

Haier
Haier HL40K2AFA User manual

Haier
Haier L42B1180 Assembly instructions

Haier
Haier LT15R1CBW User manual

Haier
Haier HL32K2a User manual

Haier
Haier P42LV6-T1 User manual

Haier
Haier LE32D2320 User manual

Haier
Haier 29FV6NW User manual

Haier
Haier L22T6 User manual

Haier
Haier LC-1910P User manual

Haier
Haier DTA-2196PF User manual

Haier
Haier 29F9B-P User manual

Haier
Haier HTAF29S User manual

Haier
Haier HT-3499 User manual

Haier
Haier HL19KN1 User manual

Haier
Haier HLC19W-A Building instructions

Haier
Haier LT22R3COW User manual

Haier
Haier LV1913 User manual

Haier
Haier TDC1314S User manual

Haier
Haier 1407 User manual