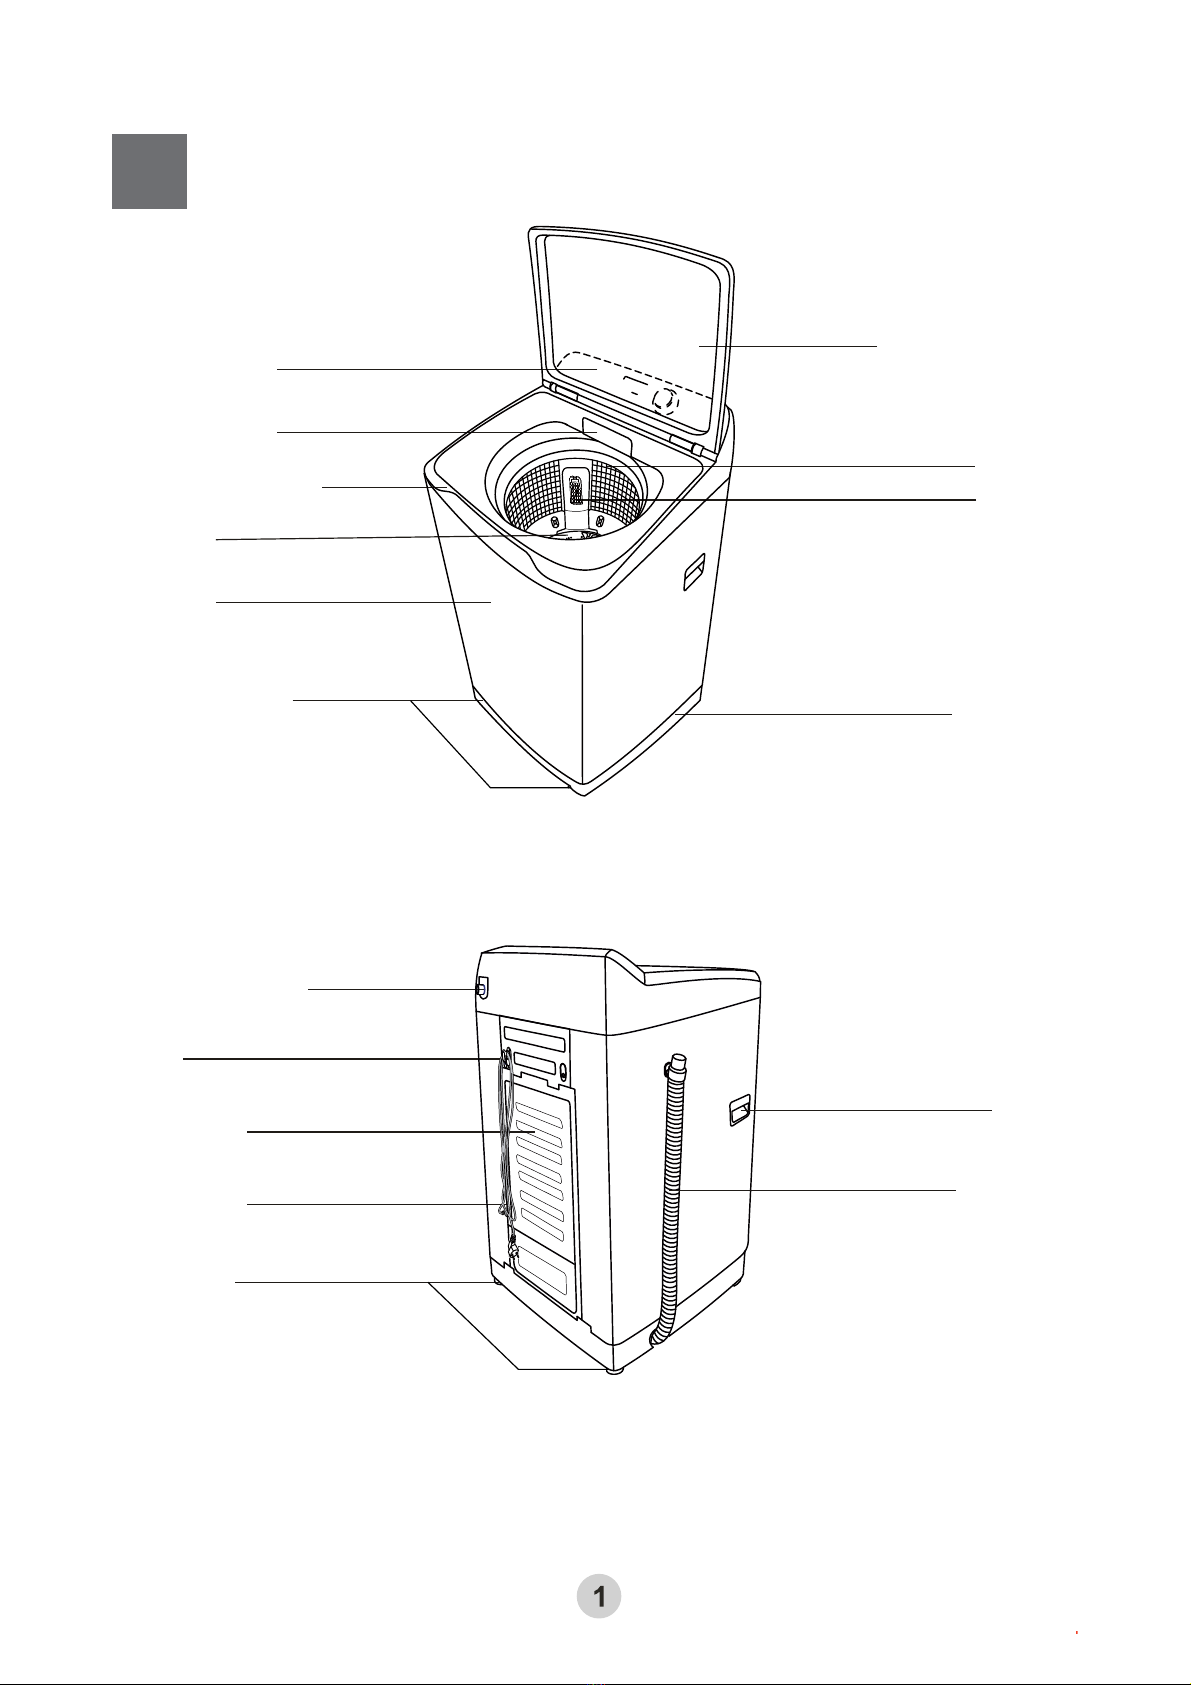
logo
Brands
  1. Home
  2. •
  3. Brands
  4. •
  5. Haier
  6. •
  7. Washer
  8. •
  9. Haier HWM100-678NZP User manual

Haier HWM100-678NZP User manual

Other Haier Washer manuals

Haier HW90-B14CIN User manual

Haier

Haier HW90-B14CIN User manual

Haier HWM1270KFL User manual

Haier

Haier HWM1270KFL User manual

Haier JW-K50B\JW-K50C User manual

Haier

Haier JW-K50B\JW-K50C User manual

Haier HK1270TVEME User manual

Haier

Haier HK1270TVEME User manual

Haier HWM65-0566 User manual

Haier

Haier HWM65-0566 User manual

Haier XPB50-AS User manual

Haier

Haier XPB50-AS User manual

Haier HW80-1403D User manual

Haier

Haier HW80-1403D User manual

Haier HNS1460TVE User manual

Haier

Haier HNS1460TVE User manual

Haier HWM110-9188 User manual

Haier

Haier HWM110-9188 User manual

Haier HWM85-0566 User manual

Haier

Haier HWM85-0566 User manual

Haier HWM70-FD10829 User manual

Haier

Haier HWM70-FD10829 User manual

Haier MWB146E User manual

Haier

Haier MWB146E User manual

Haier JW-K33B User manual

Haier

Haier JW-K33B User manual

Haier RWT350AW User manual

Haier

Haier RWT350AW User manual

Haier XQBM22-C User manual

Haier

Haier XQBM22-C User manual

Haier TEL6TL User manual

Haier

Haier TEL6TL User manual

Haier HWM33-200D User manual

Haier

Haier HWM33-200D User manual

Haier HKS1000TXVE, HKS1000TXME User manual

Haier

Haier HKS1000TXVE, HKS1000TXME User manual

Haier HWM90-0713P User manual

Haier

Haier HWM90-0713P User manual

Haier HW-F1481 ME User manual

Haier

Haier HW-F1481 ME User manual

Haier HDS1260TVE User manual

Haier

Haier HDS1260TVE User manual

Haier HM501 User guide

Haier

Haier HM501 User guide

Haier HWM80-27S User manual

Haier

Haier HWM80-27S User manual

Haier HLP23E - Electronic Touch Pulsator Ing Portable Washing... User manual

Haier

Haier HLP23E - Electronic Touch Pulsator Ing Portable Washing... User manual

Popular Washer manuals by other brands

Samsung WF8508NMW8 null

Samsung

Samsung WF8508NMW8 null

Samsung WF-B105AV null

Samsung

Samsung WF-B105AV null

Akai AWM1050WF null

Akai

Akai AWM1050WF null

Tricity Bendix AW 1000 W Operating & installation instructions

Tricity Bendix

Tricity Bendix AW 1000 W Operating & installation instructions

Panasonic NA-F60L5WRB operating instructions

Panasonic

Panasonic NA-F60L5WRB operating instructions

GE WSLP1500 Dimensions and installation information

GE

GE WSLP1500 Dimensions and installation information

Electrolux EWF1284EDW Service manual

Electrolux

Electrolux EWF1284EDW Service manual

LG TV2516DV3B owner's manual

LG

LG TV2516DV3B owner's manual

LG TH2517DSAV owner's manual

LG

LG TH2517DSAV owner's manual

VESTEL CMH-XL 7510 TE user manual

VESTEL

VESTEL CMH-XL 7510 TE user manual

AEG 74335 User information

AEG

AEG 74335 User information

Johnson JWF721A user manual

Johnson

Johnson JWF721A user manual

Beko WTE7604XLW0 owner's manual

Beko

Beko WTE7604XLW0 owner's manual

Danby DTT100A1WDB Owner's use and care guide

Danby

Danby DTT100A1WDB Owner's use and care guide

Amica WA 14 Ex operating instructions

Amica

Amica WA 14 Ex operating instructions

Daewoo DWD-F1222 instruction manual

Daewoo

Daewoo DWD-F1222 instruction manual

Bosch WAS28461AU instruction manual

Bosch

Bosch WAS28461AU instruction manual

Miele PW 6080 Vario manual

Miele

Miele PW 6080 Vario manual

https://manuals.online logo
https://manuals.online logoBrands
  • About & Mission
  • Contact us
  • Privacy Policy
  • Terms and Conditions

Copyright 2026 Manuals.Online. All Rights Reserved.

MODEL
Please readthismanualcarefullybefore
operatingyour washingmachineand retain
itforfuturereference.
FULLYAUTOMATICTOP LOADING
WASHING MACHINE
USER S MANUAL
0030513712
HWM100-678NZP
CONTENTS
Installation &adjustment
Bef
ore washing
Operation
Cleaning orMaintenance
Packinglist
Specification
5
5
5
5
6
6
9
10
10
11
9
10
15
18
18
Balancewashing machine
Change thedirection ofthe drain hose
Installthe bottomplate
Usageofthe drain hose
Inlet pipe connection
Checkthe following beforewashing
Usageofthe detergent
Loading yourlaundry
Explanation ofbuttons
Trouble-shooting 16
Productoverview
Safetyprecautions
1
2
2
4
Description ofsymbols
Warning
Forbidden
Safetywarning
2
3
Pleaseunderstand thatthe shapesofthewashingmachineandaccessoriesmay
be different fromthe sketchfiguresinthismanual duetoproduct improvement.
Handle
Back cover
Powercord
Waterinletvalve
Fixedfoot
(2pieces)
Hook
Drainhose
Productoverview
Detergent box
Toplidcomponent
Pulsator
Cabinet
Baseframe
Controlpanel
Controlpanelseat Innertub
Adjustablefoot
(2pieces)
Lint filter
Safetyprecautions
2
Descriptionofsymbols
Warning sign
Forbidden sign
Safetywarning
Contentsmarkedwiththissymbolarerelated tothe safeuseof
theproductandthepersonalsafetyof theuser.
Pleaseoperateinaccordancetothecontentsofthismanual,to
avoidharmtotheuserordamage tothe machine itself.
Contentsmarkedwiththissymbolindicateoperationsoractions
thatshouldnotbeundertakenbytheuser.
Performingof suchactionsmayresultinaninjury totheuser
ordamage tothe machine itself,andvoidwarranty.
Pleasecheckpowersocketconditiontoensureit hasbeenearthedcorrectlypriorto
installationtoensureyoursafety.
Aseparate,earthed powersocket is
required forthepowersupply.
Holdtheplug-NOTthe electriccable-when
unplugging the washing machine.
Do notinsert orremovethepowerplugwith
wet hands.
The powerplug shouldbe accessibleafter
the machineinstallation.
Thisapplianceisintended tobeused in
householdand similarapplicationssuchas:
staff kitchen areasinshops,officeand
otherworkingenvironments;
farm houses;
byclientsinhotels,motelsandother
residential typeenvironments;
bedand breakfasttype environments;
areasforcommunaluseinblocks offlats
orin launderettes.
Warning
If the supplycordisdamaged, it
must bereplaced bythe manufacturer,
itsserviceagent orsimilarqualified
personsinordertoavoidahazard.
CAUTION:If this applianceissupplied
fromacordextensionset orelectrical
portableoutlet device,the cordextension
set orelectricalportableoutletdevice
must bepositionedsothat it isnot
subject tosplashing oringressof
moisture.
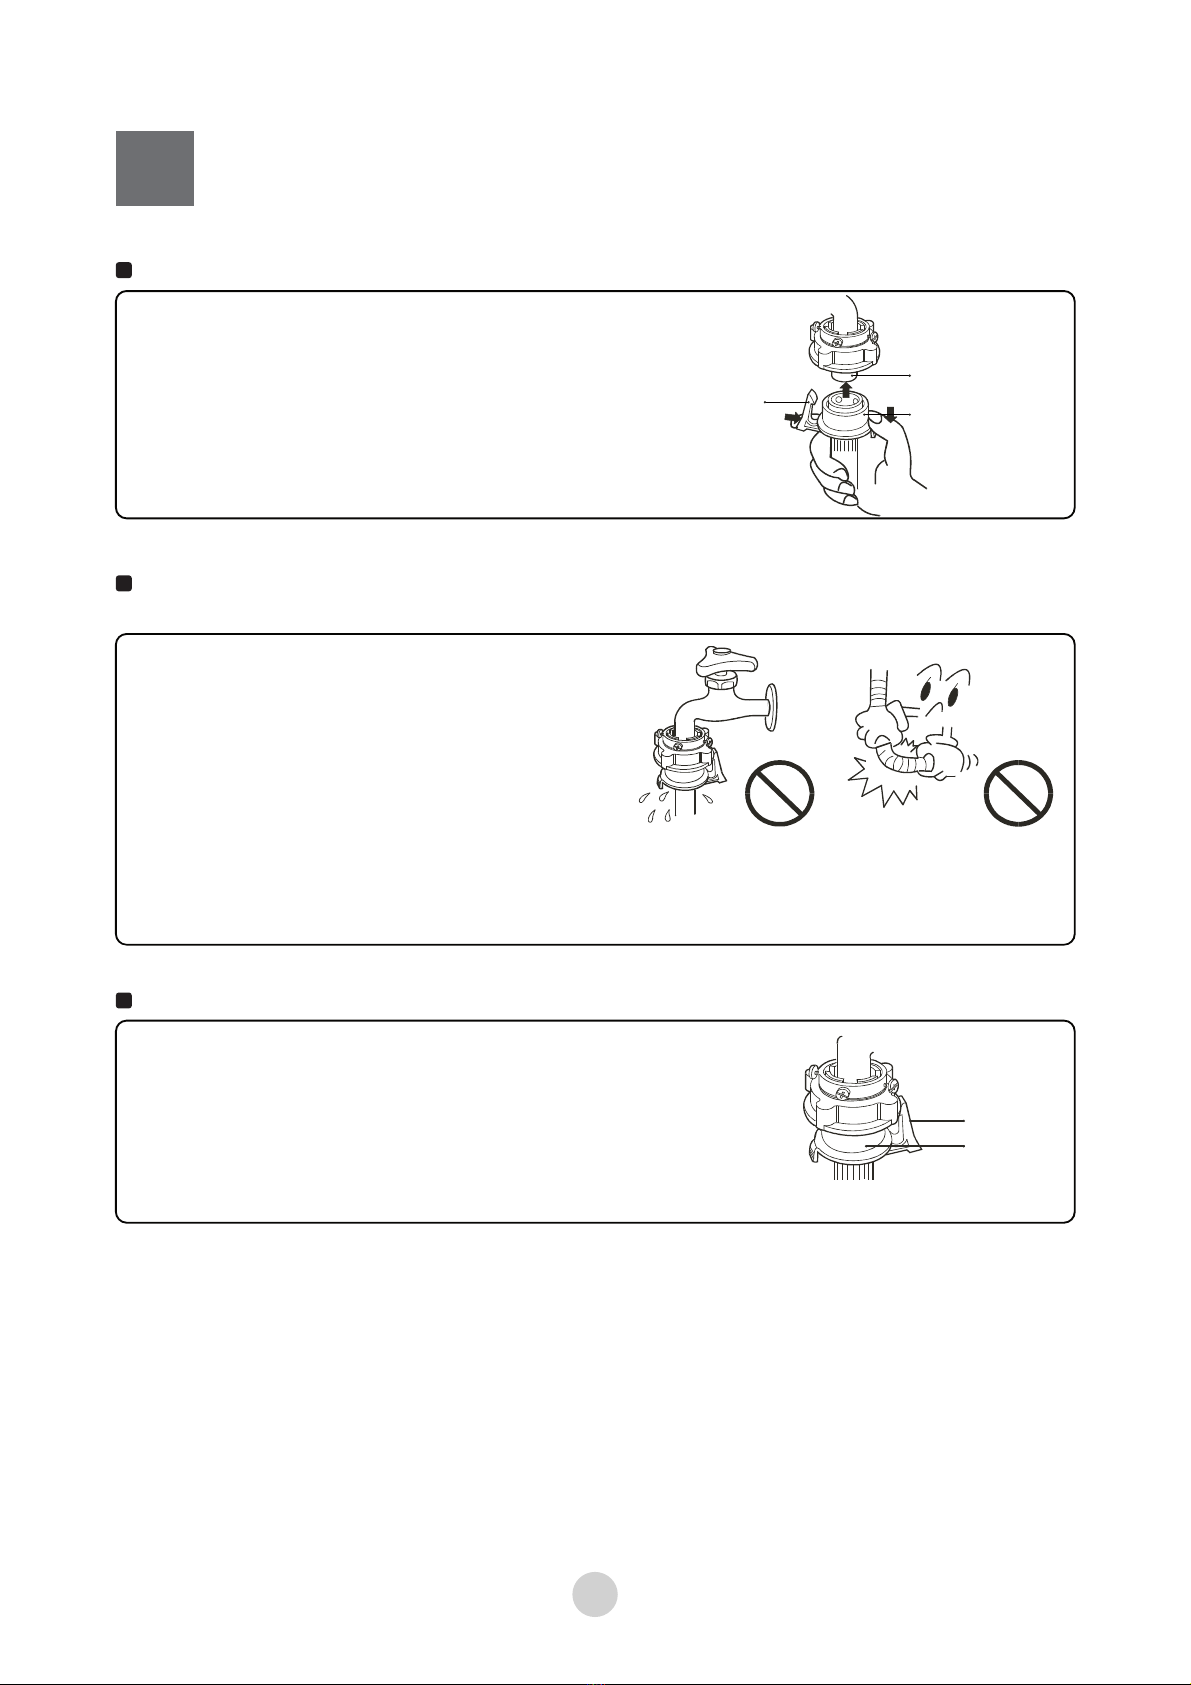
Ensurethe plugisremoved and thetap is
turned off inthe followingcases power
failure,cleaning,moving,installation
andwhen notinuse.
The new hose-setssuppliedwiththe
appliancearetobe usedandthatold
hose-setsshould notbereused.
The ratedwashingcapacity,spinning
capaciy,the max.and min.inlet
waterpressurereferto
specification page.
Safetyprecautions
3
Ifyou areusinganextension cordor
aportableelectricaloutlet
device(not recommended),ensurethatitispositioned sothat
it doesnotcomeintocontactwithwaterormoisture.
Do notwash
water-proofclothing
asthismayaffect
load balanceduring
spincycle(s).
Forbidden
Thisapplianceisnot intendedforuse
by
persons(including children)withreduced
physical,sensoryormental
capabilities,orlackof experience
and knowledge, unlesstheyhave
beengiven supervision or
instruction byapersonresponsible
fortheirsafety.Children should besupervised to
ensurethat theydonot playwiththe appliance.
Donot takeapart,
repairoralterthe
machine by
yourself.
Donot leavehotorheavy itemsonlid
orcontrolpanel asthismaycause
damagetothewasherormakethe
washerunsafetooperate.
Donot washlaundry
withchemicalsorother
volatilematerials(suchas
petrol,solventsorthinners)
asthiscausedamage
tothe machine.
Keep washeraway
fromheat sources
suchasheater,
stovesordirect sunlight.
Back
Front
Bottomplate
Soft object
Do notblockthe ventilationholeswithcarpet.
Ensurecarpetdoesnotobstructthe opening under
the baseofthe cabinet.
Theventilation
holesat the bottom
Do notconnecttohot
waterhotterthan
50°C.
The maximuminlet
waterpressurerefers to
specification pape.
Do notinstallthisappliancein a
damporwetenvironment.Donot
leavewetlaundry on the control
panel orspraywaterdirectlyonto
thisappliance,asthismaycause
malfunctionofthe washeroran
electrical fault.
Donot attempttomovewashing orplace
handsinsidewashingmachinewhilein
operation.Pleaseensurechildrenare
supervisedaroundmachinetoavoid
harm.
Safetyprecautions
4
Ifpowercordorotherpartsof thismachinebecomedamagedorfaulty,please
contact atechnician tohaveit repaired Donot attempt torepairbyyourself as this
maycausepersonalharm orvoid warranty.
Thewashingmachinewhoselid canbeo
penedduring waterextraction,thatit takes
15sormoretostopofwater-e
xtractingchambertub. Thenewhose-setssupplied
withtheappliancearetobeusedandth
atoldhose-setsshouldnot bereused.
Thewashingmachinewhoselid canbeopenedduringwaterextraction, thatittakes15s
ormoreforcompletestop of water-extractingchambertub.
Thenewhose-setssuppliedwiththeappliancearetobeusedandthatold hose-sets
shouldnotbereused
Safetywarning
Pleaseremoveitemsuchascoins,
button,sandandothersolidmaterials
fromclothing beforewashing.
Checkthatwaterfaucetsareopen
afterconnectiontomachine,prior
tooperation and thatpipesare
connected correctly.
Pleaseuselow suds/highefficiency
washingpowder.
Smarthingepreventssudden closing ofthedoor.Doorisheavy,becarefulwhile
closingof thedoor.
Donot letyourhandsoranyothermaterialbecaught
belowdoor. It mightcauseinjury ordamage.
Doorclosing timeisdependentonambient temperature.
Thehighertheambienttemperatureis,theshorterthe door
closingtimeisandviceversa. SmartClosing Doorperforms
bestwhenlidisclosed fromfullopencondition.
Smart hinge
Pleaseinstall andadjustthemachineaccordingtothedirectionscontainedinthis
manual.Itisvery importanttofollowthesedir
ectionsforthesafeoperationofthe
machine andtoensureyourmachine operatescorrectly.
Installation &Adjustment
5
Back
Front
Screw
Bottomplat
e Carpet
Donotinstall thismachine on an incline greaterthan 2°.Installing machine on an
angle oron rough ground will resultin unstable running orstoppage ofthe
machine.Pleaseadjustitbythe following method:
1.Confirmitislevel.
2.Liftup the side ofthe leg slightlyand twistthe adjustable foot.
Balancewashing machine
Installthebottomplate
Thepurposeof thebottom plateis tosuppress noise
fromthewashing machineduringoperation.
Steps:
2. Placethe plateontothebottom ofthemachine.
3. Useascrewdriver totightenthescrew (inaccessory
bag)securing thepanel tobottomof thewasher.
4. Oncethescrew is tight andthe panelissecure, return
thewashertoits standing position.
Changethedirection ofthe drainhose
1. Lay thewasheron its back, onanonabrasivesurface.
Note:Thedistancebetweenthe washing machine
andwall:atleast20 mm.
Installation &Adjustment
Usageofthe drainhose
Inletpipeconnection
1.The heightofthedrainhoseshallbeless
than 10cm, orthedrainage will notbe
smooth andcostsuchlongtimethatthe
machine maystopatmidway.
2.Do nottrampleorpress the drainhose.
3.Ifthedrainhoseistoolong, cutit atmid
point.Tomakesmoothdrainage,cutthe
frontend ofthe hoseslantingly.
4.Ifextradrainhoseisneeded,please
makeseparatepurchase.The inner
diameterofthe extrahoseshallnotbe
less than 30mm,andthelengthshall
not exceed1.5m.
5.Iftheextrahoseistoolong, cutit either
atAoratBpoint.
Note: The instructionsforappliancesconnectedtothewatermainsbydetachable
hose-setsshall statethat thenew hose-setssupplied withtheapplianceareto
beusedand thatold hose-setsshould not be reused.
AB
The newhose-sets supplied with the appliance are tobe used andthat old hose-sets
should not be reused.
Confirm the waterfaucet
It is required that thefront end shall be longerthan 10mm.
The exit end faceof the faucet shall beflat and smooth. Ifnot, please file it to avoid
leakage.
The exitend face ofthe faucet
waterfaucet,suitable waterfaucet, notsuitable
6
Thedrainageshallbesmoothwith thedrain hose.
Installation &Adjustment
Connectionbetweenthe waterinlethose jointerandthe waterfaucet
1.Press the lowerend of the lock leverand pushdown the slider. Take off the
water
inlet hose jointerromthe waterinlet hosecomponent.See to Figure 1.
2.Take off the nameplate. Make sure the threadingis 4mmabove theuppersurface
of the nut. See toFigure 6.If thethreading is less than4mmabovetheupper
surfaceof thenut, please loosen the screws.
3.Loosen the screwtill the waterfaucet can be accessed.Put the jointerof thewater
inlet hose on thefaucet. See to Figure 2.(If thefaucetis too large andthe jointer
can not be set on thewaterfaucet,please loosen the fourscrews and take out the
bushing inthe jointer. The frontend of the faucet must be smooth, otherwise it may
leak water. See to Figure 3.)
4.Fastenthe four screws evenly. SeetoFigure 4.
5.Twistthe fasteningnut, seetoFigure5. Afterinstallation, the threading is
less than 2mm abovetheupper surfaceof thenut. SeetoFigure 6.
About4mm before
twisting
About less than
2mm aftertwisting
Lock lever
Waterinlethose
Slider
Waterinlethosejointer
Screw knife
Nameplate
Screw
Bushing
Screw nut
Figure1 Figure2 Figure3
Figure4
Figure5 Figure6
Connectionbetweenthe waterinlethose andthe washer
1.Donottakeoffthe waterabsorption cushion.
Pleasecheck if the cushion isdroppedor
damaged beforeeach usage.Ifithappens
please contactourafter-saledepartment
immediately.
2.Putthe nutof the waterinlethose on the
valve jointer.
3.Fastenthe nut.Swing itgentlytoconfirmifit’s suitable.
nutof thewater inlethose
jointerof thewaterinletvalve
waterabsorption cushion
7
Installation &Adjustment
Connectionbetweenthe jointerofthewaterinlethose andthewaterinlethose
1.Push downthe slider.Insert the waterinlethose
intothe jointer.
2.Hang the lock levertothe jointer.Release the
slidertillaclick sound isheard.
Check the connectionbetweenthejointerofthe waterinlethoseandthe
waterfaucet
1.Swing the hose gentlytoconfirmifit
isfastened stably.
2.Afterinstallation, open the faucetto
check ifitleaks.
3.Donotbend the hose withoverstrain.
4.Beforeeach usage please check if
the connection between thejointerofthe water inlethose and the water
faucet,and the installation ofthe waterinlet
hose arefirm, so as toprevent
dropping fromimproperinstallationposition.
Dismantle thewaterinlethose
1.Close the water faucet.
2.Press the locking lever.Push downthe slider.Then
pulloffthewaterinlethose.Ifthe machine isused
frequently,the jointerofthe waterinlethosevhose.
Ifthe machine isusedfrequently,the jointerofthe
waterinlethose
Lockinglever
Slider
Lockinglever Slider
thejointerofthewater
inlet hose
8