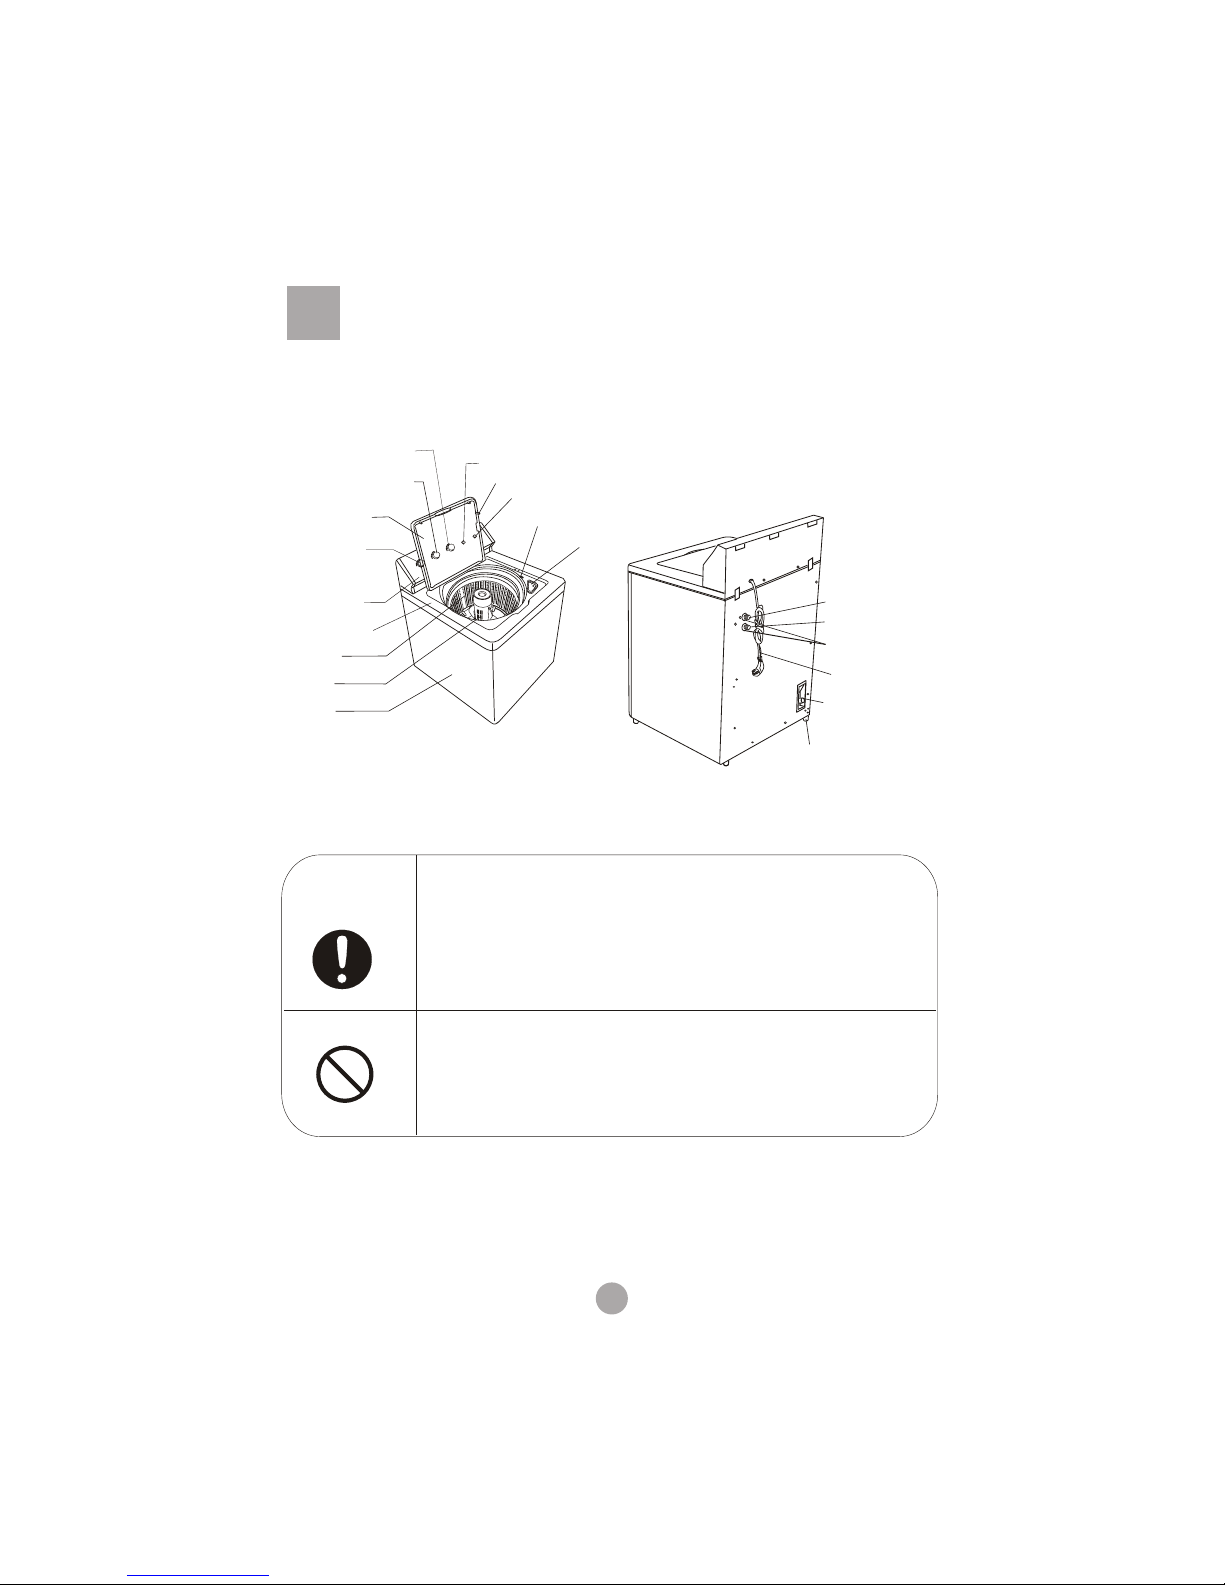
Haier WMQ-12.P User manual

France
WASHING MACHINE
LAVE LINGE
MANUAL OF USE
MANUEL D’UTILISATION
WMQ-12.P
WMQ-12.PX

Contents
Names of the parts ………………………………………………1
Safety precautions……………………………………………2
Installation and adjustment……………………………………4
Preparation before washing……………………………………6
Put in the laundries……………………………………………7
…………………………………………7
7
…………………………………………………8
………………………………………
After washing…………………………………………11
Trouble shooting answer to question…………………………12
Packing list………………………………………………………13
Specification………………………………………ĂĂĂĂĂ14
Add the detergent
Close the top lid…………………………………………………
Select water level
Press the POWER button 8
Select program…………………………………………………8
Set of TEMPERATURE of wash and rinse water……………9
Press the START/PAUSE button…………………………………10
The washing is finished……………………………………10

1
Names of the parts
Meaning and description of the symbols
Warning sign
Prohibition sign
Contents marked with that symbol are related to the safety of the product
and the personal safety of the users. Please operate in strict conformity
to the contents, otherwise it may cause damage of the machine or injure
the personal safety of the user.
Contents marked with that symbol are actions forbidden to perform.
Performing of those actions may result in damage of the machine
or injure the personal safety of the user.
Power switch
Program selector
Bleach injection inlet
Cabinet
Control panel
Control panel seat
Inner tub
Top lid
Water level knob
Control foot of door switch
Agitator
Start/Pause switch
Door switch
Temperature Wash/Rinse switch
Adjustable feet
(4)
Power line
Cold water inlet valve
Water absorption cushion
Drain hose joint
Hot water inlet valve

2
Safety precautions
Do not put the machine at damp place like the bath
room. Never wash it with water.Not put wet laundries
on the control panel.
Do not let the machine share one receptacle
with other electric appliances. If the power
plug is damaged, or the plugging into the
receptacle is loose, do not use the plug any
more.
Do not wash water-proof laundries like
the raincoat, bike covers etc. to avoid
abnormal vibrations in spinning.
Please insert the power cord into special three
-phase receptacle.The earthing terminal of the
receptacle must be earthed reliably.If possible ,
please adopt electric leakage protector.
Do not bend ,extend,twist,bind by force.Do not press or nip it with weight.
Keep the pin of the power plug clean,if the power plug is polluted with dust,please wipe
with dry cloth carefully.
If the power cord or the power plug is bad, to avoid risk it is required to have it replaced
by the technicians of our special shop or the after-sale service department.
The power cord plug should be convenient
to be pluged in or pluged out with hand
while the washing machine runs normally.
Be sure to pull the plug out and close the
water tap when the machine is idle,when
moving the machine,or when cleaning
the machine.Do not use wet hand to ins-
ert or pull out the power plug.
Do not use water hotter than 60℃.
C
60
In case the washing machine is installed on ground
with carpet, be careful not to block the ventilation hole
with carpet.
Earth

Safety precautions
3
Do not decompose, repair or alter the
machine by yourself.
Do not put any hot or heavy items (such
as the kettle with hot water ) on the
washing machine.
Do not wash laundries with volatile
materials (such as thinner, petrol etc.)
The handicapped or children without
care shall not use the machine.
Keep the machine away from direct
sunlight and heat source like the heater.
Do not stretch hands into the working
machine. It is dangerous even if the
rotation is slow. Take special care of
the children.
Petrol
Thin er
n
To prevent your laundries and washing
machine from damages, be sure to take
out all of the foreign materials from your
pocket, such as coins, buttons, sand or
hair pins etc. Before washing, please check if the
water tap is open, and if the water inlet
pipe is connected properly.
It is suggested to use low-foaming
washing powder.
In case the washing machine is installed
on ground with carpet , do not block the
ventilation hole with carpet.

Installation and adjustment
4
<2
Adjust the installation position
The largest allowed slope of the base of the machine is 2°. The slanting or rough
ground will result in unstable running or stoppage of the machine. Please adjust
it with following methods:
Confirm it's horizontal:
Hang the lead line to confirm
if it is horizontal.
Adjust the adjustable foot:
To twist the adjustable foot, please first lift up
the side of the foot slightly, and twist the foot.
.
High Low
Adjustable foot
Install the drain hose
Usage of the drain hose
The drainage shall be smooth with the drain hose.
1.put the drain hose up to suitable position.
2.Do not step on or press the drain hose.
1.0m-1.5m
Outer drain hose
component Drain hose hook
Drain hose joint
Drain hose clamp
First install the drain hose hook on the parts of
outer drain hose component.
Put the drain hose clamp on the outer drain hose,
insert the outer drain hose into the joint for it, and
then clutch tightly with drain hose clamp.

5
Install the water inlet hose
2. Connect the hot and cold water inlet hoses to the hot and cold
water faucet.
3. Connect the other ends to their respective cold and hot water inlet valve
located at the rear of the washer
Hot water needs to be at a temperature of at least 120 F- 140 F.
(49 C-60 C)for the soap to dissolve and to avoid soap residue
remaining on clothes.
Note:
C
H
Water absorption cushion
Jointer of the water inlet hose
Jointer of the
water inlet valve
C
H
Check the connection between the water inlet
hose and the water tap
1.Swaying the hose gently to confirm if it is fastened
stable.
2.After installation, open the tap to check if it leaks.
3.Do not bend the hose with overstrain.
4.Before each usage please check if the connection
between the water inlet hose and the water tap, is firm,
so as to prevent dropping from improve Installation
position.
1.Close the water tap.
2. Pull off the water inlet hose from the water tap and washer
Take down the water inlet hose
Figure 1
Figure 2
1. Respectively attach the water inlet hoses to the hot water faucet and the cold
water faucet. ( As figure 1)
NOTE: Do not over tighten. Damage to the
valves can result.

6
Preparation before washing
Pay attention to followings before washing the laundries
Preparation before washing
1.Connect the water inlet hose. Open the water
faucet.
2.Confirm that the washing machine is earthed
reliably. Then insert the power plug into the
receptacle. The earth terminal shall not link to
gas pipeline and faucet water pipeline.
3.Put the drain hose up.
1.0m~1.5m
Confirm if
there's special
requirment for
the laundries.
Clear the pocket.
Take out the
coins , sand,
hairpins etc.
Fasten the
buttons and
zippers.
When the pulsator
is running , the
buttons of the
laundries may
cause noise. For
the sake of
carefulness,please
put the laundries
with buttons into
other laundries.
The big laundries
like the jeans
shall be put in
loosely.
a.Please check if the laundries are applicable for washing.
b.Separate those not colorfast from other laundries.
c.For laundries not water absorbing,please put them into water with hands.
d.For laundries with much soil,please remove the soil first.You can add detergent on the
part with serious soil directly.It is much easier to remove the soil by that mean.
e.For laundries likely to get lint ball or with long fiber,please first turn the inside out before
putting them into the water.
f.Do not put the laundries polluted with chemicals directly into the washing machine.

7
Put in the laundries
The thickness, size, type of the cloth will influence the
actual washing capacity. It is suitable for one time
washing to put in reasonable amount of laundries
and the laundries can be turned round in washing.
Do not select high water level for laundries small than
4.0kg, so as to avoid splashing of water.
The capacity of washing and spinning of the machine
refer to the largest weight of the standard laundries
under dry condition that can be washed or spined in
one times. Washing quantity shall be lower than the
rated capacity.
The largest capacity of this machine is 10.0kg.
How to use the washing powder
Direct dissolved in the machine(not applicable for fuzzy
and reserve programs)
1.Fill small quantity of water.
2.Add the power. Run for 30 seconds to dissolve
it completely.
3.Put in the laundries. Select suitable water level.
Washing power with poor quality or not used for a long
period may get blocked. Please clean the detergent box
in time.
It is suggested not to use high sudsing detergent.
The powder is more prone to pollute the laundries than
the detergent. Therefore please use it with proper quantity.
The instant dissolving of the washing powder:
1. Prepare warm water of 30℃ and a container.
2. Add the powder while stirring to fully dissolve it.
How to use the bleacher
Fill water to decided level .Dilute the whitener with
container. Pour it slowly into the washing tub.
Avoid using whitener on laundries with colour or
pattern as they are prone to lose colour.
The whitener shall not touch the laundries directly.
Refer to the user's manual for the usage and
quantity of the whitener.
For whitener powder, please dissolve it before use.
Close the top lid
If you open the top lid,
the machine will stop
working during spinning.
Add the detergent

8
Using this button to switch on or off the power. When the power is on ,
the relevant indicator light will be lighted.
POWER Switch
Circumvolve this knob, the following programs can be
selected solely: STANDARD, HEAVY, GENTLE, QUICK, SPIN .
OFF
ON
POWER
GENTLE
STANDARD
HEAVY QUICK
SPIN
WASH
SOAK
RINSE
SPIN
CYCLE
Paraphrase of the program
Program the occasion
STANDARD The common washing.
QUICK
SPIN Only needing spining after washing with hands.
Select water level
RESET
LARGE
SMALL
MEDIUM
WATER LEVEL
WATER LEVEL KNOB
Three water levels available according to the laundries quantity:
LARGE; MEDIUM; SMALL.
After the water inlet as per the preset water level, in case
additional water quantity is required, please first set the button
to the "RESET", and perform automatic water inlet. When it
reaches the suitable water level, you can turn it to the preset
water level.
After the water inlet under set water level, if higher water level is
needed, please first turn the knob to " RESET ", then turn back to
needed water level. The washing machine will fill water to the
new water level automaticly .
Press the POWER button
When the washing is over , it will switch off the power automatically.
Select program
Mode and meaning of the indicator light
The frame of indicator is not lighted.
the frame of the indicator is flashing : indicate the running program.
the frame of the indicator is on : indicate the program about to run,
or indicate the selected mode.
the frame of the indicator is flashing rapidly: indicate abnormal condition.
HEAVY
GENTLE Washing woolen textile or underwear.
For quick washing of lightly soiled laundry.
For washing bigger, thicker and heavily soiled laundry.

9
SOAK WASH RINSE SPIN THE CYCLE IN POINT
QUICK
SOAK·WASH·RINSE·SPIN
HEAVY WASH·RINSE·SPIN
STANDARD
GENTLE·RINSE·SPIN
GENTLE
(Drain water)only SPIN
SPIN
Cycle
The indicator
The method of the program indicator light
light
Even ther e's no water in the tub, the spi nni ng
will star t after a cer tai n per iod.
Do not use the “SOAK” pr ogr am for the wool len
laundr ies.
Wash the laundr ies that ar e pr one to lose
col our s separ atel y from other l aundr ies.
To wash thin laundr ies such as the stocki ng,
silks et c. , pl ease put them into washi ng bag
(which is sel ect abl e par t).
Attention
SPIN
RINSE
QUICK
Set of TEMPERATURE of wash and rinse water
TEMPERATURE
WARM-COLD
COLD-COLD
HOT-COLD
WARM-WARM
WASH
RINSE
According to the different washing
laundries,4 kinds of different wash
/rinse temperature may be selected.
Note:
For the marked temperature, the
upper is wash temperature ,and the
lower is rinse temperature.

10
Attention:·If you have pushed the Start/Pause button, you will select only during the
soaking or washing.
·If you want to select during other cycle, you must switch off the power for
more than 3 seconds, then switch on the power to select again.
·It will drain water for set time only when there is water in the tub; if there is
no water in the tub, it will drain water for 10 seconds, then turn to the next cycle.
·When running the rinsing cycle, it will rinse twice, but when rinsing in
the gentle cycle ,it will rinse only once.
START/PAUSE
Push the START/PAUSE button
After the power is switched on, push it to start the machine
During working, push it to pause working.
During pause, push it to resume working.
When in pause, the indicator light which is flashing will be light only.
Press the Start/Pause button, the indicator light will flash.
The washing is finished
It beeps to indicate
the finishing of
washing.
The power will be switched off automatically
after the finishing of the washing.

11
After washing
Agitator
Press
Lint filter
Lint Screen
Figure1
Figure 2
Figure 3
Pul l u utp o
After using, please clean the lint and foreign materials of the lint filter etc. in time. Otherwise
it may influence your using the machine.
Please first pull off the power plug from the receptacle before cleaning.
If the cabinet is dirty, wipe it with wet cloth
Do not flush it directly with water.
Wipe it with neutral detergent.
Do not wipe it with thinner, petrol, alcohol etc.
Tnrhin
e
Petrol
Alcohol
1.After washing, close the water faucet. ( If needed, you can dismantle the water inlet hose).
5.Wipe off the water drops on the surface of the machine and inside the tub. Open the top lid for
some time (about 1 hour), then close the top lid.
4.Hang up the power cord and drain hose.
3.Be sure to pull off the power plug before maintenance.
2.Do not store water in the washing machine for a long period. Drain the water completely after
each using.
Cleaning the lint filter
The lint filter must be used during washing.
It must be cleaned in time after each using
1.Take off the lint filter
Pull up the lint filter on the agitator
to remove. As shown in Figure 1.
2.Removing lint
Press the lint screen clip with your
thumb and index finger, and get the
screen downward as shown in Figure
2. While wet, remove the lint on the
screen in water.
3.Mounting the lint filter
After cleaning, mount the screen back
onto the lint filter as shown in Figure 3.
Then put the lint filter back in the agitator
barrel.
Press
The filter screen of the
water inlet valve is likely
to be blocked by foreign
materials and influence
the water inlet. Please
clean it with brush every
two months.

12
Trouble shooting answer to question
(If there's breakdown, please pull off the power plug before checking) The following
phenomena are not breakdowns sometimes. Please confirm again before sending it to
repair. If there are real breakdowns, please come to the special maintenance department
or after-sale service department of our company. Do not repair it by yourself.
Common phenomena
The water faucet leaks.
There's abnormal sound
inside the machine.
The top lid is not closed
Is there metal material inside
the washing machine?
Are the laundries slanting in
spinning?
Is the machine slanting?
Is the jointer of the water inlet
hose is loose or twisted
awry?
Close the top lid
Fasten the jointer properly.
Re-order the laundries. Close the
top lid.
Phenomena The reason How to settle
No water filling
Insert the plug firmly
Turn on the tap
Press Power On/Off and
Start/Pause
There is still water after
draining for 8 minutes(the
indicator light of soak, wash,
rinse, spin flashing).
In rinsing, spinning, the
machine stops running.
(The indicator light flashing)
Is the drain hose blocked by
foreign material?
Clean the foreign material .
Open and close the top lid once.
It does not do water inlet or
the speed is slow ( the water
level is not reached after 30
minutes. The wash rinse is
flashing).
Is the water faucet open ?
Is the water inlet valve blocked? Clean the water inlet valve .
Open and close the top lid once.
Open the water faucet.
Open and close the top lid once.
Is the hydraulic pressure too low?. Please use the machine after the
hydraulic pressure reached to the
rating.
the machine
does not act
No washing
No spinning
Is there power failure?
Is the power plug loose?
Does the water reaches the preset level?
Is the power plug loose?
Is the top lid closed?
Are the laundries Distributed
evenly?
Use it when the power is on.
Insert the power plug tightly.
Fill water to the preset level.
Distribute the laundries evenly.
Insert the power plug tightly.
Close the top lid
Level the machine properly.
The spinning is intermittent when it starts. Balance the laundries to avoid slanting.
Phenomena Explanation
Select the SPIN program, but it doesn't work. The program is setting the drain time. Some time is needed
before it starts spinning.
There may be some water flowing out of the drain hose in the first
use of the machine.
It is the water remained in the factory inspection of performance.
Fasten the buttons and zipper
If plug is inserted firmly?
If tap is turned on ?
If Power On and
Start/Pause is pressed?

Packing list
Name Quantity
User's manual One
Components of the water inlet hose
Outer drain hose
One
Drain hose clamp One
Agitating washing machine One
Two
13
Outer drain hook One

220-240V/50Hz
High/97L Medium/78L Low/58L
0.03MPa 1.0MPa
525W
380W
About75kg
L686mm W686mm H1115mm
~
WMQ-12.P/WMQ-12.PX
Specification
Model
Rated voltage frequency
Water level/Water quantity (about)
Rated washing power
Rated spinning power
Weight
Dimension
Inlection pressure
14

Table des matières
Noms des pièces…………………………………………………1
Précautions de sécurité…………………………………………2
Installation et réglage……………………………………………4
Préparation avant lavage……………………………………… 6
Mettre à la blanchisserie……………………………………… 7
Ajouter du détergent…………………………………………… 7
Fermer le couvercle…………………………………………… 7
Sélection du niveau d'eau………………………………………8
appuyer sur la touche POWETR………………………………8
Sélection du programme……………………………………… 8
Réglage de la TEMPERATURE pour le lavageet rinça…… 9
Appuyer sur la touche START/PAUSE………………………10
Fin du lavage……………………………………………………10
Après le lavage…………………………………………………11
Problèmes réponse à votre demande……………………… 12
Liste………………………………………………………………13
Spécifications……………………………………………………14

1
Noms des pièces
Signification et description des symboles
Signe attention
Signe interdit
Contenus avec ce symbole sont relatifs à la sécurité du produit et celle
des utilisateurs.Utiliser en suivant strictement le contenu du manuel,
sinon cela peut endommager la machine ou vous blesser
nus avec ce symbolesont relatifs aux actions qui sont interdites.
Il en résulterait des dommages sur la machine
ou des blessures sur l'utilisateur .
Interrupteur de mise en route
Sélecteur de programme
Entrée blachisseur
Carrosserie
Panneau de contrôle
Support panneau de contrôle
Tambour
Couvercle supérieur
Touche niveau d'eau
Interrupteur de Contrôle de porte
Agitateur
Interrupteur Start/Pause
Interrupteur de porte
Interrupteur de TempératureLavage/Rinçage
Pieds réglables
(4)
Câble d'alimentation
Valve entrée d'eau froide
Coussin d'absorption d'eau
Joint tuyau de vidange
Valve entrée d'eau chaude

2
Précautions de sécurité
Ne pas mettre la mchine dans un lieu humide tel que
la salle de bain. Ne pas arroser d'eau. Ne pas mettre
de linge humide sur la panneau de contrôle
Ne pas mettre de prise multiple avec la
machine à laver.Si l'alimentation électrique
est endommagée, ou aucune prise murale
ne pas utiliser la prise de courant.
Ne pas laver des vêtement de pluie comme
l'imperméable,vêtement de cycliste etc.
afin d'éviter les vibrations à l'essorage
Mettre la prise de courant dans un réceptacle
avec la terre.La prise murale doit impérativement
connectée à la terre et si possible avec un
coupe circuit.
Ne pas tordre,rallonger, courber,gripper de .Ne pas appuyer ou écraser avec du poids.
Garder la goupille de la prise propre,si il y a de la poussière, essuyer-la avec un
un tissu propre et sec prudemment.
Si le câble our la prise sont en mauvais état,éviter tous risques et remplacer-les
par un technicien ou un service spécialisé .
Lecâbled'alimentation doitêtreconvenablement
branché ou branché à la main pendant
le fonctionement de la machine à laver.
Bien débrancher et fermer le robinet
d'arrivée d'eau lorsque la machine ne
fonctionne pas,en cas de dépplacement,ou
entretien de la machine.Ne pas utiliser les
mains humides pour débrancher..
Ne pas utiliser d'eau chaude > 60℃.
C
60
Si la machine est installée sur un tapis éviter de
bloquer l'orifice de ventilation avec le tapis.
Terre

Précautions de sécurité
3
Ne pas démonter ou réparer la machine
vous-même.
Ne pas poser d'objets chauds ou lourds
(comme une bouilloire avec de l'eau chaude)
Ne pas laves de vêtements avec des
produits volatiles(comme l'éther, pétrole etc.)
Les personnes handicapées ou les enfants ne
doivent pas utiliser la machine sans surveillance
Eloigner la machine des rayons directs du soleil
et des sources de chaleur comme le radiateur.
Ne pas mettre les mains dans le tambour
de la machine.C'est dangereux même si la
rotation est lente . Faîtes attention
aux enfants.
Pétrole
éther
n
Pour préserver le linge et la machine à laver
des dommages, enlever tout objet
étranger des poches comme les pièces,
boutons,sable ou épingle à cheveux. Avant le lavage, vérifier si le robinet
d'arrivée d'eau est ouvert, et si le tuyau
est correctement branché
il est recommandé d'utiliser de la poudre
à laver.
Au cas ou la machine est installée sur un
sol avec tapis , ne pas bloquer l'orifice
de ventilation avec le tapis.
This manual suits for next models
1
Table of contents
Languages:
Other Haier Washer manuals

Haier
Haier HW70-1003D S User manual

Haier
Haier HWM130-0523S User manual

Haier
Haier HWM72-27S User manual

Haier
Haier HDWM800TX User manual

Haier
Haier HWM65TLF User manual

Haier
Haier HW-C1460TVE ME-U User manual

Haier
Haier HWM60-0713S User manual

Haier
Haier HK1007TME User manual

Haier
Haier WD-8888-71 User manual

Haier
Haier XQS80-828 User manual

Haier
Haier HWM55-26GS User manual

Haier
Haier XPB62-0613RU User manual

Haier
Haier HWM60-78 User manual

Haier
Haier HA1000 User manual

Haier
Haier HWM65-0566 User manual

Haier
Haier BS808A User manual

Haier
Haier HWM30-0701

Haier
Haier HWT60AA User manual

Haier
Haier Thermocool HWM110-287S User manual

Haier
Haier HLP24E User manual