Haier LMA0120WPAB0 User manual

550-MABE1789
SERVICE MANUAL
Order NO.TL1709S002V1.1
Automatic Washing Machine
Model Number:
LMA0120WPAB0
LMA0120WBAB0
LMAE0120WGAB0
LMA0120WPBB0
LMA0120WBBB0
LMA1120WPCL0
LMAL1120WBCL0
LMA9020WPAB0
LMA1120WGCL0
LMA1120WBCL0
Haier group
This service information is designed for experienced repair technicians only and is not designed for use by the general public.
It does not contain warnings or cautions to advise non-technical individuals of potential dangers in attempting to service a product.
Products powered by electricity should be serviced or repaired only by experienced professional technicians.Any attempt to service
or repair the product or products dealt with in this service information by anyone else could result in serious injury or death`
WARNING
C2017 Haier washing Machine
All rights reserved. Unauthorized copying and distribution is a violation of law.

2
Chapter 1: General Infromation...................................... 2
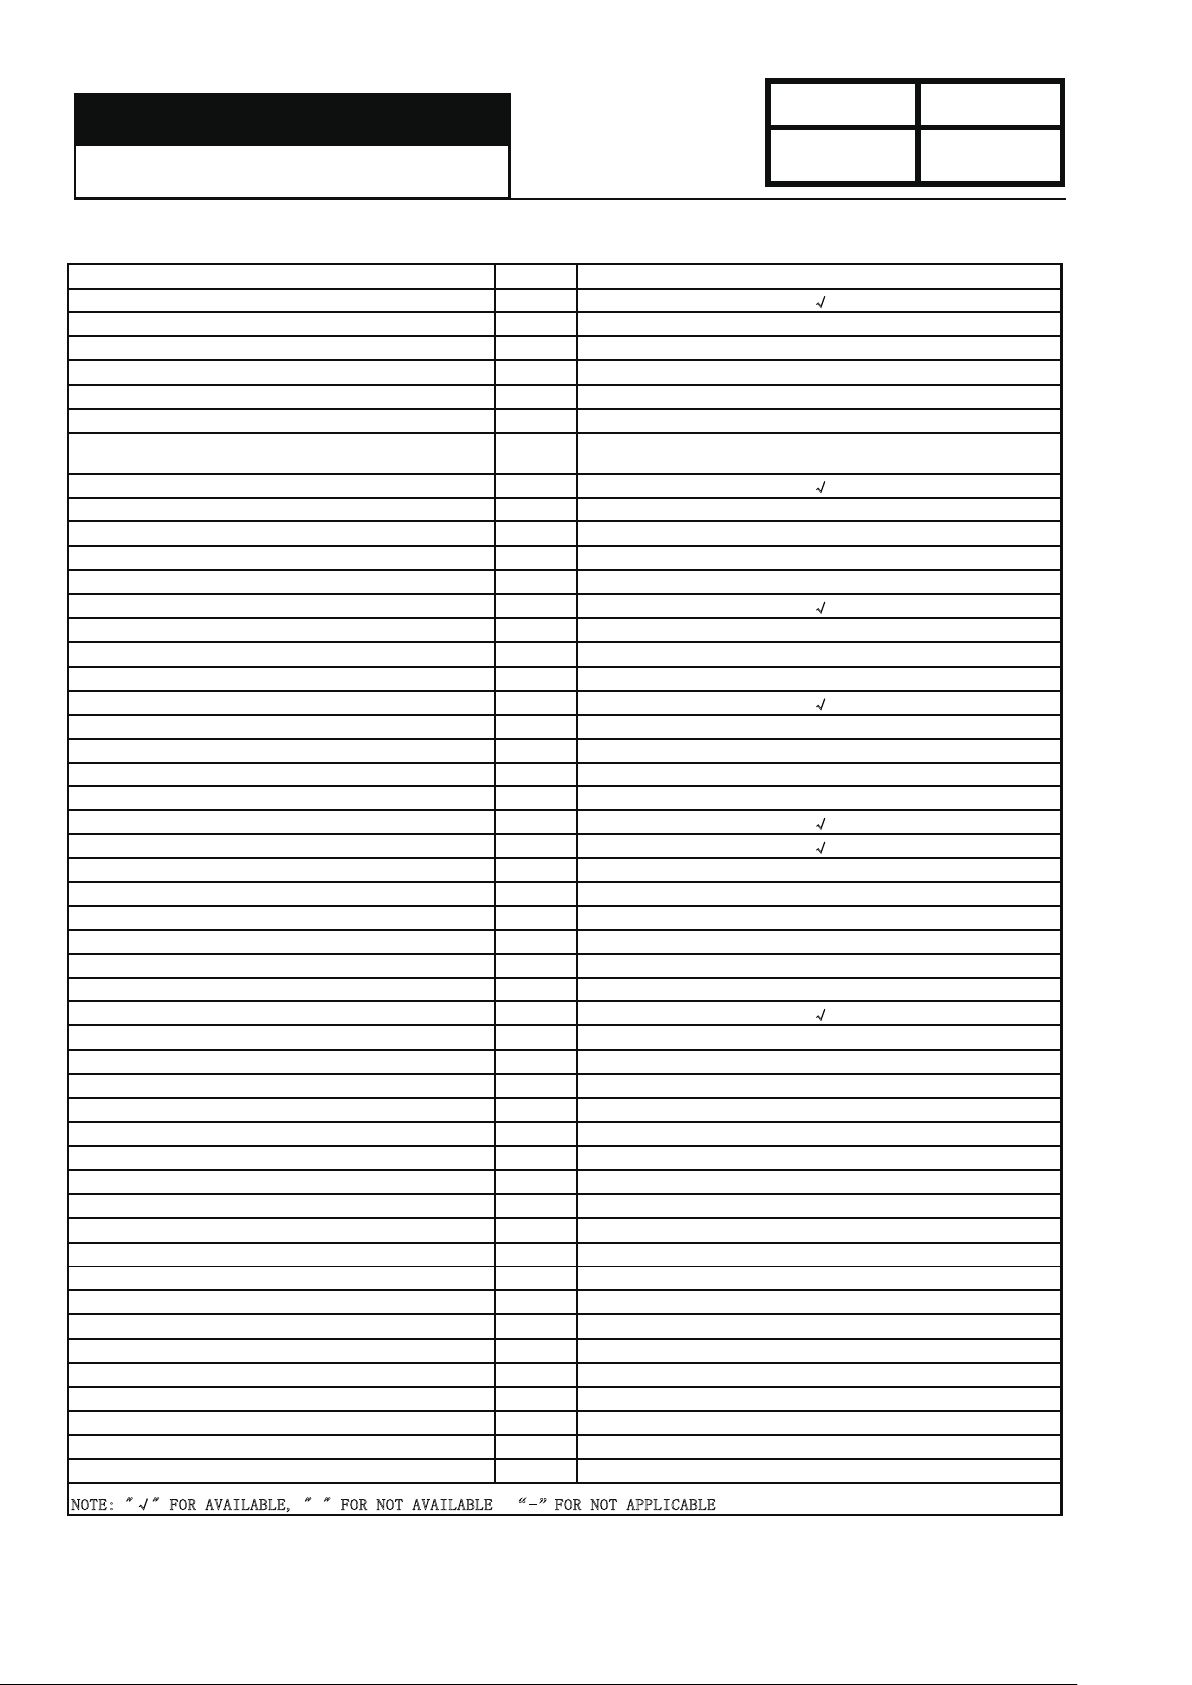
1-1.Table of Contents ................................................................................ 2
1-2. General Guidelines ........................................................................... 3
1-3. Caution and Warning symbols........................................................... 3
1-4. Function indication symbols............................................................... 3
Chapter 2: Product Features............................................ 4
2-1. Features........................................................................................... 4
2-2. Specification .................................................................................... 5
Chapter 3: SAFETY PRECAUTIONS............................. 6
3-1. Safety................................................................................................. 6
3-2. Warning and Cautions ....................................................................... 6
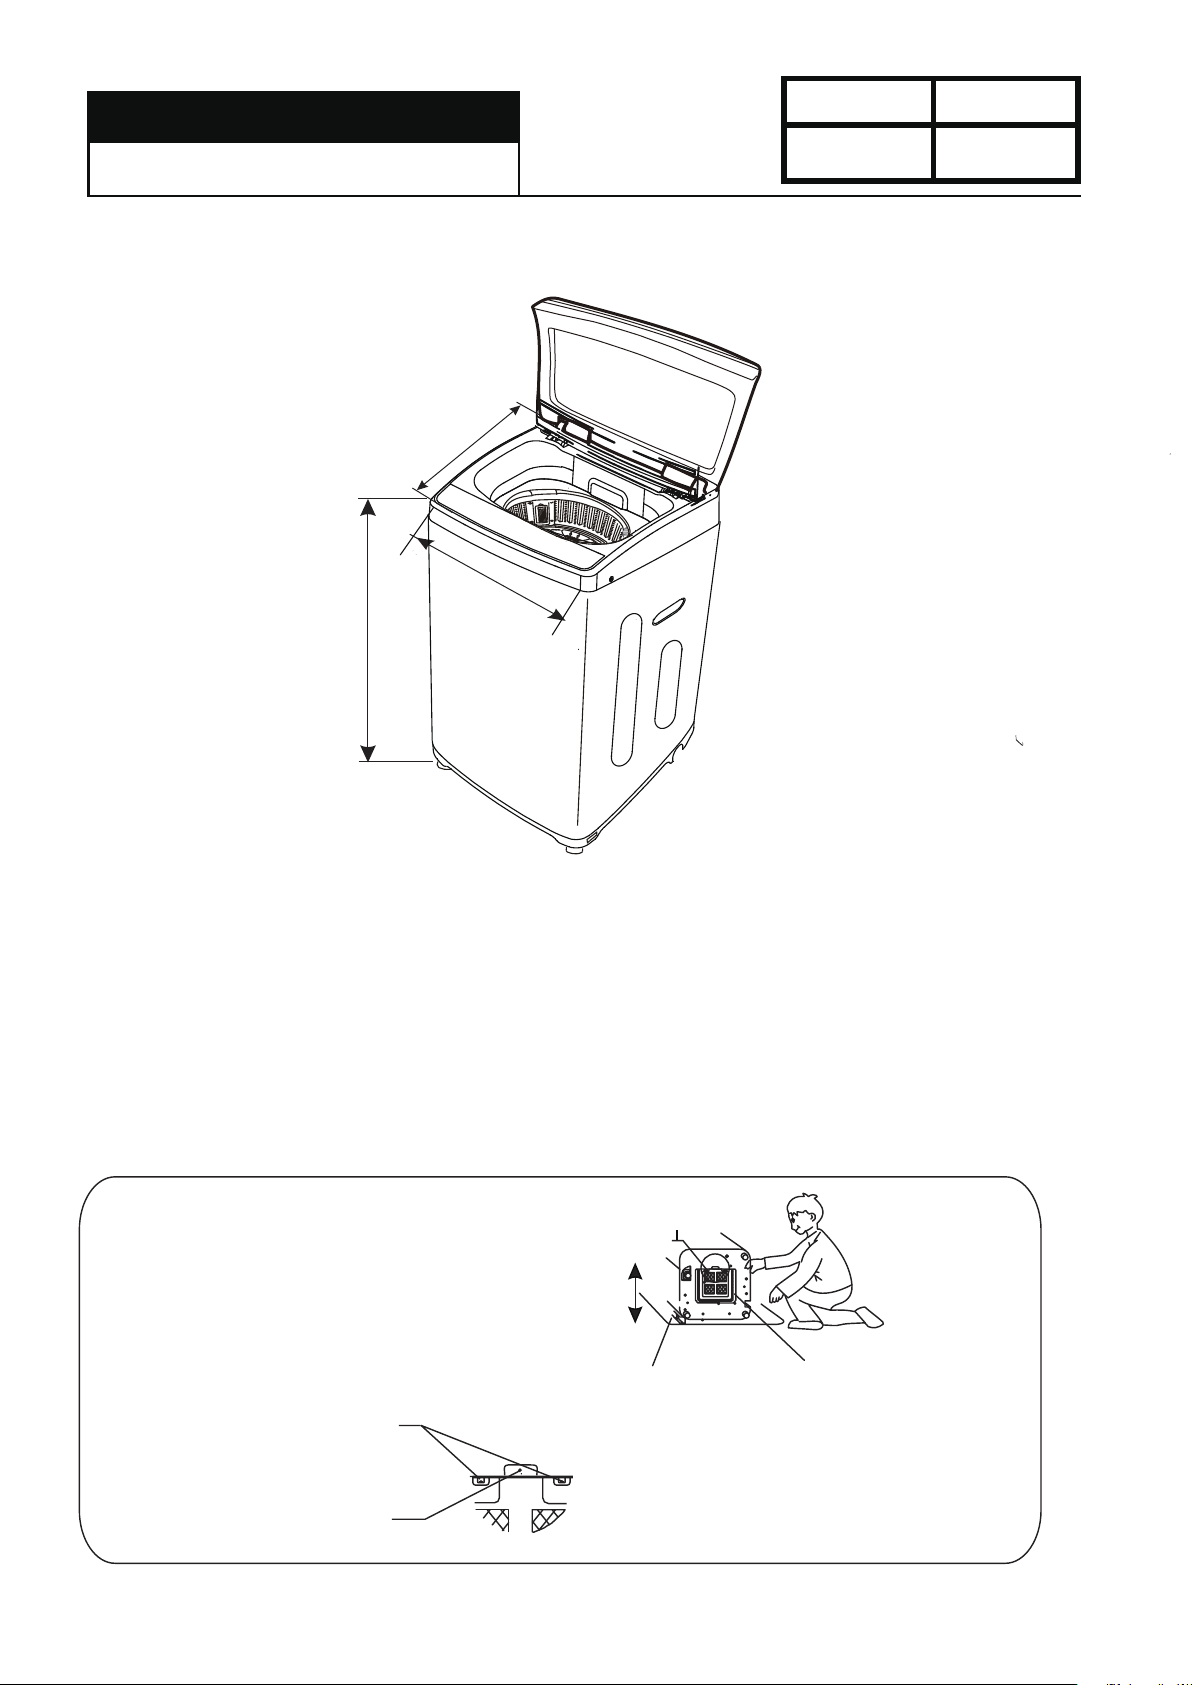
3-3. Net Dimensions ................................................................................. 8
Chapter 4: Installation and accessory parts ................... 8
4-1. Key points in installation..................................................................... 8
4-2. Install the bottom plate ...................................................................... 8
4-3. Adjustment of the installation position................................................ 9
4-4. Install drainage hose
..................................
9
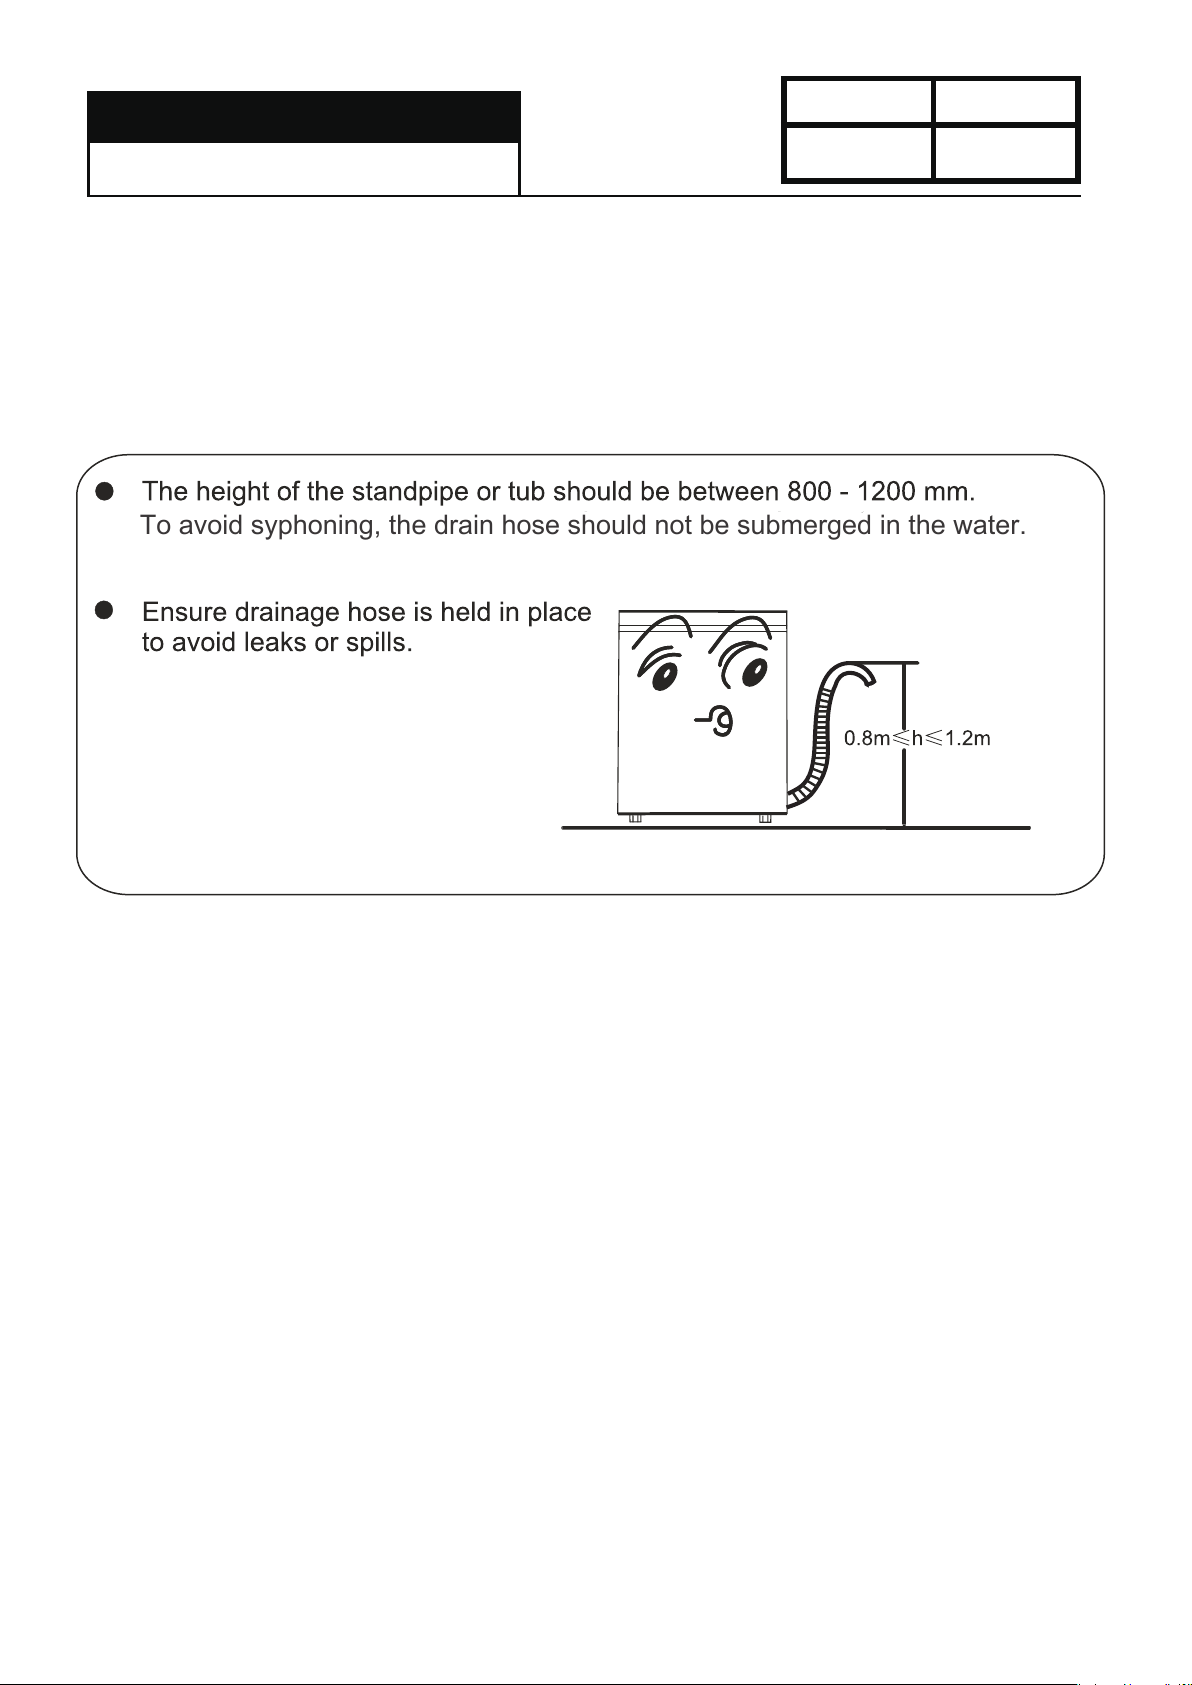
4-5. Placement of Drainage Hose .
...............................................
10
4-6. Usage of operation buttons ...........................................................
4-7. Key points in disassembly............................................................... 13
4-7-1 Points of attention in maintance...............................................................13
4-7-2 Points of attention in assembly................................................................
Chapter 5: PARTS AND FUNCTIONS.......................... 15
Chapter 6: MAINTENANCE SERVICE
AND TROUBLE SHOOTING ........................ 16
6-1. Trouble alarm and solve method...................................................... 16
6-2. Trouble-shooting charts ................................................................... 17
6-2-1 No action (The indicator is off) .........................................................................17
6-2-2 No water filling........................................... ........................................................18
6-2-3 No rotation in washing (or rotate to one direction only) ....................................18
6-2-4 No draining........................................................................................................19
6-2-5 Keep filling water...............................................................................................19
6-2-6 No spinning .......................................................................................................20
6-2-7 Too much spinnin noise.....................................................................................20
6-2-8 Too much noise in washing...............................................................................21
6-2-9 The tub rotate to one direction(in washing)......................................................21
6-2-10 Brake time out.................................................................................................22
Chapter 7: WIRING DIAGRAM................................................ 23
11
Service Manual
Model No:
Issue
Rev.
Service Manual
520-MABE1789
4-8 Damping component .....................................................................................
14
14
4-9 Test Program .................................................................................................
14

3
1-2. General Guidelines
When servicing observe the original lead dress.If a short circuit is found, replace all parts which are
overheated or damaged by the short circuit.After servicing,see to it that all the protective devices such as
insulation barriers ,insulation papers shields are properly installed .Confirm that the screws,parts and wiring
which were removed in order to service are put in the original positions, or whether there are the portions
which are deteriorated around the service places serviced or not. And be sure safety of that.
1-3. Caution and Warning symbols
(You will see them in “Matters needing attention”)
Any instructions in this service manual with this Warning sign must be followed strictly.
To prevent damage to the washing machine, any instructions in this manual with this
Stop sign must be followed strictly.
!
1-4. Function indication symbols
(You will see them in the specification table)
VSignify the washing machine has this function.
XSignify the washing machine doesn’t have this function.
Service Manual
Model No:
Issue
Rev.
Service Manual
520-MABE1789

Service Manual
Model No:520-MABE1789
Issue
Rev.
4
Service Manual
Chapter 2: Product Features
2-1. Features
● Soak wash make cleaner wash
● Fashionable appearance, transparent top lid
● Efficaciously reduce noise
● Automatically power off function
● Self-adjustment to unbalance of laundry in spinning
● Fuzzy computer control, self-program function, more convenient washing
● Basin pulsator, washing more clean
● Tub drying technology dry the inner tub and the out tub which can avoid growing mildew

Service Manual
Model No:520-MABE1789
Issue
Rev.
5
2-2. Specification
Model
MABE-1789
Free standing √
Built under ×
EAN code -
Features for use
Wash capacity kg 8
Spin capacity kg 8
Level/Volume L
1/17L 2/20L 3/24L 4/27L 5/31L
6/35L 7/39L 8/44L 9/48L 10/53L
Preset H √
Residual dampness % <115
Control model
controller ×
Normal computerized ×
Fuzzy computerized √
Frequency conversion ×
Service features
Programs 8
Short cycle √
Inlet heating select ×
Heating selection ×
Spinning cycle (selector) ×
Spinning cycle (variable) ×
Start/Pause √
Automatic balancing √
Aesthetics
Cabinet material
(
P=Plastic/Z=Zincking/C=Cold ) Z
Rolled stainless steel
Inner drum(stainless steel=s/plastic=p) S
Drain type UP
Door (glass=g / plastic=p) G
Adjustable feet √
Technical data
Voltage/frequency V/Hz LMA9020WPAB--127V/60Hz ;LMA0120WGCL0--220V/50Hz ;LMA0120WPBB--220V/60Hz
Wash power W 410
Spin power W 350
Special function
Air-Bubble ×
Feet wheel ×
Water fall current ×
Dimensions (measurements)
Height / built under mm 940
Width mm 520
Depth / with open door mm 540
Dimensions packed ( measurements packed)
Height mm 1015
Width mm 596
Depth mm 581
Net weight kg 35
Gross weight kg 38
40H’Container load Sets 204
NOTE: "√" FOR AVAILABLE, "
×
" FOR NOT AVAILABLE “-”FOR NOT APPLICABLE

6
Chapter 3: SAFETY PRECAUTIONS
3-2. Warning and Cautions
Please insert the power cord into special receptacle with rated voltage. Be
sure to use single-phase three pins receptacle.The earthing terminal of the
receptacle must be earthed reliably. If possible,please adopt electric leakage
protector.
The washing machine must be positioned so that the plug is accessible. Be
sure to pull the plug off and close the water faucet in following cases: power
failure, delivering the machine, setting the machine idle or cleaning the
machine.
Do not plug or pull the power plug with wet hand.
Do not bend ,extend, twist, bind by force. Do not press or nip it with weight.
Keep the pin of the power plug clean, if the power plug is polluted with dust,
please wipe with dry cloth carefully.
If the supply cord is damaged, it must be replaced by the manufacturer or its
service agent or a similarly qualified person in order to avoid a hazard.
Do not let the machine share one receptacle with other
electric appliances. If the plugging into the receptacles
loose, do not use the plug any more.
In case the washing machine is installed on ground
with carpet, do not block the ventilation hole
with carpet. Ensure carpet does not obstruct the
opening in the bases.
Do not put the machine at damp place like the
bathroom. Never wash it with water. Do not put wet
laundries on the control panel.
Do not stretch hands into the working machine. It is
dangerous even if the rotation is slow. Take special
care of the children.
Do not put any hot or heavy items (such as the kettle
with hot water ) on the washing machine.
Do not wash water-proof laundries like the raincoat,
bike covers etc. to avoid abnormal vibrations in
spinning. Wash the clothes that can float on the
water surface easily, please be careful especially,
for fear damage.
!
3-1. Safety
Service Manual
Model No:
Issue
Rev.
Service Manual
520-MABE1789

7
Do not wash laundries with volatile materials (such as
thinner, petrol etc.)
The children shall not approach the working washing
machine.
Do not decompose, repair or alter the machine by
yourself.
Do not use water hotter than 50 °C.
Keep the machine away from direct sunlight and
heat source like the heater.
Please keep the lint filter in
good condition, and install it to
proper position during washing.
If the lint filter is lost or damaged,
please contact the customer
care agent of our company. llatsni
dismantle
To protect your laundries and
washing machine, please take
out all of the coins, buttons, sand,
hairpin and other foreign materials
before washing.
● Please check if the water faucet is open, and if the connection of the water inlet pipe is proper.
● It is suggested to use foamless washing powder.
● To change the direction of drain pipe, please contact the customer care agent of our company.
● Please don′t use the washer in the environment below 0 ℃; if the washer has been stored below 0℃,
please be sure to ensure the washer is placed under the room temperature for 2~4 hours and then
use otherwise the washing effects may be lowered or the washer may be damaged.
Service Manual
Model No:
Issue
Rev.
Service Manual
520-MABE1789

Service Manual
Model No:
Issue
Rev.
8
Service Manual
Bottom plate
I
Section I enlarging
3-3. Net Dimensions
Chapter 4: Installation and accessory parts
4-1. Key points in installation
Please install and adjust the machine according to the requirement of the mannual.
It is very important to your security and correct operating the machine.
4-2. Install the bottom plate
After you open the package, please lean
the washing machine gently down on soft
items ( like the towel cloth, blanket, etc. ).
Install the bottom plate to the bottom of
the machine, then lift the machine up
gently. See to the figure:
Two claws at the bottom cover shall
be inserted in two bar-shaped holes
in the stand. Make sure the claws
are firmly in place.
Fasten the bottom plate to
base frame with one screw
Front
Back
Soft items
Unit: mm
520
540
940
520-MABE1789

Service Manual
Model No:
Issue
Rev.
9
≤2°
The largest allowable slope of the shank base of the machine is ≤2°. The slanting or rough ground will result in
unstable running or stoppage of the machine. Please adjust it with following methods:
●Confirm it's horizontal:
Hang the lead line to check if it is horizontal
●Adjust the adjustable foot:
To twist the adustable foot, please first lift up the side of the foot slightly,
and then you can twist the two adustable feet. Please make sure to keep the
washing maching in balance.
4-4. Install drainage hose
4-3. Adjustment of the installation position
The adjustable foot
High Low
back
the bracket
clamp
clamp
,
Bracket
520-MABE1789

Service Manual
Model No:
Issue
Rev.
10
Service Manual
4-5. Placement of Drainage Hose
To avoid syphoning, the drain hose should not be submerged in the water.
520-MABE1789

Service Manual
Model No:
Issue
Rev.
4-6. Usage of oper
11
A
C
DE B
Display
Flashing
Lighting
Process
Remaining Minutes
Child
Lock
Adjust
Start/Pause Power
Cycle
Normal
Strong
Quick
Delicate
Wool
Delay
Water Level
Wash Time
Rinse Times
Spin Time
Warm
Cool
Cold
Hot
Water
Temp
Soak
Deep Clean
Air Dry
B“Cycle ”button
Wool Machine washable
woolen items
Cycle
Deep clean
Delicate
Air Dry
Strong
Soak
Use this cycle for normally soiled
cottons and mixed fabric loads.
Use this cycle for heavily soiled
durable garments.
Washing for light-soil
saving
laundries
To clean very dirty
clothes
Quick washing for normal laundries
Normal
Flashing Lighting
This cycle is suitable for soiled
items which require soak
Dries the laundries to
avoid the growth of
mildew
Note:“Air Dry” program running time is 60 minutes. The purpose is to dry the
laundries ,at the same time can dry the outer tub and the inner tub, which can
avoid growing mildew on the outer tub and the inner tub.
The max drying capacity of the laundries is 1.5kg.
F
A “Power” button
To adjust the water level, wash time, rinse times
DAdjust ” button
spin time and delay time.
Press the “Water Temp”button to select you wash temperature.
CWater Temp ” button
Power
Power Start/Pause
520-MABE1789

Service Manual
Model No:
Issue
Rev.
12
Set the desired washing program,after seting,press the Start/Pause button,and
washing machine begin to run Then hold the water level button and delay botton at
the same time for more than 3 seconds,you will hear three beep sound,digital tub
display“CL”,and the child lock will activate All of the bottons are locked,and will no
function.
the water level button and delay botton at the same time for more than 3 seconds,
FStart/Pause” button
Process” button
To select water level, wash time, rinse times , spin
time and Delay. When the process is selected,
push ”Adjust“ button and then adjust the parameters.
E
When the power is switched on “Normal” cycle is automatically set
Turn the “cycle” button to select automatic program.
select automatic program
Turn Cycle button to
Process
Adjust water level,
Start/Pause
5
wash time,rinse times and spin time
procedure
520-MABE1789

Service Manual
Model No:
Issue
Rev.
13
4-7. Key points in disassembly
4-7-1 Points of attention in maintance
1) General attention
● Be sure to pull off the power plug in disassembly or maintenance
● Use stipulated crimp terminals in connecting the wires between the conducting wires as far as possible,
and fix with suitable tools; and insulate with insulation tape competely.
● In inserting the conducting wires, be sure to plug the pins to the root and make it hard to be pulled out.
● If welding is needed, be careful not to touch the plastic or other insulation parts with the iron.
● When connecting the wires, be sure not to make the wire touch the mobile parts like the belt, radiating
pulley and jib etc., and the sharp protruding parts and the parts with high temperature (motor). Connect
and fix the wires as per their original mode.
● If there's metal object at the wire fixing point, be sure to insulate with insulation materials.
Retain the diamantled screws for future usage in installation.
2)Points of attention in usage of electric components
In case that the power is on, the earthing circuit of the computer sequencer can have 120V voltage to
earth.Take care not to get electric shock.
● Store the computer sequencer and driver under 4℃-30℃ . Avoid direct sunlight.
In trouble-shooting, it may require hot-line work. Please be extremely carefull
The part of control panel seat
1)Method of opening the control panel
A Open the back cover Loosen the three locking belt fixed on the cabinet(used in inner wiring),to loosen
the inner wiring.
B Loosen the four screws used to install the control panel seat(rear and side).
Lift the rear upwards. Loosen the control panel seat from the inlay cabinet .
Attention:
●Do not Lift the control panel seat by force ,otherwise the safty switch control rod may get transformed, and
the jointer part of the conncting pipe of the water lever sensor may be loosened, therefore influence the
normal operation of the microswitch and water level sensor
● After opening the control panel seat, hole it with one hand or lean it on supporter like the wall. Do not
put it down.
520-MABE1789

Service Manual
Model No:
Issue
Rev.
14
Service Manual
● Fix the wiring in the control panel seat to its original position. Do not make it touch sharp corner
and mobile position. The space surrounding the computer sequencer is rather narrow. Please
dispose it carefully and do not make the transformer press the wires.
● Cofirm that the control panel seat is installed to proper position of the cabinet. Pay attention on
the adjusting of the gap between the control panel seat and the cabinet.
The cabinet and other tub component
1) Method of disassembling
A. Loosen the two motor bolt unit to dismantle the motor. To adjust the tension of the belt, loosen
the bolts and move the motor left and right .
B. Loosen the four fastening screws to dismantle the delivery shield.
C. Loosen the three fastening bolts to dismantle the drain motor.
D. In dismantling the drain valve, first loosen the screws, then rotate slowly to make it loose.
Then
dismantle the drain valve.
E. In dismantling the inner tub,first take off the outer tub cover, then dismantle the pulsator, finally
dismantle the inner tub. Handle with care when taking the inner tub off from the outer tub.
2) Points of attention in assembly
● In installation of the drain valve, please smear a piece of 801 glue at the connection part
between the drain valve and outer tub and between the overflow hose and drain hose to guarantee
that the drain valve will not leak.
● In fastening the screws, make it tight without sliding.
● Take care not to scratch the cabinet and influence the appearance of the Machine.
4-7-2 Points of attention in assembly
White
0030802045A
Back
Front
White Yellow
0030802045A 0030802045
0030802045A
White
4-8 Damping component
520-MABE1789
4-9 Test program
C1 Test: Hold ‘Temperatura’ and ‘programma’ at the same time,the press ‘encender/apagar’.
Digital tube displays ‘C1’. All lights are lit.1s after the digital tube and all the
lights flashing out 3 times, while the buzzer rang 3 times, and then power off.
C2 Test: Hold ‘Temperatura’ and ‘programma’ at the same time,the press ‘Power’.
Press ‘temperatura’ in three
seconds.Then Perform washing process.
C3 Test: On the basis of above C2 test,press ‘temperatura’ again, Dehydration test go on.
Software break: start up ‘encender/apagar’, then hold ‘etapa’ and ‘programa’ at the same time.
Digital tube displays ‘B1’.Default displays ‘20’,then press ‘etapa’ to change.
Digital tube displays ‘21’,press ‘Start/pause’.

Service Manual
Model No:520-MABE1789
Issue
Rev.
15
Chapter 5: PARTS AND FUNCTIONS
Control panel
seat
Filter cover
Control panel
film
Adjustable
foot(2 pieces)
Outer tub cover
Lint filter
Balance ring
Cabinet
Top lid
component
Inner tub
Pulsator
Cabinet
handle
Liquid detergent dispenser Powder detergent dispenser
Cold water inlet valve
Water absorption
gasket
Power cord
Back cover
Fixed foot(2 pieces)
Base frame
Hook
Hot water inlet valve
Drain hose joint
Drain pump filter

Service Manual
Model No:
Issue
Rev.
16
Service Manual
Chapter 6: MAINTENANCE SERVICE AND TROUBLE SHOOTING
6-1. Trouble alarm and solve method
phenomena Exlpalanation
●The spinning is intermittent when it starts. ●Balance the laundries to avoid slanting
●The wash procedure is paused. ●The cloth sensor is checking the cloth,it will add water after 48
seconds.
●Push the PROGRAM button to select SPIN,but it
doesn't work.
●The program is setting the drain time. Some time is needed before it
starts spinning.
●The pulsator pauses during water inlet in wash and
rinse. ●It is to avoid splashing during water inlet.
●There may be some water flowing out of the drain
hose in the first use of the machine. ●It is the water remained in the factory inspection of performance.
Note: when the digital tube displays the abnormal symbol during working,it buzzs once in succession every two minutes,then the
power will be cut automatically after ten minutes
if
FA
Push
Is the drain hose set too low?
The height of the end of the drain hose
should be between 800mm-1200mm
The display shows F2. Is the water level too high? Please contact Customer Care.
The display shows EL. Is the laundry too much?Put part of the laundry out,then
push the Start/Pause button.
520-MABE1789

Service Manual
Model No:
Issue
Rev.
17
If you replace the computer sequencer without checking the other components carefully, the
computer sequencer may be damaged again. Therefore,please first check if the other components
working normally before replacing the computer sequencer in maintence.
6-2-1 No action (The indicator is off)
Confirm that there's no power failure
and the power plug is inserted reliably.
The power switch is at "On" mode.
Measure the voltage
of the two ends of the power input
of the sequencer
Replace the sequencer.
Exist
Not exist
Pull off
the power
plug
Measure the resistance
between the light blue wire terminal
in the white plug on top of the wire unit
and the N pin on the power
receptacle
Infinite
The resistance
is 0
Measure the resistance
between the light blue wire terminal
in the red plug on top of the wire unit
and the light blue wire of
the lower part.
Infinite
The resistance
is 0
The resistance
is 0 Replace the
power cord.
Measure the resistance
between the brown wire terminal
in the white plug on top of the wire
unit and the brown wire of
the lower part.
Infinite
Check if the fuse is burnt?
Yes
No Replace the fuse.
Replace the wire unit.
At this time please chenck if the other
electric components work normally.
Check if the connection
between the fuse and the wires
of the two ends are well? Yes
Replace the computer
sequencer.
No
Connect the fuse and the
wires of the two ends.
6-2. Trouble-shooting charts
520-MABE1789

Service Manual
Model No:
Issue
Rev.
18
Service Manual
6-2-2 No water filling
Switch on the power. Push
the "Start/Pause" button.
Confirm the action sound
of the water inlet valve?
There is sound Remove the foreign materials of the water
inlet valve filter screen or raise the water
pressure to 0.03Mpa-1Mpa before use.
There is no sound
There is voltage Replace the water inlet valve.
Measure the voltage
of the two ends of the
water inlet valve?
There is no voltage
There is voltage Replace the wire unit.
Measure the voltage
of the two ends of the
computer sequencer?
There is no voltage
Replace the computer sequencer.
At this time please chenk if the
Water inlet valve works normally.
6-2-3 No rotation in washing (or rotate to one direction only)
Start the test without water.
Enter no-water washing.
Check the action of the
motor
It acts. Please check the transmission
system carefully.
If it is normal of the bearing part
locking the clutch.
Not exist
Exist
Measure the voltage of the
two ends of the motor.
Not exist
Not exist
Exist
Yes
Yes
No
No
If the motor overheat
protector acts?
Please check
the reason.
Measure the voltage
of the two ends of the output of
the computer sequencer.
If the capacitor has broken
circuit or short circuit?
Replace the
wire unit.
Replace the computer sequencer.
At this time please check if the
capacitor and motor works normally. Replace the motor.
Replace the
capacitor.
520-MABE1789

Service Manual
Model No:
Issue
Rev.
19
6-2-4 No draining Set rinse or spin.
Start the machine.
Check the drain system like
the drain valve etc.
Check if the drain motor acts? Roll up normally
No
Exist
No Exist
Measure the
voltage of the two ends of
the drain motor.
Measure the voltage
of the two ends of the output
of the computer sequencer.
Exist
Replace the drain motor.
Replace the wire unit.
No Exist
Replace the computer
sequencer.
At this time check if the drain motor
works normally.
Open the water faucet without
switching on the power.
6-2-5 Keep filling water
If the water can fill into
the water inlet valve.
Yes
Yes
No
Switch on the power. Do not
push the "Start/pause" button.
Replace the water inlet valve.
If the water can fill into
the water inlet valve.
Yes
Yes
No
No
No
Yes
No
Replace the computer sequencer.
At this time please chenck if the
water inlet valve is well.
Replace the wire unit.
Check if the wire connecting
the computer board to the
water level sensor is bad?
Select 1 or 2 water level
and start the machine to
check if the gas cell
has water?
It leaks gas. Please check and
repair the gas guide system.
Please smear 801 glue in installation
of the connecting pipe.
Please smear 801 glue in installation
of the gas cell cover.
Clear various factors like
the foreign Materials.
Blow from the connecting pipe to the
water level sensor and gas cell to see
if there's blocking.
Check if the gas guide system
is blocked?
Replace the water level switch.
520-MABE1789

Service Manual
Model No:
Issue
Rev.
20
Service Manual
6-2-6 No spinning
6-2-7 Too much spinning noise
The washing and
draining are normal.
Replace the drain motor.
Replace the hanger.
Replace the motor.
Fasten the motor.
Replace the retarder.
Adjust the angle or the distance of
the ratchet and pawl. The distance
between the ratchet and the pawl is
above 2mm.
Adjust the cabinet to acquire
balance.
Adjust the gap between the
balance ring and the outer tub.
Fix the connecting pipe and
wire unit.
Replace the retarder clutch.
Check the On/off point of the
microswitch and stop switch.
At this time please check
if the drain motor is well.
No On/Off point Replace the microswitch
or stop switch.
Normally
Check if the clutch pawl
is pulled enough.
If the washing machine
is set horizontally?
If the noise of the motor
is too much?
If the motor is fastened
tightly?
If the bearing of the retarder
is well?
If the departing of
the ratchet and pawl
is well?
If the machine body
vibrate resonantly with th
cabinet?
If the balance ring is rubbing
the outer tub cover?
If the connecting pipe
or the wire unit bumps
the outer tub?
The hanger seat is lack of oil.
Inject oil at the hanger seat.
If the hanger is
wrongly used?
No
No
Yes
Yes
Yes
Yes
Yes
Yes
Yes
No
No
No
No
No
No
No
No
Yes
Yes
Yes
Set the machine horizontally
520-MABE1789
This manual suits for next models
9
Table of contents
Other Haier Washer manuals

Haier
Haier HBF600T User manual

Haier
Haier HW70-B1426 User manual

Haier
Haier HWM60-111P User manual

Haier
Haier HDY-D70 User manual

Haier
Haier HWM40-187S User manual

Haier
Haier GWT 450 AW User manual

Haier
Haier HW-E1070TVE User manual

Haier
Haier HWF5000AW Assembly instructions

Haier
Haier HW-CS1050TXVE User manual

Haier
Haier HW70-1401S-F User manual

Haier
Haier HW80-1279 User manual

Haier
Haier XQS52-78 User manual

Haier
Haier HW80-B14876 User manual

Haier
Haier HA800TX User guide

Haier
Haier HWM120-35FF User manual

Haier
Haier HW70-BP1439N User manual

Haier
Haier HW80-BP14636N User manual

Haier
Haier HK1007I/ME User manual

Haier
Haier HW100-B14636N User manual

Haier
Haier HWM25 User manual