Hako Robotic Rocket Vac XP +PLUS User manual

Rocket Vac XP
+PLUS
INSTRUCTION MANUAL AND PARTS GUIDE
Rocket Vac XP +PLUS
Rocket Vac XP HEPA +PLUS
Rocket Vac XP
Rocket Vac XP HEPA
CAUTION Read the instruction manual before using the machine
Back Pack Vacuum Cleaner with H-10
HEPA or H-14 HEPA Filter
H-10 Model No: 12770000
H-14 Model No: 12780000

Page 1
Unpacking and Inspection Instructions
Carefully unpack and inspect your Rocket Vac XP for shipping damage.
Each unit has been tested and thoroughly inspected before shipment.
Operator Responsibility
Do not use this machine prior to reading this manual carefully.
The operator is responsible for taking care of the daily maintenance and inspection of the machine to keep it
in good working condition.
Contents of Box
1 x Rocket Vac XP, or XP+PLUS or HEPA or HEPA +PLUS
1 x Wand (2 x pieces)
1 x Vacuum Hose
1 x EZ2GO Floor tool
1 x Crevice Tool
1 x Pack of 5 paper bags
1 x Parts Manual and Owners Guide
This manual provides the necessary operating and preventative maintenance instructions. Operators must
read and understand this manual before operating or servicing this machine.
This machine was designed to give you excellent performance and efficiency. For best results and minimal
cost please follow the general guidelines below:
Operate the machine with reasonable care.
Follow the manufacturer's suggested maintenance instructions as provided in this manual.
Use original manufacturer’s parts.
295 mm
215 mm
495 mm
Rocket Vac XP +PLUS - Rocket Vac XP HEPA +PLUS - Rocket Vac XP - Rocket Vac XP HEPA

Page 2
Safety Instructions
Read this manual before using the back pack and always follow
the Safety and Maintenance instructions.
CAUTION: This machine shall be stored indoors only
This machine is intended for domestic and commercial use only
Do not leave the appliance when plugged in. Unplug from the power point when not in use and before
servicing.
Do not use outdoors or on wet surfaces.
For domestic use:
The appliance is not intended for use by persons (including children) with reduced physi-
cal, sensory or mental capabilities, or lack of experience and knowledge, unless they
have been given supervision or instruction concerning use of the appliance by a person
responsible for their safety
For commercial use:
The appliance is not intended for use by persons (including children) with reduced physical, sen-
sory or mental capabilities, or lack of experience and knowledge
Children should be supervised to ensure that they do not play with the appliance.
Use only as described in this manual. Use only manufacturer’s recommended attachments.
Extension Cord MUST be secured by the relief retainer in the side of the vacuum cleaner.
Do not use with damaged cord or plug. If appliance is not working as it should, has been dropped,
damaged, left outdoors, or dropped into water, return it to a service centre.
Do not pull or carry by cord, use cord as a handle, close a door on cord, or pull cord around sharp edg-
es or corners. Do not run appliance over cord. Keep cord away from heated surfaces.
If the supply cord is damaged, it must be replaced by the manufacturer or its service agent or a similarly
qualified person in order to avoid a hazard.
Do not unplug by pulling on cord. To unplug, grasp the plug, not the cord.
Do not handle plug or appliance with wet hands.
Do not put any object into openings. Do not use with any opening blocked.
Keep hair, loose clothing, fingers and all parts of body away from openings and moving parts.
Turn off all controls before unplugging.
Use extra care when cleaning on stairs.
Do not use to pick up flammable or combustible liquids, such as gasoline, or use in areas where they
may be present.
A locally approved optional electric power brush shall only be connected to the power outlet. (Max
Load:200w)
WARNINGS
SAVE THESE INSTRUCTIONS
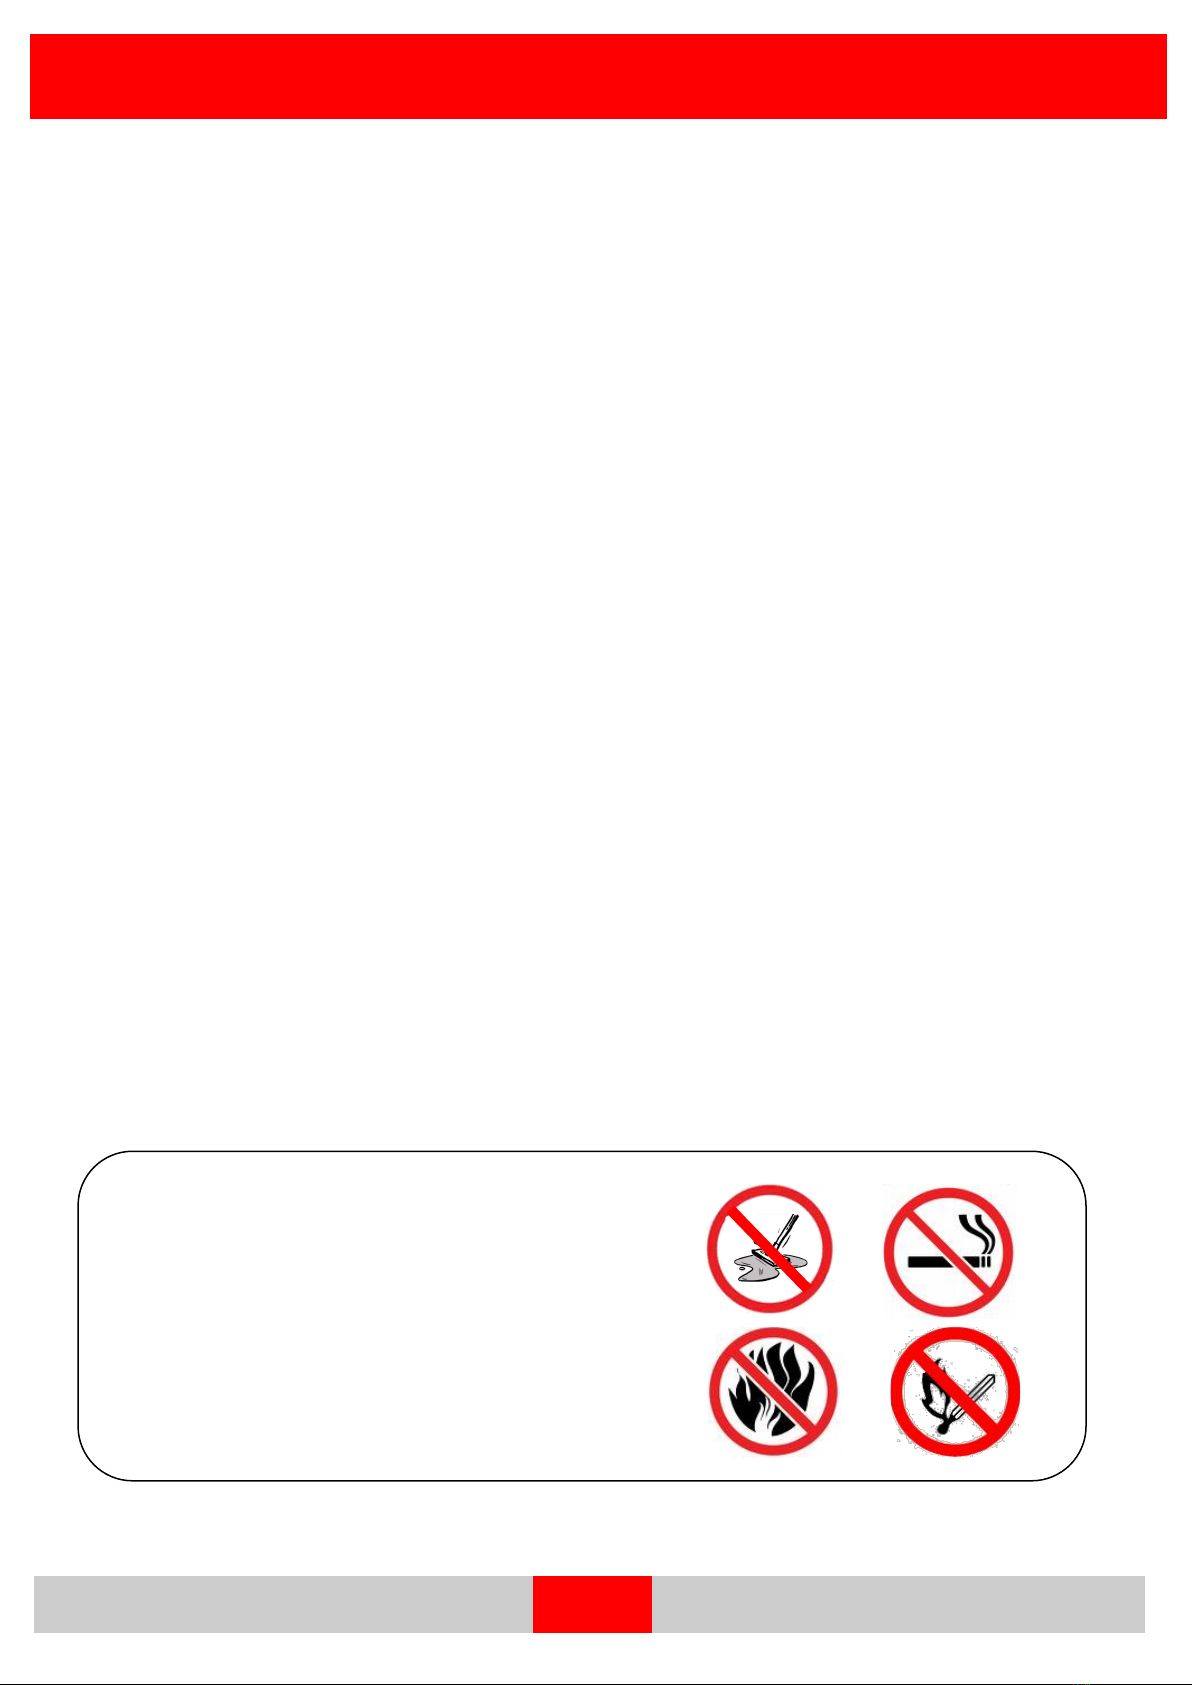
Do Not
Do not vacuum wet surfaces, damp areas or suck up
water
Do not use machine if water has been picked up by the
vacuum system without an electrical inspection by a
qualified person.
Do not vacuum anything that is burning or smoking
such as cigarettes, matches or hot ashes.
Do not use the machine in areas where flammable or
combustible liquids, vapours or gas are present.
Do not operate near explosive materials such as
solvents, thinners, fuels or grain dust.
Rocket Vac XP +PLUS - Rocket Vac XP HEPA +PLUS - Rocket Vac XP - Rocket Vac XP HEPA

Page 3
Machine Assembly
Lid – To Remove
Lift Magnetic Latch opposite side of inlet, rotate Lid away from
canister body.
Lid – To Fit
Rotate onto canister body fitting inlet side first, ensuring
accurate alignment. Magnetic latch will engage automatically.
NOTE: The lid can be fitted for either left or right operation.
Cloth Filter Bag – To Remove
Lift from top of canister using bag rim.
Filter Bag – To Fit
Place over canister rim and press firmly ensuring bag is level.
Hose – To Remove
Press Hose Release Button, and gently pull Inlet Elbow from Lid.
Hose - To Fit
Insert Inlet Elbow into lid opening.
Paper Bag Filter – Removal & Disposal
Ease cardboard retainer off the groove on the Inlet Spout. Fold
card board tab over bag inlet hole to prevent spillage. Dispose
into garbage bin.
NOTE: The paper bag is manufactured using
bio-degradable material.
Paper Bag – To Fit
Align paper bag cardboard, engage non-serrated portion of
cardboard (A) into Inlet Spout groove. Ease the remaining
serrated portion of cardboard (B) onto groove. Keep corners
of paper folded down to avoid entrapment under lid edge.
B
A
Rocket Vac XP +PLUS - Rocket Vac XP HEPA +PLUS - Rocket Vac XP - Rocket Vac XP HEPA

Page 4
Machine Assembly
To Remove - H10 HEPA Filter from XP or XP +PLUS
Use the Panel Filter flaps to lift from canister base. Remove
with care from the canister.
To Fit - H10 HEPA Filter into XP or XP +PLUS
Insert into canister base filter recess. Press firmly around the
edge of the filter to fit into position.
NOTE: Do not press on filter media.
Cord – To Fit
For safety in reducing tripping
hazards, and for unplugging, Fit the
cord onto extension cord restraints
on both sides of machine as shown.
Air Regulator – To Adjust
Slide forward to close, this provides more air at the nozzle.
Slide back for less air, this is to be used when vacuuming
loose materials eg. curtains.
Attachments – To Fit or Remove.
Twist and pull to disassemble. Attach at any point from Bent
End Piece to Wand end, to suit application.
Aus/NZ model - switch side
Rocket Vac XP +PLUS - Rocket Vac XP HEPA +PLUS - Rocket Vac XP - Rocket Vac XP HEPA
Aus/NZ model- power inlet side

Page 5
Machine Assembly
Tool Holder – To Adjust
Size the adjustment loop before wearing to suit the tool to be
inserted.
Wearing the Back Pack Correctly for best COMFORT
STEP 1.
To loosen the shoulder pad:
1. Pull the adjustment strap away from the Shoulder Pad,
this releases the Strap from the Buckle.
2. Lift machine onto one shoulder by the shoulder strap.
Insert opposite arm through the shoulder strap by which
the machine is lifted. Slide other arm through the remain-
ing strap.
STEP2
Waist Pad - Preliminary Adjustment
3. Position the waist-band into the 'small' of your
back just above your backside. This will lower the
centre of gravity of the unit, and positions the weight
closer to the body onto the stronger pelvic area. It
provides freedom of movement for the arms, and
prevents the unit from riding up the
4. Tighten the elasticised waist belt by overlapping
the hook and loop flaps until secure and comforta-
ble.
STERP 3
Shoulder pad and Sternum Strap Adjustment
5. After waist belt adjustment, pull down on shoulder
straps to just support the back pack. DO NOT pull
down too tightly. The top back pad should just be
touching your shoulder blades.
6. Clip sternum strap and adjust for comfort.
Rocket Vac XP +PLUS - Rocket Vac XP HEPA +PLUS - Rocket Vac XP - Rocket Vac XP HEPA
1
5
4
3
2
Note: For maximum comfort do not adjust shoulder straps completely until waist belt has been adjusted
and fastened
6

Page 6
Safety and Maintenance Checks
Cloth Bag Filter
After every use
Remove Cloth Filter Bag and empty.
Occasionally
Turn bag inside out and remove fine dust coating using a soft
banister brush or vacuum.
Note: The filter material has been treated with a moisture re-
pelling agent for improved dust release. There is no requirement
for washing or dry cleaning the Filter Bag.
XP & XP +PLUS H10 HEPA Filter
After every use
Remove VFD Filter and tap out dust.
Occasionally
Brush surface using a soft nylon brush or wash filter in neutral
cleaner solution then rinse in clean water.
Note: Ensure filter is completely dry before
XP HEPA & XP HEPA +PLUS- H14 HEPA Filter (where fitted)
Check after every use
Remove HEPA filter if necessary and tap out dust.
Occasionally
Wash in neutral cleaner solution using swirling action only, then rinse
in clean water.
Note: The filter material has been treated with a soft polymer
moisture repelling agent, do not touch media surface by hand or any
other mechanical device as this can damage the media and impair the
filtration quality. Ensure filter is completely dry before recommencing
vacuuming.
As Needed
Check Inlet Elbow, Hose, Bent End Piece and Floor Tool for blockages.
Regularly
Check cord for cuts, exposed wire, abrasion and twisting.
Replace cord only with original manufacturer’s part.
Note:
Always unplug cord from power point when not in use.
Gather the cord by winding from the machine end.
Drape cord over handle for storage.
-
Rocket Vac XP +PLUS - Rocket Vac XP HEPA +PLUS - Rocket Vac XP - Rocket Vac XP HEPA
H10 HEPA
H14 HEPA

Using
For comfortable operation, stand upright with a relaxed
posture, arms hanging loosely to the side.
Maintaining a straight wrist, hold the hand grip section of
the wand with one hand, parallel to the floor.
When vacuuming under office desks, the reach of the
wand is sufficient to avoid bending at the waist.
When vacuuming under lower profile objects or when
picking up items off the floor, bend the knees and
maintain a straight back.
When turning, do not twist at the waist.
Turn using your feet.
Page 7
Operation
Working
Plan the work path based on location of the power
point, room/furniture layout, and entrance and exit
points.
Commence vacuuming using a systematic approach
working one half of the area first, away from the power
point, and then the other half of the area, returning
back to the start.
Ensure that the power cord is clear of feet to reduce
likelihood of tripping.
Rocket Vac XP +PLUS - Rocket Vac XP HEPA +PLUS - Rocket Vac XP - Rocket Vac XP HEPA

Page 8
General H10 —XP +PLUS, XP H14 —XP HEPA +PLUS, XP HEPA
Packaging Size: 35 x 35 x 53 cm
Weight: 9.0 kg
Vacuum Type: Dry
Class: Type 2 Double Insulated
Approval: RCM
Air Flow Nozzle: 34l/s
Suction: 22 kPa
Weight: 4.4 kg - not including cord and rod
Filtration XP, XP +PLUS H10 XP HEPA, XP HEPA +PLUS H14
Cloth Filter Bag Size: 5 Litre, Antimicrobial polyester needle felt. Size: 4 Litre, Antimicrobial polyester needle felt.
Paper Filter Bag Size: 5 Litre, Rubber membrane sealed cardboard
reinforced paper bag.
Size: 4 Litre, Rubber membrane sealed card-
board reinforced paper bag.
Motor Pre-Filter Type: Polyester Pleated Filter
Class: H 10 HEPA
Type: Polyester Pleated Filter
Class: H 14 HEPA
Power Supply 220 - 240V.a.c., 50 Hz
Power Outlet 2 Pin IEC
Total Power 1500W
Electrical Cord 18 m, 10 A, 3 core ordinary duty
Thermal Protection 110°C auto-reset thermostat
Vacuum Motor Type: Rated 1300w, Eco Single Turbine Flow Through
Output Performance: Air flow 42.0 l/s, Suction 27.2kPa, Air Watts 450
Carbon Brush Life: 700h
Warranty 2 year Body, 2 year Motor
Sound level 72 dB(A) Noise level average 70 dB(A) Noise level average
Accessories 32mm EZ2GO Floor Tool with rubber tread
32mm Crevice Tool
5 Paper Bag Filters
1 x 5 Litre Antimicrobial cloth Bag
1 x 32mm x 1.2m Antimicrobial Vacuum Hose
2 x 495L Metal Rods
Product Specification
Rocket Vac XP +PLUS - Rocket Vac XP HEPA +PLUS - Rocket Vac XP - Rocket Vac XP HEPA
PLEASE NOTE: Products are in constant review. In the interest of product improvement, specifications can change
without notice

800mA
FUSE
0.22uF CAPACITOR
BROWN (ACTIVE)
2
POWER
OUTLET
33
VACUUM MOTOR
BLUE (NEUTRAL)
110
C AUTOMATIC
RESET THERMOSTAT
DOUBLE POLE
SINGLE THROW
SWITCH
12770000 ROCKET VAC XP (H10 HEPA) +PLUS ASSEMBLY
1
7
5
4
30
31
32
20
33
8
10
27
25
18
28
16
23
6
2
19
20
22
21
12
13
9
11
3
29
21
17
34
35
36
37
38
24
26
ROCKET VAC XP +PLUS
220-240V 50Hz SUPPLY
ELECTRICAL CIRCUIT DIAGRAM
20
14
15
Item
Part Number & Description
Qty.
1
13717003 Lid BVC DGrey Assy
1
13610009 Button Release BVC Black
1
13710001 Lid View Lens
1
13710004 Lid Spout
1
13710021 Latch with Magnet Black
1
13750001 Pin Latch
1
13780010 Spring Release
1
13790005 Trim Lid DGrey
1
2
13657006 Filter Bag Paper 5L 5/Pkt. Std.
2
3
13657001 Filter Bag Assy 5L AB Std.
1
4
13657003 Filter VFD Assy H10 HEPA
1
5
13677001 Housing Upper Canister Assy
1
6
13780004 Seal Canister Housing
1
7
13610003 Base Upper Canister
1
8
13780002 Screw WN1412 KB40 x 12 ZP
12
9
13780006 Seal Motor Harbin
1
10
13610004 Baffle Motor Housing
1
11
13727002 Motor Vacuum Harbin 240V
1
12
13620005 Clamp Motor
1
13
13827001 Wire Thermostat Assy 4L & 5L BVC
1
14
13780014 Switch Rocker 2HP
1
15
13820002 Wire N 240V Inlet-Switch 4L & 5L BVC
1
16
13820003 Wire N 240V Switch-PO 4L & 5L BVC
1
17
13657011 Fuse Link 4L & 5L BVC
1
18
13780005 Foam Seal (Upper Baffle)
1
19
13670004 Housing Canister Lower In Out and Sw
1
20
13780003 Screw WN1412 KB50 x 16 ZP
14
21
13680003 Insulation End Cap (Set)
1
22
13620022 Cap Motor Housing BVC LGrey
1
23
13680002 Insulation Motor Housing Side (Set)
1
24
13680001 Insulation Motor Housing End (Set)
1
25
16002004 Cord Extension 18m Orange
1
26
13620009 Cord Coupling IEC - 4L & 5L BVC
1
27
13780007 Socket Inlet C14
1
28
13780008 Socket Outlet C18
1
29
13750003 Pad Back BVC
1
30
16018025 Strap Sternum with Adjuster and Buckle
1
31
13750006 Pad Shoulder BVC 4 Piece Set
1
32
13650002 Frame BVC DGrey
1
33
13750007 Pad Waist BVC
1
34
13677006 Hose AB BEP & Elbow 4L & 5L Assy
1
13640001 Elbow Inlet BVC
1
13640002 Elbow BEP 32mm Black
1
35
16022005 Rod Stainless 32mm x 495L
2
36
16019002 Tool Crevice
1
37
16019003 Tool Dusting Brush
1
38
16019004 Tool Floor EZ2GO
1
Rocket Vac XP +PLUS

800mA
FUSE
0.22uF CAPACITOR
BROWN (ACTIVE)
2
POWER
OUTLET
33
VACUUM MOTOR
BLUE (NEUTRAL)
110
C AUTOMATIC
RESET THERMOSTAT
DOUBLE POLE
SINGLE THROW
SWITCH
12780000 ROCKET VAC XP HEPA (H14) +PLUS ASSEMBLY
1
7
5
30
31
32
20
33
8
10
27
25
18
28
16
23
6
2
19
20
22
21
12
13
9
11
3
29
21
17
34
35
36
37
38
24
26
ROCKET VAC XP HEPA +PLUS
220-240V 50Hz SUPPLY
ELECTRICAL CIRCUIT DIAGRAM
20
14
15
4
Item
Part Number & Description
Qty.
1
13717003 Lid BVC DGrey Assy
1
13610009 Button Release BVC Black
1
13710001 Lid View Lens
1
13710004 Lid Spout
1
13710021 Latch with Magnet Black
1
13750001 Pin Latch
1
13780010 Spring Release
1
13790005 Trim Lid DGrey
1
2
13657007 Filter Bag Paper 4L 5/Pkt. HEPA
2
3
13657002 Filter Bag Assy 4L HEPA
1
4
13657004 HEPA H14 Filter & Fastener Assy 4L BVC
1
5
13677001 Housing Upper Canister Assy
1
6
13780004 Seal Canister Housing
1
7
13610003 Base Upper Canister
1
8
13780002 Screw WN1412 KB40 x 12 ZP
12
9
13780006 Seal Motor Harbin
1
10
13610004 Baffle Motor Housing
1
11
13727002 Motor Vacuum Harbin 240V
1
12
13620005 Clamp Motor
1
13
13827001 Wire Thermostat Assy 4L & 5L BVC
1
14
13780014 Switch Rocker 2HP
1
15
13820002 Wire N 240V Inlet-Switch 4L & 5L BVC
1
16
13820003 Wire N 240V Switch-PO 4L & 5L BVC
1
17
13657011 Fuse Link 4L & 5L BVC
1
18
13780005 Foam Seal (Upper Baffle)
1
19
13670004 Housing Canister Lower In Out and Sw
1
20
13780003 Screw WN1412 KB50 x 16 ZP
14
21
13680003 Insulation End Cap (Set)
1
22
13620022 Cap Motor Housing BVC LGrey
1
23
13680002 Insulation Motor Housing Side (Set)
1
24
13680001 Insulation Motor Housing End (Set)
1
25
16002004 Cord Extension 18m Orange
1
26
13620009 Cord Coupling IEC - 4L & 5L BVC
1
27
13780007 Socket Inlet C14
1
28
13780008 Socket Outlet C18
1
29
13750003 Pad Back BVC
1
30
16018025 Strap Sternum with Adjuster and Buckle
1
31
13750006 Pad Shoulder BVC 4 Piece Set
1
32
13650002 Frame BVC DGrey
1
33
13750007 Pad Waist BVC
1
34
13677006 Hose AB BEP & Elbow 4L & 5L Assy
1
13640001 Elbow Inlet BVC
1
13640002 Elbow BEP 32mm Black
1
35
16022005 Rod Stainless 32mm x 495L
1
36
16019002 Tool Crevice
1
37
16019003 Tool Dusting Brush
1
38
16019004 Tool Floor EZ2GO
1
Rocket Vac XP HEPA +PLUS

12
4
3
ROCKET VAC XP + PLUS ACCESSORIES
56
OPTIONAL ACCESSORIES
ITEM NO.
PART NUMBER
DESCRIPTION
QTY
1 16019005
Tool Turbo Brush 32mm
1
2 16019006
Tool Combination 32mm x 300mm Wide
1
3 16019014
Tool Mega Gulper Pro 32mm x 385mm Wide
1
4 16019007
Tool Upholstery 32mm
1
5 16019017
Tool Electric Brush 32mm x 355mm Wide
1
6 16019016
Tool Hard Floor 32mm x 360mm Wide
1

Page 12
Rocket Vac XP +PLUS - Rocket Vac XP HEPA +PLUS - Rocket Vac XP - Rocket Vac XP HEPA
Trouble Shooting
Always switch off Rocket Vac XP +PLUS and unplug from wall prior to correcting any problems.
If you are unable to rectify the problem, contact your local service agent.
Problem: Machine not working
Cause No power at power point.
Solution Connect machine to a functional power point.
Cause Power cord not plugged into power point or machine.
Solution Check plug is firmly plugged into a power point and machine.
Cause Machine or power supply not switched on.
Solution Turn on/off switch to ON (I). Turn power supply outlet on.
Cause Machine has switched off due to overheating.
Solution Switch off and unplug machine. Check for any blockages in wand, floor tool and inlets.
Ensure filters and paper and cloth bags are clean. Wait for 30 minutes and switch ma-
chine back on. If machine does not start up, contact service agent.
Problem: Poor or No Suction
Cause Blockage.
Solution Turn off machine and unplug. Check wand, suction hose, floor tool, elbow inlets for ob-
structions and remove.
Cause Paper or Cloth Filter Bags are full.
Solution Check paper bag and if full, remove and replace. Check Cloth Filter Bag, turn inside out
and brush with a soft banister brush before replacing.
Cause Hose not installed properly or damaged.
Solution Check hose connection and ensure it is locked in. Replace if damaged.
Cause Secondary Filter is blocked.
Solution Remove Secondary Filter and tap gently to remove excess dust before replacing.
Cause Air Regulator needs adjustment.
Solution Adjust Air Regulator on hose to obtain suction required.
Problem: Backpack is Uncomfortable to Wear
Cause Backpack is not fitted correctly to your body.
Solution Adjust waist bands and shoulder straps as described on page 7 to ensure correct fit.
Cause Pads or straps are worn.
Solution Replace padding/straps.

Page 13
General Warranty Policy
Hako Australia Pty Ltd ACN 002 858 059 (“Hako”) warrants to the original purchaser that the equipment spec-
ified in this manual (“Equipment”) is free from defects in workmanship and materials under normal use for a
period of 12 months.
Under this warranty, after examination discloses it to have been defective, Hako will repair or replace at its
factory or authorised dealer service outlet, parts of the Equipment that fail under normal use and service,
when operated and maintained in accordance with the applicable operation and instruction manuals.
All warranty claims must be submitted via the Hako-authorised dealer or service agent the item was pur-
chased.
The purchaser is responsible to return the defective goods at their expense, to the Hako-authorised dealer or
service agent the item was purchased from.
This warranty does not apply to components replaced due to recommended service schedules, normal wear
and tear or to items whose life is dependent on their use and care.
Use of replacement parts not manufactured or supplied by Hako will void all warranties expressed or implied
and may give rise to a potential health hazard. All parts replaced under this warranty become the sole proper-
ty of Hako or its original manufacturer, whichever the case may be.
This warranty is applicable only to the original purchaser. Hako is not responsible for costs or repairs per-
formed by persons other than those specifically authorised by Hako. This warranty does not apply to damage
from transportation, alterations by unauthorised persons, misuse or abuse of the equipment, use of non-
compatible chemicals or parts, or damage to property, or loss of income due to malfunction of the Equipment.
If a difficulty develops with this Equipment you should contact the dealer from whom it was originally pur-
chased.
The warranty coverage period on Equipment will commence 1 year after the date of shipment from Hako to its
dealer or authorised agent unless the Equipment is sold before this time. This sale date would then be the
beginning date of the warranty coverage.
The following statements only apply to a consumer sale of goods or services as defined in the Australian Con-
sumer Law. In this statement, ‘Our’ means ‘Hako’ and ‘you’ means ‘original purchaser’:
Our goods come with guarantees that cannot be excluded under the Australian Consumer Law. You are enti-
tled to a replacement or refund for a major failure and for compensation for any other reasonably foreseeable
loss or damage. You are also entitled to have the goods repaired or replaced if the goods fail to be of ac-
ceptable quality and the failure does not amount to a major failure.
To the extent permitted by law, all other warranties whether implied or otherwise, not set out in these warranty
terms and conditions are excluded and Hako is not liable in contract, tort (including, without limitation, negli-
gence or breach of statutory duty) or otherwise to compensate you for:
· any increased costs or expenses;
· any loss of profit, revenue, business, contracts or anticipated savings;
· any loss or expense resulting from a claim by a third party; or
· any special, indirect or consequential loss or damage of any nature whatsoever caused b Hako’s
failure in complying with its obligations.
The benefits given to you in this warranty are in addition to other rights and remedies under a law in relation to
the Equipment or services to which this warranty applies.
Rocket Vac XP +PLUS - Rocket Vac XP HEPA +PLUS - Rocket Vac XP - Rocket Vac XP HEPA
This manual suits for next models
3
Table of contents
Popular Vacuum Cleaner manuals by other brands

Zeegma
Zeegma Zonder Pro Multi user manual

Diamond Products
Diamond Products DP80500 Operator's manual

cecotec
cecotec Conga Rockstar 2700 Vital instruction manual

Euroclean
Euroclean Back Vac 10 Specifications

Thomas C. Wilson
Thomas C. Wilson 9487-0000 Operating instructions & service manual

Samsung
Samsung POWERbot SR20J90 U Series user manual