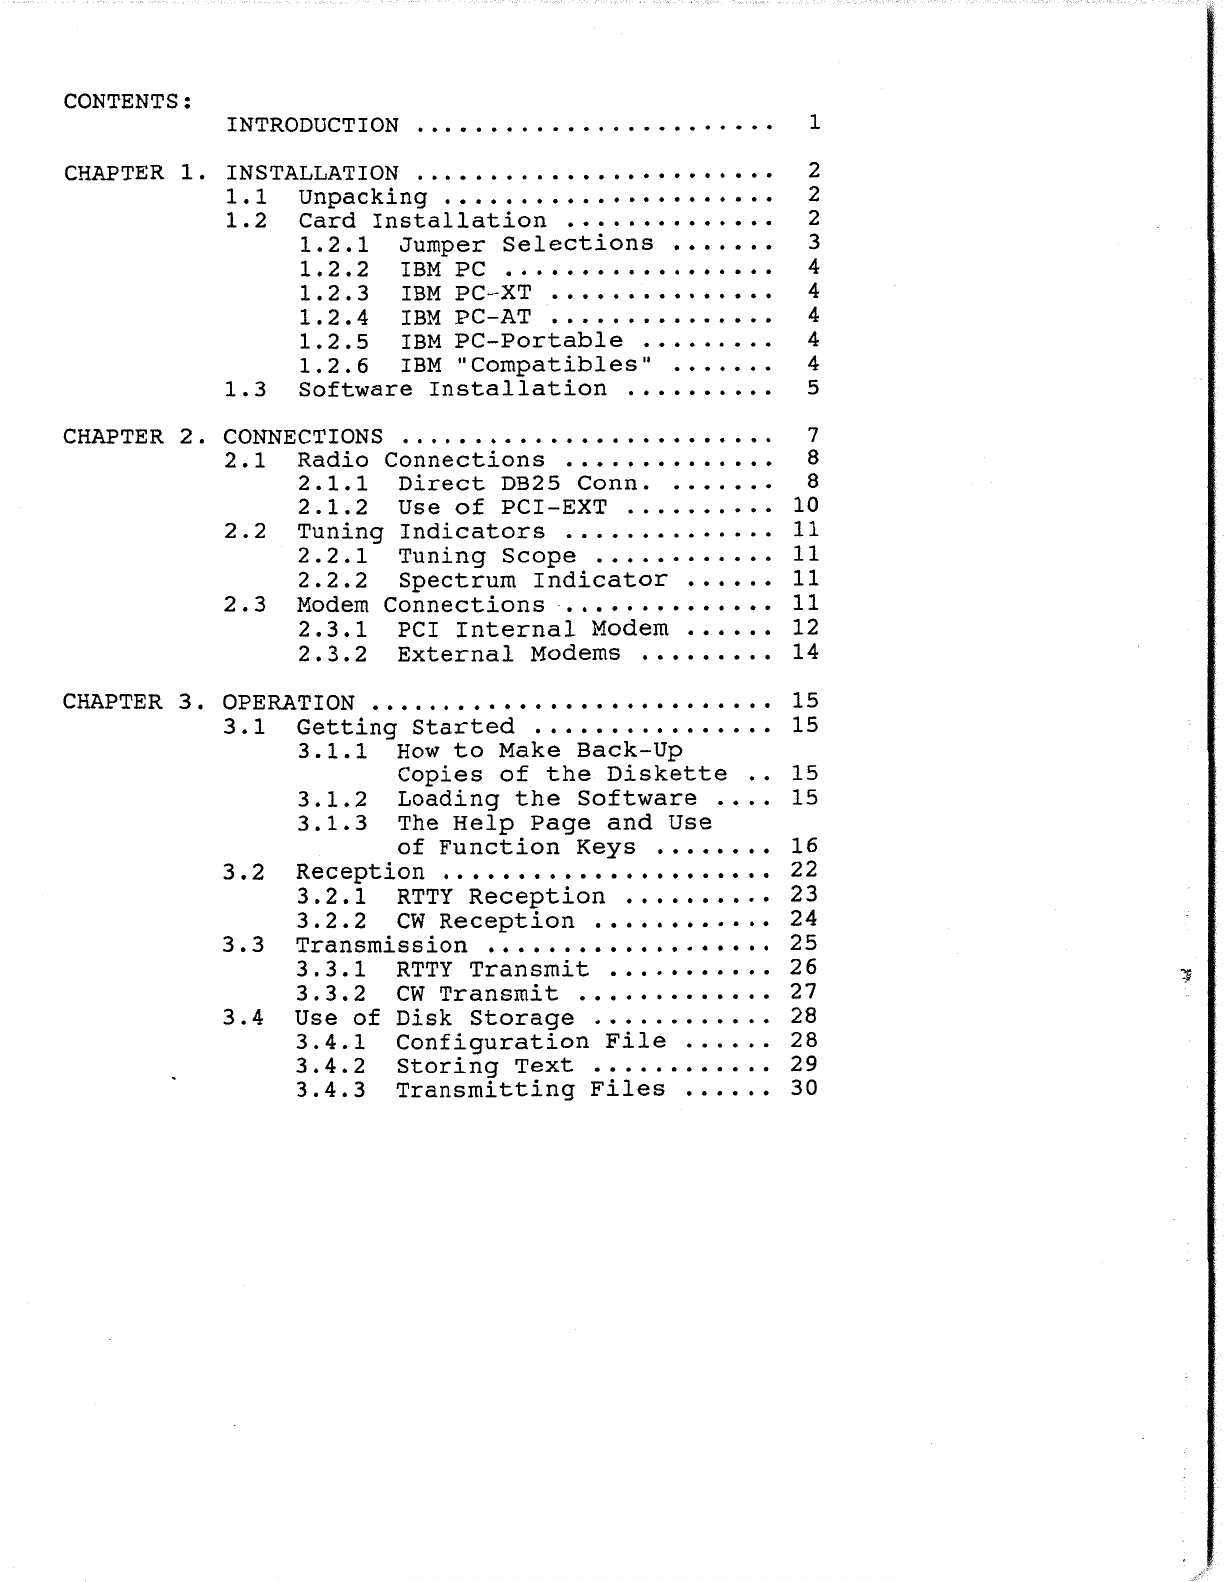
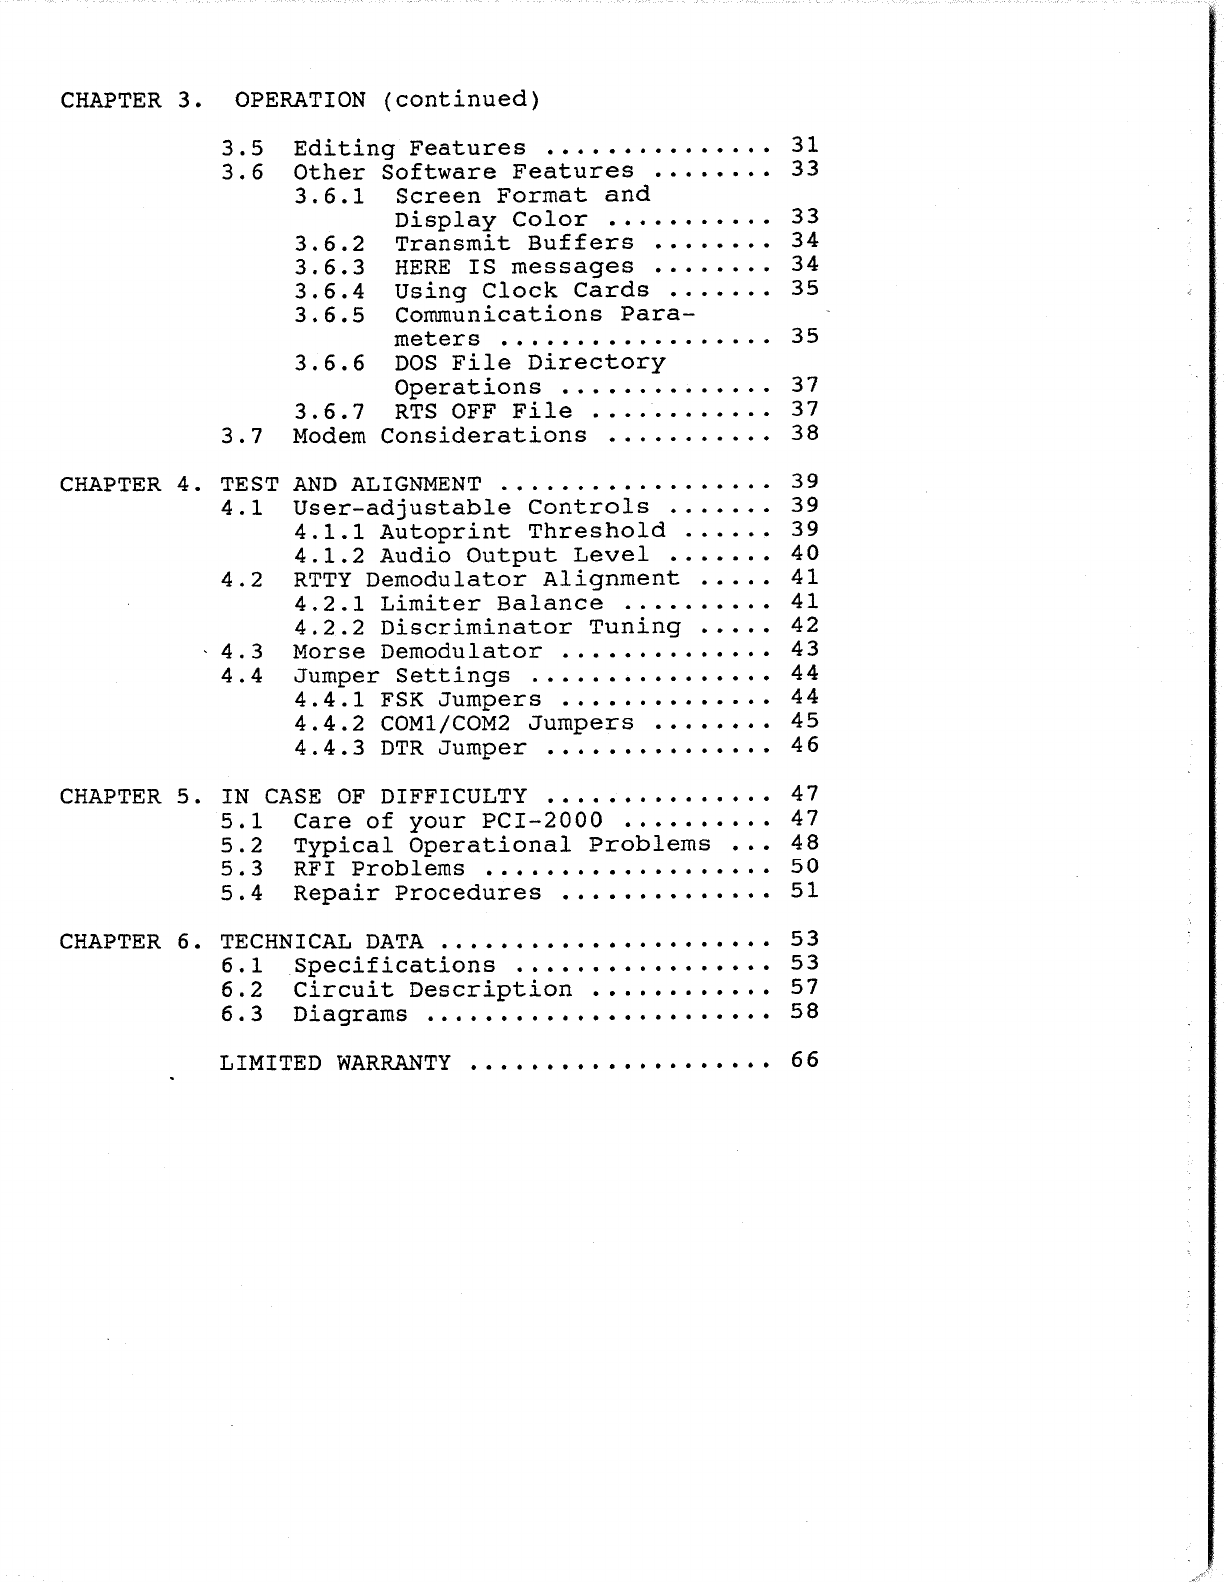
Hal Communications PCI-2000 User manual

PCI-2000
Personal
Computer
Interface
for
IBM®
Personal
Computers
Copyright
~1984
by
HAL
Communications
Corp.,
Urbana,
Printed
in
the
United
States
of
America.
All
rights
Contents
of
this
publication
may
not
be
reproduced
in
without
the
written
permission
of
the
copyright
owner.
Illinois.
reserved.
any
form
®IBM, IBM-PC, PC-XT, PC-AT,
and
PC-Portable
as
used
in
this
manual
are
trade
marks
of
IBM
Corporation.
October,
1988
Printing.

CONTENTS:
INTRODUCTION
. . . . . . . . . . . . . . . • . . . . . . . . 1
CHAPTER
1.
INSTALLATION . . . . . . . . . . . . . . . . . . . . . . . . 2
1.
1
Unpacking
. . . . . . . . . . . . . . . . . . . . . . 2
1.2
Card
Installation
..............
2
1.2.1
Jumper
Selections
.......
3
1 . 2 . 2
IBM
PC . . . . . . . . . . . . . . . • . . 4
1.2.3
IBM
PC-XT
............•..
4
1.2.4
IBM
PC-AT
............•..
4
1.2.5
IBM
PC-Portable
......•..
4
1.
2.
6
IBM
II
Compatibles
II
• • • • • • • 4
1.3
Software
Installation
..........
5
CHAPTER
2.
CONNECTIONS
. . . . . . . . . . . . . . . . . . . . . . . . . 7
2.1
Radio
Connections
..............
8
2.1.1
Direct
DB25
Conn
........
8
2.1.2
Use
of
PCI-EXT
.......•..
10
2.2
Tuning
Indicators
..............
11
2.2.1
Tuning
Scope
............
11
2.2.2
Spectrum
Indicator
...•..
11
2.3
Modern
Connections
...........•..
11
2.3.1
PCI
Internal
Modern
...•..
12
2.3.2
External
Modems
.........
14
CHAPTER
3.
OPERATION . . . . . . . . . . . . . . . . . . . . . . . . . . .
15
3.1
Getting
Started
................
15
3.1.1
How
to
Make
Back-Up
Copies
of
the
Diskette
..
15
3.1.2
Loading
the
Software
.•..
15
3.1.3
The
Help
Page
and
Use
of
Function
Keys
........
16
3.
2
Reception
. . • . . . . . . . • . . . . . . . . • . .
22
3.2.1
RTTY
Reception
..•.......
23
3.2.2
CW
Reception
............
24
3.3
Transmission
................•..
25
3.3.1
RTTY
Transmit
...........
26
3.3.2
CW
Transmit
..........•..
27
3.4
Use
of
Disk
Storage
............
28
3.4.1
Configuration
File
......
28
3.4.2
Storing
Text
............
29
3.4.3
Transmitting
Files
......
30
Cj

CHAPTER
3.
OPERATION
(continued)
3.5
Editing
Features
...............
31
3.6
Other
Software
Features
........
33
3.6.1
Screen
Format
and
Display
Color
...........
33
3.6.2
Transmit
Buffers
........
34
3.6.3
HERE
IS
messages
........
34
3.6.4
Using
Clock
Cards
.......
35
3.6.5
Communications
Para-
meters
. . . . . . . . . . . . . . . . . .
35
3.6.6
DOS
File
Directory
Operations
..............
37
3.6.7
RTS
OFF
File
............
37
3.7
Modem
Considerations
•..........
38
CHAPTER
4.
TEST
AND
ALIGNMENT
..................
39
4.1
User-adjustable
Controls
.......
39
4.1.1
Autoprint
Threshold
......
39
4.1.2
Audio
Output
Level
.......
40
4.2
RTTY
Demodulator
Alignment
.....
41
4.2.1
Limiter
Balance
..........
41
4.2.2
Discriminator
Tuning
.....
42
4.3
Morse
Demodulator
..............
43
4.4
Jumper
Settings
................
44
4.4.1
FSK
Jumpers
..............
44
4.4.2
COMl/COM2
Jumpers
........
45
4.4.3
DTR
Jumper
...............
46
CHAPTER
5.
IN
CASE
OF
DIFFICULTY
...............
47
5.1
Care
of
your
PCI-2000
..........
47
5.2
Typical
Operational
Problems
...
48
5.
3 RFI
Problems
. . . . . . . . . . . . . . . . . . .
50
5.4
Repair
Procedures
..............
51
CHAPTER
6.
TECHNICAL
DATA
................•.....
53
6.1
Specifications
...............•.
53
6.2
Circuit
Description
............
57
6.
3
Diagrams
. . . . . . . . . . . . . . . . . . . . . . .
58
LIMITED
WARRANTY
.......•............
66

ILLUSTRATIONS:
FIGURE
FIGURE
FIGURE
FIGURE
FIGURE
FIGURE
FIGURE
FIGURE
FIGURE
FIGURE
FIGURE
FIGURE
1.
PCI-2000
. . . . . . . . . . . . . . . . . . . . . . . . . . . 1
2.
PCI-2000
JUMPER
LOCATIONS
...........
3
3.
DIRECT
RADIO
CONNECTIONS
..........•.
9
4.
RADIO
SYSTEM
USING
PCI-EXT
•.........
10
5.
PCI-2000
PHONE
LINE
CONNECTIONS
.....
13
6.
PCI-2000
BLOCK
DIAGRAM
..............
59
7.
PCI-2000
BUS
INTERFACE &
CONTROL
....
60
8.
PCI-2000
CW
DEMODULATOR
.............
61
9.
PCI-2000
MODEM
&
UART
. . . . . . . . . . . . . . .
62
10.
PCI-2000
RTTY
DEMODULATOR
...........
63
11.
PCI-2000
I/0
CONTROL
................
64
12.-
PCI-2000
PARTS
PLACEMENT
............
65
TABLES:
TABLE
1.
PCI-2000
Jumpers
.•...................
TABLE
2.
IBM
II
COMPATIBLES
II
••••••••••••••••••••
TABLE
3.
I/0
CONNECTIONS
....................•.
TABLE
4.
I/0
RATINGS
..................•.......
TABLE
5.
BOOTING
THE
SOFTWARE
................
.
TABLE
6.
FN
KEYS-
HERE
IS
MESSAGES
..••.......
TABLE
7.
ALT-FN
KEYS-
PCI-2000
CONTROL
......
.
TABLE
8.
SHIFT-FN
KEYS-
SCREEN
CONTROL
......
.
TABLE
9.
CTRL-FN
KEYS-
SYSTEM
CONTROL
......•.
TABLE
10.
SPECIAL
KEYS
.....•.................•.
TABLE
11.
EDITING
KEYS
.....•...................
TABLE
12.
STATUS
LINE
..................•.......
TABLE
13.
UNIQUE
BAUDOT
KEY
COMBINATIONS
......
.
TABLE
14.
MORSE
PROSIGNS
......................
.
TABLE
15.
CONFIGURATION FILE PARAMETERS
.......
.
TABLE
16.
BAUDOT
CODE
DIFFERENCES
.............
.
TABLE
17.
103
MODEM
TONES-
RADIO APP
..........
.
3
5
7
8
16
17
17
18
19
19
20
21,22
27
27
28
36
38

PCI-2000
TECHNICAL
MANUAL
INTRODUCTION
This
manual
describes
the
installation
and
operation
of
the
HAL
PCI-2000
Personal
Computer
Interface.
This
interface
is
specifically
designed
to
allow
use
of
the
PC,
PC-XT,
PC-AT,
and
PC-Portable
models
of
the
IBM
Personal
Computer
in
radio
systems.
The
PCI-2000
may
also
be
used
with
some
models
of
other
manufacturers
that
are
"PC-compatible".
Since
it
is
impossible
to
include
data
on
all
the
possible
variations
of
"compatible"
computers,
the
performance
of
the
PCI-2000
is
only
warranted
for
installation
in
IBM
Corp.
personal
computers
(see
LIMITED
WARRANTY
at
end
of
manual).
The
PCI-2000
includes
a
large
number
of
features,
giving
a
great
deal
of
flexibility
to
the
operator.
It
is
suggested
that
the
operator
particularly
read
all
of
Chapters
1
and
2
before
installing
the
circuit
board
and
Chapter
3
before
attempting
use
of
the
software.
FIGURE
1.
PCI-2000

1.1
Unpacking
CHAPTER 1
INSTALLATION
Page
2
When
unpacking
your
PCI-2000,
carefully
inspect
the
shipping
carton,
the
circuit
board,
and
the
software
diskette
for
shipping
damage.
Any
evidence
of
damage
should
be
immediately
reported
to
your
supplying
dealer
or
shipping
carrier.
Be
sure
to
save
all
packing
materials
if
damage
is
found
-
the
shipping
carrier
will
want
to
inspect
them
for
any
insurance
claim.
Check
the
accessories
against
the
following
list.
If
any
are
found
missing,
double-check
the
packing
for
loose
parts
and
notify
your
dealer
or
HAL
Communications
Corp.
so
that
the
shortage
may
be
rectified.
Please
be
sure
to
specify
the
HAL
part
number!
Packing
List:
1 -
930-02000
1 -
852-02000
1 -
870-02000
5 -
332-02010
1 -
333-10250
1 -
440-03000
PCI-2000
Circuit
Board
PCI-2000
Software
Diskette
PCI-2000
Manual
Jumper
Plugs
(on
PCI
board)
DB-25
Cable
Connector
Card
edge
guide
Additional
Options
Available
for
PCI-2000:
PCI-EXT:
Connector
Extender
to
provide
phono
type
connections
to
the
radio
system.
SPT-1:
SPECTRA-TUNE
Tuning
Indicator
for
RTTY
and
CW
recept~on.
1.2
Card
Installation
The
PCI-2000
is
constructed
on
one
full-length
IBM
plug-in
card.
It
may·be
inserted
into
any
unused
full-length
card
slot
in
the
IBM-PC,
IBM
PC-XT,
IBM
PC-AT,
or
IBM
PC-Portable
Computers.

CHAPTER
1 INSTALLATION
Page
3
1.2.1
Jumper
Selections
Before
installing
the
PCI-2000
in
your
computer,
check
to
see
that
the
jumpers
on
the
PCI-2000
circuit
board
are
set
correctly.
The
available
jumpers
are
shown
in
Table
1
below
and
their
positions
are
shown
in
Figure
2.
JUMPER
TABLE
1
PCI-2000
JUMPERS
POSITIONS
FACTORY
SETTINGS
------------------------------------------------
cw
cw
CARRIER
PLL
esc I'REQ
I I
DO
0
TP5
IRQ
ADR
DTR
FSK POLARITY
FSK
LEVEL
IRQ4/IRQ3
PRI/SEC
HI/LO
NORM/REV
oc,
+5'
+12
IRQ3
SECONDARY
HI
(jumper)
NORM
+5V
0
TP6
•Tf'4
NOTES:
1 .
II
COM1"
= IRQ4 + PRIMARY
2.
"COM2"
= IRQ3 +
SECONDARY
3.
COM
setting
for
PCI-2000
must
not
be
same
as
any
other
I/O
board.
4.
See
Section
4.4
for
jumper
options
ew
I.IIXER
BALANCE
I
D
0TP8
"TPT
•TP3
.AUTOPRINT
THRESHOLD
I
D
~~F'Tl
~:.;.~eEl
AUOlO
OUTPUT
LEVEl
I
8~0
I
;~I~T
!
SHIFT
MARK
REC
AOJ
I LIMITER
BALANCE
I
CJ
I I I I I 0
TPII
CJ
·TPI2
CJ
0
TP9
0TP!O
SECONDARY PRII.IARY
"TP!l
ADDRESS"
/AOORESS
.
~
El-~~i~
s
0
E~'hT
f'SK OUTPUT
I'SK
OUTPUT
•TP2
WITH
PULLUP
TO
•12\1""
/WITH
PULLUP
TO
•5V
0TPI
~
/""'.
IRQ4 IRQ3
m~
I'SK /
"'f'SK
IHVERTEO NOR!.IAI.
FIGURE
2.
PCI-2000
JUMPER LOCATIONS

CHAPTER
1 INSTALLATION
Page
4
*****************************************************************
NOTE:
The
PCI-2000
has
been
tested
in
"standard"
versions
and
models
of
the
IBM-PC
and
works
well
with
the
IBM
video
card,
disk
controller
card,
and
serial
communications
cards
installed.
However,
HAL
Communications
cannot
assume
responsibility
for
operation
(or
non-operation)
of
the
card
when
other
options
are
installed
in
the
computer.
If
problems
are
experienced,
try
removing
extra
option
cards
until
correct
operation
is
observed.
*****************************************************************
1.
2.
2
IBM
PC
The
PCI-2000
may
be
installed
in
any
of
the
slots
available
in
the
IBM-PC.
It
is
recommended,
however,
that
it
be
inserted
in
the
first
slot
on
the
left
(connector
J1)
if
at
all
possible.
Choose
the
desired
slot,
install
the
supplied
plastic
card
guide,
and
plug-in
the
PCI-2000.
1.2.3
IBM
PC-XT
The
PCI-2000
may
be
inserted
into
any
of
the
long-card
slots
in
the
PC-XT
with
the
left-most
slot
being
preferred.
Choose
the
desired
slot,
install
the
supplied
plastic
card
guide,
and
plug-
in
the
PCI-2000.
1.2.4
IBM
PC-AT
The
PCI-2000
may
be
used
in
any
long-card
slot
of
the
PC-AT,
but
you
may
prefer
to
use
a
slot
that
has
only
the
rear
card
connector
to
save
the
two-connector
slots
for
other
devices.
Choose
the
desired
slot
and
plug-in
the
PCI-2000.
1.2.5
IBM
PC-Portable
When
installed
in
the
PC-Portable
model,
it
is
recommended
that
you
first
move
the
video
card
from
the
slot
next
to
the
monitor
to
the
second
slot
(connector
J2).
Then,
install
the
PCI-2000
in
the
left-hand
slot
(connector
J1).
This
is
necessary
to
avoid
mechanical
conflict
with
the
CRT
controls
and
keyboard
connector
on
the
front
panel.
1.2.6
IBM
"Compatibles"
Due
to
the
rapid
growth
of
the
"PC-Compatible"
market,
it
is
impossible
to
list
all
possible
models
and
variations.
Compatibility
questions
should
be
addressed
to
HAL
sales
personnel.
In
general,
the
PCI-2000
will
ONLY
work
if
the
hardware
and
firmware
conditions
listed
in
Table
2
are
met
by
the
"compatible"
personal
computer:

CHAPTER
1 INSTALLATION
TABLE
2.
REQUIREMENTS
FOR
"PC-COMPATIBLE"
COMPUTERS
1.
Compatible
ROM
BIOS
routines.
2.
Compatible
Bus
connector
3.
Compatible
Interrupt
Routines
4.
Have
COM1
or
COM2
serial
I/0
channel
unused
or
provision
to
disable
any
on-board
serial
device
using
these
addresses.
Page
5
Because
of
the
great
variation
in
the
use
of
the
word
"compatible",
HAL
cannot
assure
proper
PCI-2000
operation
in
any
but
the
above
mentioned
IBM
Corporation
models
of
the
Personal
Computer.
1.3
Software
Installation
The
software
for
the
PCI-2000
is
supplied
on
one
5.25"
floppy
diskette.
You
should
make
back-up
copies
of
this
diskette
BEFORE
attempting
operation.
It
is
recommended
that
you
place
a
write-
protect
tab
on
the
HAL
diskette.
This
will
help
prevent
accidental
erasing
of
the
original
diskette
when
copying
the
files.
The
DOS
system
files
must
also
be
included
on
the
operating
PCI-2000
diskette,
so
first
prepare
new
diskettes
using
the
FORMAT/S
command.
Next,
copy
the
PCI-2000
files
onto
the
newly
formatted
diskettes.
Refer
to
your
DOS
manual
for
proper
procedures
for
your
computer
configuration.
After
copies
have
been
made,
store
the
original
HAL
diskette
in
a
safe
location
and
use
a
copied
diskette
for
normal
operation.
*****************************************************************
NOTE:
The
PCI-2000
software
will
function
only
with
the
HAL
PCI-2000
circuit
board.
The
PCI-2000
software
is
copyrighted
by
HAL
Communications
Corp.
and
duplication
of
the
software
for
other
than
your
own
use
with
the
PCI-2000
is
specifically
prohibited.
Any
attempt
to
copy
this
software
for
resale
or
any
use
other
than
with
the
supplied
PCI-2000
circuit
board
will
be
vigorously
prosecuted
to
the
full
extent
of
the
copyright
laws.
*****************************************************************
After
the
PCI-2000
circuit
board
is
installed
in
your
computer
(but
before
connection
to
the
radio
system),
refer
to
section
3.1.1
of
this
manual,
install
the
PCI-2000
diskette
in
disk
drive
1,
and
boot
the
computer
("cold"
or
"warm"
boot).
The
diskette
includes
an
"AUTOEXEC.BAT"
file
that
will
first
request
the
time
and
date
and
then
automatically
load
the
PCI-2000
software.
You
will
first
see
the
title
page
with
copyright
notice,
and
software
version
number.
Remember
the
version
number!
We
will
need
to
know
this
version
number
if
you
call
HAL
with
a
problem.

CHAPTER
1 INSTALLATION
Page
6
Some
brands
of
clock
cards
may
be
used
with
the
PCI-2000
and
the
necessary
calling
routine
should
then
be
inserted
in
the
AUTOEXEC.BAT
file.
The
clock
card
software
routine
must
also
be
copied
onto
the
PCI-2000
software
diskette.
Further
details
about
clock
cards
are
found
in
section
3.5.4
of
this
manual.
Approximately
6
seconds
after
the
title
page
appears,
you
will
see
the
operating
screen
format
of
the
PCI-2000
with
a
status
line
on
top
and
a
vertical
row
of
line
numbers
down
the
left
margin.
The
top
half
of
the
line
numbers
are
for
the
receive
buffer
(12-1
using
bright
video).
The
transmit
buffer
line
numbers
show
in
the
lower
half
of
the
screen
(1-12
using
dim
video).
Typed
characters
should
show
in
dim
video
on
the
lower
half
of
the
screen.
Control
of
the
PCI-2000
board
and
screen
features
will
be
discussed
in
detail
in
Chapter
3.

CHAPTER
2
CONNECTIONS
Page
7
All
I/0
connections
to
the
PCI-2000
are
made
via
the
25-pin
connector
on
the
rear
panel.
All
signals
required
for
direct
connection
to
a
radio
system,
an
RTTY
tuning
indicator,
the
internal
103/202
modem,
or
an
external
modem
or
computer
are
supplied
on
this
connector.
Therefore,
the
cable
connections
will
vary
with
the
intended
application
and
few
installations
will
require
use
of
all
25
pins.
Note
that
this
DB25
connector
is
NOT
compatible
with
"standard"
DB25 modem
connectors!
All
PCI-2000
I/O
connections
are
explained
in
Table
3
and
voltage
and
current
limitations
in
Table
4.
WARNING:
PIN
1
2
3
4
5
6
7
8
9
10
11
12
13
14
15
16
17
18
19
20
21
22
23
24
25
TABLE
3.
I/0
CONNECTIONS
NAME
AF
IN
TXD
RTS
KY2
CD
SPACE
MARK
KY1
MODEM
GROUND
FSK
GROUND
+CW
KEY
PTT
DTR
RXD
CTS
AF
OUT
GROUND
RING
+12V
-12V
+5V
-CW
KEY
GROUND
FUNCTION
(audio
from
RX
speaker)
(RS232
transmit
data)
(RS232
request
to
send)
(switched
output
No.
2)
(RS232
carrier
detect)
(SPACE
tuning
indicator)
(MARK
tuning
indicator)
(switched
output
No.
1)
(103/202
Modem
AF
I/0)
(signal
ground)
(FSK
output
to
TX)
(signal
ground)
(positive
CW
key
output)
(TX
push-to-talk
circuit)
(RS232
Data
Terminal
Ready)
(RS232
receive
data)
(RS232
Clear
To
Send)
(TX
microphone
input)
(signal
ground)
(103/202
modem
ring
signal)
(+12VDC
to
accessory)
(-12VDC
to
accessory)
(+SVDC
to
accessory)
(negative
CW
key
output)
(signal
ground)
Do
NOT
connect
a
standard
Modem
cable
without
using
the
optional
PCI-EXT.
AVOID SHORTING
PINS
21,
22,
AND
23
TO
ANY
OTHER
PINS
OR
GROUND.
DAMAGE
TO
PC
POWER
SUPPLIES
MAY
RESULT
IF
THIS OCCURS.

CHAPTER
2
WARNING:
PIN
SIGNAL
1
2
3
4
5
6
7
8
9
11
13
14
15
16
17
18
20
21
22
23
24
AF
IN
TXD
RTS
KY2
CD
SPACE
MARK
KY1
MODEM
FSK
+CW
KEY
PTT
DTR
RXD
CTS
AF
OUT
RING
+12V
-12V
+5V
-CW
Key
CONNECTIONS
TABLE
4.
I/0
RATINGS
MAXIMUM
10V
P-P
+/-12V
+/-12V
+25V,
.1A
+/-12V
10V
P-P
10V
P-P
+25V,.1A
0
dBm
+12V,.lA
+50V
1
.lA
50VI • 2A
+/-12V
+/-12V
+/-12V
0
dBrn
+12V
.05A
.05A
.lA
50V,
.lA
TYPICAL
0
dBm
(0.7V
RMS)
RS232
Signal
(out)
RS232
Signal
(out)
+Voltage
Only
RS232
Signal
(in)
Hi-Z
Scope
Output
Hi-Z
Scope
Output
+Voltage
Only
DAA
Phone
Line
o.c.
or
+V
output
+Voltage
Only
Page
8
+/-
Relay
Output
RS232
Signal
(out)
RS232
Signal
(in)
RS232
Signal
(in)
-30
dBrn
(200
rnv
rrns)
DAA
Signal
(in)
PS
Output
PS
Output
PS
Output
-Voltage
Only
Avoid
shorting
ANY
signal
pins
to
ground
or
to
a
power
supply
voltage.
IMPROPER
USE
OF
PINS
21, 22,
OR
23
MAY
RESULT
IN
DAMAGE
TO
THE
PC
POWER
SUPPLIES.
2.1
Radio
Connections
If
a
single-cable
harness
is
to
be
used
with
the
radio
system,
all
wires
may
be
connected
to
the
supplied
DB-25
connector.
However,
it
may
be
more
convenient
to
use
separately
shielded
phono-type
cables
for
each
function
(RX AUDIO,
TX
AUDIO,
etc.).
In
this
case,
the
HAL
PCI-EXT
accessory
Cable
Expander
is
very
useful.
Whether
connections
are
made
directly
to
the
25-pin
connector
or
through
the
PCI-EXT,
it
is
HIGHLY
recommended
that
ALL
cable
to
and
from
the
PCI-2000
be
shielded
and
that
a
separate
low
inductance
RF
ground
also
be
connected
between
one
of
the
rear
corner
screws
of
the
IBM-PC
cabinet
and
the
radio
equipment.
2.1.1
Direct
DB25
Connections
In
some
radio
systems,
it
is
convenient
to
make
up
one
or
two
multi-conductor
cables
that
include
all
the
necessary
signals
to
and
from
the
PCI-2000.
This
may
be
particularly
desirable
when
transceivers
with
multi-pin
I/O
connectors
are
used.
In
this

CHAPTER
2
CONNECTIONS
Page
9
case,
use
a
shielded,
multi-conductor
cable
with
No.
24
or
26
wire
size
for
the
system
cable.
The
simplest
hook-up
involves
only
one
5-conductor
shielded
cable
(Ground,
AF
IN,
AF
OUT
or
FSK, PTT,
and
CW
KEY). A
second
2-conductor
shielded
cable
is
also
desirable
for
connection
to
a
tuning
indicator
or
RTTY
scope.
A
typical
radio
system
direct
cable
connection
is
shown
in
Figure
3.
SPT-1
RXIE-€7-----+-----,
SPECTRA-TUNE
TESTk6 I
o'f{,
+12V
...
EXTERNAL
SPEAKER
KEY
TRANSCEIVER
LSB
OR
FSK
-liE
-USE
hiiC INPUT IF
FSK
NOT
INCLUDED
IN
TRANSCEIVER
-SEE
SEC.
4.4.1
FOR
FSK
DATA
-------------
-USE
SHIELDED CABLE
FOR
ALL
CONNECTIONS
FIGURE
3.
DIRECT
RADIO
CONNECTIONS
POWER

CHAPTER
2
CONNECTIONS
Page
10
2.1.2
Use
of
PCI-EXT
Cable
Expander
Some
receiver-transmitter
systems
have
separate
rear
panel
connections
for
each
I/O
function
(receive
audio,
transmitter
audio,
push-to-talk,
etc.).
In
this
case,
it
may
be
desirable
to
use
separately
shielded
cables
for
each
signal.
The
PCI-EXT
accessory
provides
a
convenient
expansion
of.the
DB-25
connector
to
10
phono
connectors
for
radio
connection
and
to
a
standard
DB-25
for
the
external
modem
or
other
serial
device.
The
PCI-
EXT
also
allows
rapid
cable
change
between
different
transmitters
and
receivers
and
greatly
reduces
the
need
to
fabricate
custom
cables.
When
using
the
PCI-EXT,
be
sure
to
include
a
good
low
inductance
ground
between
the
PCI-EXT
ground
terminal
and
the
cabinets
of
the
transmitter
and
receiver.
Also,
use
ONLY
shielded
cables
for
each
signal
connection.
The
common
hi-fi
monaural
cables
and
stereo
cables
work
well
for
this
use
and
may
often
be
purchased
with
connectors
that
match
those
on
the
transmitter
and
receiver,
eliminating
most
connector
assembly.
Typical
radio
system
connections
using
the
PCI-EXT
are
shown
in
Figure
4.
ANTENNA
RTTY
SCOPE
I
_____
I TO PERSONAL COMPUTER
CABINET
• TRANSCEIVER
LSB
OR
FSK
-)
I
--------
(FSK)
ICYI@
) I
Q)IPTT
SPT-1 +12VI<Q I IN@AUOYJ@ ) I •
~
SPECTRA-
tE-J
"""'~
OUT MIC
TUNE
~~
~--;--~--t---------~--~
•14 I
PC:Z:-EXT
«USE
NIC
INPUT
IF
FSK NOT INCLUDED
IN
TRANSCEIVER
-SEE
Sl:CTION
4.4.1
FOR
FSK
DATA
·
-USE
SHIELDED CABlES
FOR
ALL
CONNECTIONS
EXTERNAL
SPEAKER
FIGURE
4.
RADIO
SYSTEM
USING
PCI-EXT
POWER

CHAPTER
2
CONNECTIONS
Page
11
2.2
Tuning
Indicators
An
RTTY
tuning
indicator
is
a
highly
recommended
addition
to
the
PCI-2000
radio
system.
Two
slightly
different
tuning
indicators
maybe
connected
to
the
PCI-2000:
(1)
a
"standard"
X-Y
oscilloscope
or
RTTY
scope,
or
(2)
an
audio
spectrum
indicator
(such
as
the
HAL
SPT-1
SPECTRA-TUNE).
Both
indicators
may
be
connected
simultaneously,
if
desired.
2.2.1
RTTY
Tuning
Scope
The
RTTY
scope
should
be
connected
to
the
MARK
and
SPACE
outputs
to
give
the
normal
X-Y
ellipse
presentation.
Conversely,
any
standard
oscilloscope
with
separate
vertical
(Y=SPACE)
and
horizontal
(X=MARK)
can
be
used
as
a
tuning
indicator.
The
MARK
and
SPACE
outputs
of
the
PCI-2000
produce
audio
signals
with
approximately
10V
P-P
amplitude
when
the
input
signal
frequencies
match
those
of
the
discriminator
filters.
Some
older
vacuum
tube
type
oscilloscopes
may
require
additional
amplification
for
the
horizontal
(X)
axis
input.
Be
sure
to
use
shielded
cables
for
all
tuning
scope
connections.
Typical
scope
connections
are
shown
in
Figures
3
and
4.
2.2.2
Spectrum
Indicator
An
oscilloscope
gives
a
very
good
RTTY
tuning
indicator,
preferred
by
many
experienced
RTTY
operators,
but
does
NOT
give
a
tuning
indication
for
reception
of
Morse
code.
The
HAL
SPT-1
SPECTRA-TUNE
gives
an
equally
effective
tuning
indication
for
RTTY
and
many
also
be
used
for
reception
of
Morse
code.
Three
special
connections
are
provided
for
the
SPT-1
SPECTRA-TUNE:
Receive
Audio,
Audio
Out,
and
DC
Power.
Be
sure
to
use
shielded
cables
for
all
audio
connections
to
the
SPT-1.
Connections
to
the
SPT-1
are
shown
in
Figures
3
and
4.
2.3
Modem
Connections
The
PCI-2000
is
a
versatile
addition
to
the
Personal
Computer
and
provides
more
than
the
minimum
connections
for
use
with
a
radio
system.
In
addition,
the
serial
I/O
UART
of
the
PCI-2000
may
be
used
directly
with
an
external
modem
or
computer,
by-passing
the
PCI-2000
RTTY
modems.
An
added
advantage
of
the
PCI-2000
is
the
internal
103/202
modem.
Although
this
modem
will
normally
be
used
for
radio
communication,
it
may
also
be
used
in
phone-line
applications
if
external
line
protection
is
provided
("DAA"
device).
There
are
two
ways
in
which
a
telephone
line
modem
may
be
used
with
the
PCI-2000:
(1)
use
the
internal
103/202
modem
with
external
isolation
device,
and
(2)
use
an
external
modem
connected
to
the
RS232
signals.
Two
more
options
are
also
available
for
general
PC
use:
(3)
use
a modem
card
in
another
slot
in
the
computer,
or
(4)
use
a
communications
card
in
the
PC
connected
to
an
external
modem.
These
last
two
options
do
not

CHAPTER
2 CONNECTIONS
Page
12
involve
use
of
the
PCI-2000
but
are
available
since
the
PCI-2000
may
be
assigned
to
either
COM1
or
COM2
serial
I/O
channels
in
the
PC.
Obviously,
the
optimum
choice
will
depend
upon
what
options
and
external
devices
you
already
have
for
the
computer.
2.3.1
Use
of
PCI-2000
Internal
Modem
If
it
is
desired
to
use
the
internal
103/202
modems
of
the
PCI-
2000,
you
should
consider
the
following
requirements:
1.
The
PCI-2000
does
NOT
include
the
FCC-required
DAA
isolation
device.
You
must
use
an
approved
DAA
(such
as
the
Bell
CDT
or
equivalent)
to
make a
legal
connection
to
the
telephone
system.
2.
The
PCI-2000
does
NOT
include
a
ring-detection
circuit.
This
feature
is
supplied
by
the
DAA
device.
However,
a "RING"
or
connect/disconnect
input
is
provided
to
the
modem
circuit
(connect
=
logic
low,
disconnect
=
open
circuit,
pulled
to
+5VDC
internally).
3.
The
PCI-2000
software
does
NOT
support
telephone
line
type
protocol,
dialing,
and
other
desirable
phone
modem
features.
However,
the
PCI-2000
may
be
used
with
other
software
if
the
operating
parameters
are
first
set-up
with
SETUP.EXE,
the
modem
set-up
program
on
your
HAL
diskette.
4.
The
PCI-2000
does
include
FDX
for
either
ANSWER
or
ORIGINATE
modes
when
the
103
modem
option
is
selected.
This
should
also
be
set-up
beforehand
as
discussed
in
item
3.
5.
The
PCI-2000
202 modem
does
NOT
support
the
75
baud
reverse
channel
feature
of
some 202
type
modems.
6.
Audio
connections
to
and
from
the
radio
equipment
should
be
disconnected
when
the
PCI-2000
modem
is
connected
to
telephone
lines.
7.
Connections
to
MODEM
LINE
and
RING
must
be
made
directly
to
the
PCI-2000
DB-25
I/O
connector
(pins
9
and
20).
These
connectors
are
NOT
available
on
the
PCI-EXT
accessory.
Typical
·
connections
for
use
of
the
PCI-2000
103/202
modem
on
telephone
lines
are
shown
in
Figure
5.

CHAPTER
2
PCI.-2000
0
0
0
0
0
0
0
0
0
0
0
19
21
0
0
0
·o
~
0
FIGURE
5.
CONNECTIONS
DAA
ISOLATION
DEVICE
+12V
-12V
~V
GNO
{
PIN21
IF
PIN22~-------i
REQUIRED
PIN
23
~---------~
PIN~
..:~----------1
I
>T
I
:.R
PCI-2000
TELEPHONE LINE CONNECTIONS
Page
13
PHONE
LINE

CHAPTER
2
CONNECTIONS
Page
14
2.3.2
External
Modem
with
PCI-2000
The
UART
circuit
of
the
PCI-2000
may
also
be
directly
connected
to
an
external
modem.
In
this
case,
the
PCI-2000
operates
much
like
any
other
serial
asynchronous
communications
card.
You
should,
however,
furnish
your
own
telephone
communications
software
that
utilizes
the
selected
PCI-2000
serial
I/O
channel
(COMl
or
COM2). The
external
modem
in
this
arrangement
should
be
connected
directly
to
either
the
DB-25
connector
on
the
PCI-2000
or
to
the
special
DB-25
on
the
PCI-EXT
accessory.
*****************************************************************
NOTE:
The
DB-25
connector
on
the
PCI-2000
does
NOT
follow
standard
modem
pin
arrangement
due
to
the
large
number
of
signals
required
to
support
all
PCI-2000
modes.
If
a
direct
connection
is
required,
a
special
cable
will
be
required
between
the
PCI-
2000
DB-25
and
the
modem.
CHECK
YOUR
WIRING
CAREFULLY!
Conversely,
the
MODEM
DB-25
connector
on
the
PCI-EXT
accessory
DOES
follow
standard
DTE
pin
arrangement
and
most
modems
may
be
connected
directly
to
this
connector
with
standard
cables.
Addition
of
the
PCI-EXT
is
highly
recommend
when
an
external
modem
is
to
be
connected
to
the
PCI-2000.
*****************************************************************

CHAPTER
3
OPERATION
Page
15
This
section
of
the
manual
discusses
how
to
use
the
software
supplied
with
the
PCI-2000.
A
complete
reading
of
this
chapter
is
of
course
recommended.
However,
section
3.1
contains
an
outline-view
of
operation
that
will
get
the
experienced
computer
user
going.
3.1
Getting
Started
A
few
easy
steps
are
required
to
start
the
PCI-2000.
These
steps
are
much
the
same
as
you
would
perform
for
any
other
program
and
will
become
very
familiar
after
some
practice.
3.1.1
How
to
Make
Back-up
Copies
of
the
Diskette
Some
PC
owners
seem
to
have
confusion
about
how
to
copy
the
PCI-
2000
software
to
their
own
diskette.
For
IBM
PC
owners,
the
following
technique
works
well:
a.
Format
a new
diskette
that
includes
the
DOS
system
files
using
the
FORMAT/S
command.
In
a
two-drive
system,
put
the
DOS
diskette
in
drive
A
and
the
new
diskette
in
drive
B.
After
booting
DOS,
type:
FORMAT
B:/S
(and
the
enter
key)
b.
Copy
all
files
from
the
HAL
PCI-2000
diskette
to
the
newly
formatted
diskette.
In
a
two
drive
system,
put
the
HAL
diskette
in
drive
A
and
the
newly
formatted
diskette
in
drive
B.
Then
type:
COPY
*·*
B:
(enter)
All
of
the
files
on
the
HAL
diskette
will
now
be
copied
to
the
new
diskette.
When
complete,
put
the
HAL
copy
in
a
safe
place
and
use
the
newly
prepared
diskette
for
operation.
3.1.2
L?ading
the
Software
Be
sure
that
you
have
the
DOS
system
files
on
the
copied
PCI-2000
diskette.
The
software
for
the
PCI-2000
is
controlled
by
an
"AUTOEXEC.BAT"
file
that
automatically
loads
the
main
program
called
"PCRTTY". The
software
may
be
loaded
using
either
a
"cold
boot"
or
a "warm
boot".
The
full
procedure
for
a
"cold
boot"
is
listed
in
Table
5.
For
a
"warm
boot",
simply
press
ALT-
CTRL-DEL
and
start
at
step
No.
4.
You
may
also
run
the
program
by
typing
"PCRTTY"
in
response
to
the
system
prompt.
For
.
experienced
computer
users,
later
versions
of
PCRTTY
have
been
designed
to
operate
in
multi-tasking
environments
like
TOPVIEW
from
IBM.
This
means
that
you
can
do
word
processing
or
homework
on
the
PC
while
PCRTTY
monitors
radio
link
activity.

CHAPTER
3
1.
OPERATION
TABLE
5
BOOTING
THE
SOFTWARE
With
the
PC
power
turned
OFF,
install
the
PCI-2000
circuit
board
in
the
computer
as
discussed
in
Chapter
2.
2.
Insert
the
PCI-2000
software
diskette
in
disk
drive
"A"
(top
or
left-hand
drive
in
most
machines).
Have
you
made
back-up
copies?
If
not,
do
it
NOW
and
use
the
copy!
See
Section
3.1.1
if
you
are
still
confused
about
how
to
copy
the
program
to
another
diskette.
DON'T
close
the
door
lever
until
after
power
is
turned
on.
3.
Turn-on
the
PC
power
switch.
4.
After
the
computer
power
is
on,
close
the
drive
door
lever.
5.
After
the
PC
memory
check
is
completed,
the
disk
light
will
come
on
and
the
screen
will
request
the
time.
Enter
the
time
in
the
normal
format
(hrs:mins:sec).
Then
enter
date
as
requested
(mo-day-yr).
(Use
of
clock
cards
is
discussed
in
section
3.6.4.)
6.
The
executive
file
will
now
call
"PCRTTY"
and
the
title
page
will
be
displayed.
Note
that
a
version
number
is
displayed
on
this
page.
Write
down
this
number
in
your
manual
for
future
reference.
7.
After
a
short
delay,
the
operating
screen
will
be
displayed.
3.1.3
The
HELP
Page
and
Use
of
the
FN
Keys
Page
16
The
ten
·function
(FN)
keys
of
the
PC
are
used
to
set
and
control
many
hardware
and
software
features.
A
"HELP"
menu
page
explaining
the
function
key
uses
is
available
at
any
time
by
typing
"ALT-H". The
following
tables
present
a
complete
list
of
the
controls
available.
The
features
will
be
discussed
in
detail
in
following
sections
of
this
chapter.
In
the
following
tables,
the
symbol
"CR"
means
carriage
return,
or
the
ENTER
key
on
most
PC-compatible
keyboards.
Table of contents
Popular Recording Equipment manuals by other brands

Yamaha
Yamaha NAI48-ES Bedienungsanleitung

Louroe Electronics
Louroe Electronics AP-4-RM Installation and operating instructions

Emerson
Emerson ControlWave GFC IStran instruction manual

Soldano
Soldano ASTRO-20 instruction manual

Radionics
Radionics D9210B Operation and installation manual

FUNAI
FUNAI D50Y-100M Service manual

Eclipse
Eclipse ECL-SC1 owner's manual

Avid Technology
Avid Technology Pro Tools S6 Master Post Module manual

Emerson
Emerson Keystone OM9 - EPI2 Installation, operation and maintenance manual

Pentair
Pentair Raychem NGC-UIT2-0RD Installation Instructions and Specifications

Tascam
Tascam US-428 Installation procedures

Akai
Akai Professional MPC 1000 release note