Half Price Blinds Folding Arm Awning User manual

FOLDING ARM AWNING FITTING
INSTRUCTIONS
(INCLUDING OPTIONAL UPGRADE RAFTER BRACKET FIXING)
Your new Outdoor Awning has been custom built for you from the highest quality
materials please follow the installation instructions provided.
FOR SAFETY REASONS WE STRONGLY RECOMEND USING A QUALIFIED BUILDER TO
INSTALL YOUR AWNING.
DELIVERY CARTON BOX CONTAINS THE FOLLOWING COMPONENTS:
1 x pre-assembled frame and fabric awning.
4 set mounting brackets + Packer (including 8 x 10mm
screws, wall plugs, mounting M6 nuts (dome) bolts and
washers ) * Please note the fixings supplied are for solid
brick walls and concrete walls ONLY For any other
structural fixing
contact your local qualified builder.
1 x remote control to operate Awning.
1 x detachable winding handle to adjust pitch only (depending on model see fig 7 & 8)
4 rafter brackets – optional extra.
1 x 3 pin plug.
Weather Box
8 x Hex Nuts – m8
4 x Hex Bolts – m8 x 25
4 x Hex Bolts –m8 x 20
8 x washers – m8
Joining brackets to rafter brackets
(Optional Extra)
8 x Nuts – m8
8 x Bolts m8 x 65
8 x Washers m8
Fig 1
Fig 2
Fig 3

INSTALLATION INSTRUCTIONS
The awning can be easily installed in about 30 minutes. For safe and easy installation of the
awning, we recommend that 2 to 3 persons are required for lifting and positioning.
TOOLS REQUIRED:
Power drill
10mm Masonry drill bit
Philip head screw driver or drill
Spirit level
Adjustable spanner
One near power supply connector is needed for motor or qualified electrician to hard wire or install GPO
and connect blind to power.
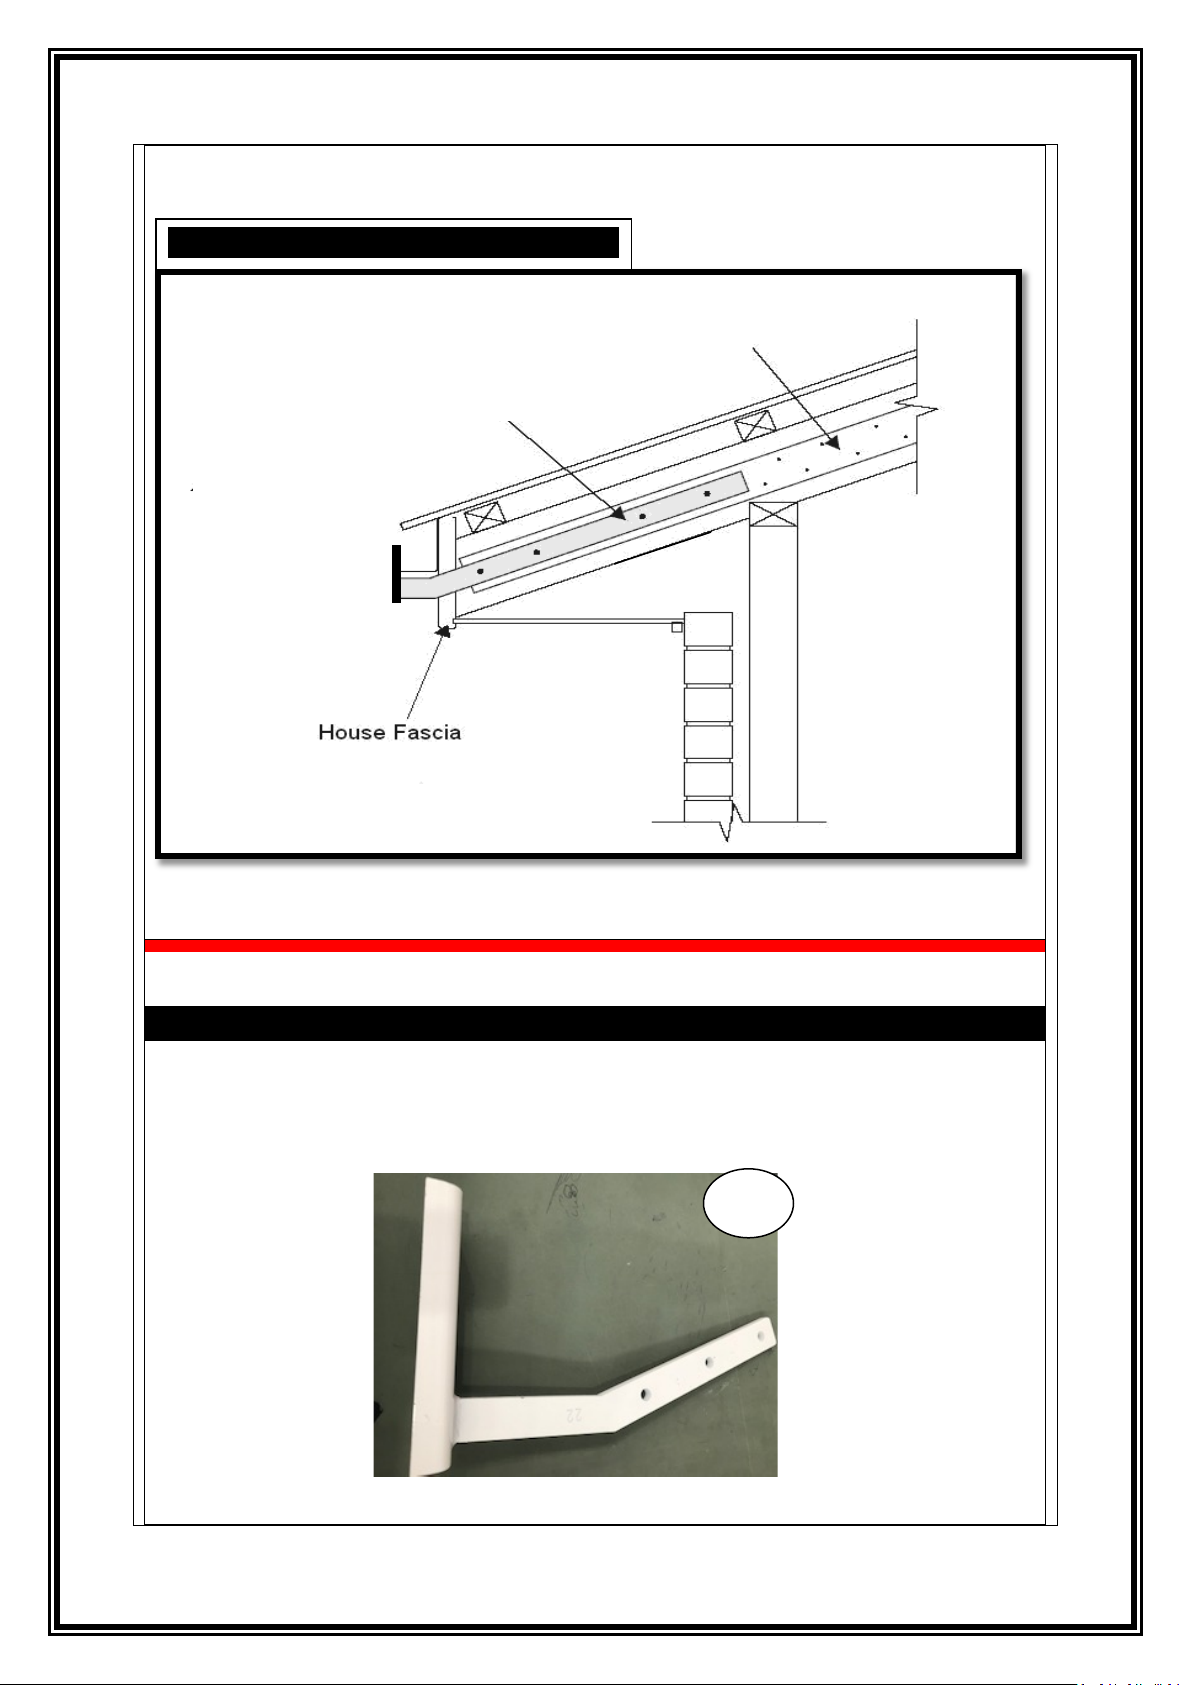
METHOD: 2 x outer brackets must be installed within 100mm of the arm brackets. To
prevent twisting of the awning cassette. The remaining brackets to be spread evenly along
the centre of blind. Packers (supplied to be placed behind all brackets to enable weather
box to be installed.
STANDARD WALL FIX BRACKETS
Determine the height the awning is required, considering the door clearances, angle of
slope etc. and mark a horizontal line on the wall to the total width of awning as shown in
step 1 below and making sure it is level.
There must be at least 7 brick courses above bracket installation point and allow a
minimum of the lintel plus three brick courses below if placing over a door/window
FOLLOW STEPS BELOW FOR BRACKET POSITIONING
IMPORTANT!
The fixings supplied are for brick walls and concrete walls only. For any other structural
fixing contact your local qualified builder or hardware store for recommended fixings.
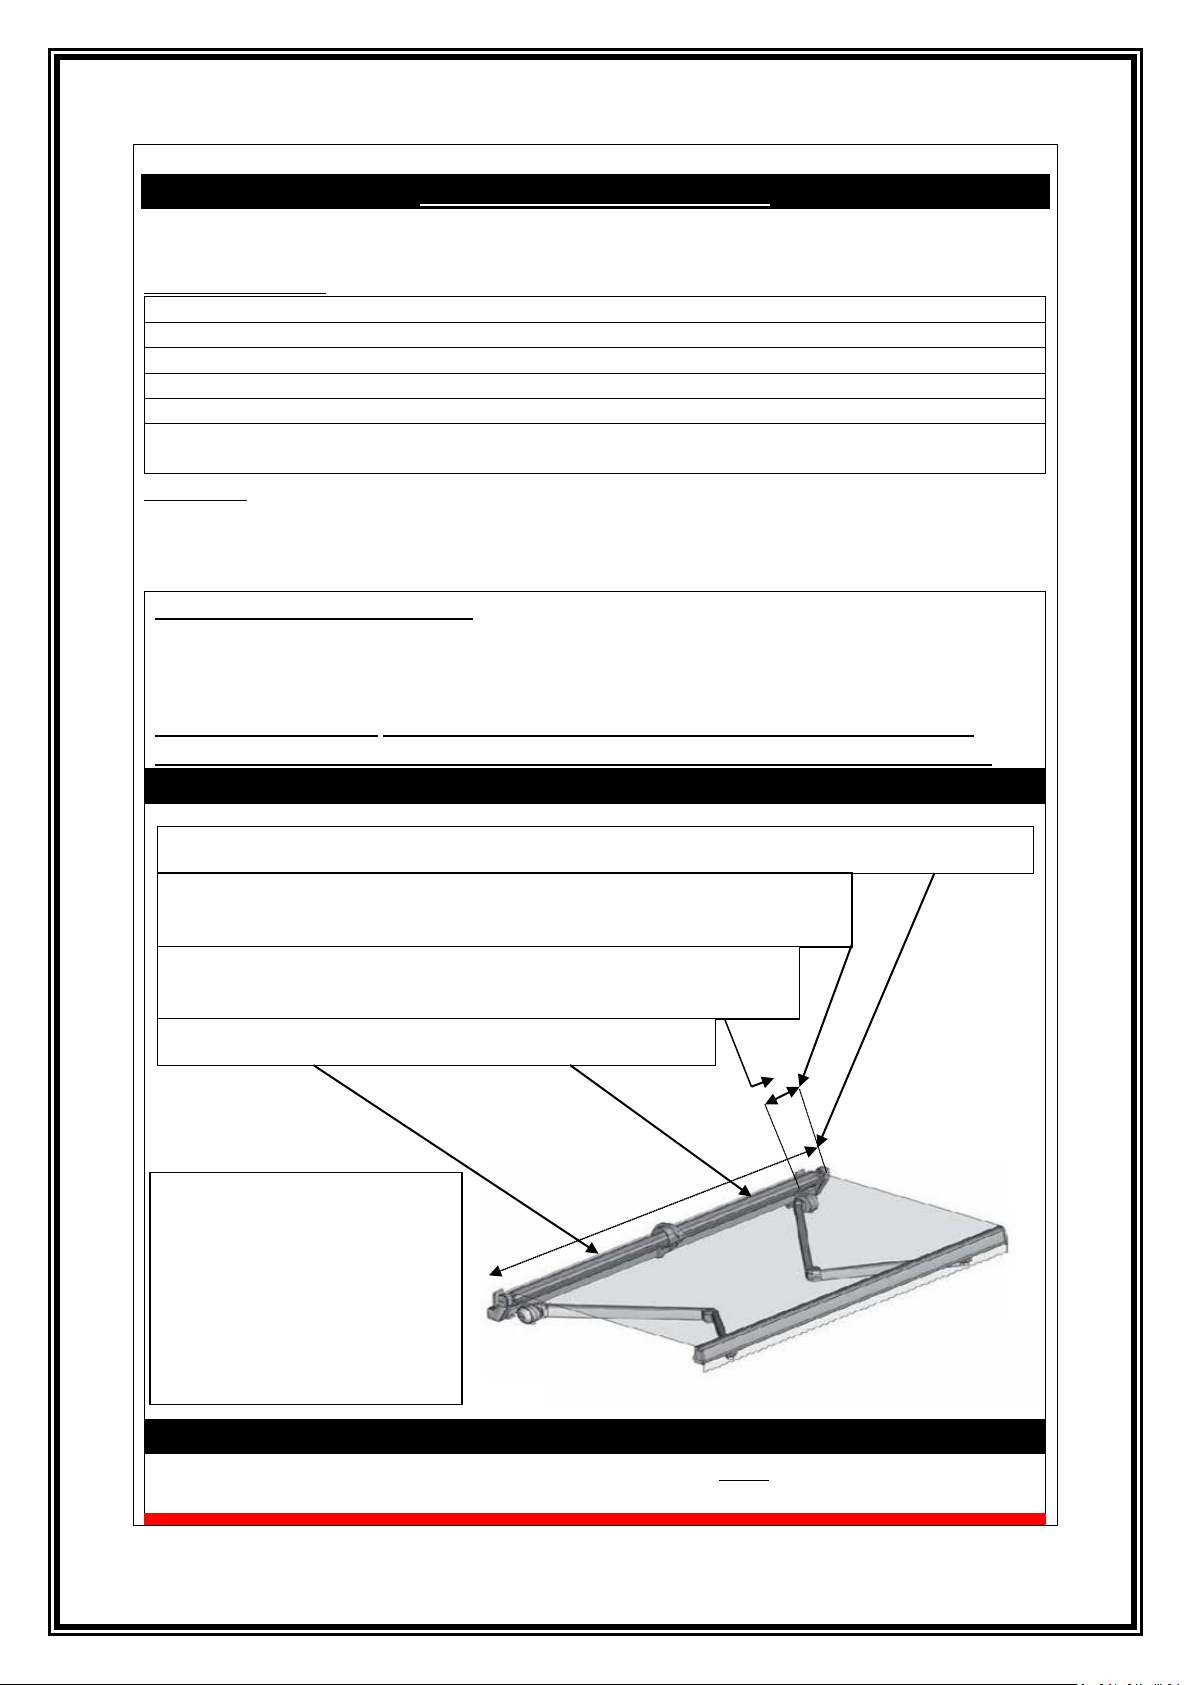
STEP 1. Measure total width of awning without weather box and mark your horizontal line
STEP 2. Measure distance from outer edges to folding arm, mark these
measurements on your horizontal line.
STEP 3 Measure 100mm from folding arm mark back towards outer
edge, these points mark the positions for end brackets on each side.
STEP 4. Space other 2 brackets evenly for central support.
Brackets must be firmly fixed
to the wall using the screws
and wall plugs provided ( Fig 1)
but only for brick or concrete
walls. Use spirit level to make
sure the fixings are completely
level.

Fixings for rafter bracket to rafter are not supplied
Recomend :- 12mm Bolts 70mm – 90mm Long with nuts & washers to match.
RAFTER BRACKET FIXING (OPTIONAL EXTRA)
Where wall height is an issue rafter brackets should be installed as an alternative fixing
point. Custom Rafter brackets are available from supplier as an optional extra. If your
installation requires a rafter bracket use bolts (fig 3) to attach the awning brackets to the
rafter brackets.
Rafter Bracket
Rafter
RAFTER BRACKET FIXTURE (OPTIONAL EXTRA)
Fig 4

WEATHER BOX INSTALLATION
STEP 1 Slide the head of m8 x 20 bolts
(shorter) into front track in the underside of
the weather box
STEP 2 Slide the head of m8 x 25 bolts
(Longer) into back track in the underside of
the weather box
STEP 3 Distance the bolts to line up with
brackets
STEP 5 Position weather box in line with
brackets so that the bolts fix through brackets
and use washers and nuts to secure into
place.
STEP 6 Once your brackets
and weather box are
securely installed lift awning
into position (we
recommend 2-3 person lift)
inserting frame into the
brackets between the two
lower protrusions.
STEP 4 Using small screws (fig5) attach end
caps to weather box, you will have a left and
right end cap, ensure the screws sit flush with
end cap, the holes are countersunk on one
side for a neat finish
Left and right end caps with countersunk
holes & 4 small screws for weather box
STEP 7 Secure the frame in place with the m6 bolts
(fig1) – insert bolt through the two holes in the front
of the two lower protrusions of the brackets and
secure firmly with the washers and nuts.
Using bolts (fig 2) and end caps (fig5),
assemble weather box and fix to brackets
following the steps below.
Fig 5
Fig 6

The angle of the slope can be adjusted using the crank handle or adjustment bolt
(depending on which model you have)
Please refer to motor set up guide to
set awning limits
GENERAL CARE AND PRECAUTIONS
The awnings are constructed from weather resistant powder coated metal and hard-
wearing polyester fabric, and designed for many years service. The awnings can be easily
washed or sponged down, but should not be left for prolonged periods.
The awnings are intended to provide shade from direct sunlight, not as protection from the
harsher elements such as rain and wind, and should be retracted in such conditions or when
not in use in case the weather should change for the worse, such as the wind power exceeds
5 grade.
You should check–up the settled parts after using for a period of time , it requires all settled
parts are fastened well
The awnings can be easily removed from the brackets for winter storage.
Your blind is now installed and ready. We hope it brings you and your home
many years of great functionality and beauty. We thank you for your
purchase
BOLT ADJUSTMENT
CRANK HANDLE ADJUSTMENT
Fig 7
Fig 8

IMPORTANT INFORMATION
WARNING
STRUCTURAL HAZARD
Installation instructions: WE STRONGLY RECOMEND THAT AWNINGS
ARE INSTALLED BY A PROFESSIONAL BUILDER.
EXTERNAL BLINDS CAN BECOME A STRUCTURAL HAZARD IF NOT INSTALLED PROPERLY
AND COULD RESULT IN PROPERTY DAMAGE, INJURY OR EVEN DEATH.
IT IS IMPERATIVE THAT BLINDS ARE FIXED SECURELY WITH THE CORRECT FIXINGS.
YOUR AWNINGS ARE SUPPLIED WITH STANDARD FIXIINGS FOR SOLID BRICK AND
CONCRETE WALLS. ANY OTHER STRUCURES MUST BE FIXED WITH ALTERNATIVE SAFE
FIXING METHODS SEE YOUR BUILDING SPECIALIST.
FOLDING ARM AWNINGS ARE DESIGNED FOR SUN SHADE ONLY AND MUST BE FULLY
RETRACTED WHEN NOT IN USE AND IN WINDY CONDITIONS.
'WARNING:
STRUCTURAL
HAZARD

Table of contents
Popular Accessories manuals by other brands

Aqara
Aqara Temperature and Humidity Sensor quick start guide

Baumer
Baumer FEDK 07N6901/KS35A manual

Ezviz
Ezviz DB1 Pro user manual

SENSORWORX
SENSORWORX SWX-201-2 Installation & operation instructions

Balluff
Balluff BIC 1B0-ITA50-Q40KFU-SM4A4A user guide

Hugo Müller
Hugo Müller GS 41.10 knx instruction manual