Handykey Corporation Twiddler2 User manual

twiddler2
USER
MANUAL
Rev. 1.6
Copyright © Handykey Corporation, 1992, 2000
All Rights Reserved
Twiddler® and Twiddler2 are trade arks of
Handykey Corporation

Contents
GETTING STARTED. . . . . . . . . . . 5
THE KEYBOARD . . . . . . . . . . . . . 8
TYPING . . . . . . . . . . . . . . . . . . . . 9
THE MOUSE POINTER . . . . . . . 18
INTERACTIVE PROGRAMMING 20
KEY ASSIGNMENTS . . . . . . . . . 40
WARRANTY INFORMATION . . . 45
FCC WARNING
Note: This equipment has been tested and found to comply with the
limits for Class B digital device, pursuant to Part 15 of the FCC
ules. These limits are designed to provide reasonable protection
against harmful interference in a residential installation. This equip-
ment generates, uses and can radiate radio frequency energy and, not
installed and used in accordance with instructions, may cause harm-
ful interference to radio communications. However, there is no
guarantee that interference will not occur in a particular installation.
If this equipment does cause harmful interference in radio or televi-
sion reception, which can be determined by turning the equipment
off and on, the user is encouraged to try and correct the interference
by one or more of the following measures:
- eorient or relocate the receiving antenna.
- Increase the separation between the equipment and
the receiver.
- Connect the equipment into an outlet on a different
circuit from that to which the receiver is
connected.
- Consult the dealer or an experienced radio/TV
technician for help.
Caution: Changes or modifications not expressly approved by the
party responsible for compliance with FCC rules could void the
users authority to operate the equipment.
FCC ID: I62 - HKT2
THIS DEVICE COMPLIES WITH PART 15 OF THE FCC RULES
Operation is subject to the following two conditions: 1) This device ay not
cause har ful interference, and 2) This device ust accept any interfer-
ence received, including interference that ay cause undesired operation.
Twiddler2 Model HKT2-16 - Reg. U.S. Patent Office
MADE IN USA

ETTIN STARTED
Overview
The Twiddler2 provides the sa e input to
your co puter as both a conventional keyboard and a
ouse. To do this the Twiddler2 uses twelve keys on
the front and, on top, four keys plus an IBM
Trackpoint®. The top keys are for your thu b; your
other four fingers operate the front keys; and the red
Trackpoint under your thu b perfor s the pointing
function of a ouse. The Twiddler2 is designed to be
operated by only one hand. The hand not holding the
Twiddler2 is free for other tasks (like holding a tele-
phone or a cup, keeping your place when typing a list,
jotting a note on paper, etc.)
The Strap
There is a soft fabric strap that extends fro a
slot in the side of the Twiddler2's case and attaches to
a Velcro®pad on the botto . This strap goes around
the back of your hand and holds the Twiddler2 in posi-
tion for typing or pointing. When you receive your
Twiddler2, the strap will be set up for right-hand use,
but it ay be easily readjusted for left-hand use.
Changing to Left-Hand Use
To adjust the Twiddler2 for left-hand use, first
re ove the strap fro its Velcro fastener on the botto .
5
etting
Started

How to ho d the Twidd er2
How you hold the Twiddler2 is a atter of per-
sonal taste. It is designed to acco odate a wide
range of hand sizes and shapes. The following guide-
lines ay help you find a co fortable position:
In general, the strap goes around the back part
of your hand, between your knuckles and wrist, and
attaches to the Velcro fastener on the botto of the
case. (Check the photo on the back cover for strap
place ent.) Do not ake the strap too tight. You should
adjust the strap so your fingers fall naturally and easily
over the center colu n of keys (the keys with the s all
guide-bu ps on the ).
You will notice that your thu b is resting on the
top inside corner of the Twiddler2. When the strap is
adjusted correctly, it is loose enough so that your hand
can be re oved and re-inserted without detaching the
strap fro the Velcro. Rotating the Twiddler2 toward or
away fro your pal adjusts the angle of operation to
acco odate longer or shorter fingers; and the angle
of the strap on the botto of the Twiddler2 can also be
adjusted for your co fort. In fact, one way to find a
co fortable position is to re ove the strap fro the
botto , set the Twiddler2's angle, and then re-attach
the strap to the Velcro pad. The fastener on the botto
helps to hold the desired angle of the
Twiddler2.
When you have adjusted the strap and angle
so that your fingers fall naturally over the center col-
7
Next, grasp the strap close to the slot and slide the
end of the strap out of the slot. It is designed to be a
snug fit. Then slide the sa e fitted end of the strap into
the atching slot on the opposite side of the
Twiddler2. Be sure to insert it all the way into the slot.
Getting Started: Left or Right?
Which hand should you use for the Twiddler2?
The first inclination is to use it in your do inant
hand. But you ay wish to put off this decision and try
the Twiddler2 with each hand and think about how you
will be using it before you decide.
Here are a few things to consider:
What do you want to be able to do with the
hand not holding the Twiddler2?
If you want to take pencil-and-paper notes, you
ay wish to try the Twiddler2 in your non-writing hand.
Does your normal computer work involve fine
control of the pointing device (such as CAD or drawing
programs ?
If so, you ay want to use the Twiddler2 in the
hand that has the best drawing control. In any case,
you ay wish to experi ent with each hand to see
which suits you best. It is always easy to change the
strap to the other side. The Twiddler2 key layout is
designed to work equally well in either hand.
6

able chords. And, since ost of these key co bina-
tions are not preset at the factory, you can custo ize
your Twiddler2 by aking your own assign ents to
these chords. You can even override factory-preset
key/chord/character assign ents. Custo chording is
explained in the section on Interactive Programming.
TYPIN ON THE TWIDDLER2
Sing e Keys
There are twelve keys on the front of the
Twiddler2 arranged in three colu ns and four rows.
Each key in the center colu n has a tiny bu p which
akes touch-typing easier by letting you know i edi-
ately, by touch, which key your finger is pressing.
Each of your fingers is assigned to a specific
row of three keys across. Your index finger presses the
keys arked A, E, and SP (space) in the first or top
row. Use your iddle finger to press B, F, and DEL
(delete) in the second row. Your third (ring) finger is for
the C, G, and BS (backspace) keys in the third row.
And your little finger (pinkie) is in position for the keys in
the fourth or botto row--D, H, and ENT (enter). Press
and release any of these keys singly to type the charac-
ter or co and with which the top of the key is labeled.
9
u n, you will find that the left and right colu ns of keys
are an equally short reach for your fingers. If the strap
is too tight, the closest colu n ay cra p your
fingers. If the strap is too loose, the colu n farther
away ay be hard to reach.
You can comfortably rest your thumb on the inside
corner of the Twiddler2, in a relaxed position, as
shown in the photograph on the back cover.
You don't need to grip the Twiddler2. By resting the
thu b as shown, and applying gentle outward pres-
sure, you will keep the Twiddler2 steady and reach the
keys ore easily.
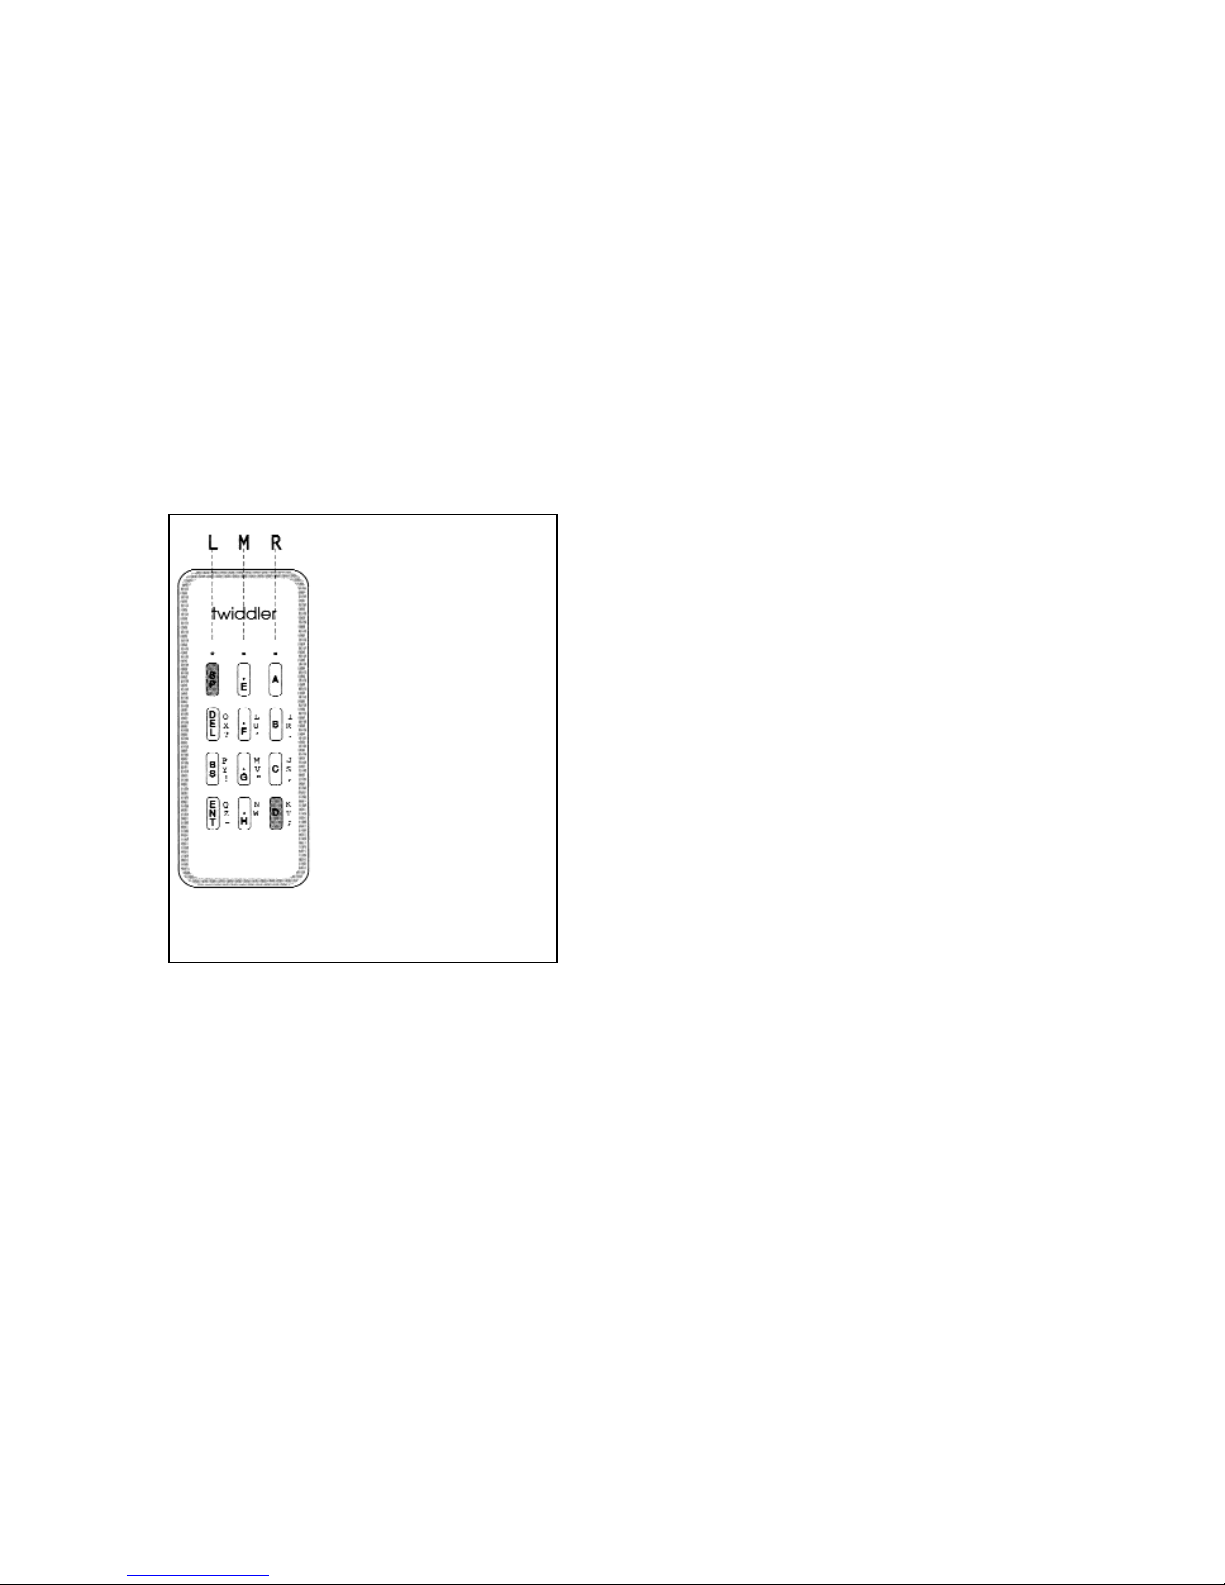
THE KEYBOARD
The Twiddler2 keyboard is designed to do all
the work of a standard co puter keyboard plus a lot
ore. With only sixteen keys, the Twiddler2 acco -
plishes this by chording.
On a piano keyboard you can play a single note
by striking one key or play a chord by playing a nu ber
of keys at the sa e ti e. The Twiddler2 works in a si -
ilar way. You can type a character or co and with a
single key or with a co bination of keys called a chord.
Using various single keystrokes or chords, you can type
all the letters, characters, sy bols and co ands
found on a standard keyboard. In fact, the Twiddler2
actually offers you over a thousand different progra -
8

Key Notation
This user's guide uses a special notation to
show you how to type each character and co and
with a factory-preset chord. As you face Twiddler2's
twelve-key layout, you will find four keys (labeled SP,
DEL, BS, and ENT) arranged in a colu n on the left.
This colu n is designated L. The four keys in the
iddle colu n (E, F, G, H) are referred to as M. And
the four keys on the right (A, B, C, D) are designated
R.
Each unique chord is defined by a four-sy bol
sequence indicating which key is pressed in each of the
four rows ordered fro top to botto . If no key needs
to be pressed in a particular row, a zero (0) in the
sequence will indicate that. Re e ber that the first
sy bol in the chord notation refers to a key in the top
row pressed by your index finger, the second sy bol to
a key in the second row assigned to your iddle finger,
the third sy bol to a key in the third row pressed by
your ring finger, and the fourth sy bol to a key in the
botto row reached by your little finger. (See the box,
Finger Key Notation)
For exa ple, to type a lowercase letter a, your
index finger ust press and release the key at the right
end of the top row, while no other keys need to be
pressed in the next three rows. So the notation for ais
R000.
11
Chords
The Twiddler2 does not register a keystroke until you
release a key or keys. For exa ple, when you press
the Akey on the Twiddler2 and hold it down, nothing
happens. But when you release the Akey, a lowercase
letter aappears on the screen. When you press a
group of keys as a chord, its assigned character does
not appear on the screen (or its assigned co and is
not issued) until you release at least one of the chord's
keys. Because characters are generated by the release
rather than the initial press of a key, you do not have to
worry about whether you have pressed all the keys in a
chord at exactly the sa e instant.
Repeating Keys
On a standard keyboard, when you hold down
a key it generates a repeating character. To repeat
characters in the sa e way on the Twiddler2, press and
release a key or chord and then quickly press and hold
down the sa e key or chord. When you do this the
desired character will repeat as long as the key or
chord is held down.
10
Si ilarly, you can type the lowercase letter kby
pressing and releasing (with your index finger) the left key
in the top row, no keys in the next two rows, and (with your
little finger) the right key in the botto row. This chord is
designated by the notation L00R.
12
FINGER KEYS are indicated
by a group of four symbo s:
0, L, M, and R.
These symbols repre-
sent key presses in OWS 1,
2, 3, and 4 (top to bottom). 0
means no button pressed in
that row; L means the Left
button is pressed; M means
the Middle button is pressed;
and, means the ight button
is pressed.
Example:
L00 means the
LEFT Button in OW 1 and
the IGHT button in OW 4
are pressed. No buttons are
pressed in OW 2 or OW 3.
The example given
L00 is the notation for typ-
ing the letter k.
L
0
0
R
Finger Key Notation
Labe s
Black, red, blue, and green labels on
Twiddler2's keys can re ind you how to type the ost
co on characters and co ands.
A black label on a key refers to the character or
co and you type when you press and release that
key alone. To type a lowercase a, you press and
release the key labeled with a black A. To type a lower-
case b, press and release the key labeled B; and so on
for keys labeled C, D, E, F, G, and H. Si ilarly, keys
arked SP (space), DEL (delete), BS, (backspace), and
ENT (enter) issue the designated co and when
pressed and released singly.
You will find a colored dot above each top row
key. Red arks the top left key; blue arks the top
iddle key; and green arks the top right key. To the
right of each key in the re aining three rows you will
find a colu n of three labels whose colors--red, blue,
and green--correspond with the colors of the top row
dots. Matching colors indicate a dotted-key/labeled-key
chord which types the labeled character.
For exa ple, press the left key in the top row
under the red dot and the right key in the next row
beside the red label I. When you release the two keys
you have typed the lowercase letter i. Note that the
label I is red to re ind you that the red-dotted top row
13

pappeared when you released your ring finger.) Now
use your iddle finger to press and release the right-
hand key in the second row. (Note that it is next to the
red label I.) You just typed a lowercase i(LR00).
Again, keeping the red-dotted key down, release your
iddle finger fro the second row and reach with your
little finger for the iddle key in the botto row (labeled
with the red N) to for the chord for lowercase n
(L00M).
Finally, release both top and botto keys. This
technique will help you type faster by avoiding unneces-
sary finger ove ents. You can use this with any
co binations of letters: st, ry, in, lo... Can you find
so e others?
Another Speed Tip
The Twiddler2 offers you another typing short-
cut. You can use factory-preset chords to type so e of
the co onest English words or letter sequences:
the, of, to, ed, and, in, ion, and ing. The key nota-
tion for these chords can be found in the Key
ssignment Tables.
15
key is part of the ichord LR00.
Here is a second exa ple. Press the top row key
under the green dot together with the key in the third
row just to the left of the green excla ation point !.
When you release both keys you have typed an excla-
ation point ! (R0L0).
Re e ber that, after you have pressed all the keys in
a chord, you ay release the together or in any order.
You will find a co plete list of factory-preset letters,
characters, sy bols, and co ands in the Key
ssignment Tables near the end of this guide.
Speed Tip
Here is a tip to speed up the way you type a
series of letters which have chord labels of the sa e
color: Keep holding down the top row key with your
index finger while your other fingers for chord after
chord with keys on the lower rows. Try this exa ple.
Type the word pin.
First press the chord for lowercase p(L0L0)--a
red-labeled chord. Then lift your ring finger fro the
third row while continuing to hold down the red-dotted
key in the top row with your index finger. (Notice that a
14

Ctrl key on a standard keyboard. To type Ctrl-Alt-Del,
for exa ple, si ply press and release the CTRL key
together with the ALT key and the front key labeled
DEL.
Likewise, the Shift key, as you would expect on
a conventional keyboard, allows you to type capital let-
ters. When you for a chord which includes the Shift
key with your thu b, the sa e key or chord you ordi-
narily use to type a lowercase letter will instead produce
the sa e letter in uppercase.
It is i portant to note, however, that the Shift
key (like all the thu b keys) does not just shift the front
keys to upper case, but fully particpates in the chording
function. For exa ple, the word the is assigned to the
chord 0RR0. If you press Shift + 0RR0, however, you
get The. If the thu b button labelled Shift just shift-
ed characters, you would get THE.
As you read the section on Macros, you will see
that the chording principle is very flexible and allows
assign ent of over a thousand sy bols, functions, or
groups of sy bols or functions to chords.
17
Thumb Keys
In addition to the red IBM Trackpoint, there are
four keys on the top rear of the Twiddler2 case. In
clockwise order they are labelled NUM, ALT, CTRL,
and Shift. These thu b keys take part in the chording
and co bine with the twelve front keys to for addition-
al chords.
Chords using the NUM key include the nu er-
als. You hold down the NUM key with your thu b and
co plete the chord by pressing additional keys on the
front. To see how it works, try holding down NUM with
your thu b while your other fingers consecutively press
and release the following keys:
A, B, C, D, E, F, G, H, SP, DEL.
You have just typed the nu erals
1, 2, 3, 4, 5, 6, 7, 8, 9, 0.
The ALT key accesses the sa e functions as
an Alt key on a conventional co puter keyboard. For
exa ple, to issue the co and Alt-x, you si ply for a
chord, including the ALT key and pressing and releas-
ing the chord for the letter x(ML00).
When you for chords by holding down NUM
and ALT together, the front keys A, B, C, D, E, F, G, H,
SP, DEL, BS, ENT output the codes for Function keys
F1 through F12.
In si ilar fashion the CTRL key acts like the
16

The Ckey issues a left-Ctrl-click and the Gkey pro-
vides a left-Shift-click.
By default, the Twiddler2 stays in mouse-
mode indefinitely after you release the mouse but-
ton. (This may be adjusted by the user. See
Interactive Programming, below) This enables you
to position the pointer on the screen, release the
Trackpoint, and then click on an object. With the excep-
tion of two keys (explained below), pressing and releas-
ing any black (thu b or finger) key exits ouse ode
after perfor ing its function.
Here is an exa ple of a co on situation: You
are typing a e o and you wish to insert a word 2
lines above. Press the ouse key and ove the point-
er where you wish to insert the word. Re ove your
thu b fro the ouse pointer and it stays in ouse
ode until you press the "A" key (left-click). This sets
the cursor in the selected location and auto atically
exits ouse ode back to keyboard ode so you can
start typing i ediately.
Exceptions:
The two ouse keys which do not auto atically
exit to keyboard ode are the key arked "E" and the
key arked "F". The "E" key, in ouse ode, signals
left-click-and-stay-in- ouse- ode. The usefulness of
this is when clicking repeatedly on the scroll-bar without
touching the ouse. The "F" key, in ouse ode, sig-
nals iddle-click-and-stay-in- ouse- ode.
19
THE MOUSE POINTER
The IBM Trackpoint®on the Twiddler2 is your
ouse. Press the red button with your thu b to ove
the pointer on your screen. When you take your thu b
off the Trackpoint, the onscreen pointer stays where it
is.
Mouse-c icking
When you press the Trackpoint, the Twiddler2
goes into ouse- ode. This eans that the front keys
now function as ouse buttons. (I agine a ouse with
12 buttons.) The Akey is now the left ouse button
and the SP key is the right ouse button. Press and
release the Akey to left-click on an onscreen object.
Press and release the SP key to right-click on an
object. The Ekey is also a left click button, with the dif-
ference that it stays in mouse mode after it is released.
When you need to double-click with a left
ouse button you can press and release the Ekey
twice, or si ply press and release the Bkey. This is a
very convenient way to double-click. (Since the Akey
exits ouse ode when it is released, you cant use
this to double click.) If you need to click-and-drag, the
Twiddler2 will e ulate a left ouse button being held
down when you press and release the Dkey. Press D
again to "lift" the virtual left ouse button. Si ilarly, a
right ouse button is virtually "held down" when you
use the ENT key and "lifted" by again pressing ENT.
18

Constants to Defaults
N+S L00M = Default Mouse Keys Only
N+S R00M = Clear Mouse Keys Only
The Interactive Progra ode can be enabled
at any ti e. Once in the Progra Mode, the re aining
hardcoded co ands can only be issued when no
other data has been entered (i.e. the cursor is at the
start of a line). The Interactive Program mode is
designed to be used with a simp e text editor
such as Windows Notepad. Any text editor wi
work, since it is just to provide some visua feed-
back during the interactive programming.
Upon entering the Progra Mode, the Twiddler2 will
display a essage si ilar to the following ...
Twiddler2 PS/2 Program Mode Enabled
Current Keymap Valid
6069 Bytes Available
assu ing the current key ap is valid. If the key ap is
not valid, the Twiddler2 will display the following ...
Twiddler2 PS/2 Program Mode Enabled
ERROR IN KEYMAP, SETTIN TO
DEFAULTS ...
Key Map Set To Defaults
21
MACROS
The Twiddler2 has over a thousand chords, and
ost of the are not factory-preset. By assigning your
own favorite words, phrases, or co ands to unused
chords, you can custo ize your Twiddler2 in powerful
ways. To help you do this, we have provided software,
built into the Twiddler2, that supports user-defined
acros. You can even over-ride the factory-preset
chords to custo ize the Twiddler2 to work just the way
you want it to.
The next section explains how to do this on-
the-fly. It also explains how to custo ize the Twiddler2
in other ways.
INTERACTIVE PROGRAMMING
INSTRUCTIONS
1.0 Basics
The following key co binations have been
hardcoded (i.e., they cannot be re-assigned) for use in
the Twiddler2 Interactive Progra ing ode:
N+S RRRR = Enable Progra ing Mode
N+S MMMM = Exit & Save Changes
N+S LLLL = Exit & Discard Changes
N+S LM00 = Set Key Map, Mouse Keys, & Constants
to Defaults
N+S RM00 = Clear Key Map & Mouse Keys, Set
20

2.0 EDITING KEY MAPS
To edit the key ap, co ands are issued using the
following for at:
t ffff = <data>
Only a single thu b key (t) character is allowed, valid
thu b codes are ..
0 - no thu b key pressed
S - SHIFT Key
N - NUM
F - NUM+ALT Keys
The finger key string (ffff) consists of four characters -
the first character corresponds to the top row - with the
following designations ...
0 - no key pressed
L - left key
M - iddle key
R - right key
For exa ple, the key labeled A corresponds to a finger
designation of L000. (A value of 0000 is invalid.)
2.1 AUTO CHORD MODE
A special feature of the Interactive Progra ing ode
is the Auto Chord function. When enabled, pressing a
valid key co bination with no other data having been
23
6096 Bytes Available
indicating that the key ap has been set to its default
configuration.
Once in the Progra Mode, the Twiddler2 will always
use its default key ap for typing. Note that while in
the Progra Mode, the ouse keys will not function.
To exit and save the changes that have been ade,
press the N+S MMMM co bination, and the Twiddler2
will display the following ...
Exiting Program Mode, Please Wait ...
Key Map Saved
Packing Memory, Please Wait ...
Resuming Normal Operation
Note that depending on the nu ber of changes, saving
the key and packing the e ory can take several sec-
onds to co plete. To exit and abandon any changes
ade, press the N+S LLLL co bination, and
the Twiddler2 will display the following ...
Program Mode Aborted
Resuming Normal Operation
22

2.2 KEY DATA
The <data> to be assigned to the selected chord can
be in one of four for ats.
1. A Predefined Key
2. A Text String
3. A Make/Break Scan Code Sequence
4. A Co bination of Predefined Keys
Regardless of the for at used, the Twiddler2 will auto-
atically parse the string entered, and if valid, will
respond with an OK essage. If an error exists, the
Twiddler2 will display ERROR. When the available
e ory is not sufficient to store the new entry, the
Twiddler2 will display the following ...
Insufficient Memory
0009 Bytes Available
Note that when editing the key ap, ouse key, and/or
constants, the Twiddler2 stores the changes te porarliy
in a previously unused portion of the e ory. This
allows the user to abort the Progra Mode without sav-
ing the changes. However, this te porary storage
echanis also requires substantial overhead data. As
such, if the e ory beco es full, si ply exit and re-
enter the progra ode. This will co it the changes
and re ove the overhead data freeing up additional
e ory for ore changes.
25
typed, will cause the Twiddler2 to issue a the corre-
sponding thu b/finger co bination for that key followed
by an equals sign. At this point the user only needs to
type the <data> field to be assigned to the key.
The Auto Chord feature is enabled/disabled by pressing
the CTRL key. Upon entry into the progra ing ode,
the Auto Key feature is disabled. Pressing the CTRL
key will enable this ode as indicated by the Twiddler2
displaying the following essage ...
Auto Chord Active
To disable the Auto Key function, press CTRL again
and the Twiddler2 will respond with ...
Auto Chord Disabled
Note that the state of the Auto Chord feature can only
be altered when no data has been typed on a line, i.e.
the cursor ust be at the beginning of a line. With the
Auto Chord Active, pressing the key labeled Awill
cause the Twiddler2 to type the following ...
0 R000 =
and the user can now assign a new function to this
chord.
24

Function Keys
INS Insert
DEL Delete
HOME Ho e
END End
PGUP Page Up
PGDN Page Down
BKSP Backspace
TAB Tab
BTAB Back Tab (Shift+Tab)
ENTER Enter
CAPS Caps Lock
NUM Nu Lock (Note Nu Lock is local &
does not issue scan code)
SCROLL Scroll Lock
ESC Esc
PRINT Print Screen
PAUSE Pause
BREAK Break
LWIN Left Windows
RWIN Right Windows
APP Application
F1 thru F12 Function Keys
UPAR Up Arrow
DNAR Down Arrow
LTAR Left Arrow
RTAR Right Arrow
27
The string buffer used during progra ing is 80 char-
acters in length with one character reserved for the car-
riage return (CR). As such, if ore than 79 characters
are typed before a CR is detected, the Twiddler2 will
discard the data and display the BUFFER OVER-
FLOW essage.
It is i portant to understand that the characters being
stored are only the ones typed by the Twiddler2 itself.
If a second keyboard is in use, characters typed on this
keyboard are never seen by the Twiddler2 and are not
stored in the buffer. In other words, the text editor is
only for visual feedback, it does not actually provide the
data input.
When saving the key ap, only the last entry for a
chord is actually stored. As such, if a chord definition is
entered incorrectly, but accepted by the Twiddler2, the
user needs only to re-enter it correctly.
2.2.1 Predefined Keys
Predefined keys have their scan codes defined in the
internal progra e ory of the Twiddler2, and should
be used whenever possible as they require the least
a ount of custo key e ory. The following prede-
fined keys exist in the Twiddler2.
26

With the exception of the letters and the Predefined
Macros, none of the predefined keys are case sensitive.
For exa ple, both alt and ALT are per issable.
2.2.2 Entering Text Strings
To enter a text string acro, the string ust be
enclosed in double quotes. The length of the string is
li ited to the size length of the internal buffer of the
Twiddler2 (~80 characters) inus the nu ber of chord,
whitespace, and quote characters. Below is an exa -
ple of a string acro.
0 00MM = "Twiddler2"
The follow co binations of characters can also be used
in strings.
\r converts to a carriage return
\t converts to a tab character
\" converts to a double quote character "
\\ converts to a backslash \
For exa ple, the following string definition will produce
the sa e result as the one above, but with a return
included.
0 00MM = "Twiddler2\r"
29
Shift Keys
SHIFT Left Shift
CTRL Left Ctrl
ALT Left Alt
RALT Right Alt
RCTRL Right Ctrl
RSHFT Right Shift
Characters
SPACE space bar
a-z and A-Z letters, A-Z issue SHIFT first
0-9, nu ber (keys at top of qwerty)
! @ # etc. all punctuation keys
Predefined Key Combinations
SHIFT+HOME Shift+Ho e
SHIFT+END Shift+End
SHIFT+PGUP Shift+Page Up
SHIFT+PGDN Shift+Page Down
SHIFT+UPAR Shift+Up Arrow
SHIFT+DNAR Shift+Down Arrow
SHIFT+LTAR Shift+Left Arrow
SHIFT+RTAR Shift+Right Arrow
ALT+F1 ... ALT+F12 Alt+F1 thru Alt+F12
CTRL+F1 ... CTRL+F12 Ctrl+F1 thru Ctrl+F12
SHIFT+F1 ... SHIFT+F12 Shift+F1 thru Shift+F12
28

RRRR would be the following:
0 RRRR = \m 33f033 11 69f069 6bf06b 6cf06c
f011 24f024 4b \b f04b
For your convenience, the scan codes listings can be
found on our web site.
Great care must be exercised when defining custom
make/break scan code sequences, as invalid scan
codes can lock up a PC.
2.2.4 Entering Combinations of Predefined Keys
Custo scan code sequences can also be defined by
concatenating up to 8 predefined keys. Predefined
keys are separated by the + sy bol. For exa ple, the
following chord definition will produce a shift alt back-
space co bination.
F LM00 = shift+alt+bksp
When the Twiddler2 generates the ake sequence the
keys are read fro left to right, but when generating the
break they are read right to left. This insures the ost
recent press is released first, and so on.
2.3 Defau ting/C earing Key Maps
Pressing the N+S LM00 chord will allow the user to
clear out all custo key ap edits, and set the key ap
to its default setting. Note this function also sets the
31
2.2.3 Entering Make/Break Sequence
To enter a custo Make/Break sequence the following
for at is used.
t ffff = \ < ake> \b<break>
The < ake> and <break> sequences are specified
using two-character ASCII hex bytes. For exa ple, the
following sequence will define an Alt+a.
F LM00 = \m 11 1c \b f0 1c f0 11
Note that the spaces are optional, but can be included
for clarity. Both a ake and a break sequence ust be
defined. The case of the hex characters a-f is ignored.
Also,
0 R0LM = \m1170f070 69f069 72f072 6b\bf06b
f011
and
0 R0LM = \m1170f070 69f069 72f072 6bf06b
\bf011
give the SAME result (Alt 0124). The only difference is
during the TYPEMATIC feature when a sequence is
repeatedly sent out, it is only the \ section.
Scan code progra ing is quite powerful in that you
can contruct whole strings and co binations (including
the e bedding of Alt codes) and assign the to a sin-
gle T2 co bination. For exa ple, "hôtel" assigned to 0
30

3.0 MOUSE KEY DEFINITIONS
Mouse key definitions are perfor ed in a si ilar an-
ner as entering the key ap. However, the thu b char-
acter is a M and the <data> field consists of one or
ore predefined ouse actions concatenated with the
+ sy bol. The following ouse actions are possible.
LEFT left ouse button press
MIDDLE iddle ouse button press
RIGHT right ouse button press
DBL issue a dbl click of the specified button
ALT issue Alt before ouse button
CTRL issue Ctrl before ouse button
SHIFT issue Shift before ouse button
TOGGLE toggles the state of the specified ouse
button
INV_EXIT re ain in ouse ode
For exa ple, the following co bination generates a
Shifted Left Double Click.
M 000L = shift+dbl+left
Note that only a axi u of 15 ouse key co bina-
tions can be defined. Further, since the progra does
not keep track of how any ouse keys have been
defined, it is up to the user to insure that only 15 co bi-
nations have been set.
33
ouse keys and the constants to their default values.
Since this process can't be undone, the user is pro pt-
ed with the following query ...
DEFAULT KEY MAP - CAN'T BE UNDONE, CONTIN-
UE? (Y/N)
responding with a Ywill continue the process,
responding with no or CR will abort the process.
Pressing the N+S RM00 chord will allow the user to
clear the entire key ap so that no keys are defined
(when the Progra Mode is exited). Note this function
also clears the ouse keys and sets the constants to
their default values. Since this process can't be undone,
the user is pro pted with the following query ...
CLEAR KEY MAP - CAN'T BE UNDONE, CONTIN-
UE? (Y/N)
and the user can proceed the sa e as the default
process.
To clear just a single chord, enter the chord co bina-
tion followed by the equal sign with no data. For exa -
ple,
F LM00 =
will re ove any assign ent to the F LM00 chord.
32

ing with no or CR will abort the process.
Pressing the N+S R00M chord allows the user to clear
all the ouse keys. Since this process can't be undone,
the user is pro pted with the following query ...
CLEAR ALL MOUSE KEYS - CAN'T BE UNDONE,
CONTINUE? (Y/N)
and the user can proceed the sa e as the default
process.
To clear a single ouse key co bination, enter the
ouse key definition with no data after the equal sign.
M 000L =
will re ove any ouse action assign ent to the 000L
co bination.
3.2 Defau t Mouse Keys
The following are the default ouse keys defined.
M R000 = LEFT Left click
M M000 = LEFT+INV_EXIT Left click and stay in
ouse ode
M L000 = RIGHT Right click
M 0R00 = DBL+LEFT Double click left
M 0M00 = MIDDLE+INV_EXIT Middle click
and stay in ouse
35
To allow so e buttons to not exit the ouse ode
when the key is released, the keyword INV_EXIT can
be used. Note the INV_EXIT sets both the TOGGLE
and the DBL flag, so these should not be used with
INV_EXIT. The Twiddler2 Progra Mode does not flag
this as an error, but the Download progra will check
for it. Note too, that if a ouse chord definition has
TOGGLE+DBL, this will have the sa e affect as
INV_EXIT.
Another MCNS ( ouse constant) called FLGS has
been added. This constant is a flag byte, that can be
used to reverse the ouse button exit logic. Setting
MCNS FLGS = 1, will reverse the logic. In this ode,
ouse button releases will not auto atically exit ouse
ode, and using INV_EXIT in a ouse chord definition
will direct the Twiddler2 to exit the ouse ode for that
button. The default is MCNS FLGS = 0. (See also
below under Timing Constants.)
3.1 C earing/Defau ting Mouse Keys
Pressing the N+S L00M chord allows the user to set
just the ouse keys to their default settings. Since this
process can't be undone, the user is pro pted with the
following query ...
DEFAULT MOUSE KEYS - CAN'T BE UNDONE, CON-
TINUE? (Y/N)
responding with a ywill continue the process, respond-
34

4.0 Timing Constants
Several t ing constants can be used to tailor the opera-
tion of the PS/2 Twiddler2. These are defined below
along with their default values. Note the for at for
defining constants is si ilar to defining chords, but with
the thu b and finger codes set to special strings. All
values, except for the MCNS DBNC are * 0.005 sec-
onds. For exa ple, the key repeat rate is 0.1s
(20*0.005s).
KCNS DLY = 100 sets the key repeat delay (0.5s)
KCNS RPT = 20 sets the key repeat rate (0.1s)
MCNS DLY = 300 sets the ouse function ti e
out(1.5s)
MCNS DBL = 20 sets the ouse double click
ti e (0.1s)
MCNS KEY = 10 sets the delay fro sending the
alt, shift, ctrl key to actually
pressing the ouse button
(0.05s)
MCNS DBNC = 82 controls the debouncing of the
ouse activity detection algo-
rith .
MCNS FLGS = 0 sets default behavior of ouse
keys to exit ouse ode upon
release. INV_EXIT causes it to
re ain in ouse ode.
MCNS FLGS = 1 Sets default behavior of ouse
keys to re ain in ouse ode
37
ode
M 0L00 = DBL+RIGHT Double click right
M 00R0 = CTRL+LEFT Control left click
M 00M0 = SHIFT+LEFT Shift left click
M 00L0 = ALT+LEFT Alt left click
M 000R = TOGGLE+LEFT Holds down/releases
the left button
M 000M = TOGGLE+RIGHT Holds down/releases
the right button
M 000L = SHIFT+DBL+LEFT Shift left double click
3.3 Mouse On/Off
The predefined special code of MOUSE_ON and
MOUSE_OFF can be used to assign a chord to turn the
ouse function on and off, respectively. This function
can be used to save power when just entering text.
The default chords are defined below.
F MMMM = MOUSE_ON
F LLLL = MOUSE_OFF
36

Key Assignment Notation
The table, below, shows the default assign ents of
sy bols, functions, or co ands to chords for ed by
pressing and releasing thu b and finger keys. The gen-
eral table layout is:
Thu b Key(s) Finger Key(s) = XXXXX
where XXXXX is what is accessed or displayed.
For an explanation of the finger chords, please see the
Finger Key Notation box, shown on page 7.
The thu b keys designations are as follows:
0 = No thu b key pressed
S = Shift
N = NUM
F = Both NUM and ALT are pressed
M= Mouse (including Mouse- ode)
Where ultiple thu b keys are indicated
(Ex. 0SN 000L = ENTER), it eans that the sy bol or
function indicated on the right side of the equals sign is
accessed by pressing any of the thu b keys indicated.
In the case of this exa ple, the ENTER function is
accessed either with no thu b keys, with the Shift key,
or with the NUM key.
39
upon release for the ti e speci
fied by MCNS DLY, and
INV_EXIT causes it to exit in
ouse ode upon release.
The Twiddler2 polls for ouse activity every 5 illisec-
onds, the DBNC, MCNS value can be used to adjust
the debouncing window (in the ost-significant nibble,
sn) and the ini u activity flag count (in the least-
significant nibble, lsn). The debounce window is the
sn*10 illiseconds (=> 10 to 300 s), ini u count
is the lsn+1. The default value is 82 deci al which is
52H => 50 s and 3 counts.
38
Table of contents


