HAPPATIO Gazebo User manual

HAPPATIO
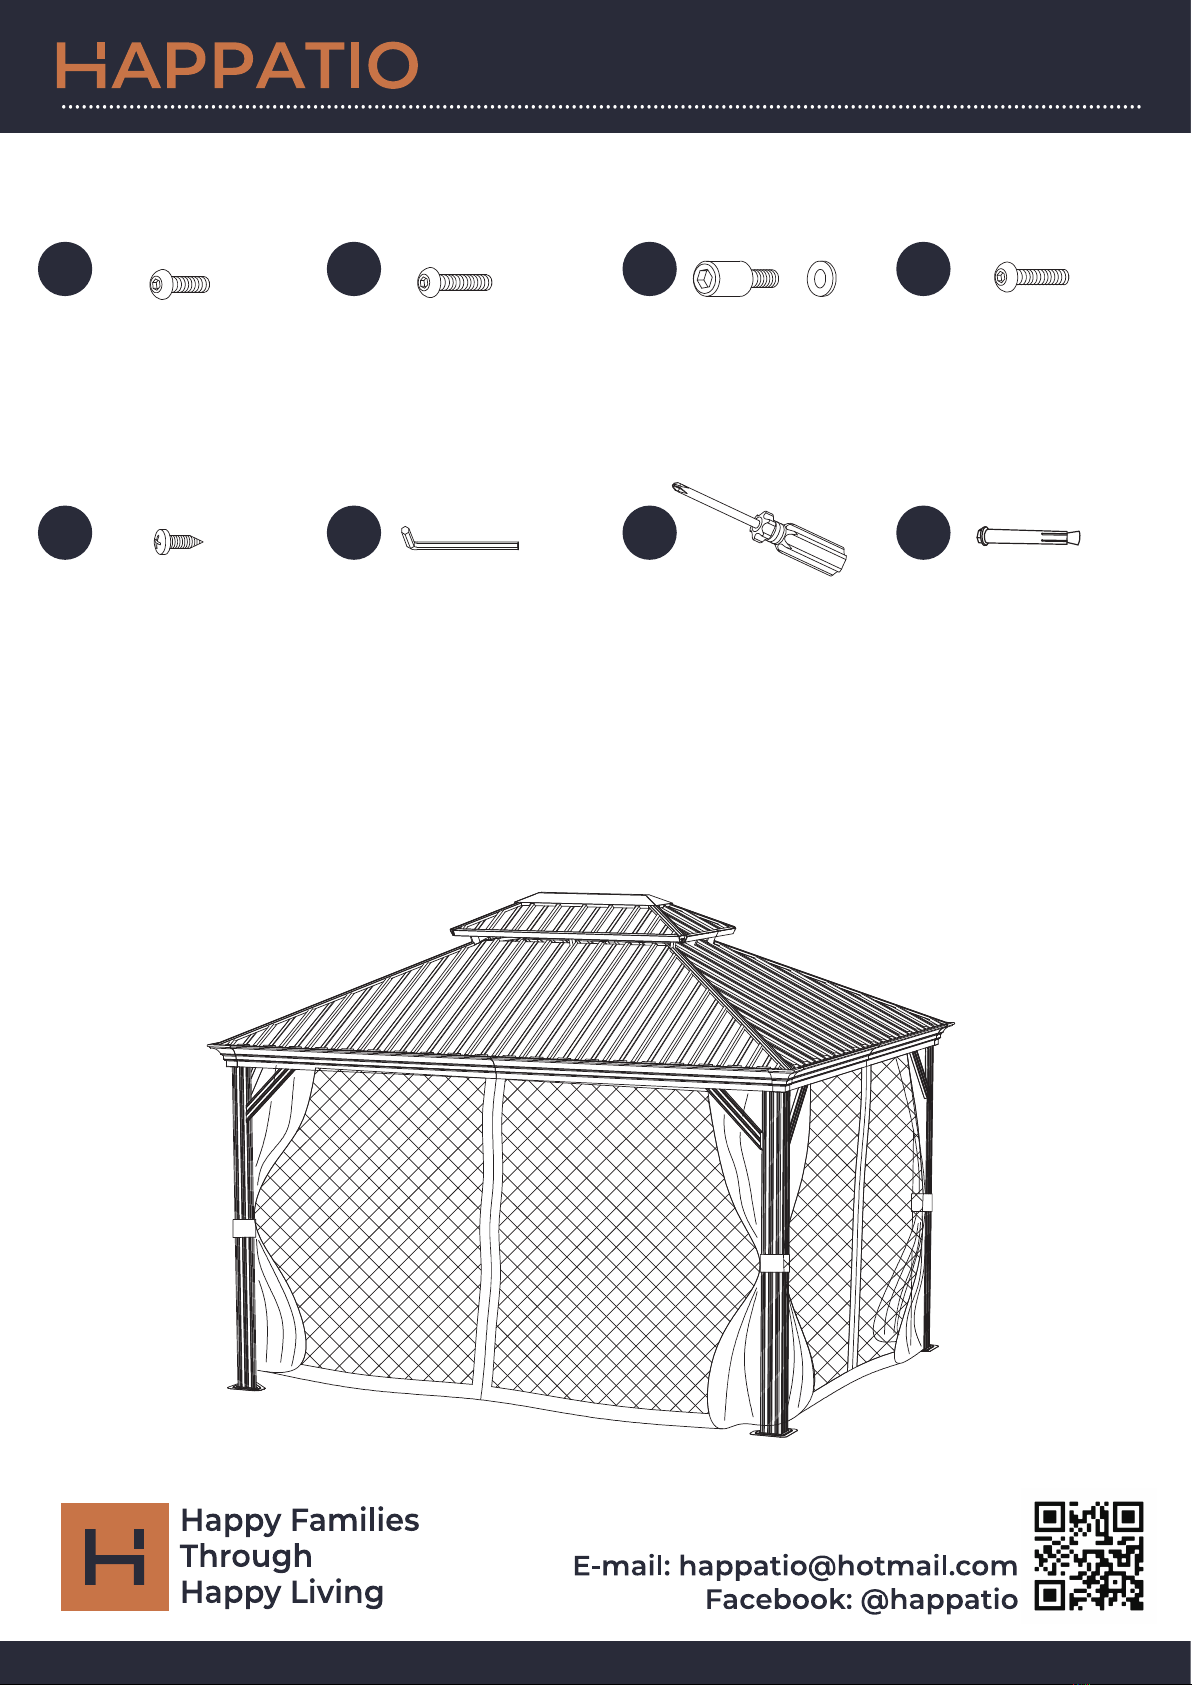
Double Hardtop
Aluminum Gazebo
OWNER’S MANUAL
“Making Happy Living Easier”
.......................................................................................................................................................

E-mail: [email protected]om
Facebook: @happatio
Scan the QR code for installation video
If you have any questions.
please contact customer service:

WARNING
General Notes:
WARRANTY COVERAGE REQUIREMENTS
Please read and understand this entire manual before attempting to assemble or install
this product.
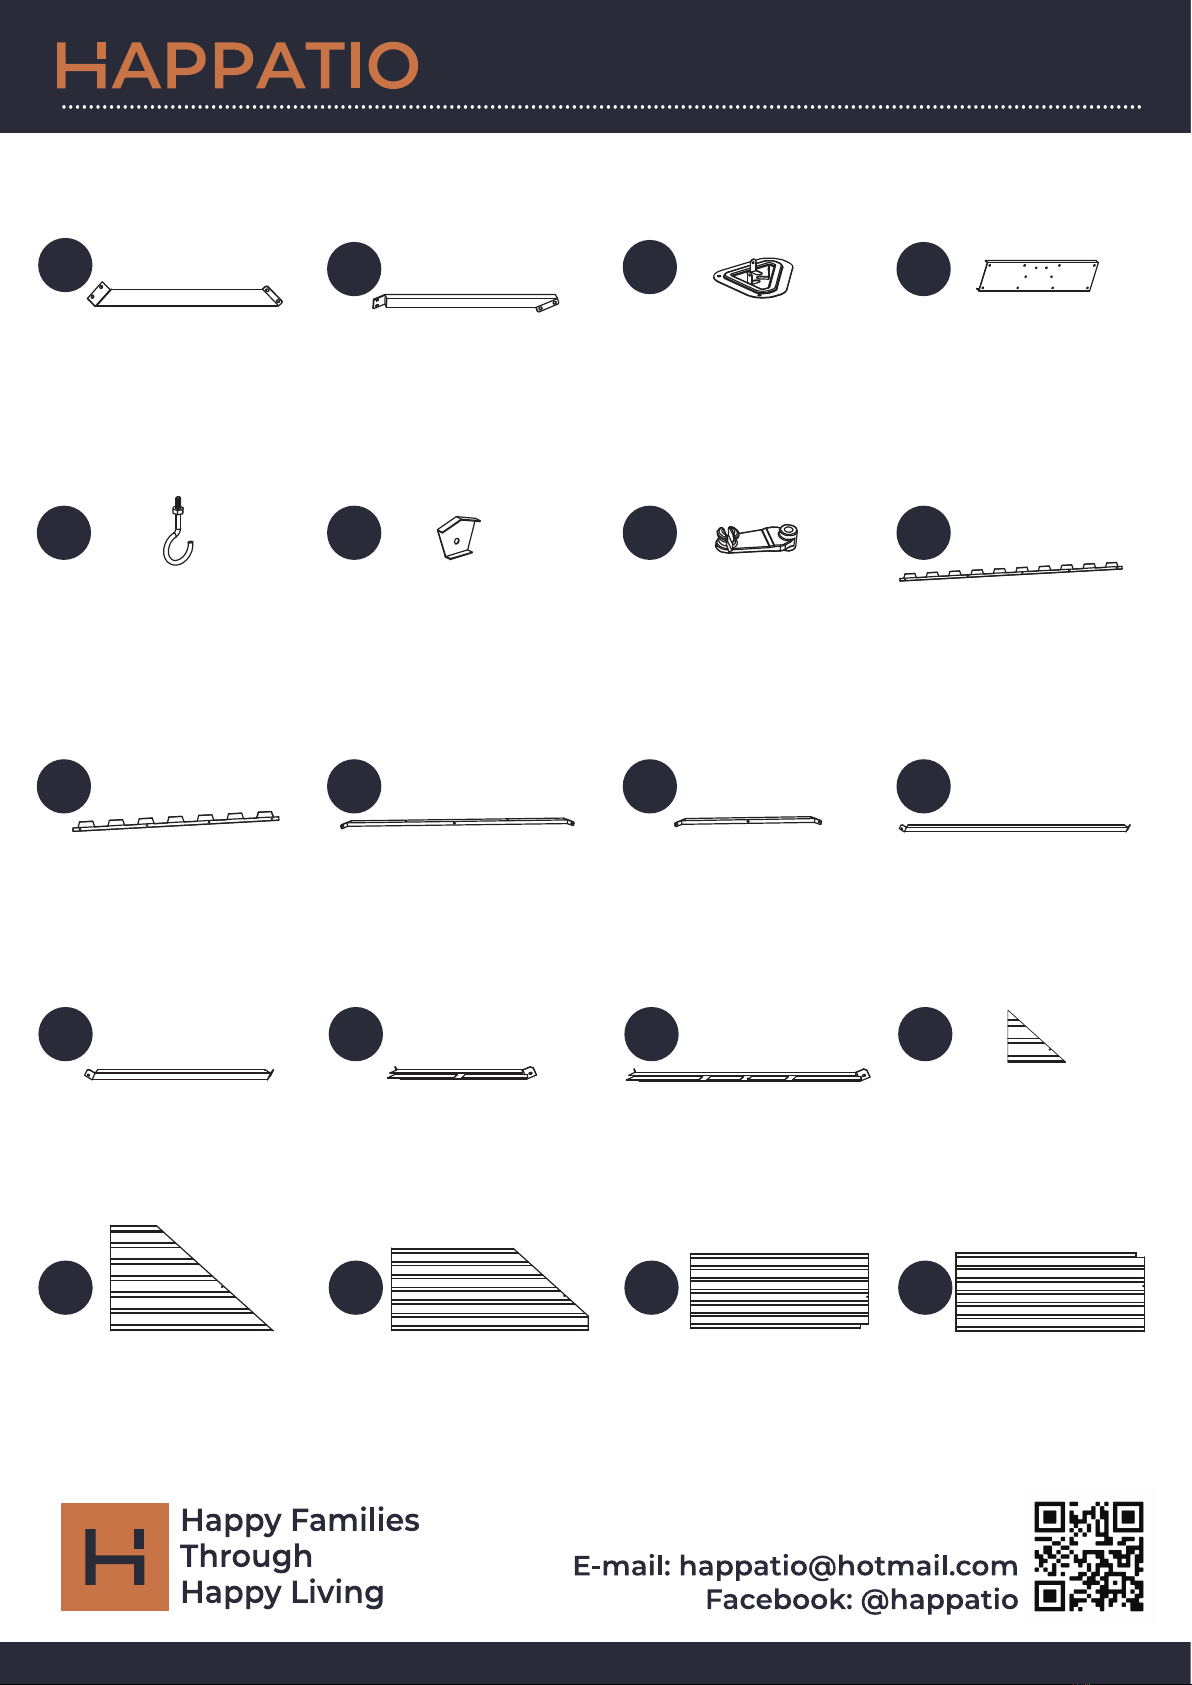
Compare the parts in the box with those on the parts list provided - make sure that none
are missing.
Some parts may have sharp edges. Please wear protective gloves when assembling or
installing this product.
Choose and measure the location where you intend to place your gazebo - make sure
your location is large enough. Choose a large assembly area where you can lay out and
pre-assemble all parts for the gazebo.
Keep all children and pets away from your assembly area. Children and pets should be
supervised when they are in your gazebo assembly area.
Check all bolts for tightness before use,
and periodically check and tighten bolts as necessary.
...............................................................................................................................................................
This item is heavy. Please handle with care. Four or more people are required for this assembly.
You will need these additional tools: a ladder and an adjustable wrench.
Once a unit has been pre-assembled in each step, please set it aside until further instructions.
It is important that during the assembly process, the assembly must be completed on a solid
plane in strict accordance with the requirements of the instructions.
In severe weather such as rain and snow, you do not need to remove the gazebo.However,
in order to prevent damage to the frame and iron roof due to heavy snow and heavy rain loads,
please clear the snow and water on the roof in time.
We care about your experience. Please feel free to contact us if you have any issues or comments.
We will try to offer you ecient solutions ASAP.
...............................................................................................................................................................
Pictures of the damaged parts.
The order number of your product.
Please gather all of this information BEFORE you contact us.
Do not use this item in a way inconsistent with the manufacturer's instructions as this could
void the product warranty.
...............................................................................................................................................................
!
√
Safety Precautions

...............................................................................................................................................................
...............................................................................................................................................................
..........................
..........................
..........................
D1
2PCS
C1 E
2PCS
D
2PCS
...............................................................................................................................................................
..........................
..........................
..........................
F1E1 F2
4PCS
F
..........................
..........................
..........................
A
4PCS
B1
B C
2PCS 2PCS 2PCS
2PCS
4PCS4PCS2PCS
...............................................................................................................................................................
Table installation steps
111
...............................................................................................................................................................
..........................
..........................
..........................
H1
4PCS
G I
4PCS
H
4PCS
...............................................................................................................................................................
..........................
..........................
..........................
JI1 J1
1PC
I2
4PCS
1PC4PCS4PCS
Gazebo
...............................................................................................................................................................
...............................................................................................................................................................
..........................
..........................
..........................
Q
72PCS
M R1
4PCS
M1
8PCS
...............................................................................................................................................................
..........................
..........................
..........................
S2R2 U1
2PCS
S1
..........................
..........................
..........................
K
4PCS
L
K1 L1
4PCS 4PCS 4PCS
1PC
2PCS2PCS4PCS
...............................................................................................................................................................
Table installation steps
2
...............................................................................................................................................................
..........................
..........................
..........................
V2
2PCS
U2 N1
2PCS
V1
2PCS
...............................................................................................................................................................
..........................
..........................
..........................
N4N2 N5
2PCS
N3
2PCS
2PCS2PCS2PCS
Gazebo

...............................................................................................................................................................
...............................................................................................................................................................
..........................
..........................
..........................
O4
2PCS
O2 O5
2PCS
O3
2PCS
...............................................................................................................................................................
..........................
..........................
..........................
W2O6 W3
4PCS
W1
..........................
..........................
..........................
N6
2PCS
N8
N7 O1
2PCS 2PCS 2PCS
2PCS
1PC4PCS2PCS
...............................................................................................................................................................
Table installation steps
3
...............................................................................................................................................................
..........................
..........................
..........................
Y2
72PCS
W4 P
132PCS
Y1
1PC
..........................
P1
1PC
16PCS
Gazebo
...............................................................................................................................................................
...............................................................................................................................................................
..........................
..........................
..........................
T2X4 T3T1
..........................
..........................
..........................
X X2X1 X3
...............................................................................................................................................................
Table installation steps
4
2+1PCS
M6X25MM
16+2PCS 20+2PCS
M6X30MM
Note:
There are some additional accessories packed
in the A tube.Please take these accessories out,
count them, and make sure you have the correct
amount before continuing to the installation.
Gazebo
230+4PCS
M6X15MM
2PCS 1PC 12PCS48+2PCS
5X10MM
5
Gazebo
...............................................................................................................................................................
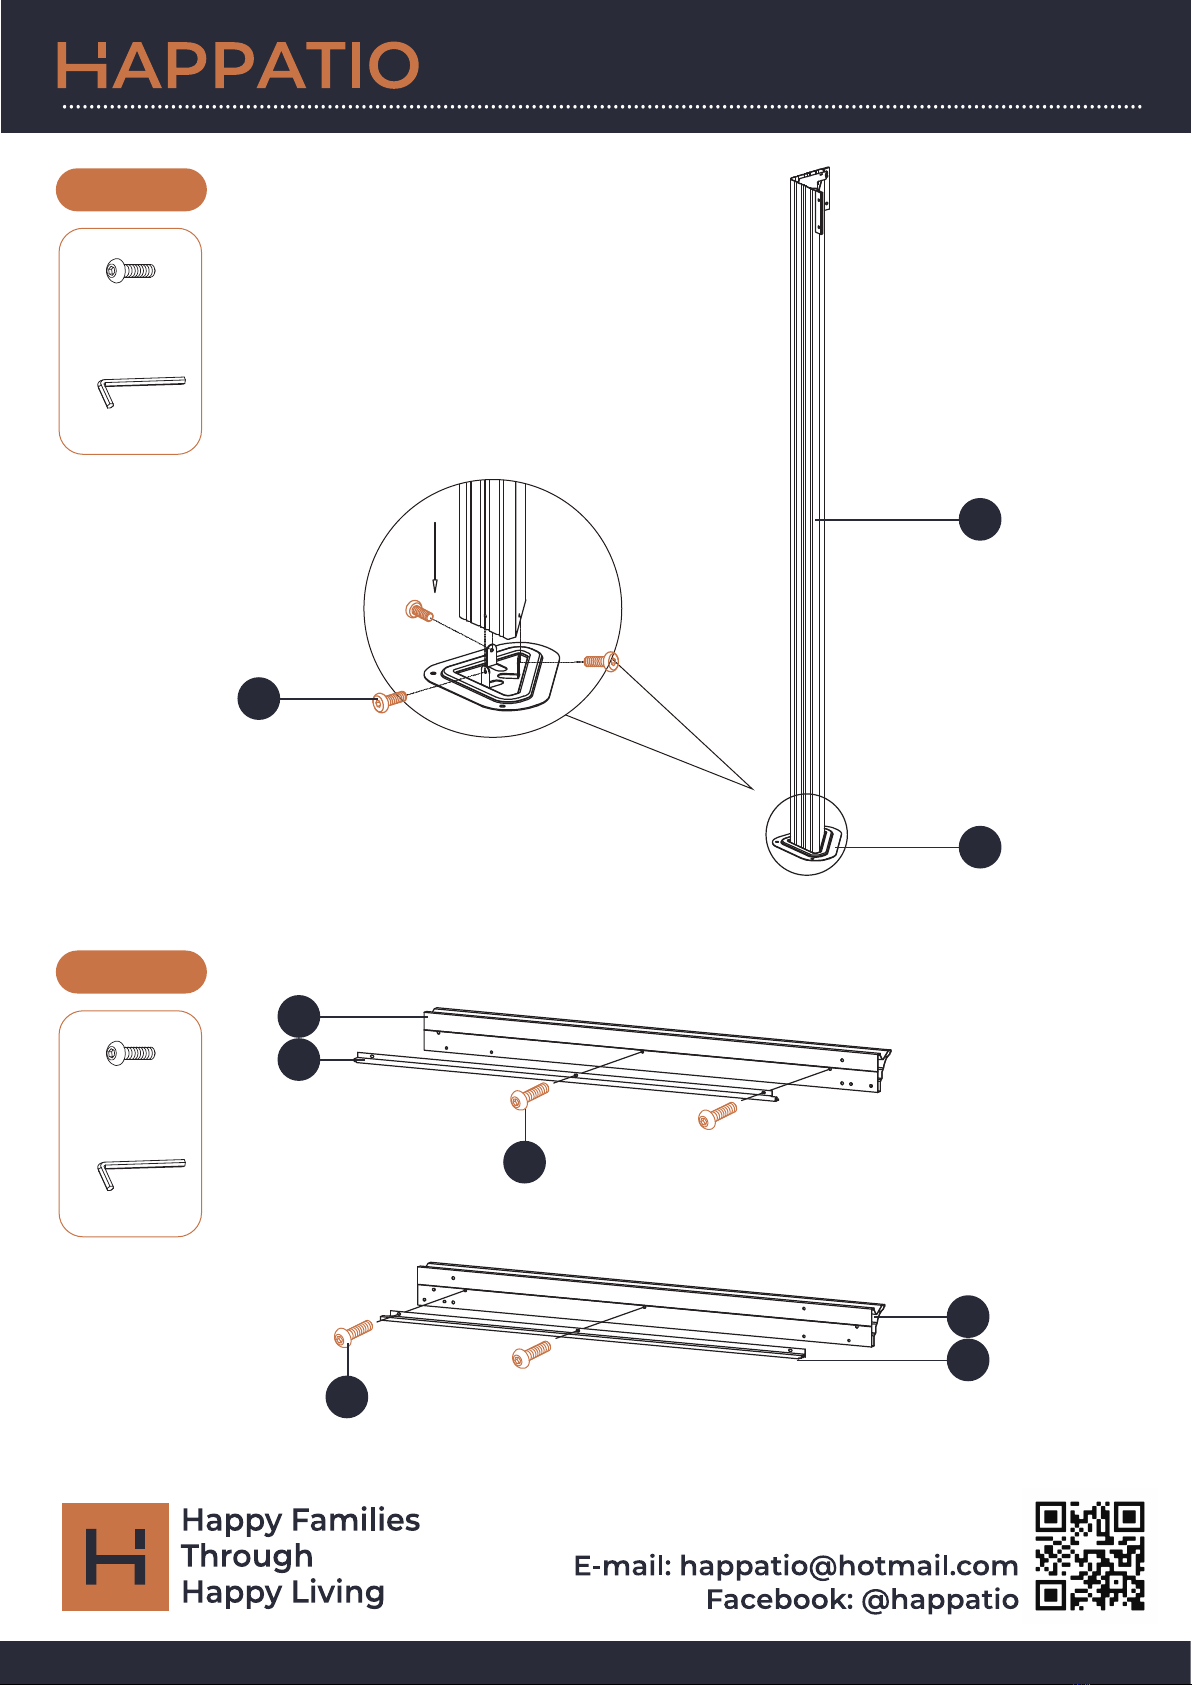
STEP 2
STEP 1
M6X15MM Bolt
12PCS
X
1PC
T1
A
L
X
B
B1
C1
C
X
M6X15MM Bolt
8PCS
X
1PC
T1
X
6
Gazebo
...............................................................................................................................................................
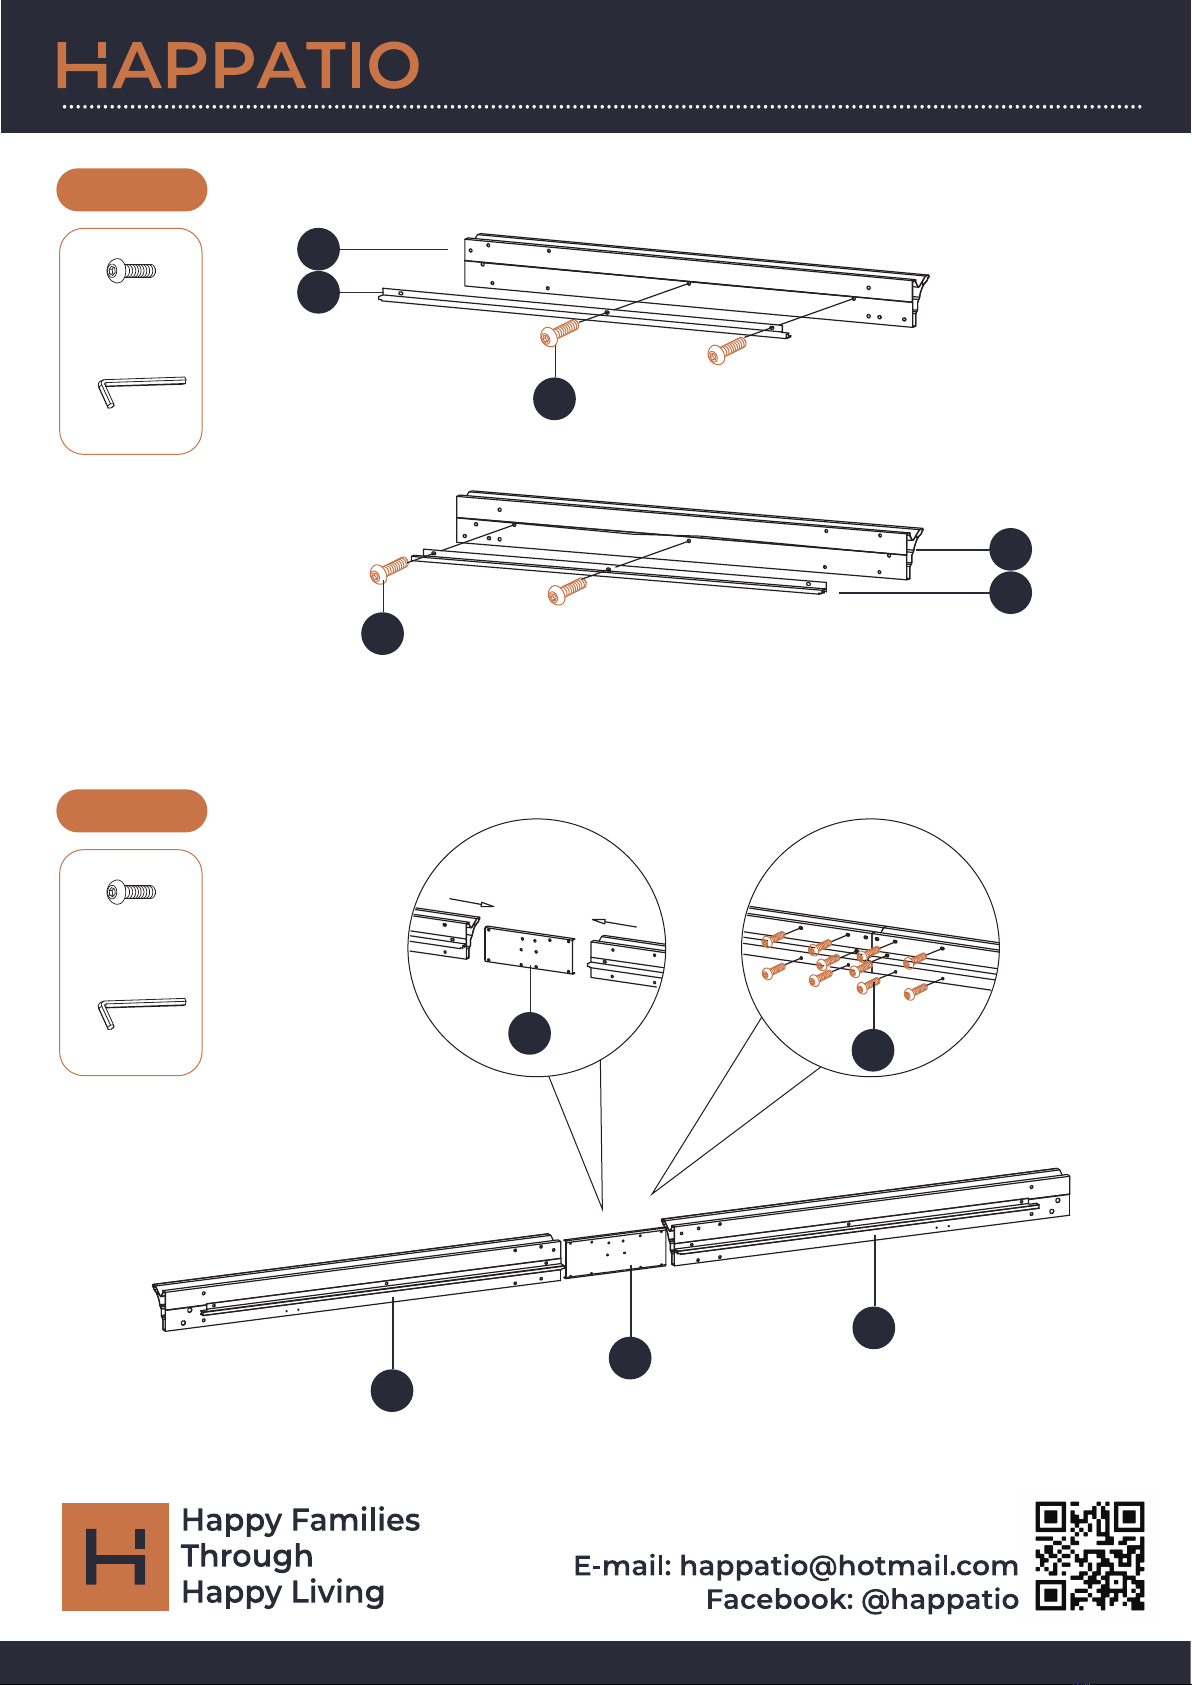
STEP 4
STEP 3
M6X15MM Bolt
8PCS
X
1PC
T1
M6X15MM Bolt
20PCS
X
1PC
T1
D
D1
E1
E
X
X
E
L1
L1 X
D

7
Gazebo
A
X2
A
C
B
D
E
...............................................................................................................................................................
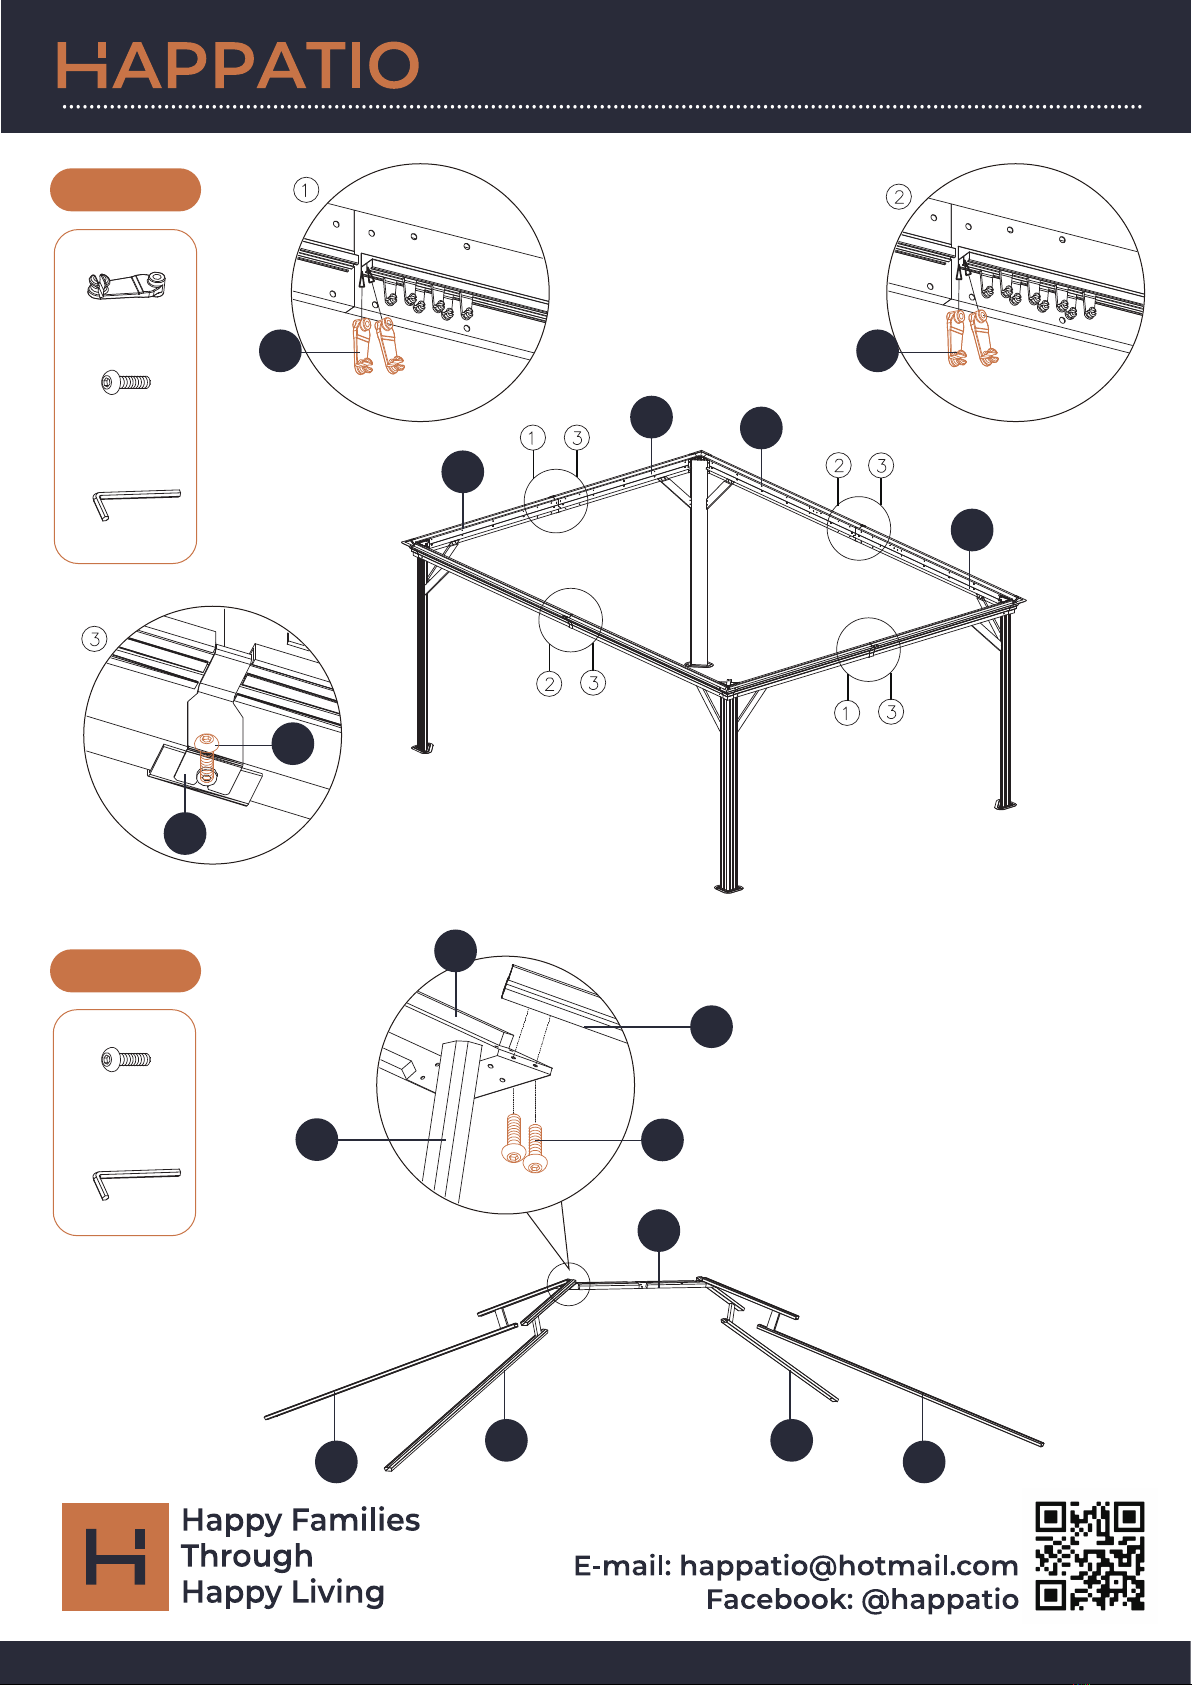
STEP 6
STEP 5
16PCS
X2
X
M6X15MM Bolt
16PCS
1PC
T1
M6X15MM Bolt
20PCS
X
1PC
T1
X
C
L1
B
C
B
L1
X

8
Gazebo
X4
...............................................................................................................................................................
STEP 8
STEP 7
5X10MM Bolt
32PCS
X4
1PC
T2
I1
5X10MM Bolt
16PCS
X4
1PC
T2
X4
I
X4
K1K
A
9
Gazebo
72PCS
Q
X
M6X15MM Bolt
4PCS
1PC
T1
1PC
...............................................................................................................................................................
STEP 10
STEP 9
M6X15MM Bolt
8PCS
X
T1
FF FF
Q
X4 X5
X
Q
D
I2
C
B
E
J
J
X
F
F

10
Gazebo
M6X15MM Bolt
4PCS
X
1PC
T1
M6X15MM Bolt
12PCS
X
1PC
T1
...............................................................................................................................................................
STEP 12
STEP 11
F
G
G
G
G
J
F
F
X
F
F
G
G
X
X
11
Gazebo
M6X15MM Bolt
8PCS
X
1PC
T1
M6X15MM Bolt
16PCS
X
1PC
T1
...............................................................................................................................................................
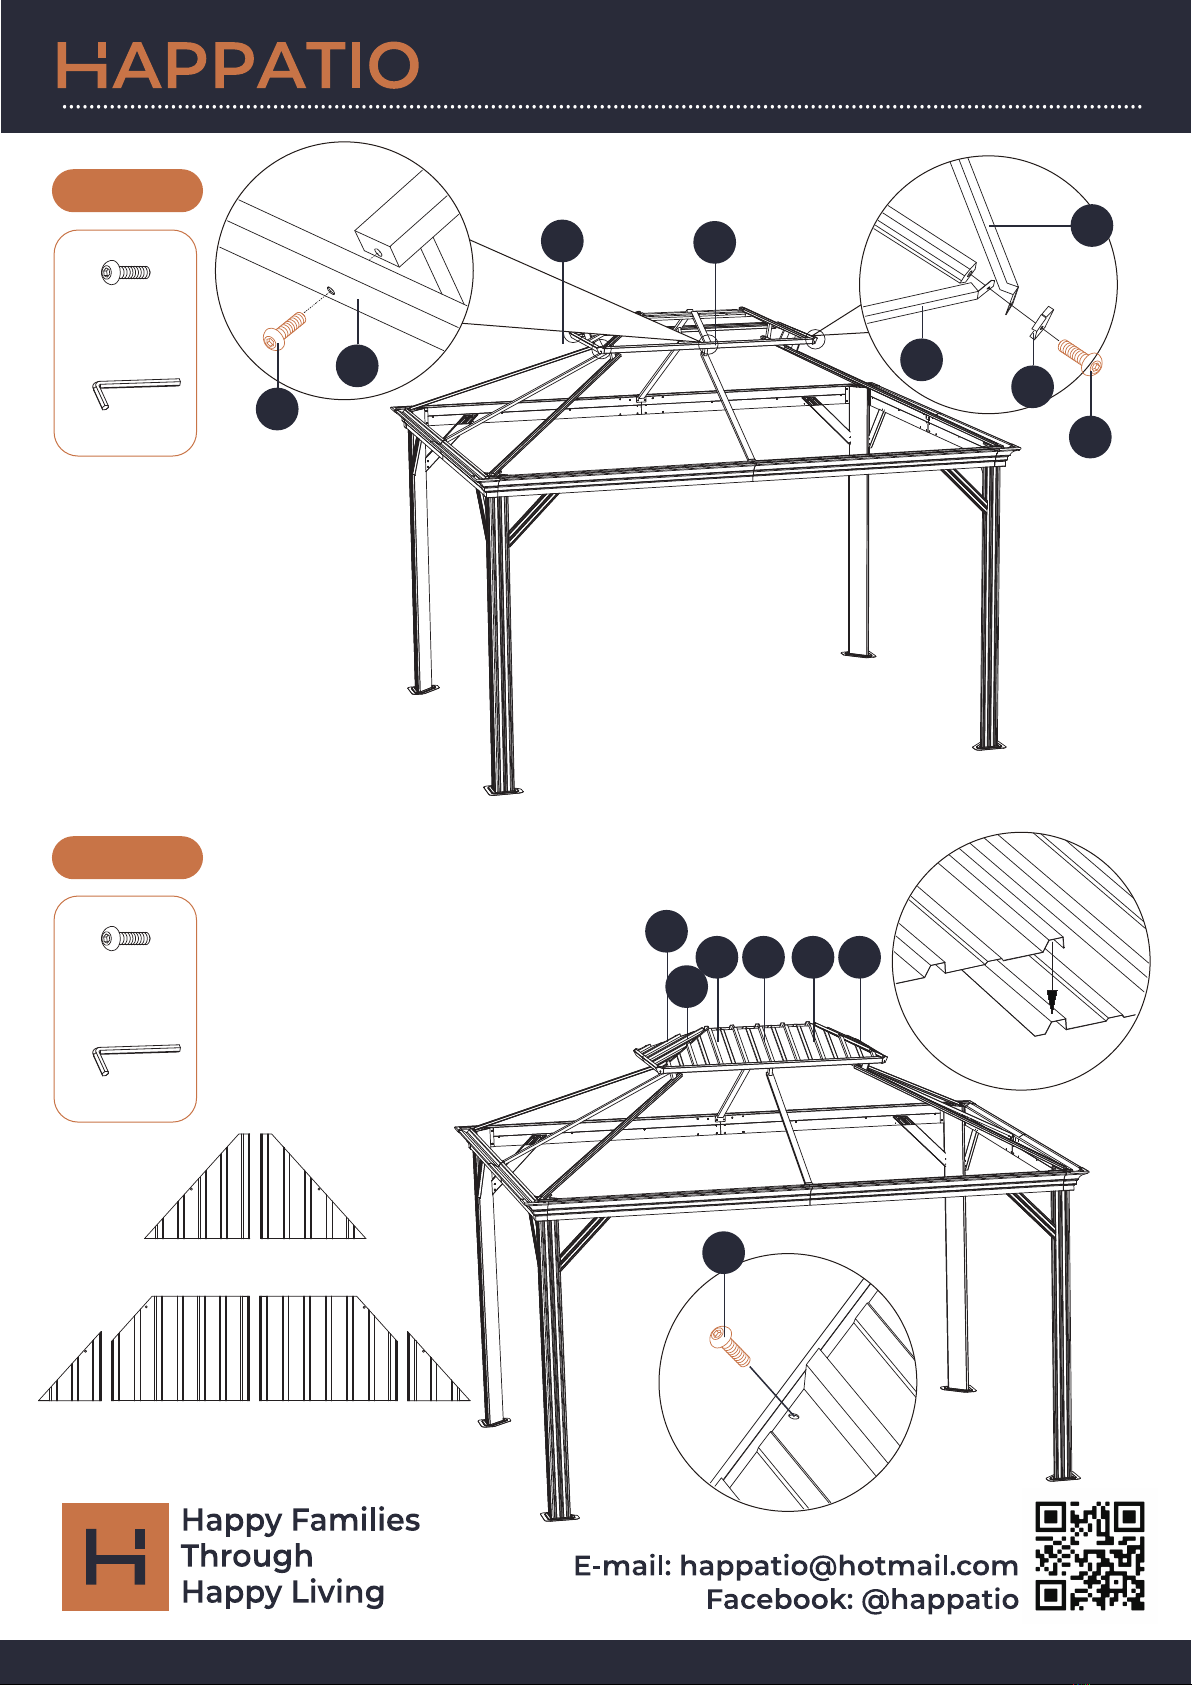
STEP 14
STEP 13
U1
M1
X
U1
W1
Y2
Y1
Y1 Y2
W1 W2 W3 W4
W2 W3W4
X
U2
X
U1
U2
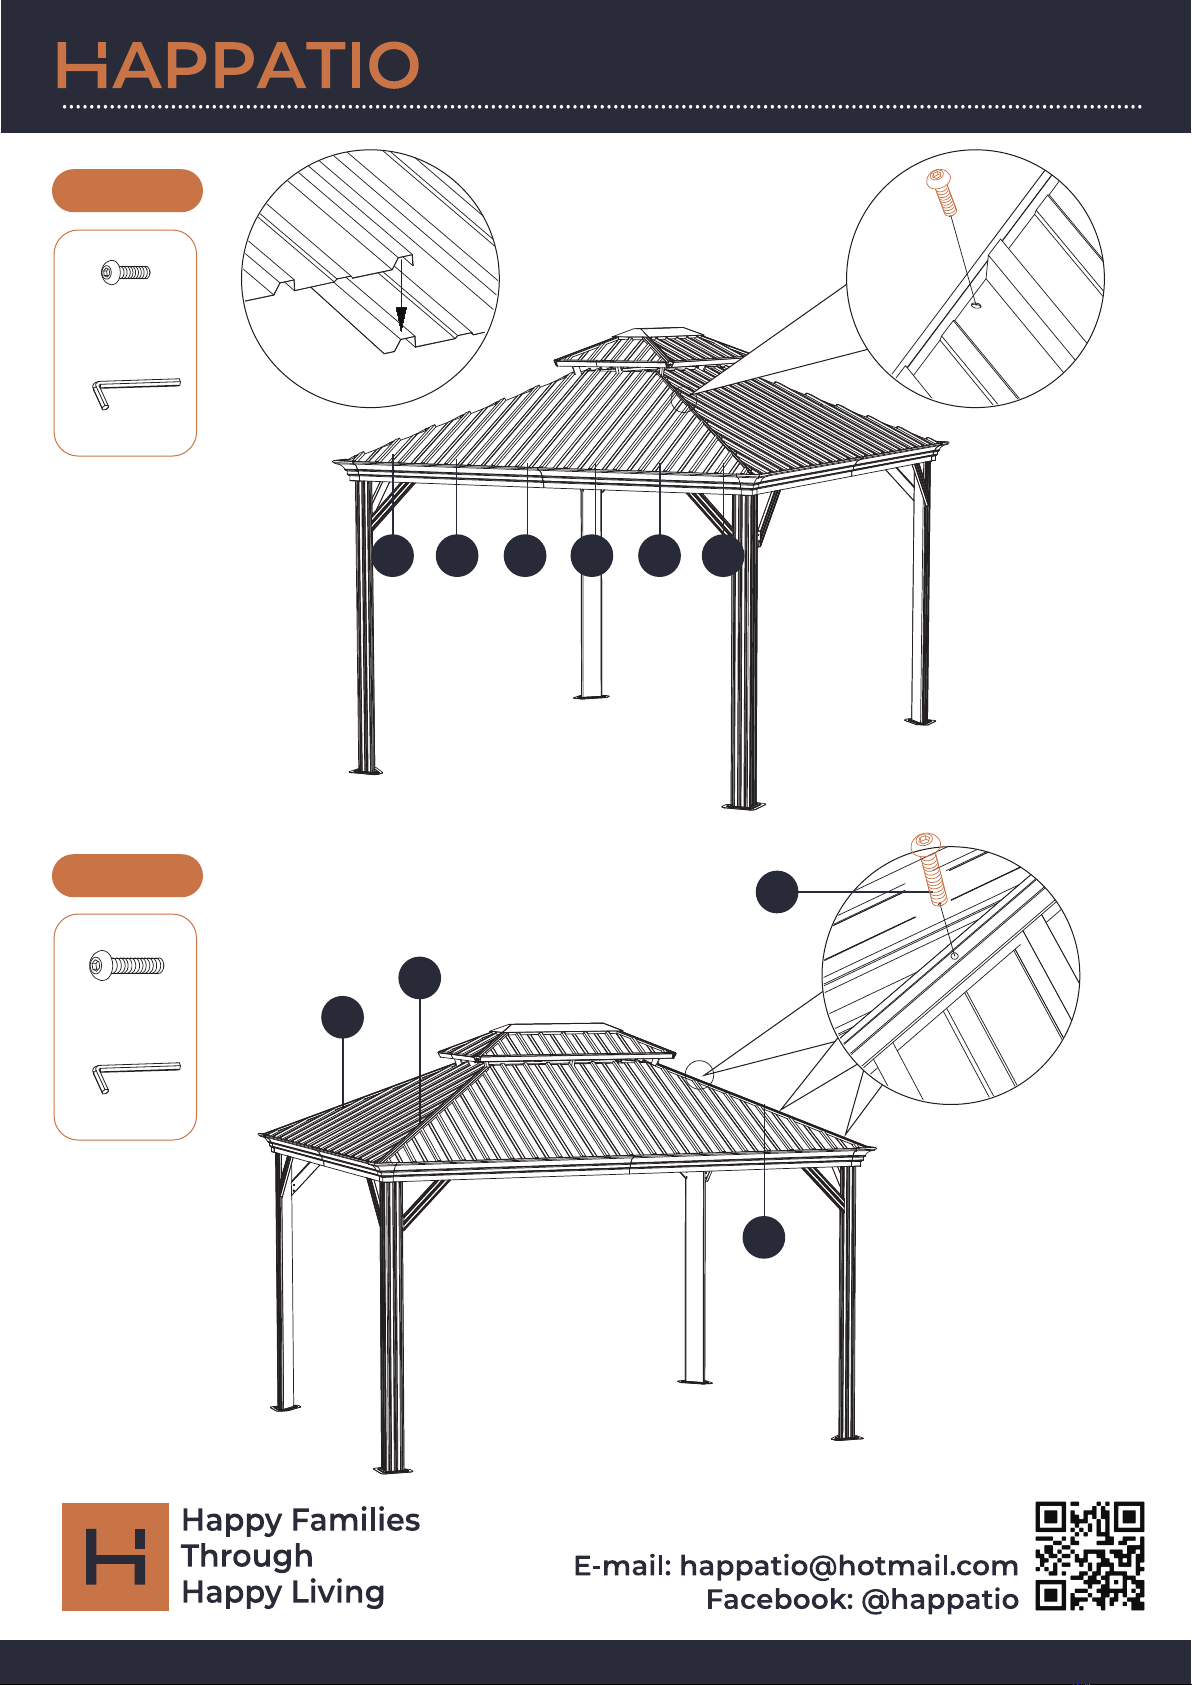
Note:
①The iron sheet contains sharp parts, please
wear gloves when installing.
②Prepare a relatively high ladder
and power tools, which will make your
installation easier and faster.
③Each iron plate has 2 holes. The holes near
the top need to be fixed on the frame
with screws, and the holes near the
bottom do not require any operation.

12
Gazebo
M6X30MM Bolt
8PCS
X3
1PC
T1
M6X25MM Bolt
2PCS
X1
1PC
T1
...............................................................................................................................................................
STEP 16
STEP 15 F2 F2
F2
J1
X1
M
J1
J
F2
X3
X1
13
Gazebo
M6X15MM Bolt
8PCS
X
1PC
T1
M6X15MM Bolt
16PCS
X
1PC
T1
...............................................................................................................................................................
STEP 18
STEP 17
S1S2
H1
HH1 H
X
X
X
X
14
Gazebo
M6X15MM Bolt
16PCS
X
1PC
T1
...............................................................................................................................................................
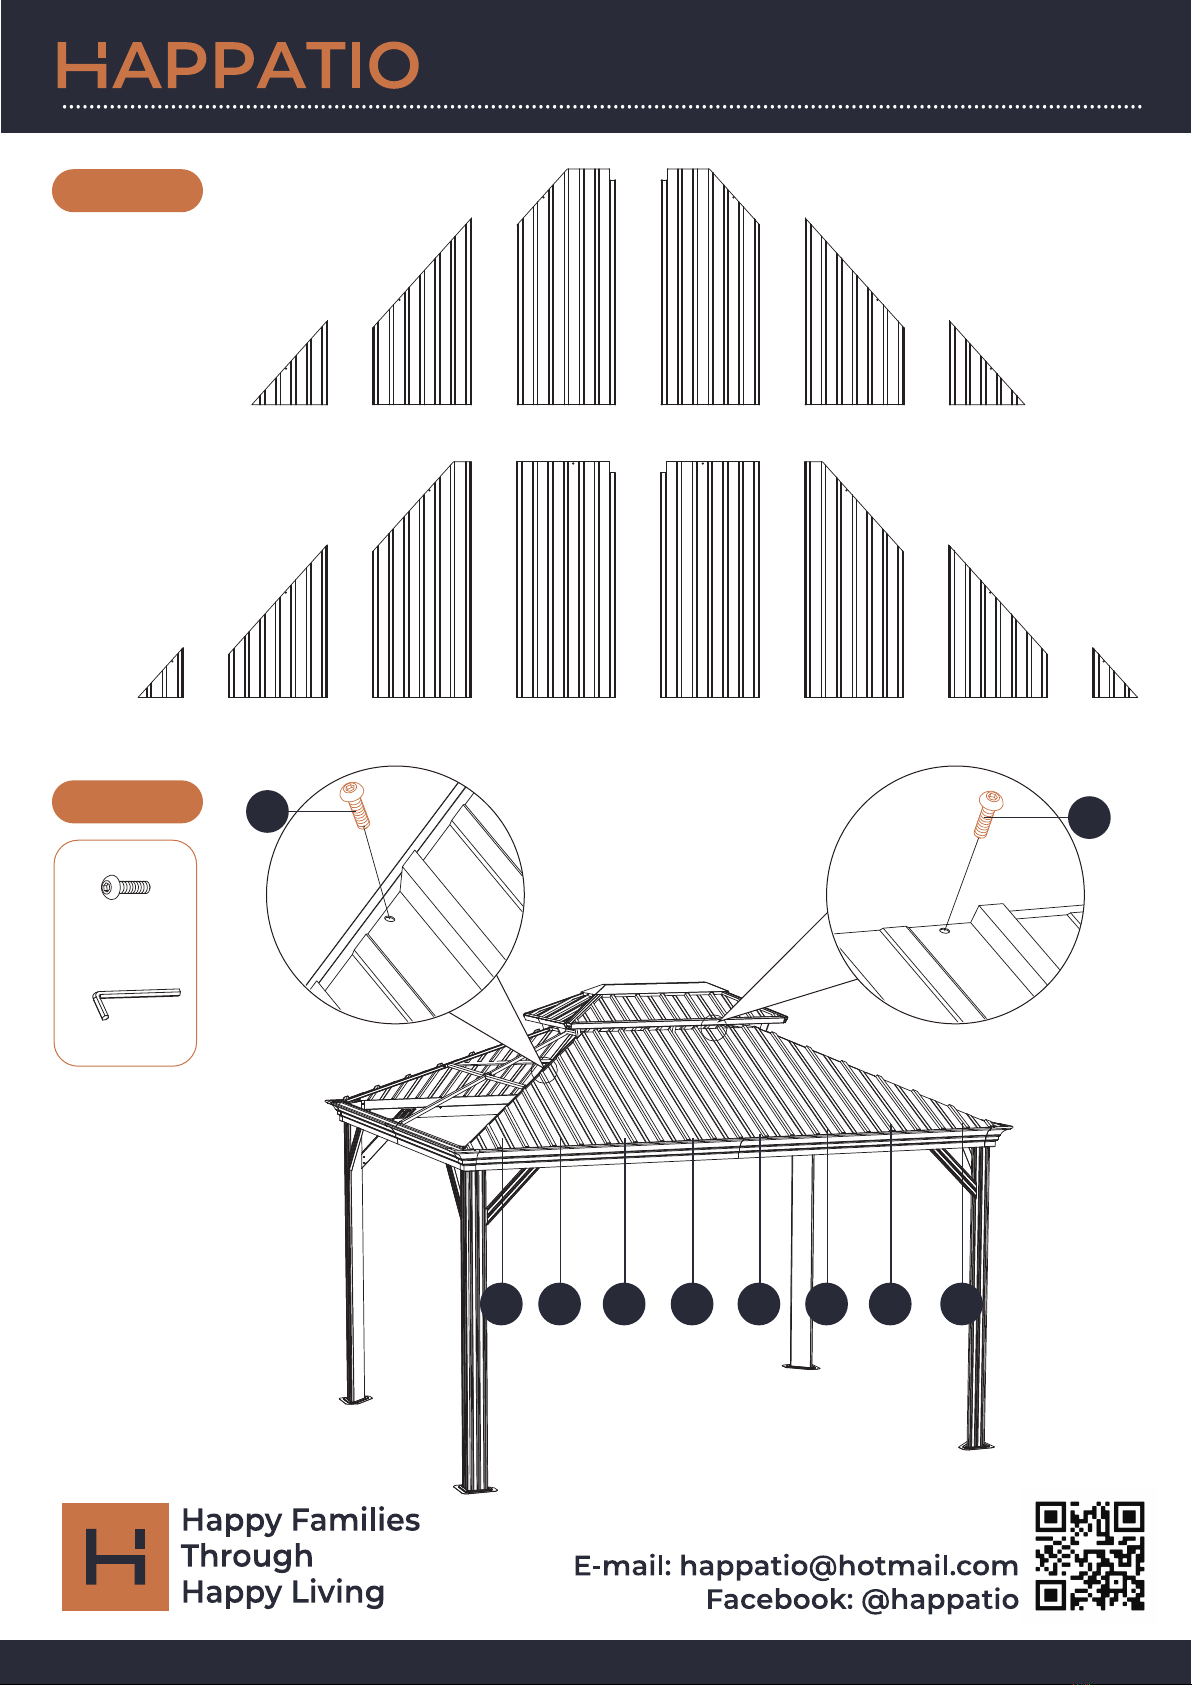
STEP 20
STEP 19
030201 04 05 06
N4N3N2N1 N5 N6 N7 N8
XX
N6 N7 N8N1 N2 N3 N4 N5
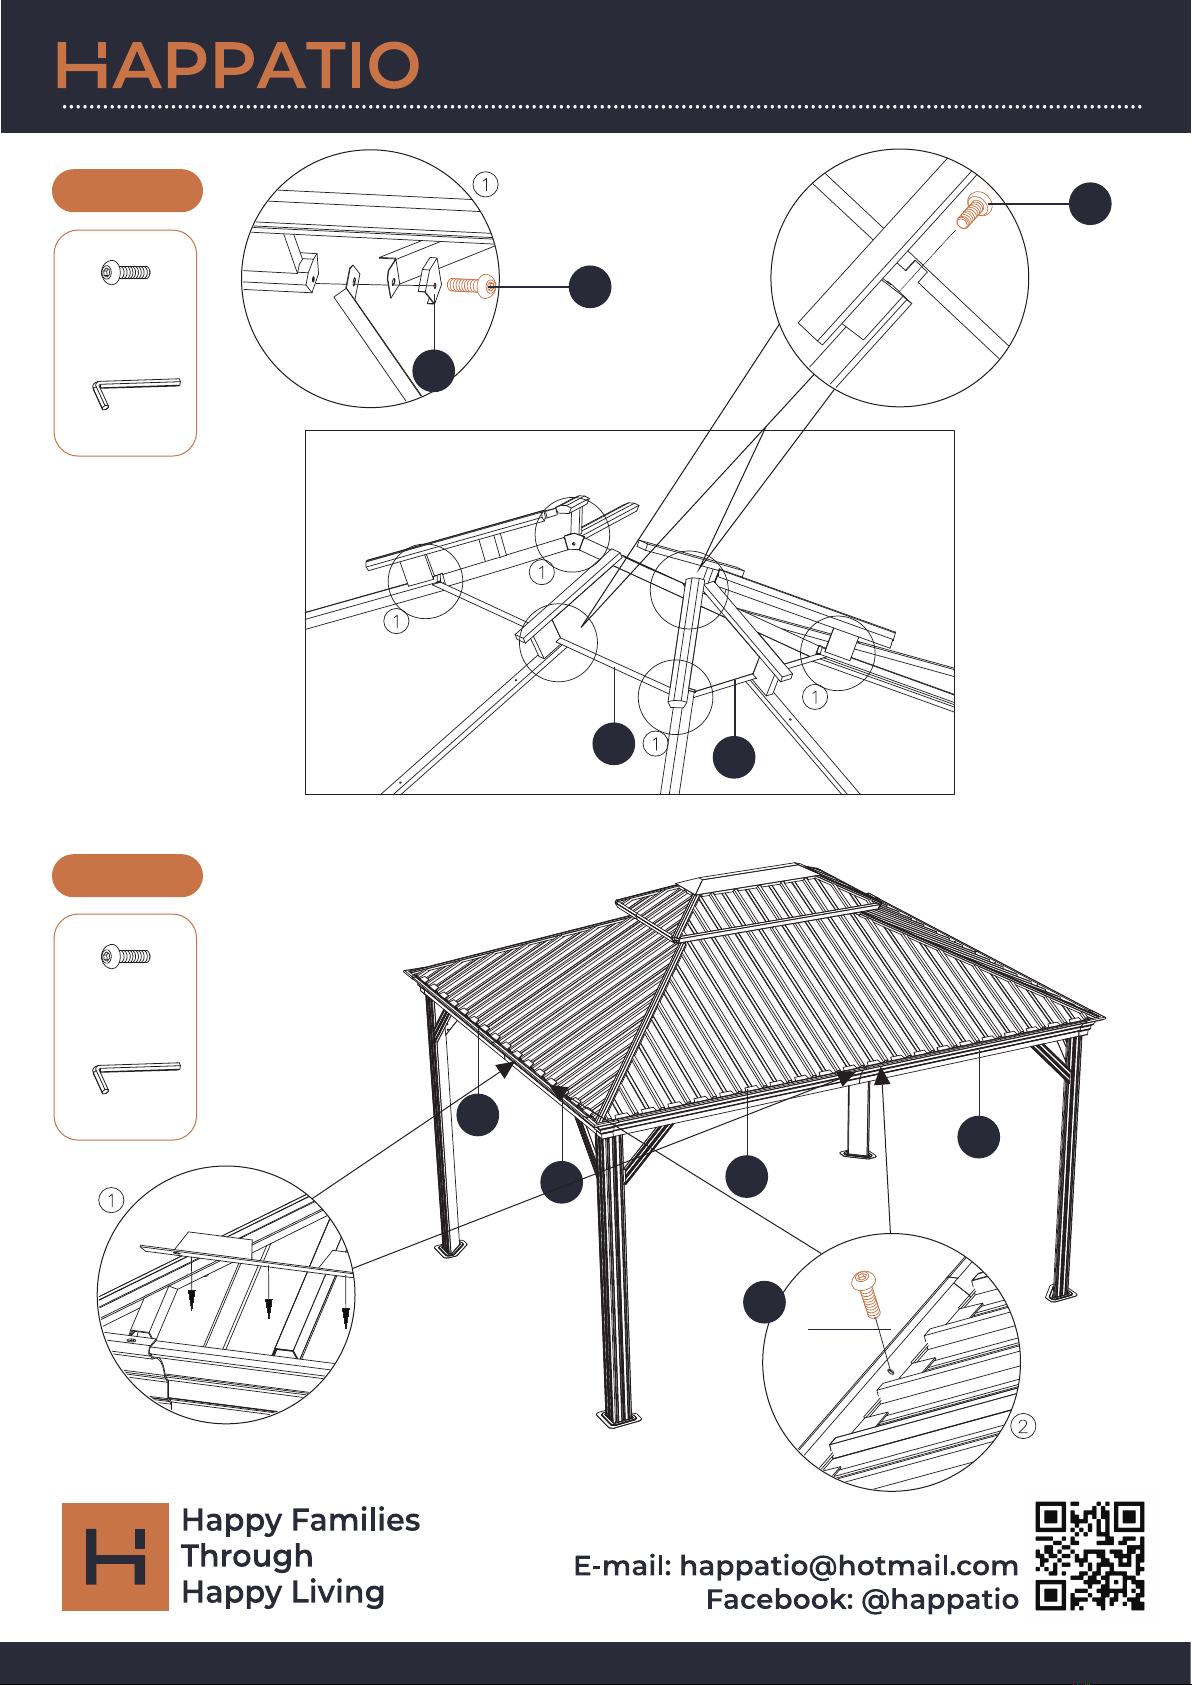
Note:
①Each iron plate has 2 holes.
The holes near the top need to be
fixed on the frame with screws,
and the holes near the
bottom do not require
any operation.
Note:
①The iron sheet contains
sharp parts, please wear
gloves when installing.
②Prepare a relatively high
ladder and power tools,
which will make your
installation easier and faster.
15
Gazebo
M6X15MM Bolt
12PCS
X
1PC
T1
M6X30MM Bolt
12PCS
X3
1PC
T1
...............................................................................................................................................................
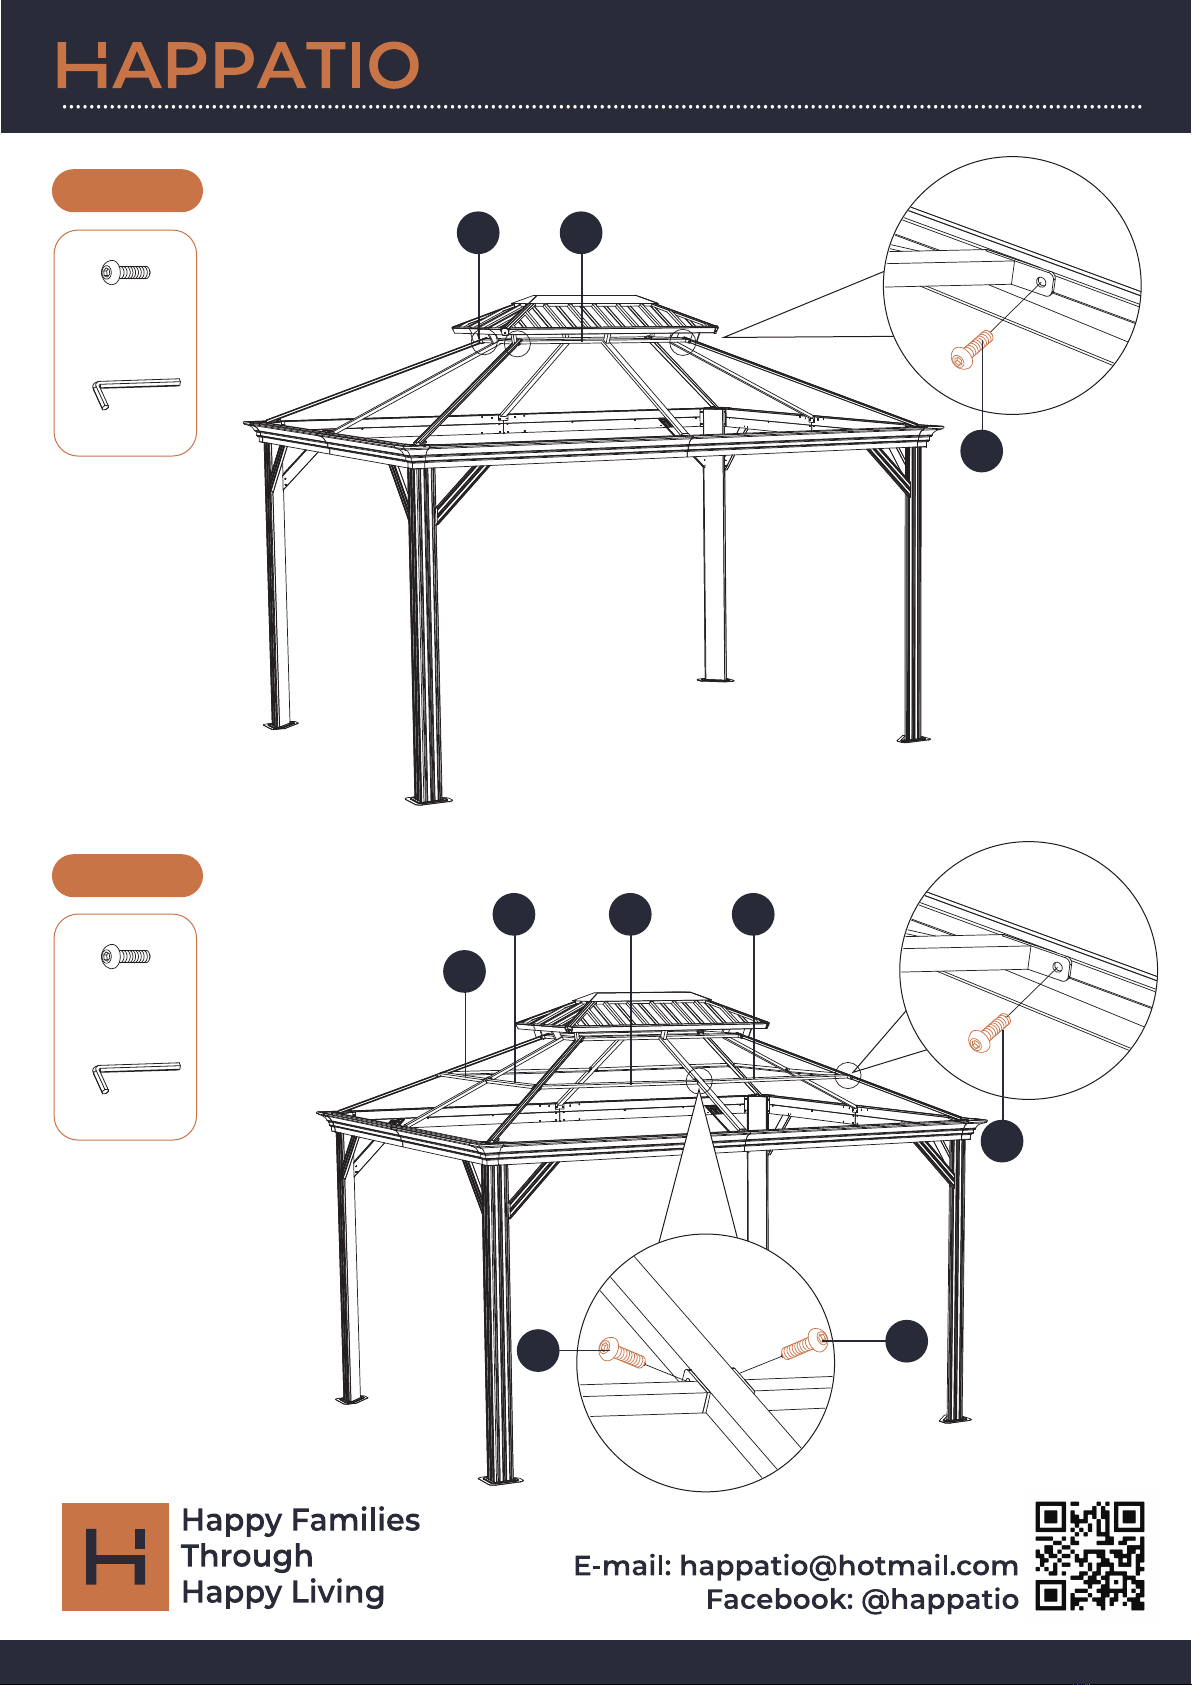
STEP 22
STEP 21
O5 O6O1
F1
F1
F1
O2 O3 O4
X3
Note:
The hole on the F1 near the
small roof can be installed
from the inside of
the hardtop gazebo.
16
Gazebo
M6X15MM Bolt
6PCS
X
1PC
T1
M6X15MM Bolt
36PCS
X
1PC
T1
...............................................................................................................................................................
STEP 24
STEP 23
R1
R1
R2
R2
V2
V1
M1
X
X
X
Note:
V1 and V2 are installed
from the inside,
installed on the top of
the big roof,
used to fix the iron sheet.

COMPLETE
17
Gazebo
12PCS
T3
P P1
P1P1
P1
P P
P1
Q
X
Note:
Install P and P1 to Q.
Other HAPPATIO Outdoor Furnishing manuals


Popular Outdoor Furnishing manuals by other brands

Harbor Freight Tools
Harbor Freight Tools 41293 Assembly and operating instructions

Garden Oasis
Garden Oasis D71 M12206 owner's manual

Waltons
Waltons 01GRO1208DD-V1 manual

BENITO
BENITO Urban Trajana Flex H410 Anchoring instructions

Shademaker
Shademaker Athens Base Assembly guide

Kettler
Kettler DIAMOND 0103919-0010 Assembly & operating instructions

Oxford Garden
Oxford Garden CLASSIC ROCKER Assembly instructions

Outdoor GreatRoom Company
Outdoor GreatRoom Company Sonoma Assembly & instruction manual

Gumax
Gumax RAL-7016 Mounting instructions

Leigh Country
Leigh Country TX94094 instruction manual

hanit
hanit SOMERSET BSB12200 Assembly instructions

Anova
Anova F1030R Assembly instructions


