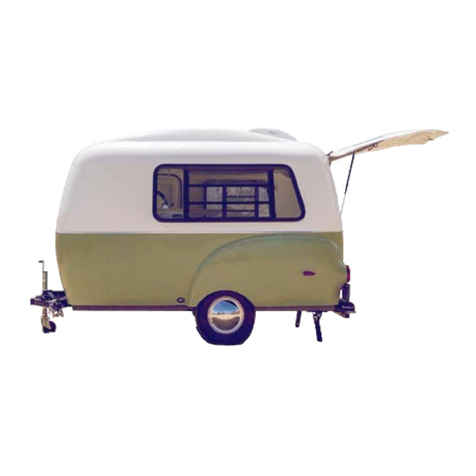
HAPPIER CAMPER HC1 User manual


THE BASICS

04 05
WELCOME TO THE HC1
THE HAPPIER CAMPER
Delivering modern adventure and ground-breaking flexibility in an ultra-light package,
the HC1 is the result of a lifetime of enthusiasm and years of careful design. Each
camper comes standard with a huge rear hatch, wide entry door, classic fenders,
modular floor grid, and large panoramic windows. The HC1 is completely handcrafted
and is built to last for generations.
AN INNOVATIVE MODULAR SYSTEM
Our highly flexible Adaptiv™modular interior system allows you to easily customize
your trailer on-the-fly, to suit a variety of needs. From camping, to hauling, to guest
quarters, create the layout you want in just minutes. Configuring and reconfiguring
is a snap, and the possibilities are near limitless.
QUALITY CONSTRUCTION
The HC1 is made with 100% fiberglass double hull handmade shells, honeycomb
fiberglass floor grid, custom hardware, and custom durable components. Fiberglass
exhibits less expansion and contraction due to heat or cold than alternative materials,
is chemically inert, flexible, and has a very high strength-to-weight ratio.
WHAT’S INCLUDED
The HC1 comes with these items
HC1 CAMPER
HC - TSHIRT
STABILIZER KEY
CAMPER KEYS
PLAYING CARDS
MANUAL
SPARE TIRE
REGISTRATION +
WARRANTY CARD

06 07
CAMPER SPECIFICATIONS
BACK
VIEW
FRONT
VIEW
LIFTED CAMPER
DRIVER VIEW
+ 3 INCHES
7'
54.5"
53.5"
6'11"
18"
STABILIZERS
GAS LIFT
OFF-ROAD TIRES
SPARE TIRE 14"
WITH A/C
13'
10'
8'4"
STANDARD CAMPER
PASSENGER VIEW
RIGID FRAME W/ TORSION AXLE & GWR OF 3500 LBS.
RETRACTABLE
WHEEL JACK
7'8"
6'1" 62"
30.5"
STANDARD CAMPER
DRIVER VIEW
ROOFTOP FAN OR A/C
TRAILER TIRES
SPARE TIRE
CITY
WATER
GREY
WATER
VENTSHORE
POWER
SOLAR
13"

08 09
CAMPER FLOOR PLAN
The modular floor of the HC1 is made of 1.5" thick honeycomb fiberglass. Grooves are
embedded in the floor to hold the AdaptivTM cube components in place — just like Lego®.
The surrounding benches are permanent, providing a 42 sq ft walkable space and a
total of 72 sq ft of space.
ADAPTIVTM SYSTEM
THE ADAPTIVTM INTERIOR
Create your own layout at any moment using our unique floor grid. The simply
managed Adaptiv system is fully modular and can be changed instantly to suit your
needs. Modular components are made from light-weight durable materials and can
be easily rearranged, stacked, leaned, and used outdoors.
LOCKING DOWN THE ADAPTIVTM SYSTEM
Optional locking hardware is available as a factory install in order to more permanently
attach the cubes to each other. This is particularly useful when securing the sink module
to the other cubes. For additional information please contact us.
LEG MOUNT
D-RING CITY WATER
& DRAINAGE
AC PORT
USB / DC PORTDC PORTS STORAGE
DC PORT
AC PORT
CONVERTER
THUMBSCREWS

10 11
INTERIOR ADD-ONS
TO PREP KITCHEN FOR USE
Set Adaptiv Kitchenette at front driver side interior
Use quick-connect function to attach fixtures to
hoses. The drainage and city water fixtures are
located inside the driver-side bench. The city
water silver hose connects to the brass fitting and
the plastic hose connects to the plastic drainage
port (see pg 15).
Remove the drainage cap on the exterior of the
camper on the driver’s side to allow gray water to
drain from the sink basin when the sink is in use.
To power water pump plug male to male charger
from kitchenette to DC power port in camper.
To cook al fresco, disconnect the fixtures and
move the kitchenette outside. The DC ports near
the rear power the kitchenette water to function.
ADAPTIVTM KITCHENETTE
The kitchenette package includes water fixtures, stove top, and storage. It comes
equipped with an electric water pump, a glass fold up sink, two extension fold up
counter tops (one on either side), a five gallon water tank, “city water” hook ups, and
utensil holder. The water tank functions via DC power. City water provides continuous
pressurized water and requires a hook up site.
FILLING THE WATER TANK
The water tank can be filled in two ways: 1. Connect an external hose to fresh water
inlet located on the back of the kitchenette (see pg 15). 2. Connect external hose to
the hose connector located on the water tank located inside the kitchenette cube.
Open valve. Allow water to flow to the desired amount and then close valve.
Monitor the water level to avoid overfilling.
STANDARD KITCHENETTE
SWITCH /
LED
HOSE
CONNECTOR
SHUT OFF VALVE
TOP VIEW SIDE VIEW
SHUT-OFF
VALVE
MAX FILL LINE
HOSE
CONNECTOR

12 13
SINK INSTRUCTIONS
Ensure the power cord is connected to the DC power ports. Flip the power switch
located on the front of the kitchenette, to the “on” position. The LED indicator will light
up. The water pump will start making a humming sound, which means it’s running.
Lift up the glass protection lid on your sink and lift the faucet head to the upright
position. Your sink is now ready to use. Let the water run for a few minutes to ensure
all the air is out of the lines.
Your camper only runs cold water, as the kitchenette does not come equipped with a
hot water heater. The blue marking on the faucet represents the water tank usage and
the red marking represents the city water usage.
FILL THE WATER TANK WITH WATER FIRST BEFORE TURNING ON
DO NOT RUN THE WATER PUMP WITHOUT WATER
EMPTYING THE WATER TANK
Ensure the fixtures and hoses are connected. Remove the drainage cap on the exterior
of the camper on the driver’s side. Turn the faucet knob to the blue marking, which will
switch the faucet to waker tank usage, allowing the water to empty the tank via the
sink basin and exit out the exterior driver side port when in use.
When using your kitchenette outdoors, leave the drainage hose extended from the
back, and allow the water to drain to the ground or desired container during use.
12V DC POWER PORT
FRESH WATER INLET
GREY WATER
DRAINAGE HOSE
W/ QUICK CONNECT
KITCHENETTE BACK VIEW
CITY WATER HOSE

14 15
ADAPTIVTM NESTING TABLE TOP
This package comes with a table leg, a table
top, and hardware. Ensure the tab at the
bottom of the table leg is twisted all the way
up before inserting into the silver leg mount.
Once inserted into the groove of the silver leg
mount, twist clockwise to tighten the table leg
into place.
Once tightened, take the table top and align
the table mount (located under the table top)
with the table leg. Gently, push the table onto
the table leg to allow the table to click into
place. Reverse these steps to disassemble.
There are up to 6 possible leg mount positions
(see pg 10).
The table top can also serve as a
connecting point between Adaptiv
cubes. Simply set the cubes in the
desired position and slide the table top
between them. You can set a bed or a
sitting area with this method.
OPTIONAL INTERIOR ADD-ONS
Here are a few options you can customize your camper with
For all add-ons download the HC1 catalogue at happiercamper.com
TWIST & LOCK
INSERT TABLE
LEG INTO MOUNT
PUSH TABLE TOP
AND CLICK INTO
PLACE
TOP
VIEW
SIDE
VIEW
DELUXE KITCHENETTE
SINK + FRIDGE
TOILETCOUNTER TOP LID COOLER CUBE
BUNK BED / COUCH

16 17
POWER INFORMATION
The HC1 is equipped with 12-Volt DC (Direct Current) and shore power AC (Alternative
Current) systems. The primary source of power is 12-Volt. It powers all components
except the air conditioner and AC outlets. Shore power, or AC power, is electricity
your HC1 receives when plugged into a campground electrical hookup, rather than
from the trailer’s battery. It will provide power to operate the air conditioner and AC
ports for portable appliances such as coffee brewers, microwaves, blenders, etc.
OUTLET INFO
AC and DC ports are conveniently located throughout your HC1 (see pg 10).
POWER SYSTEM
The converter acts as a main breaker panel for AC power. It also converts AC power
to DC power acting as a battery charger as well as a battery supply. Even when
completely empty of charge all DC components will function when plugged in to shore
power. In addition the converter is a smart charger — it senses the capacity of the
battery and regulates the charging rate.
The converter is protected against voltage spikes or reverse polarity by its onboard
breakers and fuses. Breakers (AC power) are easily reset by toggling up and down
once. And fuses (DC power) are replaceable. Fuses can be purchased at any auto
parts store, and the breakers at any hardware store.
BATTERY
The HC1 is equipped with an AGM battery. It handles discharging and charging efficiently.
THE CONVERTER PANEL
FLOOR DRAINAGE IS DIRECTLY BELOW — KEEP WATER AWAY FROM UNIT
USB & DC PORT MAIN AC PORTS
AIR CONDITIONER
(OPTIONAL)
DRIVER /
LEFT SIDE
LIGHTS
PASSENGER /
SIDE DOOR LIGHTS
FAN
FUSES
BREAKERS

18 19
KEEP COOL
FAN
Turn on using the power button located on the fan unit.
Use the speed control buttons to increase and decrease air flow.
Use the “reverse” button to select air flow (exhaust or intake).
To open and close the vent, turn the black knob on the ceiling unit
(pull to unlock prior to turning).The fan will still operate with the lid closed.
AIR CONDITIONER
The rooftop Air Conditioner has a high BTU and wattage rating. It will only
operate when plugged into shore power or while using a supported generator.
(Ensure generator can support the appliance’s power output).
*For detailed operating instructions please refer to the manufacturer’s manual.
HEATER
The optional add-on heater is compact and
lightweight. It runs off battery power and uses
propane gas to generate heat. The interior space
heats quickly and contains an insulation R value of 10.
*For detailed operating instructions please
refer to the manufacturer’s manual.
GET COZY
EXTERIOR ADD-ONS
Here are a few options you can customize your camper with
For all add-ons download the HC1 catalogue at happiercamper.com
SOLAR PANELROAD SHOWER
AWNING
FIBERGLASS
BAR
PRIVACY
SCREEN

HIT THE ROAD

22 23
VEHICLE REQUIREMENTS
WEIGHT IN
FRONT
HC1 BASE DRY = 1100 LBS
HC1 BASE = 1300 LBS
MAKE SURE YOU HAVE A VEHICLE
THAT CAN TOW AT LEAST 1500 LBS.
STEP 1
Ensure modular components are
securely in place and secure any loose
items in your camper to avoid damage.
STEP 2
Remove/pack-up any exterior
components prior to towing.
STEP 3
Check and tighten hardware.
STEP 4
Ensure your trailer is properly connected
to your vehicle prior to towing.
STEP 5
Ensure the connecting ball is securely
locked into the hitch tongue.
STEP 6
Ensure the wheel jack is stowed in the
up position prior to travel.
FLIGHT CHECK
STEP 7
Ensure the safety chains and e-brake
cable are securely attached.
STEP 8
Ensure the tab handle on the receiver
is in the down position and the pin is
inserted.
STEP 9
Check to make sure there are no
passengers inside the camper before
driving. Safety first.
STEP 10
Ensure your side door, rear hatch, roof
fan and windows are closed and locked
prior to towing.
STEP 11
Ensure the stabilizer jacks are locked in
the up position prior to towing.
STEP 12
Check that all running lights are working
properly before you drive.

24 25
TOWING INSTRUCTIONS
After camper is raised and ready to be towed, position the coupler over the ball.
Lift the tab handle of the hitch upward.
Lower the wheel-jack so the ball fits into coupler.
After the ball is seated, push the handle back down (this will engage a locking
tongue to hold ball in the coupler).
Lock by inserting pin through the tab handle. (Use a padlock instead of pin for
extra security).
1
2
3
4
5
CHAINS & EMERGENCY BRAKE CABLE
The e-brake mechanism is located just under
the tongue on the driver side.
Ensure the black plastic e-brake “key” is
plugged in before hauling your HC1.
To ensure your emergency brakes don’t engage
unnecessarily while in transit, make sure the
e-brake cable is threaded through the tongue
pin hole and that both the cable and the chains
are attached to the car hitch before towing.
Attach 7 pin connector to inlet port located
near the tow vehicle’s hitch.
1
2
3
4
ALWAYS DOUBLE CHECK THAT THE TAB HANDLE IS DOWN FOLD BACK TONGUE AND HITCH LOCK
BLACK
E-BRAKE
KEY
7 PIN CONNECTOR
PIN KEY
E-BRAKE
CABLE
TONGUE
PIN HOLE
CHAINS
ATTACH TO
CAR HITCH
15" STANDARD
HC1 SUSPENSION
< TO CAMPER
2" BALL
VEHICLE
TAB HANDLE
COUPLER

26 27
HOW TO CHANGE A FLAT
SECURING THE INSIDE
Ensure modular components are secured in place; use hardware when needed.
Do not open and close the hatch from the side as this may damage the gas lifts.
Exercise caution when opening hatch (items may have shifted around in transit).
Never block the exterior battery vent or interior converter.
Completely close all propane canisters when not in use.
Open your roof fan and / or windows for ventilation prior to cooking inside or
sleeping. Close roof fan and windows tightly before driving.
TRAILER TIRES
• Do not use tire care products containing
alcohol or petroleum distillates.
• Never tow your trailer if you notice any
cuts, bulges, snags or punctures on the tires.
• Your trailer tires are 5-lug.
TIRES / AIR PRESSURE
Air pressure is the most important factor in determining tire life, and under-inflation is
the number one cause of trailer tire failure. We recommend that you fill your trailer tires
to 35 PSI. Periodically inspect both tires for tread wear and damage from road hazards.
Loosen the lugs.
Drop the nose of the trailer by cranking the wheel jack all the way down.
Flip out and extend the rear jacks as far as they can go.
Crank the wheel jack all the way UP.
Remove all the lugs and the flat tire.
Replace with the spare tire located under the frame
on the front passenger side (undo the housing bolt first.)
Screw lugs into place tightly. Lower the jacks.
Tighten lugs one more time, now you’re ready to go!
TOW YOUR TRAILER TO A SAFE AREA WITH PLENTY OF SPACE
1
2
3
4
5
6
7
8
1
2
3
4
5
6
RECOMMENDED
TIRE PRESSURE
CHECK & TIGHTEN
LUGS IF NEEDED
35 PSI
MAX
50 PSI
MAX STANDARD SIZE
ST175 / 80 R13

28
ONCE AT THE SITE
SECURING THE CAMPER
To help reduce the chance of theft make sure to pull the pin key from the tongue mid-
point and place a heavy duty pad-lock. Store the pin inside your vehicle or place it in
the swing back tongue receiver with the tongue in the fold-in position. You can also
lock the tab handle with a padlock after unhitching your vehicle from the trailer.
Use the stabilizer key to manually lower stabilizers. The leveler on the tongue will
indicate the trailer’s stability (see below).
CENTER AIR
BUBBLE

KEEP YOUR CAMPER HAPPY

32 33
MAINTENANCE
MECHANICAL MAINTENANCE SHOULD ONLY BE PERFORMED BY A QUALIFIED
MECHANIC. IF YOU DO NOT HAVE THE EXPERIENCE OR THE TOOLS TO SAFELY
COMPLETE MAINTENANCE PROCEDURES, PLEASE CONTACT HAPPIER CAMPER.
WE ASSUME NO LIABILITY FOR INJURIES OR DAMAGES INCURRED AS A RESULT
OF IMPROPER, UNAUTHORIZED SERVICING.
CHECK THE FRAME
Occasional inspection of your frame is recommended. Look for these signs: welds,
rust, or scratches. If found, first remove any rust, dirt, or grease and coat with enamel
black touch up paint. It is important to note that during winter season salt may oxidize
the frame if not cleaned promptly.
BRAKE INSPECTION
The brake linings and magnets are subject to wear and require inspection every 6,000
miles or annually. Replacement is necessary if the linings are worn (to within 1/16” or
less), contaminated with grease or oil, or abnormally scored or gouged. It is important
to replace all linings (both wheels) at the same time to maintain even braking action
across the axle. Annually inspect the wires under the trailer and on the axle for broken
insulation or faulty connections. Repair or replace as necessary.
A CLEAN CAMPER
FIBERGLASS MAINTENANCE
Fiberglass should be maintained on a
regular basis. If the HC1 exposure to the
elements is minimal, the fiberglass can
be maintained about every 6 months.
If your HC1 is exposed to the elements
constantly, regular maintenance should
be done every 3 months. Without
regular care and maintenance,
fiberglass will begin to show signs of
oxidizing in 4 to 12 months.
Choose a wax suitable for fiberglass,
like ProtectAll™. This particular product
has the advantage of combining polish,
wax, and UV protectant. Be sure to
follow the application instructions to
get the best results.
UPHOLSTERY CARE
The trailer’s cushions are upholstered
with marine-grade, UV-resistant
Sunbrella™fabric. Simply unzip the
cushion covers and machine-wash
gentle inside out with cold water.
Lay flat to dry.
ADAPTIVTM CUBE CARE
All cubes can be cleaned with most
soaps and water. Greased Lightning
takes out tougher marks.
FLOOR PANEL CARE
To wash the floor panels, simply scrub
with soapy water and a nylon brush and
rinse off with a hose. Let them air dry
completely before stacking.

34
FINAL TIPS
CRITTER-PROOF YOUR CAMPSITE
To minimize the chance of encountering
bears, raccoons, and other critters at
your campsite, pack food in odor proof
bags or containers, use air tight bags
for trash / leftovers, wash cookware and
utensils immediately after use, and keep
your food / garbage in a bear-proof box
or properly hang it out of reach and
away from your sleeping area.
PUTTING OUT THE CAMPFIRE
Before bed and before leaving your
site remember to properly extinguish
your campfire. Fully extinguish your
camp fire by dumping water onto it or
smothering it with dirt / sand. Scrape
at the charred remains with a stick or
shovel to ensure that no embers are still
burning and check that the remains are
no longer giving off any heat.
LEAVE NO TRACE
Leave your site as clean or cleaner
than you found it. Anything you bring
in you should take out with you.
OUTDOOR PROTECTION
Stay hydrated, use sunscreen, and
pack warm / waterproof layers.
AVOID LIGHT POLLUTION
Night time is for the stars, don’t leave
lights on all night.
UNPLUG, UNWIND
Enjoy nature. Ditch your phones and
do a little digital detoxing.

NOTES + SKETCHES NOTES + SKETCHES

NOTES + SKETCHES NOTES + SKETCHES
Table of contents
Other HAPPIER CAMPER Motorhome manuals
