Hardlife Utility 122008R User manual
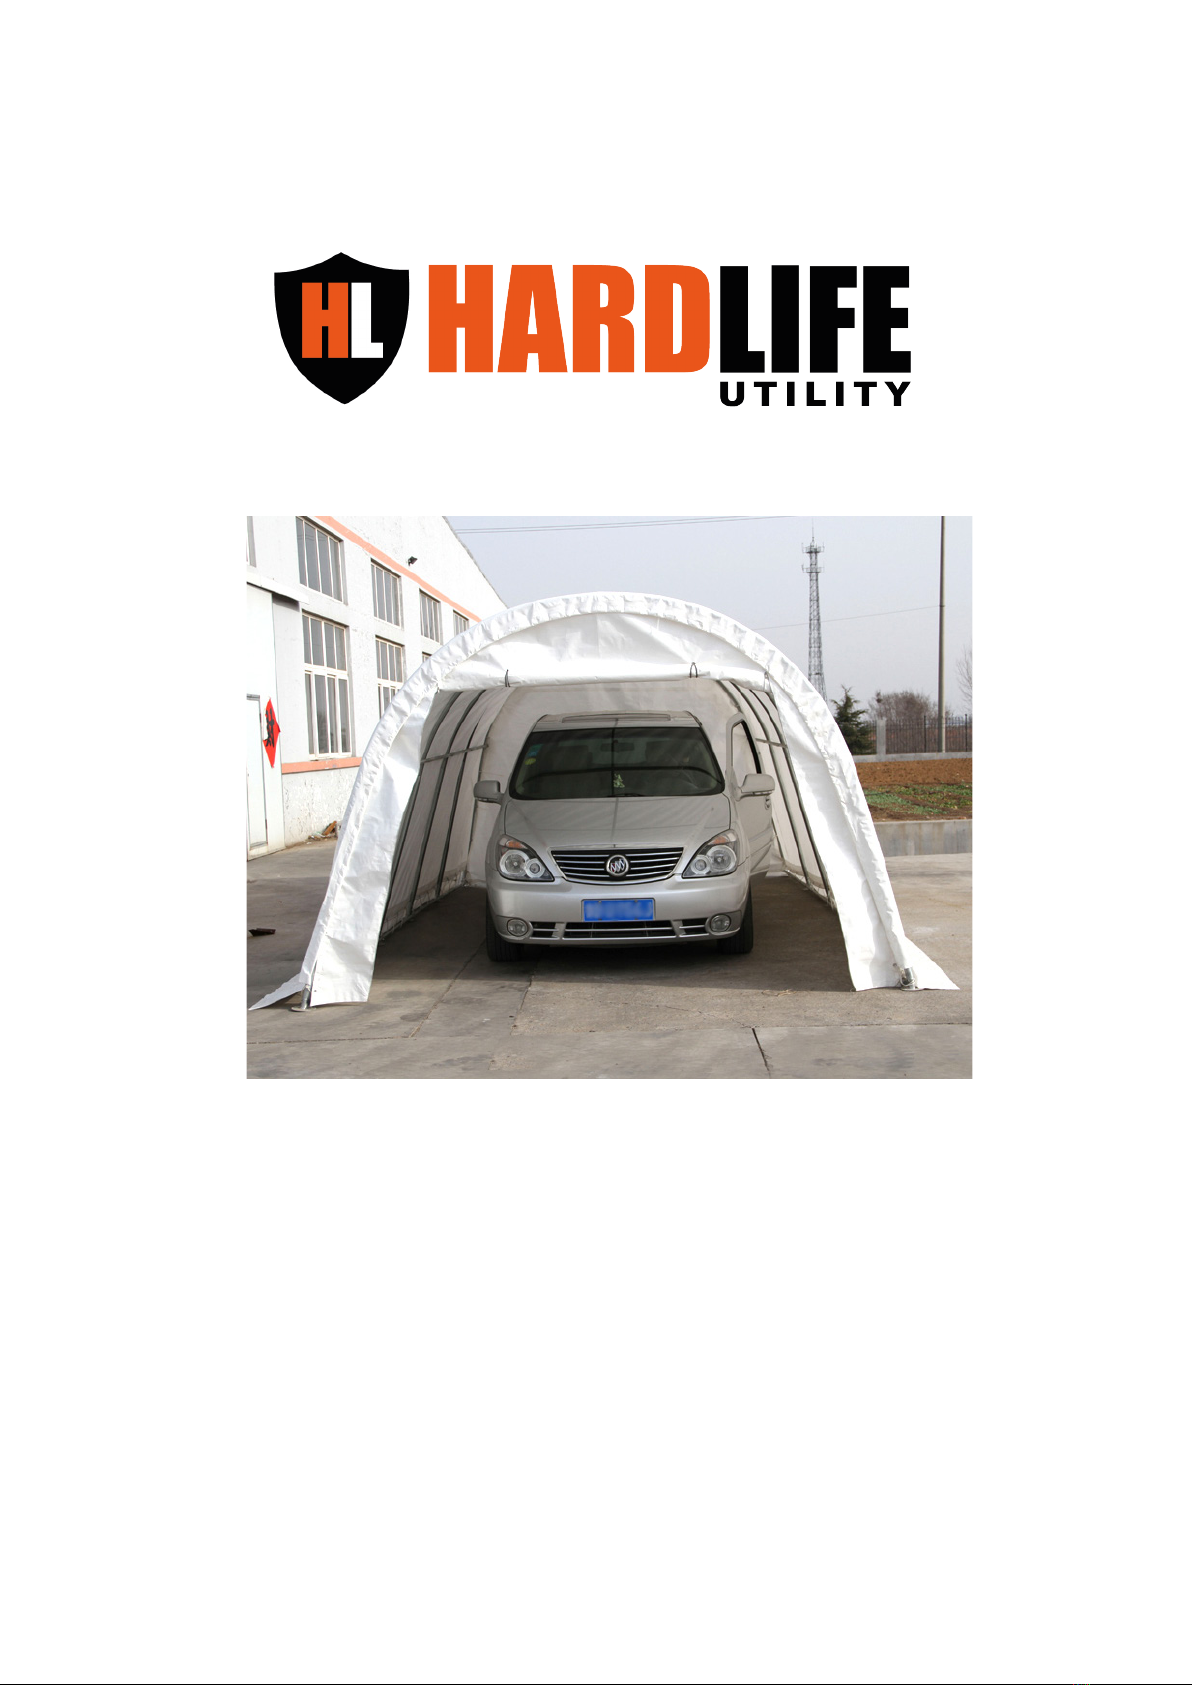
INSTRUCTION MANUAL
122008R
CARPORT
www.hardlifeutility.com

1www.hardlifeutility.com
INTRODUCTION ..............................................................................................
ASSEMBLY INSTRUCTIONS ..........................................................................
USAGE INSTRUCTIONS .................................................................................
CARPORT SPECIFICATIONS ..........................................................................
COMPONENT LIST ..........................................................................................
FRAME SKETCH .............................................................................................
ASSEMBLY AND INSTALLATION ....................................................................
TOOLS REQUIRED FOR INSTALLATION .......................................................
SITE PREPARATION .......................................................................................
FRAME ASSEMBLY .........................................................................................
Assembly of the Front and Back Door Arches ..................................................
Assembly of the Group Arches .........................................................................
FRAME INSTALLATION ...................................................................................
INSTALLING THE FRONT AND BACK COVERS.............................................
FRONT WALL ASSEMBLY ...............................................................................
INSTALLING THE ROOF COVER ...................................................................
DUCKBILL NAIL INSTALLATION .....................................................................
MAINTENANCE ...............................................................................................
TABLE OF CONTENTS
02
03
03
03
04
05
06
06
06
07
07
07
08
09
10
11
12
13

2
www.hardlifeutility.com
INTRODUCTION
ank you for purchasing the Hardlife Utility 122008R carport. e Hardlife 122008R port-
able carports are tough, sturdy, and reliable. e carports’ frames are made of tough, Q215 steel tubes that
are specially designed to protect your vehicle in unpredictable weather conditions, and the fabric is made of
heavy-duty PVC.
To ensure safety, please read through this instruction manual carefully prior to the assembly, installation, use,
and removal of the carport. Improper site preparation, assembly, and maintenance of the carport may invali-
date warranty. Please reach out to your local dealer for any queries.
To ensure user-friendly assembly of the carports, each individual component is identied with their respec-
tive component code, as indicated in the “Component List” of this manual. Please refer to the component
codes and the gures to ensure hassle-free and safe assembly.
e information, specications, and illustrations in this manual are on the basis of the information that was
available at the time of publication. Our products are subject to improvements and changes without prior
notice. e manual will be revised from time to time based on upgrades to the carports. Please contact the
manufacturer or the authorised dealers for the latest available information.

3www.hardlifeutility.com
ASSEMBLY INSTRUCTIONS
1. Adhere to the instructions mentioned in this manual during assembly, anchoring, use, and removal of the
carports. Improper assembly can result in potential hazards.
2. Keep the work area free of clutter.
3. Assemble and install the carports only on at, hard, and level surfaces. Do not install the carports on slip-
pery or wet surfaces, in areas of high-velocity winds, or near snow dris.
4. Ensure to keep children and bystanders away during installation, maintenance, and removal of the car-
ports.
5. Ensure proper footing and balance at all times.
6. Do not assemble the carport under the inuence of alcohol, drugs, or medication. Read the warning
labels on your medication to determine if your judgment or reexes may be impacted.
7. Do not assemble the carport in windy conditions; fasten the base of the carport in concrete if it’s likely to
be windy.
8. Ensure personal safety during assembly of the carport. Wear safety goggles and gloves during assembly,
and exercise caution when handling clips and tubes.
9. Ensure there is adequate ventilation for exhaust and other dangerous fumes.
USAGE INSTRUCTIONS
1. Ensure that the tent fabric is clear of snow at all times, taking care to remove snow manually if it does not
fall o by itself.
2. Ensure to keep the carport away from heat sources. Do not expose the tarpaulin to open ame.
3. Ensure to remove the fabric cover before hurricanes and blizzards.
4. Tighten the fabric cover every month.
5. Ensure adult supervision at all times.
SHELTER SPECIFICATIONS
DIMENSIONS LS1313
Overall Dimensions (.) 4W X 4L X 3.2H
Overall Dimensions (m) 3.66W X 6.1L X 2.44H
Zipper Door Dimension (m) 3.5W X 1.9H

4
www.hardlifeutility.com
COMPONENT LIST
COMPONENT
CODE DESCRIPTION 122008R
(Quantity)
1Male Bent Tube 6
2Female Bent Tube 6
3 Stake Peg for Back Door Arch 2
3A Stake Peg for Front Door Arch 2
4 Stake Peg for Middle Arch Frame 8
5 Male Horizontal Connecting Tube 20
6 Female Horizontal Connecting Tube 5
7 Diagonal Bracing Tube 2
9Duckbill Nail 6
10 Ø12x X 1000 mm Steel Rod 1
11 U bolt 6
13 Roof Cover 1
14 Front and Back Door Covers 2
15 M8 X 80 mm Bolts 30
16 M8 X 50 mm Bolts 2
17 Bungee Cords 6
18 Ø42 mm Plastic Plugs 12
19 Ø28 mm Plastic Plugs 10
20 Rope 2 Rolls

5www.hardlifeutility.com
FRAME SKETCH
Figure 1

6
www.hardlifeutility.com
ASSEMBLY AND INSTALLATION
You can install the Hardlife portable carport with a 2-member team of your own in a day, by carefully follow-
ing the instructions provided in this Instruction Manual.
WARNING: Ensure that you do not leave this product partially assembled, as it can pose serious dangers.
CAUTION: Ensure that all the components are securely tted before use.
TOOLS REQUIRED FOR INSTALLATION
1. Measuring tape
2. String for alignment
3. Electric hammer
4. Step Ladder
5. Sledge hammer
6. Wrench
7. Scissors
SITE PREPARATION
To prepare the site for installing the shelter:
1. Select a at, hard, and level surface.
2. Ensure that all the components are present by checking with the “Component List” prior to installation.
3. Mark out a rectangular site using a string or chalk. It is recommended that the string or chalk line is
slightly larger than the carport area.
4. Lay out all the components within the rectangular site, in the approximate locations at which they will be
assembled. is makes preliminary work easier on an open, clear space rather than having parts scattered
in the way.

7www.hardlifeutility.com
Figure 2
FRAME ASSEMBLY
Assembly of the Front and Back Door Arches
e arches for the front and back door, as shown in Figure 2, are made of:
• One male bent tube (Indicated by component code 1).
• One female bent tube (Indicated by component code 2).
• Two pieces of stake pegs for the front door arch (Indicated by component code 3A).
• Two pieces of stake pegs for the back door arch (Indicated by component code 3).
Connect all the pieces together, as shown in Figure 2, to make the front and back door arches.
Assembly of the Group Arches
Each group arch is made of:
One male bent tube (component code 1).
One female bent tube (component code 2).
Two pieces of stake pegs for the middle arch frame (component code 4).
Connect all the pieces together to make a group arch. Similarly, assemble all the other group arches.
8
www.hardlifeutility.com
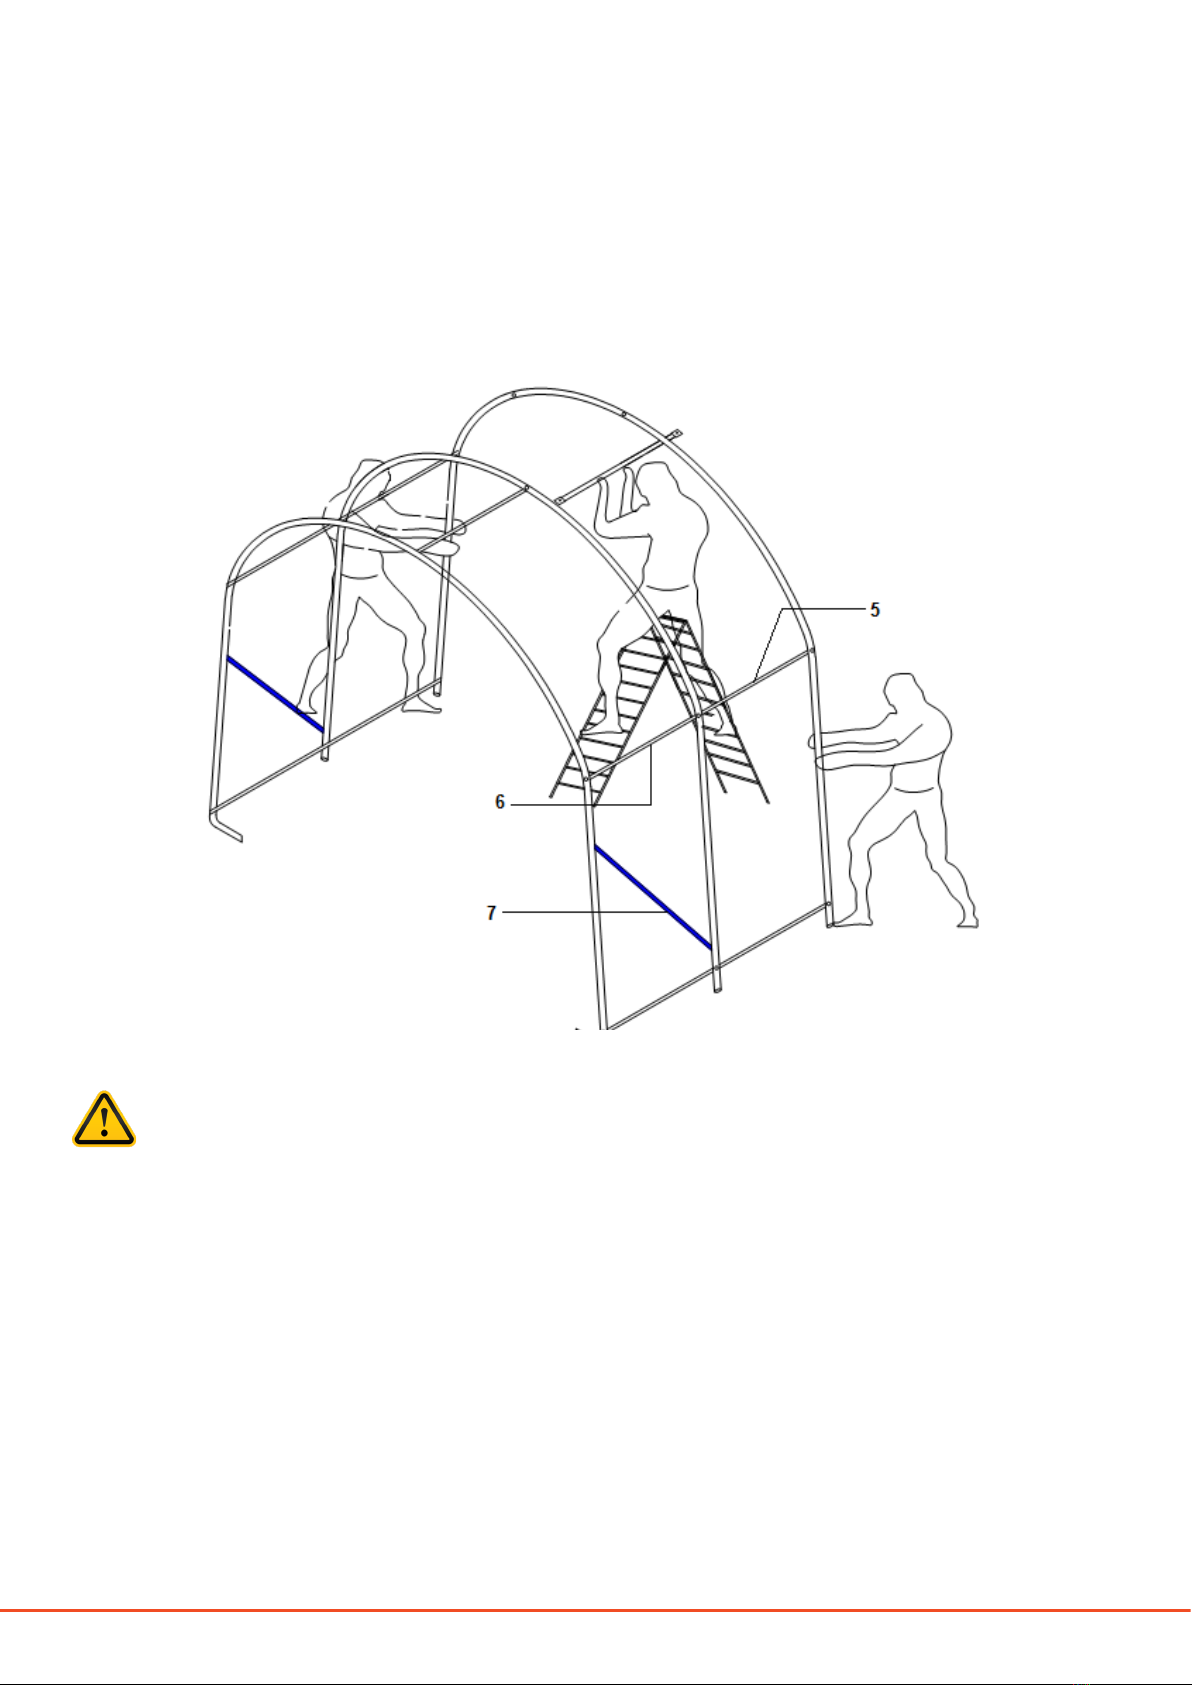
FRAME INSTALLATION
1. Erect the front door arch, as shown in Figure 3.
2. Install the second arch immediately aer installing the rst arch, and connect the two arches using female
horizontal connecting tubes (component code 6), as shown in Figures 1 and 3. Secure the connecting
tubes using M8 X 80 mm bolts (component code 15).
CAUTION:
• Ensure that the bolt head is in the right direction to prevent it from tearing the roof cover.
• Do not install the carriage bolt on top of the truss, where the fabric will rest, as it can tear the
fabric.
3. Install the diagonal bracing tube (component code 7) and secure using M8 X 50 mm bolts (component
code 16) to make the front door group arch.
NOTE:
ere are 5 pieces of female horizontal connecting tubes between the rst and second arches.
4. en, install the third arch and connect the male horizontal connecting tubes (component code 5) be-
tween the second and third arches, as shown in Figures 1 and 3. Secure the connecting tubes using M8 X
50 mm bolts.
Figure 3
9www.hardlifeutility.com
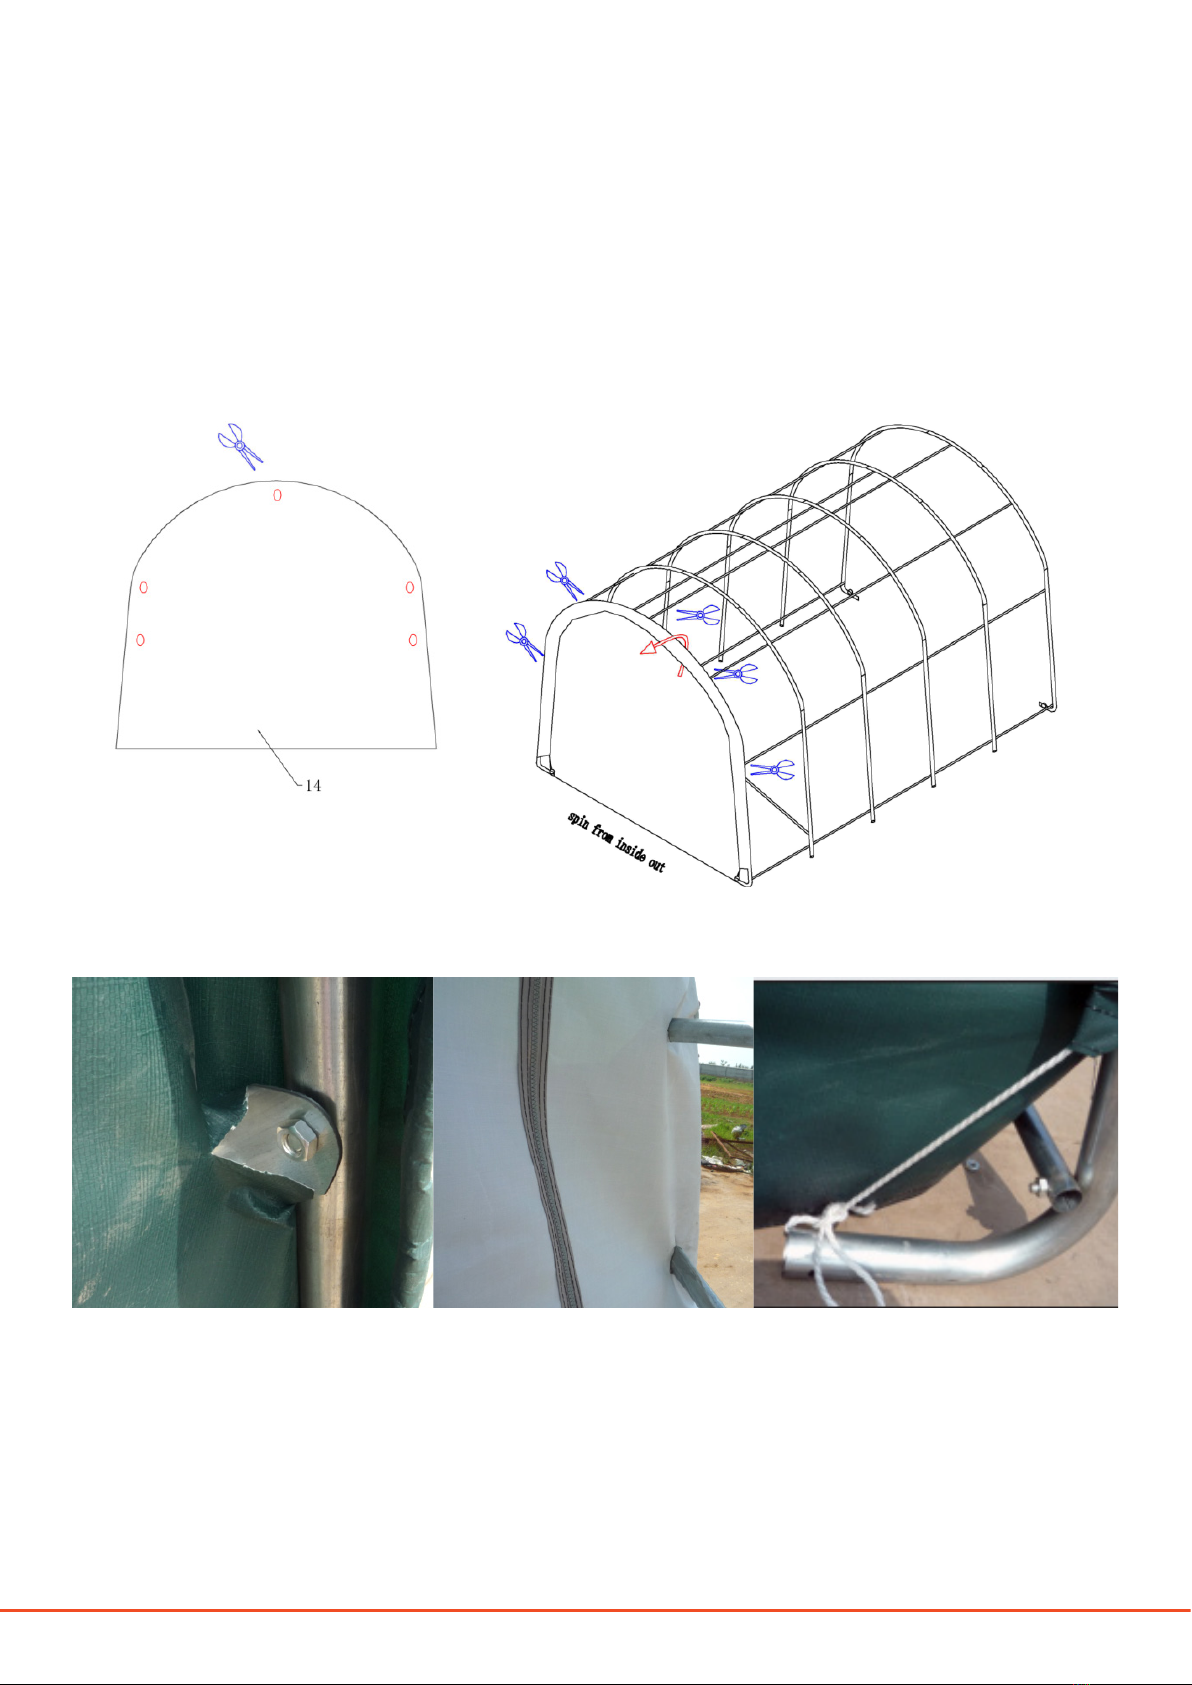
INSTALLING THE FRONT AND BACK COVERS
CAUTION:
Do not install the front and back covers onto the frame of the carport in high wind conditions.
1. Put on the front door cover (component code 14) from the inside of the front door frame to the outside,
as shown in Figure 5.
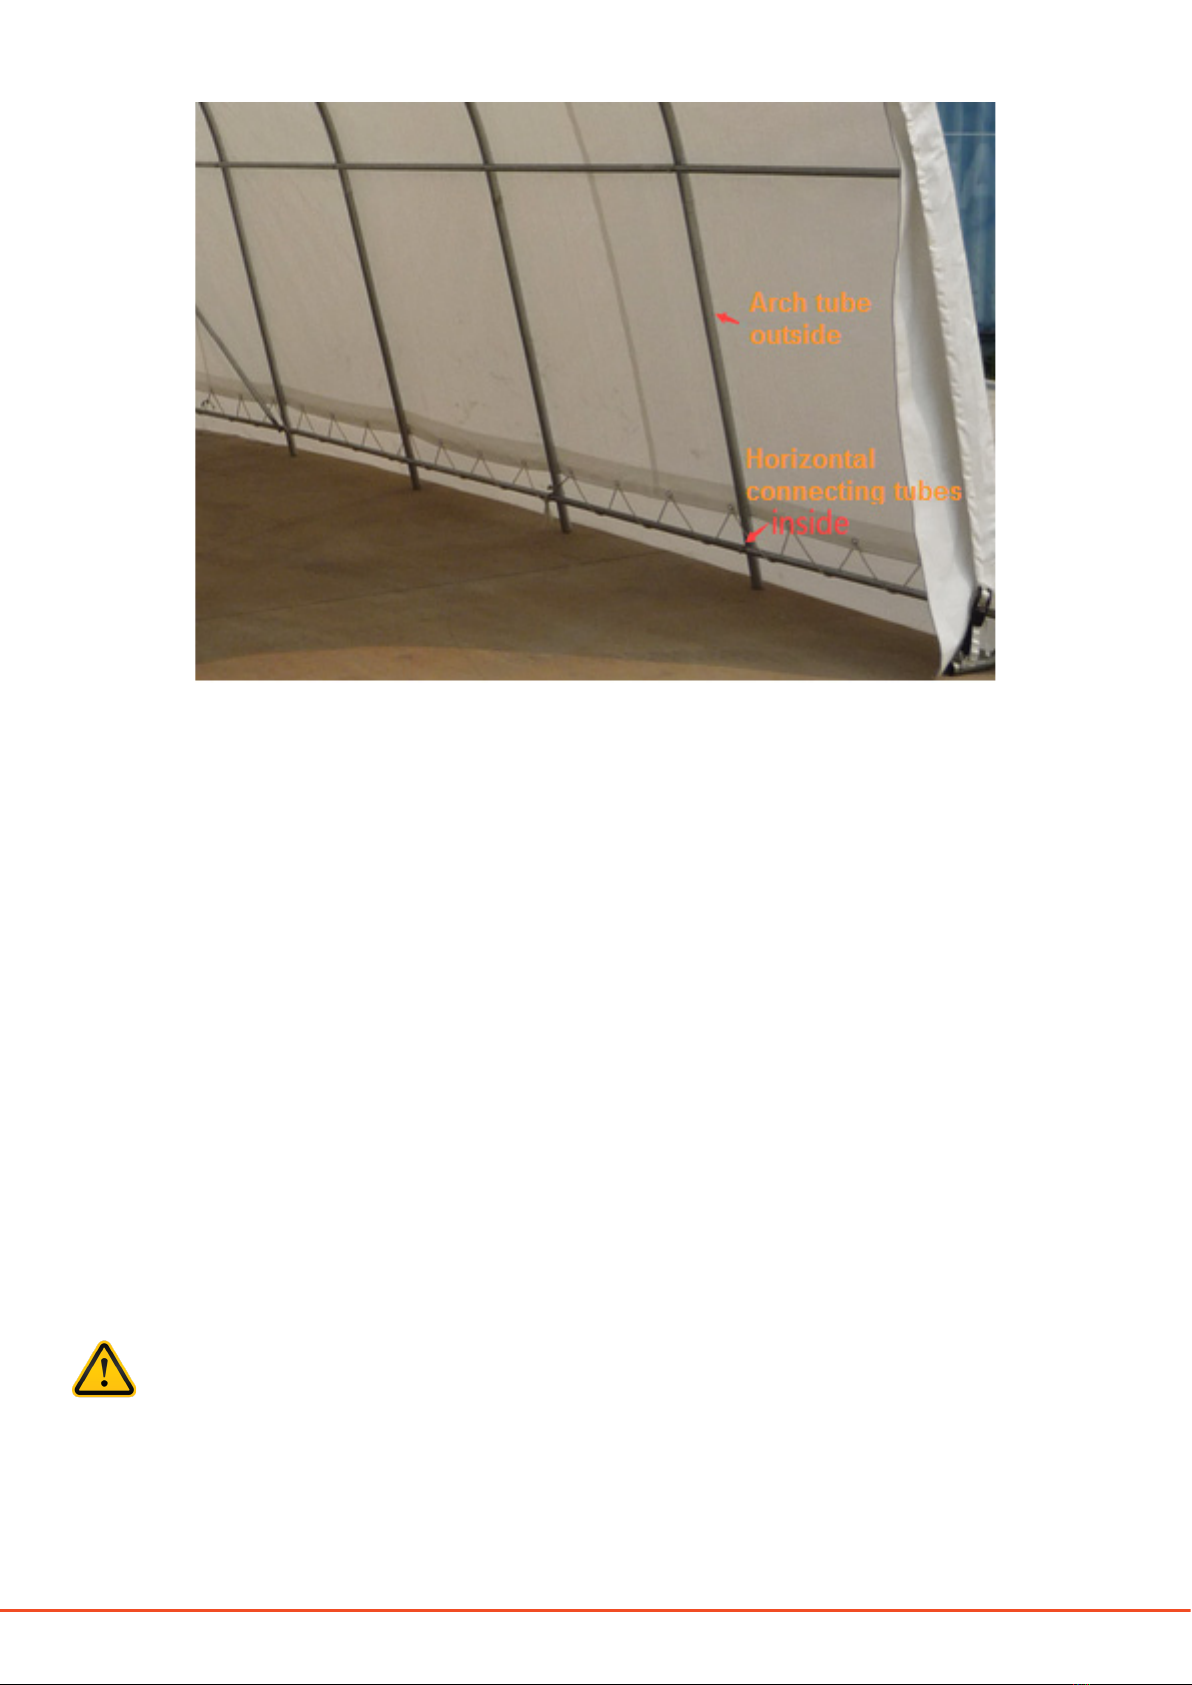
Figure 4
NOTE:
Ensure that the horizontal connecting tubes are below the arch of the frame so that the roof cover can be well
supported, as shown in Figure 4.
5. Likewise, install the other arches in the same manner and connect them using the male horizontal con-
necting tubes.
6. Install the back door arch and connect using the male horizontal connecting tubes.
7. Finally, plug the connecting tubes with their respective ø42 mm plastic plugs (component code 18) or ø28
mm plastic plugs (component code 19).
8. Tighten all the frame bolts and connecting tubes adequately before installing the roof cover.
10
www.hardlifeutility.com
Figure 5
Figure 6
2. Cut pieces of ropes (component code 20) to suit your requirement and use them to lace the front cover,
from the inside, to the frame of the front door through the grommets provided on the cover, thus secur-
ing the front cover, as shown in Figures 5 and 6.
3. Tie the remaining rope to the bottom of the door frame, as shown in Figure 6.
4. Repeat the same procedure for the back door cover (component code 14).
5. To open the doors, unzip the front door and back door covers, roll them up, and secure with bungee
cords (component code 17), as shown in Figure 7.

11 www.hardlifeutility.com
Figure 7
INSTALLING THE ROOF COVER
NOTE:
A slight breeze is the most advantageous for roof cover installation. To take advantage of the breeze, gently
pull the cover up over the arches using ropes, with breeze blowing in the cover like a sail lled with air.
1. Unpack the roof cover (component code 13) and lay it open on the ground, parallel to the assembled
frame on one side.
2. Pull the roof cover over the frame evenly, carefully, and slowly as shown in Figure 7. You can tie ropes to
one end of the roof cover and pull it over the frame, if required.
WARNING:
Never leave the roof cover unattached under any circumstances until the nal assembly and tighten-
ing have been completed.
NOTE:
Ensure that the roof cover does not get snagged on any part of the frame as it can result in tears.
3. Adjust the cover such that it is evenly centred on the frame, and smoothen to remove all wrinkles on the
cover.
4. Knit the lower end of the roof cover to the lowest horizontal connecting tubes using ropes, as shown in
Figure 7.
NOTE:
Ensure that you do not over tighten the lacings.
12
www.hardlifeutility.com
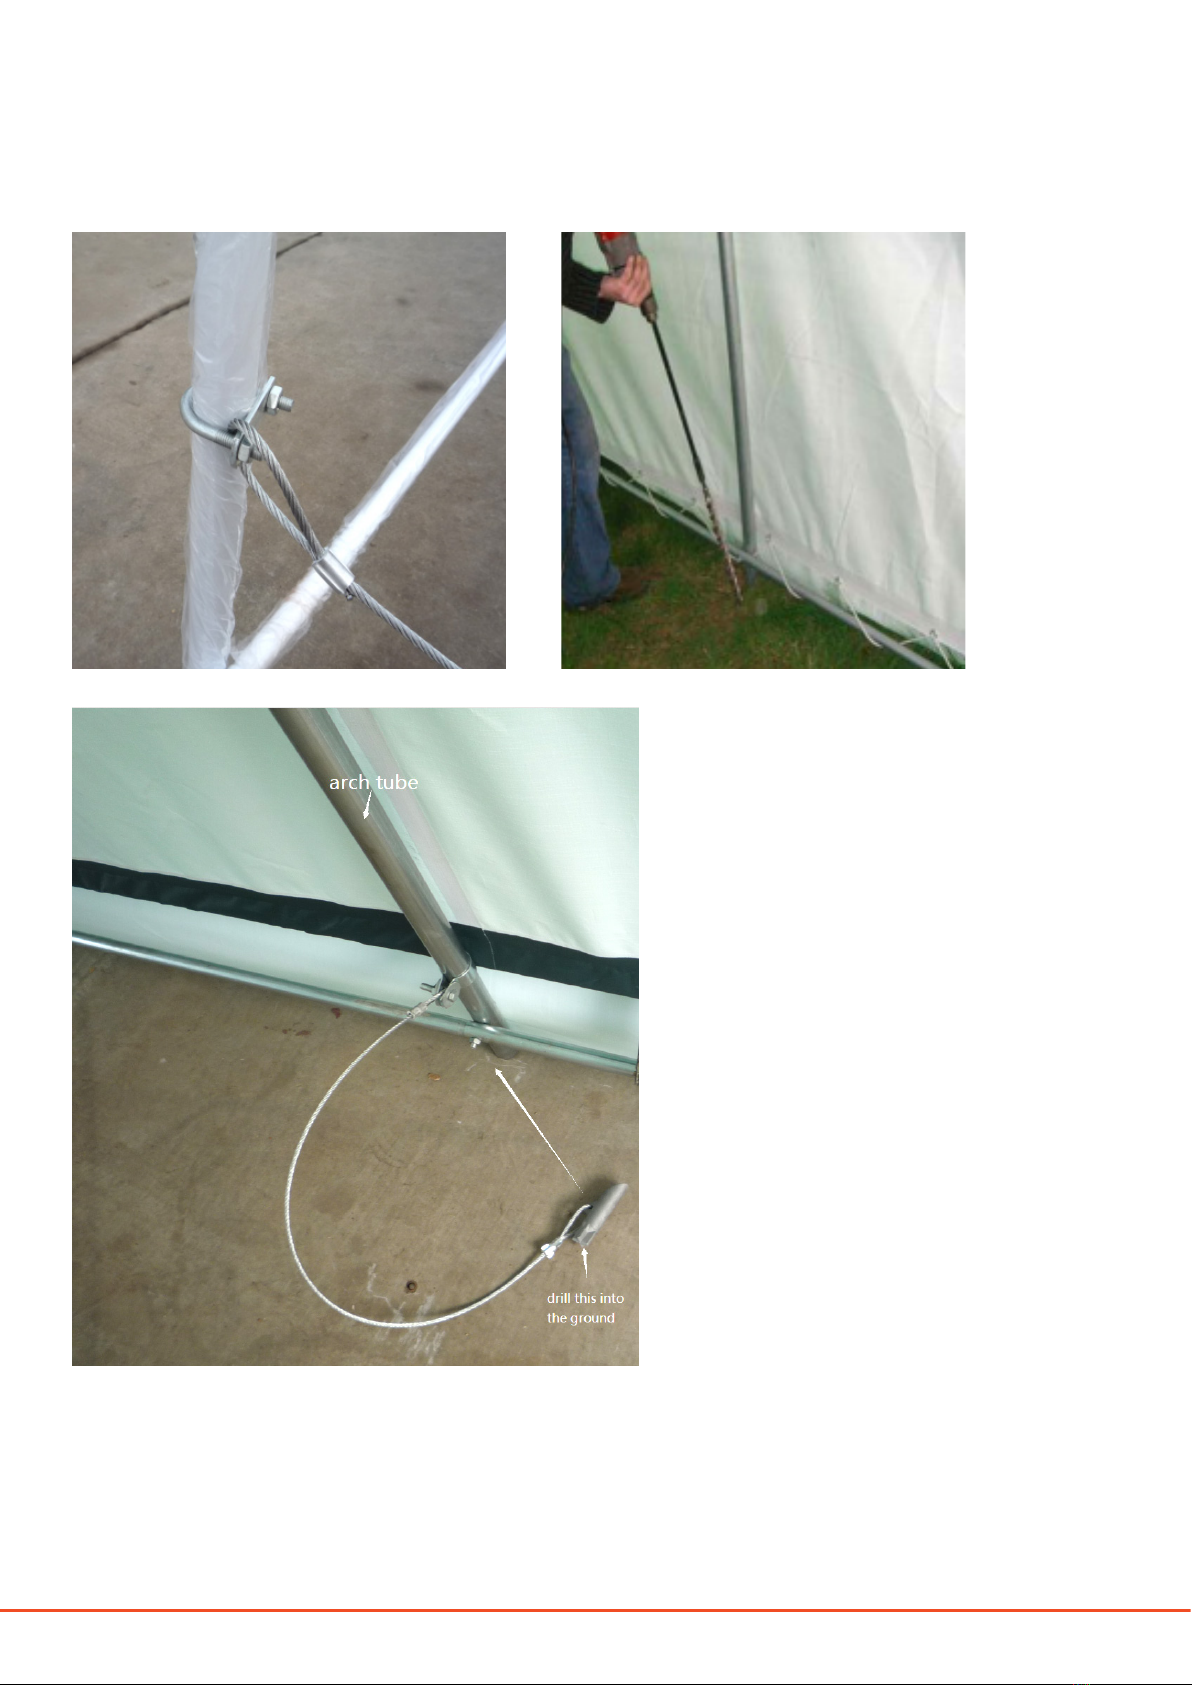
DUCKBILL NAIL INSTALLATION
Figure 8
13 www.hardlifeutility.com
1. Insert the ø12mm steel rod (component code 10) into one duckbill nail (component code 9), and use an
electric hammer to insert the nail deep into the ground, as shown in Figure 8.
2. Fix the duckbill nail to the lower end of the arch tube using U bolts (component code 11). ere are 6
duckbill nails.
3. Your carport assembly is complete.
NOTE:
Use duct tape to close the gaps in between the steel frame aer installation of the carport, if required. You can
also use duct tape on some tube connections near the top of the frame to ensure that the roof cover doesn’t
tear from rubbing against sharp corners.
MAINTENANCE
• It is mandatory to tighten the roof fabric enough to avoid “hammocks” on the roof and re-tighten the
roof fabric regularly. is maintenance procedure is crucial as the roof fabric tends to be sti in the cold
season (autumn and winter) and slack during summer. Hence, the roof fabric should ideally be re-tight-
ened before the next winter.
• Adjust the roof cover every month to ensure you always have a at and tensioned roof cover.
• Inspect the carport regularly, and replace damaged components.
14
www.hardlifeutility.com

15 www.hardlifeutility.com
H A
ECONOMICAL SHELTERS
e best price guarantee in the UK.
24-HOUR DISPATCH
Dispatch of orders within 24 hours of receiving your payment (subject to availability).
5-YEAR SPARE PART REPLACEMENT
Spare part availability for 5 years from the date of purchase.
EFFICIENT AFTER SALES SUPPORT
Lifelong technical assistance for all our products.
CUSTOMISED SHELTERS
Custom-made tents manufactured to meet your requirements.
Write to us: info@hardlifeutility.com
Call us: +(44) 01525 851912

16
www.hardlifeutility.com
Unit 4, Dawson Road, Bletchley,
Milton Keynes, MK1 1LH
United Kingdom
Call us: +(44) 01525 851912
Table of contents


