Harley Benton DR. CHORD PRO User manual

Owner’s Manual
DR. CHORD PRO
CHORDFINDER • TUNER • METRONOME

2
Product description
Owning one Dr. Chord Pro, you will own a chord encyclopedia,
an accurate chromatic tuner, an accurate metronome and an ac-
curate tone generator. These are Dr. Chord’s features:
Find Chord Position
The Dr. Chord Pro contains over 2,500 chord voicings and over
500 unique chord types. All chords are organized rst by root and
then by quality or type, you can nd the chord position you need
by this theory. Whether you are a beginner looking for your rst
chord, or a budding jazz guitarist searching for a new voicing, you
will nd what you are looking for here.
Find Chord Name
When you play an elegant chord on guitar, but you don‘t know
what name it is, Dr. Chord Pro can tell you easily with its memory
of over 2,500 chords.
Chromatic Tuner
Dr. Chord Pro has also chromatic tuner function. It‘s sensitive,
accurate and easy to use. You can tune any musical instrument
conveniently.
Metronome
Another function of Dr. Chord Pro is metronome. It‘s accurate with
loud sound and clear display.
Tone Generator
One more function of Dr. Chord Pro is tone generator, giving you
accurate sounding of standard notes for reference.
Please read this manual thoroughly to familiarize yourself with
proper usage of this unique Dr. Chord Pro.

3
CAUTION!
zDo not open the casing for any reason as this may
cause short circuit or malfunction of the product.
zDo not apply excessive force to the product. In the event of the
product suffering breakage, be careful not to hurt yourself with
the broken pieces.
zDo not put in any liquid nor foreign object.
zKeep unit away from dust, extreme temperatures and humidity.
zWhen the unit is not in use for a long period of time, remove
the battery to prevent leakage.
Operation panel
qPower switch iInput
w Mode button hand set button oMIC
e Left arrow button aEarphone
r Right arrow button sVolume
t OK button dDC adaptor input
y Up arrow button fLED Indicator
u Down arrow button g Dynamic Speaker

4
LCD Display
zMode display area A: Find chord position mode,
Find chord name mode, Tuner mode, Metro-
nome mode, Tone generator mode.
zHand set display area B: Right handed (standard).
Left handed.
zChord Voicing display position C: Displays your
selected chord voicing.
zGuitar Fret number display position D: This tells you to move
your hand up to that fret to position your ngers.
zGuitar fretboard area E: On the guitar fretboard, the six vertical
lines represent the six strings on the guitar, from low E to high E
if right hand setted, from high E to low E if left hand setted (from
left to right). „X“ stands for mute, „0“ indicates an open string.
Black dots indicate the nger position. Note name appearing be-
low each string tells you which note name you played.
JOPERATING PROCEDURE
zPress button q to turn on Dr. Chord Pro. The power will be
turned off automatically 5 minutes later if the unit has been left
unattended. Press this button again to turn the device off.
zMode select:
When you press but-
ton w under any situ-
ation when the unit is
on, the mode select-
ing menu will appear
on the LCD like the above picture. The ashing outline frame
indicates the mode you select, you can press button eand r
to move the ashing cursor. When you have moved the ash-
ing cursor to the mode you desire ,press button t to conrm
your selected mode, the system will enter your selected mode.
* If you have not pressed button t to conrm your selected mode, the
system will stay on the mode select menu untill auto power off.
Mode selecting menu
* The gray parts are possibly to be displayed.
Only the black parts are displayed for certain.

5
zFind Chord Position mode:
1. Under Find chord position
mode, the LCD will display
like the picture to the right.
The position A on the LCD
shows your selected chord
root. When the chord root
is ashing, you can press
button yand uto select
chord root from C to B,
when your desired chord
root appears, you should
press button t to conrm
your selecting or press button r to move the ashing cursor to
the next position.
2. When the LCD position B is ashing, you can press the button
yand u to select the chord quality or type. When the chord
type you need appears, press button tor r to conrm your
selecting or move the ashing cursor to the next chord type se-
lecting if the next chord type exist. If the next chord type does
not exist, press button t to nish chord name setting. Then the
chord position will be displayes in the area C .
3. How to select a chord name:
The Dr. Chord Pro contains 44 chord types for each of the
twelve chord root. You can nd your desired chord under its
symbol. For example, you want to nd the chord C7b5#9, you
should select the chord root as C, then select the rst chord
type as 7, select the second chord type as b5,select the last
chord type as #9. For the chord name selecting process you
do not need you to know the chord’s construction, you only
need to kwon how to spell the chord symbol. The following
table present the Dr. Chord Pro’s chord types:
Find Chord Position mode LCD display
* The gray parts are possibly to be displayed.
Only the black parts are displayed for certain.

6
CHORD
ROOT
CHORD
TYPE1
CHORD
TYPE2
CHORD
TYPE3 NAME SPELL OTHER SPELL
From C
to B
maj
5 5
66
.9 6.9 6/9, 6add9
7
7 dom7
b5 7b5 7-5, dom7b5
#9 7b5(#9) 7-5(+9),dom7b5(#9)
b9 7b9 7-9,dom7b9
#9 7#9 7+9,dom7#9
#11 7#11 7+11,dom7#11
sus4 7sus4 7sus
9
9
b5 9b5 9-5,dom9b5
sus4 9sus4 9sus
11 11
13 13 dom13
sus4 13sus4 13sus
m
m min,-
6m6 min6,-6
.9 m6.9 m6/9
b6 mb6 -(b6),minb6
7m7 -7,min7
b5 m7b5 -7(b5),min7-5
9
m9 -9,min9
b5 m9b5 m9-5,min9b5
maj7 m9(maj7) m9+7,-9+7
11 m11 -11,min11
13 m13 -13,min13
add9 m(add9)
maj7 m(maj7) m(+7)
maj
7maj7 M7
#11 maj7#11 M7#11
9 maj9 M9
13 maj13 M13
sus 2 sus2 5add2
4 sus4 sus
+
+ aug.#5
7
+7 7#5
b9 +7b9 7+5(b9)
#9 +7#9 7+5(#9)
9 +9 9#5,9+5
dim 5 dim5 °
7 dim7 °7
add9 add9

7
In the blank “OTHER SPELL”, different spells is separated with “,”.
q When displaying chord type, “(“ and “)” does not appear.
w When displaying chord type, “maj” displays as “MAJ”.
e When displaying chord type, “add” displays as “Add”
4. Different Chord voicings under the same chord name:
One chord can have many different voicings. A voicing refers
to how the chord notes are arranged, which is related to where
the chord is played on the guitar, and how it’s ngered. Dr.
Chord Pro provides 5 different chord voicings for each Chord
name. When the LCD displays a Chord position and there is
no ashing cursor, press button eor rto start Chord name
setting or Chord voicing setting. The Chord name or Chord
voicing will ash in the LCD. If the chord voicing ashes, press
button t to conrm. Then press button yand uto select voic-
ing No. among 1 to 5. After nishing selecting, press button
tto conrm. The Chord voicing you select will display in the
LCD. If the Chord name ash, press button tto enter new
chord name setting. Repeat the previous steps.
zFind Chord Name Mode:
1. After entering this mode,
the position “1fr” in the dis-
play will ash, press button
yand uto select guitar
fret (from 1 to 15). Press
button t to conrm your
selecting or press button r
to enter nger position set-
ting of each guitar string.
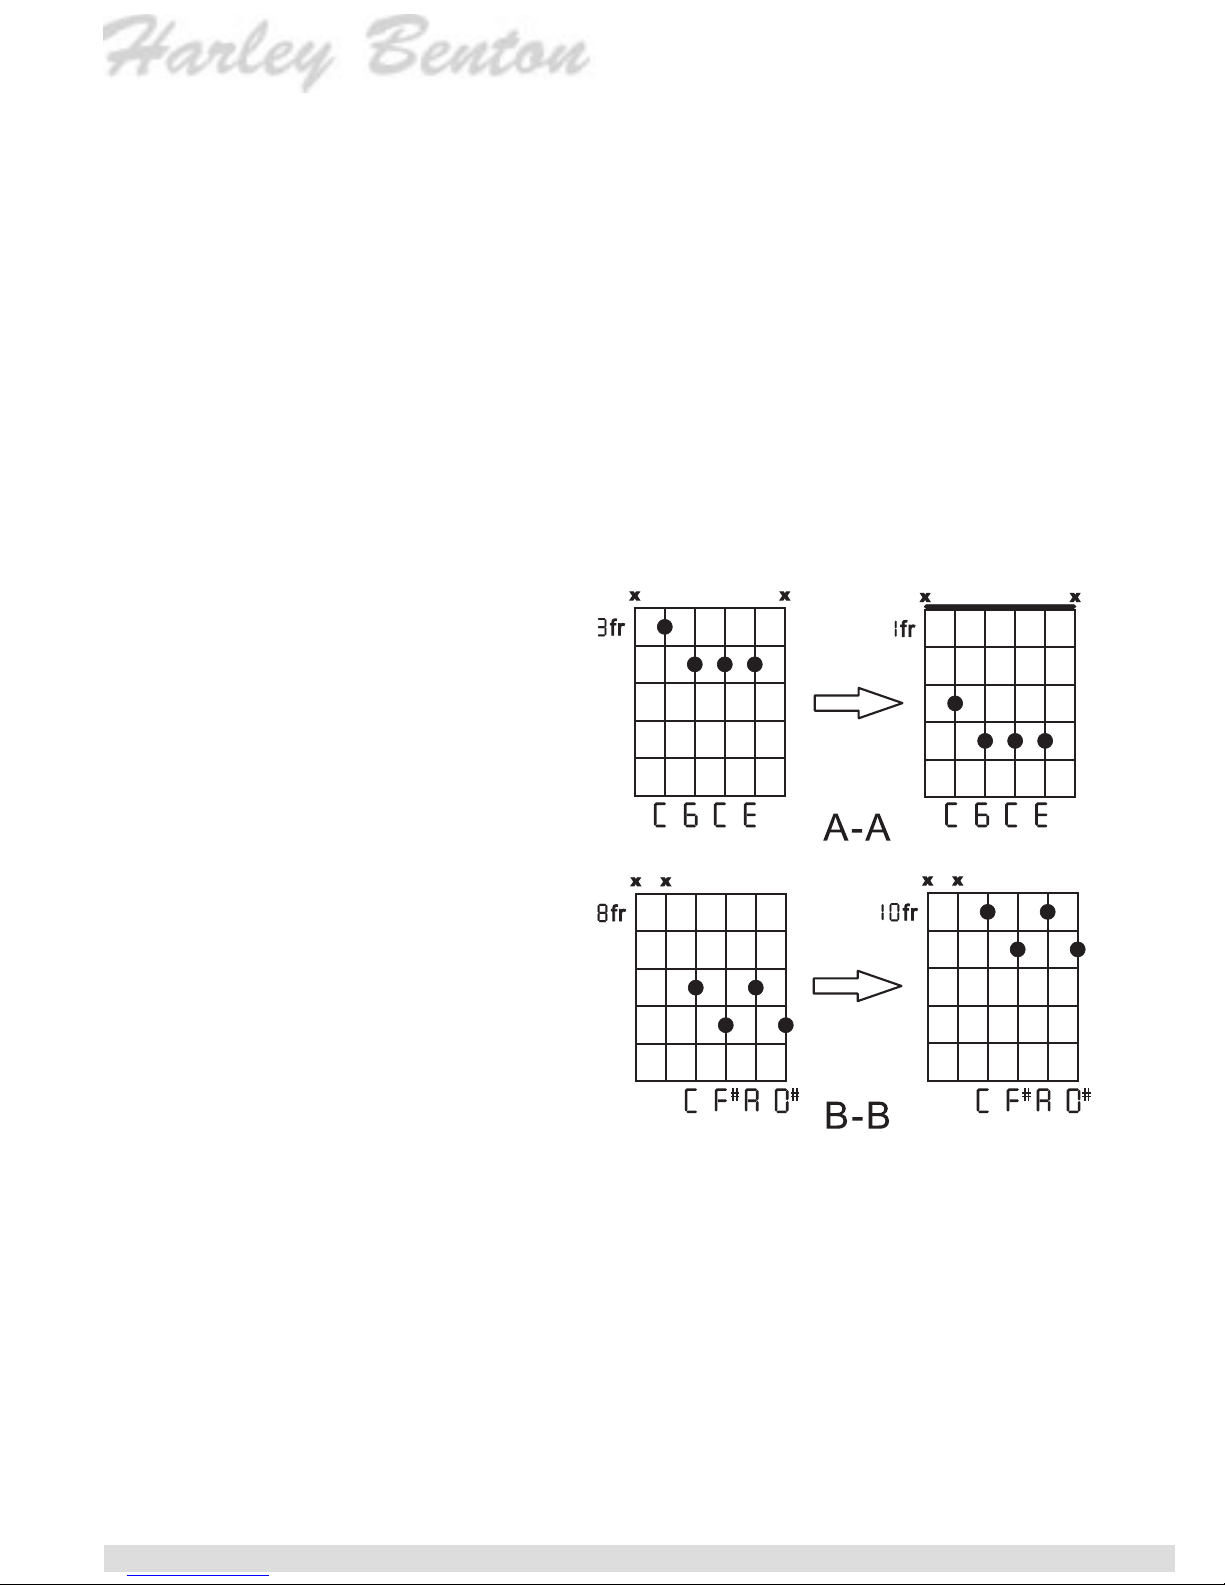
For right handed chord,
the 6 vertical lines stand
for 6E, 5A, 4D, 3G, 2B,
1E from left to right.For left handed chord, the 6 vertical lines
stand for 6E, 5A, 4D, 3G, 2B, 1E from right to left.
2. When you set nger position on the string, the cursor will ash
at the string. Press button yand u to select the nger posi-
tion of that string. “0” stands for open string, “x” stands for not
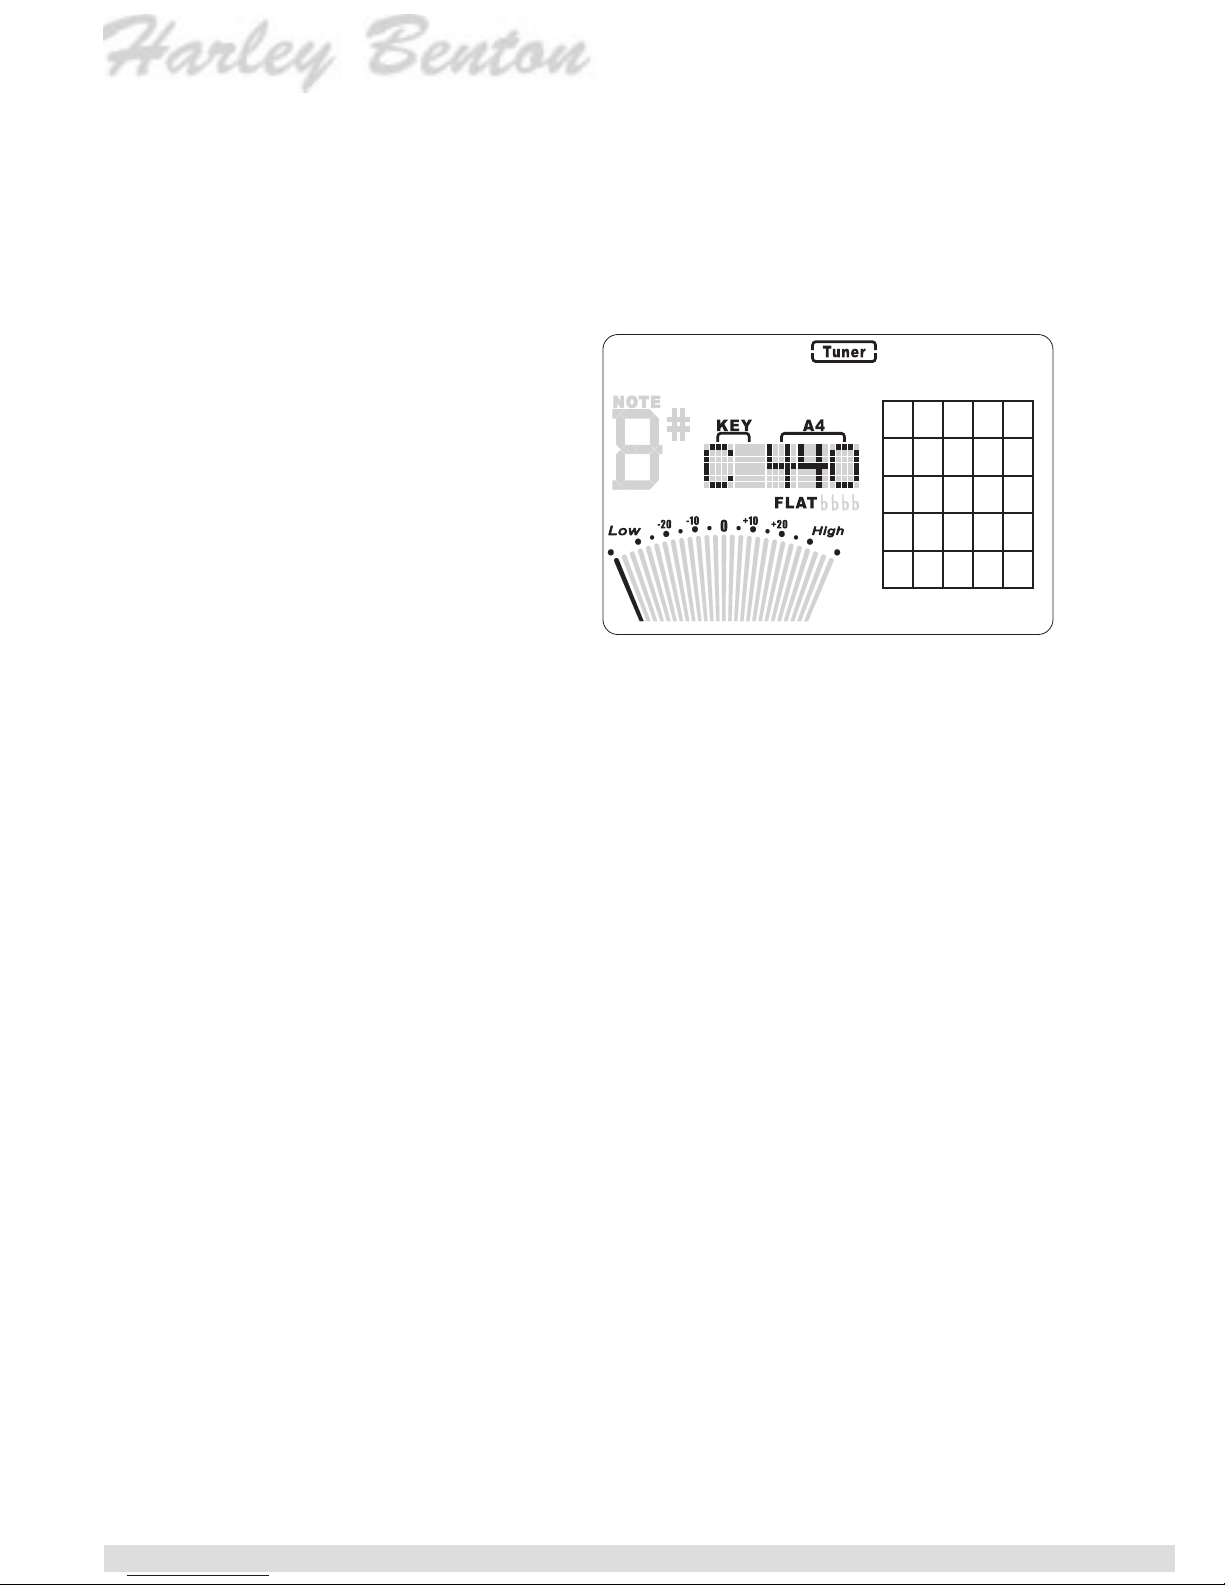
Find chord name mode LCD
* The gray parts are possibly to be displayed.
Only the black parts are displayed for certain.

8
playing this string(mute), black dot stands for nger position.
At this time, you can press button eand rto move to different
strings to set. If you have nished the last string (1E) setting,
press button t to nish chord position setting. Dr. Chord Pro
will search the related Chord name according to the chord
position you set.
* If you press button t not when you have nished the last string
setting, the cursor will move to the next string for you to make nger
position setting. Dr. Chord Pro will begin the Chord name searching
only when you have nished the last string setting and pressed button
t to conrm.
3. Standard Guitar Chord Position Transforming:
When you nished Chord
position setting, press button
t, Dr. Chord Pro will make
standard transforming for
your setting. The standard
transforming has the follow-
ing 2 rules:
(1) If the fret number can
go back to 1 fret, Dr. Chord
Pro will transform it to 1 fret,
such as displayed in the
picture A-A. The left picture
is the position picture you
set. The right picture is the
chord position picture after
standard transforming. They stand for the same chord position.
(2) If the fret number is not 1fret and can not go back to 1 fret,
Dr. Chord Pro will make the rst doted fret the rst line. In the
above picture B-B, the left one is the chord position picture
you set. The right one is the position picture after standard
transforming. They stand for the same guitar chord position.
Dr. Chord Pro will display the position picture on the LCD after
standard transforming.

9
4. Guitar Chord Name searching result display:
Dr. Chord Pro will search in its memory the Chord name in ac-
cordance with the chord position you set. If it can not nd the
related chord name, the LCD will display the information as the
above picture A. And the word “ SORRY!” will ash standing for
not nding this chord. Press button eor rto reset the chord
position. Repeat the previous steps. If Dr. Chord Pro nds the
related chord name, the LCD will display the information as the
above picture B. Chord name will display at position C. Chord
position will display at position D. If the search result includes
more than one Chord name, press button e, the ashing cur-
sor will move to position C. The Chord name will ash. You can
press button yand u to check other chord names. The ash-
ing cursor will move among position C, D and E. When the
ashing cursor is at position D, presing button twill stop the
ashing position D and position F will start ashing. At this time
press button yand u, you can check other chord voices under
this chord name. Press button t to conrm. When the ashing
cursor is at area E (the whole chord position picture), press
button t, you will begin new chord position setting. Repeat the
previous steps to have a new searching.
If the searching result has only one Chord name, the cursor
will not move to position C in the LCD.
5. Right and left handed chord setting:
No matter it’s under chord1 or chord2 mode, press button
w for about 2 seconds, you will see Right and Left display-

10
ing on the LCD. The cursor will ash at the position you have
chosen. Press button yand uto select the mode you need.
Then press button t to conrm and leave right and left handed
chord setting.
zTuner mode:
1. After entering this mode,
Dr. Chord Pro can start
tuning automatically if
there is any sound input.
Choose tuning with Mic or
input jack: When tuning
with Mic,Don’t plug any
object in the input jack.
Otherwise the Mic will not
work. And please try to
make the sounding part
of the music instrument
closer to the Mic of Dr. Chord Pro to get best tuning result.
When tuning with input jack, please plug the output plug of
pickup in the input jack of Dr. Chord Pro.
Key selecting:
Press button e and r to move the ashing cursor to the
position KEY in above picture. Then press button yand uto
select the key you need. You can choose among C,Bb,Eb and
F. The key you selected will display at the position KEY.
A4 calibration:
Press button e and r to move ashing cursor to position
A4 in above picture. Then press button y and u to select
the A4 frequency you need. The A4 frequency will increase
or decrease every time with 1 Hz step. A4 range is from
410Hz~480Hz. Keeping pressing this button will automatically
increase or decrease A4 frequency continuously. A4 frequency
will display at position A4 in the above LCD picture.
Tuner mode LCD
* The gray parts are possibly to be displayed.
Only the black parts are displayed for certain.

11
Flat tuning setting:
Press button e and r to move ashing cursor to position
FLAT in the above picture. Then press button yand uto
select the at setting you need. You can set standard mode
tuning or at tuning. Flat tuning can be set as , , and .
Flat setting will display at FLAT position in above LCD picture.
* It’s standard tuning if there is no “” at the position FLAT in the LCD.
How to tune:
When tuning, the musical instrument gives a sound. The note
name of that sound will display at position A in the LCD. Adjust
the sound of the musical instrument to get the desired note
name in the LCD. At the same time, the needle in the LCD
will move according to the sound. When the sound is lower or
higher, the LED indicating light will light red. When the sound is
in tune, the LED indicating light f will light green. And at this
time the LCD needle will be at the center position.
zMetronome mode
1. After entering this mode,
the LCD display will be as
the left picture.
2. Beat setting:
Press button e and r and
to move cursor to posi-
tion BEAT as shown in the
picture. Then press button
y and u and to adjust the
beat. Beat adjusting range
is from 0 to 9. After nish-
ing beat setting, you can move the cursor to the position you
need by pressing button y and uto set other parameter. If
you have nished setting, press button t to conrm.
Metronome mode LCD
* The gray parts are possibly to be displayed.
Only the black parts are displayed for certain.

12
3. Tempo setting:
Press button e and r to move the cursor to the position TMP
as in the above picture. Then press button y and u to adjust
the tempo. Tempo range is from 30 to 250 BPM. If you keep
button yor upressed, you can increase or decrease tempo
continuously with 1 Hz step. After nishing tempo setting, you
can move the cursor to the position you need by pressing
button e and r to set other parameter. If you have nished
setting, press button t to conrm.
4. Rhythm setting:
Press button eand rto move the cursor to the position
RHYTHM as in the above picture. Then press button yand
u to adjust the rhythm. After nishing rhythm setting, you can
move the cursor to the position you need by pressing button
e and r to set other parameter. If you have nished setting,
press button t to conrm.
* You need to press button tto conrm your setting every time when
you nish setting. Otherwise the cursor will stay ashing.
zTone generator mode
1. After entering this mode,
the LCD display will be as
the left picture.
2. Note name selecting:
Press button yand u to
select note name. Note
name range is from C
to B, total 12 notes. The
selected note name will
display at position NOTE
as in left LCD picture.
3. Calibration:
Press button e and r to move the cursor to the position A4 as
in the above picture. Then press button y and u to adjust A4
frequency. The range of A4 frequency is 410Hz~480Hz. Keep-
Tone generator mode LCD
* The gray parts are possibly to be displayed.
Only the black parts are displayed for certain.

13
ing pressing the button yor uwill automatically increase or
decrease the A4 frequency continuously with 1 Hz step. After
nishing A4 setting, press button t to conrm.
zHow to change the Battery:
As the battery runs out, the LCD will become darker. When
the LCD is not clear, you need to change the battery. Before
changing battery, please turn off the unit. Please use 6F22
(9V) dry battery to replace. Please open the battery cover ac-
cording to the left picture indicating when changing battery. If
you will not use the unit for a long period of time, please take
out the battery to avoid battery leakage damaging the unit.
zDC adaptor using instruction:
You can use 9V, over 150mA DC adaptor as the power supply
for Dr. Chord Pro. Plug the adaptor plug into position d. The
positive and negative pole of adaptor must be .
zUsing Stand
When you want to put the unit on the table to get a better view
effect, you can open the stand according to the above picture.
Disposal
Do not dispose of the device at the end of his operat-
ing life in your normal domestic waste. This device is
subject to the European Guidelines 2002/96/EC.
zHave the product disposed of by a professional dis-
posal company of by your communal disposal facility.
zObserve the currently applicable regulations. In case of doubt
contact your disposal facility.
zDispose of packaging materials in an environmentally
responsible manner.

14

15

© 2010 • Musikhaus e. K. • Treppendorf 30 • 96138 Burgebrach • Germany • www.thomann.de
Table of contents
Other Harley Benton Tuner manuals