Harnisch+Rieth G-F 316 E User manual
Operating instructions
Machine designation: Denture model grinding unit with
Suction and filter unit
Machine type: G-F 316 E
Machine no.: .....................................
Keep for future reference!

G-F 316 E - 24.02.2002 / Vers.: 2 1
Dear customer,
Thank you for the confidence you have placed in us by purchasing this denture model grinding
unit.
For this unit to be of service to you for many years to come, please take the time to read these
operating instructions carefully, especially before using the unit for the first time.
Contents
1 Safety ...................................................................................................................................... 2
1.1 Intended use.................................................................................................................. 2
1.2 Possible dangers ........................................................................................................... 2
1.3 Approved operators ....................................................................................................... 2
1.4 Safety measures at site of operation ............................................................................. 2
1.5 Marking of safety references contained in these instructions......................................... 2
2 Initial/Setting into operation ................................................................................................. 3
2.1 Unpacking the unit ......................................................................................................... 3
2.2 Identification of the unit components ............................................................................. 3
2.3 Initial/setting into operation procedure ........................................................................... 4
2.4 Checking the filter unit ................................................................................................... 4
3 Operation................................................................................................................................ 5
3.1 Automatic switch-off....................................................................................................... 5
3.2 Changing the disposable filter bag................................................................................. 5
3.3 Changing/cleaning (dry) the ultra-fine filter cartridge ..................................................... 5
3.4 Changing the carbide metal milling tool ......................................................................... 6
4 Cleaning/maintenance........................................................................................................... 7
4.1 Cleaning the suction channel......................................................................................... 7
4.2 Maintenance .................................................................................................................. 7
5 Electrical fuse protection ...................................................................................................... 7
6 Technical data ........................................................................................................................ 8
7 Warranty conditions .............................................................................................................. 9
8 EC declaration of conformity.............................................................................................. 10

2G-F 316 E - 24.02.2002 / Vers.: 2
1 Safety
1.1 Intended use
The G-F 316 E denture model grinding unit is intended for use in dental laboratories for spot
grinding dentures. This unit is designed exclusively for milling plasters and other similar
materials.
The filter unit is suitable for extracting dusts of the use category C as stipulated in the BIA
requirements according to ZH 1/487 (i. e. also for dusts hazardous to health).
Unauthorized modifications and additions are not permitted for reasons of safety!
1.2 Possible dangers
The G-F 316 E denture model grinding unit is safe when used as intended. However, when not
used properly or with care its use can lead to injuries (for further details see section
“2.3 Inital/setting into operation procedure“ “Danger“.
−Before leaving the G-F 316 E denture model grinding unit the user should always switch the
unit off at the main switch.
−Potential ignition sources should not be suctioned.
−As the dusts to be extracted are more or less hazardous to health, special care should be
taken that the ultra-fine filter and the PE foil bag are properly inserted and that they are not
damaged!
−Before maintenance work and cleaning, the unit should be switched off and disconnected
from the mains supply (i. e. the mains plug should be pulled).
−Before accessing any of the incorporated electric components, the unit should be
disconnected from the mains supply!
1.3 Approved operators
The operator of the machine should make sure that the operating instructions are accessible to
the operating personnel. The operator should make sure that they have been read and fully
understood by the operating personnel. Only then should they be allowed to operate the
machine.
1.4 Safety measures at site of operation
The installation surface should be flat and stable according to the weight of the denture model
grinding unit.
Foreign bodies should not be inserted through the ventilation openings of the unit.
1.5 Marking of safety references contained in these instructions
Note Refers to tips and other particularly helpful pieces of information.
Caution Refers to particular ways of operation or handling, the non-adherence of which can lead
to malfunctioning, damages or other kinds of trouble.
Danger Refers to dangerous situations, in which injuries can occur.
Warning of possible danger. (Caution, danger, refer to documentation).
This sign is also attached to the unit because of the rotating milling tool.
G-F 316 E - 24.02.2002 / Vers.: 2 3
2 Initial/Setting into operation
2.1 Unpacking the unit
1. Put the carton onto a flat surface.
2. Remove the upper packaging material.
3. Lift the unit out of the packaging.
4. Check the accessories.
−Documentation
−Tubular hexagon box wrench (19 mm)
Crossbar ∅12 mm for tubular hexagon box wrench (19 mm)
blocking pin ∅6 mm with O-ring.......................................................................no. 316 E 640
−Mains supply connection cable .........................................................................no. 316 E 500
−For possible further accessories see note of delivery
2.2 Identification of the unit components
The G-F 316 E denture model grinding unit comprises the following main elements:
a) Motor milling spindle with collet chuck and conical carbide metal milling tool (other milling
tools upon request).
b) Incorporated suction and filter unit, consisting of a noise-absorbing motor-driven suction
blower, a disposable filter bag and a subsequently connected ultra-fine filter cartridge with an
automatic de-activation device for monitoring the suction unit/process.
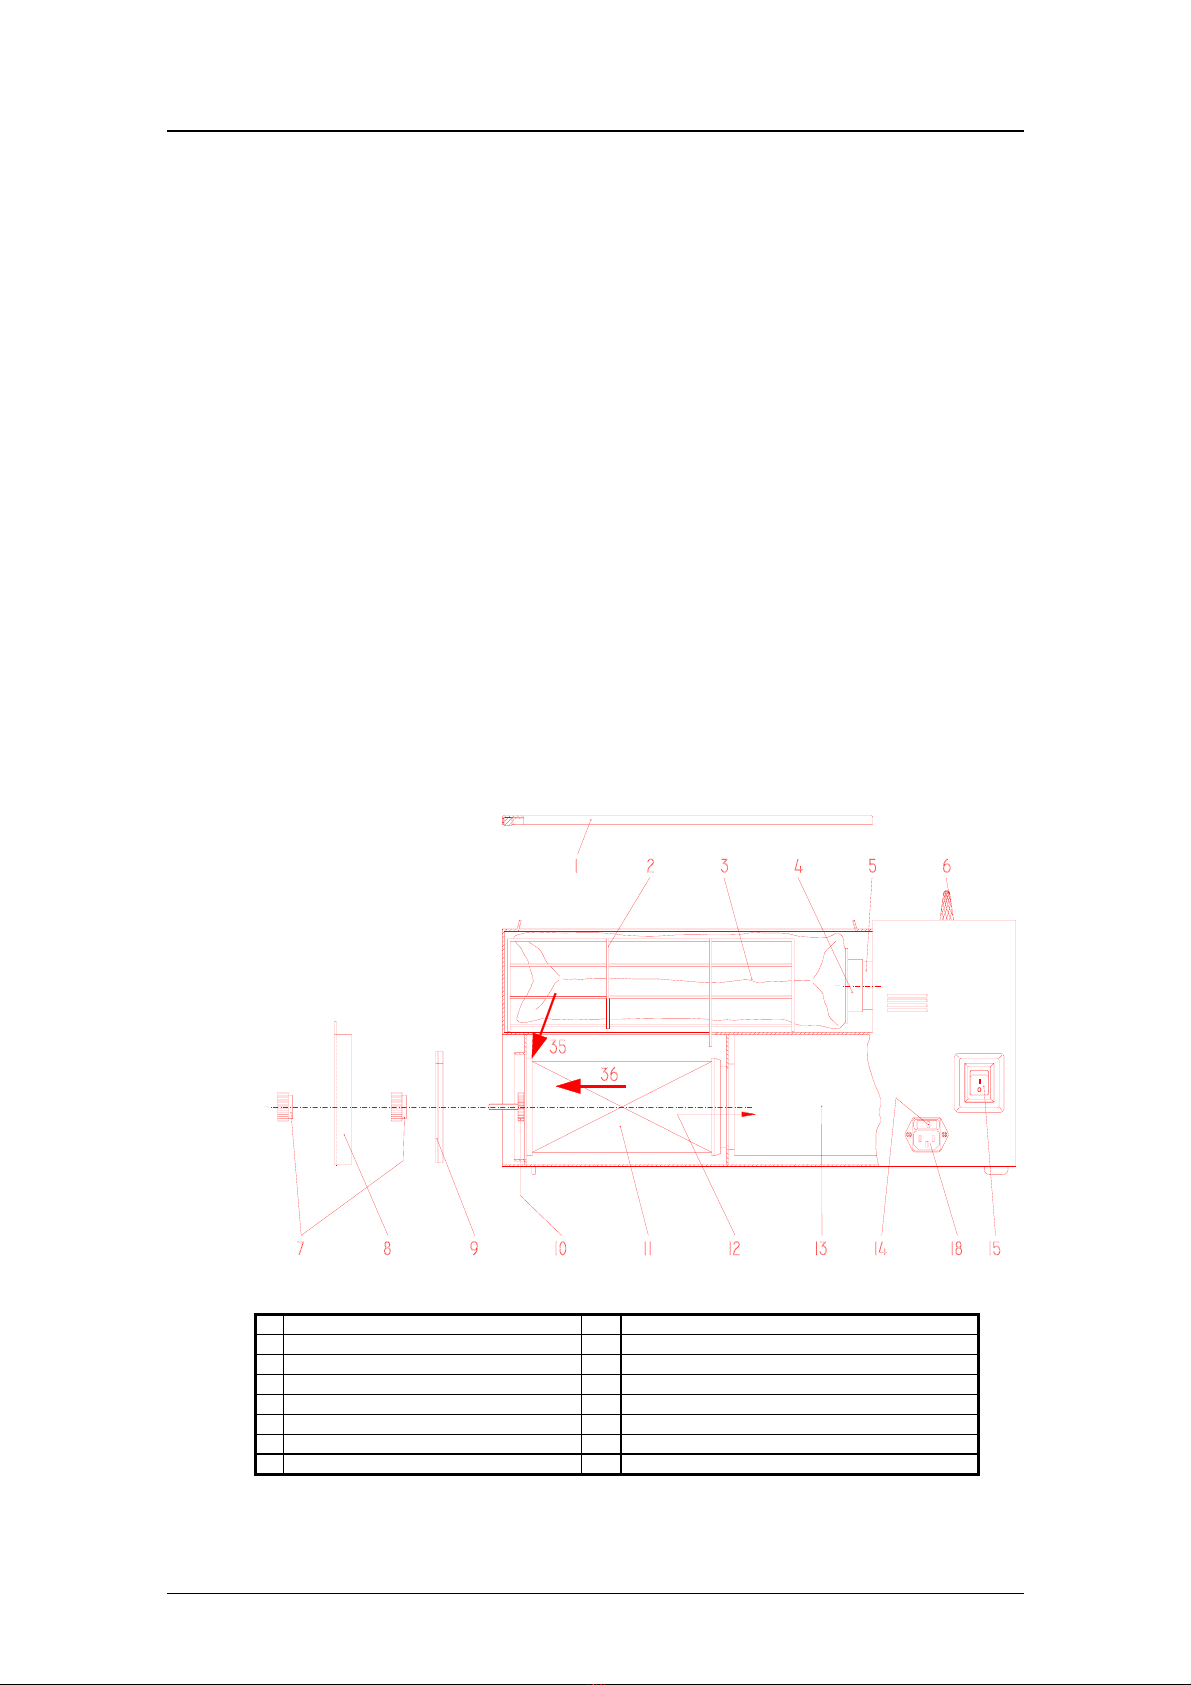
Fig. 1: Identification of the unit components
1 Lid (access filter bag) 9 Lid (for ultra-fine filter)
2 Wire basket 10 Knurled nut
3 Disposable filter bag 11 Ultra-fine filter cartridge
4 Plastic connection 12 Opening to suction blower
5 Nozzle 13 Suction blower
6 Milling tool 14 2 fuses for feeble currents 10 A/T
7 Knurled nuts with copper disk 15 Main switch
8 Lid (access ultra-fine filter) 18 Mains connection unit plug (230 V/50 Hz)

4G-F 316 E - 24.02.2002 / Vers.: 2
2.3 Initial/setting into operation procedure
(See Fig. 1, page 3)
1. Before setting the unit into operation you should check the filter unit as described in section
“2.4 Checking the filter unit“.
2. Establish the connection to the mains supply (230 V/50 Hz).
3. Actuate the main switch (15).
Danger The rotating milling tool can lead to injuries, for instance, due to loose work clothing, long hair,
etc. as these can entangle with the milling tool.
Therefore you should take appropriate preventive measures!
4. Milling tool rotating!
5. Suction running.
Note Press the denture slightly with both hands against the rotating milling tool (6), moving in
opposite direction to the cutting direction.
2.4 Checking the filter unit
(See Fig. 1, page3)
1. Switch unit off at main switch and pull mains supply plug.
2. Remove lids (1), (8) and (9).
3. Check to make sure that the ultra-fine filter cartridge (11) and the filter bag (3) are not damaged
and that they are inserted properly (tightly).
4. Knurled nut (10) should be tightened fairly securely.
5. Plastic connection (4) of the filter bag (3) should be attached firmly to nozzle (5).
6. Wire basket (2) should be inserted as displayed!
7. Put all lids (1), (8) and (9) back on and close them.
Caution The filter unit should be inspected at least once a month by appropriately trained personnel.

G-F 316 E - 24.02.2002 / Vers.: 2 5
3 Operation
3.1 Automatic switch-off
(See Fig. 1, page 3)
Note As soon as the disposable filter bag (3) is full, the automatic switch-off is activated via avacuum
switch. The extraction unit and the milling drive (6) are switched off.
−The disposable filter bag (3) must be replaced, see section "3.2".
Note If the unit is deactivated by the automatic switch-off, you can continue operation for a short
period without changing the disposable filter bag (3) by switching the unit off and on and by
tapping the filter bag a few times.
−To tap the disposable filter bag (3) open the clamp fasteners and take off the lid (1).
Note If upon activation of the automatic switch-off the disposable filter bag (3) is still practically
empty, then check the ultra-fine filter (11), see section "3.3".
3.2 Changing the disposable filter bag
(See Fig. 1, page 3)
1. Remove lid (1) and press the plastic connection (4) off of the nozzle (5) using both hands.
2. Seal filter bag (3) with attached plastic lid.
Note Do not eliminate dust from the unit with compressed air!
3. Inspect the suction channel (see section “4.1 Cleaning the suction channel“).
4. Insert new filter bag (3) tightly (for further details see section “2.4 Checking the filter unit“).
Note Also read section “3.3 Changing/cleaning (dry) the ultra-fine filter cartridge“.
3.3 Changing/cleaning (dry) the ultra-fine filter cartridge
(See Fig. 1, page 3)
Note After changing the filter bag (3) approx. three times you should also exchange the ultra-fine
filter cartridge (11) or change/ clean it (dry)!
1. Disconnect the unit from the mains supply (pull the mains plug).
2. Take off lids (1), (8) and (9) and remove filter bag (3) and wire basket (2).
3. Take out nut (10) and press the ultra-fine filter cartridge (11) from above (arrow (35)) until it
loosens. Then pull out ultra-fine filter cartridge backwards (arrow (36)).
Caution In all cases you should prevent dust from getting into opening (12) as this could otherwise
damage the suction blower (13) (see also section “4 Cleaning/maintenance“).
Note We can also clean the ultra-fine filter cartridge (11) for you in exchange for a new one. We only
use type checked filters according to ZH 1/487, para. 2 (with test certificate according to
DIN 24 184).
3. Insert new/cleaned ultra-fine filter cartridge (11) and new filter bag (3) (for details see section
“2.4 Checking the filter unit“).
4. Examine suction channel (see section “4.1 Cleaning the suction channel“).
6G-F 316 E - 24.02.2002 / Vers.: 2
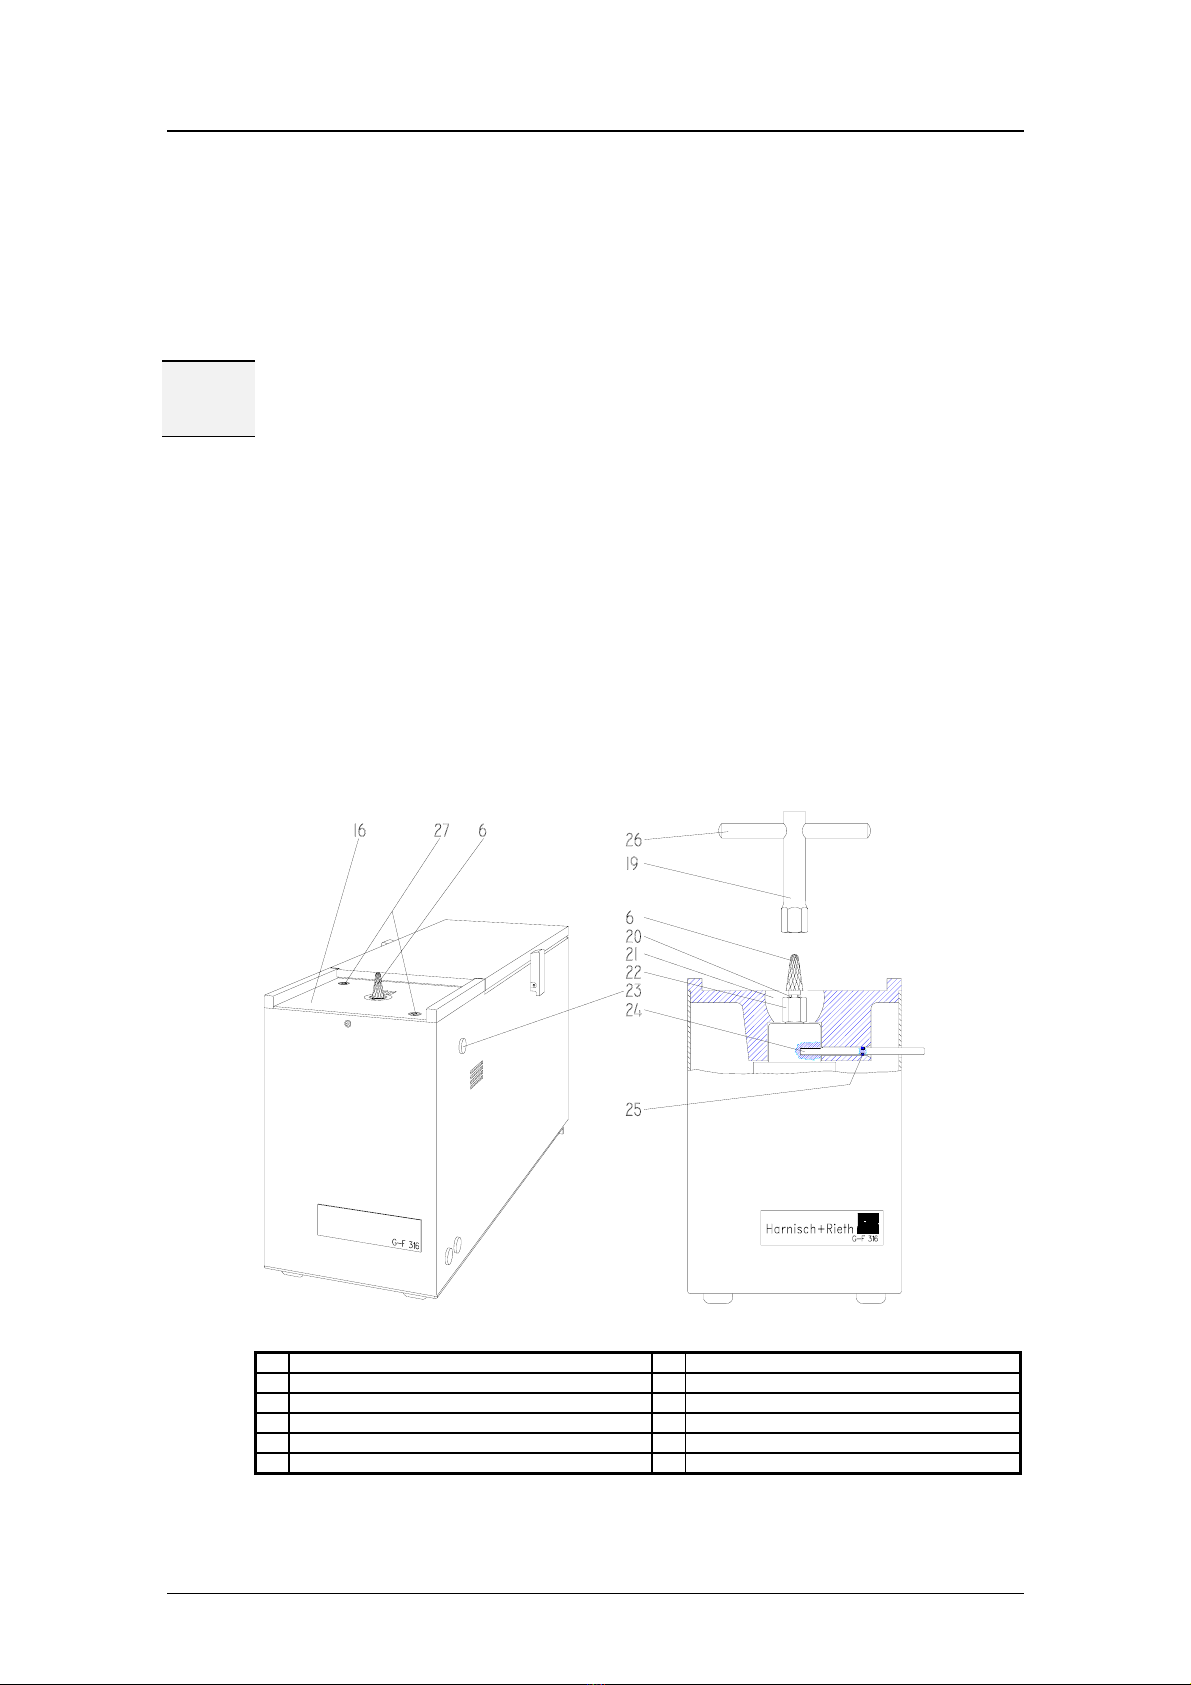
3.4 Changing the carbide metal milling tool
See Fig. 2., page 6)
1. Switch off unit at main switch and pull mains supply plug.
2. Take out the two recessed countersunk head screws (27) and take off the work table (16).
3. With the milling tool (6) clamped in clean the swivel nut (22) with a brush.
Caution The swivel nut must be cleaned before changing the milling tool as dust falling into the collet
chuck could cause damages to it.
The denture model grinding unit should not be cleaned with compressed air.
4. Take the plastic plug out of the opening (23).
5. Press the blocking pin (24) into opening (23) and turn the milling tool (6) until the blocking pin
(24) snaps in securely into the spindle thus locking it. The O-ring (25) prevents the blocking pin
from jumping out.
6. Loosen the swivel nut (22) with the tubular hexagon box wrench (19 mm) (19) and using the
crossbar (26) and pull out the milling tool (6).
7. Insert new milling tool (6) with O-ring (20).
8. Slightly tighten the swivel nut (22) by hand until the milling tool shaft can just about be moved in
and out..
9. Press down the milling tool (6), thus slightly squeezing the O-ring (20) and making it tight.. The
milling tool must be kept in this pressed position.
10. Tighten the swivel nut (22) securely with the tubular hexagon box wrench (19).
11. Pull out the blocking pin (24), seal opening (23) with the plastic plug and screw on the work
table (16) again with the two recessed countersunk head screws (27).
Fig. 2: Front right view and front cross section
6 Milling tool 23 Opening for plastic plug
16 Work table 24 Blocking pin
19 Tubular hexagon box wrench (19 mm) 25 O-ring on the blocking pin
20 O-ring on the milling tool shaft 26 Crossbar Ø 12 mm
21 Suction channel 27 2 recessed countersunk head screws
22 Swivel nut (19 mm)

G-F 316 E - 24.02.2002 / Vers.: 2 7
4 Cleaning/maintenance
The filter bag compartment and the ultra-fine filter cartridge compartment should be cleaned
every time the filter is exchanged.
4.1 Cleaning the suction channel
See Fig. 2. page 6)
Caution To prevent the drive motor from possibly overheating the suction channel (21) should be
controlled for plaster deposits at least every time the filter bag is changed and, if necessary,
cleaned with a spatula or a brush..
1. Switch the unit off at the main switch and pull the mains supply plug.
2. Take out the two recessed countersunk head screws (27) and take off the work table (16).
3. Check and, if necessary, clean the suction channels (21) of plaster deposits.
4. Screw the work table (16) back on again with the two recessed countersunk head screws (27).
4.2 Maintenance
Apart from cleaning the suction channel the denture model grinding unit is maintenance-free.
5 Electrical fuse protection
−The unit is fuse protected with the two main fuses (14).
Fig. 3: Electrical fuse protection
14 2 main fuses 10 A/T
18 Mains connection unit plug

8G-F 316 E - 24.02.2002 / Vers.: 2
6 Technical data
Machine designation :Denture model grinding unit
Machine type :G-F 316 E
Overall dimensions :Width 180 mm, depth 520 mm,
Height 280 mm
Electrical connection :230 volts/50 Hz
Overvoltage category :II
Use category :U, S, G and C
Power consumption :approx. 700 watts
Electrical fuse protection :2x 10 A/T
Milling speed :approx. 9000 rpm
Collet chuck diameter :8 mm
Weight :16 kg

7 Warranty conditions
This device conforms to the current safety regulations and was subjected to extensive
testing before leaving the works.
We grant a 12 months guarantee, in which we are obliged to carry out all repairs
resulting from material or fabrication faults free of charge.
The warranty expires if repairs are not carried out by specialized dealers or by us.
Replacements for reasons covered by the guarantee do not lead to an extension of the
original guaranty period.
Normal wear and tear or damages resulting from incorrect operation are not covered by
the terms of warranty.
In order to be able to provide you with a comprehensive service we ask you to fill out the
guarantee return form (attached at the beginning of these instructions) and send it to us
by fax or letter (window envelope).
Fax no.: 0 71 81/ 73 13 9
---------------------------------------------------------------------------------------------------------------------------Fold here for window envelope ----
Copy
Guarantee return form
Machinenbau
Harnisch+Rieth GmbH & Co.
Postfach 1260
D-73644 Winterbach
Machine
designation: Denture model grinding unit
Machine type: G-F 316 E
Machine no.:
Date of purchase
Dealer/store:
From:
Date/signature:

10 G-F 316 E - 24.02.2002 / Vers.: 2
8 EC declaration of conformity
as stipulated by the EC directive for machines
89/392/EEC, Appendix II A
We herewith declare that due to its design the machine specified below is in conformity with the
basic safety and health requirements of the EC directives.
In the event of modifications of the machine not approved by us this certificate looses its
validity.
Name of the manufacturer :Harnisch+Rieth
Address of the manufacturer :Küferstraße 14-16, 73650 Winterbach
Machine designation :Denture model grinding unit
Machine type :G-F 316 E
The following pertinent EC directives were applied:
EC machine directive (89/392/EEC), corresponding to 9. GSG regulation of 12.05.93
EC low voltage directive (73/23/EEC), corresponding to 1. GSG regulation of 11.06.79
EC EMC directive (89/336/EEC), corresponding to EMC law of 09.11.92
Following harmonizing standards were applied:
DIN EN 292 :Machine safety.
DIN EN 61 010-1 :Safety regulations for electric measuring, controlling and laboratory devices.
DIN EN 55 014 :Interference suppression of electrical apparatus and installations.
DIN EN 55 104 :Electromagnetic compatibility, noise resistance requirements (category I).
The following national technical specifications were applied:
ZH 1/487 :Facility for separating health endangering dusts with re-circulation of the clean air into the
work rooms.
A technical documentation is available.
The operation instructions belonging to the machine are also available.
Director of the Quality Control Department
Winterbach, 06th September, 1995
Table of contents
Other Harnisch+Rieth Dental Equipment manuals


