Hatching Time CIMUKA HB Series User manual
1
HB SERIES
CIMUKA EGG INCUBATORS
USER MANUAL
HB SERIES Models...........................................2
Parts of Models...............................................3-4
Quick Guide.......................................................5
Placement of Models.........................................6
Ventilation..........................................................6
Egg Handling.....................................................7
Temperature / Humidity Controller...............7-10
USB Connection / Room Sensor.....................11
HumisonicTM Auto-Humidity Control.…........... 12
Humidity Tray..................................................13
TurnXTM Automatic Turning System................14
Setter Trays and Hatchery Baskets...........15-16
Active Periodic Cooling (APC)...................17-20
Setting and Hatching..................................21-23
Incubation Records.........................................24
Factors Affecting Hatchability.........................24
Cleaning up and Service................................25
Safety Labeling...............................................25
Product Information........................................26
Recommended Incubation Values.................27
IMPORTANT! Read the following instruction manual carefully before use.
Keep this user manual safe for future reference.
HB175 / HB350 / HB500 / HB700

2
HB SERIES
Models
Combined Models (C)
Setter Models (S)
HB175 S
Hatcher Models (H)
HB350 S
HB500 S
HB700 S
HB175 H
HB350 H
HB500 H
HB700 H
HB175 C
HB350 C
HB500 C
HB700 C
3
HB SERIES
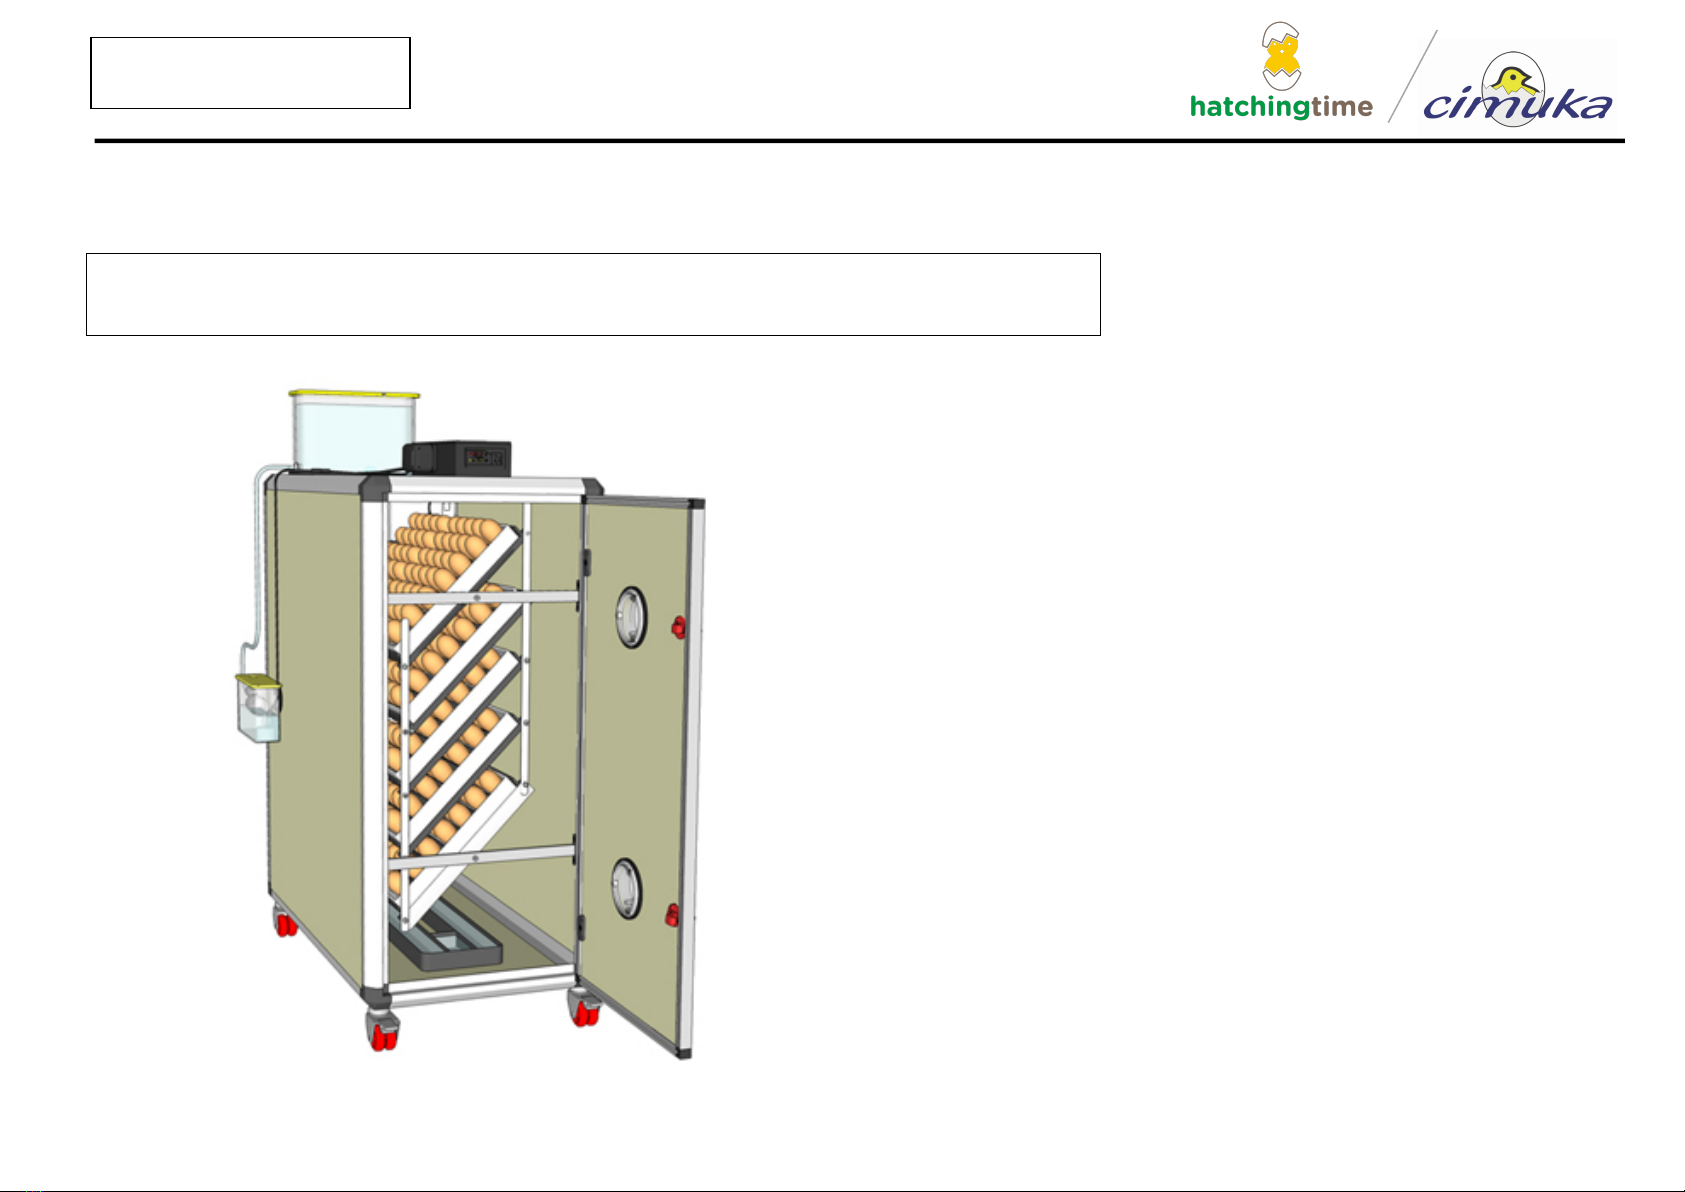
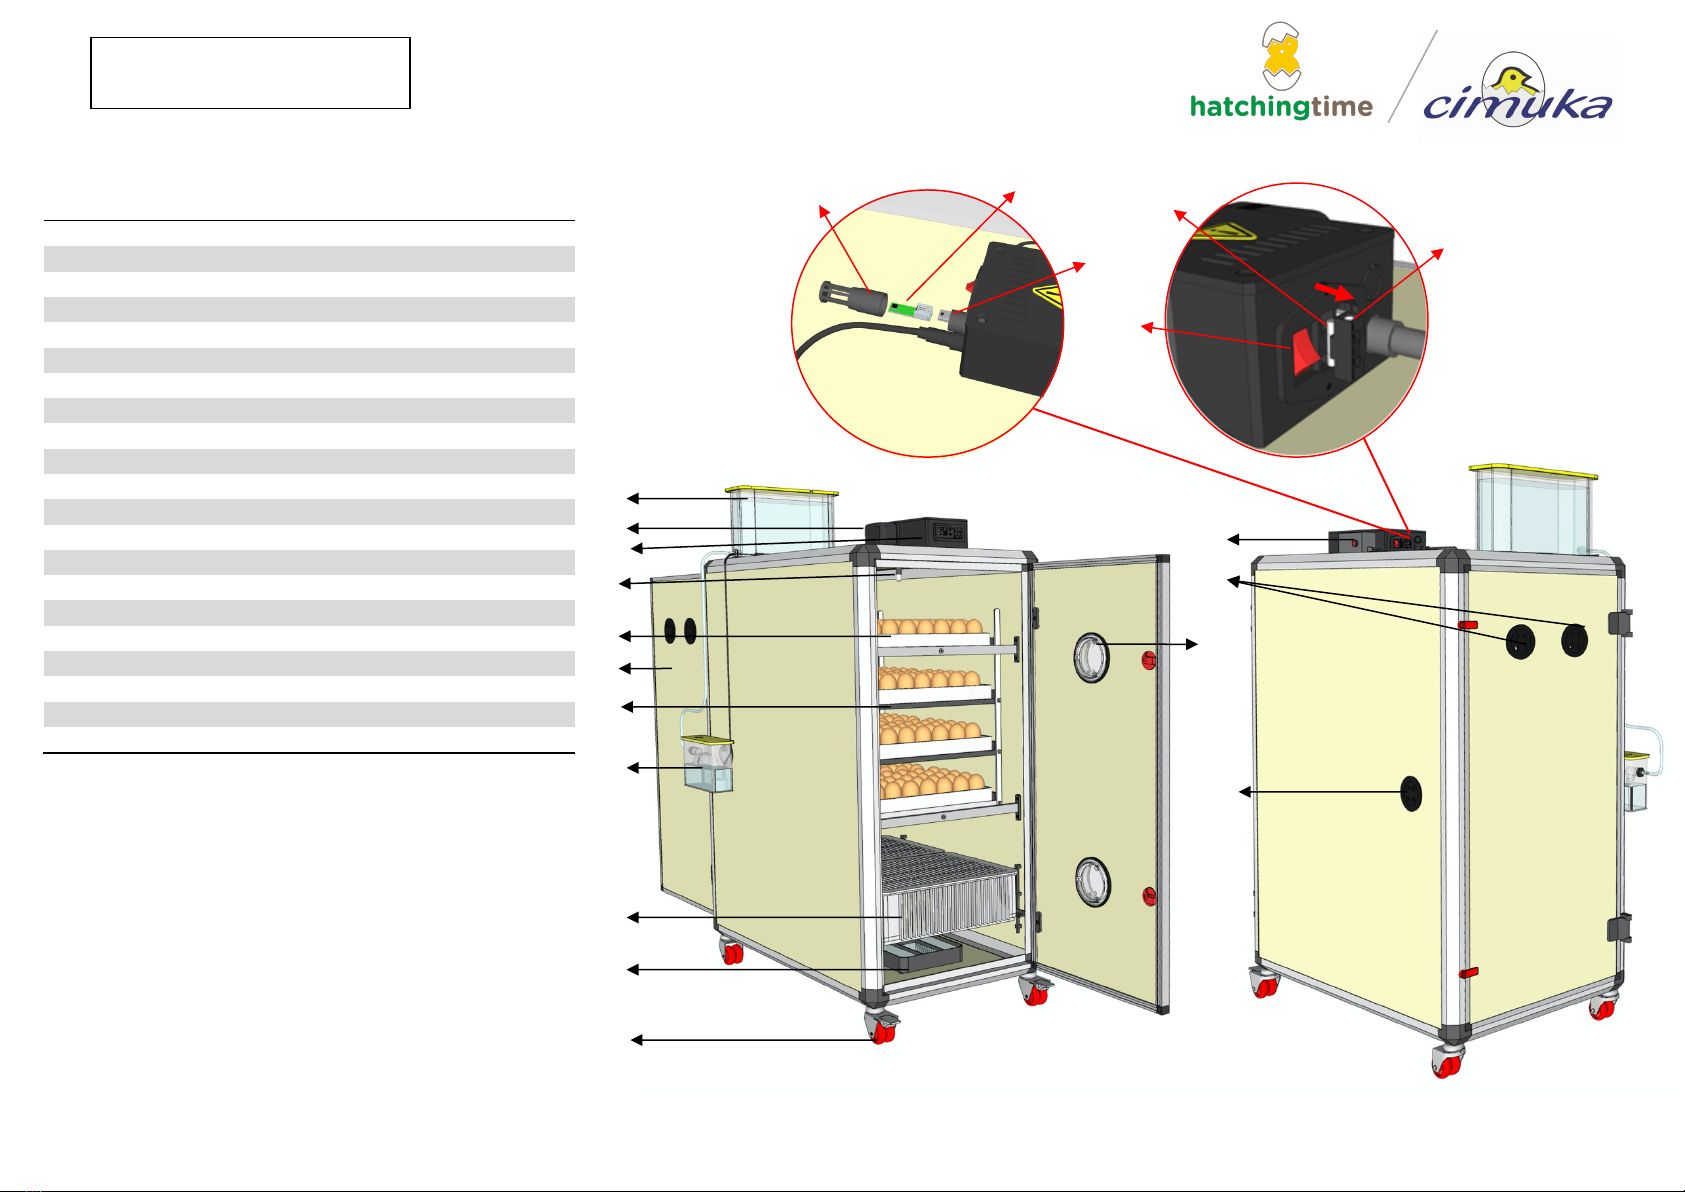
Parts of Models
1
Water Reservoir - (1 Gallon)
2
HumisonicTM Adapter
3
Control Panel
4
Temperature / Humidity Sensor
5
Flexy35 Setter Tray (C & S Models)
6
Back Door for Cleaning and Servicing
7
TurnXTM Unit (C & S Models)
8
HumisonicTM Reservoir
9
CS35Y Hatchery Baskets (C & S Models Only)
10
Humidity Tray
11
Lockable Wheels
12
TurnXTM Control Adapter
13
Adjustable Exhaust (air-out) Holes
14
Observation Windows
15
Adjustable Intake (air-in) Hole
16
Power Switch
17
Protection Fuse (F type)
18
Spare Fuse (F type)
19
USB Connection
20
Room Sensor Chip
21
Room Sensor Cover
1
2
3
4
5
6
7
9
8
10
11
18
17
12
13
14
16
15
19
20
21
4
HB SERIES
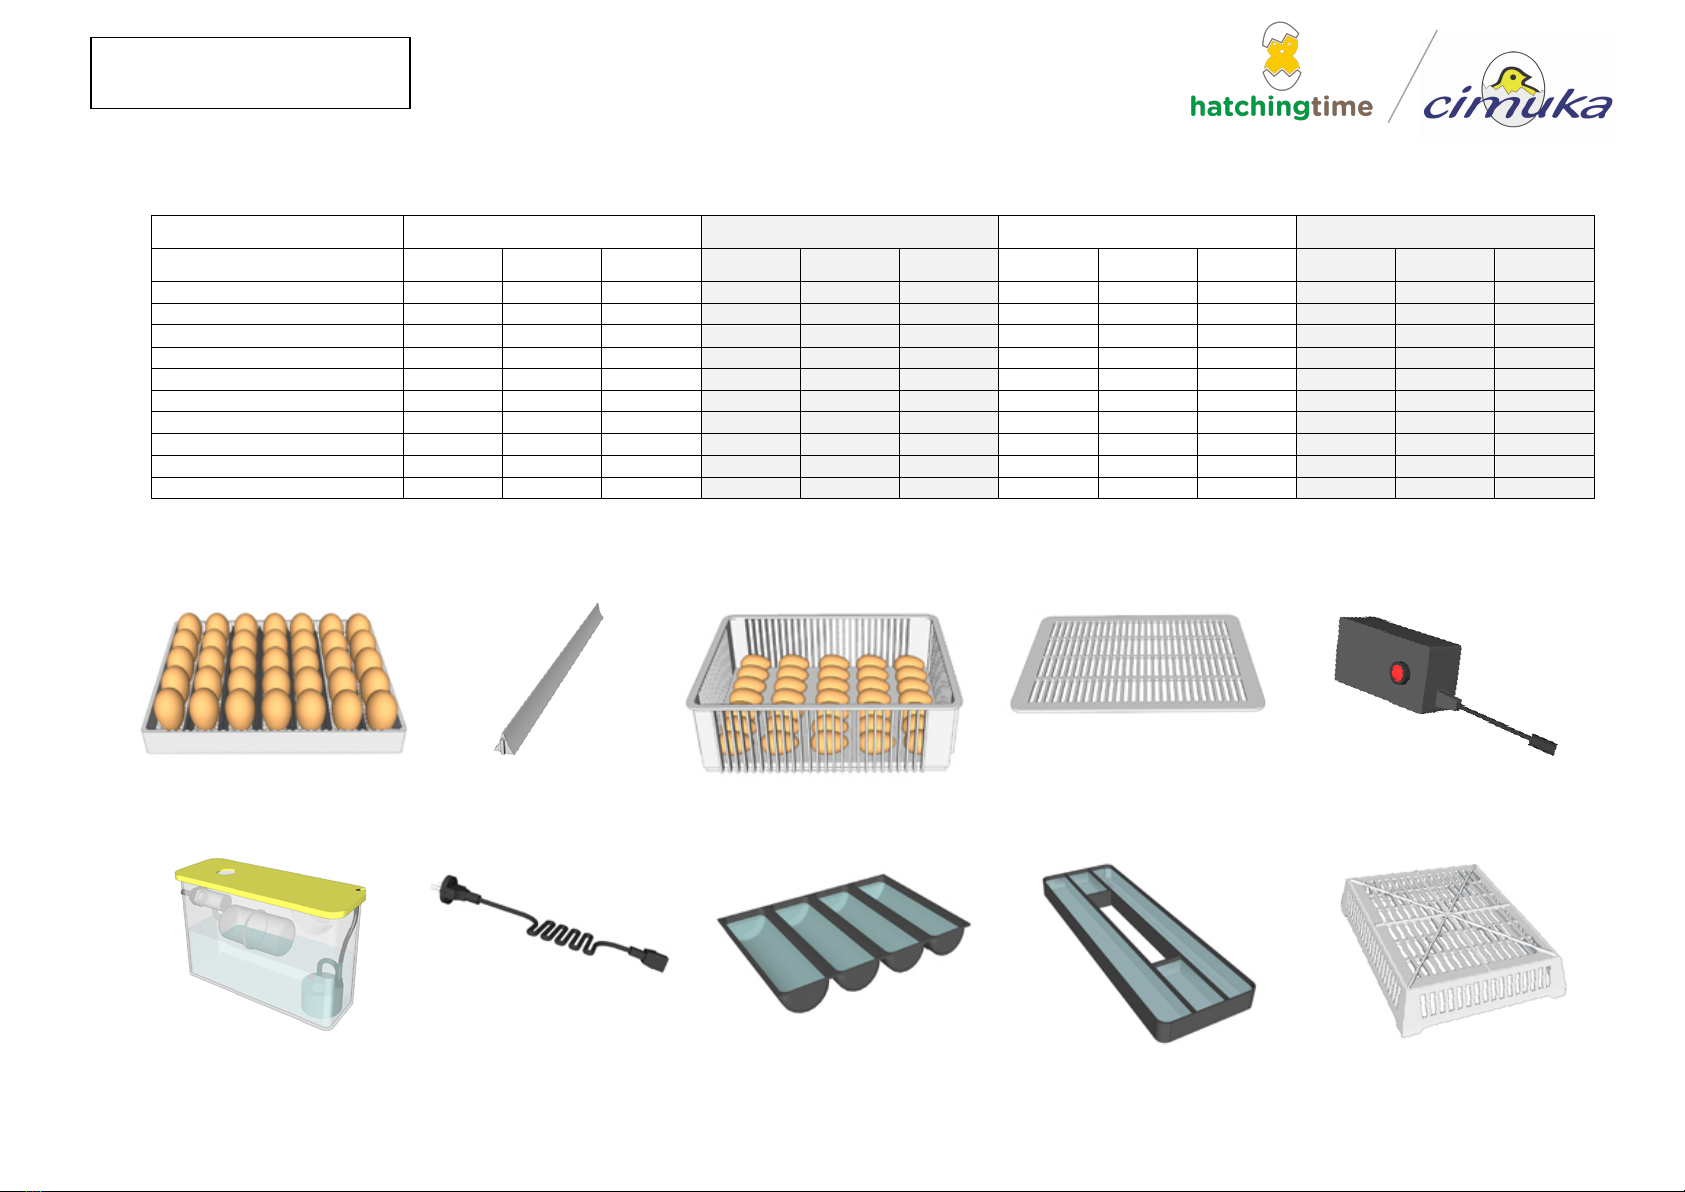
Accessories
HB175
HB350
HB500
HB700
C
S
H
C
S
H
C
S
H
C
S
H
Flexy35
4 pc
5 pc
-
8 pc
10 pc
-
10 pc
14 pc
-
16 pc
20 pc
-
Separators for Flexy
40 pc
50 pc
80 pc
100 pc
100 pc
140 pc
160 pc
200 pc
-
CS35Y
1 pc
-
5 pc
2 pc
-
10 pc
4 pc
-
14 pc
4 pc
-
20 pc
Cover for CS35Y
1 pc
-
2 pc
2 pc
-
4 pc
2 pc
-
4 pc
2 pc
-
4 pc
TurnXTM Adapter
1 pc
1 pc
-
1 pc
1 pc
-
1 pc
1 pc
-
1 pc
1 pc
-
HumisonicTM Unit
1 pc
1 pc
1 pc
1 pc
1 pc
1 pc
1 pc
1 pc
1 pc
1 pc
1 pc
1 pc
Power Cable
1 pc
1 pc
1pc
1 pc
1 pc
1 pc
1 pc
1 pc
1 pc
1 pc
1 pc
1 pc
Humidity Tray - WT02
1 pc
1 pc
1 pc
-
-
-
-
-
-
-
-
-
Humidity Tray - WT03
-
-
-
1 pc
1 pc
1 pc
1 pc
1 pc
1 pc
1 pc
1 pc
1 pc
Hatchery cover for Flexy35
Optional
Optional
-
Optional
Optional
-
Optional
Optional
-
Optional
Optional
-
Flexy35
Separator for Flexy35
CS35Y
Cover for CS35Y
TurnXTM Adapter
HumisonicTM Unit
Hatchery cover for Flexy35
Humidity Tray - WT03
Power Cable
Humidity Tray - WT02
CAUTION! Do not use damaged parts.

5
HB SERIES
Quick Guide
- Remove all packing material carefully.
- Identify and inspect all parts of model. (See Pages 2-4)
- Install HumisonicTM unit into cabinet. (See Page 11)
- Fill humidity tray with water (at least 1 channel). Picture 1
- Adjust Flexy35 separators to the size of the eggs you are setting.
Picture 2
- Plug in your TurnXTM / HumisonicTM adapters to the control panel,
then plug your machine into the power supply. Picture 3
- Press power button and set the temperature and humidity for your
eggs. Picture 4 (See Pages 8-9)
CAUTION! Do not use equipment with high electric consumption
in the same electrical line as your egg incubator.
CAUTION! Always use a grounded power line for your incubator.
CAUTION! Run the incubator for 3-4 hours before first use to test
the parts and functionality.
TurnXTM
Adapter
HumisonicTM
Adapter
Power
Cable
1
2
3
4
6
HB SERIES
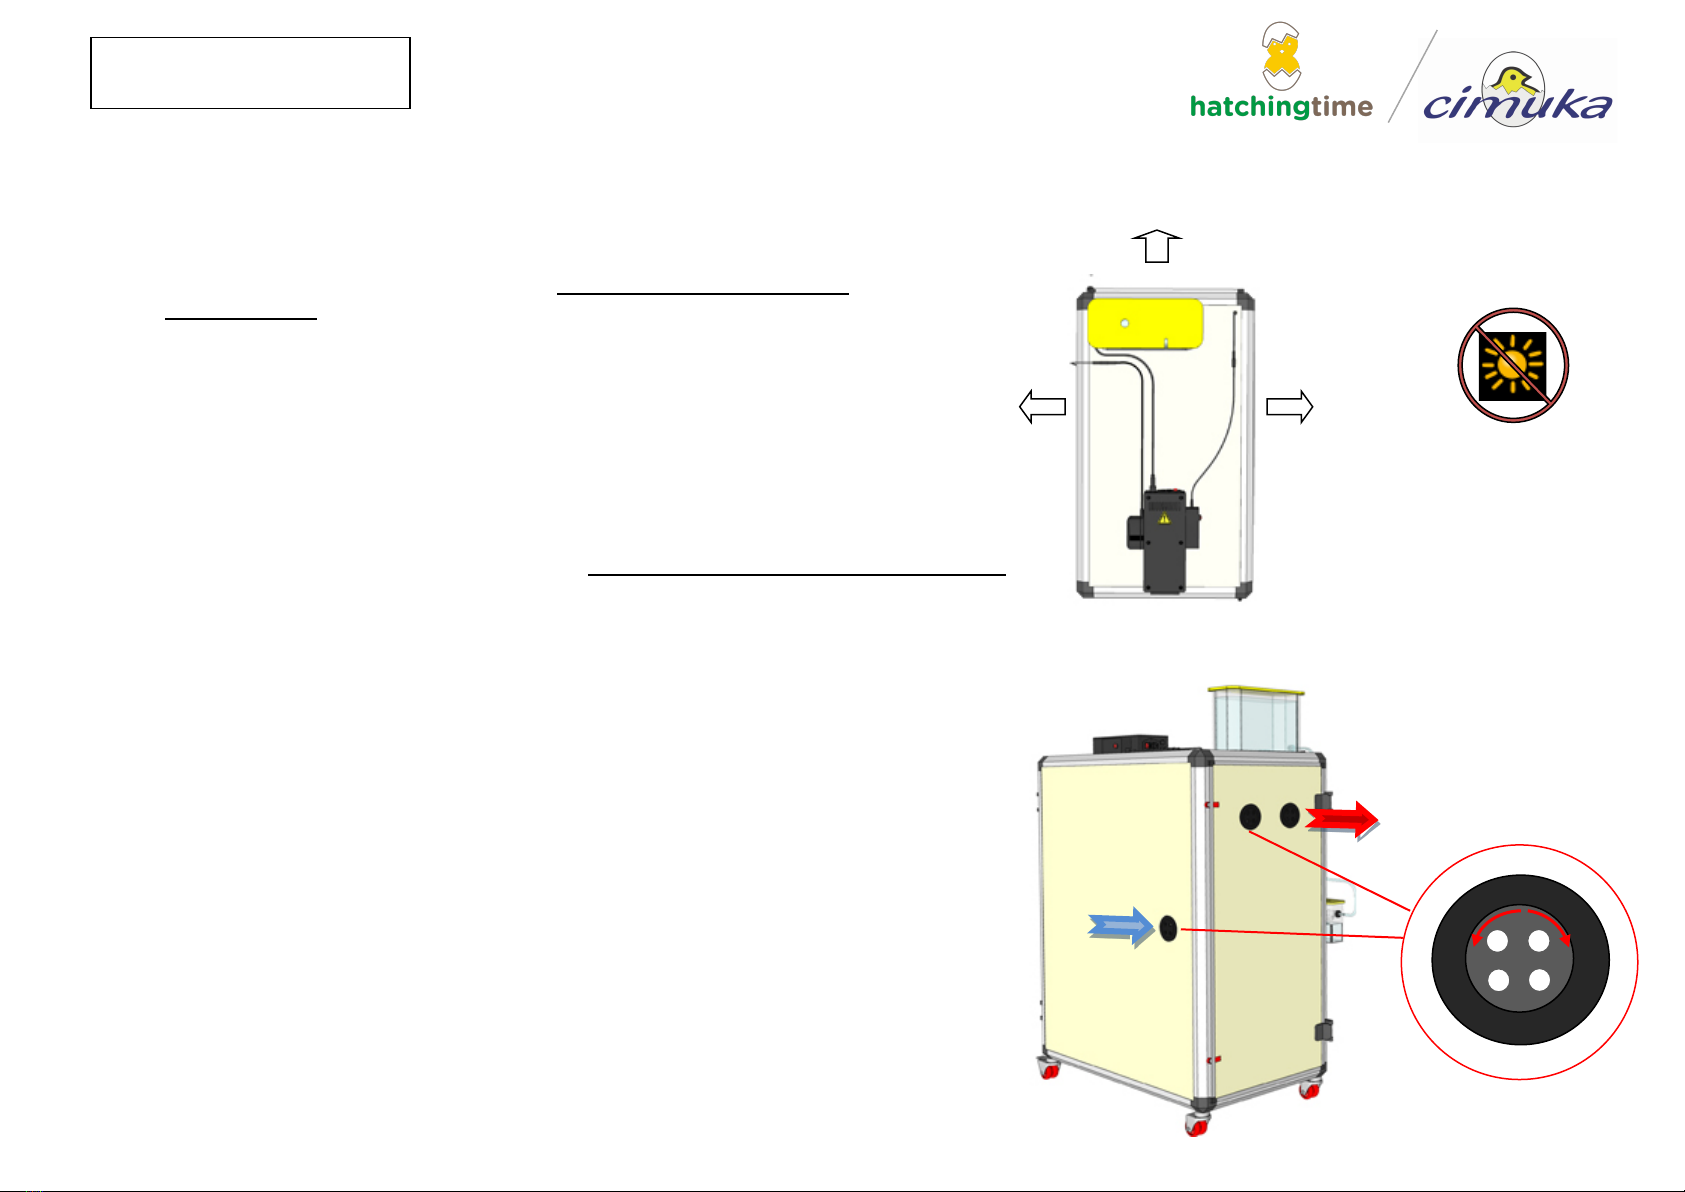
Placement of Model
Ventilation
During incubation embryos produce carbon dioxide. Ventilation is required to
remove carbon dioxide and maintain the correct oxygen levels.
Ventilation is supplied automatically with a fan and adjustable air holes.
Air holes are adjusted by turning the vent to increase/decrease the amount of air
in/out. The amount of ventilation required will depend on egg size and quantity.
Caution! Never close air holes.
Caution! Always keep air holes fully open during hatching period.
Caution! Never breed animals in your incubation room.
Caution! Be sure incubation room is well ventilated.
Caution! Do not let room temperature go below 59
°
F (15
°
C) or above 86
°
F (30
°
C).
Caution! Do not let other animals and insects near the incubator.
Caution! Do not let children operate the equipment.
Air out
Air in
1½ ft (50cm)
Your incubator must be located indoors. Place your incubator on a flat
surface, away from doors and windows. Ideal distance from any wall
is 1½ ft (50cm). The area must be clean and well ventilated. The
incubator should not be exposed to direct sunlight, water, or high
humidity levels.
Ideal incubation room temperature is 68-77
°
F (20-25
°
C). Wide
temperature variations in the room will negatively affect your incubation
results. Consider using an air conditioner or heater to maintain room
temperature.
1½ ft (50cm)
1½ ft (50cm)
7
HB SERIES
Egg Handling
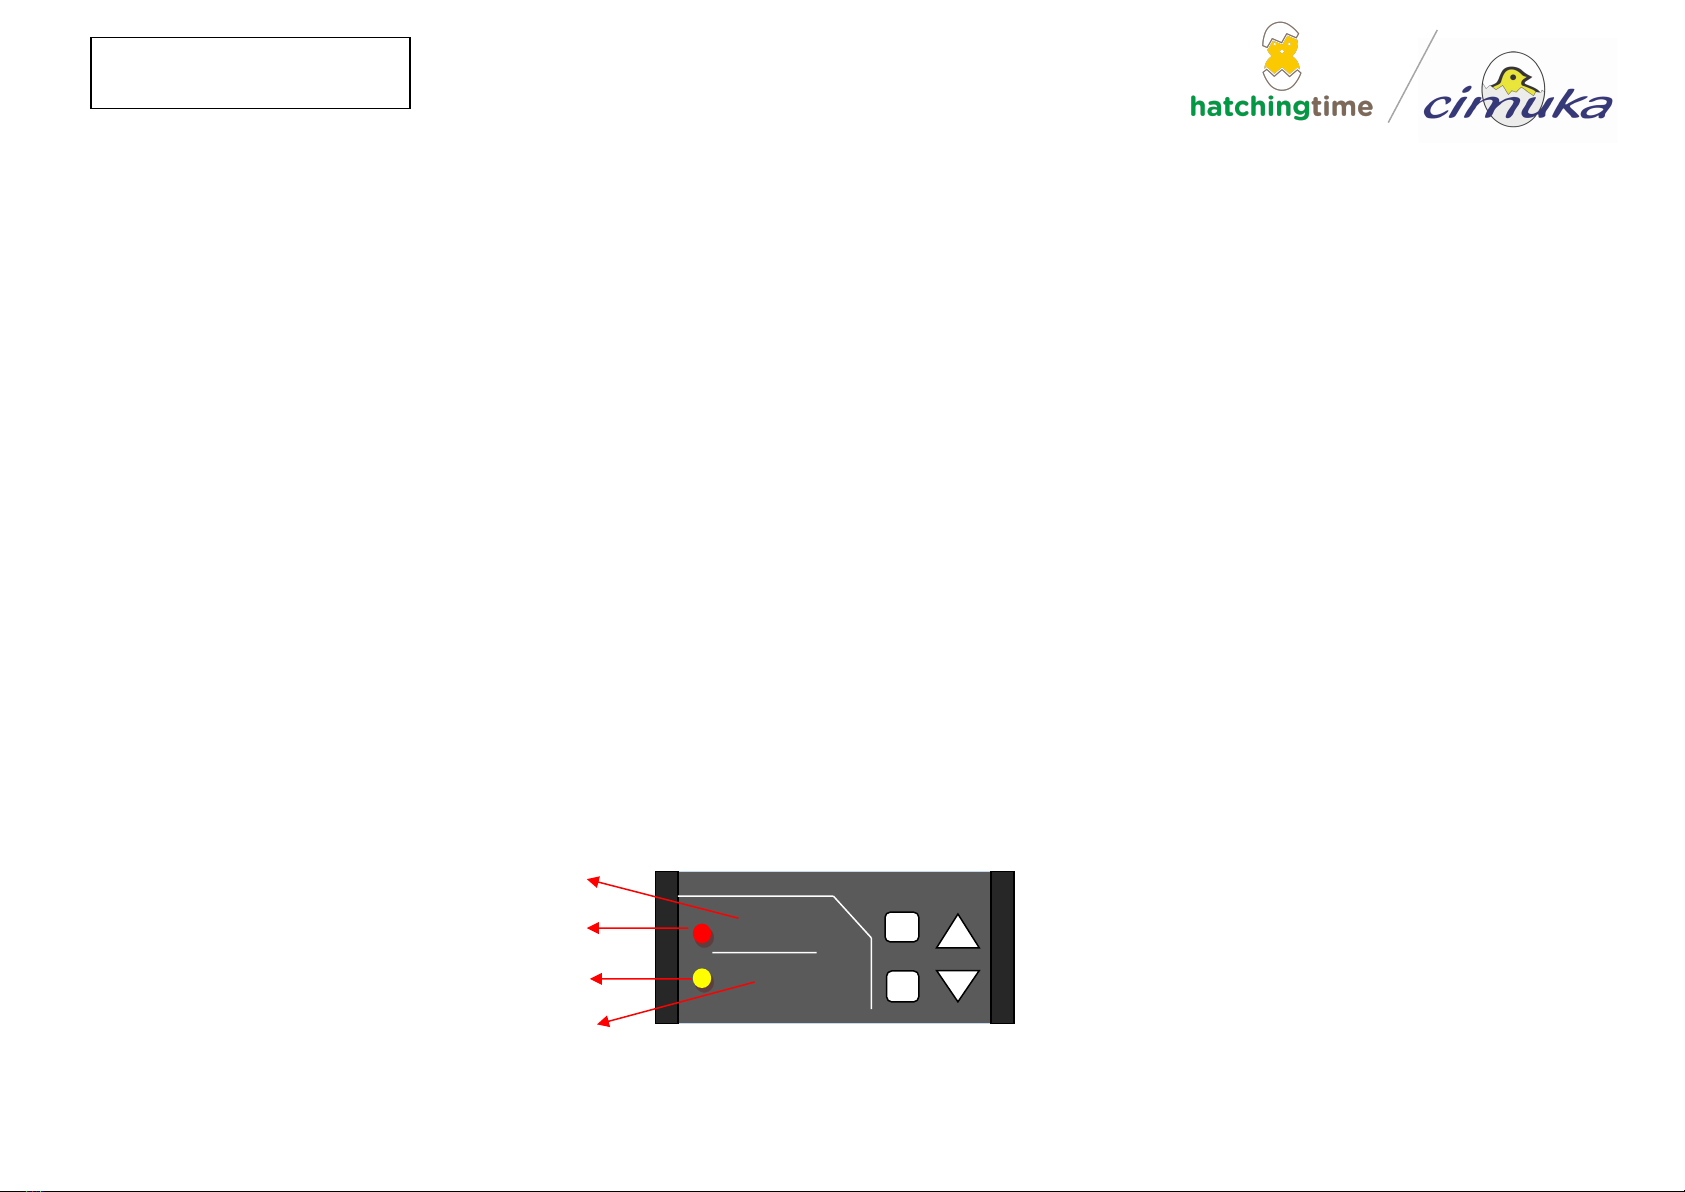
Temperature / Humidity Controller
The most important factor for successful egg incubation is temperature. Temperature is preset for chicken eggs but can be manually adjusted
for all other eggs.
Embryos tolerate short term temperature drops but higher than ideal temperatures can be detrimental. Validate your temperature setting is
accurate with a second thermometer. Do not be concerned about short term cooling of eggs when opening door for water or inspections.
Humidity RH%
Temperature 0F/0C
50
99.8
T
H
Heater active LED
U - Up
D - Down
T - Temperature Set
H - Humidity Set
U
D
Humidifier active LED
Main Screen
Eggs should be collected and stored in proper conditions prior to setting. Good quality eggs are important for positive hatchery results. Sanitizing
eggs before storage is an effective method for killing or decreasing the number of microorganisms on the egg’s surface. Be sure to use proper
sanitary procedures, the sanitation process kills bacteria on the egg but it can also kill the chick embryo in the egg.
Ideal egg storage temperature is 53-55
°
F (12-13
°
C) but can be stored in conditions between 50-68
°
F (10-20
°
C) as necessary, never expose
eggs to sunlight. Daily turning of eggs is suggested during storage to maintain hatchability.
CAUTION! Never store eggs in refrigerator - 39
°
F (4
°
C) is too cold.
CAUTION! Do not store eggs for more than 7 days as this decreases the egg quality and hatchability.
CAUTION! Eggs must be stored for at least 1 day before setting.
CAUTION! Use proper cleaning methods to clean dirty eggs, never use a cloth to clean eggs.
8
HB SERIES
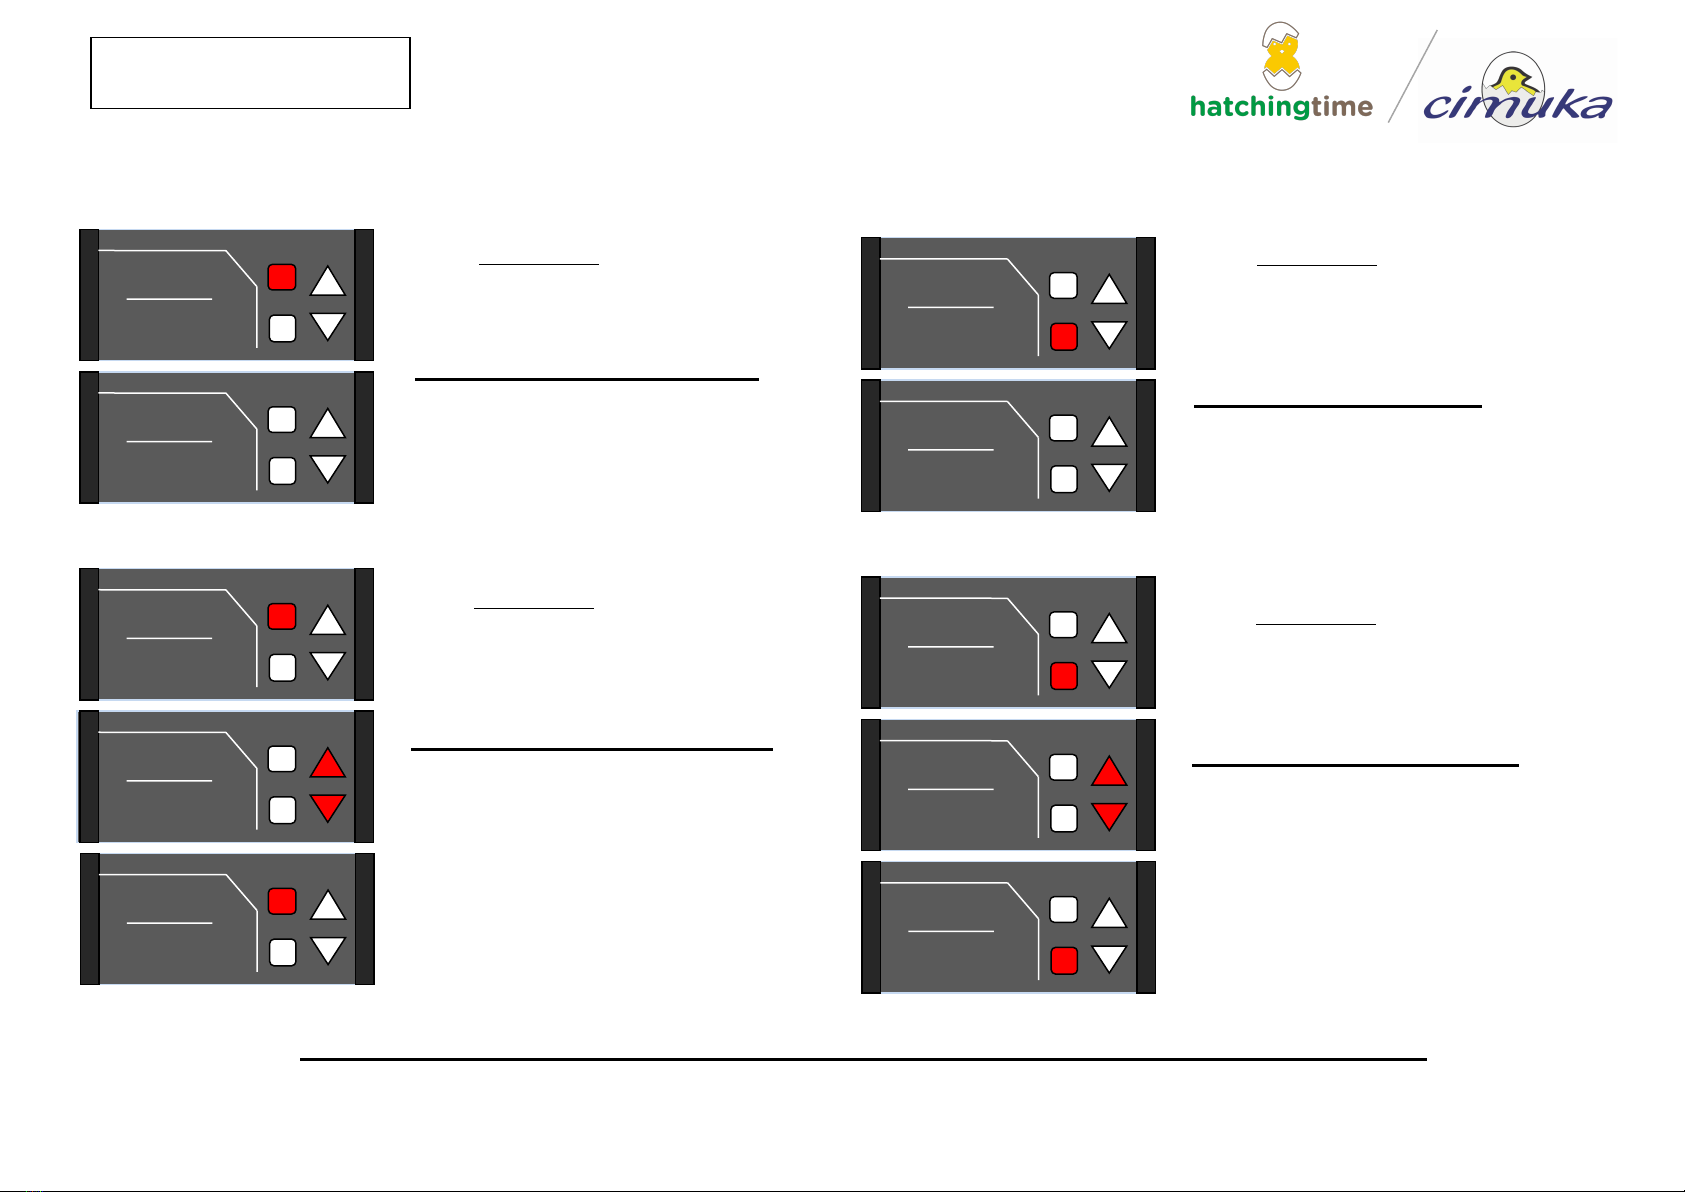
Recommended temperature and humidity values for different species are on page 27
50
%
T
H
U
D
99.8
99.8
%
T
H
U
D
(f)tSEt
50
%
T
H
U
D
99.8
>99.8<
%
T
H
U
D
donE
%
T
H
U
D
50
%
T
H
U
D
99.8
50
%
T
H
U
D
hSEt
50
%
T
H
U
D
99.8
>50<
%
T
H
U
D
hSEt
donE
%
T
H
U
D
SAVE
When main screen is active,
Press T button and release
(f)tSEt – Temperature Set Screen
will appear for 2 second and turn
back to main screen.
Lower value is temperature set point.
To change temperature set point
When main screen is active,
Hold T button for 2 seconds
While temperature set value blinks
Use U / D buttons to adjust
temperature set point
When finished adjusting,
Press T button to “save” chosen value.
When main screen is active,
Hold H button for 2 seconds
While humidity set value blinks
Use U / D buttons to adjust
humidity set point
When finished adjusting,
press H button to “save” chosen value.
When main screen is active,
Press H button and release
hSEt – Humidity Set Screen
will appear for 2 seconds and turn
back to main screen.
Lower value is humidity set point.
To change humidity set point
(f)tSEt
SAVE
SEt
To check humidity set point
To check temperature set point

9
HB SERIES
Turn Light On
When main screen is active,
Press D button to light on and off.
The light bulb will automatically turn off
after 3 minutes.
50
%
T
H
U
D
99.8
To Lock Screen on/off
When main screen is active,
Hold H+D buttons together for 3
seconds to lock and unlock screen
on/oFF
)
T
H
U
D
loc
Alarm delay
dlY
%
T
H
U
D
Alr
When main screen is active,
Hold U button for 3 seconds
Alarm will be delayed for 15 minutes.
50
%
T
H
U
D
99.8
When main screen is active,
Press U button and release to check second
sensor values and remaining time for next
cooling
Note: Second sensor value will only appear if
second sensor is activated
Check user menu parameters (See Page 10)
SnS2 will appear.
Then, second sensor temperature and
humidity values will appear.
Then remaining time until next periodic
cooling will appear.
Note: Remaining time to next cooling will appear if
periodic cooling function is on
Check APC menu (See Page 18)
Then, screen turns back to main screen.
%
T
H
U
D
SnS2
Second Sensor / Remaining time until next cooling
33
%
T
H
U
D
22.7
11.27
%
T
H
U
D
clt
50
%
T
H
U
D
99.8

10
HB SERIES
User Menu Parameters
50
%
T
H
U
D
99.8
10
%
T
H
U
D
hhı
-10
%
T
H
U
D
hlo
1.5
%
T
H
U
D
-4.0
%
T
H
U
D
Hold T + H together for 3 seconds to enter menu
- Use T/H buttons to choose parameters.
- Use U/D buttons to change set values.
- Hold T + H together for 3 seconds to save changes.
hhi: high humidity alarm
Started: set value +10
Delay time: 20 minutes
Notification: Alr 5
Alarm: continuous
hlo: low humidity alarm
Started: set value -10
Delay time: 20 minutes
Notification: Alr 6
Alarm: intermittent
(f)thi: high temperature alarm
Started: set value +1.5
Delay time: 2 minutes
Notification: Alr 1/3
Alarm: continuous
(f)tlo: low temperature alarm
Started: set value -4.0
Delay time: 30 minutes
Notification: Alr 2/4
Alarm: intermittent
tco: temperature calibration value
CAUTION! tco is a critical parameter. Changing this can
results in chick loss. Use qualified and calibrated glass
or electronic thermometers for calibrating.
Check temperature values regularly.
hco: humidity calibration value
CAUTION! hco is a critical parameter. Changing this can
results in chick loss. Use qualified and calibrated glass or
electronic thermometers for calibrating.
Check humidity values regularly.
(f)thi
(f)tlo
th
%
T
H
U
D
uS2
64
%
T
H
U
D
(f)rtl
83
%
T
H
U
D
(f)rth
10
%
T
H
U
D
rhl
85
T
H
U
D
off
%
T
H
U
D
rhh
rAt
off
%
T
H
U
D
rAh
0.0
%
T
H
U
D
hco
0.0
%
T
H
U
D
(f)tco
US2: USB connected device
no: no connected device
th: second sensor connected (room/calibration)
ıot: iot module connected
Notification: Alr 15 (usb connection error)
Below parameters active if Us2 is selected “th”
(f)rtl: second sensor low temperature alarm
Started: below 65°F (18°C)
Delay time: no
Notification: Alr 10
Alarm: intermittent
(f)rth: second sensor high temperature alarm
Started: over 83°F (28°C)
Delay time: no
Notification: Alr 9
Alarm: intermittent
rhl: second sensor low humidity alarm
Started: below 10 RH
Delay time: no
Notification: Alr 14
Alarm: intermittent
rhh: second sensor high humidity alarm
Started: over 85 RH
Delay time: no
Notification: Alr 13
Alarm: intermittent
rAt: second sensor temperature alarm activation
On: alarms activated
Off: alarms deactivated
rAh: second sensor humidity alarm activation
On: alarms activated
Off: alarms deactivated
11
HB SERIES
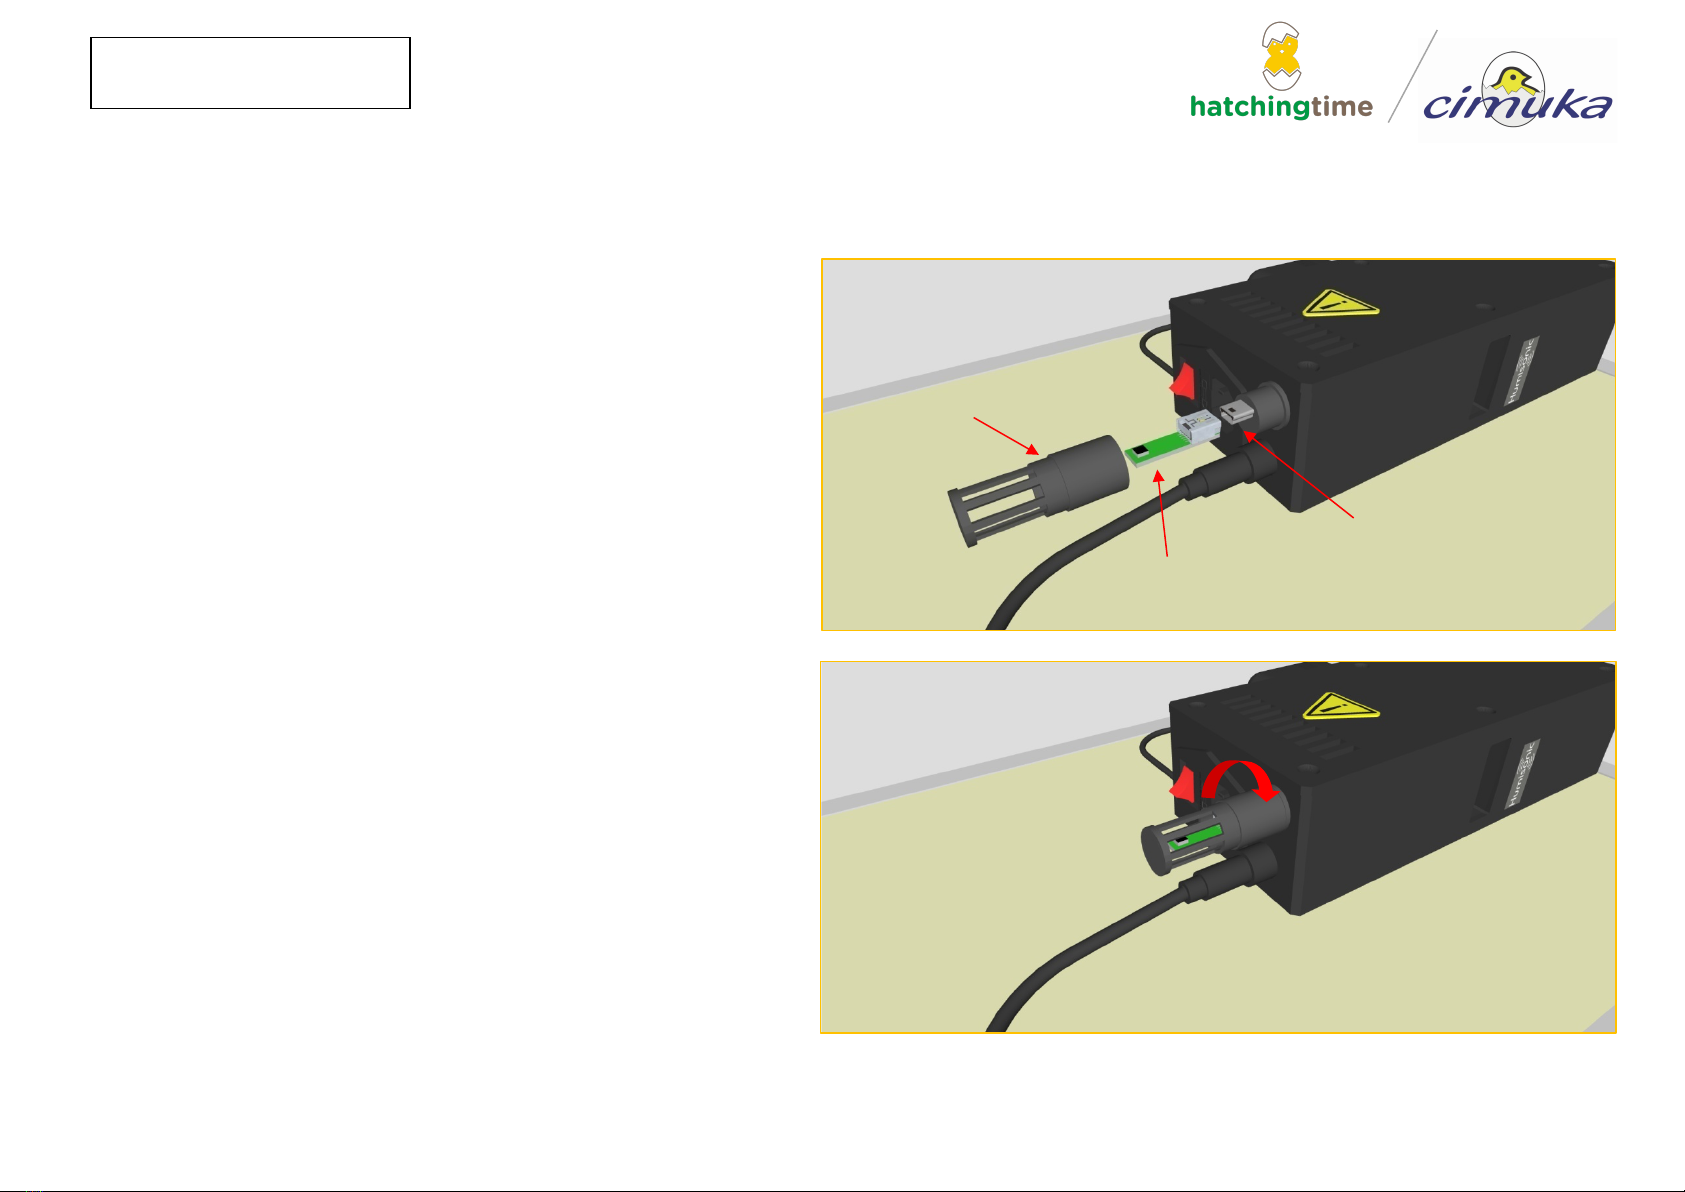
USB Connection / Room Sensor
USB connection
Room sensor chip
Sensor protective cover
Your incubator is equipped with a room sensor installed
through USB connection. The room sensor measures the
temperature and humidity conditions of the room. The room
sensor is identical to the main sensor inside the egg
incubator, it can be used as a spare sensor in emergency
situations. The incubator is complete with alarms to help you
monitor high/low temperature and humidity.
USB connection can also be used for calibration
sensors. Connection device should be selected from the
user menu on the display. Additional USB accessories for
your incubator coming soon!
CAUTION! Always power off the incubator during any
sensor installation.
12
HB SERIES
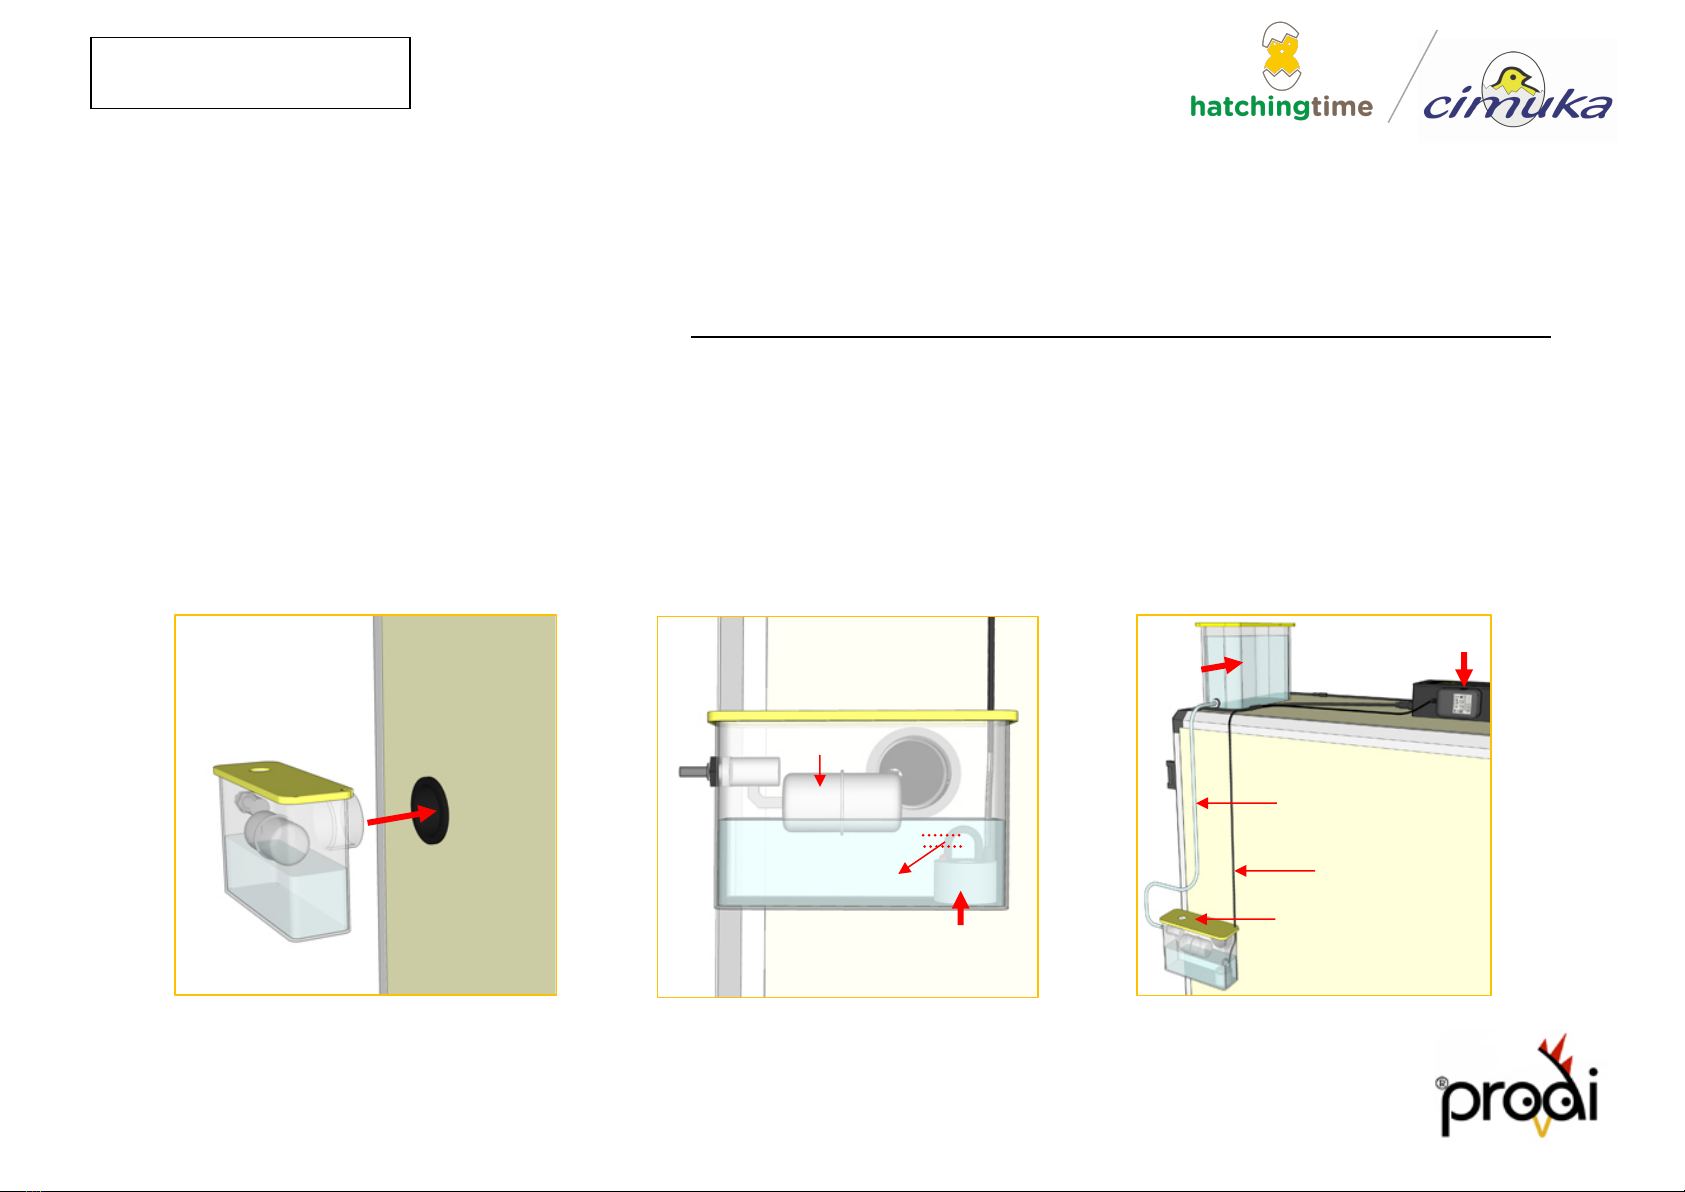
HumisonicTM Automatic Humidity Control
Installation
HumisonicTM
Adapter
1-2 cm
Level sensor
HumisonicTM unit
HumisonicTM
reservoir
HumisonicTM
cable
Flexible hose
Float valve
Reservoir
(1 Gallon)
Air-in hole
Humidity adjustments are required to provide adequate water loss from eggs. Eggs need to lose between 13-16% of water depending on the
species. Weighing your eggs during incubation is the most reliable way to ensure you have reached proper humidity levels for your eggs.
Short term humidity changes during incubation are not impactful. Keeping an average humidity (See Page 27) during the entire incubation
period is enough to achieve good results. However, high humidity levels during the hatching period (last 2-3 days) are very important.
When the chicks start to hatch, the inner membranes of the eggs dry quickly. This causes membranes to harden, and chicks can stick to their
shell. To prevent the drying of the membranes, humidity must be adjusted to high levels for the last 2-3 days of incubation.
- Connect HumisonicTM reservoir to the incubator.
- Place stainless steel HumisonicTM unit into the bottom of the reservoir.
- Use flexible hose to connect water tank and HumisonicTM reservoir.
- Connect HumisonicTM cable to HumisonicTM adapter. Connect adapter to the control panel.
o The float valve will keep water level 1-2cm (.4-.8”) above water level sensor.
CAUTION! Do not use hard or lime-enriched water for either the humidifier system or humidity tray. Change
humidifier disks regularly. HumisonicTM humidifier units are designed for on / off use. Leaving the unit on for
prolonged periods of time will decrease the life of the unit. Never cover the air-in hole on HumisonicTM reservoir cover.
13
HB SERIES
Lowest humidity
Highest humidity
Don’t forget that humidity values depend on temperature values, always validate humidity values at the temperature set point.
Cabinet humidity values can be adjusted manually by adding water to humidity tray channels. Check humidity values on the control panel.
Humidity levels directly relate to the amount of water in the humidity tray. HB SERIES models have different sized water channels so that
humidity can be adjusted to desired level.
Humidity Tray
CAUTION! Never fill humidity tray with cold water. Use warm water close to incubator’s temperature set point. Ideally 77-860F (25-300C)
CAUTION! Humidity tray is part of the incubator. Always keep it in bottom, even when empty. Keep at least one channel of the humidity tray
full during setting period and keep full for hatching period (last 2-3 days).
Keeping water in humidity tray offers many advantages:
- Acts as a backup water supply in case your external water tank runs out of water or if there is an unexpected malfunction.
- Prolongs the life of your HumisonicTM unit.
- Less power consumption resulting in lower energy costs.

14
HB SERIES
TurnXTM Automatic Turning System
Turner
button
TurnXTM
Adapter
TurnXTM Automatic turning system provides 900 (450 in each direction) turning every hour. TurnXTM linear actuator is controlled by TurnXTM
control adapter. The “Turner button” allows you to manually adjust the position of the egg racks.
CAUTION! Only use the “Turner button” to reset the setter trays in a horizontal position.
CAUTION! Do not try to set or take out trays before getting them in a horizontal position.
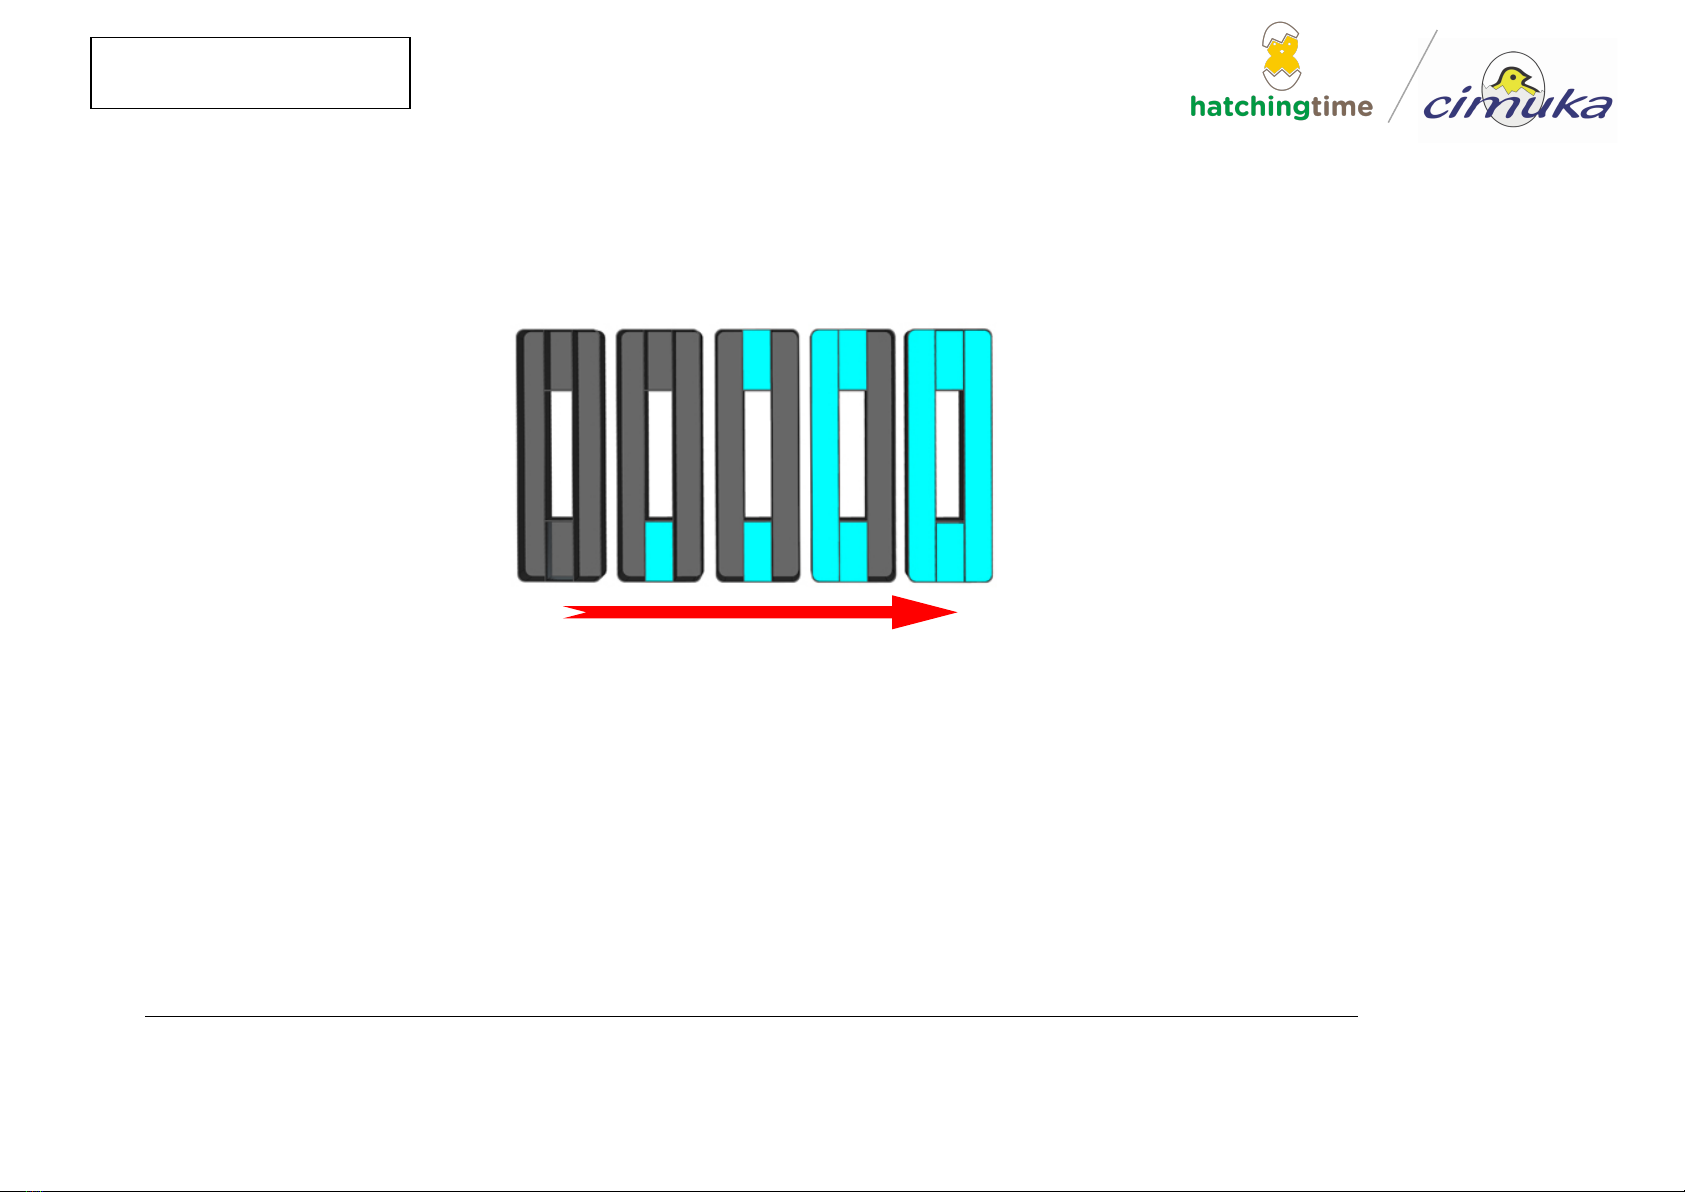
Adjust setter trays into a horizontal position:
- Push and release the “Turner button” to start turning
- When the trays become horizontal, switch the incubator off
- Turn incubator on after inserting or removing racks/baskets
CAUTION! Flexy35 trays must sit properly within incubator.
Before switching the incubator “on”, check all trays. Otherwise,
trays or turning mechanism can be damaged.
Power Switch
Adapter power
connection

15
HB SERIES
Approximate
Egg Capacities
Setting
Chicken / Duck
35
6 separators / 7 line x 5 egg
Quail
99
10 separators / 11 line x 9 egg
Partridge
56
8 separators / 8 line x 7 egg
Pheasant
48
7 separators / 8 line x 6 egg
Turkey / Big Duck
24
5 separators / 6 line x 4 egg
Goose / Peacock
15-20
4 separators / 5 line x 3-4 egg
Setter Trays and Hatchery Baskets
Flexy35 Universal Setter Tray
HB SERIES Setter (S) and Combined (C) models come with Flexy35 universal egg setter trays. Flexy35 separators can be adjusted for
different egg sizes. Each Flexy35 tray comes with 10 separators and can be adjusted for any size egg, from quail to goose eggs.
CAUTION! Never set eggs with the small end up.
Eggs must be set with small end down or horizontal.
CAUTION! Before setting Flexy35 trays to TurnXTM
mechanism, make sure that separators are placed
properly and check that no eggs fell during 450 turning.
Goose and peacock eggs must be set horizontally with small end tilted down

16
HB SERIES
Typical Egg Capacities
Chicken / Duck
35
Quail
99
Partridge
56
Pheasant
48
Turkey / Big Duck
24
Goose / Peacock
15-20
CS35Y Hatchery Basket
Eggs are transferred to
hatchery baskets for the last
2-3 days of incubation.
Combined (C) Models have an internal hatchery section
for hatchery baskets.
Hatcher (H) Models have shelves for hatchery baskets
and all hatchery baskets are reachable separately for
easy access to chicks.
Internal
hatchery
section for
CS35Y
Shelves for
hatchery baskets
Cover for CS35Y
in middle and
top shelves.

17
HB SERIES
Active Periodic Cooling (APC)
CAUTION! Active periodic cooling function is for professional users only. If needed, please seek assistance from your vendor. Results
can change for a variety of reasons including poultry species, egg size, and room conditions. Improper cooling can result in late
hatching and chick loss.
In natural incubation, most birds leave the nest for a period of time at least once after the first week of incubation. Eggs cool and dehumidify during
this period. Active periodic cooling (APC) lets you mimic this natural behavior.
Research shows that periodic cooling of goose, duck and even chicken eggs during incubation has positive effects on hatch rates and chick quality.
Periodic cooling is very important for most goose types. Without periodic cooling, goose egg hatch rates can decrease by up to 20-30%. Many
breeders manually cool the eggs by taking them out of the incubator, let them cool in hatchery room conditions, and spray the eggs with warm
water before placing them back in the incubator again.
To automate the process, Cimuka uses Active Periodic Cooling (APC) with 2 different modes to simulate natural behavior. All alarms for
temperature and humidity will be off during this time. After APC is complete, temperature and humidity will return to preset parameters.
1. (clt) Cooling for a time mode
• System turns off heat and humidity (for models with humidifier) for an adjusted time.
2. (clS) Cooling for a set mode
• System turns off heat and humidity (for models with humidifier) and drops temperature to an adjusted temperature set point and
keeps the temperature at this point for a set amount of time.
Models include 2 more modes:
1. Humidification mode (for models with humidifier) – before cooling period ends, high humidity is applied
2. Fan assistant cooling mode (for models with cooling fan) - reaches desired cooling temperature faster
Cimuka ‘s advanced incubator controller allows users to change all parameters with Active Periodic Cooling (APC) menu. Now experienced
breeders can work outside of preset parameters to achieve the best hatch rates for their eggs.

18
HB SERIES
Active Periodic Cooling (APC)
Menu
50
%
T
H
U
D
99.8
oFF
%
T
H
U
D
cIF
coF
%
T
H
U
D
cb
24
%
T
H
U
D
-8.0
%
T
H
U
D
cPr
cSt
-15.0
%
T
H
U
D
FSt
30
%
T
H
U
D
cth
180
%
T
H
U
D
hct
on
%
T
H
U
D
chu
10
%
T
H
U
D
80
%
T
H
U
D
cht
chh
on
%
T
H
U
D
cFn
donE
%
T
H
U
D
SAVE
42
%
T
H
U
D
>Cool<
Hold U + D together for 3 seconds to enter menu
- Use T/H buttons to choose parameter.
- Use U/D buttons to change parameter values.
cIF: Active Periodic Cooling (APC) function activation
oFF: Active Periodic Cooling is deactivated.
cLt: “cooling for a time” mode - Stops heater and humidifier for
“hct” time. (check hct parameter)
cLS: “cooling for a set” mode - Stops heater and humidifier up
to an adjusted temperature set point and keep temperature at
this point for an adjusted time. (check cSt/FSt)
cb: Active Periodic cooling Starting
con: first cooling starts immediately after save the menu.
coF: first cooling starts after periodic cooling cycle (cPr)
cPr: Periodic cooling cycle time (hours)
6-8-12-24-48-72 hours selectable.
System repeats cooling in this cycle.
cSt: cooling set point (C display models)
cooling set value: temperature set point – cSt (-8°C)
note: cSt is only active in clS mode on C display models
Example: for a system working on 37.7°C, system cools
up to 29.7°C (37.7°C - 8.0°C = 29.7°C)
FSt: cooling set point (F display models)
cooling set value: temperature set point – FSt (-15°C)
note: FSt is only active in clS mode on C display models
Example: for a system working on 99.8°F, system cools
up to 84.8°F (99.8°F - 15.0°C = 84.8°F)
cth: waiting time in cooling set point. (minute)
Waiting time of system in cooling set point
cth is only active in clS mode
.
hct: max cooling time (minute)
Heater/humidifier cut off time for clt mode.
Maximum cooling time for clS mode.
chu: humidification activation during cooling
(Only for models equipped with humidifier)
on: humidification activated
oFF: humidification deactivated
cht: Humidification time in cooling (minute)
(Only for models equipped with humidifier)
Humidification will start before cooling finished for cht
time.
Example: If cooling will finish within 30 minutes,
humidification starts after 20 minutes (30-10=20) (Page 21)
chh: max humidification set in cooling (RH%)
(Only for models equipped with humidifier)
Humidifier works up to this set and keeps incubator in this
point during humidification period.
cFn: cooling fan activation
(Only for models equipped with cooling fan)
On: cooling fan is activated during cooling.
OFF: cooling fan is deactivated during cooling.
Hold T+ H together for 3 seconds to save changes
During cooling, “cool” blinks on screen,
CAUTION! Do not cut the power of incubator
during cooling. Power failure will terminate cooling
but the time for cooling period will continue.

19
HB SERIES
Cimuka’s research team is collecting data from their research center and from customers for different APC applications. The table below outlines
the recommended parameters for cooling for a set (clS) mode.
Note: Cooling by a time (clt) mode is highly dependent on hatchery room conditions and the number of eggs in the incubator. It is advisable to use
a temperature-controlled hatchery room to reach optimal hatching results.
Active Periodic Cooling (APC) Parameters
Display
Factory Setting
Chicken
Duck
Goose
Cooling mode
clF
oFF
cIS
On at 8th day
Off at 19th day
cIS
On at 8th day
Off at 25th day
cIS
On at 8th day
Off at 27th day
Cooling start time
cb
cof
con
con
con
Cooling cycle time
cPr
24 h
24
24
24
Cooling set point °C (set - adjusted data)
cSt
-8.0°C
-8.0
-8.0
-8.0
Cooling set point °F (set - adjusted data)
FSt
-15.0°F
-15.0
-15.0
-15.0
Waiting time in cooling set point
cth
20 min
10 min - 8th to 13th
20 min - 14th to 18th
10 min - 8th to 15th
25 min - 16th to 25th
10 min - 8th to 14th
20 min - 15th to 21th
40 min - 22th to 27th
Max cooling time
hct
120 min
120 min
150 min
180 min
Humidification*
chu
on
on
on
on
Humidification Time*
cht
10 min
10
15
15
Max humidity during humidification*
chh
80 RH%
80
80
80
Cooling fan activation**
cFn
on
on
on
on
* only for models equipped with humidifier
**only for models equipped with cooling fan
CAUTION! Turn off Active Periodic Cooling (APC) function during hatching period (Last 2-3 days of incubation). Cooling in the last 2-3
days of incubation results in bad hatch rates and chick loss.
CAUTION! Changing cooling mode (cIF) or cooling cycle time (cPr) parameters in APC menu resets periodic cooling cycle time (cPr).
CAUTION! In clS mode, time to reach cooling set point cSt (Fst) is highly dependent on room temperature. For very low set points,
system may not be able to reach cooling set point. For such situations, system finalizes cooling at max cooling time (hct).
20
HB SERIES
APC starts
APC stops
cSt/ FSt
cth
APC start
APC stop
chh
cht
Humidification starts
TEMPERATURE
HUMIDITY
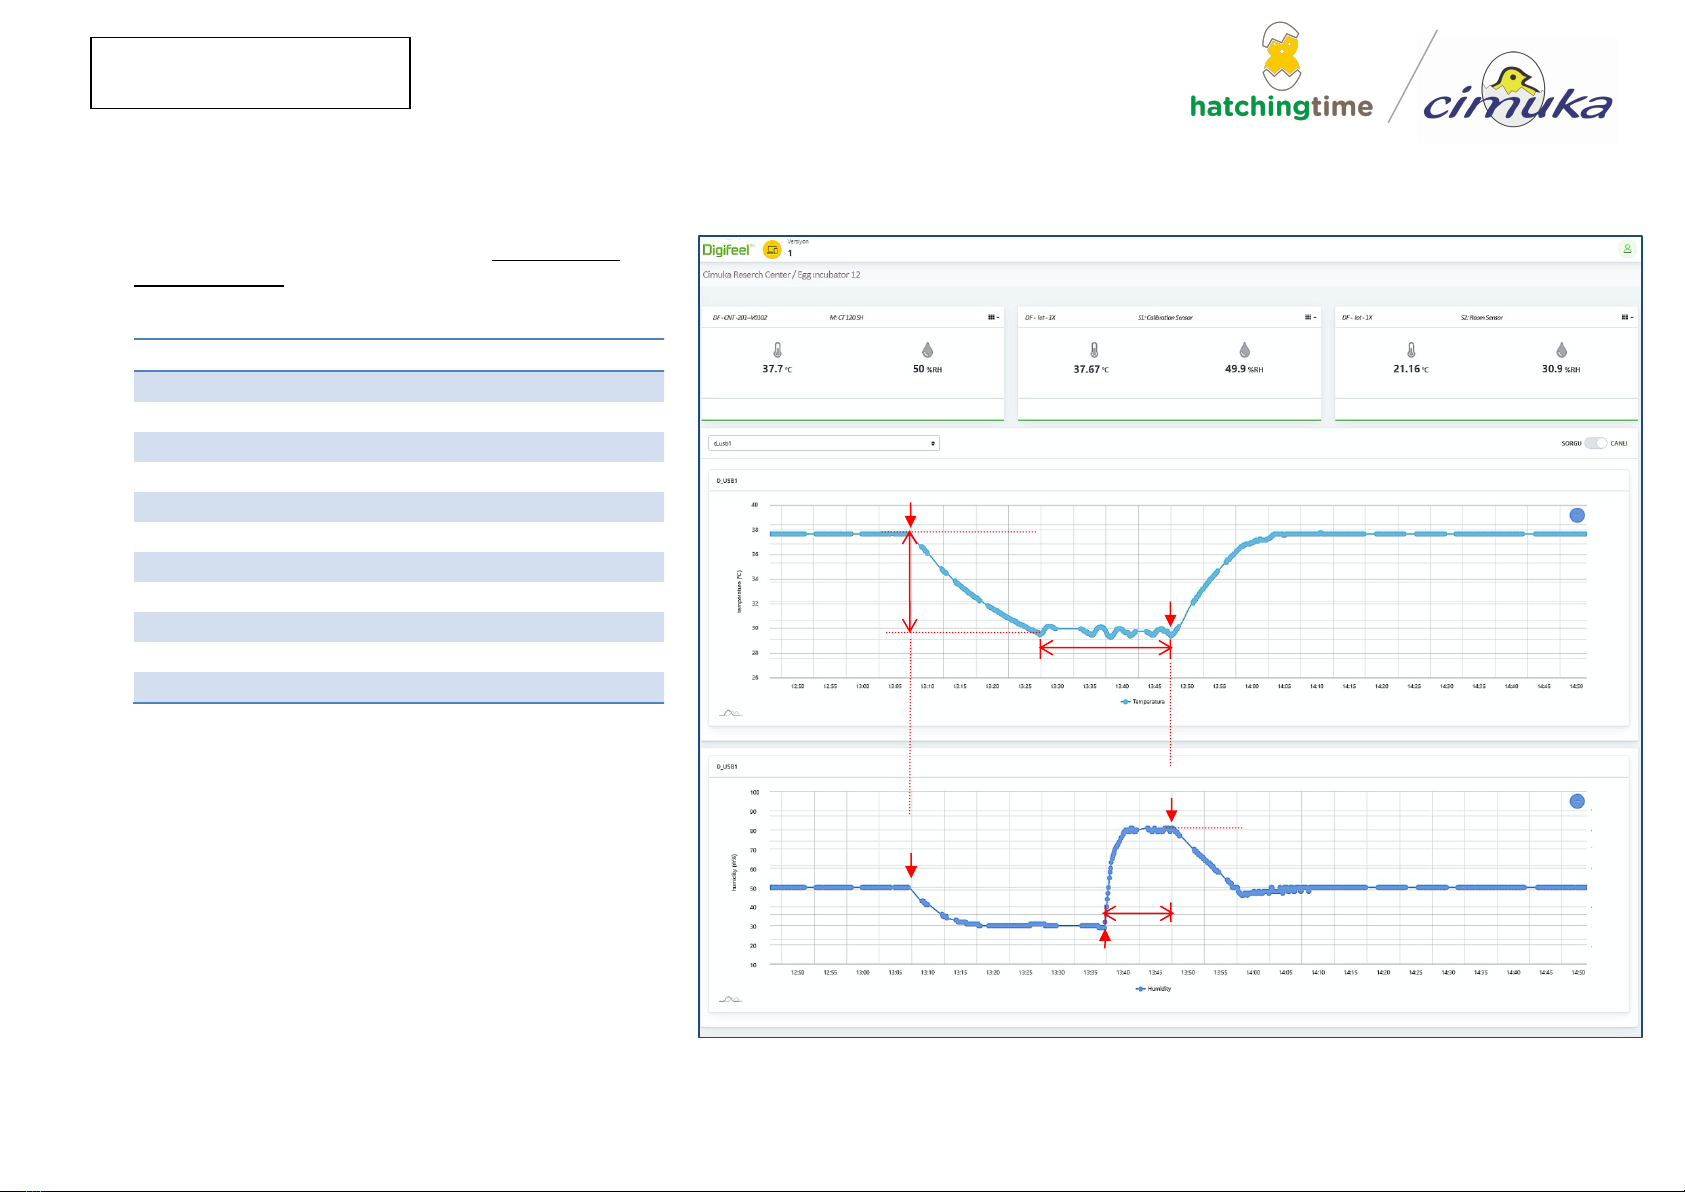
Active Periodic Cooling (APC) set at “cooling for a
set (clS)” mode is shown in the graph below with
sample parameters.
APC Parameters
Display
Setting
Cooling mode
clF
clS
Cooling start time
cb
on
Cooling cycle
cPr
24 h
Cooling set point °C (set - adjusted data)
cSt
-8.0 C
Cooling set point °F (set - adjusted data)
FSt
-15 F
Waiting time in cooling set point
cth
20 min
Max cooling time
hct
120 min
Humidification*
chu
on
Humidification Time*
cht
10 min.
Max humidity during humidification*
chh
80 RH%
Cooling fan activation**
cFn
on
* only for models equipped with humidifier
**only for models equipped with cooling fan
System repeats APC behavior every cooling cycle
time (cPr).
In a power outage, cooling cycle time (cPr) is not
reset. It will continue from last recorded time.
Example: if there is a 1 hour power outage, the next
cooling time will delay about 1 hour.
Remaining time to next cooling can be checked on
the controller (See Page 9)
This manual suits for next models
16
Table of contents
Other Hatching Time Accessories manuals


