Hatching Time Cimuka CT Series User manual
/
CT Series Incubator User Manual
CT60 CT120 CT180
MODELS INCLUDE BOTH SETTER TRAYS & HATCHING BASKETS
www.hatchingtime.com
2021

CT Series /
Table of Contents
Parts List 3
CT Series Components 3
Parts List by Model 4
Egg Turner - ConturnTM30 4
Egg Turner Accessories (Sold Separately) 5
Quail Egg Tray - QT13 5
Goose Egg Rack - GT03 5
Capacity Chart 6
Pre-Incubation Tasks 6
Egg Storage 6
Incubator Placement 6
Ventilation 7
Incubator Setup 7
Out of the Box Setup Guide 7
Set Parameters - Incubators arrive preset for chicken eggs 11
Adjust Parameters for Your Eggs 12
Alarms 14
Set Internal Sensor Alarm 14
Set External Room Sensor Alarm 14
Loading Eggs 15
Example: Chicken (Typically hatches on 21st day) 15
Partial Loading (Every Week) 16
Technology 17
Active Periodic Cooling (APC) - Advanced Users Only 17
Active Periodic Cooling (APC) Parameter Menu 18
APC (clS Mode) Technical Analysis 19
Room Sensor 20
Safety 20
Power 20
Helpful Tips & Tricks 21
Record Keeping 21
Humidity 21
Egg Turners 21
Active Periodic Cooling (APC) 22
Independent Factors that could Affect Hatch Rates 22
Cleanup / Servicing 22
Page 2 of 23

CT Series /
Parts List
CT Series Components
1
Water Tank - 1 Gallon
10
Adjustable Exhaust
2
Humisonic Adapter
11
Window
3
Display
12
Adjustable Air Intake
4
Temp / Humidity Sensor
13
Power Switch
5
Back Door
14
Fuse
6
Egg Turner & Basket Section
15
Spare Fuse
7
Humisonic Reservoir
16
USB Connection Module
8
Egg Turner Adapter
17
Room Sensor
9
Humidity Tray
18
Room Sensor Cover
Page 3 of 23
CT Series /
Parts List by Model
CT60SH
CT120SH
CT180SH
ConturnTM 30 Egg Racks
2
4
6
ConturnTM30 Adapter
1
1
1
Distribution Cable
1
1
1
Power Cable
1
1
1
Hatching Basket - CS30
2
4
6
HumisonicTM Unit
1
1
1
Humidity Tray - WT01
1
1
1
Quail Rack - QT13
Sold Seperately (See Page 5)
Goose Rack - GT03
Sold Seperately (See Page 5)
Hatching Basket - CS15
Sold Seperately (See Page 5)
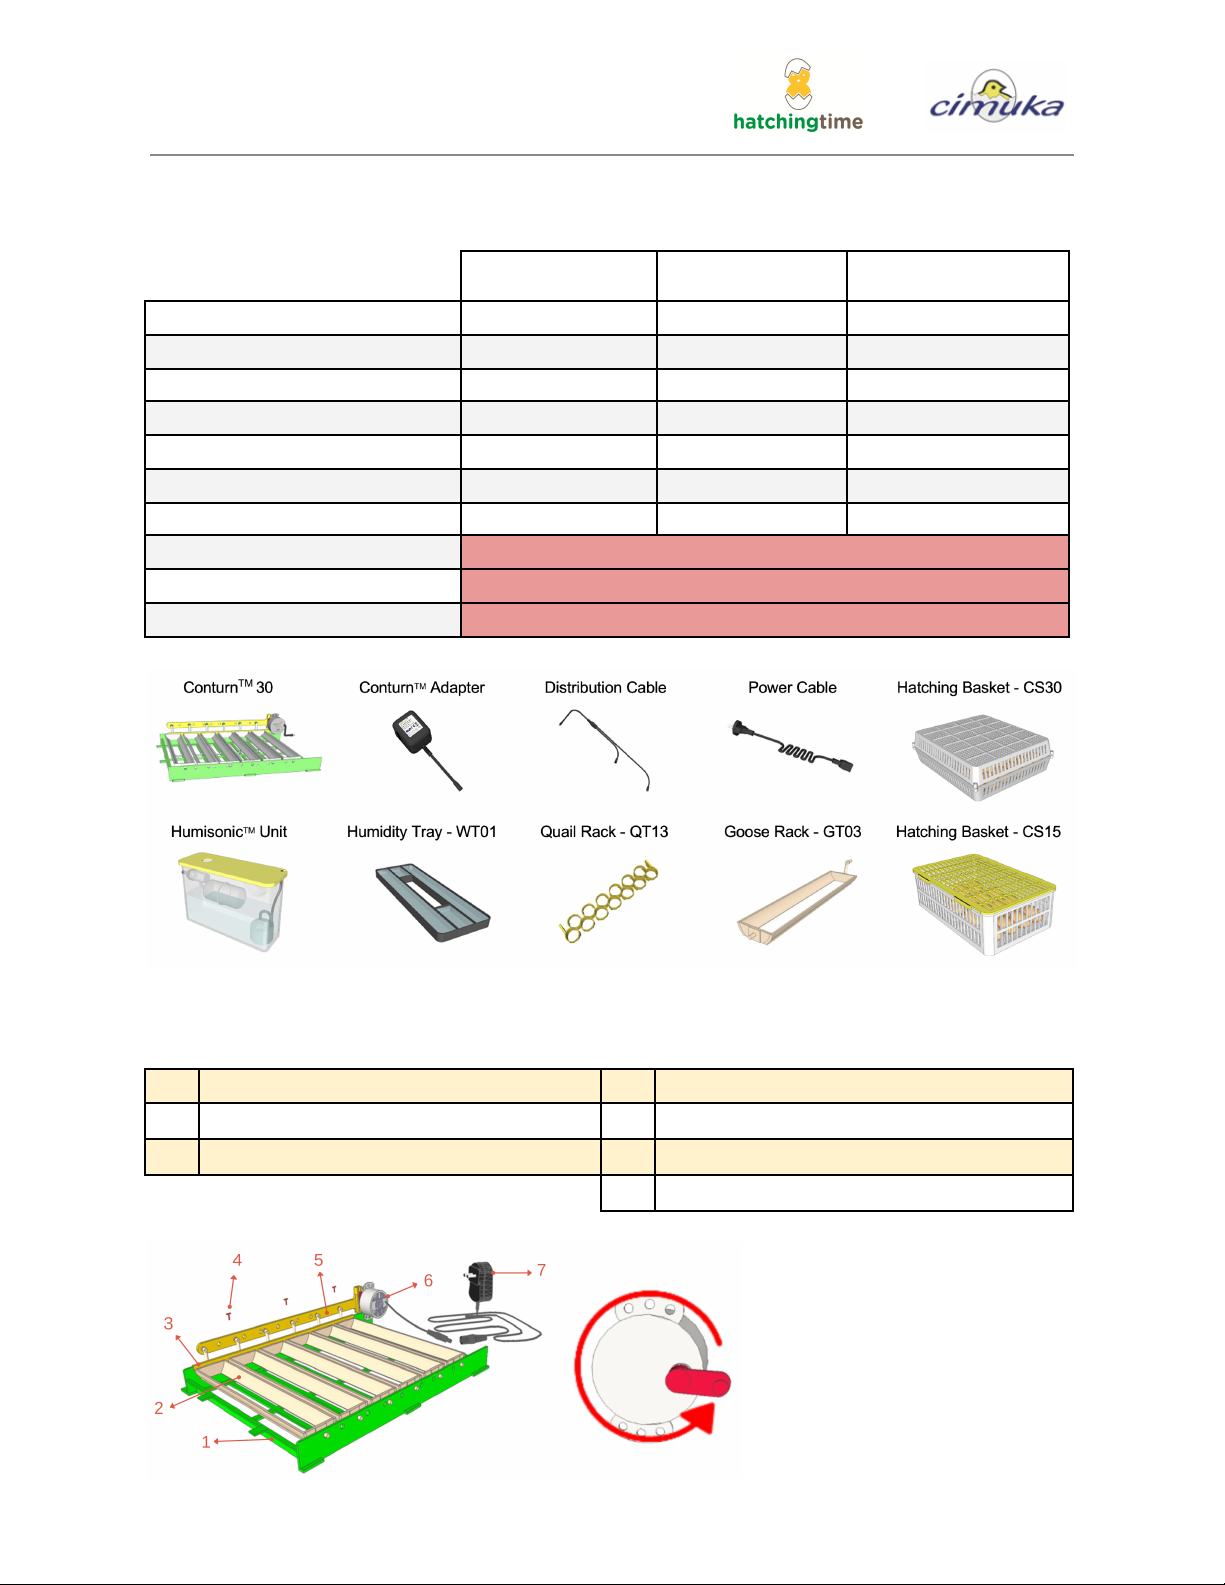
Egg Turner - ConturnTM30
1
ConturnTM30 Base
4
Rack Fixing Pins
2
ConturnTM30 Egg Racks
5
Main Turner Bar
3
Rack Fixing Bar
6
ConturnTM30 Motor
7
ConturnTM30 Adapter
Every 3.2 hours, eggs turn a full
90 degrees (45 degrees on each
side)
Page 4 of 23
CT Series /
Egg Turner Accessories (Sold Separately)
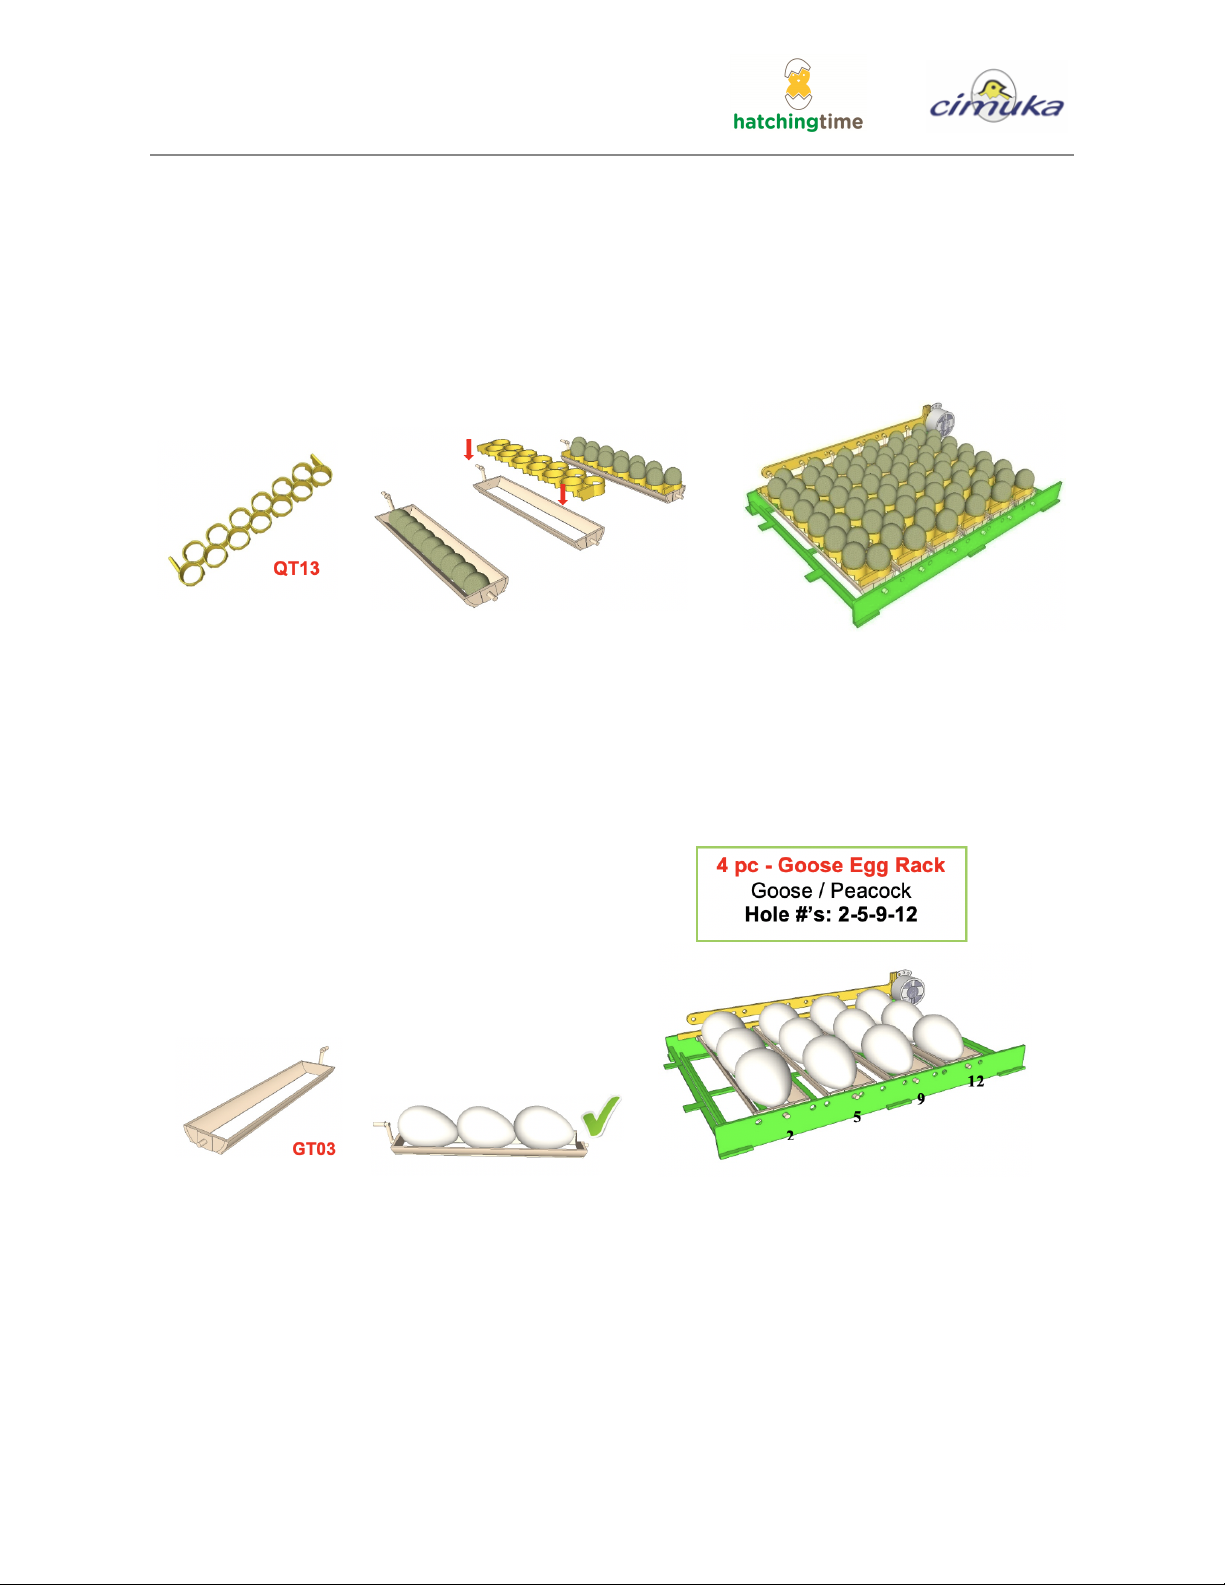
Quail Egg Tray - QT13
Increase each rack capacity from 9 eggs to 13 eggs with the QT13 accessory. Attach the
accessory on top of the existing rack to increase each egg turning layer from 56 to 78 eggs!
Goose Egg Rack - GT03
Set up to 3 goose eggs per rack with the GT03. The Goose Egg Rack is designed for large
goose eggs. Goose eggs must be set in a horizontal position with the small end a bit lower (10
degrees). Periodic cooling of goose eggs is advised to mimic natural incubation.
Page 5 of 23
CT Series /
Capacity Chart
CT60SH
CT120SH
CT180SH
Quail
108 - 156*
216 - 312*
324 - 468*
Partridge
84
168
252
Pheasant
72
144
216
Chicken / Duck
60
120
180
Turkey / Large Duck
40
80
120
Goose / Peacock
24*
48*
72*
*Must purchase separate egg racks to reach max capacity
Pre-Incubation Tasks
Egg Storage
In the days leading up to the incubator, make sure to keep your eggs between 50-68°F
(10-20°C). For the best results, store within a controlled environment between 53.6-55.4°F
(12-13°C). It is best not to store eggs past 7 days. Eggs must be collected at least 1 day prior to
loading the incubator. Don’t forget to turn your eggs during storage.
Caution! Never store fertile eggs in conditions colder than 50°F (10°C) (ie: refrigerator)
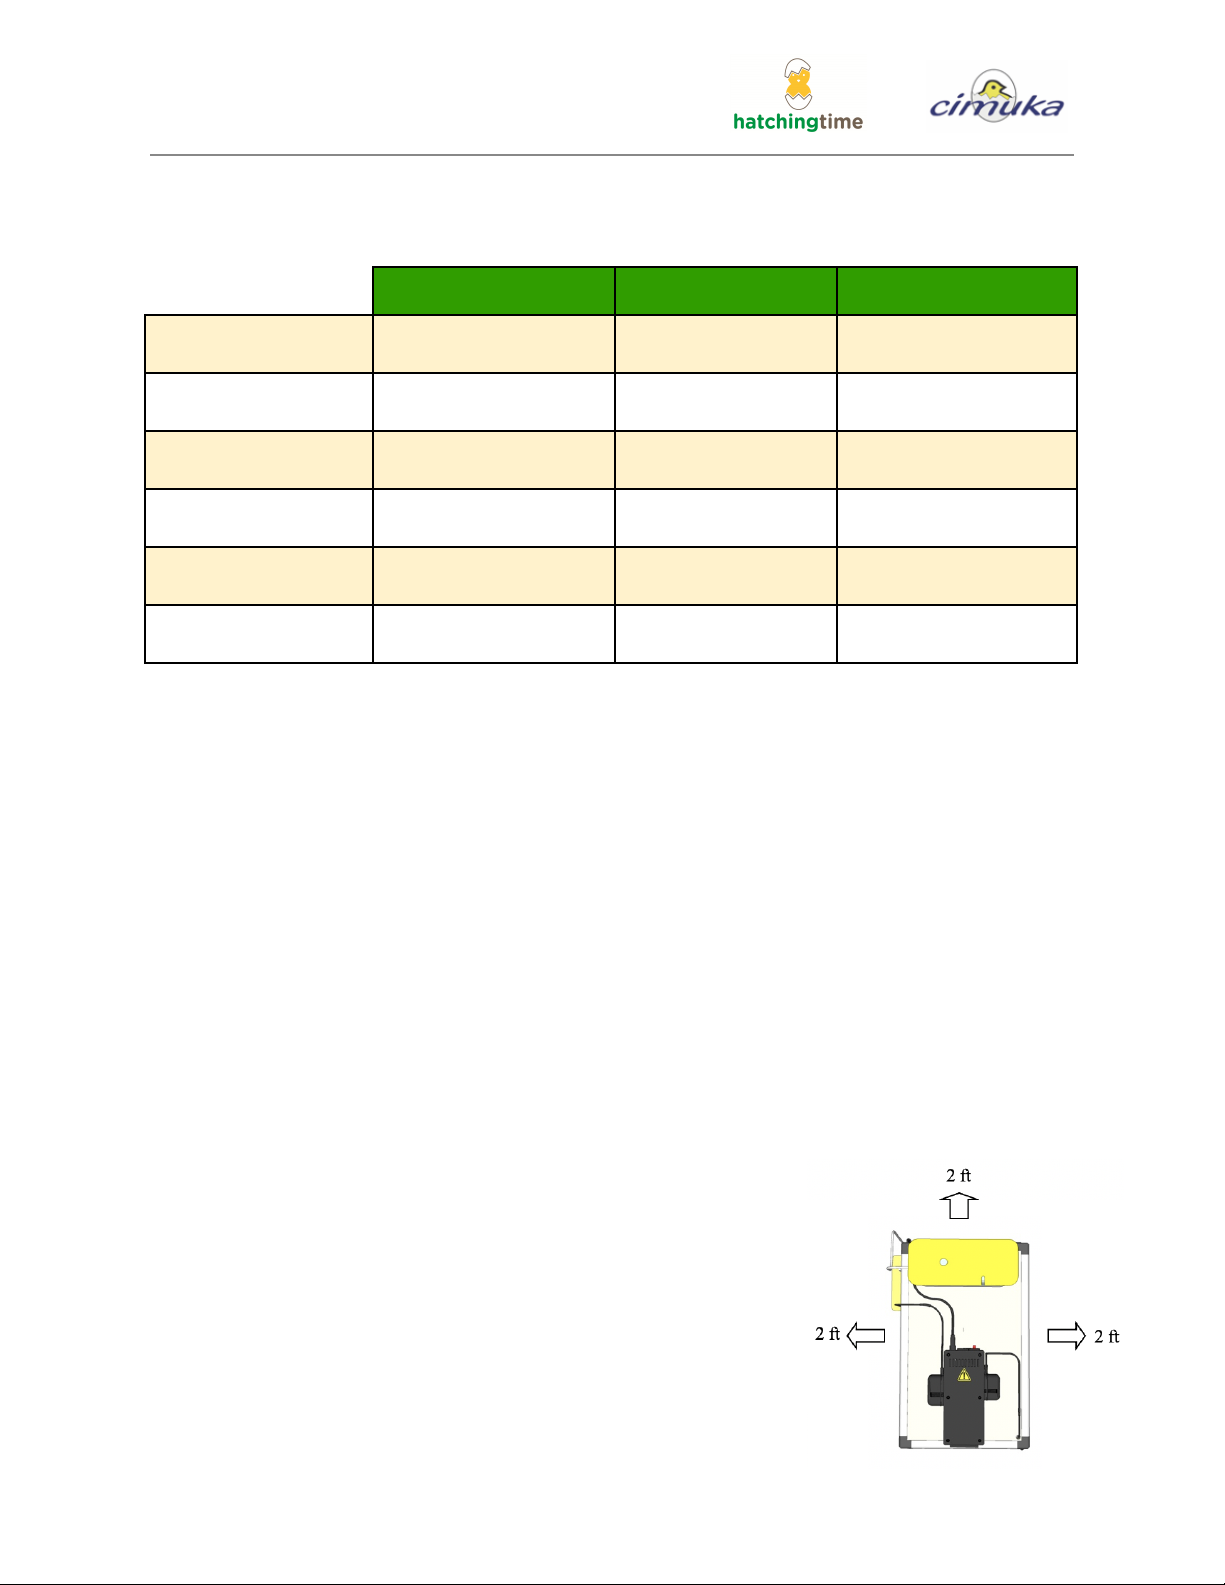
Incubator Placement
Keep in a clean, well-ventilated indoor space. Place on a flat
surface away from doors and windows. Place 2 feet away from
any structure/wall. Keep out of direct sunlight. Avoid high humidity.
Large temperature fluctuations may affect incubation results.
* Ideal room temperature: 64.5-82.4°F (18-28°C)
Caution! KEEP AT LEAST 2 FT AWAY FROM WALL
Caution! Room temperature must be between 59-86°F (15-30°C)
Caution! Don’t let children use without parental assistance
Page 6 of 23
CT Series /
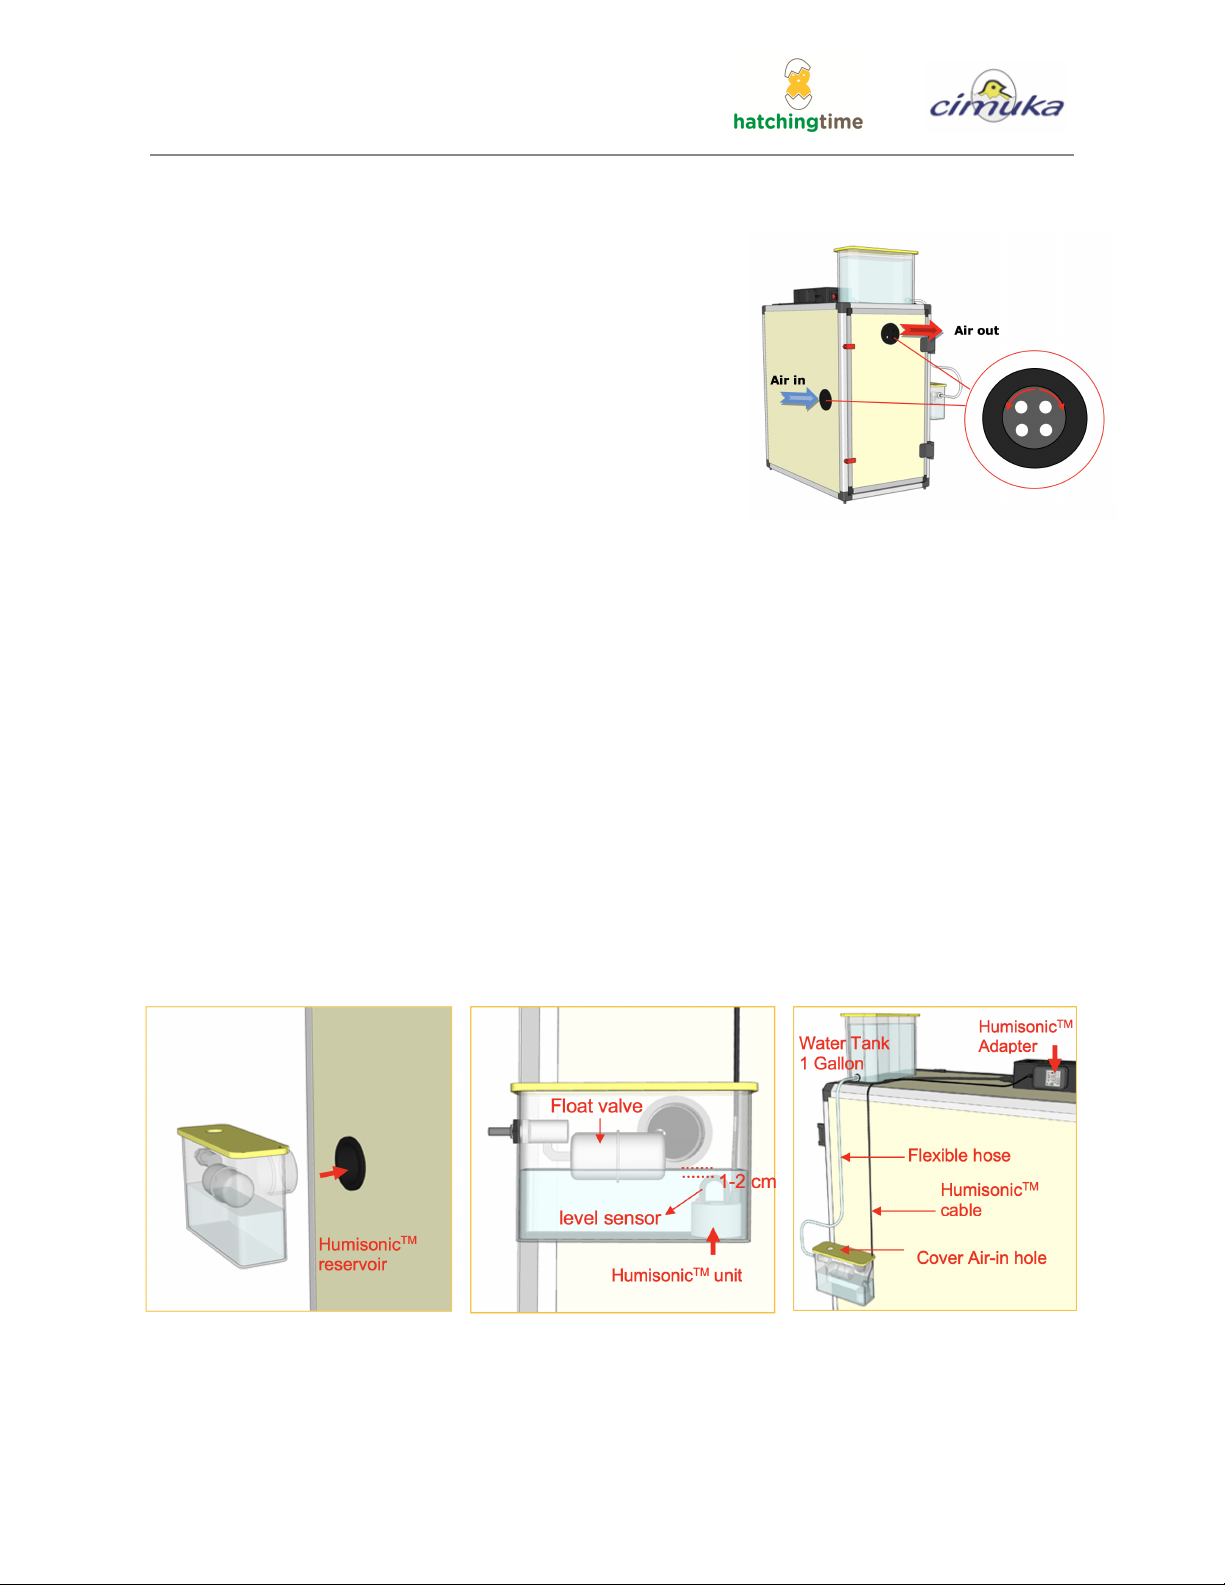
Ventilation
Carbon dioxide is produced during incubation and needs
to be removed through proper ventilation. Good
ventilation in your incubation room will enrich your eggs
with oxygen rich air and remove excess carbon dioxide.
In CT series models, ventilation within the unit is
adjustable through exhaust and intake fans. Twist intake
and exhaust holes to increase or decrease air flow within
the incubator. Keep at least 2 ft away from any walls.
Caution! Make sure room is well ventilated
Caution! Keep vent holes at least ⅓ open at all times
Caution! Keep vent holes fully open during hatching period
Caution! Never breed birds in incubation room due to carbon dioxide release
Incubator Setup
Out of the Box Setup Guide
Step 1) Attach Humisonic Reservoir
1. Place HumisonicTM reservoir into hole
2. Place stainless steel HumisonicTM unit into the bottom of the reservoir
3. Connect Water Tank - 1 Gallon and HumisonicTM reservoir with Flexible hose
4. Connect HumisonicTM cable to HumisonicTM Adapter.
5. Connect adapter to the control panel.
Caution! Do not use hard or lime-enriched water & change humidifier disks regularly.
Caution! We do not advise leaving the unit on for prolonged periods of time.
Caution! Never attempt to close the air-in hole on the HumisonicTM reservoir cover.
Page 7 of 23
CT Series /
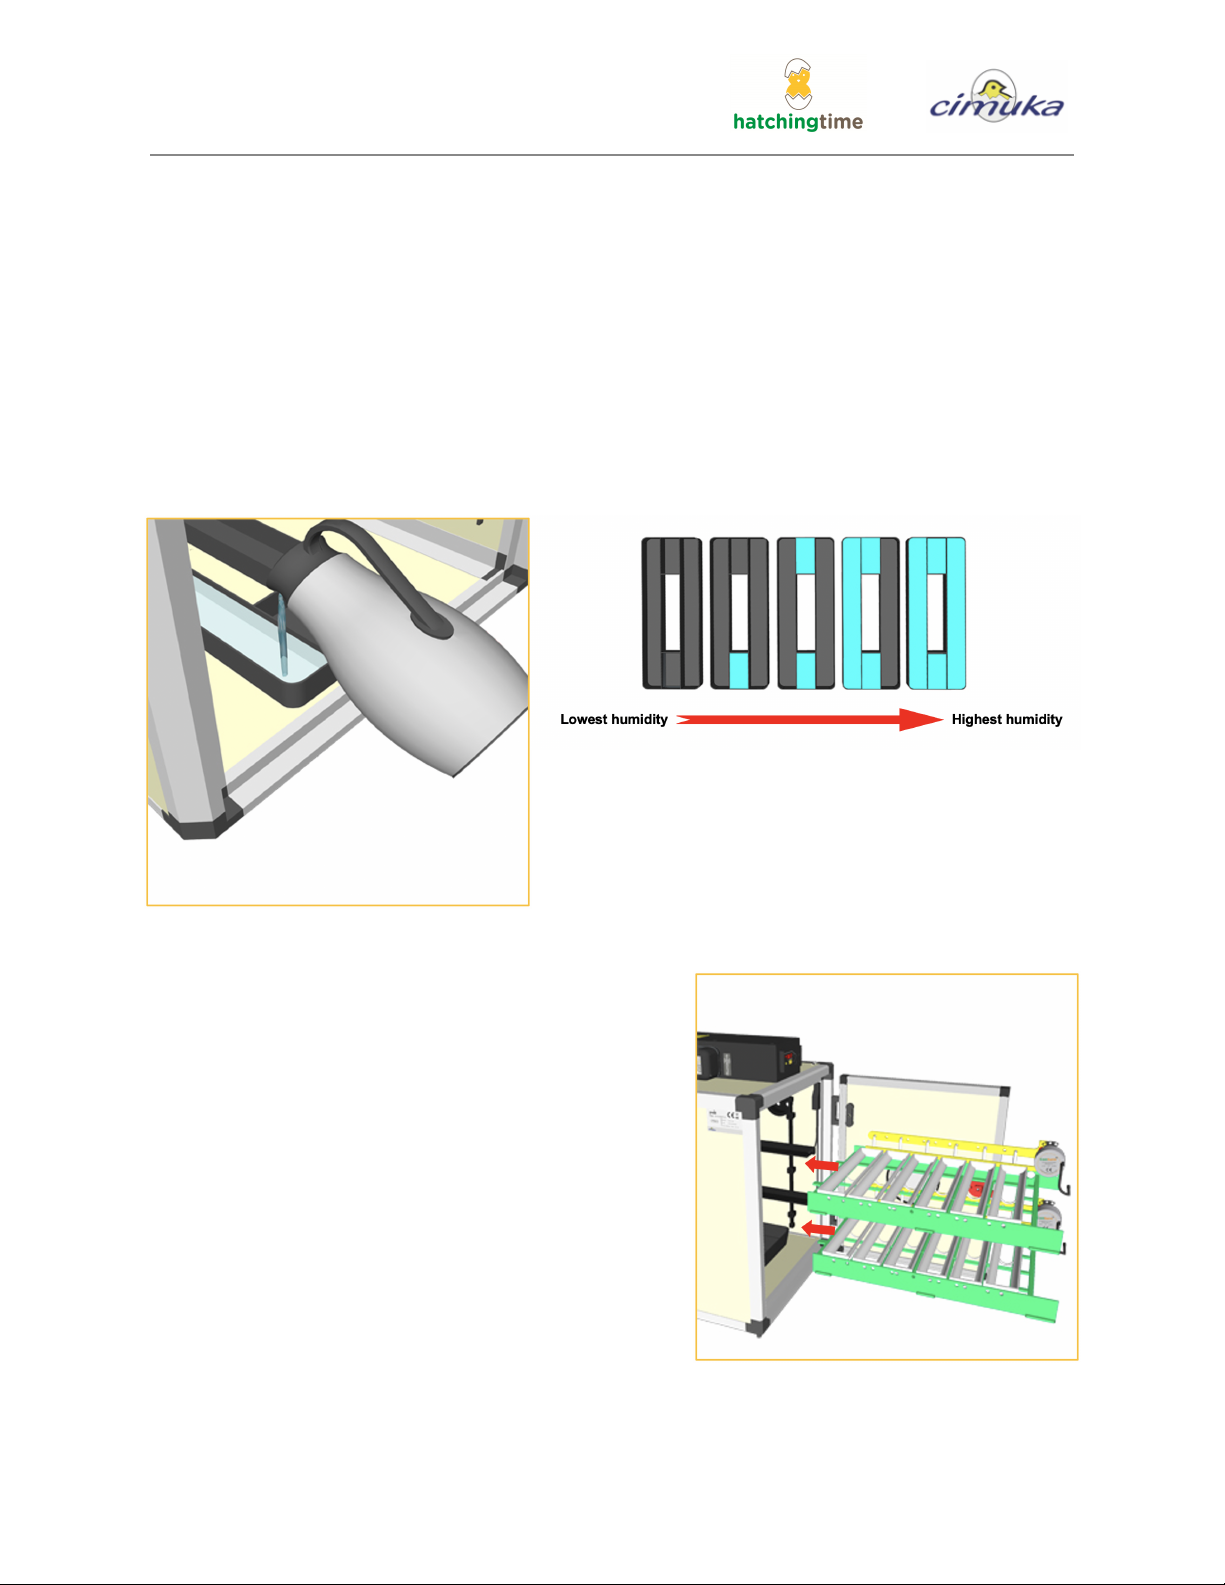
Step 2) Fill first channel of humidity tray
● Check room humidity levels with a hygrometer before incubation
○ If room is below 50%, always keep at least 1 channel on the humidity tray filled
○ If room is over 50%, do not fill humidity tray but leave within the incubator
Caution! NEVER REMOVE HUMIDITY TRAY - will affect calibration
Caution! Never fill humidity tray with cold water, must be room temperature: 77-860F (25-300C)
Caution! Always keep the tray at the bottom, even when empty
Caution! Keep full during the last 2-3 days.
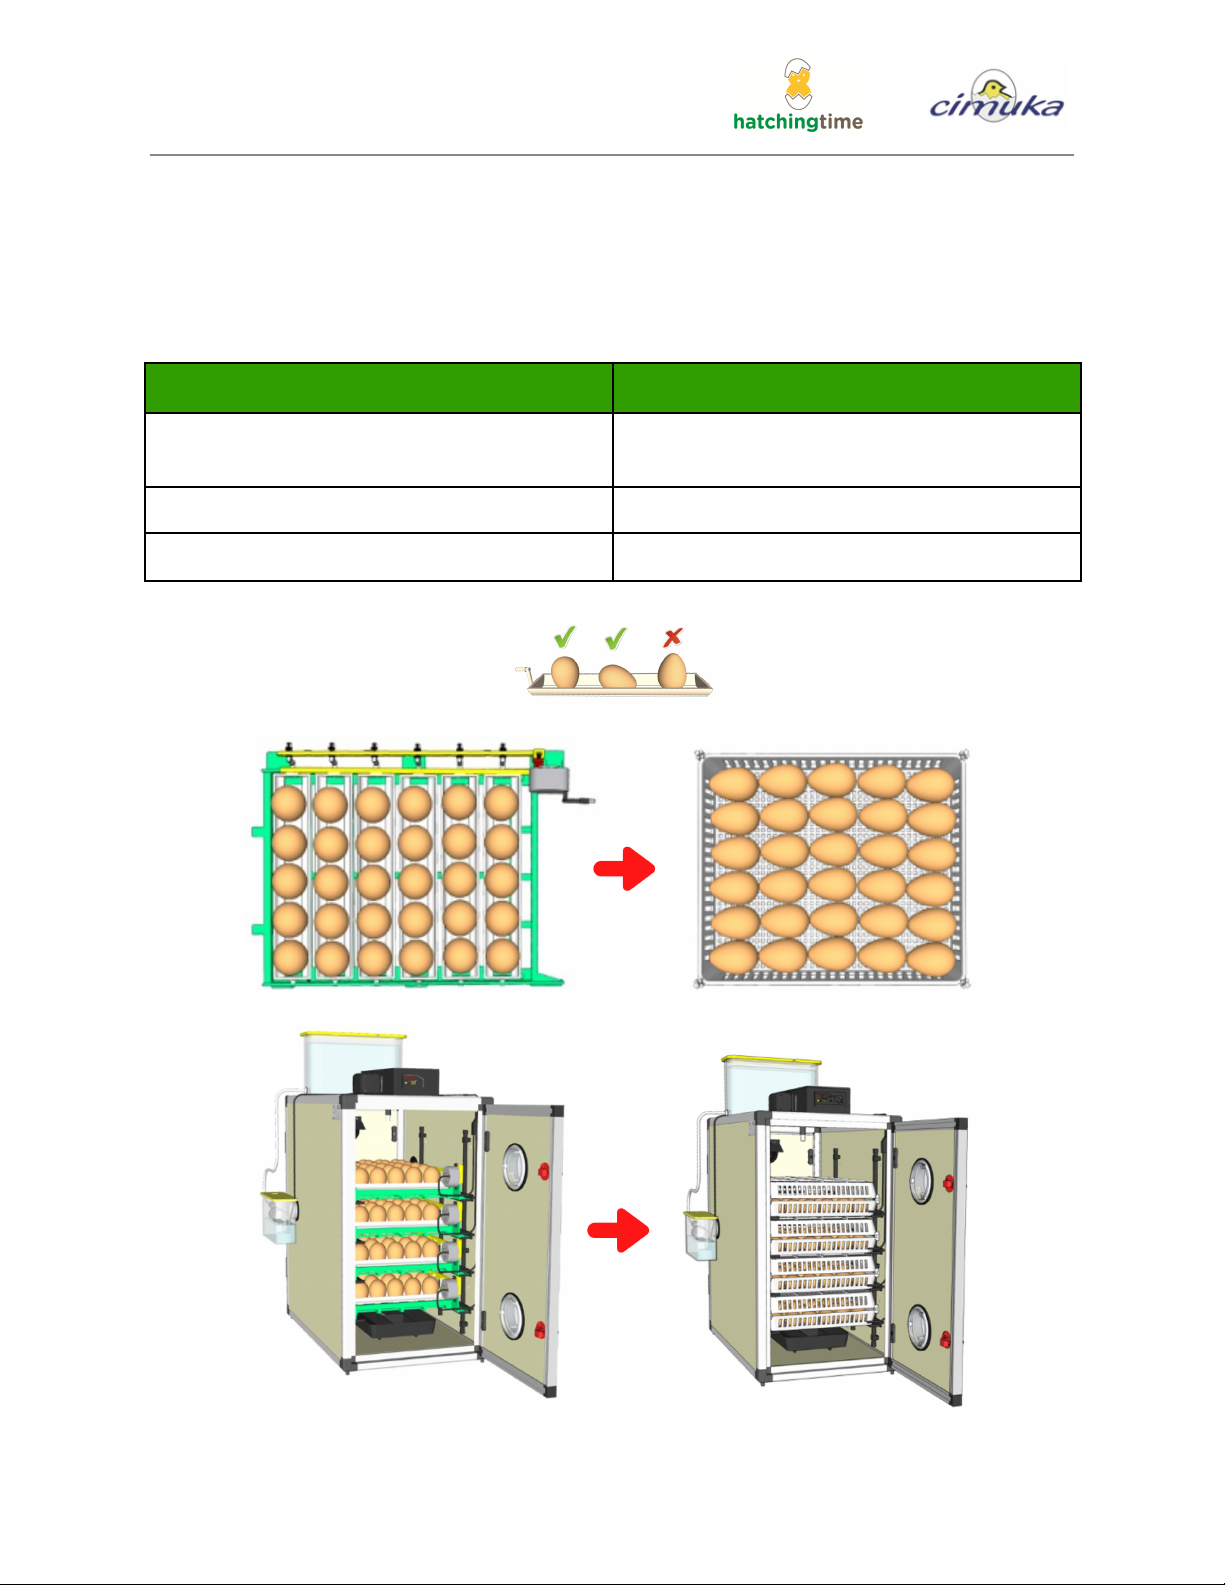
Step 3) Install ConturnTM30 Egg Trays
1. Adjust egg rack, if necessary (See Page 9)
2. Slide egg turner into incubator
3. Plug in distribution cords
Page 8 of 23
CT Series /
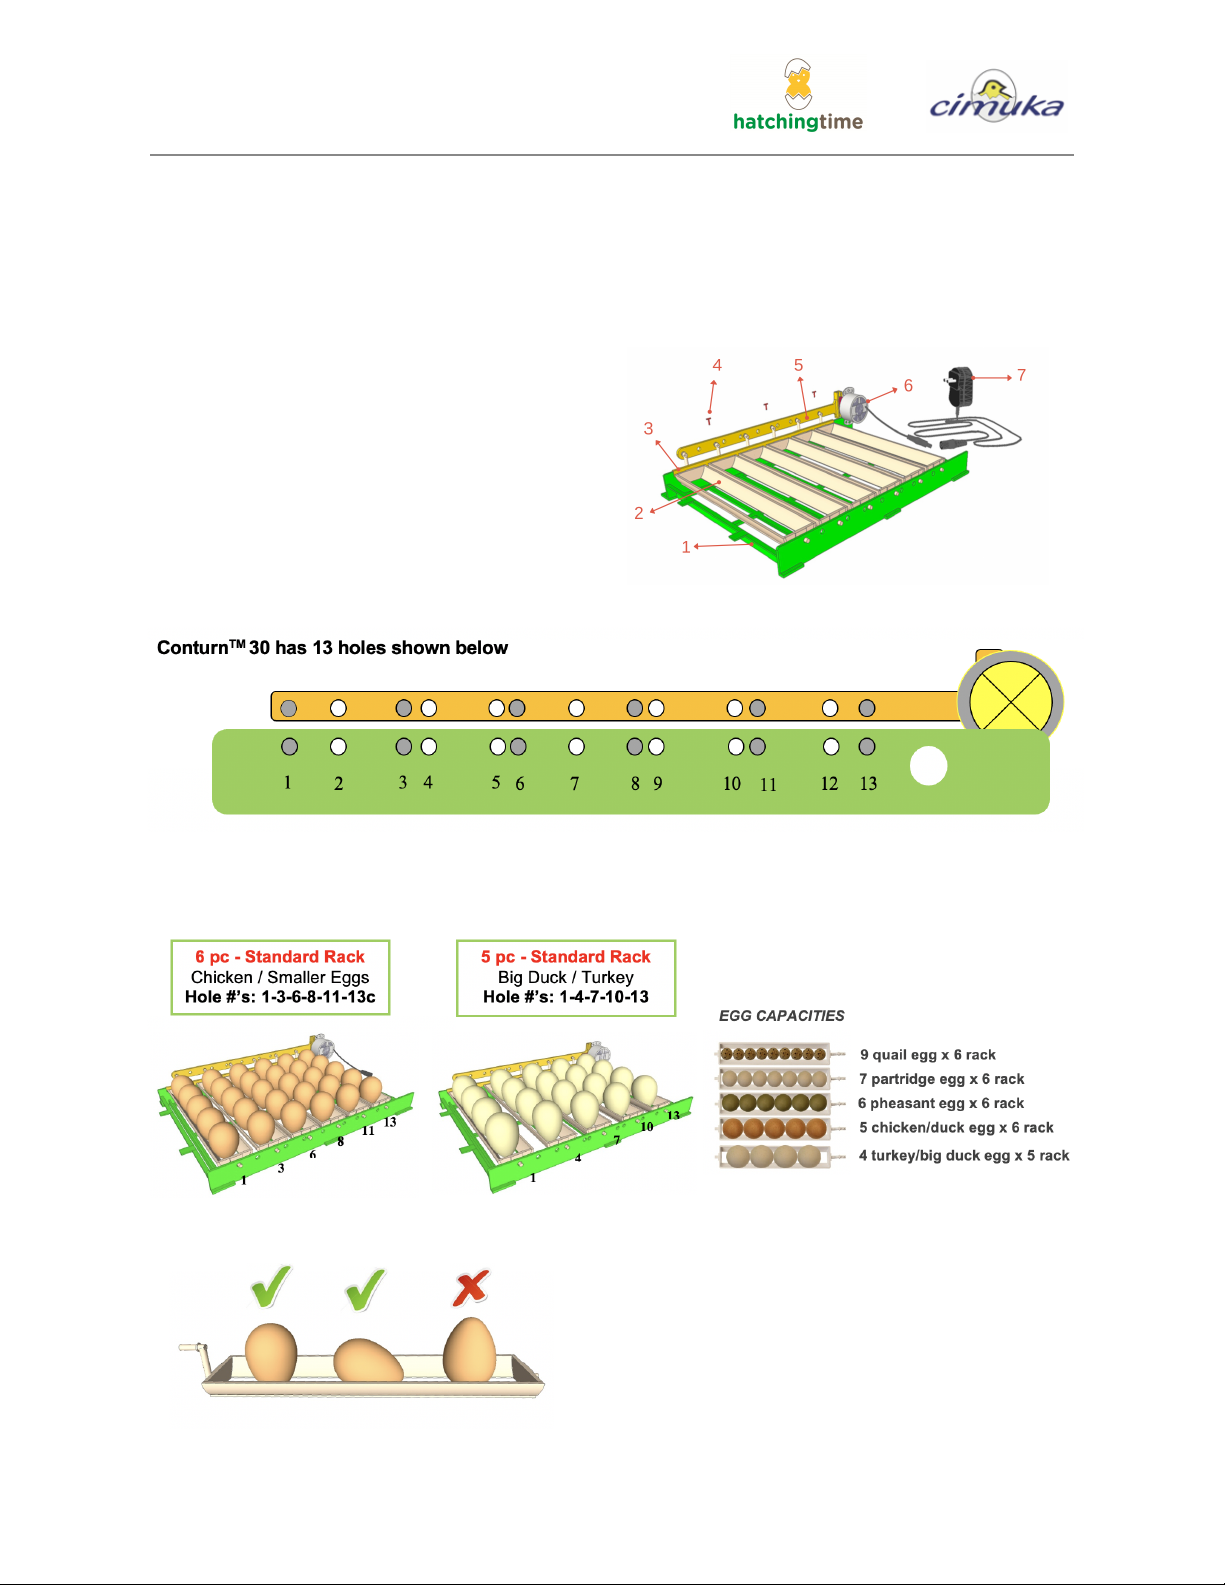
Step 4) Adjust Egg Racks
ConturnTM 30 comes with 6 pre-installed racks. If your eggs are bigger than chicken eggs, racks
must be adjusted.
To adjust,
1. Remove the rack fixing bar (3) and pins (4)
2. Remove main turner bar (5) from motor
3. Adjust the egg racks (2) for your egg size
4. Attach main turning bar (5) to motor arm
and racks
5. Attach the rack fixing bar (3) and pins (4)
Adjust trays using above guide
Racks must be adjusted for larger eggs. If the egg is too large, it may fall down during turning.
Page 9 of 23

CT Series /
Step 5) Plug in cords
Caution! Do not use equipment with high electric consumption in the same electrical line.
Caution! Always use a grounded power line for your incubator.
Step 6) Turn unit on & set parameters, if necessary (See Pages 11-13)
● Incubator comes preset for chicken eggs.
NOTE: Test incubator for 3-4 hours before egg loading
Page 10 of 23

CT Series /
Set Parameters - Incubators arrive preset for chicken eggs
Use the chart below to set your eggs to the necessary parameters
Reference pages 11-12 for how to edit parameter menu
Species
Incubation
Period
(Days)
Setting Days
Hatching Days (Last 3 Days)
Temperature
Humidity
Temperature
Humidity
Chicken
21
99.8°F (37.7°C)
%RH 50 - 55
98.9°F (37.2°C)
%RH 65 - 70
Turkey
28
99.5°F (37.5°C)
%RH 50 - 55
98.6°F (37°C)
%RH 65 - 70
Quail
17
99.8°F (37.7°C)
%RH 50 - 55
98.1°F (37.3°C)
%RH 65 - 70
Partridge
24
99.5°F (37.5°C)
%RH 50 - 55
98.6F (37°C)
%RH 65 - 70
Pheasant
24
99.8°F (37.7°C)
%RH 55 - 60
98.9°F (37.2°C)
%RH 70 - 75
Duck
28
99.5°F (37.5°C)
%RH 55 - 60
98.6°F (37°C)
%RH 70 - 75
Goose
30
99.8°F (37.7°C)
%RH 55 - 60
98.9°F (37.2°C)
%RH 75 - 80
Parameter Display Screen
Factory Reset - Press & hold “H” + “U” for 10 seconds
Page 11 of 23

CT Series /
Adjust Parameters for Your Eggs
Page 12 of 23
CT Series /
Changing Advanced Parameters (Technical Users Only)
Page 13 of 23

CT Series /
Alarms
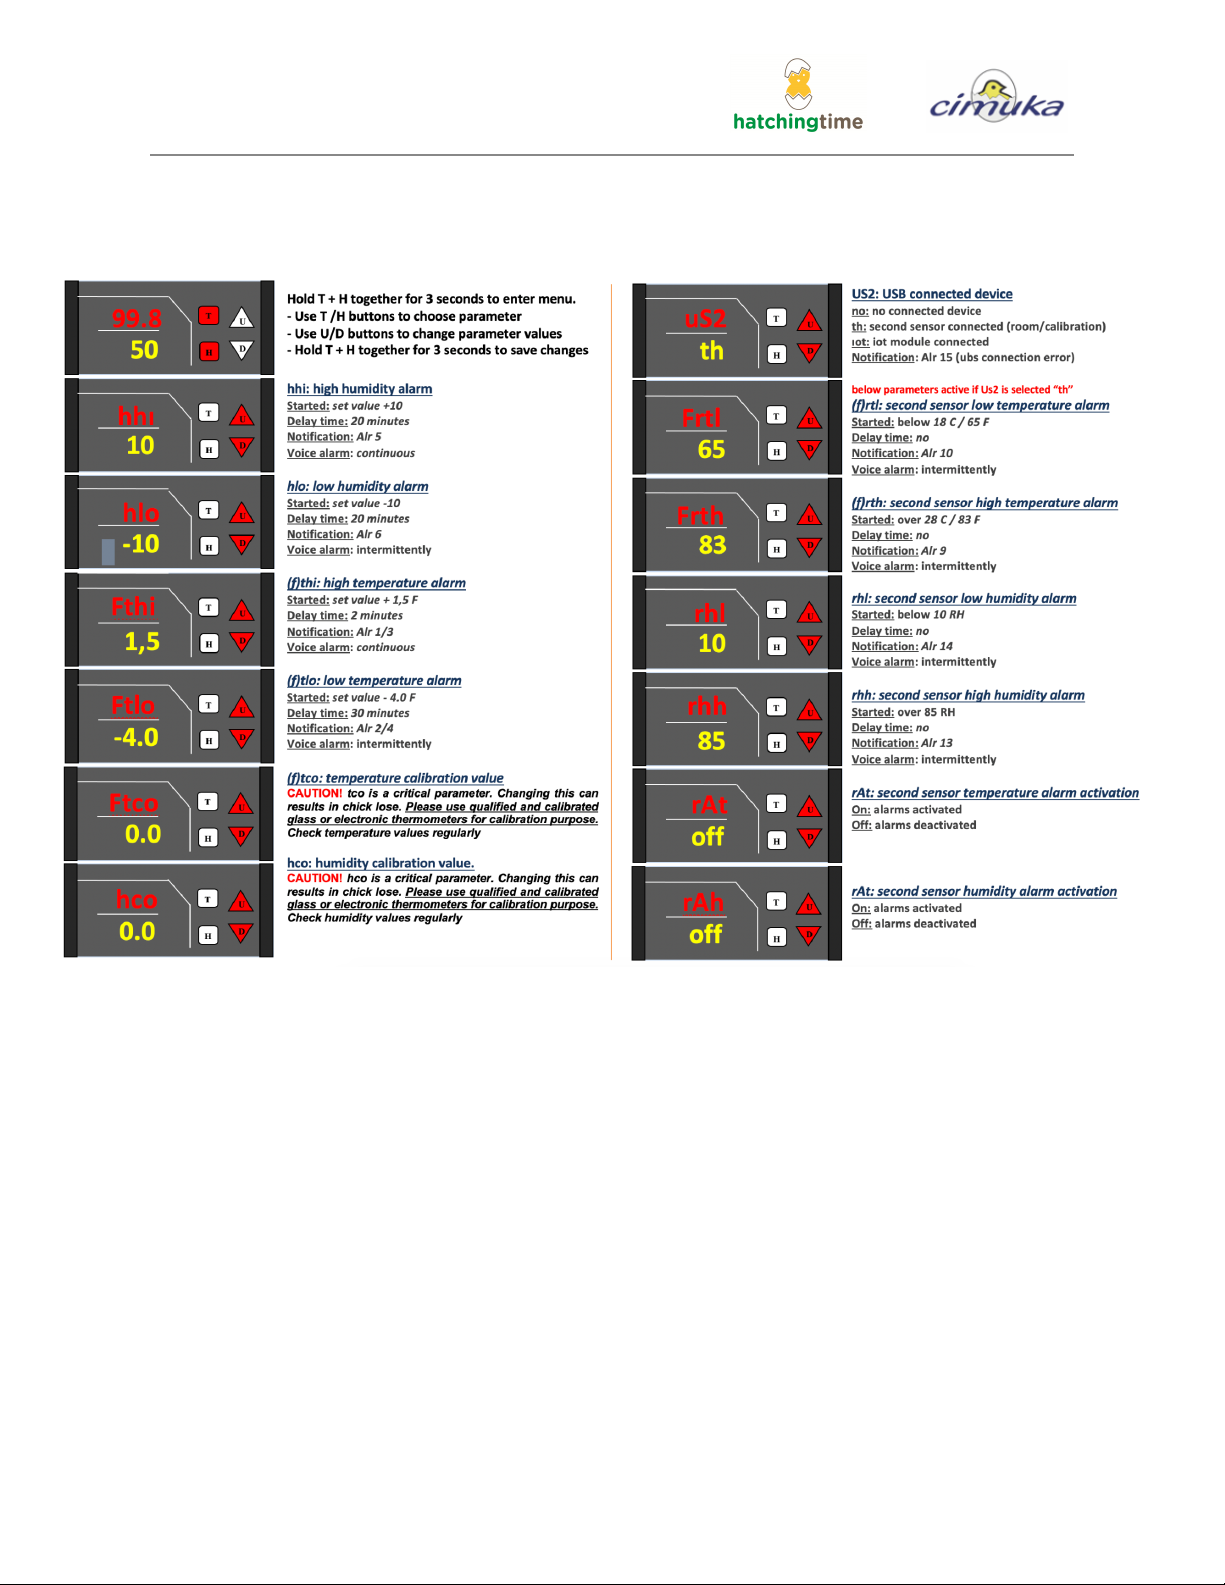
Set Internal Sensor Alarm
To enter main menu:
1. Press & hold "H" + "T" for 3 seconds
2. Choose parameter: Press "T" or "H"
3. Edit parameter: Press "U" or "D"
4. Save changes: Press & hold "T" or "H" for 3 seconds
Symbol
Start Value
Delay Time
Notification
Voice Alarm
High Humidity
hhi
10
20 min.
Alr 5
Continuous
Low Humidity
hlo
-10
20 min.
Alr 6
Intermittently
High Temperature
(f)thi
0,8
2 min.
Alr1/3
Intermittently
Low Temperature
(f)tlo
-2
30 min.
Alr2/4
Intermittently
Set External Room Sensor Alarm
To adjust:
1. Choose parameter: uS2
2. Select "th" option
○ If Alr15 appears, USB Connection error
Symbol
Start Value
Delay Time
Notification
Voice Alarm
Low Temperature
(f)rtl
Below 65°F (18°C)
no
Alr10
Intermittently
High Temperature
(f)rth
Over 83°F (28°C)
no
Alr9
Intermittently
Low Humidity
rhl
below 10RH
no
Alr14
Intermittently
High Humidity
rhh
over 85 RH
no
Alr13
Intermittently
Alarm Activation -
Temperature
rAt
on / off
Alarm Activation -
Humidity
rAh
on / off
Page 14 of 23
CT Series /
Loading Eggs
Example: Chicken (Typically hatches on 21st day)
Day 1-18
Day 19-21 (Last 3 Days)
1. Place eggs, larger side up, on turning rack
(ConturnTM 30)
1. Move eggs from turning racks to hatching
baskets (CS30)
2. Make start temperature: 99.8°F (37.7°C)
2. Change temperature to: 98.9°F (37.2°C)
3. Change humidity to: 50% (50-55)
3. Change humidity to: 70% (65-70)
Page 15 of 23

CT Series /
Partial Loading (Every Week)
If you follow the procedure below, eggs can be loaded every 5-7 days. 2-3 days before you are
about to have a layer hatch, change temperature / humidity to the ‘hatching” parameter values,
even if you have eggs in the setting period.
Example: CT Series Model: CT120SH - Setting 30 eggs a week
Day 1 Day 8 Day 15 Day 20
Day 1
Day 8
Day 15
Day 20
Load top layer
Add new layer
Add new layer
Transfer first layer to
hatching baskets
Setting Days
Hatching Days
Temp
99.8°F (37.7°C)
98.9°F (37.2°C)
Humidity
50% (50-55)
70% (65-70)
Page 16 of 23

CT Series /
Technology
Active Periodic Cooling (APC) - Advanced Users Only
In natural incubation, birds leave the nest for a period of time at least once after the first week of
the incubation. Eggs cool and dehumidify during this period. Active periodic cooling (APC) lets
you mimic this natural behavior and increases chick quality (not hatchability). Mainly used for
goose eggs
(cIt) Cooling for time (Controlled Hatching Environments Only)
- System turns off completely for a set period of time
- Temperature and humidity alarms will be off during this time. It is only advisable to use
temperature-controlled hatchery rooms, around 77-86°F (25-30°C), to reach high
hatching results. After APC is complete, temperature and humidity will return to presets.
(clS) Cooling for a set of values (Recommended)
- The humidity and temperature are adjusted to the set values
- When clS is turned on, factory settings are automatically enabled
clS Suggested Values
Parameters
Symbol
Factory
Settings
Chicken
Duck
Goose
Cooling mode
clF
oFF
On at 8th day
Off at 19th day
On at 8th day
Off at 25th day
On at 8th day
Off at 27th day
Cooling start time
cb
cof
con
con
con
Cooling cycle
cPr
24 h
24
24
24
Cooling set point °C
(set–adjusted data)
cSt
-8.0°C
-8°C
-8°C
-8°C
Cooling set point °F
(set–adjusted data)
FSt
-15°F
-14.4°F
-14.4°F
-14.4°F
Waiting time in cooling
set point
cth
20 min
10 min - 8th to 13th
20 min - 14th to 18th
10 min - 8th to 15th
25 min - 16th to 25th
10 min - 8th to 14th
20 min - 15th to 21th
40 min - 22th to 27th
Max cooling time
hct
120 min
120 min
150 min
180 min
Humidification*
chu
on
-/on
on
on
Humidification Time*
cht
10 min
10
15
15
Max humidity during
humidification*
chh
80 RH%
80 RH%
80 RH%
80 RH%
Cooling fan activation**
cFn
on
on
on
on
*Humidification mode - Once APC ends, high humidity is applied
**Cooling fan activation - Fans push cool air through incubator during cooling process
Page 17 of 23

CT Series /
Active Periodic Cooling (APC) Parameter Menu
Page 18 of 23
CT Series /
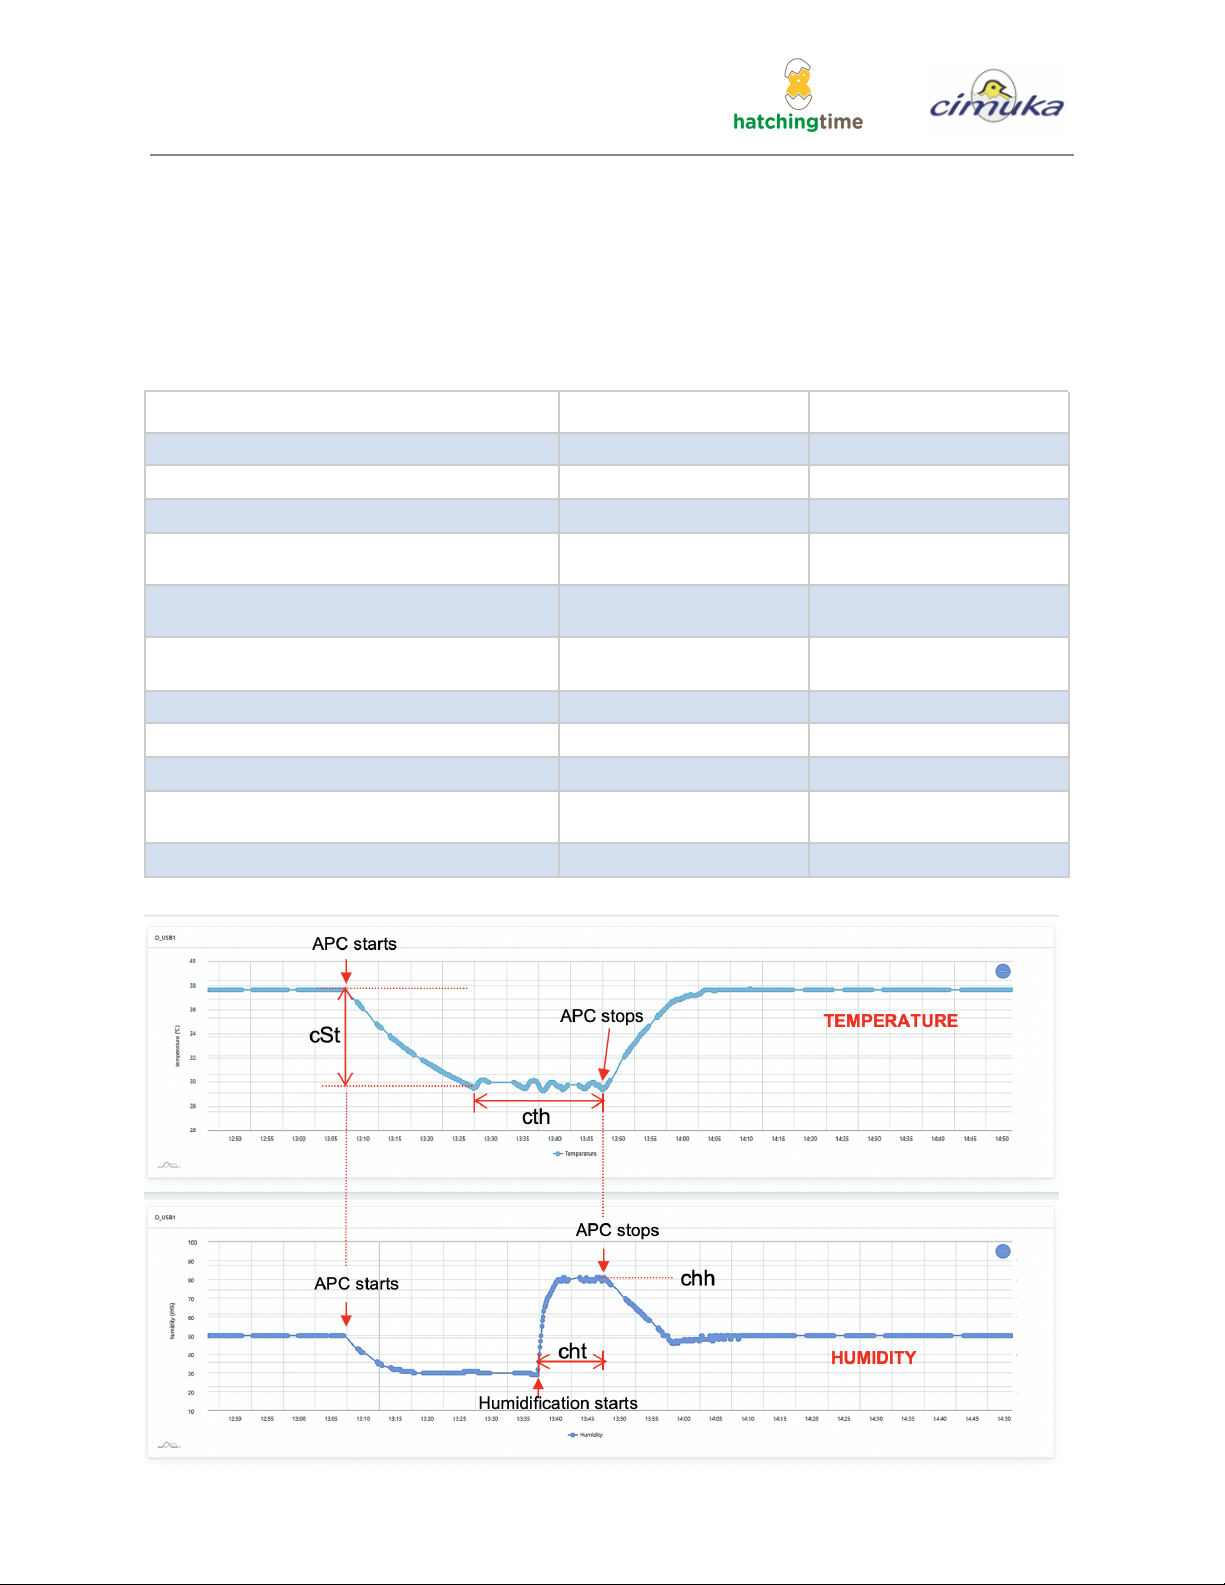
APC (clS Mode) Technical Analysis
System repeats APC every cooling cycle time (cPr). In a power outage, (cPr) will continue from
the last recorded time. Example: If there is a 1 hour power cut, the next cooling time will delay
about 1 hour. Remaining time to next cooling can be checked by the controller (See Page 12).
“Cooling for a set (clS)” mode parameters
APC Parameter
Symbol
Set Value
Cooling mode
clF
clS
Cooling start time
cb
on
Cooling cycle
cPr
24 h
Cooling set point °C (set - adjusted data)
cSt
-8.0 C
Cooling set point °F (set - adjusted data)
FSt
-15 F
Waiting time in cooling set point
cth
20 min
Max cooling time
hct
120 min
Humidification*
chu
on
Humidification Time*
cht
10 min
Max humidity during humidification*
chh
80 RH%
Cooling fan activation**
cFn
on
Page 19 of 23
CT Series /
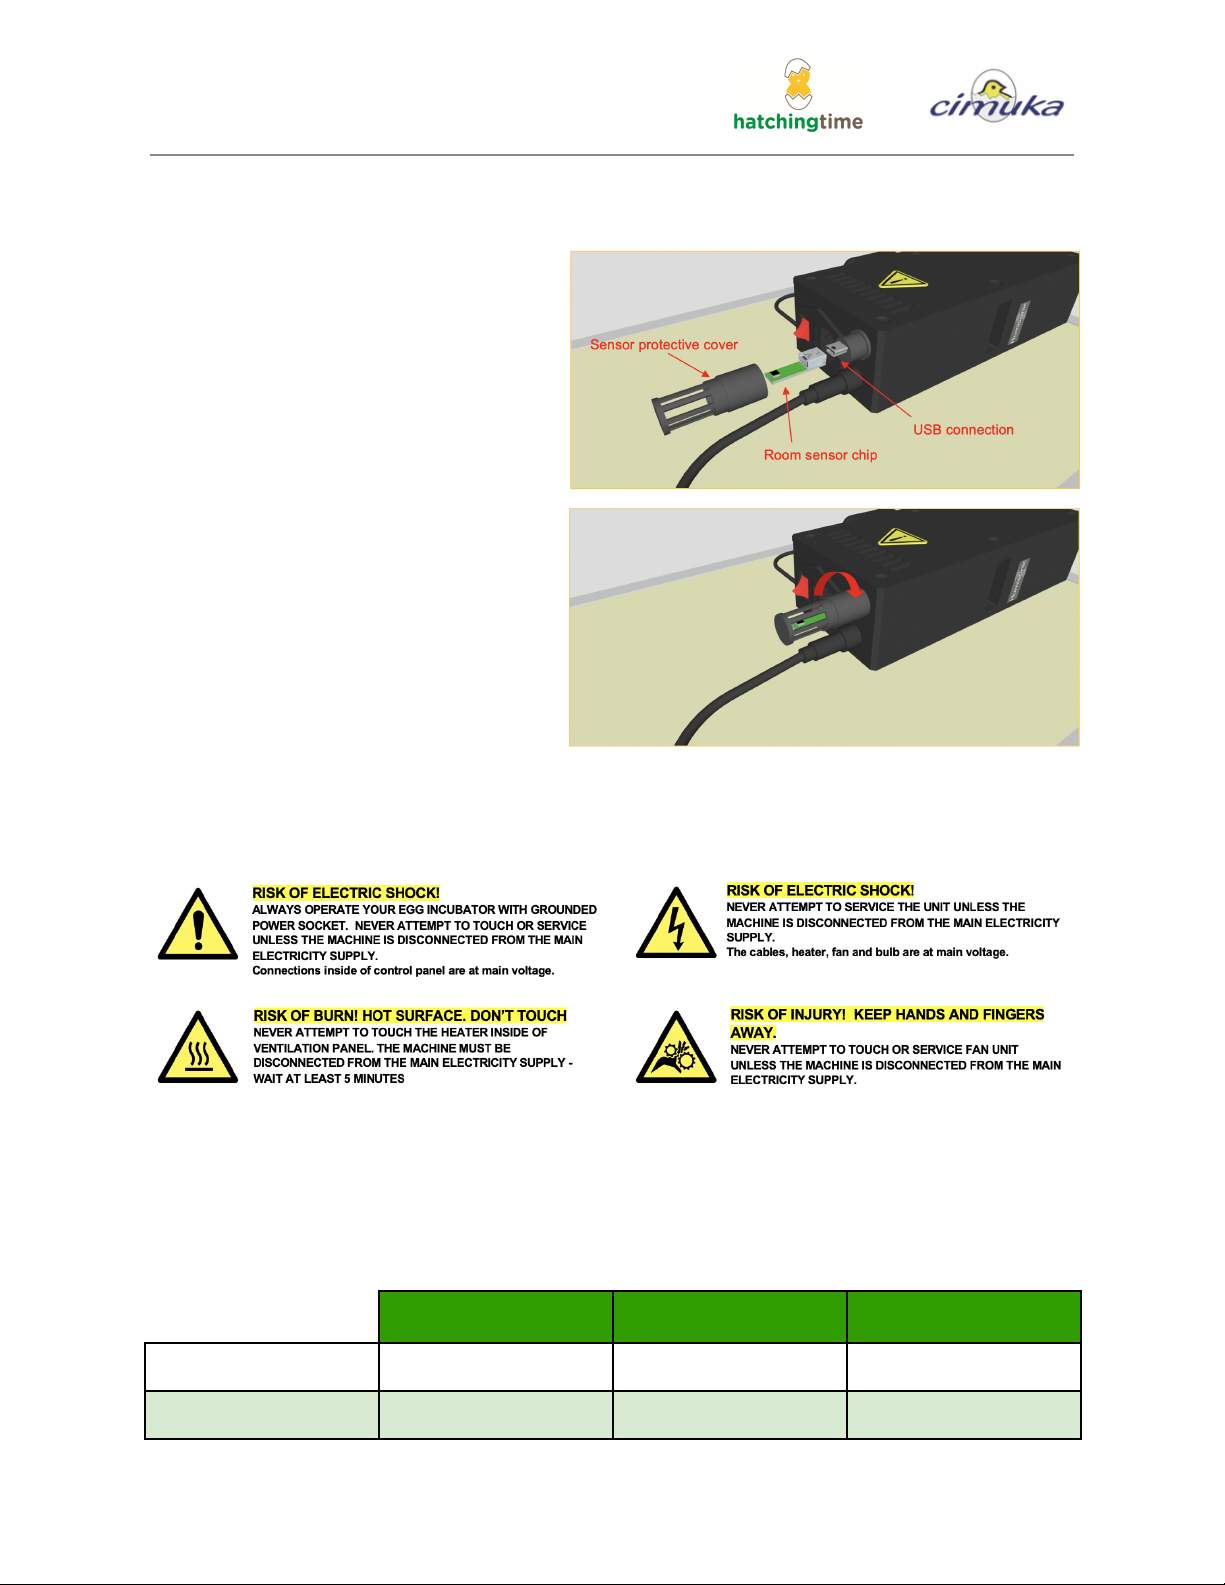
Room Sensor
Your CT model is equipped with a room
sensor installed through USB connection.
Room sensor measures the temperature
and humidity conditions of the room. The
room sensor is identical to the main
sensor inside the egg incubator. It can be
used as a spare sensor in emergency
situations. The incubator is complete
with alarms to help you monitor high/low
temperature and humidity.
USB connection can also be used for
calibration sensors. Connection device
should be selected from the user menu
on the display. Additional USB
accessories for your incubator coming
soon!
Caution! Always power off the incubator
during any sensor installation.
Safety
Power
● 110V / 60Hz - Plug directly into the wall without using extension cords
CT60SH
CT120SH
CT180SH
Watts
140
185
210
Average
50
65
70
Page 20 of 23
This manual suits for next models
3
Table of contents
Other Hatching Time Accessories manuals


