HAUREX HAUREX OS 10 User manual

ISTISTRRUZIONUZIONII •• GAGARRAANNZ IZIAA
INSTRUINSTRUCCTIONTIONSS •• WWARRANTYARRANTY

INFORMAZIONE AGLI UTENTI
ai sensi dell’art. 13 del Decreto Legislativo 25 luglio 2005,
n. 151 “Attuazione delle Direttive 2002/95/CE, 2002/96/CE
e 2003/108/CE, relative alla riduzione dell’uso di sostanze
pericolose nelle apparecchiature elettriche ed
elettroniche, nonché allo smaltimento dei rifiuti”
Il simbolo del cassonetto barrato riportato sull’apparecchiatura
indica che il prodotto alla fine della propria vita utile deve
essere raccolto separatamente dagli altri rifiuti.
L’utente dovrà, pertanto, conferire l’apparecchiatura giunta a
fine vita agli idonei centri di raccolta differenziata dei rifiuti
elettronici ed elettrotecnici, oppure riconsegnarla al
rivenditore al momento dell’acquisto di una nuova
apparecchiatura di tipo equivalente, in ragione di uno a uno.
L’adeguata raccolta differenziata per l’avvio successivo
dell’apparecchiatura dismessa al riciclaggio, al trattamento e allo
smaltimento ambientalmente compatibile contribuisce ad evitare
possibili effetti negativi sull’ambiente e sulla salute e favorisce il
riciclo dei materiali di cui è composta l’apparecchiatura.
Lo smaltimento abusivo del prodotto da parte dell’utente
comporta l’applicazione delle sanzioni amministrative di cui al
D.Lgs. n. 22/1997” (articolo 50 e seguenti del D.Lgs n. 22/1997).

• ИНСТРУКЦИЯ • ІНСТРУКЦІЯ

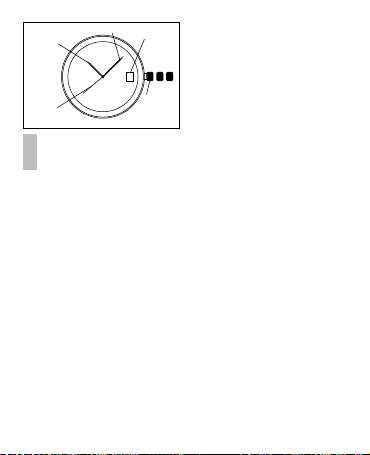
CARATTERISTICHE TECNICHE
■Durata batteria: 2 anni circa.
■Precisione: + o – 20 secondi per mese.
ISTRUZIONI
■Corona: regolazione.
MESSA ALL’ORA
1. Tirare la corona nella posizione (1).
2. Girare la corona per fissare l’ora.
3. Spingere la corona in posizione (0).
CARATTERISTICHE TECNICHE
■Durata batteria: 2 anni circa.
■Precisione: + o – 20 secondi per mese.
ISTRUZIONI
■Corona: regolazione.
MESSA ALL’ORA
1. Tirare la corona nella posizione (2).
2. Girare la corona per fissare l’ora.
3. Spingere la corona in posizione (0).
IMPOSTARE LA DATA
1. Tirare la corona nella posizione (1).
2. Girare la corona per fissare la data.
3. Spingere la corona in posizione (0).
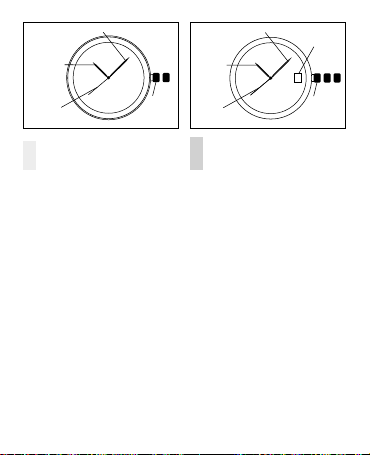
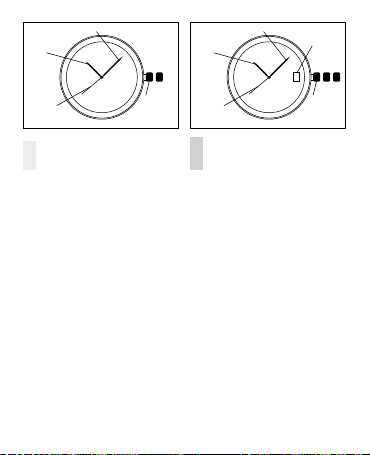
OROLOGIO ANALOGICO
AL QUARZO SOLOTEMPO
OROLOGIO ANALOGICO
AL QUARZO SOLOTEMPO
CON DATARIO
(0) (1)
LANCETTA
SECONDI
LANCETTA
ORE
LANCETTA MINUTI
CORONA
MESSA
ALL'ORA
(0) (1) (2)
DATARIO
LANCETTA
ORE
LANCETTA MINUTI
CORONA
MESSA
ALL'ORA
LANCETTA
SECONDI

I
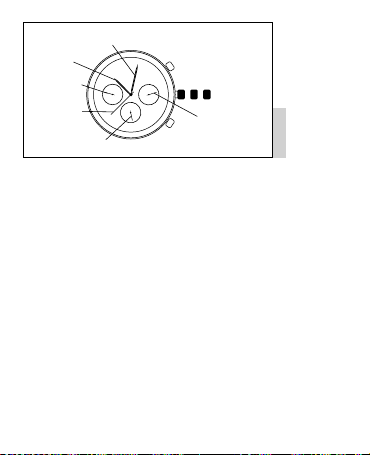
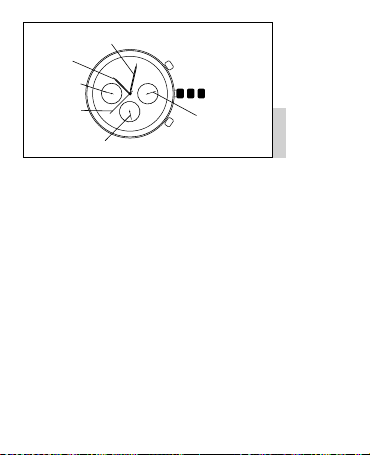
CARATTERISTICHE TECNICHE
Movimento meccanico con carica tramite
movimento del polso o azionando la corona
in pos. (0).
ISTRUZIONI
■Corona: regolazione.
MESSA ALL’ORA
1. Tirare la corona nella posizione (2).
2. Girare la corona per fissare l’ora.
3. Spingere la corona in posizione (0).
IMPOSTARE LA DATA
1. Tirare la corona nella posizione (1).
2. Girare la corona per fissare la data.
3. Spingere la corona in posizione (0).
OROLOGIO AUTOMATICO
CON DATARIO
(0) (1) (2)
DATARIO
LANCETTA
ORE
LANCETTA MINUTI
CORONA
MESSA
ALL'ORA
LANCETTA
SECONDI
I
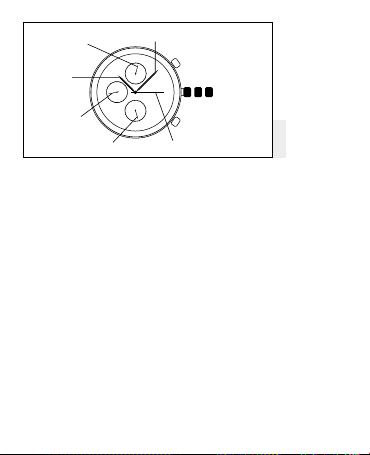
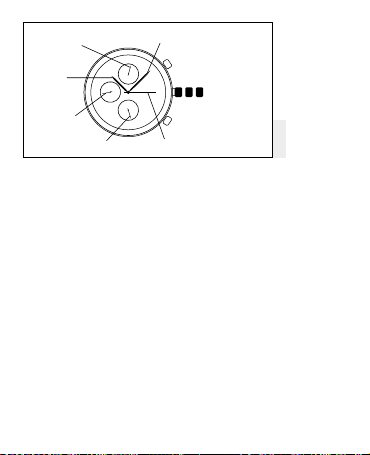
CRONOGRAFO
ANALOGICO
HAUREX OS 10
CARATTERISTICHE TECNICHE
■Durata batteria: 2 anni circa.
■Batteria: SR927W o similare.
■Precisione: + o – 20 secondi per mese.
ISTRUZIONI
■Corona: regolazione.
■Pulsante PB1: start e stop.
■Pulsante PB2: rimessa a zero.
MESSA ALL’ORA
1. Tirare la corona nella posizione (2), la lan-
cetta dei secondi si blocca in posizione (0).
2. Girare la corona per fissare ora e minuti.
IMPOSTARE LA DATA
1. Tirare la corona nella posizione (1).
2. Girare la corona verso destra per fissare
la data.
3. Dopo aver fissato la data spingere la coro-
na nella posizione normale.
USO DEL CRONOGRAFO
Il cronografo è in grado di misurare e mostra-
re il tempo in 1/1 unità di secondo fino al
massimo di 1 ora.
MISURARE IL TEMPO CON IL CRO-
NOGRAFO
1. Il cronografo viene attivato e fermato ogni
qualvolta il pulsante (PB1) viene premuto.
2. Premendo il pulsante (PB2) il cronografo
viene azzerato e tutte le lancette tornano
in posizione (0).
REGOLAZIONE LANCETTA SECON-
DI CRONO
(Se questa non è tarata)
Tirare la corona nella posizione (2) premere
il pulsante PB1 per avanzare la lancetta alle
12,00 (0).
LANCETTA MINUTI
CRONOGRAFO
LANCETTA ORE
CRONOGRAFO
LANCETTA SECONDI
(0) (1) (2)
LANCETTA SECONDI
CRONOGRAFO
LANCETTA
ORE
LANCETTA MINUTI
CORONA MESSA
ALL'ORA
PB1
PB2

I
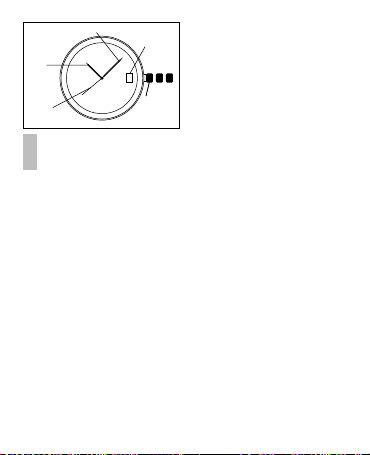
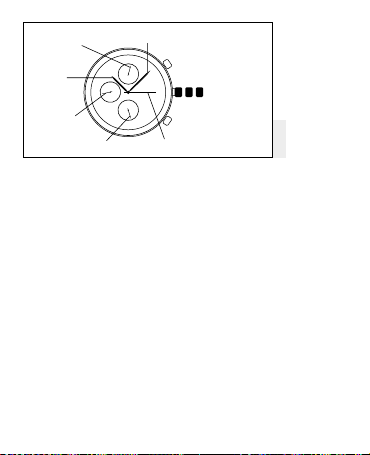
CARATTERISTICHE TECNICHE
■Durata batteria: 2 anni circa.
■Batteria: SR927W
(OS20)
- SR626SW
(FS 00)
■Precisione: + o – 20 secondi per mese.
ISTRUZIONI
■Corona: regolazione.
■Pulsante PB1: start e stop.
■Pulsante PB2: rimessa a zero.
MESSA ALL’ORA
1. Lancette ore, minuti, piccoli secondi:
posizione corona al 2° scatto girare la
corona fino al raggiungimento della posi-
zione corretta delle lancette (ora esatta).
Premere la corona in posizione normale.
2. Calendario (avanzamento veloce):
posizione corona al 1° scatto, girare la coro-
na fino al raggiungimento del giorno esatto.
COME USARE IL CRONOGRAFO
(Corona in posizione normale)
1. Partenza crono: premere PB1 per far parti-
re il crono, in caso di errata posizione della
lancetta crono-secondi, azzerare premen-
do PB2 cosicché la lancetta si possa posi-
zionare alle 12.00 (0).
2. Stop crono: per bloccare la funzione cro-
nografo premere PB1.
3. Azzeramento crono: premere la seconda
volta PB2 per ritornare alla posizione di
partenza (0).
REGOLAZIONE LANCETTA SECON-
DI CRONO
(Se questa non è tarata)
(Posizione corona al 2° scatto) premere PB1
per avanzare la lancetta alle 12.00 (0).
(0) (1) (2)
CORONA MESSA
ALL'ORA
PB1
PB2
LANCETTA MINUTI
CRONOGRAFO
LANCETTA ORE
LANCETTA
SECONDI
CRONOGRAFO
LANCETTA MINUTI
LANCETTA SECONDI
LANCETTA ORE
CRONOGRAFO
ANALOGICO
HAUREX OS 20
HAUREX FS 00
(0) (1)
SECOND HAND
HOUR HAND
MINUTE HAND
CROWN
POSITION
FOR TIME
SETTING
(0) (1) (2)
DATE
INDICATOR
HOUR HAND
MINUTE HAND
CROWN
POSITION
FOR TIME
SETTING
SECOND HAND
SPECIFICATIONS
■Battery life: approx. 2 years.
■Accuracy: ± 20 seconds per month.
INSTRUCTIONS
■Crown: setting modes.
SETTING THE TIME
1. Pull the crown out to the position (1).
2. Turn the crown to set the exact time.
3. Press the crown to position (0).
SPECIFICATIONS
■Battery life: approx. 2 years.
■Accuracy: ± 20 seconds per month.
INSTRUCTIONS
■Crown: setting modes.
SETTING THE TIME
1. Pull the crown out to the position (2).
2. Turn the crown to set the exact time.
3. Press the crown to position (0).
SETTING THE DATE
1. Pull the crown out to the position (1).
2. Turn the crown to set the date.
3. Press the crown to position (0).
ONLY TIME ANALOG
QUARTZ WATCH TIME - DATE
ANALOG QUARTZ WATCH

GB
(0) (1) (2)
DATE
INDICATOR
HOUR HAND
MINUTE HAND
CROWN
POSITION
FOR TIME
SETTING
SECOND HAND
SPECIFICATIONS
Mechanical movement that winds up by
means of the wrist moving or by turning the
crown in the (0) position.
INSTRUCTIONS
■Crown: setting modes.
SETTING THE TIME
1. Pull the crown out to the position (2).
2. Turn the crown to set the exact time.
3. Press the crown to position (0).
SETTING THE DATE
1. Pull the crown out to the position (1).
2. Turn the crown to set the date.
3. Press the crown to position (0).
SELF-WINDING WATCH
WITH DATE

GB
ANALOG
CHRONOGRAPH
HAUREX OS 10
TECHNICAL SPECIFICATIONS
■Battery life: approx. 2 years.
■Battery: SR927W or similar.
■Accuracy: ± 20 seconds per month.
INSTRUCTIONS
■Crown: setting modes.
■Button PB1: start and stop.
■Button PB2: reset.
SETTING THE TIME
1. Pull the crown out to position (2), the sec-
ond hand stops to the (0) position.
2. Turn the crown to set hours and minutes.
SETTING THE DATE
1. Pull the crown out to position (1).
2.Turn the crown to the right to set the date.
3. When the date has been set return the
crown to the normal position.
USING THE CHRONOGRAPH
The chronograph is able to measure and
show time in 1/10th second units up to a
maximum of 1 hour.
TIME CHRONOGRAPH MEASURE-
MENT
1. Press button (PB1) to start and stop the
chronograph.
2. By pressing button (PB2) the chronograph
is set to zero and all hands are reset to the
(0) position.
CHRONOGRAPH SECOND HAND
CORRECTION (If it is not aligned at the 0
position)
Pull the crown out to position (2); press the
button PB1 to advance hands at 12:00 (0).
CHRONOGRAPH
MINUTE HAND
CHRONOGRAPH
HOUR HAND
SECOND HAND
(0) (1) (2)
CHRONOGRAPH
SECOND HAND
HOUR HAND
MINUTE HAND
CROWN POSITION
FOR TIME SETTING
PB1
PB2
GB
TECHNICAL SPECIFICATIONS
■Battery life: approx. 2 years.
■Battery: SR927W
(OS20)
- SR626SW
(FS 00)
■Accuracy: ± 20 seconds per month.
INSTRUCTIONS
■Crown: setting modes.
■Button PB1: start and stop.
■Button PB2: reset.
SETTING THE TIME
1. Hour, minute, small second hands: pull the
crown out to the 2nd position and turn it to
set hands in the correct position (exact time).
Return the crown to its normal position.
2. Date (fast advancement): pull the crown
out to the 1st position and turn it to set
the correct day.
HOW TO USE THE CHRONOGRAPH
(Crown at normal position)
1. Chronograph start: press button PB1 to
start the chronograph; if the chronograph
second hand is not in the correct position,
reset it by pressing the button PB2 to let
the hand move to 12:00 (0).
2. Chronograph stop: to stop the chrono-
graph function press the button PB1.
3. Chronograph reset: press the button PB2
again to return to the normal position (0).
CHRONOGRAPH SECOND HAND
CORRECTION (If it is not aligned at the 0
position)
Pull the crown out to position (2); press the
button PB1 to advance hands at 12:00 (0).
(0) (1) (2)
PB1
PB2
CHRONOGRAPH
MINUTE HAND
HOUR HAND
CHRONOGRAPH
SECOND HAND
MINUTE HAND
SECOND HAND
HOUR HAND
CROWN POSITION
FOR TIME SETTING
ANALOG
CHRONOGRAPH
HAUREX OS 20
HAUREX FS 00

(0) (1)
MANECILLA
DE HORAS
MANECILLA DE MINUTOS
POSICIÓN
CORONA PARA
EL AJUSTE
DE HORA
MANECILLA DE
SEGUNDOS
(0) (1) (2)
INDICADOR
DE FECHA
MANECILLA DE
SEGUNDOS
MANECILLA
DE HORAS
MANECILLA DE MINUTOS
POSICIÓN
CORONA PARA
EL AJUSTE
DE HORA
ESPECIFICACIONES TÉCNICAS
■Duración de la pila: aprox. 2 años.
■Precisión: ± 20 segundos por mes.
INSTRUCCIONES
■Corona: ajuste.
AJUSTE DE LA HORA
1. Extraiga la corona hasta la posición (2).
2. Gire la corona para fijar la hora exacta.
3. Presione la corona hasta la posición (0).
AJUSTE DE FECHA
1. Extraiga la corona hasta la posición (1).
2. Gire la corona para fijar la fecha.
3. Presione la corona hasta la posición (0).
RELOJ ANALÓGICO DE CUARZO CON
SOLO INDICACIÓN DE LA HORA RELOJ ANALÓGICO DE CUARZO CON
INDICACIÓN DE LA HORAY FECHA
ESPECIFICACIONES TÉCNICAS
■Duración de la pila: aprox. 2 años.
■Precisión: ± 20 segundos por mes.
INSTRUCCIONES
■Corona: ajuste.
AJUSTE DE LA HORA
1. Extraiga la corona hasta la posición (1).
2. Gire la corona para fijar la hora exacta.
3. Presione la corona hasta la posición (0).
E
(0) (1) (2)
INDICADOR
DE FECHA
MANECILLA DE
SEGUNDOS
MANECILLA
DE HORAS
MANECILLA DE MINUTOS
POSICIÓN
CORONA PARA
EL AJUSTE
DE HORA
ESPECIFICACIONES
Maquinaria mecánica con carga por medio del
movimiento de la muñeca o girando la coro-
na en la posición (0).
INSTRUCCIONES
■Corona: ajuste.
AJUSTE DE LA HORA
1. Extraiga la corona hasta la posición (2).
2. Gire la corona para fijar la hora exacta.
3. Presione la corona hasta la posición (0).
AJUSTE DE FECHA
1. Extraiga la corona hasta la posición (1).
2. Gire la corona para fijar la fecha.
3. Presione la corona hasta la posición (0).
RELOJ AUTOMÁTICO CON
INDICACIÓN DE LA FECHA
E
CRONÓGRAFO
ANALÓGICO
HAUREX OS 10
ESPECIFICACIONES TÉCNICAS
■Duración de la pila: aprox. 2 años.
■Pila: SR927W o similar.
■Precisión: ± 20 segundos por mes.
INSTRUCCIONES
■Corona: ajuste.
■Botón PB1: inicio y parada.
■Botón PB2: reposición a cero.
AJUSTE DE LA HORA
1. Extraiga la corona hasta la posición (2), la
manecilla de los segundos se detiene en la
posición (0).
2. Gire la corona para fijar la hora y los minutos.
AJUSTE DE LA FECHA
1. Extraiga la corona hasta la posición (1).
2. Gire la corona hacia la derecha para fijar la
fecha.
3. Cuando haya terminado de ajustar la fecha
presione la corona en la posición normal.
USO DEL CRONÓGRAFO
El cronógrafo es capaz de medir y mostrar el
tiempo en unidades de 1/10 de segundo hasta
un máximo de 1 hora.
MEDICIÓN DEL TIEMPO CON EL
CRONÓGRAFO
1. El cronógrafo se activa y se para cada vez
que se presiona el botón (PB1).
2. Cuando se presiona el botón (PB2) el cro-
nógrafo se reposiciona a cero y todas las
manecillas vuelven a la posición (0).
CORRECCIÓN DE LA MANECILLA DE
SEGUNDOS CRONO (Si no está alinea-
da a la posición de 0)
Tire la corona a la posición (2), oprima el
botón PB1 para hacer avanzar las manecillas
hasta las 12:00 (0).
MANECILLA DE MINUTOS
CRONÓGRAFO
MANECILLA
DE HORAS
CRONÓGRAFO
MANECILLA
DE SEGUNDOS
(0) (1) (2)
MANECILLA DE SEGUNDOS
CRONÓGRAFO
MANECILLA
DE HORAS
MANECILLA DE MINUTOS
POSICIÓN CORONA
PARA EL AJUSTE
DE HORA
PB1
PB2

E
ESPECIFICACIONES TÉCNICAS
■Duración de la pila: aprox. 2 años.
■Pila: SR927W
(OS20)
- SR626SW
(FS 00)
■Precisión: ± 20 segundos por mes.
INSTRUCCIONES
■Corona: ajuste.
■Botón PB1: inicio y parada.
■Botón PB2: reposición a cero.
AJUSTE DE LA HORA
1. Manecillas de horas, minutos, segundero:
extraiga la corona hasta la 2da posición y la
gire hasta alcanzar la posición correcta de
las manecillas (hora exacta). Presione la
corona a la posición normal.
2. Calendario (avance veloz): extraiga la coro
na hasta la 1era posición y la gire hasta
alcanzar el día exacto.
COMO UTILIZAR EL CRONÓGRAFO
(Corona in posición normal)
1. Inicio medición cronógrafo: presione el
botón PB1 para iniciar el cronógrafo, en
caso de que la manecilla crono-segundos
no se encuentre en la posición correcta,
realice la puesta a cero presionando el
botón PB2 para que la manecilla se posi-
cione a las 12:00 (0).
2. Parada cronógrafo: para parar la función
cronógrafo presione el botón PB1.
3. Reposición cronógrafo: presione una
segunda vez el botón PB2 para volver a la
posición inicial (0).
CORRECCIÓN DE LA MANECILLA
DE SEGUNDOS CRONÓGRAFO (Si
no está alineada a la posición de 0)
(Corona en la 2da posición) presione el
botón PB1 para hacer avanzar las manecillas
hasta las 12:00 (0).
(0) (1) (2)
PB1
PB2
MANECILLA DE MINUTOS
CRONÓGRAFO
MANECILLA DE HORAS
MANECILLA
DE SEGUNDOS
CRONÓGRAFO
MANECILLA DE MINUTOS
MANECILLA DE SEGUNDOS
MANECILLA DE HORAS
POSICIÓN CORONA
PARA EL AJUSTE
DE HORA
CRONÓGRAFO
ANALÓGICO
HAUREX OS 20
HAUREX FS 00

(0) (1)
STUNDENZEIGER
MINUTENZEIGER
KRONE ZUM
EINSTELLEN
DER UHRZEIT
SEKUNDENZEIGER
(0) (1) (2)
DATUMSANZEIGE
STUNDENZEIGER
MINUTENZEIGER
KRONE ZUM
EINSTELLEN
DER UHRZEIT
SEKUNDENZEIGER
TECHNISCHE EIGENSCHAFTEN
■Batterielebensdauer: rund 2 Jahre.
■Genauigkeit: ± 20 Sekunden/Monat.
BEDIENUNGSANLEITUNG
■Krone: Einstellung.
EINSTELLEN DER UHRZEIT
1. Ziehen Sie die Krone zur Einrastposition
(1) heraus.
2. Drehen Sie die Krone, um die Uhrzeit ein-
zustellen.
3. Drücken Sie dann die Krone wieder
zurück in die Normalposition (0).
TECHNISCHE EIGENSCHAFTEN
■Batterielebensdauer: rund 2 Jahre.
■Genauigkeit: ± 20 Sekunden/Monat.
BEDIENUNGSANLEITUNG
■Krone: Einstellung.
EINSTELLEN DER UHRZEIT
1. Ziehen Sie die Krone zur Einrastposition
(2) heraus.
2. Drehen Sie die Krone, um die Uhrzeit ein-
zustellen.
3. Drücken Sie dann die Krone wieder
zurück in die Normalposition (0).
EINSTELLEN DES DATUMS
1. Ziehen Sie die Krone zur Einrastposition
(1) heraus.
2. Drehen Sie die Krone, um das Datum ein-
zustellen.
3. Drücken Sie dann die Krone wieder zurück
in die Normalposition (0).
ANALOGE QUARZUHR
(NUR UHRZEIT)
ANALOGE QUARZUHR
(NUR UHRZEIT)
MIT DATUMSANZEIGE
D
(0) (1) (2)
DATUMSANZEIGE
STUNDENZEIGER
MINUTENZEIGER
KRONE ZUM
EINSTELLEN
DER UHRZEIT
SEKUNDENZEIGER
TECHNISCHE EIGENSCHAFTEN
Mechanisches Uhrwerk, das automatisch
durch die Armbewegung des Uhrenträgers
aufgezogen wird, aber auch mit der Krone in
Normalposition (0) aufgezogen werden kann.
BEDIENUNGSANLEITUNG
■Krone: Einstellung.
EINSTELLEN DER UHRZEIT
1. Ziehen Sie die Krone zur Einrastposition
(2) heraus.
2. Drehen Sie die Krone, um die Uhrzeit ein-
zustellen.
3. Drücken Sie dann die Krone wieder
zurück in die Normalposition (0).
EINSTELLEN DES DATUMS
1. Ziehen Sie die Krone zur Einrastposition
(1) heraus.
2. Drehen Sie die Krone, um das Datum ein-
zustellen.
3. Drücken Sie dann die Krone wieder zurück
in die Normalposition (0).
AUTOMATIK-UHR MIT
DATUMSANZEIGE
D
ANALOG
CHRONOGRAPH
HAUREX OS 10
TECHNISCHE EIGENSCHAFTEN
■Batterielebensdauer: rund 2 Jahre.
■Batterie: SR927W oder gleichwertige Batterie.
■Genauigkeit: ± 20 Sekunden/Monat.
BEDIENUNGSANLEITUNG
■Krone: Einstellung.
■Taste PB1: Start und Stopp.
■Taste PB2: Nullstellen.
EINSTELLEN DER UHRZEIT
1. Ziehen Sie die Krone zur Einrastposition
(2) heraus; der Sekundenzeiger wird in der
Position (0) blockiert.
2. Drehen Sie die Krone, um die Uhrzeit
(Stunden und Minuten) einzustellen.
EINSTELLEN DES DATUMS
1. Ziehen Sie die Krone zur Einrastposition
(1) heraus.
2. Drehen Sie die Krone nach rechts, um das
Datum einzustellen.
3. Drücken Sie nach dem Einstellen des
Datums die Krone wieder zurück in die
Normalposition.
GEBRAUCH DER STOPPUHR
Die Stoppuhr gestattet das Messen und
Anzeigen der Zeit zwischen einer
Zehntelsekunde und einer Stunde.
ZEITMESSUNG MIT DER STOPPUHR
1. Zum Starten und Stoppen der Stoppuhr
müssen Sie den Knopf (PB1) drücken.
2. Zum Nullstellen der Stoppuhr drücken Sie
Knopf (PB2).Alle Zeiger kehren dann in die
Position (0) zurück.
EINSTELLEN DES SEKUNDENZEI-
GERS DER STOPPUHR (falls nicht schon
nullgestellt)
Ziehen Sie die Krone in die Einrastposition
(2) heraus und drücken Sie den Knopf PB1,
um den Zeiger bis in Position 12.00 (0) vor-
laufen zu lassen.
MINUTENZEIGER DER
STOPPUHR
STUNDENZEIGER
DER STOPPUHR
SEKUNDENZEIGER
(0) (1) (2)
SEKUNDENZEIGER DER
STOPPUHR
STUNDENZEIGER
MINUTENZEIGER
KRONE ZUM EINSTELLEN
DER UHRZEIT
PB1
PB2
D
TECHNISCHE EIGENSCHAFTEN
■Batterielebensdauer: rund 2 Jahre.
■Batterie: SR927W
(OS20)
- SR626SW
(FS 00)
■Genauigkeit: ± 20 Sekunden/Monat.
BEDIENUNGSANLEITUNG
■Krone: Einstellung.
■Taste PB1: Start und Stopp.
■Taste PB2: Nullstellen.
EINSTELLEN DER UHRZEIT
1. Zeiger für Stunden, Minuten, Kleine Sekunde:
Die Krone zur 2.Einrastposition herausziehen
und drehen, um die genaue Uhrzeit einzustel
len. Dann die Krone wieder zurück in die
Normalposition drücken.
2. Datum (Schnellvorlauf): Ziehen Sie die
Krone in die 1. Einrastposition heraus und
drehen Sie sie, bis der richtige Tag ange
zeigt wird.
GEBRAUCH DER STOPPUHR
(Krone in Normalposition)
1. Starten der Stoppuhr: Drücken Sie PB1, um
die Stoppuhr zu starten. Sollte sich der
Sekundenzeiger der Stoppuhr nicht in der
richtigen Position befinden, können Sie ihn
durch Drücken von PB2 auf die Position
12.00 (0) zurückstellen.
2. Stoppen der Stoppuhr: Zum Anhalten der
Stoppuhr drücken Sie PB1.
3. Nullstellen der Stoppuhr: Drücken Sie
Knopf PB2 zum Nullstellen (0) ein zweites
Mal.
EINSTELLEN DES SEKUNDENZEI-
GERS DER STOPPUHR (falls nicht schon
nullgestellt)
(Krone in der 2. Einrastposition) Drücken Sie
PB1, um den Zeiger auf 12.00 (0) zu stellen.
ANALOG
CHRONOGRAPH
HAUREX OS 20
HAUREX FS 00
PB1
PB2
MINUTENZEIGER DER
STOPPUHR
STUNDENZEIGER
SEKUNDENZEIGER
DER STOPPUHR
MINUTENZEIGER
SEKUNDENZEIGER
STUNDENZEIGER
(0) (1) (2) KRONE ZUM EINSTELLEN
DER UHRZEIT
(0) (1)
AIGUILLE
DES HEURES
AIGUILLE DES MINUTES
REMONTOIR
MISE A L'HEURE
AIGUILLE DES
SECONDES
(0) (1) (2)
AFFICHAGE
DE DATE
AIGUILLE
DES HEURES
AIGUILLE DES MINUTES
REMONTOIR
MISE A L'HEURE
AIGUILLE DES
SECONDES
CARACTERISTIQUES TECHNIQUES
■
Durée de la pile
:
2 ans environ.
■
Précision: ± 20 secondes par mois.
INSTRUCTIONS
■
Remontoir: réglage.
MISE A L'HEURE
1. Sortir la couronne à la position (1).
2. Tourner la couronne pour régler l’heure.
3. Presser la couronne à la position (0).
CARACTERISTIQUES TECHNIQUES
■
Durée de la pile
:
2 ans environ.
■
Précision: ± 20 secondes par mois.
INSTRUCTIONS
■
Remontoir: réglage.
REGLAGE DE L’HEURE
1. Sortir la couronne à la position (2).
2. Tourner la couronne pour régler l’heure.
3. Presser la couronne à la position (0).
REGLAGE DU CALENDRIER.
1. Sortir la couronne à la position (1).
2. Tourner la couronne pour régler le calen-
drier.
3. Presser la couronne à la position (0).
MONTRE ANALOGIQUE A QUARTZ
AVEC INDICATION DE L’HEURE
SEULEMENT
MONTRE ANALOGIQUE A QUARTZ
AVEC INDICATION DE L’HEURE ET
DU CALENDRIER
This manual suits for next models
2
Table of contents
Languages:
Popular Watch manuals by other brands

Eterna
Eterna AVANT-GARDE LADY user manual

Calypso Watches
Calypso Watches DIGITAL IKMD13303T instruction manual

Kogan
Kogan KASMRWTCPKB user guide

Weiom
Weiom WT-01 user manual

Competition Electronics
Competition Electronics Pocket Pro II User's manual and operating instructions

Citizen
Citizen F990 instructions


